-
12-14-2019, 02:17 PM
#801
East Coast Speed Machines

FFR 1879, Blown DSS 306,REDLINE management, VeryCoolParts Tuned 460RWHP
FFR 818S, The Flash, Chassis #5, 2.0L, LSD, Electromotive TEC-S, VCP Tuned, 278RWHP 265 RWTQ
FFR 6651, Green Lantern, 408W Crate, Hellion 66mm Turbo, JGS Waste gate / Blowoff valve, Tec-GT management, VCP Tuned, 575 RWHP, 690 RWTQ
FFR 8335, Black Mamba, 289 FIA CSX 2001 tribute car, 347, 48 IDA webers, VCP Tuned, 311 RWHP 386 RWTQ, 3-link, Trigo's
FFR 0004, Gen 3 , Hawk Coupe, Coyote twin turbo, 683 RWHP 559 RWTQ, IRS, VCP Tuned. "not too shabby"
US ARMY Maintenance Test Pilot (CW4 Retired)
-
Post Thanks / Like - 1 Thanks, 0 Likes
-
12-14-2019, 02:41 PM
#802
Paul, Same remarks as many and in particular, Gary/CTHiker52, "It is stunning. I can’t wait to see it completed. You have done a masterful job. I have learned so much from you and I thank you for that."
-
Post Thanks / Like - 1 Thanks, 0 Likes
-
12-14-2019, 08:33 PM
#803
I think I can taste that paint!
www.breezeautomotive.com 2005 FFR Mk3 Roadster, 302/340hp, MassFlo EFI, Breeze Pulleys, T5, Aluminum Flywheel, 3-link rear with Torsen Diff and 3.27:1 gears, Power Steering, Breeze Front Sway Bar, SN-95 Spindles with outboard SAI Mod, Breeze Battery Mount, QA1 Externally Adjustable Shocks, Quick Release Steering Wheel, Vintage Race seats, GM Arctic White, Sky Blue Scoop, Hidden Hinges, Billet Aluminum Side-view Mirrors, 2,183lbs wet. 1967 Mustang Fastback, Dark Moss Green, black interior, '67 14" styled steel wheels, 2000 Explorer 302 w 5.0 Cam, Quickfuel 450 CFM, 289 Hi-Po Dual exhaust, C4, lowering springs w Shelby drop.
-
Post Thanks / Like - 1 Thanks, 0 Likes
-
12-14-2019, 08:44 PM
#804
Paul,
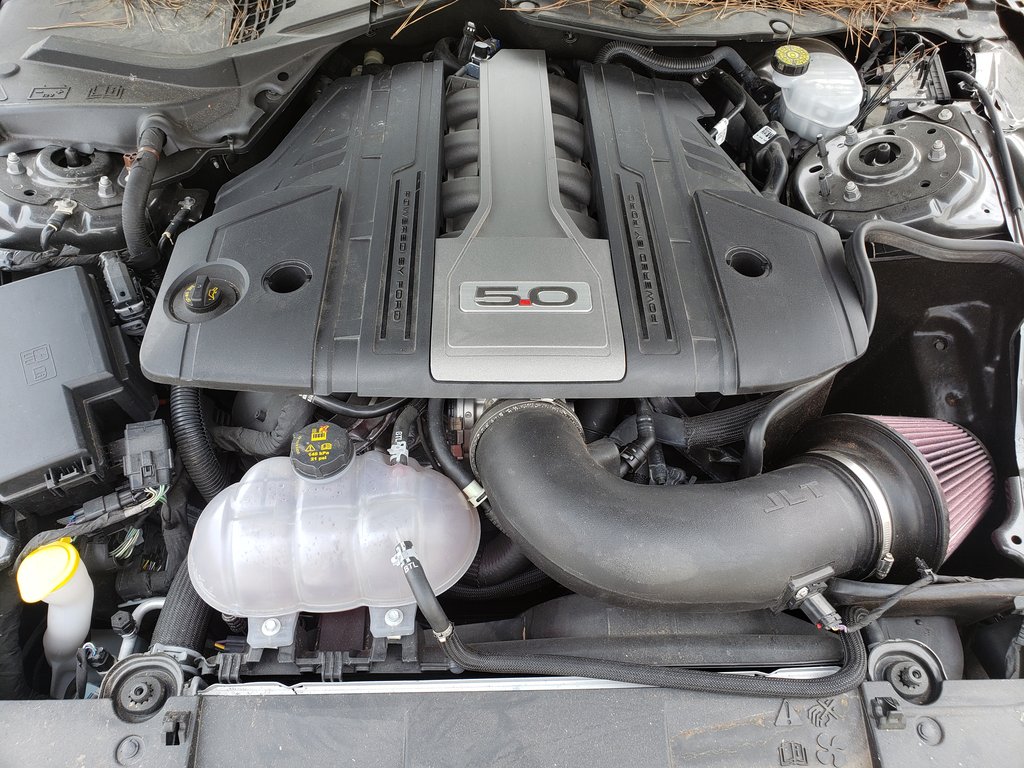
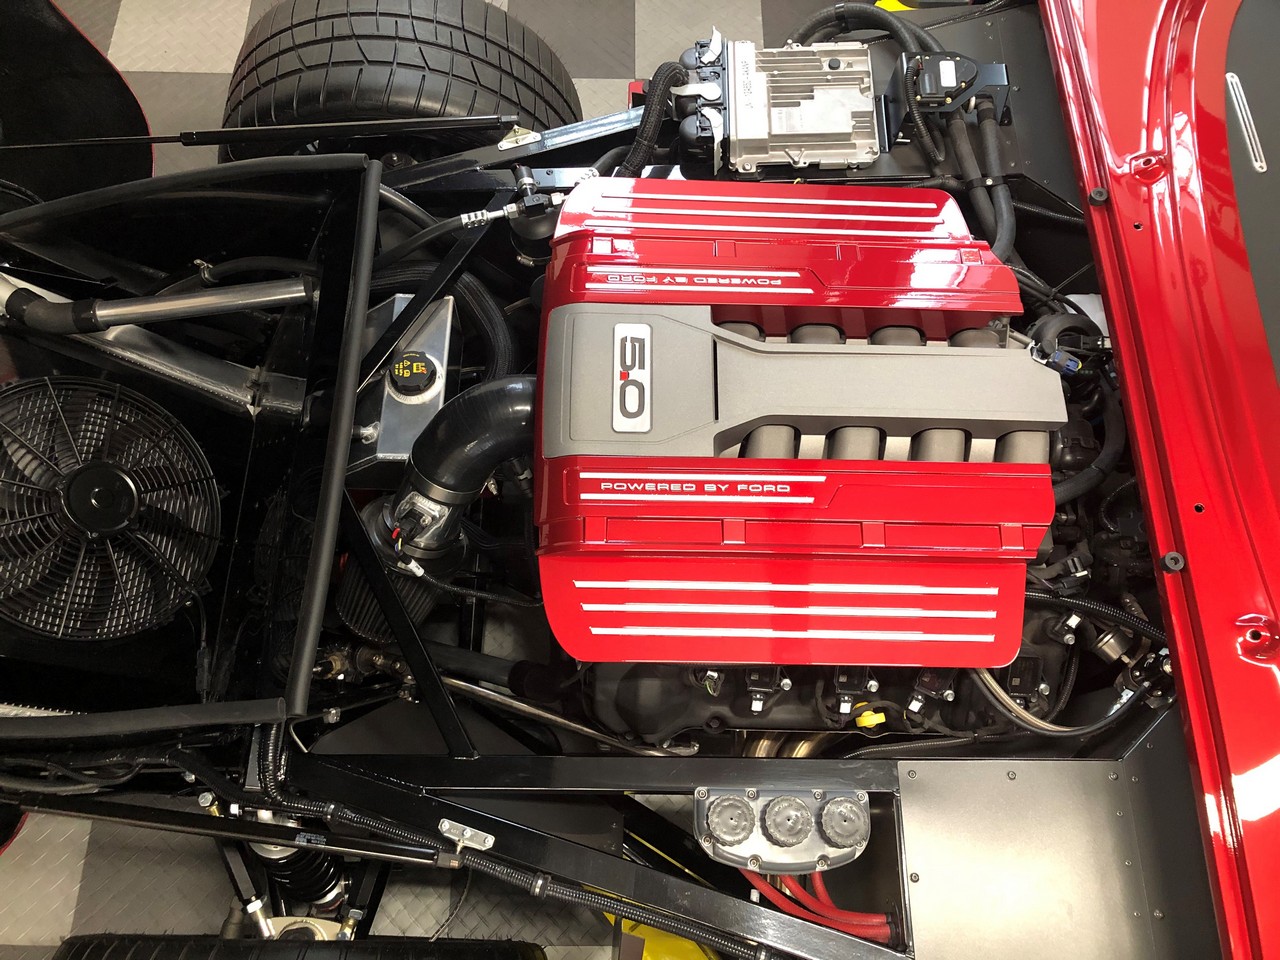
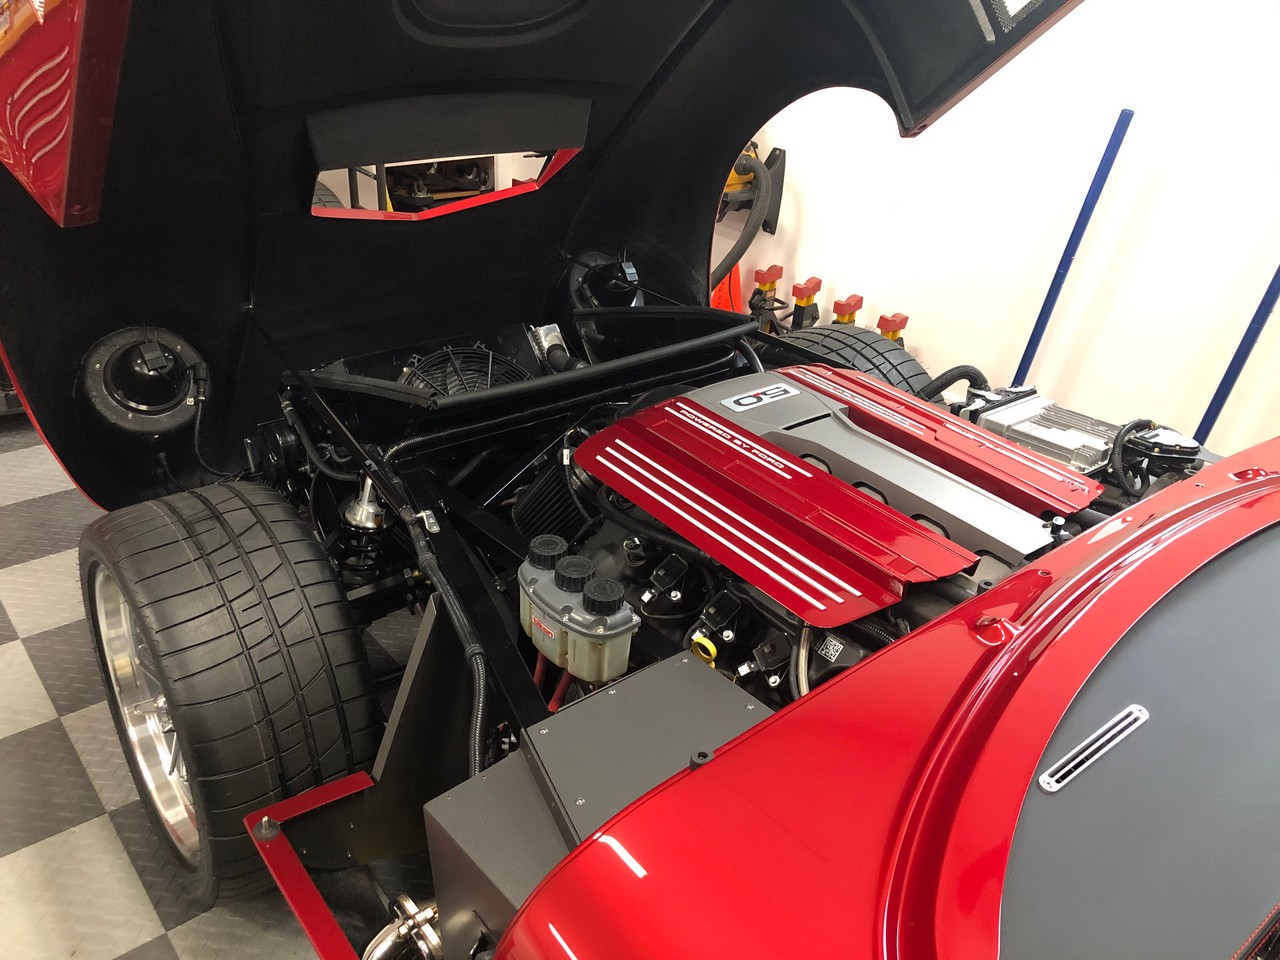
I like how the engine cover came out. It looks great. The factory version reminds me of the aliens from Independence Day.

-
Post Thanks / Like - 0 Thanks, 1 Likes
-
12-15-2019, 04:01 PM
#805
Senior Member

Final Assembly Begins
Not a bunch to report. But will check in with a progress report. Spent time cleaning things up. Still chasing some dust and grime in the engine compartment, but mostly done. One of the side benefits of all the hoses and harnesses on the Coyote installation. The shop did a good job of keeping everything masked and delivered the car relatively clean. But painting is a messy process to say the least. I have the spoiler and third brake light installed, all the rear lighting, all the front lighting, and happy to say everything works. Installed the fuel filler cap and buttoned up the tank filler and cover inside the hatch area. Feels really good to see the Coupe back up on the lift and parts going on for (hopefully!) the last time.
Also, trial fit the new Gas-N side pipes. Going to take a couple wedges to get them just right. So sent an order off to Mark at Breeze and will hopefully get those done when received. Those polished SS pipes sure look good against the new paint.


This picture shows the horseshoe-like retainer I fabricated for where the filler tube goes into the tank. The standard SS ring that came with the kit doesnt quite work with the Coupe chassis. Its oriented the wrong direction to attach properly. Ive done something like this on a couple Roadster builds. Accomplishes the same thing and adds a bit of rigidity where the tube goes into the tank seal. Fabricated from 1/8-inch aluminum, a piece of split fuel tubing, and held in place with two nutserts into the frame.

Next up will start fitting the carpet and get several of the pieces off to the interior shop to bind the edges. Minimally along the top edges of the transmission tunnel where the carpet meets the top cover, along the door sills, and on the folding cover over the dropped trunk floor. Ill see what else.
Build 1: Mk3 Roadster #5125. Sold 11/08/2014.
Build 2: Mk4 Roadster #7750. Sold 04/10/2017.
Build Thread
Build 3: Mk4 Roadster 20th Anniversary #8674. Sold 09/07/2020.
Build Thread and
Video.
Build 4: Gen 3 Type 65 Coupe #59. Gen 3 Coyote. Legal 03/04/2020.
Build Thread and
Video
Build 5: 35 Hot Rod Truck #138. LS3 and 4L65E auto. Rcvd 01/05/2021. Legal 04/20/2023.
Build Thread. Sold 11/9/2023.
-
Post Thanks / Like - 0 Thanks, 1 Likes
-
12-15-2019, 10:21 PM
#806

Steve >> aka: GoDadGo

Really Looking Fantastic!
-
12-19-2019, 09:14 PM
#807
Senior Member
More Final Assembly Details
Plugging away wrapping up multiple final details. So far, everything has taken longer than expected. So what’s new about that? This is another pretty minor update, but probably the last until after Christmas, family visits, etc. No pictures but took eight carpet pieces to my auto interior guy for binding on the edges where they’ll be exposed. He had them done in a couple days and have them on hand to start installation. Also received the exhaust header wedges from Mark at Breeze. Did a quick trial fit and I have what I need for a perfect side pipe fit. I’ll need to relocate the holes on the kit side hangars just a bit, then all will be good. Hope to get the exhaust system 100% wrapped up very soon.
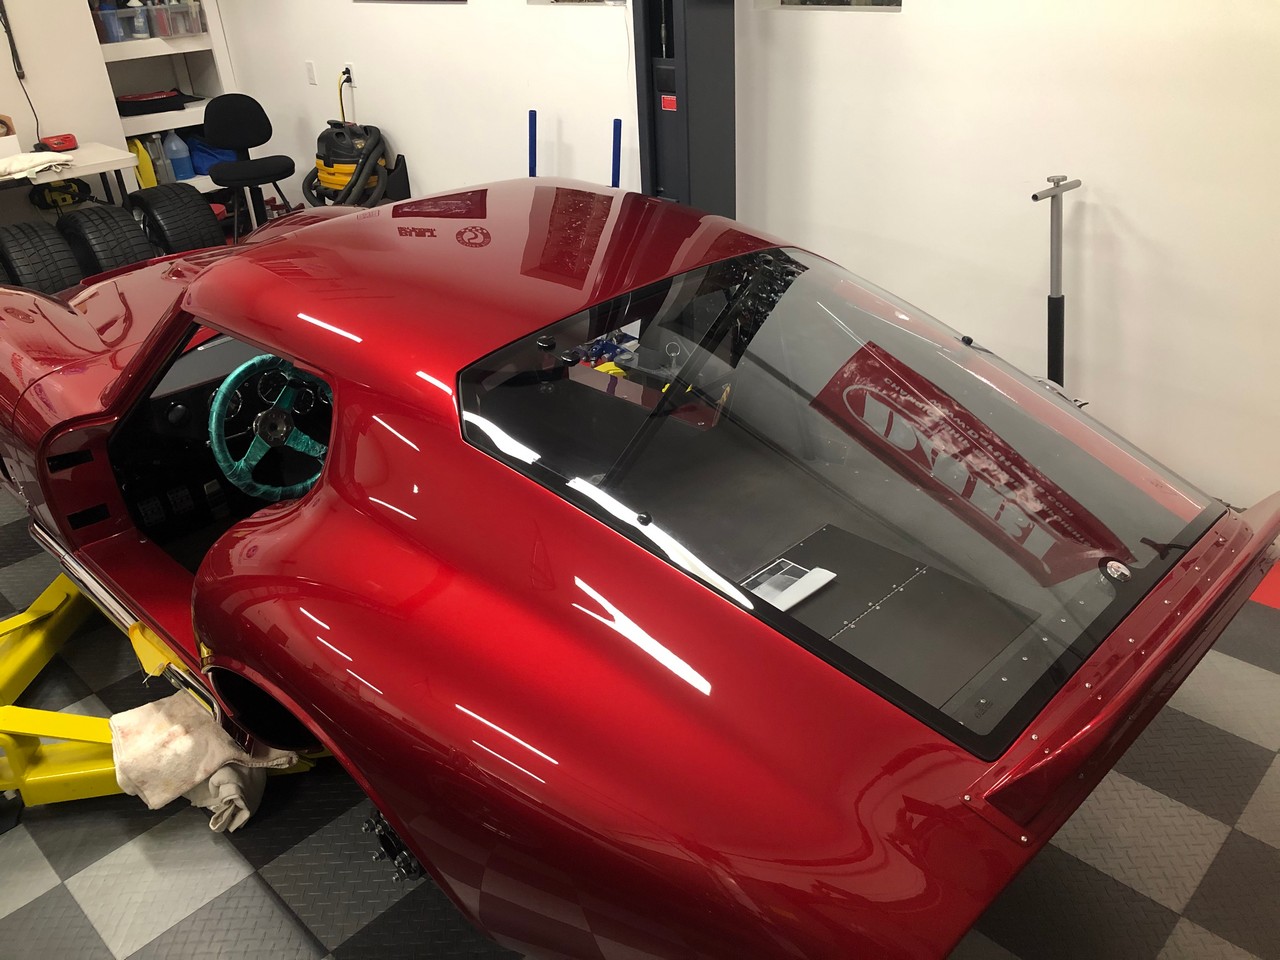
I installed the glass hatch cover. Fit just like it did during mockup, except this time installed the self-adhesive gasket material. Fits and works well. Don’t recall if I mentioned this before, but I made a different latch piece from a piece of angle aluminum and had it powder coated. I thought the kit provided one was a little wimpy. This one has a larger base and doesn’t require a spacer. Also installed the rear hatch cover and the rear splash guards. I made a minor change with the hatch cover. The instructions show riveting it through the body lip that it fits behind. I didn’t want to drill holes through my new paint job. Plus, with the bulb seal and carpet, doesn’t fit right up against the body lip anyway. I put a nutsert in the center of the cover and put a screw into it that’s hidden behind the latch. This provides enough support IMO and leaves space for the bulb seal and carpet.

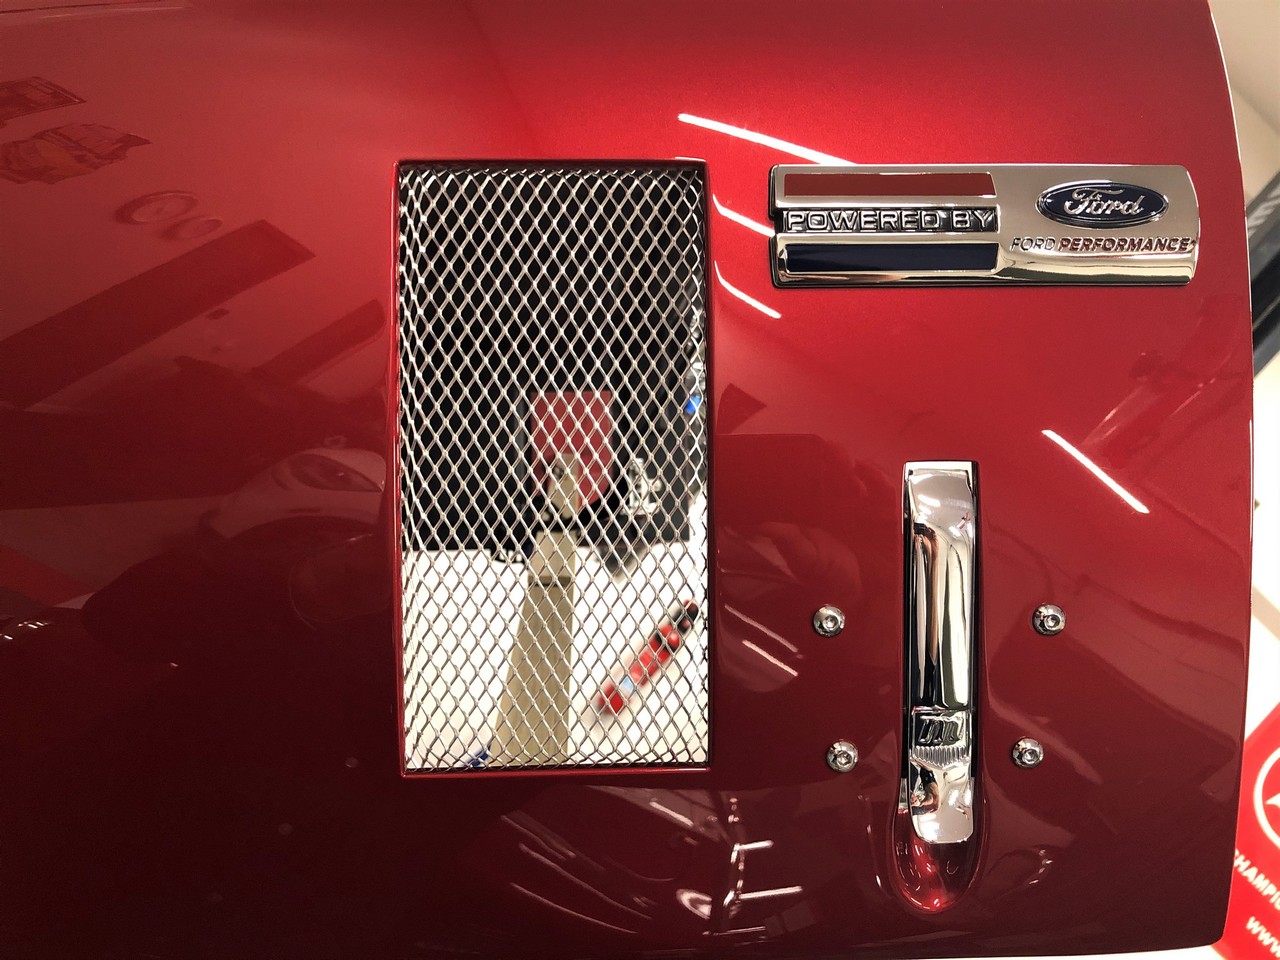
Fit and glued the side mesh pieces in place. Then located and stuck down the Ford Performance emblems I’m using. Used the same location for the emblem that Ron and team used on the SEMA Coupe build from a year ago. Looked good to me.
Finally, some have reported issues with the kit provided gas struts for the hood being able to hold it up adequately. I haven’t found that to be the case. Mine seems very solid. Even now after the added weight of filler and paint. I did adjust the chassis location just slightly but don’t think that changed anything. It opens about as far as I want with the nose close to the ground when open. But some have expressed concern about wind if open for an extended time like at a car show. Crashing down would obviously not be a good thing. From a safety standpoint, also think about what might happen if a shock should fail while I’m working under it. Some have gone to a prop rod versus the gas shocks, but I like the convenience of the gas shocks. Another build posted info about lift support clamps that could be added when needed. Didn’t know such a thing existed. What a great suggestion. The idea included a link to clamps on Amazon. Unfortunately, they were blue  . With a little searching found the same thing in red. These are CTA Tools 5360 Lift Support Clamps and aren’t expensive at $13 each. Has a brass insert in the end of the bolt so doesn’t damage the gas strut. Look like this. Easy to take on and off.

With that I’m off for a bit. Merry Christmas everyone and see you on the other side of the holidays.
Last edited by edwardb; 12-20-2019 at 07:31 AM.
Build 1: Mk3 Roadster #5125. Sold 11/08/2014.
Build 2: Mk4 Roadster #7750. Sold 04/10/2017.
Build Thread
Build 3: Mk4 Roadster 20th Anniversary #8674. Sold 09/07/2020.
Build Thread and
Video.
Build 4: Gen 3 Type 65 Coupe #59. Gen 3 Coyote. Legal 03/04/2020.
Build Thread and
Video
Build 5: 35 Hot Rod Truck #138. LS3 and 4L65E auto. Rcvd 01/05/2021. Legal 04/20/2023.
Build Thread. Sold 11/9/2023.
-
Post Thanks / Like - 0 Thanks, 1 Likes
-
12-19-2019, 10:15 PM
#808
Administrator

Great job Paul! Can you show a picture of your new rear latch piece?
Thx,
Henry
-
12-19-2019, 10:38 PM
#809
Senior Member

Originally Posted by
65 Cobra Dude

Great job Paul! Can you show a picture of your new rear latch piece?
Thx,
Henry
Hey Henry. Here you go. This is one I had before paint and powder coat. But you get the idea. It's 1" x 2" against the body, and just under 3/4" deep where it catches.
Also, for those watching closely, that little piece of gasket material I used for spacing during mock-up is backwards. It's installed the other way around, with the taller/thinner section on the inside versus the outside. Helps to actually read the instructions, which fortunately I did before installing the entire gasket a couple days ago.

Last edited by edwardb; 12-20-2019 at 07:35 AM.
Build 1: Mk3 Roadster #5125. Sold 11/08/2014.
Build 2: Mk4 Roadster #7750. Sold 04/10/2017.
Build Thread
Build 3: Mk4 Roadster 20th Anniversary #8674. Sold 09/07/2020.
Build Thread and
Video.
Build 4: Gen 3 Type 65 Coupe #59. Gen 3 Coyote. Legal 03/04/2020.
Build Thread and
Video
Build 5: 35 Hot Rod Truck #138. LS3 and 4L65E auto. Rcvd 01/05/2021. Legal 04/20/2023.
Build Thread. Sold 11/9/2023.
-
Post Thanks / Like - 1 Thanks, 0 Likes
-
12-20-2019, 07:56 AM
#810
Senior Member

Looking really amazing Paul. Love seeing these final fitting updates. The glass hatch looks like a spectacular fit. Will you be able to install the front windshield yourself? I am already having anxiety about trying that on my 911 build!
Hope you have a wonderful Christmas.
MK4 #8900 - complete kit - Coyote, TKO600, IRS - Delivered 6/28/16 First Start 10/6/16 Go cart - 10/16/16 Build completed - 4/26/17 - 302 days to build my 302 CI Coyote Cobra - Registered and street legal 5/17/17
Build Thread
http://thefactoryfiveforum.com/showt...e-build-thread
PHIL 4:13 INSTAGRAM - @scottsrides
-
12-20-2019, 08:42 AM
#811
Administrator
Thanks for the pic Paul. Outstanding work as usual. See you in TX.
Henry
-
12-20-2019, 09:30 AM
#812
David aka Ducky2009

Looks Great! Love the color... and the chrome side pipes.
MK4 Build #9035 Delivered 2/17/17, First Start & Go-Kart 6/2/17, Licensed 9/1/17
Paint - Lightning Blue Metallic, No Hood Scoop, No Stripes
Gen 2 Coyote Engine & TKO-600. Solid Axle, 8.8-3.55, Power Steering, Power Brakes, Dual Roll Bars
Heater and Glove Box, Drop Trunk, Wipers, Radio, FFR Vintage Gauges, Custom Dash
Build Thread:
http://thefactoryfiveforum.com/showt...MK4-Build-9035
-
12-20-2019, 09:33 AM
#813
Steve >> aka: GoDadGo
How About A Walk Around Youtube When You Are Done!
Man I Wish I Had Half Of Your Skills!
Even A Quarter Would Do!
Steve
-
12-20-2019, 04:41 PM
#814
Senior Member
Originally Posted by
wareaglescott
Looking really amazing Paul. Love seeing these final fitting updates. The glass hatch looks like a spectacular fit. Will you be able to install the front windshield yourself? I am already having anxiety about trying that on my 911 build!
Hope you have a wonderful Christmas.
Thanks. Yeah, the hatch fit is good. I'll be curious to see how watertight it is. Seems to pull down on the gasket OK. But we'll see. Or maybe just stay out of the rain. Pretty sure I'm going to do the windshield myself. Talked to the manager at the place that did my paint and got a lot of pointers. They have a shop they recommend and use, so have that as a fallback position. Just a pain with the logistics of getting it there and back. Plus yet more cost. Probably my biggest concern is getting the black band (called a frit) around the windshield applied neatly. The vintage windshield used in the kit was before those were applied. The urethane itself seems pretty foolproof.
Originally Posted by
65 Cobra Dude
Thanks for the pic Paul. Outstanding work as usual. See you in TX.
Henry
Not planning Texas next year. This year was the first and maybe last. It's just a long haul from Michigan. But London for sure. Also planning to do the Factory Five Open House, as long as the schedule works.
Originally Posted by
Ducky2009
Looks Great! Love the color... and the chrome side pipes.
Thanks. Agreed. The color turned out great. The pipes are polished stainless. From Gas-N.
Originally Posted by
GoDadGo
How About A Walk Around Youtube When You Are Done!
Man I Wish I Had Half Of Your Skills!
Even A Quarter Would Do!
Steve
You're too generous... A walkaround video is a great idea. Maybe when it's set up for display at Autorama. I'll keep it in mind.
Last edited by edwardb; 12-20-2019 at 04:44 PM.
Build 1: Mk3 Roadster #5125. Sold 11/08/2014.
Build 2: Mk4 Roadster #7750. Sold 04/10/2017.
Build Thread
Build 3: Mk4 Roadster 20th Anniversary #8674. Sold 09/07/2020.
Build Thread and
Video.
Build 4: Gen 3 Type 65 Coupe #59. Gen 3 Coyote. Legal 03/04/2020.
Build Thread and
Video
Build 5: 35 Hot Rod Truck #138. LS3 and 4L65E auto. Rcvd 01/05/2021. Legal 04/20/2023.
Build Thread. Sold 11/9/2023.
-
12-20-2019, 05:28 PM
#815
I did the windshield with help from my wife. The black primer is a pain, took 3 coats to get it looking good. We used good painters tape and still had it bleed under. A razor blade cleaned it up well.
David W
Mkll 4874 built in 2004
Gen 3 coupe #16 registered 2018 painted 2019
-
01-02-2020, 11:47 PM
#816
Senior Member
Final Assembly Continues
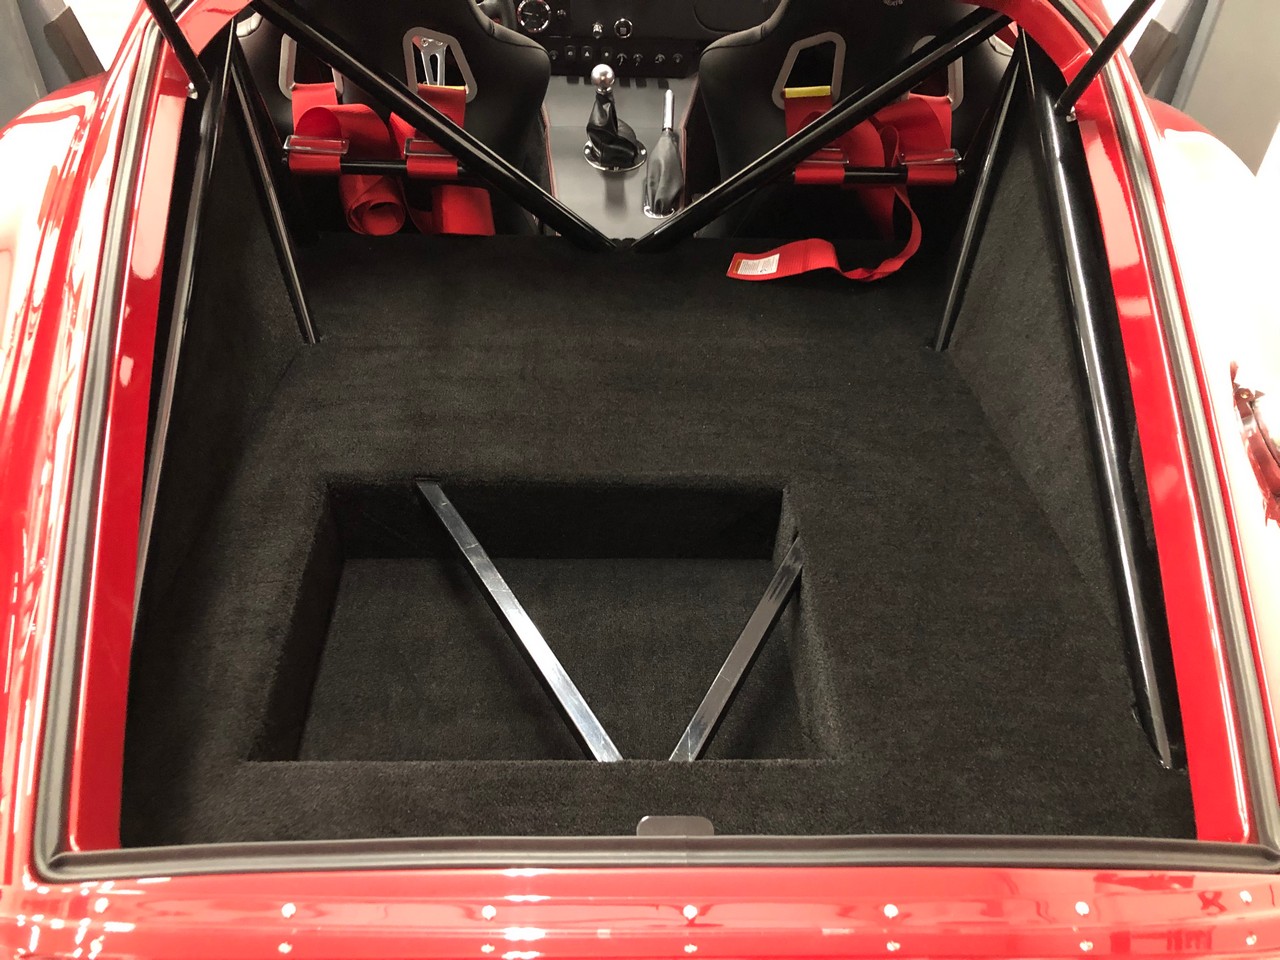
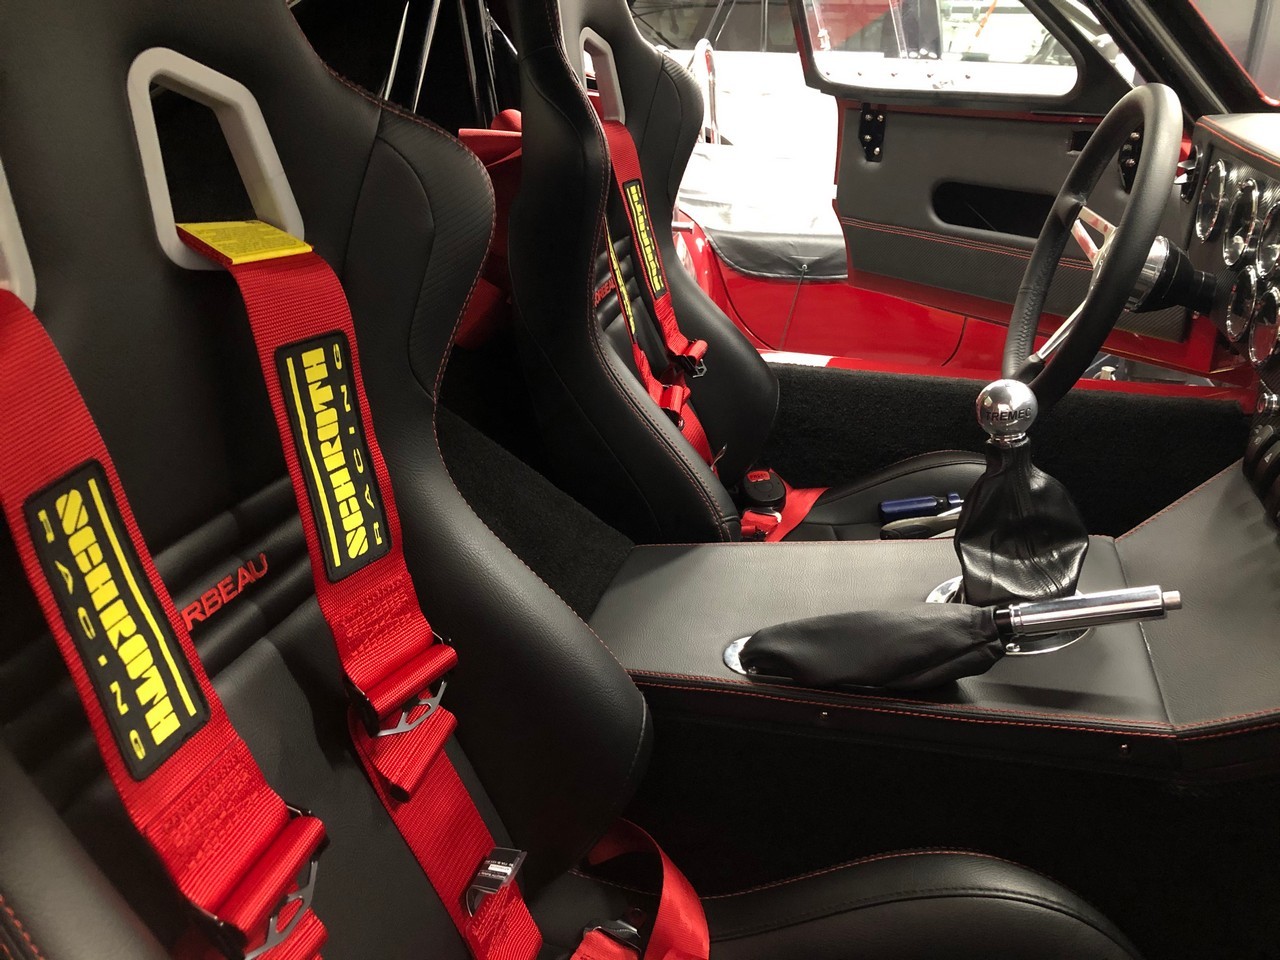
Around family visits over the holidays was able to get a few things further along. Then a couple quality days this week. While our oldest son was here, he helped me do the final installation on the side pipes and also final installation on the seats. Another set of hands for tasks like those sure make them easier. Especially when working around that freshly painted body. Before that, with some early mornings and late evenings, was able to get all the carpeting installed. In some ways, easier than the Roadster if you’re also doing the trunk since you’re basically doing the entire interior as one area. I used my standard Dap 00443 Weldwood Outdoor Carpet Adhesive for much of it, and DAP Weldwood Landau Top & Trim HHR Contact Cement for some of the smaller pieces. Both stick very well. But the carpet adhesive allows some repositioning which is critical for larger parts. Especially the giant floor piece. Can’t imagine doing that one with grabbing contact cement. I know a lot of guys use spray adhesive for the carpet, and that’s OK too. I just prefer these products. I have everything done except the folding cover for the trunk box, so that’s missing in the pics.
Gas-N side pipes look fantastic. Took one wedge on each side to get them perfect. The kit supplied hangars worked fine after a small adjustment of the hole to the pipe tab.
Not too much of the carpet visible in the cockpit with the seats in. But it’s all there. I'll be adding Russ Thompson sill plates, trimmed a bit because I chose to wrap the carpet over the edge. Did that because (1) Hides the body mounting bolts, (2) Carpet goes under the door so looks better from the inside, and (3) Gives a softer place to rest your elbow when seated. Seems to fall about there for me.

Carpet inside the hatch area including the still open trunk box. Still need to trim the end of the wrapped shoulder straps. Waiting until I confirm the exact length on the seats and finalize the wraps.
Hung the doors and windows. With a little adjustment, fit perfectly. Really happy with how everything lines up.

Today I’m finishing up the door cards and other interior details. Not much left here. Door cards are held on with the door handles and 3M VHB double back tape. Had to remove one after I installed it (don’t ask…) and it holds just fine.


Few more days and items off my list, and I’ll get pics for my Autorama application. It won’t be 100% complete (e.g. mainly windshield not installed yet) but I need to get the application in by the deadline.
Last edited by edwardb; 01-03-2020 at 08:03 AM.
Build 1: Mk3 Roadster #5125. Sold 11/08/2014.
Build 2: Mk4 Roadster #7750. Sold 04/10/2017.
Build Thread
Build 3: Mk4 Roadster 20th Anniversary #8674. Sold 09/07/2020.
Build Thread and
Video.
Build 4: Gen 3 Type 65 Coupe #59. Gen 3 Coyote. Legal 03/04/2020.
Build Thread and
Video
Build 5: 35 Hot Rod Truck #138. LS3 and 4L65E auto. Rcvd 01/05/2021. Legal 04/20/2023.
Build Thread. Sold 11/9/2023.
-
Post Thanks / Like - 0 Thanks, 1 Likes
-
01-02-2020, 11:59 PM
#817
Senior Member

Dang Paul, the car looks absolutely incredible! And the pipes just make it pop --- WOW! No doubt you have another over-the-top build. I/WE can't wait to see it completed. Outstanding!
Dj
-
Post Thanks / Like - 1 Thanks, 0 Likes
-
01-03-2020, 12:46 AM
#818
Senior Member

Wow, simply WOW. It doesn't get any better than that Paul.
Gorgeous
-Steve
Gen 1 '33 Hot Rod #1104
347 with Holley Sniper & Hyperspark, TKO600, IRS, 245/40R18 & 315/30R18, DRL, Digital Guard Dog keyless Ignition
-
Post Thanks / Like - 1 Thanks, 0 Likes
-
01-03-2020, 02:56 PM
#819
East Coast Speed Machines
that is looking REALLY good!
Before you drive it... I would HIGHLY recommend the area of the pontoon right behind the front wheel... that area get BLASTED! As you know I put my aluminum in front of the pontoon (instruction say to do it like you did).. I also put bed liner on top of the aluminum.... in 4000 miles I have had to touch it up twice.... that paint is sooo nice.... I would think some THICK 3m clear would be a good plan.
The sill plates of the doors as well... I assume you have some aluminum nice pieces..... be careful if driving in shorts and climbing in and out - your hammy might get a little bit from the heat ask me how I know.... I had put aluminum covers on there after SEMA (over the grip tape) - but after 2 ouch moments ... I took them off... the other thing you could do .. thought of it after I pulled them off is just put some clear 3m on them... might keep it cooler with the added benefit of giving it some scratch protection
Only other little annoying thing I ran into was with the seats... depending on how far back you sit and how much flex there is in the seat with you in it...in dynamic operation my seat would intermittently contact the roll bar causing a "click" - drove my OCD into complete overdrive.... I ended up putting a piece of rubber roll bar cushion on the part of the bar that was in contact... on BOTH seats
Congrats! a very nice build !!
Last edited by Erik W. Treves; 01-03-2020 at 03:03 PM.
FFR 1879, Blown DSS 306,REDLINE management, VeryCoolParts Tuned 460RWHP
FFR 818S, The Flash, Chassis #5, 2.0L, LSD, Electromotive TEC-S, VCP Tuned, 278RWHP 265 RWTQ
FFR 6651, Green Lantern, 408W Crate, Hellion 66mm Turbo, JGS Waste gate / Blowoff valve, Tec-GT management, VCP Tuned, 575 RWHP, 690 RWTQ
FFR 8335, Black Mamba, 289 FIA CSX 2001 tribute car, 347, 48 IDA webers, VCP Tuned, 311 RWHP 386 RWTQ, 3-link, Trigo's
FFR 0004, Gen 3 , Hawk Coupe, Coyote twin turbo, 683 RWHP 559 RWTQ, IRS, VCP Tuned. "not too shabby"
US ARMY Maintenance Test Pilot (CW4 Retired)
-
01-03-2020, 03:47 PM
#820
Senior Member
Originally Posted by
Erik W. Treves
that is looking REALLY good!
Before you drive it... I would HIGHLY recommend the area of the pontoon right behind the front wheel... that area get BLASTED! As you know I put my aluminum in front of the pontoon (instruction say to do it like you did).. I also put bed liner on top of the aluminum.... in 4000 miles I have had to touch it up twice.... that paint is sooo nice.... I would think some THICK 3m clear would be a good plan.
The sill plates of the doors as well... I assume you have some aluminum nice pieces..... be careful if driving in shorts and climbing in and out - your hammy might get a little bit from the heat
ask me how I know.... I had put aluminum covers on there after SEMA (over the grip tape) - but after 2 ouch moments ... I took them off... the other thing you could do .. thought of it after I pulled them off is just put some clear 3m on them... might keep it cooler with the added benefit of giving it some scratch protection
Only other little annoying thing I ran into was with the seats... depending on how far back you sit and how much flex there is in the seat with you in it...in dynamic operation my seat would intermittently contact the roll bar causing a "click" - drove my OCD into complete overdrive.... I ended up putting a piece of rubber roll bar cushion on the part of the bar that was in contact... on BOTH seats
Congrats! a very nice build !!
Thanks Erik. Great comments. You've touched on several things from my punch list. I'm planning to put film on the sill plates. Hadn't thought of them getting hot, but makes sense. Hmmm. Haven't decided yet what to do with the front of the pontoons. Might try film. Maybe make some kind of mud flap out of plastic or rubber that attaches on the front. Maybe just spray with UPOL Raptor like I have on the body underside. That stuff is considerably tougher than the solvent brush-on variety. My seats also touch the roll bar right at the top and I too noticed them squeaking as I was getting in and out. If it doesn't stop, I'll do something there too.
Last edited by edwardb; 01-04-2020 at 12:46 PM.
Build 1: Mk3 Roadster #5125. Sold 11/08/2014.
Build 2: Mk4 Roadster #7750. Sold 04/10/2017.
Build Thread
Build 3: Mk4 Roadster 20th Anniversary #8674. Sold 09/07/2020.
Build Thread and
Video.
Build 4: Gen 3 Type 65 Coupe #59. Gen 3 Coyote. Legal 03/04/2020.
Build Thread and
Video
Build 5: 35 Hot Rod Truck #138. LS3 and 4L65E auto. Rcvd 01/05/2021. Legal 04/20/2023.
Build Thread. Sold 11/9/2023.
-
01-04-2020, 11:52 AM
#821
Congratulations Paul! Absolutely fantastic build. Thank you so much for the time and effort you put into documenting and posting all of your information especially where to go to to buy the speciality parts, very helpful. You are a CLASS ACT!
Bob McLaughlin
-
Post Thanks / Like - 1 Thanks, 0 Likes
-
01-05-2020, 07:32 PM
#822
Hi Edward, all looks awesome man. Where did you get your Ford Performance emblems?
Rgds. Tim
-
01-05-2020, 09:33 PM
#823
Senior Member
Originally Posted by
timsmitaruba
Hi Edward, all looks awesome man. Where did you get your Ford Performance emblems?
Rgds. Tim
Thanks. The emblems are Ford Performance part number M-16098-PBFP. I got them from Summit Racing. But they're widely available at multiple sources. Nice pieces.
Build 1: Mk3 Roadster #5125. Sold 11/08/2014.
Build 2: Mk4 Roadster #7750. Sold 04/10/2017.
Build Thread
Build 3: Mk4 Roadster 20th Anniversary #8674. Sold 09/07/2020.
Build Thread and
Video.
Build 4: Gen 3 Type 65 Coupe #59. Gen 3 Coyote. Legal 03/04/2020.
Build Thread and
Video
Build 5: 35 Hot Rod Truck #138. LS3 and 4L65E auto. Rcvd 01/05/2021. Legal 04/20/2023.
Build Thread. Sold 11/9/2023.
-
01-06-2020, 11:43 AM
#824
Senior Member

Originally Posted by
edwardb
Around family visits over the holidays was able to get a few things further along. Then a couple quality days this week. While our oldest son was here, he helped me do the final installation on the side pipes and also final installation on the seats. Another set of hands for tasks like those sure make them easier. Especially when working around that freshly painted body. Before that, with some early mornings and late evenings, was able to get all the carpeting installed. In some ways, easier than the Roadster if youre also doing the trunk since youre basically doing the entire interior as one area. I used my standard Dap 00443 Weldwood Outdoor Carpet Adhesive for much of it, and DAP Weldwood Landau Top & Trim HHR Contact Cement for some of the smaller pieces. Both stick very well. But the carpet adhesive allows some repositioning which is critical for larger parts. Especially the giant floor piece. Cant imagine doing that one with grabbing contact cement. I know a lot of guys use spray adhesive for the carpet, and thats OK too. I just prefer these products. I have everything done except the folding cover for the trunk box, so thats missing in the pics.
Gas-N side pipes look fantastic. Took one wedge on each side to get them perfect. The kit supplied hangars worked fine after a small adjustment of the hole to the pipe tab.
Not too much of the carpet visible in the cockpit with the seats in. But its all there. I'll be adding Russ Thompson sill plates, trimmed a bit because I chose to wrap the carpet over the edge. Did that because (1) Hides the body mounting bolts, (2) Carpet goes under the door so looks better from the inside, and (3) Gives a softer place to rest your elbow when seated. Seems to fall about there for me.
Carpet inside the hatch area including the still open trunk box. Still need to trim the end of the wrapped shoulder straps. Waiting until I confirm the exact length on the seats and finalize the wraps.
Hung the doors and windows. With a little adjustment, fit perfectly. Really happy with how everything lines up.
Today Im finishing up the door cards and other interior details. Not much left here. Door cards are held on with the door handles and 3M VHB double back tape. Had to remove one after I installed it (dont ask
) and it holds just fine.
Few more days and items off my list, and Ill get pics for my Autorama application. It wont be 100% complete (e.g. mainly windshield not installed yet) but I need to get the application in by the deadline.
i love the way you did dash and trans tunnel ,how did you cover? just glued to sheet metal?
-
01-06-2020, 01:18 PM
#825
Senior Member
Originally Posted by
jwhit
i love the way you did dash and trans tunnel ,how did you cover? just glued to sheet metal?
Thanks. I'm happy with how it turned out as well. Lots of work there though. The top of the rear trans tunnel, the face of the dash and glovebox, and the door cards have 1/8-inch closed cell foam and then the covering. The rest have the vinyl applied directly without the foam. All is done with DAP Weldwood Landau Top & Trim HHR Contact Cement.
Build 1: Mk3 Roadster #5125. Sold 11/08/2014.
Build 2: Mk4 Roadster #7750. Sold 04/10/2017.
Build Thread
Build 3: Mk4 Roadster 20th Anniversary #8674. Sold 09/07/2020.
Build Thread and
Video.
Build 4: Gen 3 Type 65 Coupe #59. Gen 3 Coyote. Legal 03/04/2020.
Build Thread and
Video
Build 5: 35 Hot Rod Truck #138. LS3 and 4L65E auto. Rcvd 01/05/2021. Legal 04/20/2023.
Build Thread. Sold 11/9/2023.
-
01-07-2020, 09:43 PM
#826
Average Moderator

Stunning build, Paul, but we kind of expect that from you! Looking forward to seeing this beauty at Open House and LCS!
Garry
I sure miss my coupe!
F5R1004503SP 2004 Challenge Car, 331 Stroker
Coupe # 031, 422" Windsor stroker by Southern Automotive (Dash autographed by Peter Brock)***SOLD***
Unique 427 Roadster, 482" Aluminum FE by Southern Automotive***SOLD***
-
Post Thanks / Like - 1 Thanks, 1 Likes
-
01-08-2020, 02:44 PM
#827
Senior Member
More Details, Autorama App
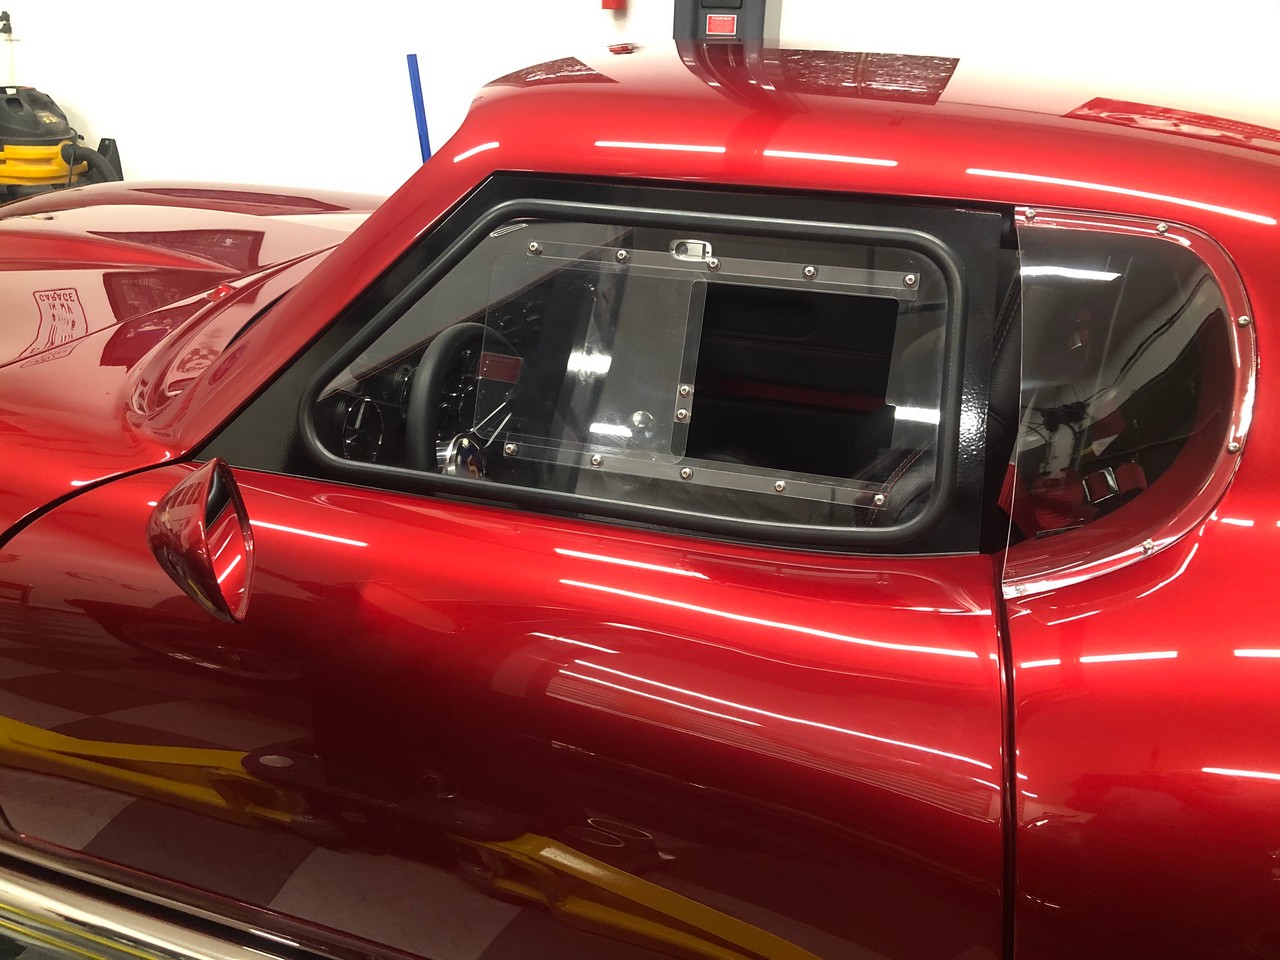
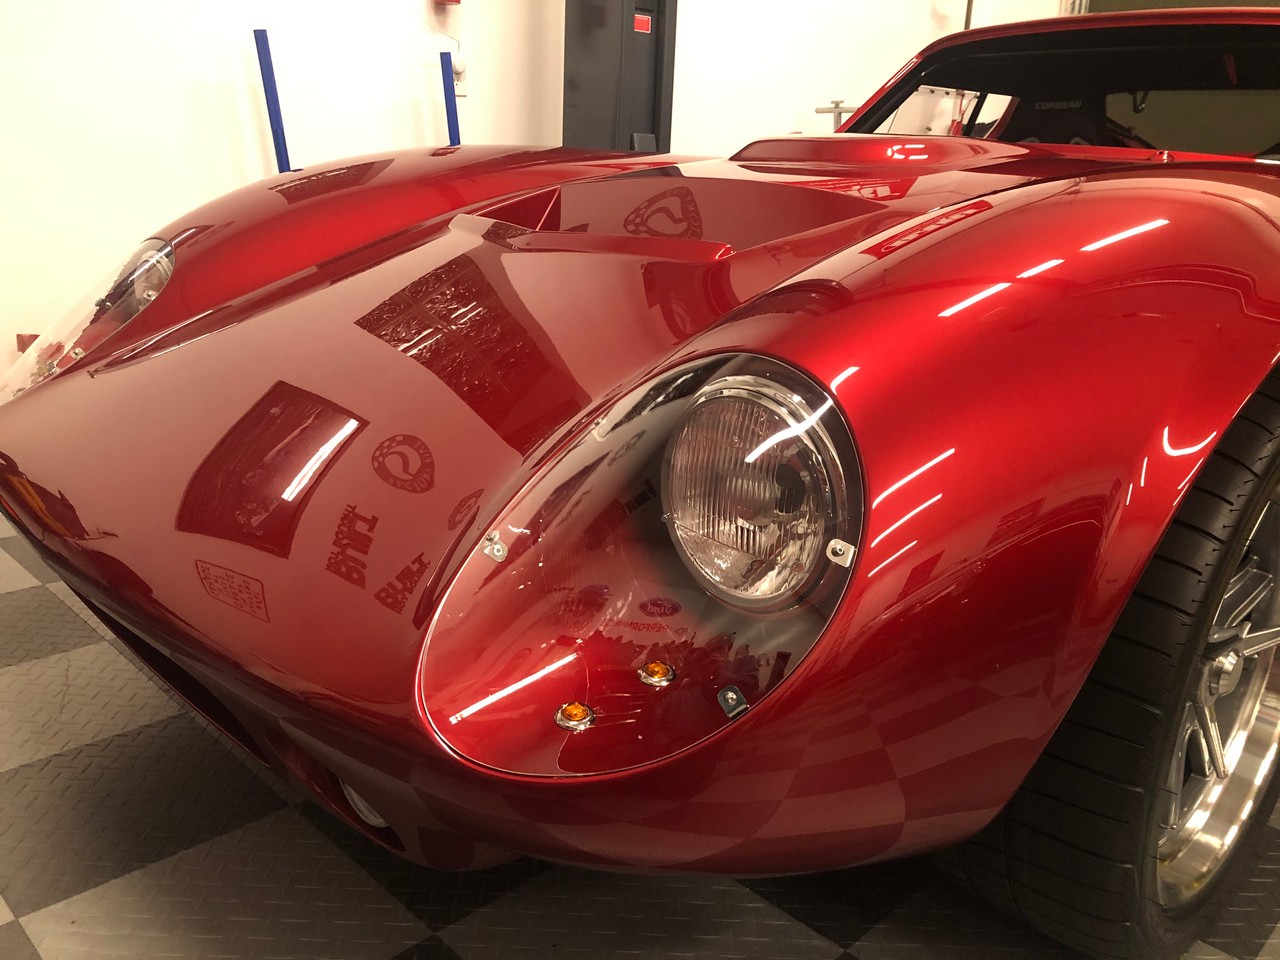
Knocked some more items off my final assembly punch list. But mainly focused on the clear acrylic quarter window scoops and headlight covers. Both come in the kit oversized and must be fit before installation. First up the quarter windows. I had previously fit those to the body before paint. So just a matter of confirming they still fit, which they did. Then drilled holes and installed using the supplied self-tapping screws. Nothing too earthshaking here. The installed windows just clear the center of the scoops when the door opens and closes. Scared me the first time I opened the door. Also in this pic you can see one of the previously mentioned Peter Brock side mirrors. Had the body color added to the main body of the mirrors.
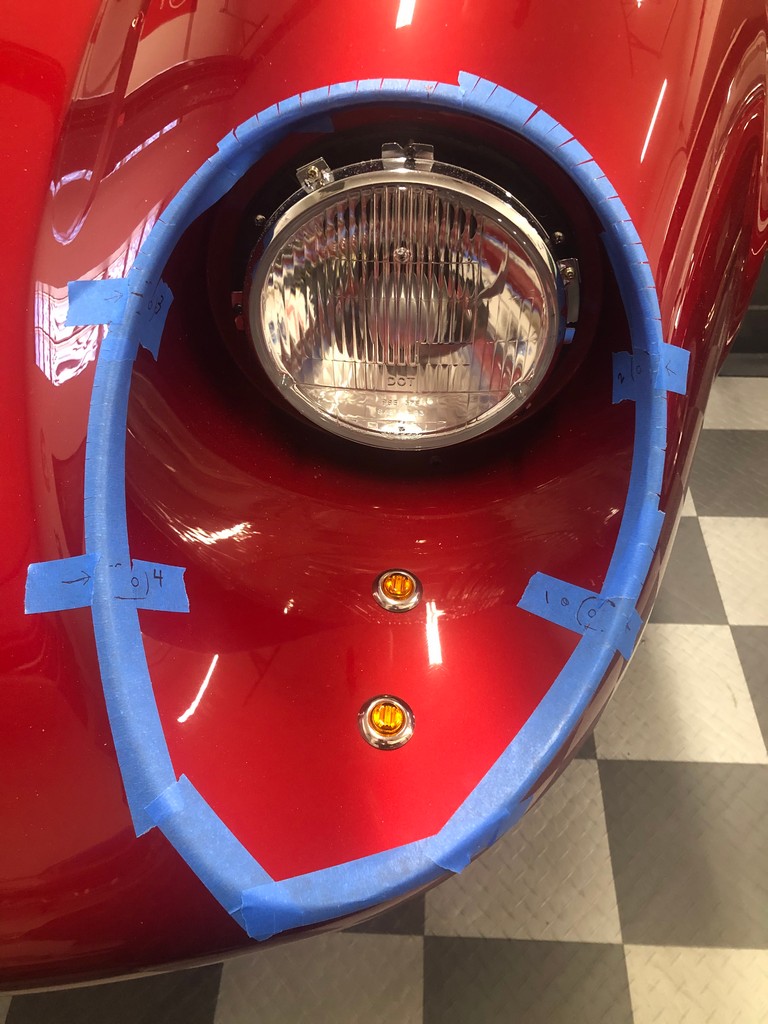
Then worked on the headlight covers. These I have to say were pretty tedious and took longer (that again…) than I expected to get the fit I was hoping for. First taped the edges of the openings, then kept trimming and sanding. Important to make a mark on the piece and the opening so you’re coming back to the same location each time when re-sizing. Otherwise you’d be chasing the fit even longer. Note I left the film on the clear pieces until I was completely done. Protects them, plus gives a surface to write on. I used a fine point Sharpie. Once fitted, proceeded to get them mounted. I had previously purchased some very nice rod end bolts that I was going to use for mounting. This was an idea from another build thread, which I mentioned and pictured previously. A really nice, elegant, and clean installation. But in the end, didn’t use them. I was concerned about getting the location and angle just right, especially since I’m working with finished paint. Plus, unless spacers were used, the holes would be very close to edge of the clear acrylic. And finally I wasn’t positive I could get the to the back side of the bolt to add the retaining nut. Or maybe I'm just getting tired and ready for this to be done. Whatever, I decided to use the stock right angle clips, which I thought would be a little more forgiving to install.
So having said that, some feedback on the instructions in the manual. The kit supplies self-tapping screws to go through the clear acrylic and into the clips. That simply doesn’t work. The SS clips totally sheer off the threads of the screws the first time they go in. I ended up tapping the clips and using 8-32 button head screws. That worked great, although tapping that SS requires some patience and cutting fluid. Once I’m pretty sure nothing will be coming apart soon, I’ll use a little RTV on the threads to make sure they don’t vibrate loose. Don’t ever use Loctite around acrylic.
Second feedback on the instructions is they say to rivet the clips to the opening, and then bend with pliers to match the angle of the acrylic cover. Those are tough little pieces, and bending them against a pop rivet in fiberglass plus while on finished paint didn’t seem like a good idea to me. Instead, I trial fit them with double back tape, and removed and bent off the car as many times as needed to get a good fit. Then with them back in place, marked the holes, drilled, and used Clecos to confirm the proper location and angle. Again, adjusting as needed. Once that was done, worked the pieces over with my polisher (looked much better that way) and popped the rivets to hold in place. Then marked and drilled the holes in the cover. Tedious process, but it all worked OK. No paint was harmed in the process. And the fit looks good. Once I pulled the film on the covers, found them a little bumpy on the back side. It’s only barely noticeable once installed. But maybe this is the quality issue Factory Five has been having, and why they took so long to arrive. Some kits still have them backordered.

Note in both cases, I used drill bits specifically made for acrylic plastic, as mentioned in a previous post. Supposed to prevent cracking. Seemed to work fine. Also, in both cases, Factory Five recommends sanding and polishing the edges of the acrylic. I progressively worked up to 1500 grit and polished using Meguiar's G12310 PlastX Clear Plastic Cleaner & Polish. The manual recommends 3M, but this is what my local parts store had and it seemed to work OK. Side issue, after doing the quarter window vents and headlight covers, noted the supplied side window and sliding door acrylic edges are quite rough. Some even sharp enough to cut if you weren’t careful. Added that to my “to-do” list when I run out of real tasks.
Last edited by edwardb; 01-08-2020 at 05:28 PM.
Build 1: Mk3 Roadster #5125. Sold 11/08/2014.
Build 2: Mk4 Roadster #7750. Sold 04/10/2017.
Build Thread
Build 3: Mk4 Roadster 20th Anniversary #8674. Sold 09/07/2020.
Build Thread and
Video.
Build 4: Gen 3 Type 65 Coupe #59. Gen 3 Coyote. Legal 03/04/2020.
Build Thread and
Video
Build 5: 35 Hot Rod Truck #138. LS3 and 4L65E auto. Rcvd 01/05/2021. Legal 04/20/2023.
Build Thread. Sold 11/9/2023.
-
Post Thanks / Like - 0 Thanks, 1 Likes
-
01-08-2020, 02:45 PM
#828
Senior Member
Autorama Application
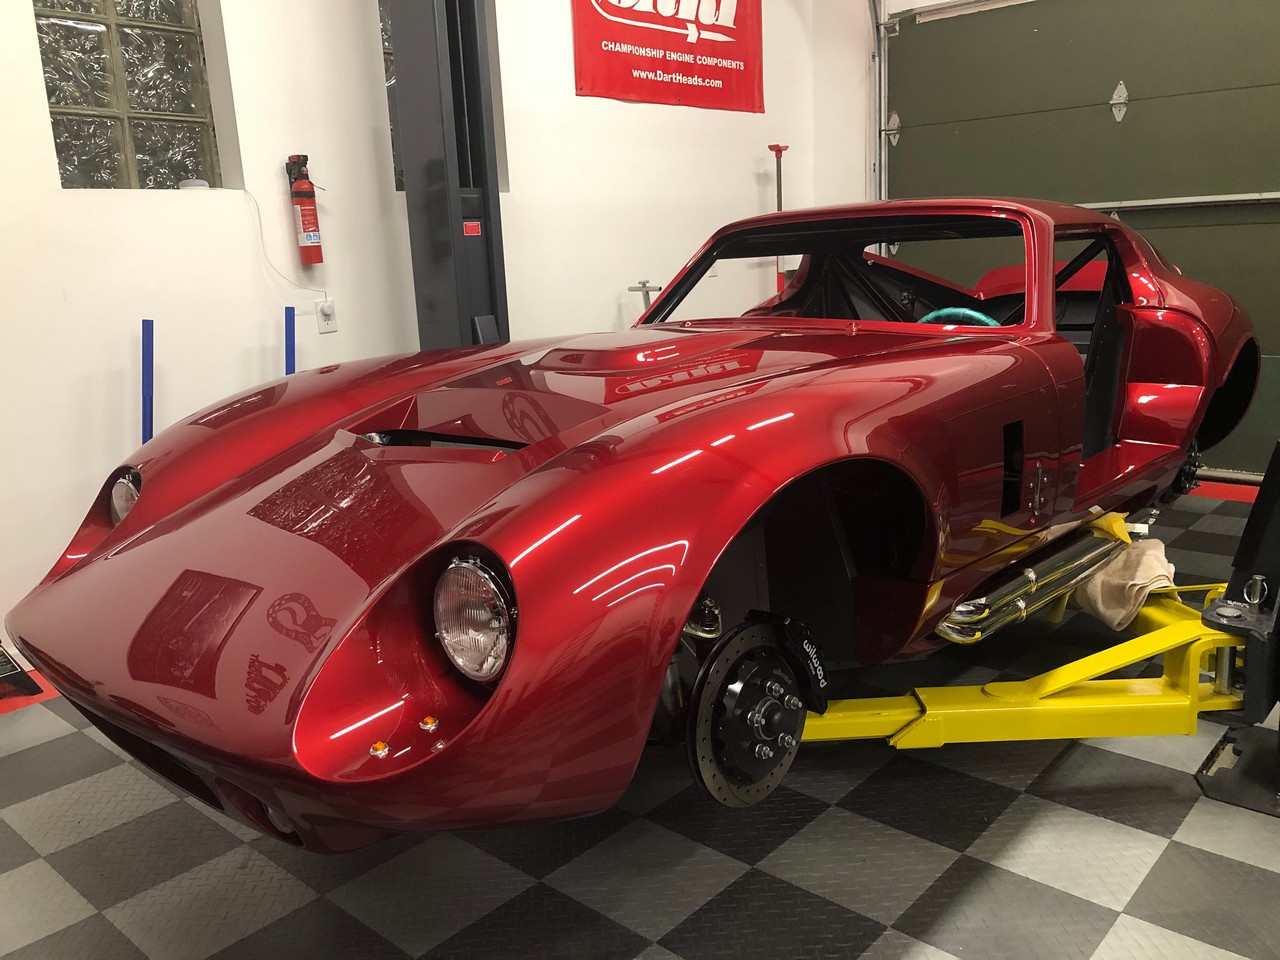
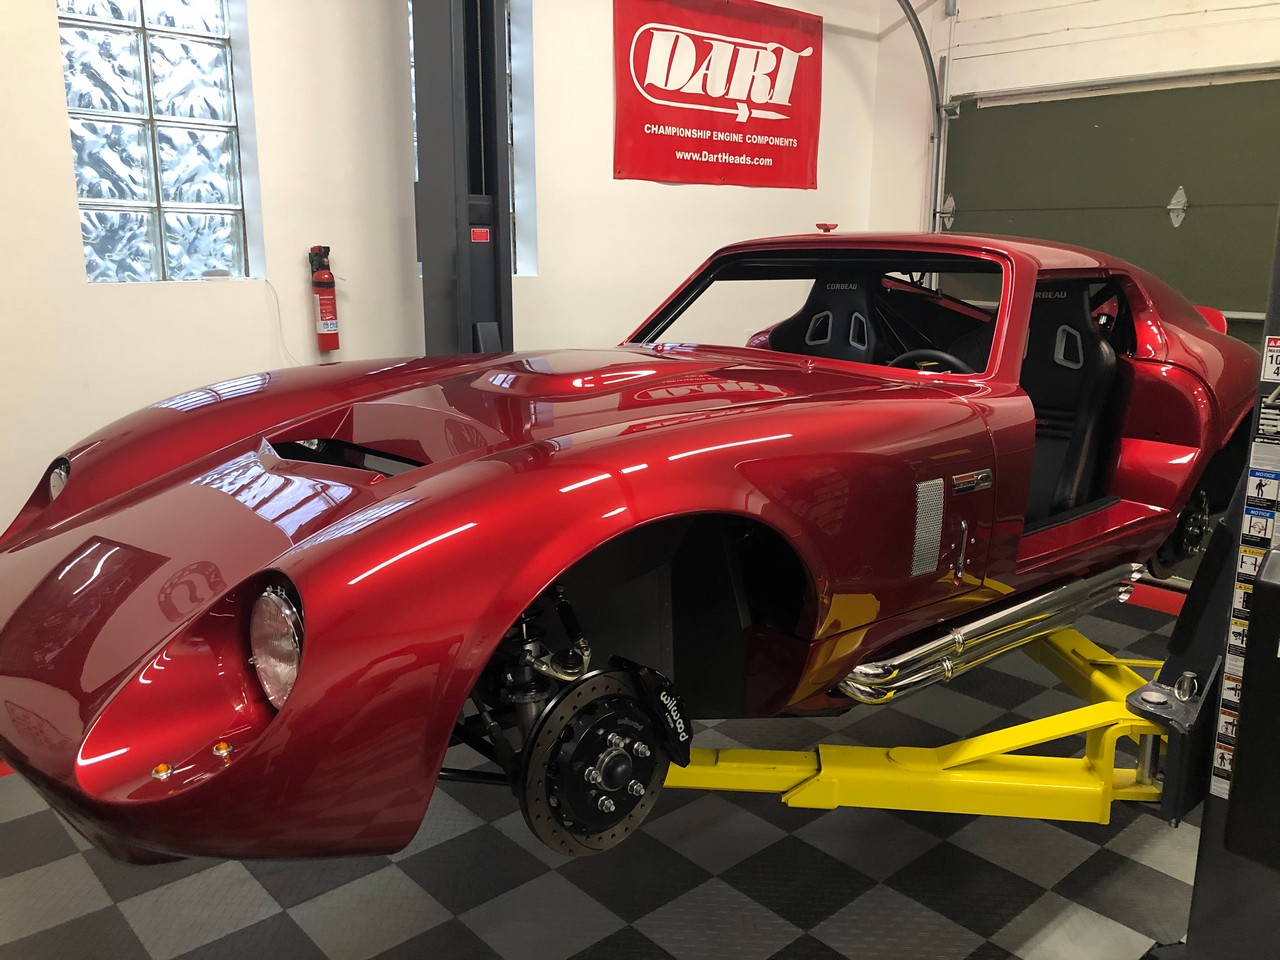
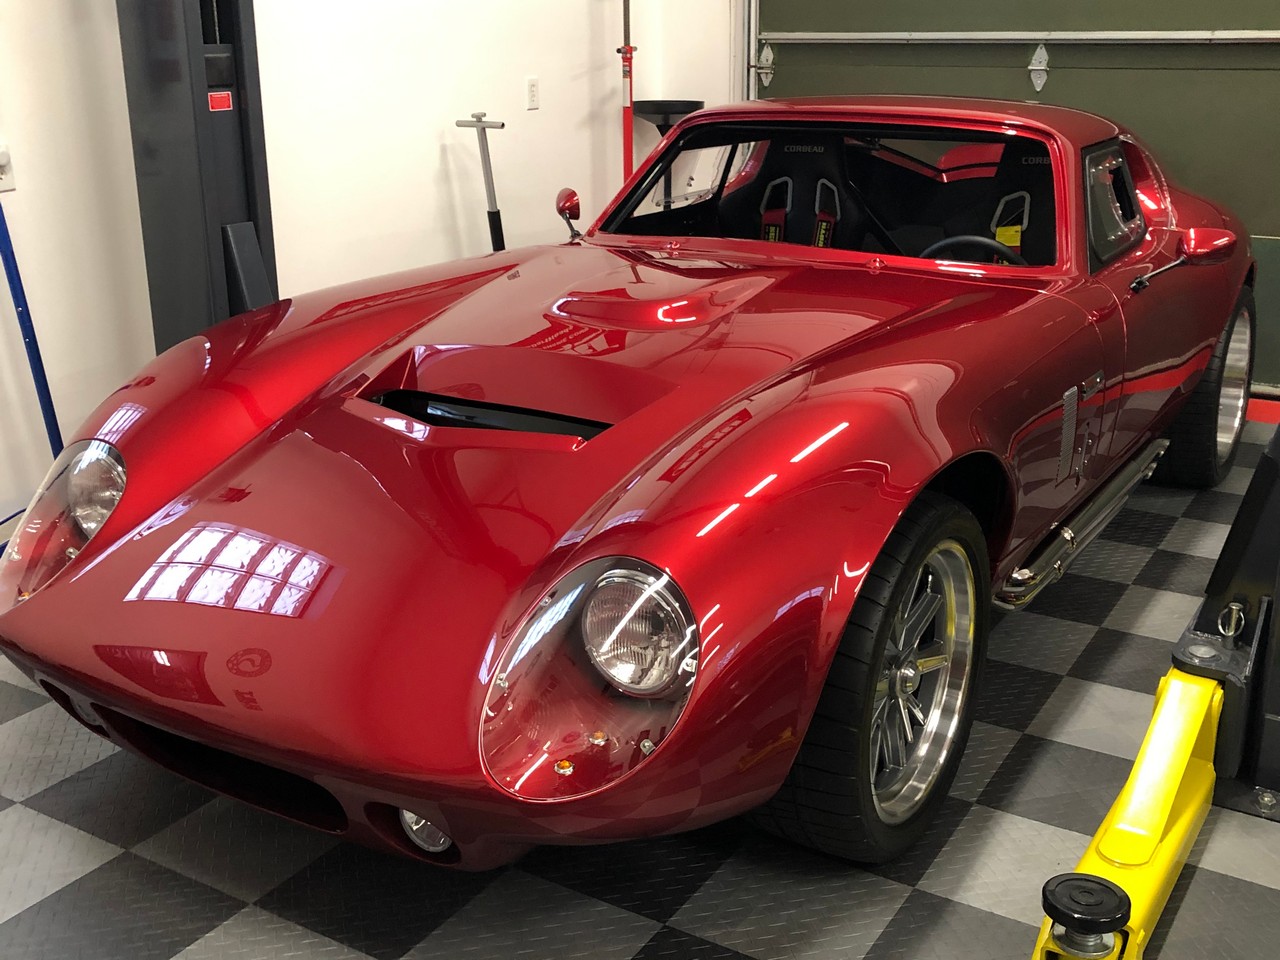
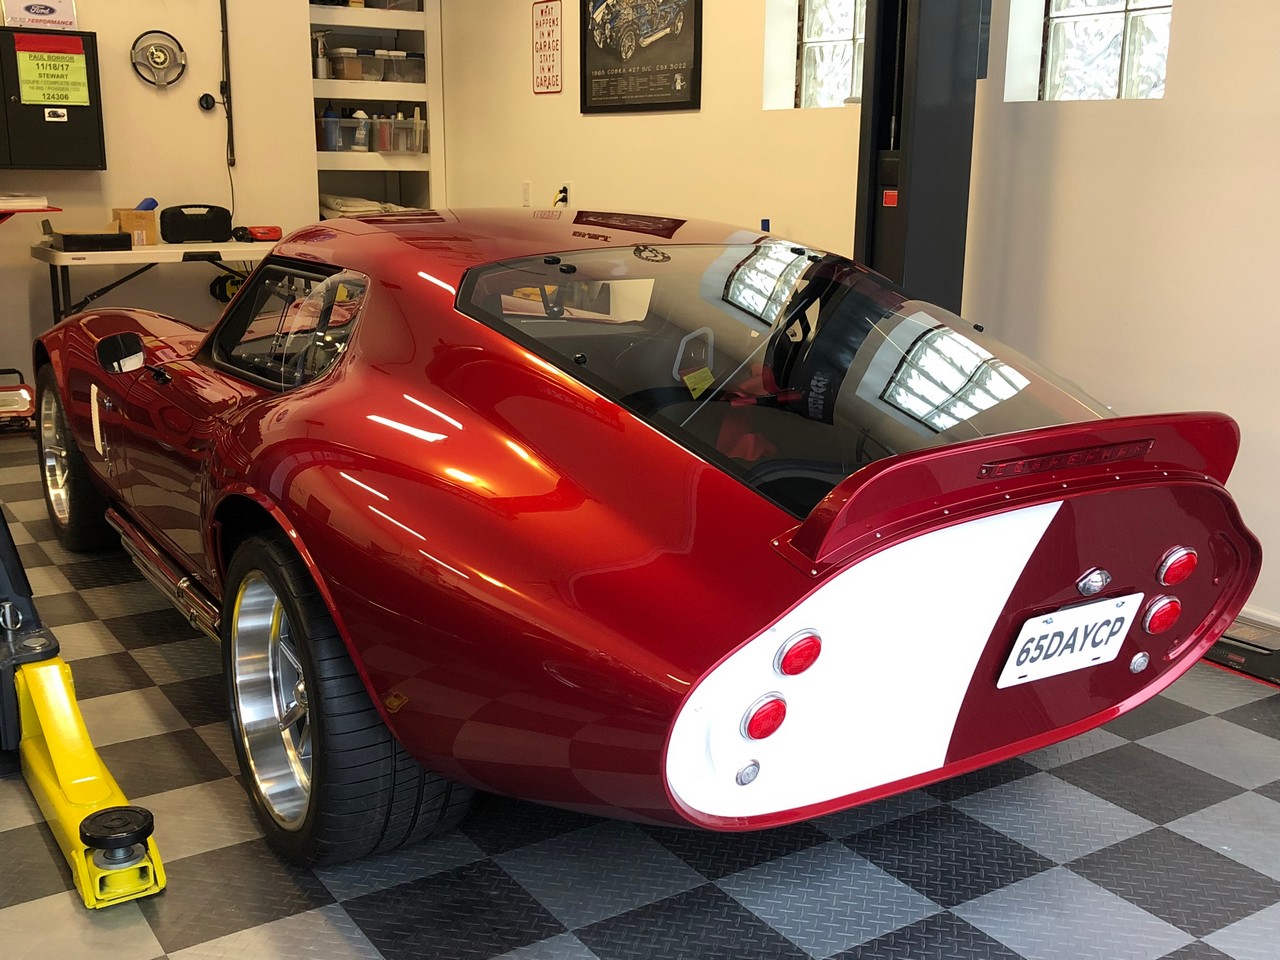
One of my big goals for this build was to enter it into the 2020 Detroit Autorama. I’ve done this show with each of my builds, and even though a lot of work it’s something I enjoy doing. January 15 is the due date for the application, so I’ve been thrashing to get this far enough along for pictures and the completed application. As of earlier today, the application is in the mail. With seven weeks to go, I should have plenty of time to complete the details that aren’t showing in the pics. Including the missing windshield which clearly is visible. These are what I sent with my application. Would have liked to take the exterior pics outside. Less cluttered and better light. But cold with snow on the ground now. So these will have to do. First time off the lift since back in the shop from paint. Man, can't wait to drive this thing.


Build 1: Mk3 Roadster #5125. Sold 11/08/2014.
Build 2: Mk4 Roadster #7750. Sold 04/10/2017.
Build Thread
Build 3: Mk4 Roadster 20th Anniversary #8674. Sold 09/07/2020.
Build Thread and
Video.
Build 4: Gen 3 Type 65 Coupe #59. Gen 3 Coyote. Legal 03/04/2020.
Build Thread and
Video
Build 5: 35 Hot Rod Truck #138. LS3 and 4L65E auto. Rcvd 01/05/2021. Legal 04/20/2023.
Build Thread. Sold 11/9/2023.
-
01-08-2020, 04:32 PM
#829
Have you considered painting a black stripe around the interior perimeter of the headlight covers? That would hide the mounting tabs and clean up nicely. Switch to black fasteners when you go back for the RTV and the average Joe may not even know theyre on the car.
-
Post Thanks / Like - 1 Thanks, 0 Likes
-
01-08-2020, 05:10 PM
#830
Steve >> aka: GoDadGo
Best In Class & Likely Best In Show Will Be Yours Again!
Fantastic Work As Usual Sir Paul; Simply Fantastic!
Steve
-
Post Thanks / Like - 1 Thanks, 0 Likes
-
01-08-2020, 05:19 PM
#831
Senior Member
Originally Posted by
Jake From State Farm
Have you considered painting a black stripe around the interior perimeter of the headlight covers? That would hide the mounting tabs and clean up nicely. Switch to black fasteners when you go back for the RTV and the average Joe may not even know they’re on the car.
Thanks for your suggestions. Cleaned up and polished, I really don’t mind the clips. They kind of blend in with the bright work on the headlights and smaller lights. I considered painting them black, but they would have still been completely visible. Don’t really want the look of a black border, or whatever that might do to the headlights shining through.
Build 1: Mk3 Roadster #5125. Sold 11/08/2014.
Build 2: Mk4 Roadster #7750. Sold 04/10/2017.
Build Thread
Build 3: Mk4 Roadster 20th Anniversary #8674. Sold 09/07/2020.
Build Thread and
Video.
Build 4: Gen 3 Type 65 Coupe #59. Gen 3 Coyote. Legal 03/04/2020.
Build Thread and
Video
Build 5: 35 Hot Rod Truck #138. LS3 and 4L65E auto. Rcvd 01/05/2021. Legal 04/20/2023.
Build Thread. Sold 11/9/2023.
-
01-08-2020, 05:22 PM
#832
Senior Member
Originally Posted by
GoDadGo
Best In Class & Likely Best In Show Will Be Yours Again!
Fantastic Work As Usual Sir Paul; Simply Fantastic!
Steve
Thanks Steve. If you’re talking about Autorama, there are several thousand cars plus the millions invested Ridler award entrants. Way out of my league, and pocketbook to say the least. I’ll be very happy with whatever recognition I get in my class.
Build 1: Mk3 Roadster #5125. Sold 11/08/2014.
Build 2: Mk4 Roadster #7750. Sold 04/10/2017.
Build Thread
Build 3: Mk4 Roadster 20th Anniversary #8674. Sold 09/07/2020.
Build Thread and
Video.
Build 4: Gen 3 Type 65 Coupe #59. Gen 3 Coyote. Legal 03/04/2020.
Build Thread and
Video
Build 5: 35 Hot Rod Truck #138. LS3 and 4L65E auto. Rcvd 01/05/2021. Legal 04/20/2023.
Build Thread. Sold 11/9/2023.
-
01-08-2020, 09:00 PM
#833
Steve >> aka: GoDadGo
Originally Posted by
edwardb
Thanks Steve. If you’re talking about Autorama, there are several thousand cars plus the millions invested Ridler award entrants. Way out of my league, and pocketbook to say the least. I’ll be very happy with whatever recognition I get in my class.
I'm just not a big fan of the over the top show cars so you'll get my vote.
Elegant Form With Excellent Function Is What You Do Best!
Good Luck & Hope You Do Well!
-
Post Thanks / Like - 1 Thanks, 1 Likes
-
01-08-2020, 10:14 PM
#834
"Once I’m pretty sure nothing will be coming apart soon, I’ll use a little RTV on the threads to make sure they don’t vibrate loose. Don’t ever use Loctite around acrylic."
Thanks, Paul! Another of those little nuggets of knowledge that show up so frequently in your comments. I'm learning to read everything you post, just because I seem to learn something new each time. Keith
-
Post Thanks / Like - 1 Thanks, 0 Likes
-
01-08-2020, 10:25 PM
#835
The car is looking better each day. Your attention to detail amazes me. Beautiful.
Last edited by CTHiker52; 01-08-2020 at 10:31 PM.
-
Post Thanks / Like - 1 Thanks, 0 Likes
-
01-08-2020, 11:00 PM
#836
I just got my Russel sil plates and platoon covers. Amazing. quality.
Your car looks awesome. I have learned a lot from your build. thank you
Nelson
-
Post Thanks / Like - 1 Thanks, 0 Likes
-
01-09-2020, 09:48 PM
#837
Senior Member

Paul,
Car looks great. One thing to think about is making a black border on your 1/4 windows. Will make a a more finished look.
Good luck at Autorama
John
-
01-09-2020, 10:44 PM
#838
Senior Member
Originally Posted by
John Dol
Paul,
Car looks great. One thing to think about is making a black border on your 1/4 windows. Will make a a more finished look.
Good luck at Autorama
John
Thanks. Do you have a picture of what you're talking about? Every Coupe I've seen, including the ones at Factory Five and in their gallery pictures, haven't done anything with the acrylic scoop. If that's what you mean.
Build 1: Mk3 Roadster #5125. Sold 11/08/2014.
Build 2: Mk4 Roadster #7750. Sold 04/10/2017.
Build Thread
Build 3: Mk4 Roadster 20th Anniversary #8674. Sold 09/07/2020.
Build Thread and
Video.
Build 4: Gen 3 Type 65 Coupe #59. Gen 3 Coyote. Legal 03/04/2020.
Build Thread and
Video
Build 5: 35 Hot Rod Truck #138. LS3 and 4L65E auto. Rcvd 01/05/2021. Legal 04/20/2023.
Build Thread. Sold 11/9/2023.
-
01-10-2020, 10:56 AM
#839
Paul,
Looks great.
And I "owe" you this. The engine cover looks really good too.
Jim
-
Post Thanks / Like - 0 Thanks, 1 Likes
-
01-10-2020, 11:05 AM
#840
Originally Posted by
edwardb
Paul,
The mirrors look really sporty. Are those part of the kit? Also, probably a really dumb question, how do you open the doors -- assume you have to reach inside to use the latch?
The car is amazing and is giving me bad (expensive) thoughts. 
Dave
-
Post Thanks / Like - 0 Thanks, 1 Likes


 Thanks:
  Likes:


 Reply With Quote


