Boig Motorsports

Visit our community sponsor

Thanks Thanks:  224
Likes Likes:  220
Page 26 of 30 FirstFirst ... 162425262728 ... LastLast
Results 1,001 to 1,040 of 1166

Thread: Edwardb’s Gen 3 Type 65 Coyote Coupe #59 Build: 5,000 Mile Report

  1. #1001
    Junior Member
    Join Date
    Jul 2011
    Posts
    11
    Post Thanks / Like
    Do you have a drawing for the wheels plates? Also I didn't a part number for the wheels. What part number did you buy for the wheels. Thanks in advance.

  2. #1002
    Senior Member edwardb's Avatar
    Join Date
    Feb 2011
    Location
    Lake Orion, Michigan
    Posts
    10,568
    Post Thanks / Like
    Quote Originally Posted by pumpman View Post
    Do you have a drawing for the wheels plates? Also I didn't a part number for the wheels. What part number did you buy for the wheels. Thanks in advance.
    My wheels are the standard 18" Halibrand style: https://www.factoryfiveparts.com/158...eplica-wheels/. I assume you're asking about the wheel spacers I put on the rear wheels? Very common on these builds with the standard wheels. No, I don't have any drawings. They're Eibach 90.4.25.010.3 Pro-Spacer Wheel Spacer Kit, 25mm (1 inch), 70.50mm diameter, 1/2-20 thread size. Fit and work perfectly. Pictured here if that helps.

    Build 1: Mk3 Roadster #5125. Sold 11/08/2014. Build 2: Mk4 Roadster #7750. Sold 04/10/2017. Build Thread
    Build 3: Mk4 Roadster 20th Anniversary #8674. Sold 09/07/2020. Build Thread and Video. Build 4: Gen 3 Type 65 Coupe #59. Gen 3 Coyote. Legal 03/04/2020. Build Thread and Video
    Build 5: 35 Hot Rod Truck #138. LS3 and 4L65E auto. Rcvd 01/05/2021. Legal 04/20/2023. Build Thread. Sold 11/9/2023.

  3. #1003
    Junior Member
    Join Date
    Jul 2011
    Posts
    11
    Post Thanks / Like
    I apologize what I meant was for the hood latch. I was looking at the thread that you showed how you made the brackets and skate wheels to help with the closing of the hood.

  4. #1004
    Senior Member edwardb's Avatar
    Join Date
    Feb 2011
    Location
    Lake Orion, Michigan
    Posts
    10,568
    Post Thanks / Like
    Quote Originally Posted by pumpman View Post
    I apologize what I meant was for the hood latch. I was looking at the thread that you showed how you made the brackets and skate wheels to help with the closing of the hood.
    No problem. I was asked about that previously and did these tracings of my prototype parts. Which I used to make the final ones out of thicker material. Not the best, but should get you started. There is definitely some customization and fitting required.
    Attached Files Attached Files
    Build 1: Mk3 Roadster #5125. Sold 11/08/2014. Build 2: Mk4 Roadster #7750. Sold 04/10/2017. Build Thread
    Build 3: Mk4 Roadster 20th Anniversary #8674. Sold 09/07/2020. Build Thread and Video. Build 4: Gen 3 Type 65 Coupe #59. Gen 3 Coyote. Legal 03/04/2020. Build Thread and Video
    Build 5: 35 Hot Rod Truck #138. LS3 and 4L65E auto. Rcvd 01/05/2021. Legal 04/20/2023. Build Thread. Sold 11/9/2023.

  5. #1005
    Junior Member
    Join Date
    Jul 2011
    Posts
    11
    Post Thanks / Like
    Thank you.

  6. #1006
    Junior Member
    Join Date
    Jul 2011
    Posts
    11
    Post Thanks / Like
    BTW I finally got my PCM back from Ford and there were some errors. The fixed them and sent it back and started right up this weekend. There were total of 7 errors and they could not tell me how this happened either.

  7. Likes edwardb liked this post
  8. #1007
    Senior Member
    Join Date
    Feb 2020
    Location
    Chicago
    Posts
    215
    Post Thanks / Like
    Quote Originally Posted by edwardb View Post
    This week of the build I’ve been jumping from one thing to the next, and seemingly not making a lot of progress. But in hindsight I guess (hopefully) I have. Focusing on trying to get everything in the engine compartment done. Completed the connection from the fuel regulator to the engine. But radiator hoses, heater hoses, A/C hoses, PS hoses, PCV hoses, and the last of the Coyote wiring still remain. To do it right, at least in my view, no one thing can be taken alone. Often they try to occupy the same space, which in some cases is limited. Also trying to do it as neat and orderly as possible of course.

    The first thing was after getting the engine and headers installed, I started having second thoughts about the PCM location. Plain and simple, the headers were closer than I anticipated. After more sitting and staring, and comparing to where the PCM is mounted in #8674, decided to ask my contact at Ford about it. The response I got back wasn’t a surprise, but wasn’t what I wanted to hear. “Too close for comfort” was the official response. Including from some technical guys that were asked about it and shown pictures. I posted pictures earlier in the build thread, so won’t again. But basically it was mounted vertically in front of the passenger side footbox. With it up as high as it could go (limited by the cowl) the bottom edge of the PCM was less than 2 inches from the nearest header pipe. I could flip it over, with the wiring end down, and the PCM was probably an acceptable distance. But then the wire harness and connectors would be similarly close to the headers. Probably even more likely to be at risk. Played around with some ideas to make a heat shield, but finally concluded this orientation wasn’t going to work. I want to get this right the first time, and clearly the mounting I had before was a bad idea.

    Short of tearing the engine harness apart, which I’ve said before I just don’t want to do, the large harness and connector coming off the engine to the PCM is the major factor determining the PCM location. So needed to figure out a new mounting in that same general area. The answer became pretty obvious that the PCM needed to be flat on top of the frame in front of the footbox. But it has to stay behind the front splash guards and also the gas strut that holds the cowl up when open. Turns out there’s just enough space in that location to mount it there. Means the heater and A/C hoses around the footbox will need to be re-routed a bit. But I can make it work. The guys at Ford liked my new location. It’s around 12 inches from the headers, much of the underside blocked by the frame, mounting, and footbox. And the heat sinks on the unit point up. Should like it there just fine. Actually further from the headers than the typical Roadster installation including #8674. This general area, with (obviously) the wiring routed and tied down when done:


    So, designed and fabricated a mounting bracket from 3/16-inch thick aluminum. Actually, harvested from my #7750 Roadster build where the original owner thought the footboxes needed full 3/16-inch sheet floors. I removed and that material just keeps giving and giving. The mounting bracket is riveted to the frame, with 5/16-18 threads tapped into the bracket and frame on one side and the bracket and a second layer of 3/16-inch thick aluminum on the other side. Added some high-temp silicone rubber sheet pads under the PCM mounting ears, and I think it’s all set. It would be real easy to add a heat shield under the PCM. But unless it turns out to be a problem (I doubt it) thinking it's more important for it to have free airspace. So won't for now.

    Installed bracket looks like this:


    With the PCM attached looks like this:


    The heater control valve doesn’t move, but the hoses from the inside unit will need to come out from the side instead of the top. The A/C hoses from the inside unit will also need to be slightly re-routed, including replacing that #10 hose connection (top one LH side) from a 90-degree fitting to a 45-degree fitting. It’s on the way. I’m also in the process of re-wrapping that large cable from the engine. Just the visible part from the top corner of the head to the PCM using convolute and harness wrap like all the other wiring. That should clean things up a bit. I’m planning to add extensions to the engine cover to hide more of what’s visible from there back.

    With that finally done, now to finalize the other two connections to the PCM. The leg from the PDB I had already reworked and it’s fine. The third connection is for the O2 sensors. Interesting. The Gen 1 Coyote had the O2 wires built into the main control pack harness. The Gen 2 Coyote Ford moved them to the stock engine harness. For the Gen 3 they’re back off the engine harness and now have their own dedicated harness connection to the PCM. With a couple challenges. The harness has four O2 sensor connections, duplicating the OE setup with upstream UEGO connectors in the exhaust collectors (the ones we use) and a second set of downstream connectors that are after the cats which we don’t typically install. A call to Ford early in the game said downstream connectors aren’t active in the crate motor program so clip the legs off or tie out of the way. Upon further review now that the PCM is located, found the required connections for the two upstream sensors aren’t remotely close to the right configuration or length. The RH side is way too long, the LH is way too short, all on the end of large single leg. Not very usable IMO. If you want to see what the supplied harness looks like, it’s on page 10 of the Gen 3 control pack instructions. https://performanceparts.ford.com/do...-6017-M50B.PDF

    So, to make it a clean sweep, since I’ve re-worked all the other harnesses, stripped off all the harness wrap and convolute. There’s only one wire (power) that’s common to all the connections. The rest are discrete right to the PCM connector. So, clipped off the downstream wires at the connector and they’re both gone. Then, shortened the RH upstream side and while I was at it lengthened the LH upstream side. Note I could have used a standard 24-inch extension for the LH side and it would have worked fine. But figured since I had it all apart anyway, just hard wire the added length and be done with it. Then joined the common power wires and wrapped it back up. Now looks like this. Just a little different.


    I measured and ordered the PS hoses and connectors I need from Breeze. Should be here any day. Ordered and received a Mastercool 71550 A/C Hose Crimper. It’s the one recommended in the Factory Five instructions if you want to make the A/C hoses yourself. I do. Interesting tool and will be a new experience. Waiting for a few other parts to arrive early next week and should have everything I need to complete all the connections in the engine compartment.

    Free unsolicited editorial comment: This all sounds a little complicated, and maybe it is. But if you’re experienced with stuff like this, probably you are completing in less time than I’m spending doing these updates. If you’re not experienced, probably it seems a little intimidating. Maybe especially the Coyote part. But between the Gen 3 Coupe and the Gen 3 Coyote, much of this is pretty new. I’m learning myself on some of this as I go. As the saying goes, just take it one bite at a time.

    Edward, for the DS O2 sensor, what size wire was used to extend the cable to reach, I see you cut and lengthened it.

    Thanks

  9. #1008
    Senior Member edwardb's Avatar
    Join Date
    Feb 2011
    Location
    Lake Orion, Michigan
    Posts
    10,568
    Post Thanks / Like
    Quote Originally Posted by jiriza84641 View Post
    Edward, for the DS O2 sensor, what size wire was used to extend the cable to reach, I see you cut and lengthened it.

    Thanks
    No choice but to make the cable longer. Not sure who designed the harness, but can't think of a single installation where the standard harness would reach. Choices are pre-made extensions (like Casper's Electronics) or add wire to the existing harness. Which is what I did. Sorry I don't remember the gauge of the wire. I duplicated what was already in the cable with standard hookup wire. I use this chart to measure and count the conductors. I don't (usually...) guess. https://www.delcity.net/images/lined...0Reference.pdf. Also, just to confirm, I only extended the harness leg. Not the pigtail on the O2 sensor itself. Both the insulation and conductor are something other than standard hookup wire. Not friendly to work with. I know from a previous build.
    Build 1: Mk3 Roadster #5125. Sold 11/08/2014. Build 2: Mk4 Roadster #7750. Sold 04/10/2017. Build Thread
    Build 3: Mk4 Roadster 20th Anniversary #8674. Sold 09/07/2020. Build Thread and Video. Build 4: Gen 3 Type 65 Coupe #59. Gen 3 Coyote. Legal 03/04/2020. Build Thread and Video
    Build 5: 35 Hot Rod Truck #138. LS3 and 4L65E auto. Rcvd 01/05/2021. Legal 04/20/2023. Build Thread. Sold 11/9/2023.

  10. #1009
    Senior Member Alphamacaroon's Avatar
    Join Date
    Jan 2019
    Location
    Richland, WA
    Posts
    457
    Post Thanks / Like
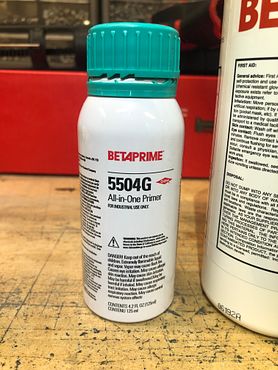
    Paul, quick question on your windshield install: I see that you used Dow primer— approximately how much did it require? Thanks!
    Last edited by Alphamacaroon; 11-02-2020 at 02:43 PM.
    Cheers,

    --jim

    Build 1: Gen III Type 65 Coupe, Gen II Coyote

  11. #1010
    Senior Member edwardb's Avatar
    Join Date
    Feb 2011
    Location
    Lake Orion, Michigan
    Posts
    10,568
    Post Thanks / Like
    Quote Originally Posted by Alphamacaroon View Post
    Paul, quick question on your windshield install: I see that you used Dow primer— approximately how much did it require? Thanks!
    I used most of a 4.2 oz bottle of Dow Black Betaprime 5504G. Did the frit (took a couple coats) and also around the body opening.

    Build 1: Mk3 Roadster #5125. Sold 11/08/2014. Build 2: Mk4 Roadster #7750. Sold 04/10/2017. Build Thread
    Build 3: Mk4 Roadster 20th Anniversary #8674. Sold 09/07/2020. Build Thread and Video. Build 4: Gen 3 Type 65 Coupe #59. Gen 3 Coyote. Legal 03/04/2020. Build Thread and Video
    Build 5: 35 Hot Rod Truck #138. LS3 and 4L65E auto. Rcvd 01/05/2021. Legal 04/20/2023. Build Thread. Sold 11/9/2023.

  12. #1011
    Senior Member Alphamacaroon's Avatar
    Join Date
    Jan 2019
    Location
    Richland, WA
    Posts
    457
    Post Thanks / Like
    Quote Originally Posted by edwardb View Post
    I used most of a 4.2 oz bottle of Dow Black Betaprime 5504G. Did the frit (took a couple coats) and also around the body opening.

    Thanks much! Wasn't sure if one bottle would be enough, but it sounds like it's close enough.
    Cheers,

    --jim

    Build 1: Gen III Type 65 Coupe, Gen II Coyote

  13. #1012
    Member
    Join Date
    Jul 2020
    Posts
    69
    Post Thanks / Like
    Thought I’d chime in on the mirrors. I looked at the photo the link took me to and think the mirrors look identical to what Honda uses on the VFR800. Ive purchased a couple pair and will have to see how they work.

  14. #1013
    Senior Member edwardb's Avatar
    Join Date
    Feb 2011
    Location
    Lake Orion, Michigan
    Posts
    10,568
    Post Thanks / Like

    First season recap and adjustments

    With snow, ice, and salt on the roads as of several weeks ago, driving season is officially over in Michigan. Made it almost to the end of November. So, no complaints.

    Officially did 1,943 miles in the first season. Given the very slow start due to stay at home orders, I’m happy with that. We couldn’t be more pleased with the Coupe. Draws major attention everywhere it goes. I’ve gotten very used to it and like it a lot. Love driving it. Everything about it is working great. In hindsight, happy with the build choices. My wife appreciates the creature comforts and rode a lot of those miles with me. We started the season with both the Roadster and the Coupe. But after almost always choosing the Coupe when going out, sold the Roadster to make room for another build as mentioned before. Ordered the ’35 Ford Truck for the next project, and now using the time until it’s delivered to check over the Coupe and get it serviced and ready for next season.

    First up changed the oil and filter. Straightforward and no surprises. It used very little oil in the miles driven. Oil looked relatively clean still. Almost nothing on the magnetic drain plug. All good. Put grease in all the zerks on the chassis. I did change out a couple to 45 and 90 degree fittings to improve access. Specifically the inner pivots on the front UCA’s, and the rear lower pivots on the front LCA’s. In those locations, the frame gets in the way and these angled fittings make it a lot easier.

    Checked all the suspension bolts and no surprises. All tight. Specific attention to the witness marks on the IRS axle nuts, IRS adjusters, and front upper ball joints. Nothing moved. Took the wheels off and looked over the brakes carefully. All good with plenty of pad left. The one thing I did find was the bolt holding the alternator belt idler pulley was backed almost all the way out. Hanging on by just a couple threads. Fortunately, the idler has a step where it sits on the front timing cover and it stayed in place. Pretty lucky I think. Installing the idler pulley was part of the alternator installation. So yours truly apparently didn’t properly tighten. Added some blue Loctite and it’s tight now.

    Of course can’t get it up on the lift and not clean everything up. Top and bottom. Looks pretty much brand new everywhere now. Touched up 4-5 stone chips on the nose. Also touched up some scratches on the underside of the nose where I managed to tangle with a parking lot bumper at a local A&W drive-in on one of our very first drives. Grr… Not perfect, but basically gone now. Definitely takes a little adjustment to how long that nose is. Once done with body clean-up and touch-up, applied a fresh coat of Adams ceramic coat. I had put some on earlier in the year. Like it OK but not sure how much better it is than a high quality wax.

    Couple of open items still. On my very last cruise of the year, after pulling into the garage found some clear oil on the ground at the front RH corner. Not a lot but still obviously unexpected. Was in the general area of the upper A/C connection to the condenser. So thinking it was oil from the A/C system leaking in the area of the hose crimp to the connector. Put the gauges on the system and both static and running pressures are all normal. A/C seems to be working properly with the right amount of temperature drop. Logically, doesn’t seem it would leak oil but not R134a refrigerant. Checked a little further and the upper gas shock end is also in that area. Read through some literature and those do have some oil in them. Removed both shocks and both seem to have the same resistance and no signs of any leaks. So for now this is still a mystery. I haven’t ruled out an A/C leak. I’m going to put some dye in the A/C system and check with a UV light. The other open item I have is I had to send my Digital Guard Dawg module back for a re-flash. A combination of user error (that’s me) programming a keyfob which clears all keyfobs (!!) and then found my emergency code no longer worked. After talking to them, said the only solution was to re-flash the module. A little disappointing. But I did find out my dash setup allowed me to remove the gauge cluster and extract the module without too much drama. Waiting for it to come back and put things back together.

    Last point I’ll mention is my attempt to quiet things down. I’ve mentioned repeatedly that the one regret I have with the build was not better insulating the body area below the doors and in the area of the side pipes. With how close the side pipes are and tucked in, I’m convinced that contributes to noise inside the cockpit. There’s open area between the chassis and the body, and this area should have additional insulation applied IMO. I have the two layers of Lizard Skin and carpet on the inside. But more on the outside should be a good thing. I thought about trying to spray some expanding foam in there. But I have very little experience with that material. One of my home projects this year was repairing a rotted door frame and sill on one of our outside doors. In the process used expanding foam for the first time. It did OK for that purpose. But really wasn’t excited about spraying it inside the body. So did some research, and found the trick material for something like this is Mass Loaded Vinyl or MLV for short. So bought one 24 x 0.25 x 54 inch sheet of Second Skin Luxury Liner Pro MLV. Working through the hole in the front of the rear wheel well, I was able to get a strip of MLV inside the chassis cross pieces and against the cockpit sheet metal down the whole side. Then another strip along the top of the side pipe area on the inside of the body. Finally, another small piece up in the front by the foot boxes. Was a little like building a ship in a bottle but managed to get all the pieces in. The MLV doesn’t have any adhesive. I used some Sikaflex-221 I had on hand.

    Once those pieces were in place, I decided to go one step further and plug that opening in the rear wheel well. Maybe that would help with sound too? At the very least, cut down on the amount of gravel and dirt that ends up inside there. So followed my usual practice of making a cardboard pattern and then .040 aluminum. Used small bulb seal. Held in place with two 10-32 screws into tapped holes in the frame. After these pictures and before final assembly, put UPOL Raptor on the outside and a piece of the MLV insulation on the inside. Really cleans up the area if nothing else.


    Ran the engine some and hard to say there’s any difference in the sound level. We’ll see when it’s driving season again. At the very least, I can say I tried to do something. That’s mostly it for the Coupe for now. My truck delivery has been delayed by the big snowstorm in the east. It’s in the trailer and on the way. But delayed in NH. Still hoping to be here by Christmas. Speaking of that, Merry Christmas and Happy New Year to all. May next year bring some improvements over 2020. Wouldn’t be hard.
    Last edited by edwardb; 12-18-2020 at 07:10 AM.
    Build 1: Mk3 Roadster #5125. Sold 11/08/2014. Build 2: Mk4 Roadster #7750. Sold 04/10/2017. Build Thread
    Build 3: Mk4 Roadster 20th Anniversary #8674. Sold 09/07/2020. Build Thread and Video. Build 4: Gen 3 Type 65 Coupe #59. Gen 3 Coyote. Legal 03/04/2020. Build Thread and Video
    Build 5: 35 Hot Rod Truck #138. LS3 and 4L65E auto. Rcvd 01/05/2021. Legal 04/20/2023. Build Thread. Sold 11/9/2023.

  15. Likes James Morse, Geoff H liked this post
  16. #1014
    Senior Member Nigel Allen's Avatar
    Join Date
    Oct 2012
    Location
    South Australia
    Posts
    503
    Post Thanks / Like
    Merry Christmas to you and everyone else on the forum. All the sharing of knowledge and ideas has been appreciated greatly again this year.

    Got great weather down here at the moment, so will be putting a few miles on over the holidays.

    Looking forward to 2021.

    Cheers,

    Nigel
    Mk.4 FFR supplied Right hand drive
    Received 12/2012 completed 12/2019
    Gen1 Coyote / TKO600 / IRS
    Lots of mods to make compliant for Australian design rules

  17. Thanks edwardb thanked for this post
  18. #1015
    Senior Member edwardb's Avatar
    Join Date
    Feb 2011
    Location
    Lake Orion, Michigan
    Posts
    10,568
    Post Thanks / Like

    Follow-up and down for the winter

    A quick note of follow-up from my previous year-end posts.

    - The Digital Guard Dawg keyless system is back together and now a closed topic. But not without some drama. After sending my module back and not hearing anything for a couple weeks, called to see what was happening. Was told it just needed a re-flash but the person who did that was out for medical reasons. Plus they had a general shortage of help from COVID. (They're in California.) Not to mention all during the holidays. After some further back and forth and a little more time, they sent me a brand new module and new keyfobs. Works perfectly, and even though not terrible I hope to not take the dash apart again. Kudos to Digital Guard Dawg for stepping up and backing their product and service. Even though I might have been a little more impatient if it was actually driving season.

    - I injected some dye into the A/C system to see if I had any leaks and if that was the possible source of the small oil leak mentioned before. No surprise when nothing showed up around the suspected fittings. Or anywhere else. Didn't make sense to me that there could be an oil leak yet no drop in pressures in the system and it's working normally. I confirmed the dye is definitely in the system. The little window on the top of the receiver dryer glows like a signal light when hit with the UV flashlight. Along with my hands and anything that seemed to be close that stuff. Will continue to monitor.

    - Just taking the leak thing one step further, also put some dye in the power steering system to see if that could be the culprit. Different dye made for that purpose and glows a slightly different color. Nothing found there either. Since the oil I found (clear, and somewhat thick) was a one time thing so far, I'm going to bail on any further testing and just keep an eye on things. Cars leak occasionally (I guess...) but don't like it much. More importantly don't want anything bad to be wrong.

    - Since I had a little time waiting for the 35 truck kit to arrive, decided to check my front end alignment. Was curious to see if anything was different after a season of driving. Did find the RH camber was off three-tenths of a degree (-0.2 versus -0.5 desired) so fixed that. Was just a couple of flats turned on both UCA adjusters, and super easy with the open front cowl on the Coupe. Everything else checked OK, including after that minor adjustment. Assuming it drives OK and I don't see any unusual tire wear, not something I'll be checking very often. But nice to have the tools to do it myself.

    With that, and the arrival last week of my 35 truck kit, the Coupe is officially now hibernating and up on the RaceRamps FlatStoppers. Ready for spring when it chooses to arrive.
    Last edited by edwardb; 01-09-2021 at 02:49 PM.
    Build 1: Mk3 Roadster #5125. Sold 11/08/2014. Build 2: Mk4 Roadster #7750. Sold 04/10/2017. Build Thread
    Build 3: Mk4 Roadster 20th Anniversary #8674. Sold 09/07/2020. Build Thread and Video. Build 4: Gen 3 Type 65 Coupe #59. Gen 3 Coyote. Legal 03/04/2020. Build Thread and Video
    Build 5: 35 Hot Rod Truck #138. LS3 and 4L65E auto. Rcvd 01/05/2021. Legal 04/20/2023. Build Thread. Sold 11/9/2023.

  19. Likes BadAsp427 liked this post
  20. #1016
    Senior Member Alphamacaroon's Avatar
    Join Date
    Jan 2019
    Location
    Richland, WA
    Posts
    457
    Post Thanks / Like
    Paul, I think at one point you mentioned adding some retaining clips or some sort of anti-slip for your floor mats. Any chance you could share how you did that?
    Cheers,

    --jim

    Build 1: Gen III Type 65 Coupe, Gen II Coyote

  21. #1017
    Senior Member Alphamacaroon's Avatar
    Join Date
    Jan 2019
    Location
    Richland, WA
    Posts
    457
    Post Thanks / Like
    Quote Originally Posted by edwardb View Post
    A quick note of follow-up from my previous year-end posts.
    - Just taking the leak thing one step further, also put some dye in the power steering system to see if that could be the culprit. Different dye made for that purpose and glows a slightly different color. Nothing found there either. Since the oil I found (clear, and somewhat thick) was a one time thing so far, I'm going to bail on any further testing and just keep an eye on things. Cars leak occasionally (I guess...) but don't like it much. More importantly don't want anything bad to be wrong.
    One thought— could it be coolant? I had the same thing happen and when I touched it and smelled it I had no idea what it was— it did not smell like antifreeze, and had an oily feel to it. Then I remembered that I was using Evans waterless coolant for the first time, and that stuff does not feel or smell like traditional coolant at all. Are you using something like Evans?

    Since then I've been tracking down small coolant leaks all over the place (lots of extra opportunities for leaks with heater installed)— I've had to tighten all the hose clamps more than what I consider "normal" to get everything to stop.
    Last edited by Alphamacaroon; 03-12-2021 at 11:57 AM.
    Cheers,

    --jim

    Build 1: Gen III Type 65 Coupe, Gen II Coyote

  22. #1018
    Senior Member edwardb's Avatar
    Join Date
    Feb 2011
    Location
    Lake Orion, Michigan
    Posts
    10,568
    Post Thanks / Like
    Quote Originally Posted by Alphamacaroon View Post
    Paul, I think at one point you mentioned adding some retaining clips or some sort of anti-slip for your floor mats. Any chance you could share how you did that?
    Used these from Amazon. Pretty straightforward installation the rear corners of the floor mats. Work well. https://www.amazon.com/gp/product/B0...?ie=UTF8&psc=1

    Quote Originally Posted by Alphamacaroon View Post
    One thought— could it be coolant? I had the same thing happen and when I touched it and smelled it I had no idea what it was— it did not smell like antifreeze, and had an oily feel to it. Then I remembered that I was using Evans waterless coolant for the first time, and that stuff does not feel or smell like traditional coolant at all. Are you using something like Evans?

    Since then I've been tracking down small coolant leaks all over the place (lots of extra opportunities for leaks with heater installed)— I've had to tighten all the hose clamps more than what I consider "normal" to get everything to stop.
    Will be keeping an eye on this as the driving season starts back up hopefully soon. No signs of any leaks during winter hibernation.
    Build 1: Mk3 Roadster #5125. Sold 11/08/2014. Build 2: Mk4 Roadster #7750. Sold 04/10/2017. Build Thread
    Build 3: Mk4 Roadster 20th Anniversary #8674. Sold 09/07/2020. Build Thread and Video. Build 4: Gen 3 Type 65 Coupe #59. Gen 3 Coyote. Legal 03/04/2020. Build Thread and Video
    Build 5: 35 Hot Rod Truck #138. LS3 and 4L65E auto. Rcvd 01/05/2021. Legal 04/20/2023. Build Thread. Sold 11/9/2023.

  23. #1019
    Senior Member edwardb's Avatar
    Join Date
    Feb 2011
    Location
    Lake Orion, Michigan
    Posts
    10,568
    Post Thanks / Like
    Quick follow-up after my minor winter mods. First day of spring a couple days ago. For Michigan that doesn't always mean too much. Still the possibility for cold and snow weeks afterward. But last few days have been warm and nice and long term forecast looks promising. So Friday took the Coupe out for a short drive. Then yesterday drove it a bunch more. Probably 25-30 miles. It's hard to say how much. Or what exactly was the most effective. But I'm convinced the attempts to add some sound proofing described in post #1013 above made a difference. Driving is still an ear plug experience. But overall it's better. Just confirms to me that the area I described should be addressed in new builds when it's open and can be even more robust than what I did. New builders, take notice!

    I posted this on Facebook also. Took a real quick, short and shaky video with my iPhone during the first drive. This is holding the wheel and my phone with one hand while shifting and also steering with the other. I know, probably not the best practice... Not something I would normally do. But there's a principle for the first drive of the season plus a very small indication of the sound inside the cockpit. I wasn't pushing it at all. There are still several thousand RPM's available above these and it does get a lot louder. https://www.youtube.com/watch?v=2ssL...nel=PaulBorror. Also no signs of any leaks anywhere. So not sure what was going on during the last drives last year. But I'll take it. Will keep an eye on things of course. Let the 2021 driving season begin. Looking forward to London and the Factory Five Open House plus lots of local activities. Cancellations are highly discouraged! Hope to see a bunch of you out there.
    Last edited by edwardb; 03-22-2021 at 10:06 AM.
    Build 1: Mk3 Roadster #5125. Sold 11/08/2014. Build 2: Mk4 Roadster #7750. Sold 04/10/2017. Build Thread
    Build 3: Mk4 Roadster 20th Anniversary #8674. Sold 09/07/2020. Build Thread and Video. Build 4: Gen 3 Type 65 Coupe #59. Gen 3 Coyote. Legal 03/04/2020. Build Thread and Video
    Build 5: 35 Hot Rod Truck #138. LS3 and 4L65E auto. Rcvd 01/05/2021. Legal 04/20/2023. Build Thread. Sold 11/9/2023.

  24. Thanks frankeeski thanked for this post
    Likes P100DHG, frankeeski liked this post
  25. #1020
    Member Russwood's Avatar
    Join Date
    May 2021
    Location
    Oklahoma City, OK
    Posts
    82
    Post Thanks / Like
    Paul -

    First, I hope this doesn't sound corny, but I am a HUGE fan of your builds. I've read through them as a lurker before joining the Forum (in fact, this is my very first post). I've learned so many things from reading through all your build threads. Your attention to detail and creative solutions are brilliant. I'm looking forward to discovering other master builders and their work on this forum.

    I've been wanting to do a FFR build for a while, and have spent countless weekends researching, making spreadsheets, notes, budgets, etc. on how I want to do it. I've taken so long in fact, I've pretty much had to move my power plant from the Gen 2 Coyote to the Gen 3, simply because the Gen 2's are pretty much history if you want a crate version. I know I could build one from the ground up, but the improvements on the Gen 3 are too good to ignore IMO.

    So, not only will I be pretty much pirating most all of your ideas & solutions (all while giving you the well earned credit), I plan to assemble your build posts into a companion to the FFR manual. I'm surely not the first to do that. Fair warning - I may reach out to you for advice along the way - much thanks in advance.

    All that brings me to my questions.

    I'm traveling to Boston this month for vacation, and plan to make a day trip down to Wareham to visit the showroom (and hopefully the Covid restrictions will allow a factory tour as well - fingers crossed!). My most pressing reason is to sit in both the Roadster and the Coupe to see how my large frame fits, as well as to actually see the cars in person. I live in Oklahoma, and while I've seen a couple Roadsters on the street, I've not gotten the opportunity to see a FFR version in the flesh. I'm really looking forward to the visit.

    Sorry - I'm still wandering here. All along I've intended to build a Roadster first. It seems to be much simpler compared to the other kits, and I like the may variations that are possible. That said, I REALLY like the Coupe, but my concern is whether that's too ambitious for my first build. Now that you've built both "back to back", are my concerns real, or has FFR refined the Coupe kits to the point that there isn't so much of a gap? I've read in your build threads that you don't think the Coupe is as daunting as some have said, but do you think that your skills have become so sharp from building 3 Roadsters prior to the Coupe that the Coupe build seemed similar and therefore not as difficult as you thought? Just wondering if that may have influenced your conclusion in any way.

    I'm an electrician by trade, and have been in the industry since the early '90s. That background, along with growing up with a father and grandfather who both believed they could fix it better and cheaper than an auto shop (and usually did), has provided me with a better than average knowledge of mechanics, electrical systems (duh), and engines/equipment. I hope that didn't read as arrogant as it felt typing it, but my point is that I've got enough experience to wade into the deeper waters and not just go buy one of these cars.

    Honestly, I'm looking forward to the build as much as the finished product, and from what I've read on the forum, I'm not alone. I've got a 14 yr old son and a 24 yr old son-in-law that may be as excited as I am. That makes the build all the more appealing.

    I feel pretty confident that I will be successful at either build, but I'd like my first time to be as straight forward as possible.

    I guess I may have just answered my own question.

    Even so, I'd love to hear your unfiltered opinion. If you could imagine not having built a FFR kit before, based on your experience with both, am I nuts to be considering a Coupe right out of the gate?

    Thanks in advance for allowing me to pick your brain.

    --Russ

  26. #1021
    Senior Member edwardb's Avatar
    Join Date
    Feb 2011
    Location
    Lake Orion, Michigan
    Posts
    10,568
    Post Thanks / Like
    Thanks for the generous comments. Glad you find my build thread useful. I have fun doing these and appreciate the feedback. Just keep in mind a high percentage of what I show are personal opinions and choices. Not a lot of absolutes. But we love our finished Coupe. Very happy with the choices made.

    To your question about the differences between a Roadster and Coupe build. The easy part is what’s the same. Although the frame construction is quite different (4-inch tube ladder style vs. space frame) the assembly effort is pretty much the same. The same front and rear suspension options, brake options, wheel options, fuel tank setup, etc. Aluminum panels are different, but the installation technique is the same. Fuel lines, brake lines, and wiring harness take different routes. But are also basically the same. Slight additional work with the radiator tunnel on the Coupe. But no big deal. Once inside, the amount of interior space is very similar. Although a Coupe would have more if different seats were used compared to the ones we used. We’re both average size and installed what works well for us. Overall, the Roadster is a bit more refined from a build standpoint. Just based on the number Factory Five has built and the improvements and changes over the years. But the most recent Gen 3 Coupe is very good. Although I don't have any experience with the previous versions, by all accounts it's much better.

    These are what I would consider are the major differences:

    - More room in the Coupe for a wide engine (like the Coyote) and a much larger transmission tunnel. The T-56 fits with ease vs. very tight in a Roadster. If you go that way. Engine height however in the Coupe is a bit more limited. Without modifications, a big block is out of the question and height needs to be carefully considered with a 351 block.

    - I would not build a Coupe without A/C. It’s loud (separate point) and keeping everything enclosed helps. It would be hot even with the side windows open based on the windshield and rear hatch glass. A/C adds complexity and cost. Heat is normally part of the HVAC package and nice. We are comfortable driving our Coupe when the open cockpit Roadster folks only want to talk about how cold it is.

    - The Roadster has a relatively simple bolt-on windshield. The Coupe has a glued in windshield (talked about a lot in my build thread) plus the rear hatch and optional side windows, which I recommend. Not particularly difficult. But more work. When finished, the Coupe is a little harder to see out of.

    - The dash in the Coupe is significantly more complicated. Especially when you start adding A/C plus other options. Again, not particularly difficult. But more work. Unless you start really changing and adding things like I did.

    - The Coupe is loud. There’s just no getting around it. With the proximity of the side pipes and with everything enclosed, it’s loud inside. Ours is very will insulated and has slightly quieter Gas-N pipes. But still not comfortable to ride/drive without ear plugs. We’re used to it and no big deal. But people who think it’s going to be quieter than an open top Roadster (where I also highly recommend always wearing ear plugs) will be surprised and maybe disappointed.

    - The overall main difference is going to be body work and finishing. Getting the front cowl mounted and properly fitted, same with the doors, etc. is not a small task. The Roadster has its challenges too. But having done both, no question the Coupe is more. Related to this, if you have body work and paint done by a shop (vs. DIY) the Coupe will be more expensive. The Coupe also has a headliner to deal with. Although I just sprayed mine with UPOL Raptor, same as the rest of the body is undercoated and similar to how you might undercoat a Roadster body. We're happy with it.

    - Nearly everyone recognizes the Roadster and will have their own personal feelings, experiences, etc. that most share. (Can be interesting…) I’m surprised how many don’t recognize the Coupe. I’ve been asked about nearly every brand you can think of. Having said that, it’s a hit everywhere it goes. There just aren’t nearly as many around so people seem to really enjoy seeing it.

    So, what about the final product? Like I said, we love our Coupe. After 10+ years driving several different Roadsters, the Coupe is a very pleasant upgrade IMO. It rides better which I suspect is mainly the longer wheelbase. The combination of the Coyote and T-56 I used is outstanding. I’m a huge supporter of power steering and IRS. Both add to the comfort and good manners. We are really enjoying being out of the wind and sun after years and thousands of miles of being in the open top Roadsters. But a Roadster with an optional top would be similar. It’s hard to explain, the but the Coupe just “feels” like a bigger car and not as quick and immediate as the Roadster. Positive or negative based on your expectations I guess.

    In my case, did building three Roadsters before the Coupe help? Of course. But I really was a complete novice when I started. Plus each Roadster build was purposely quite different. I enjoy learning and trying new things. But there's no question the previous experience was useful. Could you build a Coupe? Yes. If you're sufficiently motivated to build a Roadster you could build a Coupe. Just recognize the differences. Also, keep it as simple as you can to get the final results you want. Modifications introduce a lot of variability and surprises. Especially for a new builder.

    Hope that helps. Either is a great choice!
    Last edited by edwardb; 05-17-2021 at 07:16 PM.
    Build 1: Mk3 Roadster #5125. Sold 11/08/2014. Build 2: Mk4 Roadster #7750. Sold 04/10/2017. Build Thread
    Build 3: Mk4 Roadster 20th Anniversary #8674. Sold 09/07/2020. Build Thread and Video. Build 4: Gen 3 Type 65 Coupe #59. Gen 3 Coyote. Legal 03/04/2020. Build Thread and Video
    Build 5: 35 Hot Rod Truck #138. LS3 and 4L65E auto. Rcvd 01/05/2021. Legal 04/20/2023. Build Thread. Sold 11/9/2023.

  27. Thanks Russwood thanked for this post
    Likes James Morse liked this post
  28. #1022
    Member Russwood's Avatar
    Join Date
    May 2021
    Location
    Oklahoma City, OK
    Posts
    82
    Post Thanks / Like
    That's great feedback. Thank you so much.

    Our house is somewhat divided on the subject. I personally am very smitten by the Coupe. I loved the early versions of the Datsun Z cars - up to and through the 280's, and the profile is so very similar with the long, sleek front and short rear. Makes one wonder how much the Z cars were influenced by the Coupe. My wife had a 260Z back in the day, so you can guess where she votes (that's two for the Coupe). My son-in-law is strongly in the Roadster camp, and my son pretty much goes for whatever big brother-in-law likes. (I'll share someday the battles we have over sports teams!!) So we have a tie, and my daughter is abstaining. Probably because she doesn't want to be in the middle LOL. Smart girl.

    With build costs between the two and it being my first, I'll likely do the Roadster first. It makes sense when I run the pros/cons. But be sure, there will be a build #2, and then the only debate will be what to drive!

    I plan to place the order next week when we visit the showroom, with looking at a February 2022 delivery. Between the parts delays FFR is dealing with and my work schedule, having a several month gap in placing the order and delivery will surely help with the backorders (I hope). One big hurdle I'm dealing with as I plan the build is finding a top-notch paint shop. I want this to be a show-quality build, so body and paint are really critical to that being a success. I'm pretty sure the best aren't found on the internet, but by references & word of mouth. If anyone comes across this post that has suggestions for the Oklahoma City area (including Tulsa), please share.

    Thanks again for the help, and I look forward to the coming months/years. I intend to do a build thread so I can document the process, but mostly so you masters can help school the apprentice! My big picture plans are to invest in a trailer so we can venture North & East to the shows, so hopefully our paths will cross some day.

  29. #1023

    Join Date
    May 2014
    Location
    Simi Valley, CA
    Posts
    566
    Post Thanks / Like
    FWIW, the way I found a skilled painter was to ask the guys in the local Corvette club (fiberglass bodies) who they use for top quality work. Then go talk to the lead person to see if they are someone you are comfortable working with, and ask to see several examples of their completed work. Be warned - it will be expensive and probably a long lead time! Less so for a Roadster, but still pricy. You may be able to save a few $ by doing the body work and block sanding yourself, but some painters don't allow that or won't warrant their work if you do. Check first!
    HTH Keith HR #894

  30. #1024
    Junior Member
    Join Date
    May 2020
    Posts
    1
    Post Thanks / Like
    I saw you out driving this past Sunday, the car looked and sounded amazing, Great Job, hopefully I will see it at a car show sometime this season, a Daytona coupe was the last thing I thought I would see cruising around that day.

  31. Thanks edwardb thanked for this post
    Likes edwardb liked this post
  32. #1025
    Member James Morse's Avatar
    Join Date
    Feb 2020
    Location
    SW Virginia
    Posts
    32
    Post Thanks / Like
    @progmgr1 When you say the painting is "expensive" can you give me a ballpark order of magnitude price? Thanks. I realize if you do some prep work vs no prep work it would be different.

  33. #1026
    Senior Member edwardb's Avatar
    Join Date
    Feb 2011
    Location
    Lake Orion, Michigan
    Posts
    10,568
    Post Thanks / Like
    Quote Originally Posted by James Morse View Post
    @progmgr1 When you say the painting is "expensive" can you give me a ballpark order of magnitude price? Thanks. I realize if you do some prep work vs no prep work it would be different.
    You directed your question to @progmgr1. But I'll respond and maybe send a PM to @progmgr1 for a personal response. Prices for body work and paint vary widely depending on a number of factors. Too many to list. But expect good quality body and paint for a Roadster to be in the $8 - 10K range. And higher in some cases. A Coupe will be more. Anywhere from 50% more and up. Be careful about DIY work if you're not going to do the entire job. Talk to the shop in advance and make sure they're on board with what you're doing. And a word of caution, poorly done work can add to the cost.
    Build 1: Mk3 Roadster #5125. Sold 11/08/2014. Build 2: Mk4 Roadster #7750. Sold 04/10/2017. Build Thread
    Build 3: Mk4 Roadster 20th Anniversary #8674. Sold 09/07/2020. Build Thread and Video. Build 4: Gen 3 Type 65 Coupe #59. Gen 3 Coyote. Legal 03/04/2020. Build Thread and Video
    Build 5: 35 Hot Rod Truck #138. LS3 and 4L65E auto. Rcvd 01/05/2021. Legal 04/20/2023. Build Thread. Sold 11/9/2023.

  34. Thanks James Morse thanked for this post
  35. #1027

    Join Date
    May 2014
    Location
    Simi Valley, CA
    Posts
    566
    Post Thanks / Like
    x2 on everything Paul (edwardb) said, with the additional caveats that prices vary widely depending on location, skill level and workload of the painter. I had some quotes a few years ago (in CA, pre-Covid) that were 50% higher than the numbers cited above. Also, automotive paints are expensive, and things like candies or other special finishes may add to the material cost and / or require more coats = more labor.
    Keith HR #894

  36. Thanks James Morse thanked for this post
  37. #1028
    Junior Member
    Join Date
    Aug 2012
    Location
    Mount Dora FL
    Posts
    25
    Post Thanks / Like
    Paul,
    When you were building the trunk box, did you also have a shear in your shop. I saw you mentioned the 30" brake from Harbor Freight.
    Tim

  38. #1029
    Senior Member edwardb's Avatar
    Join Date
    Feb 2011
    Location
    Lake Orion, Michigan
    Posts
    10,568
    Post Thanks / Like
    Quote Originally Posted by mtdr View Post
    Paul,
    When you were building the trunk box, did you also have a shear in your shop. I saw you mentioned the 30" brake from Harbor Freight.
    Tim
    Nope. I don't have a shear. I cut all my aluminum on a band saw with a metal blade if it fits. If too large, use a handheld jig saw with a metal cutting blade. Then clean up the edges with a stationary disk/belt sander. Have done dozens of parts that way and works for me. I've updated my brake with a box brake from Woodward Fab. My Christmas present to myself. Talked about it in my truck build thread. It's a huge upgrade over the Harbor Freight one I used before. But the H-F one, although has limitations, will get the job done for not a lot of money.
    Build 1: Mk3 Roadster #5125. Sold 11/08/2014. Build 2: Mk4 Roadster #7750. Sold 04/10/2017. Build Thread
    Build 3: Mk4 Roadster 20th Anniversary #8674. Sold 09/07/2020. Build Thread and Video. Build 4: Gen 3 Type 65 Coupe #59. Gen 3 Coyote. Legal 03/04/2020. Build Thread and Video
    Build 5: 35 Hot Rod Truck #138. LS3 and 4L65E auto. Rcvd 01/05/2021. Legal 04/20/2023. Build Thread. Sold 11/9/2023.

  39. #1030
    Junior Member
    Join Date
    Apr 2021
    Posts
    17
    Post Thanks / Like
    Paul, the lines into the expansion tank I understand all but one, the small one facing forward that might tap into the radiator fill neck, can I ask where you connected that to? thanks in advance

  40. #1031
    Senior Member edwardb's Avatar
    Join Date
    Feb 2011
    Location
    Lake Orion, Michigan
    Posts
    10,568
    Post Thanks / Like
    Quote Originally Posted by 65DaytonaCoupe View Post
    Paul, the lines into the expansion tank I understand all but one, the small one facing forward that might tap into the radiator fill neck, can I ask where you connected that to? thanks in advance
    If I understand the hose you're asking about, that one goes from the front of the expansion tank to the top of the radiator. The FF provided radiators I've used had a radiator drain valve in that location. Remove the valve, replace with the appropriate adapter, and connect the hose. Of particular note, in case you weren't aware, that hose requires a one-way check valve to work properly so it's necessary to buy the OE hose. For my Coupe, it was part number FR3Z-8075-C. Note also with this setup, there's no radiator fill neck. The coolant is added into the expansion tank.
    Build 1: Mk3 Roadster #5125. Sold 11/08/2014. Build 2: Mk4 Roadster #7750. Sold 04/10/2017. Build Thread
    Build 3: Mk4 Roadster 20th Anniversary #8674. Sold 09/07/2020. Build Thread and Video. Build 4: Gen 3 Type 65 Coupe #59. Gen 3 Coyote. Legal 03/04/2020. Build Thread and Video
    Build 5: 35 Hot Rod Truck #138. LS3 and 4L65E auto. Rcvd 01/05/2021. Legal 04/20/2023. Build Thread. Sold 11/9/2023.

  41. #1032
    Junior Member
    Join Date
    Apr 2021
    Posts
    17
    Post Thanks / Like
    Thank You Paul!

  42. #1033
    Senior Member
    Join Date
    Apr 2017
    Location
    Scottsdale, Arizona
    Posts
    212
    Post Thanks / Like
    Hey Paul, As I mentioned before, I really appreciate your Build Threads and the value you bring to the Factory Five Family.
    For my Gen 3 Coupe with Gen 2 Coyote build, I'm about to enter the first engine start and then go-kart stages and then on to the body fitment.
    I've followed your lead on the mounting locations of the 250A Buss Fuse and the Power Distribution Box on the firewall, trying for exactly the same locations.
    Question, when the body is on, is there enough access to and space above the Power distribution box for any future need to open it up? The Cowl really seems to cover it and restrict access. I couldn't find anywhere in your build thread where you mention this nor possible remount the PDB. I know it'll be tight, but maybe OK to live with. Your comments? Recommendations?
    Thanks! Bob

  43. #1034
    Senior Member edwardb's Avatar
    Join Date
    Feb 2011
    Location
    Lake Orion, Michigan
    Posts
    10,568
    Post Thanks / Like
    Quote Originally Posted by Bob Brandle View Post
    Hey Paul, As I mentioned before, I really appreciate your Build Threads and the value you bring to the Factory Five Family.
    For my Gen 3 Coupe with Gen 2 Coyote build, I'm about to enter the first engine start and then go-kart stages and then on to the body fitment.
    I've followed your lead on the mounting locations of the 250A Buss Fuse and the Power Distribution Box on the firewall, trying for exactly the same locations.
    Question, when the body is on, is there enough access to and space above the Power distribution box for any future need to open it up? The Cowl really seems to cover it and restrict access. I couldn't find anywhere in your build thread where you mention this nor possible remount the PDB. I know it'll be tight, but maybe OK to live with. Your comments? Recommendations?
    Thanks! Bob
    Hi Bob. Thanks. I agree the Coyote PDB in that location isn't real handy. But it's accessible enough IMO. With two Coyote builds, I've only had the lid off the PDB once or twice. Just not something you normally need to do much at all once the build is complete. My recommendation is leave it there. It works.
    Build 1: Mk3 Roadster #5125. Sold 11/08/2014. Build 2: Mk4 Roadster #7750. Sold 04/10/2017. Build Thread
    Build 3: Mk4 Roadster 20th Anniversary #8674. Sold 09/07/2020. Build Thread and Video. Build 4: Gen 3 Type 65 Coupe #59. Gen 3 Coyote. Legal 03/04/2020. Build Thread and Video
    Build 5: 35 Hot Rod Truck #138. LS3 and 4L65E auto. Rcvd 01/05/2021. Legal 04/20/2023. Build Thread. Sold 11/9/2023.

  44. #1035
    Senior Member
    Join Date
    Apr 2017
    Location
    Scottsdale, Arizona
    Posts
    212
    Post Thanks / Like
    Thanks Paul. I'll leave it mounted as is, but, before the body goes on, I'll open it up and take a few documentation photos of what's inside.
    Bob

  45. #1036
    Senior Member edwardb's Avatar
    Join Date
    Feb 2011
    Location
    Lake Orion, Michigan
    Posts
    10,568
    Post Thanks / Like
    Quote Originally Posted by Bob Brandle View Post
    Thanks Paul. I'll leave it mounted as is, but, before the body goes on, I'll open it up and take a few documentation photos of what's inside.
    Bob
    Good idea. The Ford Performance control pack instructions also have a diagram and table of what's under there.
    Build 1: Mk3 Roadster #5125. Sold 11/08/2014. Build 2: Mk4 Roadster #7750. Sold 04/10/2017. Build Thread
    Build 3: Mk4 Roadster 20th Anniversary #8674. Sold 09/07/2020. Build Thread and Video. Build 4: Gen 3 Type 65 Coupe #59. Gen 3 Coyote. Legal 03/04/2020. Build Thread and Video
    Build 5: 35 Hot Rod Truck #138. LS3 and 4L65E auto. Rcvd 01/05/2021. Legal 04/20/2023. Build Thread. Sold 11/9/2023.

  46. #1037
    Junior Member
    Join Date
    Apr 2021
    Posts
    17
    Post Thanks / Like
    would you mind sharing how the dash is attached and I assume its removable? thanks in advance

  47. #1038
    Senior Member edwardb's Avatar
    Join Date
    Feb 2011
    Location
    Lake Orion, Michigan
    Posts
    10,568
    Post Thanks / Like
    Quote Originally Posted by 65DaytonaCoupe View Post
    would you mind sharing how the dash is attached and I assume its removable? thanks in advance
    No, I don't mind. I wanted the fasteners to be mostly hidden. I have one on each upper corner under the A/C vents. I installed small angle brackets on the back before the vinyl wrap. With the vent cover off, the screws are reachable. There are two tabs on the lower outside corners that come that way stock. Used those. For the center, I have the switch cluster I made attached to the front transmission cover and then the underside of that attaches to the dash along the bottom. The dash is sold with all those fasteners.

    Yes, the dash could come out in an emergency. But might not be nice since the body is resting on it and bulb seal around the front. I made the gauge cluster removable instead. It comes out with a couple screws along the bottom and then it's trapped between the dash and the upper dash tube along the top. A little hard to explain. Hope that makes sense. I've had to take the gauge cluster off once already to service the keyless module. Wasn't too bad. With the gauge cluster removed, basically everything behind the dash is reachable.

    The dash looks nice and clean without external screws. But it's a lot of extra work. You'd have to decide if it's worth it.
    Last edited by edwardb; 08-26-2021 at 04:54 PM.
    Build 1: Mk3 Roadster #5125. Sold 11/08/2014. Build 2: Mk4 Roadster #7750. Sold 04/10/2017. Build Thread
    Build 3: Mk4 Roadster 20th Anniversary #8674. Sold 09/07/2020. Build Thread and Video. Build 4: Gen 3 Type 65 Coupe #59. Gen 3 Coyote. Legal 03/04/2020. Build Thread and Video
    Build 5: 35 Hot Rod Truck #138. LS3 and 4L65E auto. Rcvd 01/05/2021. Legal 04/20/2023. Build Thread. Sold 11/9/2023.

  48. #1039
    Junior Member
    Join Date
    Apr 2021
    Posts
    17
    Post Thanks / Like
    thank you Sir!

  49. #1040
    Senior Member Tooth's Avatar
    Join Date
    Nov 2020
    Posts
    205
    Post Thanks / Like
    You did an amazing job with this car. God willing I'll get to build one of these in the near future, and if it comes out one tenth of what your car is I'll be delighted. I've been flip flopping on building a factory five car for the better part of twenty years now. Biggest hold up is time. I get the bug, can't shake it for a while, then I chicken out. This time it feels different. I just can't shake the need to build one of these this time, and cars like yours are making it really hard to get it out of my head.

  50. Thanks edwardb thanked for this post
    Likes edwardb liked this post
Page 26 of 30 FirstFirst ... 162425262728 ... LastLast

Posting Permissions

  • You may not post new threads
  • You may not post replies
  • You may not post attachments
  • You may not edit your posts
  •  

Breeze

Visit our community sponsor