
Visit our community sponsor

Thanks:
224

Likes:
220
-
04-12-2018, 08:13 AM
#241
Senior Member


Originally Posted by
Erik W. Treves

I cut mine and rewelded it to sit flush
Figures. Now that I have them powder coated. 
Thanks for the response. At least I know it's not just mine. I'll figure something out.
Build 1: Mk3 Roadster #5125. Sold 11/08/2014.
Build 2: Mk4 Roadster #7750. Sold 04/10/2017.
Build Thread
Build 3: Mk4 Roadster 20th Anniversary #8674. Sold 09/07/2020.
Build Thread and
Video.
Build 4: Gen 3 Type 65 Coupe #59. Gen 3 Coyote. Legal 03/04/2020.
Build Thread and
Video
Build 5: 35 Hot Rod Truck #138. LS3 and 4L65E auto. Rcvd 01/05/2021. Legal 04/20/2023.
Build Thread. Sold 11/9/2023.
-
04-12-2018, 12:02 PM
#242
Those A/C hoses are going to be super short! Any reason why those couldn't be replaced with hard lines? It looks like it will be just as hard to get the hose lengths correct as it would to install hard lines. Maybe there's some type of relative movement (besides thermal expansion/contraction) that has to be accommodated that I don't see?
-
04-12-2018, 03:38 PM
#243
Senior Member
Originally Posted by
Matt K.
Those A/C hoses are going to be super short! Any reason why those couldn't be replaced with hard lines? It looks like it will be just as hard to get the hose lengths correct as it would to install hard lines. Maybe there's some type of relative movement (besides thermal expansion/contraction) that has to be accommodated that I don't see?
I'm not going to re-engineer it. This is my first ever A/C install, so I'm going to follow the instructions as best I can. Agreed those A/C hoses between the under dash evaporator and the bulkhead connector are very short. I'm going to be doing the crimps myself, so (hopefully) figure it out. There were quite a few extra fittings provided in the kit, so I'm planning to practice and carefully measure the before and after crimp lengths and compensate accordingly. We'll see, but it will be several months at least. The heater side is short as well, but those are just slip on hoses with clamps. So should be easy enough. The rest of the installation looks pretty straightforward.
Build 1: Mk3 Roadster #5125. Sold 11/08/2014.
Build 2: Mk4 Roadster #7750. Sold 04/10/2017.
Build Thread
Build 3: Mk4 Roadster 20th Anniversary #8674. Sold 09/07/2020.
Build Thread and
Video.
Build 4: Gen 3 Type 65 Coupe #59. Gen 3 Coyote. Legal 03/04/2020.
Build Thread and
Video
Build 5: 35 Hot Rod Truck #138. LS3 and 4L65E auto. Rcvd 01/05/2021. Legal 04/20/2023.
Build Thread. Sold 11/9/2023.
-
04-13-2018, 10:18 AM
#244
Check how the inner cooler fits in front of the radiator. You may have to trim the hood hinge bracket like I. Did. If you have any questions on it let me know. The inner cooler shown in the manual was narrower then the one I got so things got "interesting"
-
04-13-2018, 03:06 PM
#245
Senior Member
Originally Posted by
nkw8181
Check how the inner cooler fits in front of the radiator. You may have to trim the hood hinge bracket like I. Did. If you have any questions on it let me know. The inner cooler shown in the manual was narrower then the one I got so things got "interesting"
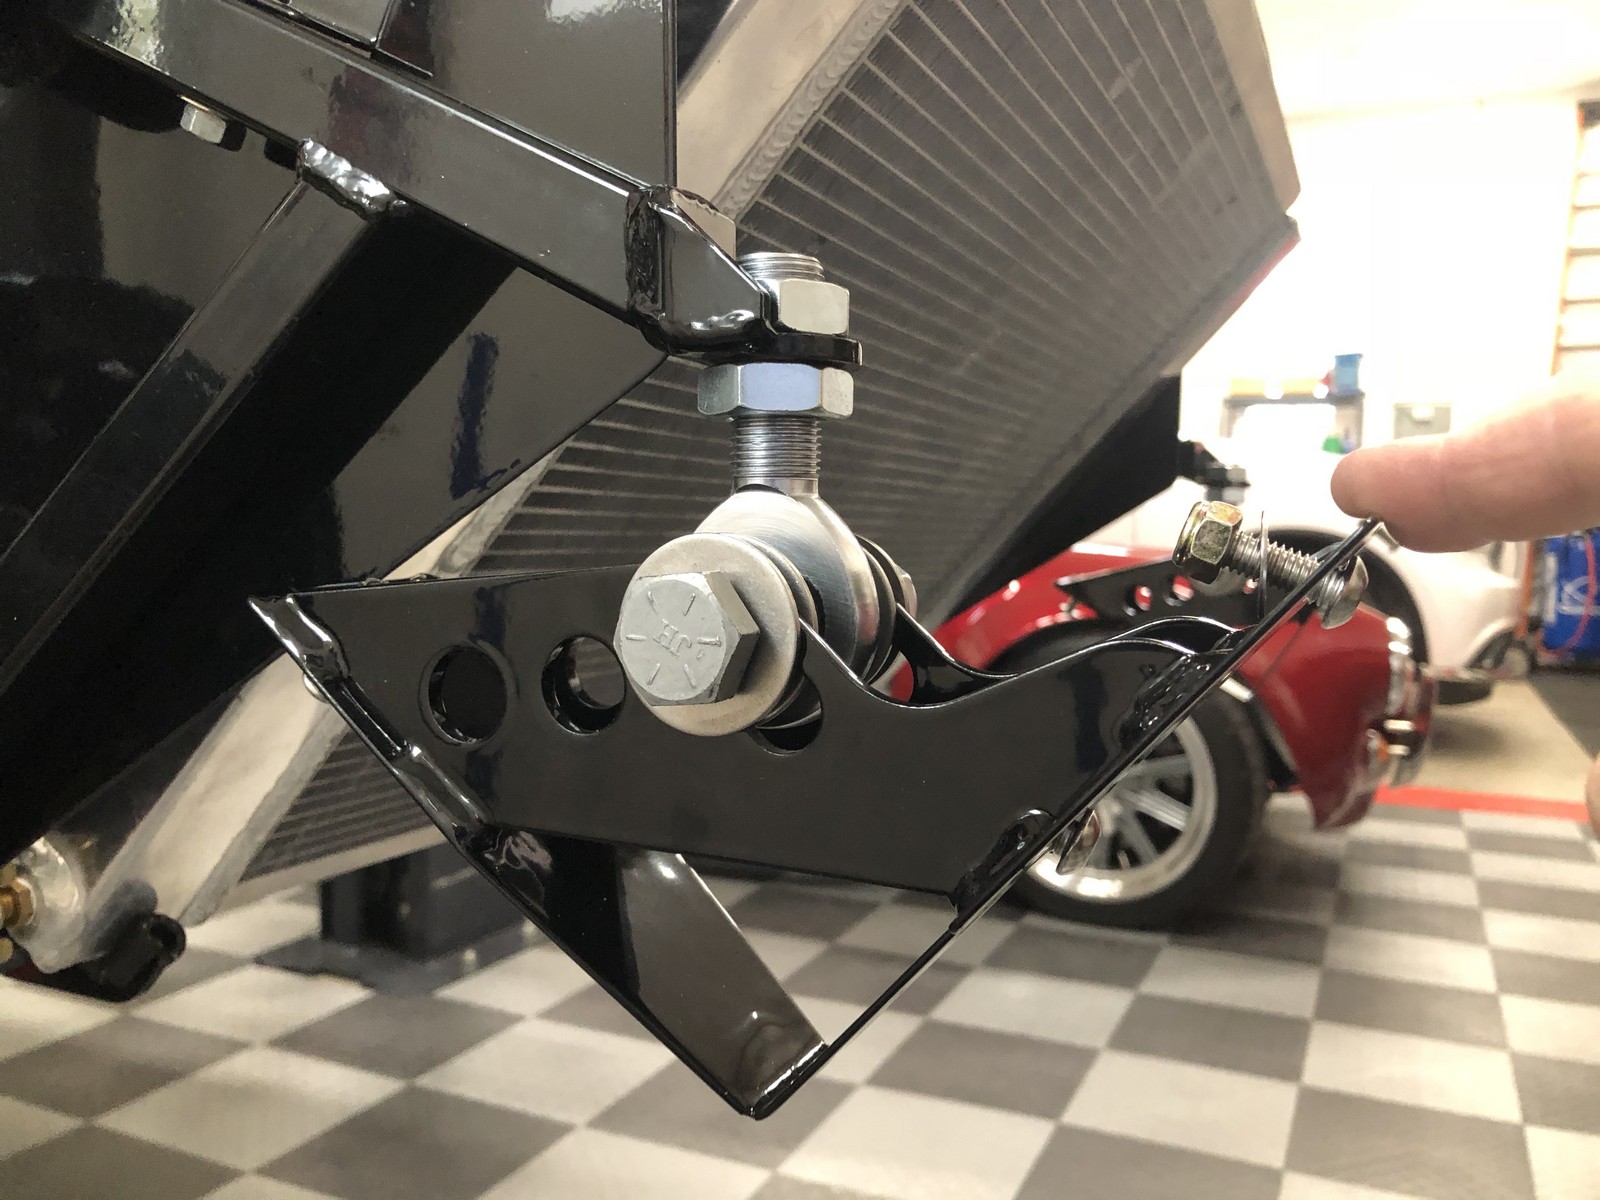
Thanks for the input. I assume you're talking about the A/C condenser. Inspired me to spend some time today mocking things up further than I have previously. The good news is I don't see a problem with the condenser that came with my kit (approx 12 x 26) fitting between the nose hinges. Close, but when mounted as shown in the instructions, should be OK. The not so good news is that when mounted were shown, the bottom connection is blocked by the radiator side tunnel piece. Not the best picture, but this illustrates both:
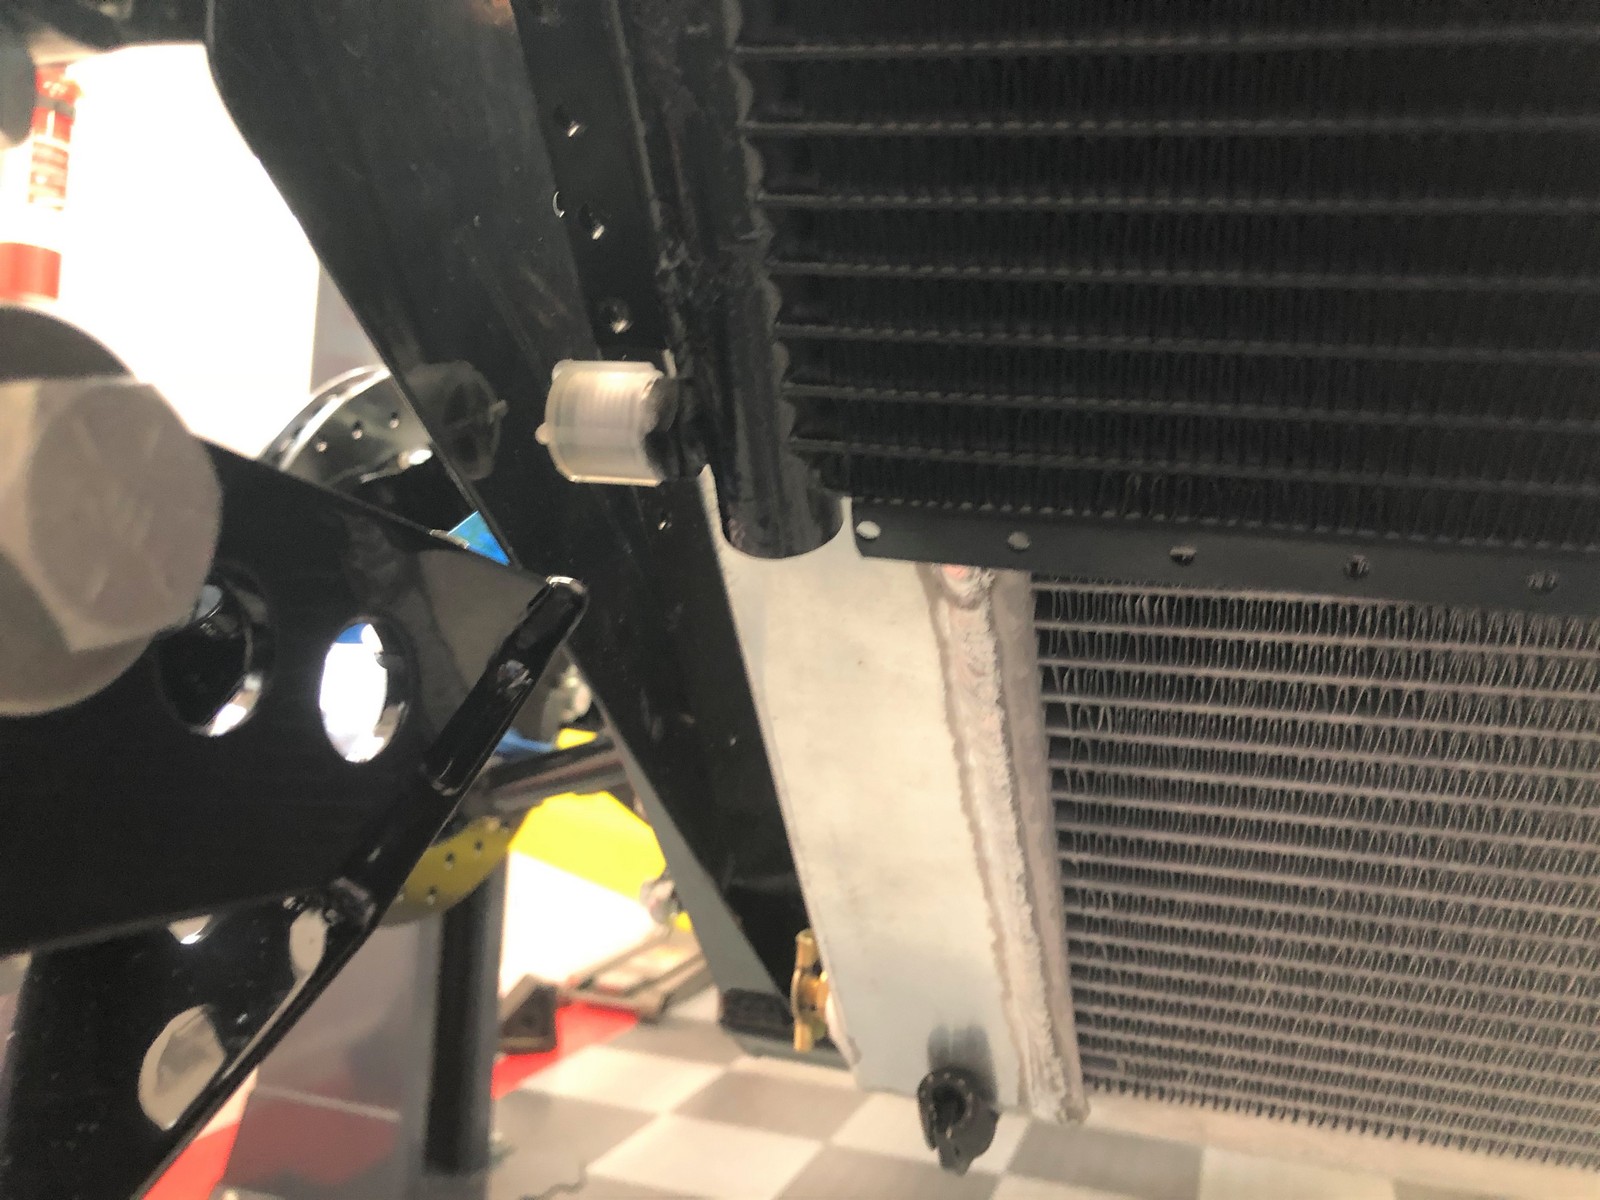
I could move the condenser down. But then the mounting method and hardware provided would have to be modified. Additionally, looks like that same radiator side tunnel piece is limiting the "up" movement of the nose hinges. I'm pretty certain they need to swing all the way up to the chassis tube. Otherwise the nose isn't going to be very far open. No big deal to trim. Just have to be careful not to damage the powder coat and then just a bit of gloss black paint along the bottom edge. I've also read where the lower nose front needs to be trimmed to clear the radiator and condenser. Can see why here has well.
Agreed?
Last edited by edwardb; 04-13-2018 at 04:28 PM.
Build 1: Mk3 Roadster #5125. Sold 11/08/2014.
Build 2: Mk4 Roadster #7750. Sold 04/10/2017.
Build Thread
Build 3: Mk4 Roadster 20th Anniversary #8674. Sold 09/07/2020.
Build Thread and
Video.
Build 4: Gen 3 Type 65 Coupe #59. Gen 3 Coyote. Legal 03/04/2020.
Build Thread and
Video
Build 5: 35 Hot Rod Truck #138. LS3 and 4L65E auto. Rcvd 01/05/2021. Legal 04/20/2023.
Build Thread. Sold 11/9/2023.
-
04-13-2018, 04:25 PM
#246
Senior Member
Little more digging on this. Looked through some build pictures. Mike Everson has a nice side shot with the nose open. Thanks Mike. Measures right at 45 degrees. The hinge as pictured about is about 3 degrees short of that. That's at the bottom of the adjustment. Moving it would allow less movement. So definitely appears will need to trim a little off the bottom of the tunnel sides. But not a lot. Plus make an escape route for that lower A/C condenser connection on the PS.
Build 1: Mk3 Roadster #5125. Sold 11/08/2014.
Build 2: Mk4 Roadster #7750. Sold 04/10/2017.
Build Thread
Build 3: Mk4 Roadster 20th Anniversary #8674. Sold 09/07/2020.
Build Thread and
Video.
Build 4: Gen 3 Type 65 Coupe #59. Gen 3 Coyote. Legal 03/04/2020.
Build Thread and
Video
Build 5: 35 Hot Rod Truck #138. LS3 and 4L65E auto. Rcvd 01/05/2021. Legal 04/20/2023.
Build Thread. Sold 11/9/2023.
-
04-13-2018, 09:23 PM
#247
I had to shift the condenser to the driver side to get the lower 90 to just barely fit between the radiator and the aluminum. I thought of running it on the outside but that had it's own problems. Here are some pics of the trimming I did. Not sure if I have one for the hinge. I tried to just add the pic from my phone unsuccessfully.
. https://thefactoryfiveforum.com/album.php?albumid=1248
2:55 on the video
https://youtu.be/unHbu3bztjE
-
04-13-2018, 10:16 PM
#248
Senior Member
Originally Posted by
nkw8181
I had to shift the condenser to the driver side to get the lower 90 to just barely fit between the radiator and the aluminum. I thought of running it on the outside but that had it's own problems. Here are some pics of the trimming I did. Not sure if I have one for the hinge. I tried to just add the pic from my phone unsuccessfully.
.
https://thefactoryfiveforum.com/album.php?albumid=1248
2:55 on the video
https://youtu.be/unHbu3bztjE
Good stuff. Looked it all over very closely. Thanks for posting. I'll look at my options. One thing that's obvious is there are a number of changes from your prototype chassis and my #59. Both the sheet metal and hinges appear to be different now.
Build 1: Mk3 Roadster #5125. Sold 11/08/2014.
Build 2: Mk4 Roadster #7750. Sold 04/10/2017.
Build Thread
Build 3: Mk4 Roadster 20th Anniversary #8674. Sold 09/07/2020.
Build Thread and
Video.
Build 4: Gen 3 Type 65 Coupe #59. Gen 3 Coyote. Legal 03/04/2020.
Build Thread and
Video
Build 5: 35 Hot Rod Truck #138. LS3 and 4L65E auto. Rcvd 01/05/2021. Legal 04/20/2023.
Build Thread. Sold 11/9/2023.
-
04-13-2018, 11:00 PM
#249
Originally Posted by
GoDadGo
Paul,
As always, I enjoy watching your build progress.
I still don't think I've got what it takes to build this car so, but that's okay.
Thanks for letting us all ride along as you create your latest Masterpiece.
Steve
Same "thank you"s from me. Reading with interest and gaining knowledge on the Coupe. Enjoy the many pictures and descriptions of your solutions to the customary bumps. Liked the Specialty Power Windows setup for the wipers.
Kevin
-
04-14-2018, 08:33 AM
#250
I made a notch in the side panel for the AC line.The other option is to move the condenser to the left and bring the line up between the rad and side panel.
My issue is the lower rad hose is sitting hard on the sway bar? will need to move the rad up about 1/4 inch
like your idea of cutting the upper foot box covers, going to do that on my drivers side.
David W
Mkll 4874 built in 2004
Gen 3 coupe #16 registered 2018 painted 2019
-
04-14-2018, 09:09 AM
#251
Originally Posted by
edwardb
Good stuff. Looked it all over very closely. Thanks for posting. I'll look at my options. One thing that's obvious is there are a number of changes from your prototype chassis and my #59. Both the sheet metal and hinges appear to be different now.
My frame is number 57 so that should be the same. I know there is an updated set of aluminum on the way to me. Yes there are some differences. The main notable one is the extra structure in the nose. The hinges look the same from what I have seen but like I said I had to trim mine. On the driver side it was caused by hitting the condenser. Passenger side was the supercharger intercooler. Hope this helps and hope you can avoid some of the "ohhh that doesn't work like that" moments.
-
04-14-2018, 11:20 AM
#252
Senior Member
Originally Posted by
nkw8181
My frame is number 57 so that should be the same. I know there is an updated set of aluminum on the way to me. Yes there are some differences. The main notable one is the extra structure in the nose. The hinges look the same from what I have seen but like I said I had to trim mine. On the driver side it was caused by hitting the condenser. Passenger side was the supercharger intercooler. Hope this helps and hope you can avoid some of the "ohhh that doesn't work like that" moments.
Oops. Sorry I had your build confused with another one. Yeah, our parts should be the same being only two numbers different. I too have updated aluminum on the way. Along with the side pipes. One of my two last backordered items. I'll wait until that arrives before doing anything. I suspect the nose tunnel pieces aren't involved, but will see. My thought right now is that I'm going to trim the side pieces off to the length of the 3/4-inch chassis tubes just above. No reason for the aluminum to extend below IMO. Some of the early builds looks like that's where it ended. That solves the potential nose hinge interference and also the condenser hose connection interference. I'd rather take the hose outside the tunnel rather than through it. In the big picture, not a big deal in either case.
Last edited by edwardb; 11-25-2021 at 08:58 AM.
Build 1: Mk3 Roadster #5125. Sold 11/08/2014.
Build 2: Mk4 Roadster #7750. Sold 04/10/2017.
Build Thread
Build 3: Mk4 Roadster 20th Anniversary #8674. Sold 09/07/2020.
Build Thread and
Video.
Build 4: Gen 3 Type 65 Coupe #59. Gen 3 Coyote. Legal 03/04/2020.
Build Thread and
Video
Build 5: 35 Hot Rod Truck #138. LS3 and 4L65E auto. Rcvd 01/05/2021. Legal 04/20/2023.
Build Thread. Sold 11/9/2023.
-
04-15-2018, 10:08 AM
#253
Senior Member
Instrument Panel and Interior
My plan for the instrument panel and interior is coming together. I’m amazed and incredibly impressed with some of the custom panels and interiors guys have come up with for the Coupe. As I’ve stated a couple times already though, I want to stay with the basic look and layout of the kit. Which is along the lines of the original. But want to clean it up and give it a little bit of a custom/sports car look. Less of a raw race car look. My plan so far is the following:
- Vinyl on the dash top and front, with 1/8-inch foam padding on the front only. Dash will have all hidden mounts. (Kind of my thing I guess.)
- Vinyl on the two transmission covers, with 1/8-inch foam padding, both removeable.
- Vinyl on the gauge panel, mounted behind the dash. Removable also with hidden fasteners. No padding. Will add connectors to the harness as needed so the complete assembly can be taken out of the way to gain access to the wiring behind the dash.
- Vinyl on the center switch panel below the dash, also no padding.
- I’m NOT going to use the brow piece.
- Horn button on the gauge panel, headlight switch and ignition (probably a start button) on the dash, all other switches and controls on the panel below the dash.
- Russ Thompson column mounted turn signal switch (already received) with the momentary stalk button used for low/high beams and flash to pass. I'll be using an American Autowire electronic headlight module, same as the last two builds. My last one in stock and they aren't made any more. Too bad.
- Details still TBD, but the switch panel will have heated seats, fog/running lights, hazards, heat and A/C controls, and the wiper/washer switch. I’m not using the FF supplied heat and A/C panel. Instead will install the provided controls in my custom panel.
- Speedo button and Speedhut dimmer knob on the underside of the dash right below the speedo. What I’ve done on other builds and it works very well.
- Heat and A/C outlets on the front of the dash corners (not underneath) and two added in the center, in addition to the defrost outlets.
- Fabricated glovebox, as deep as I can make it and still have room for the wiring and all the ducts that are behind the dash.
- LED downlights on the underside of the dash corners, on the courtesy lighting circuit (headlight knob twist).
- Locations for the master disconnect, aux power, and USB power still TBD. Thinking right now the master disconnect will be under the dash but still accessible, and the two power outlets on the ends of the center switch panel. We’ll see.
- Door cards with pockets. Design TBD. Would also like some kind of door pull. We’ll see about that.
- Kit provided carpet everywhere else and will have floor mats made. Not aware Factory Five is offering any for this kit.
For the covering material, right now planning to use vinyl. I used leather on #8674 and like it a lot. But that was also driven by the provided leather seats, plus it’s a little more work. For this build, I’m going to also kind of follow the theme of the seats, in this case the Corbeau Sportline Evolution-X seats I selected and have shown earlier. The seats are mostly black vinyl. The usual slightly pebbly variety. I’ll find some material that matches it as closely as possible. Lots of choices there. There are several contrasting panels in a vinyl carbon fiber pattern in the seats. And then the red stitching. Corbeau sells the materials used in their seats by the yard, so I ordered a yard of the carbon fiber material. I couldn’t find anything that looked like a good match anywhere else, and didn’t want to take a chance since the pattern is pretty distinctive. For starters, I’m going to use this carbon fiber like vinyl on the gauge panel, the center switch panel, and accent panels in the door cards. Additionally, I’m going to have the red stitching in the seats duplicated along the top/front edge of the dash, the corners of the transmission covers, and also in the door cards. May looking at putting some of the carbon fiber like vinyl elsewhere (glovebox maybe?) but don’t want to overdue it. Hopefully will give an overall coordinated and similar style look.
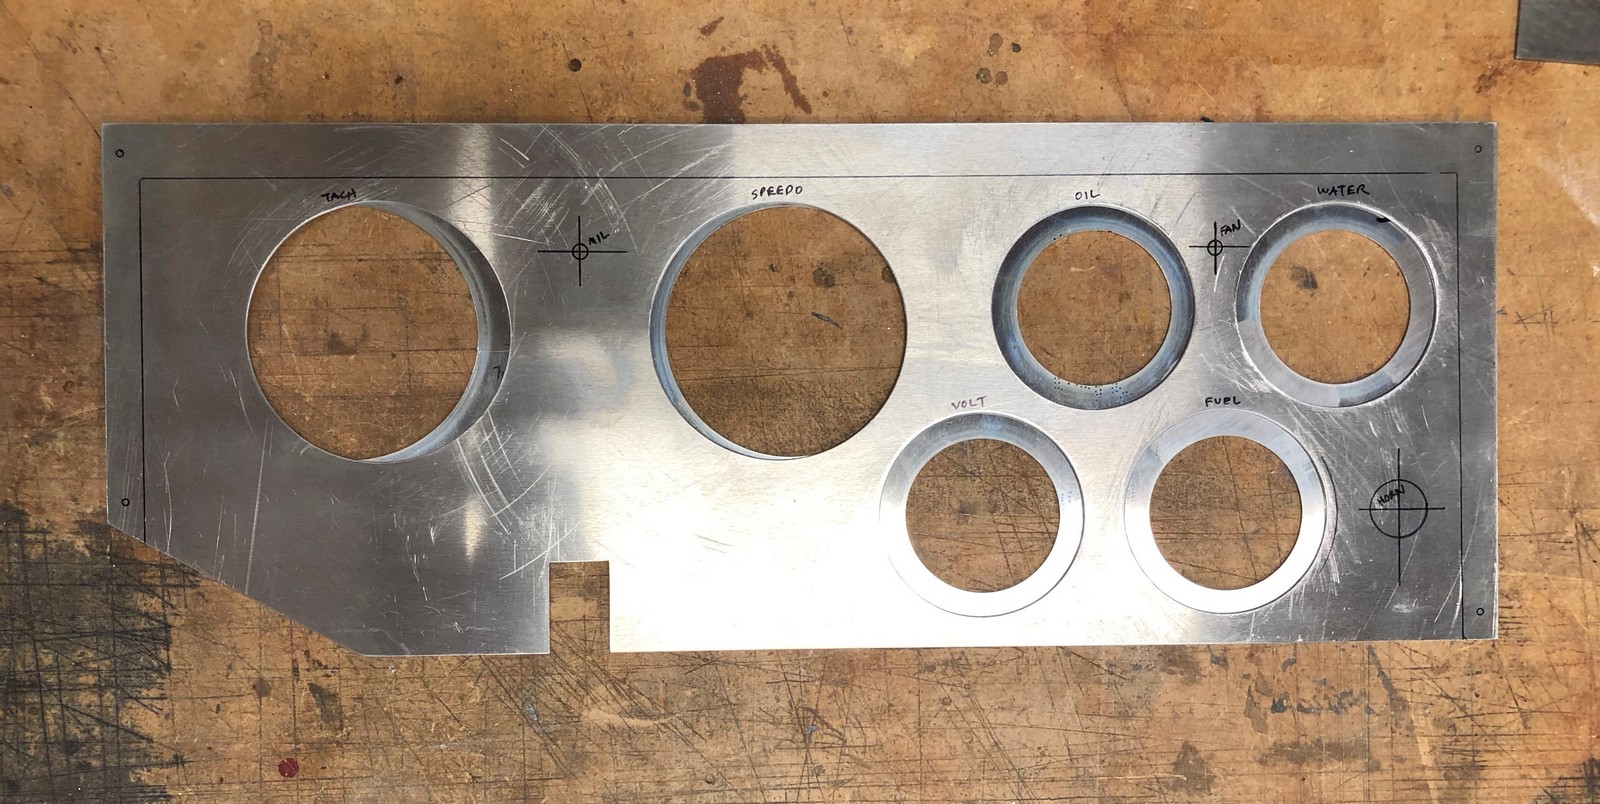
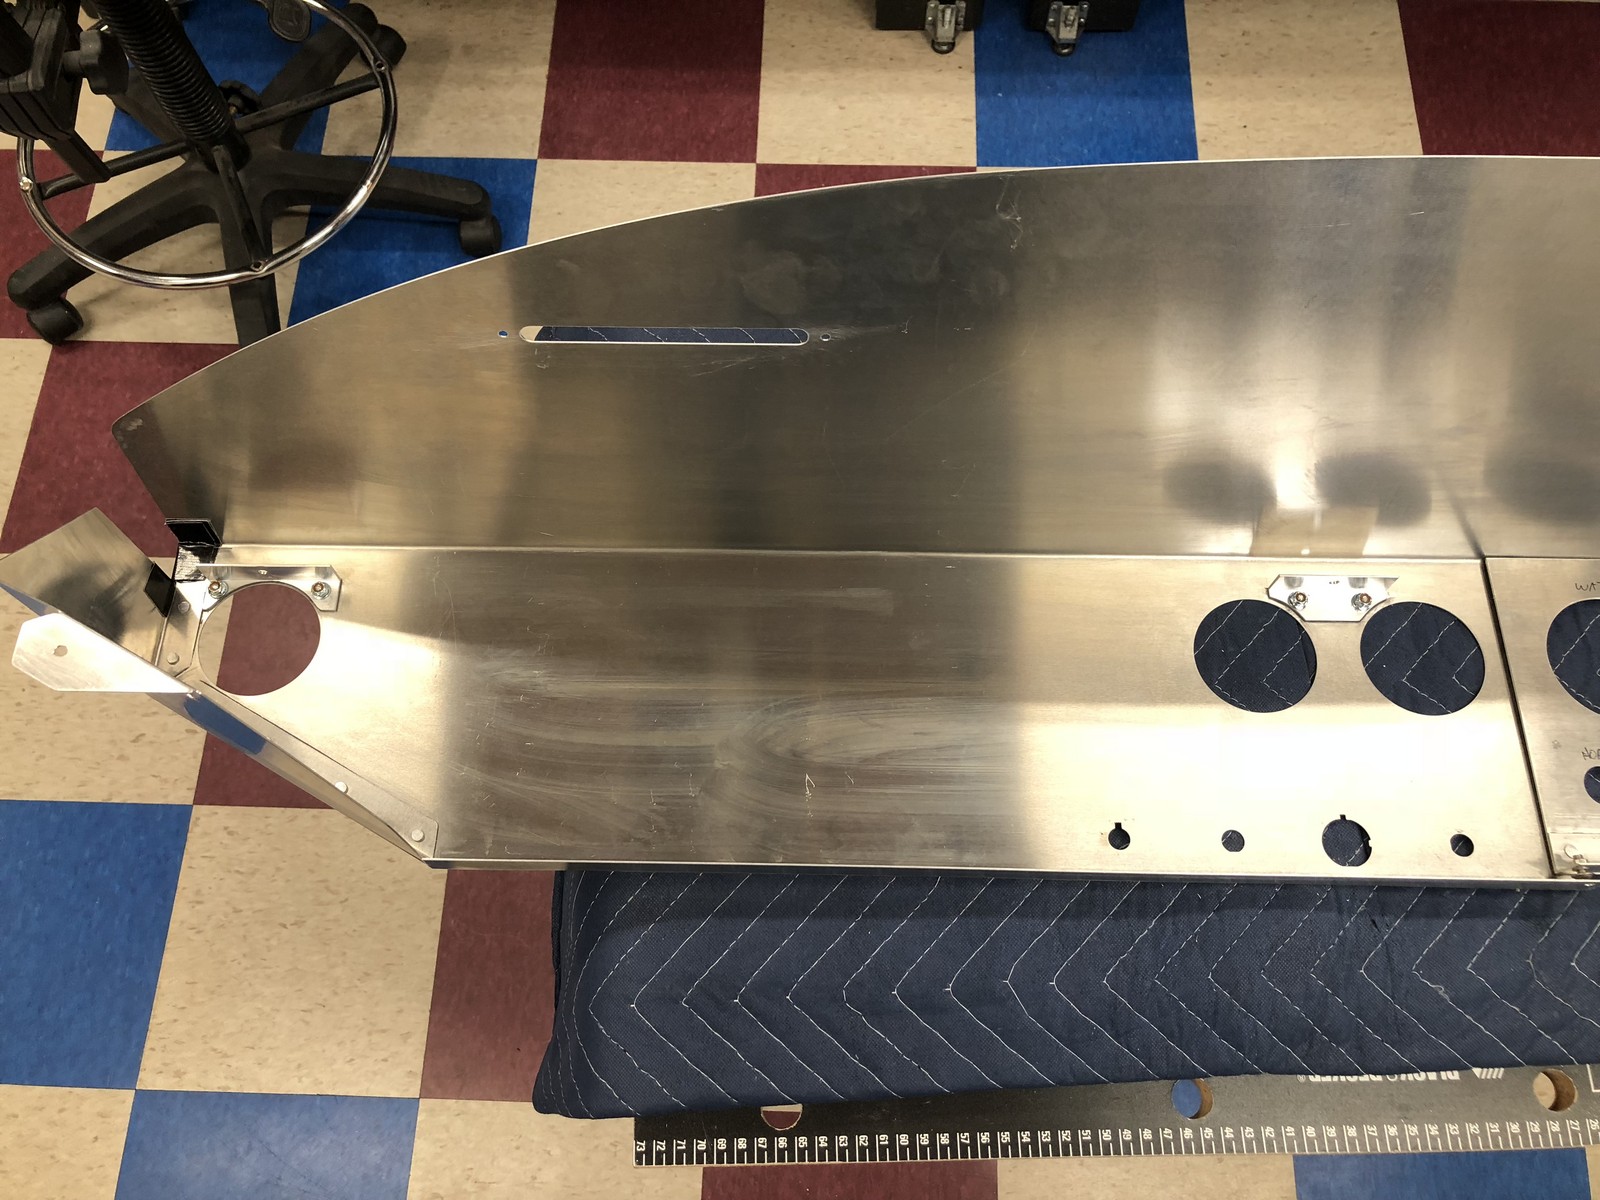
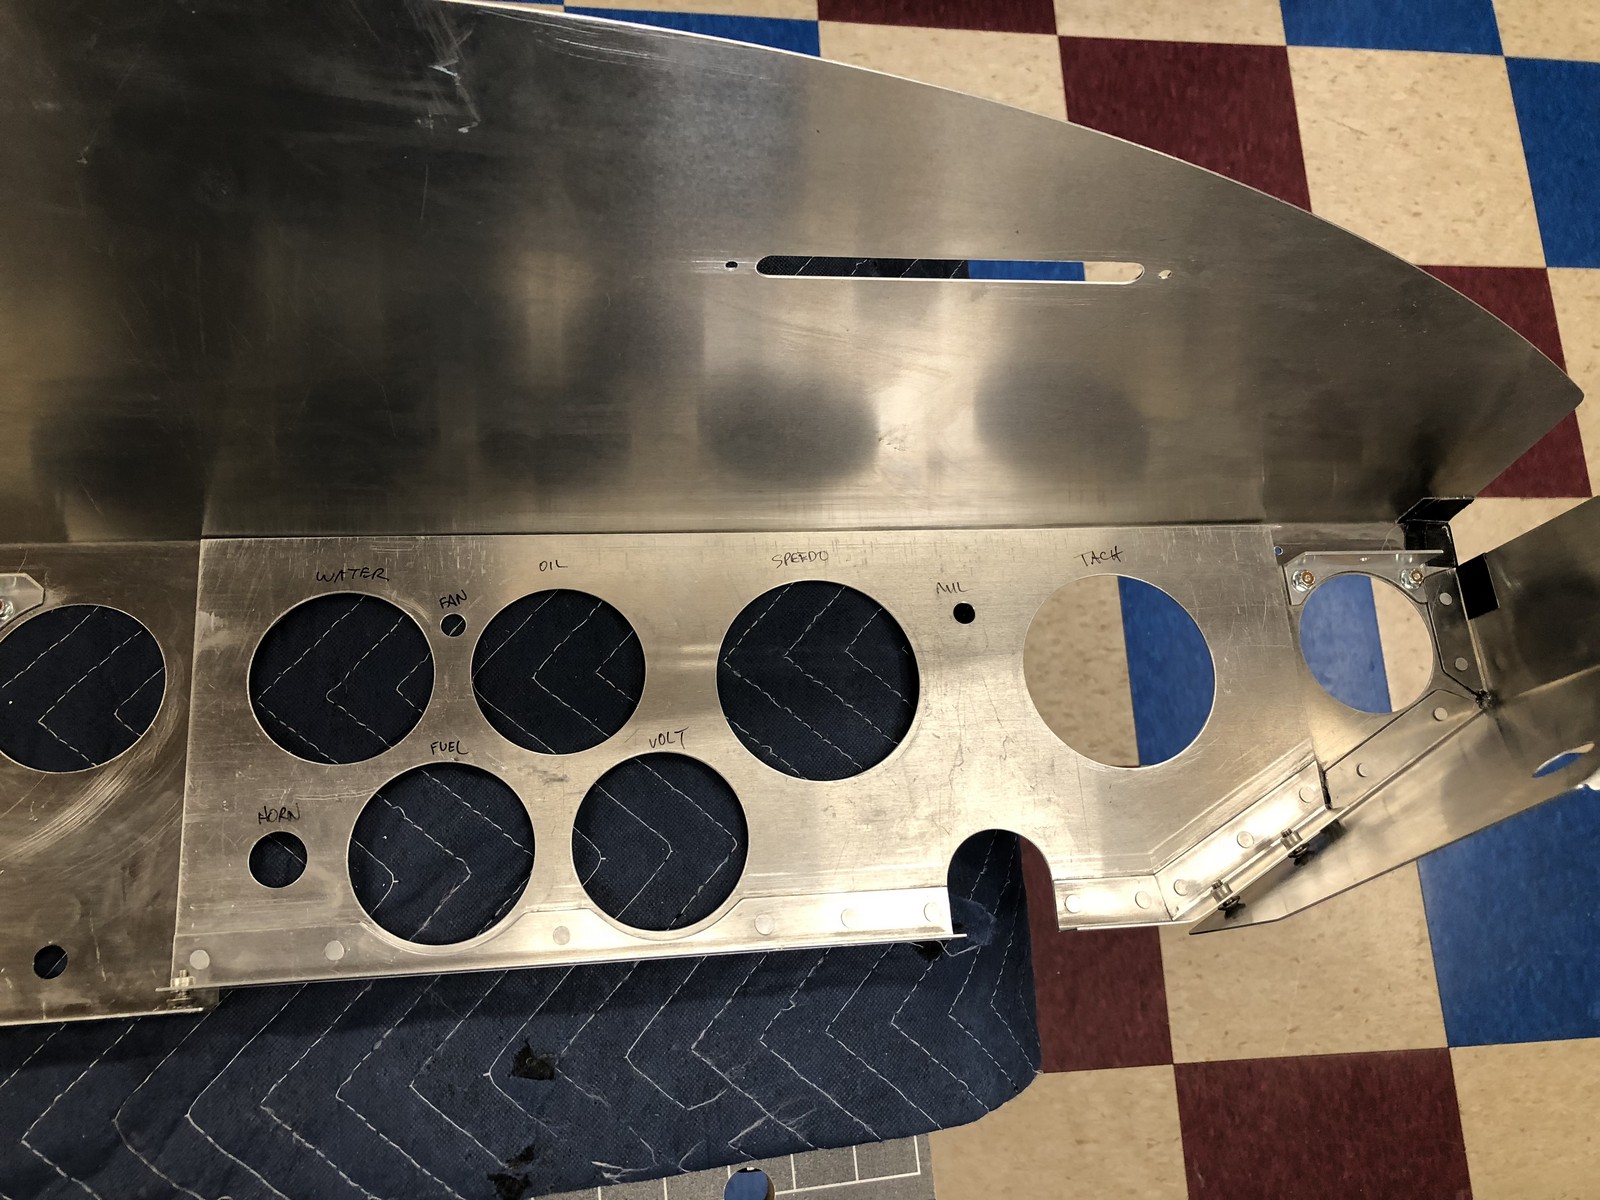
So that’s the plan. Subject to change of course (isn’t everything?) but where I’m headed. Last night dove in and made a new panel for the gauges. It’s patterned after the kit supplied piece, but with several changes. Made from .063 thick aluminum (versus .040) so it’s a little more solid, tweaked the tach and speedo locations slightly to give the best sight lines through the steering wheel, adjusted the hole size of the smaller gauges so the adapter ring is on the back versus the front, and will be adjusting the hole size for the steering column so it fits closely around the Russ Thompson turn signal assembly. Right now I just have a slot for the steering column, but will make the final cut matched to the turn signal when I get further along. I’ll be wrapping this in vinyl as described, so the hole sizes are all slightly oversized to allow the vinyl to pull through and be glued on the back side. I used an adjustable circle cutter in my drill press to make the holes. With a little cutting oil, works pretty well. Here’s a picture of the new piece over top of the kit supplied piece. Tentatively also showing locations for LED indicators for the Coyote MIL and fan (I like an indicator showing when it’s running) and the horn button. The turn signal and high beam indicators are built into the GPS speedo. I’m going to rivet a right angle piece along the bottom edge to give a little more stiffness and will also be part of the mounting.
Had a nice 60 degree day last week so #8674 came out of hibernation of its first drive of the season. Other than needing a couple pounds of air in the tires, everything was perfect. Started right up and ran like a champ. Man I like that car. Can’t wait for the real driving season to start. We’re doing an ice storm today. Just crazy.
Last edited by edwardb; 04-15-2018 at 10:17 AM.
Build 1: Mk3 Roadster #5125. Sold 11/08/2014.
Build 2: Mk4 Roadster #7750. Sold 04/10/2017.
Build Thread
Build 3: Mk4 Roadster 20th Anniversary #8674. Sold 09/07/2020.
Build Thread and
Video.
Build 4: Gen 3 Type 65 Coupe #59. Gen 3 Coyote. Legal 03/04/2020.
Build Thread and
Video
Build 5: 35 Hot Rod Truck #138. LS3 and 4L65E auto. Rcvd 01/05/2021. Legal 04/20/2023.
Build Thread. Sold 11/9/2023.
-
04-17-2018, 04:02 PM
#254
Senior Member

As usual... just an amazing build.
Thanks,
Al Adkins
Certified "Kool Aid" drinker
-
04-20-2018, 12:17 AM
#255
Hey, just wondering if you could post a picture or two on how you assembled your accelerator pedal. I called factory 5 for some tech help. they said placement of the pedal was up to me.
-
04-20-2018, 06:03 AM
#256
Senior Member
Originally Posted by
Automan
Hey, just wondering if you could post a picture or two on how you assembled your accelerator pedal. I called factory 5 for some tech help. they said placement of the pedal was up to me.
Sorry, haven't gotten that far yet. Since this is a Coyote build, will be using a DBW (Drive By Wire) accelerator assembly that comes with the not yet received Coyote crate motor package. I won't have or know any details before then. I installed the Coyote DBW assembly in #8674 sort of following the Factory Five Coyote installation manual. But the Roadster mounting is different than this Coupe.
Build 1: Mk3 Roadster #5125. Sold 11/08/2014.
Build 2: Mk4 Roadster #7750. Sold 04/10/2017.
Build Thread
Build 3: Mk4 Roadster 20th Anniversary #8674. Sold 09/07/2020.
Build Thread and
Video.
Build 4: Gen 3 Type 65 Coupe #59. Gen 3 Coyote. Legal 03/04/2020.
Build Thread and
Video
Build 5: 35 Hot Rod Truck #138. LS3 and 4L65E auto. Rcvd 01/05/2021. Legal 04/20/2023.
Build Thread. Sold 11/9/2023.
-
04-20-2018, 10:24 AM
#257
The foot well is pretty small. After talking with Mike at Fortes Parts I ordered his pedal pads http://fortesparts.com/index.php/pro...-or-v8-design/ 508 - 875 - 0016 Super helpful guy!
-
04-20-2018, 01:01 PM
#258
Senior Member
Originally Posted by
Wilder
I've used those pedals on Roadster builds. Nice parts. Look good and fit the Wilwood pedal arms perfectly. They're only slightly narrower than the stock Wilwood pedals at the center. But the taper makes them a little easier for your feet to navigate around.
The Gen 3 Coupe footwells on both DS and PS are larger than previous Coupes and the Roadster. Not having those big 4-inch chassis tubes makes a difference. But agree they can still be tight.
Build 1: Mk3 Roadster #5125. Sold 11/08/2014.
Build 2: Mk4 Roadster #7750. Sold 04/10/2017.
Build Thread
Build 3: Mk4 Roadster 20th Anniversary #8674. Sold 09/07/2020.
Build Thread and
Video.
Build 4: Gen 3 Type 65 Coupe #59. Gen 3 Coyote. Legal 03/04/2020.
Build Thread and
Video
Build 5: 35 Hot Rod Truck #138. LS3 and 4L65E auto. Rcvd 01/05/2021. Legal 04/20/2023.
Build Thread. Sold 11/9/2023.
-
04-20-2018, 01:53 PM
#259
If you are using the complete kit pedal just place it far "right" so it clears the steering shaft. I have the Forte mechanical linkage, not much extra room but it fits fine.
David W
Mkll 4874 built in 2004
Gen 3 coupe #16 registered 2018 painted 2019
-
04-20-2018, 10:58 PM
#260
-
04-21-2018, 05:38 PM
#261
Senior Member
More Instrument Panel
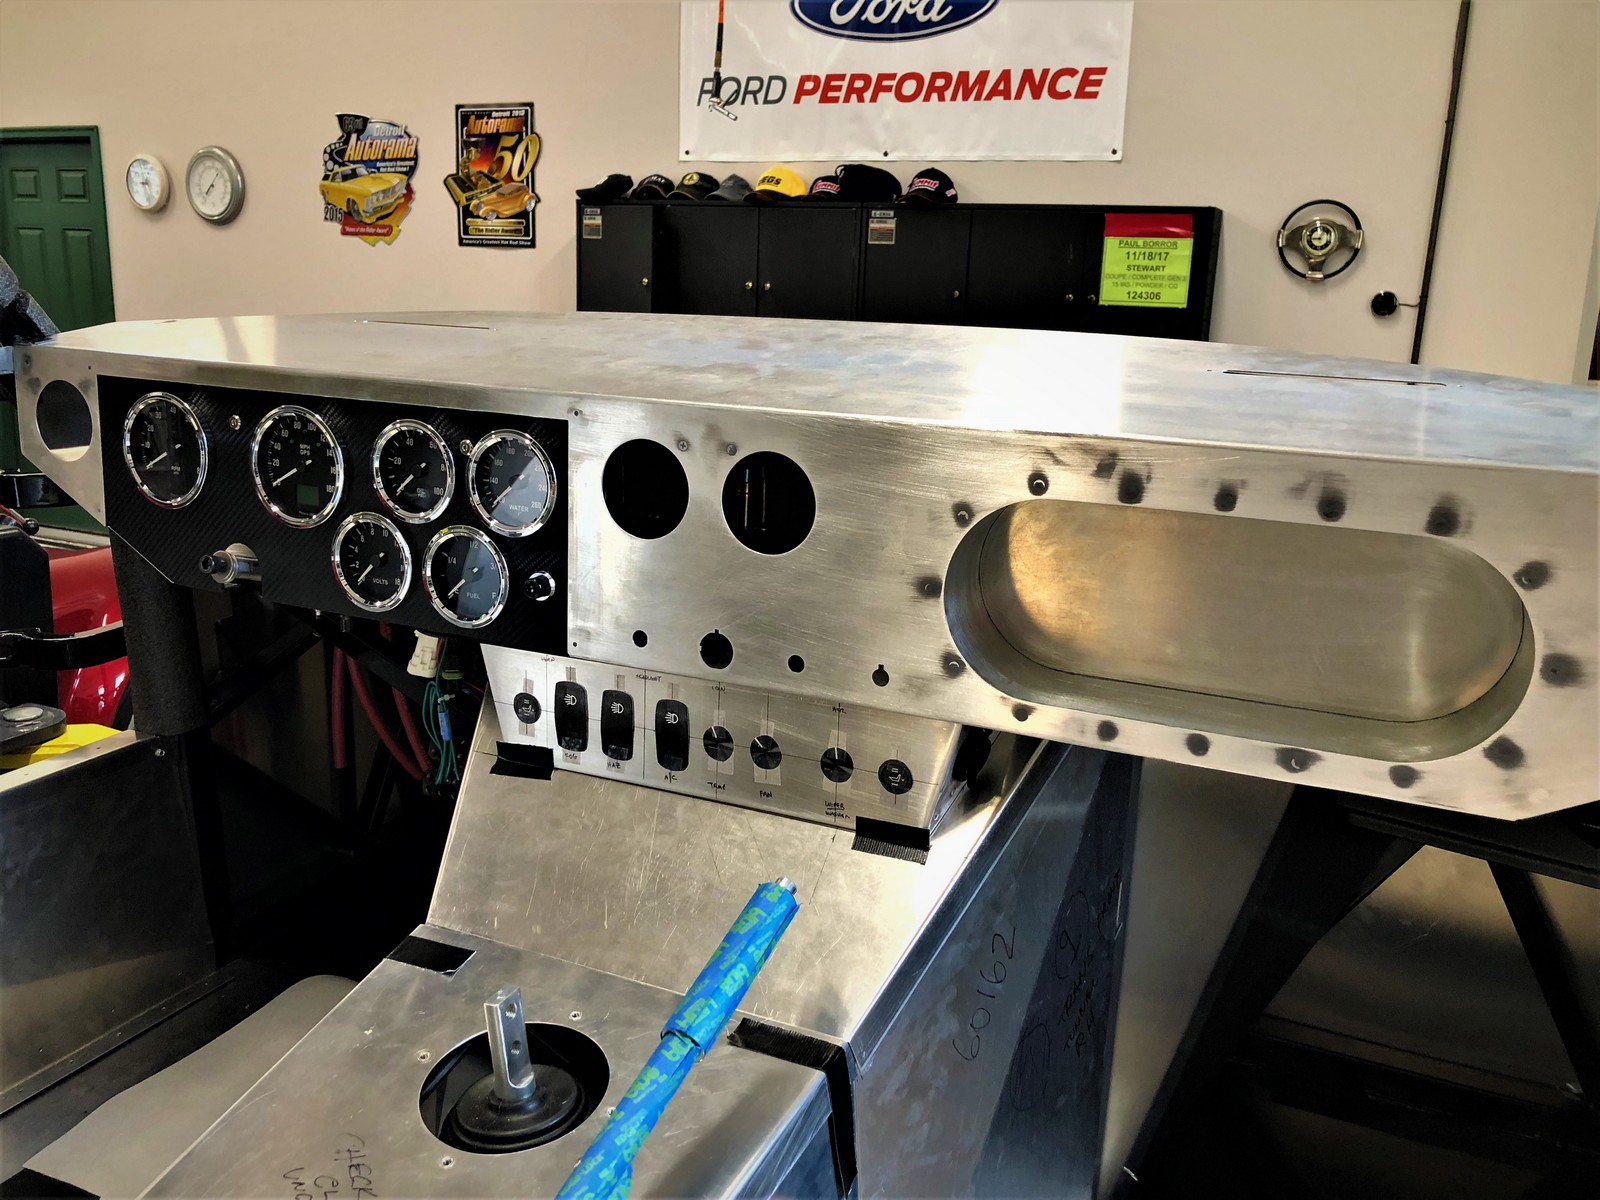
This picture looks pretty similar to pictures I’ve posted before while mocking up the dash. But this has a big difference. This is with my newly fabricated gauge panel, everything placed, and dash mounting determined.
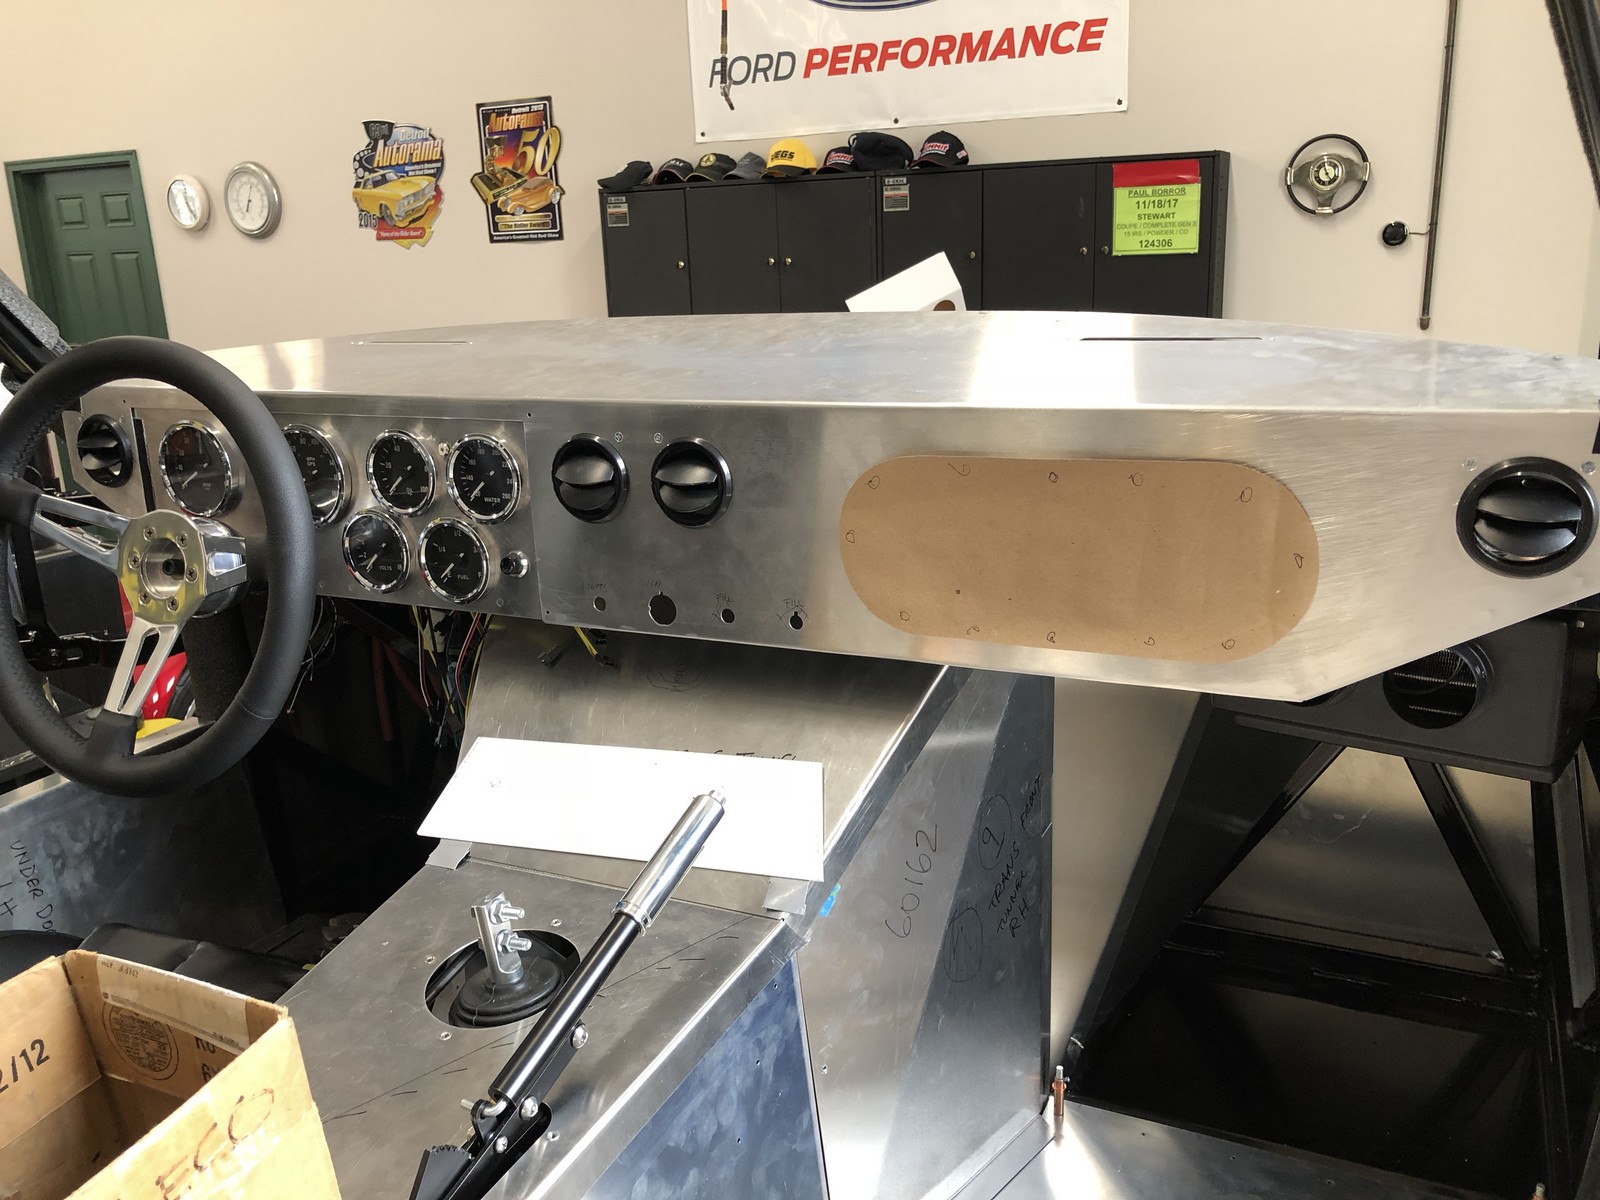
Here’s another view.

And another showing how I was able to get the Russ Thompson turn signal assembly tucked in pretty well.

Now for some details about the work completed to get to this point. First a disclaimer. The stock Factory Five dash setup is fine. It’s well thought out, everything fits, and provides a nice result. I just went at it with a few additional parameters, which I have to say resulted in quite a lot of extra work. It’s not for everyone and for some may not be worth it. Just want to put that out there. None of this is meant to be negative toward Factory Five. Just my own need for punishment I guess.
My first design goal, mentioned before, was to put the gauge panel behind the dash rather than mounted on the front. That actually turned out to be pretty easy. As pictured, at the top the panel slides between the back of the dash and the front of the 3/4-inch dash mounting tube. Then I have three 10-32 nutserts under the bottom edge to hold it in place. It will be pretty easy to drop the fully populated gauge panel out of the dash which gives wide access to the under dash area. Well, sort of easy. It will be necessary to unbolt the steering shaft bearing (reachable) and drop the steering wheel/turn signal assembly out of the way. Also will be necessary to remove the center switch panel that I’ll be adding. But it’s all doable from what I can see so far.
My second design goal, also mentioned before, is to have the dash mounting hidden. The ends were pretty easy. I riveted those in place with flush rivets, which will be hidden under the dash covering. Showed that before. The bigger challenge though was how to attach the dash to the 3/4-inch dash tube that spans from side-to-side. Unlike the Roadster, the dash piece is a large bent panel that includes not only the vertical dash itself but also the horizontal fill panel up to the windshield. This piece rests on the dash tube and the firewall which provides all the structural support. So however it’s attached only needs to keep it from sliding back. I stared at it for quite a while. Kept coming back to using right angle pieces attached to the back of the dash that could be screwed to the dash tube. Same as what I’ve done on Roadster builds. But couldn’t come up with locations that would be accessible to reach from behind to install/remove the screws. Then it hit me. I have four access panels on the dash already! The four heat/A-C vents. That’s way too easy. I ended up attaching three pieces of aluminum 3/4-inch angle stock to the back of the dash. Held in place with 6-32 flat head screws that will be buried under the covering. One at each end right behind the vents. And one in the center between the two vents. They’re spaced to fit tight against the underside of the dash tube. I’ll put nutserts in the dash tube (it’s pretty thin material) and be able to install/remove the screws through the vent holes. Some work needed to reach and remove the vents should it be necessary, but like the gauge panel, is doable. With the access provided with the gauge panel removed, I’m really not expecting to need to remove the dash once it’s installed. That’s my story and I’m sticking to it.
Here are pictures of the back side of the reworked dash with the mounting points plus the newly fabricated gauge panel. As pictured before, I put the end heat/A-C vents in the front of the dash rather than through the bottom as Factory Five shows. They fit, but it’s really tight. Then added the two in the middle. Note the right angle pieces I put around the bottom of the gauge panel. That plus being made out of thicker material (.063) it’s nice and stiff. You can also see the attachment points for the gauge panel along the bottom edge.
Next up is the glovebox. I’m planning to pretty much duplicate the method I used to make the glovebox for #8674. I’ll wrap sheet metal around some wood forms, add an aluminum back, an aluminum ring around the front, and bolt to the back of the dash opening. I’ll do a flush door also like #8674, covered with the same material as the dash. After that, will finalize the removable transmission tunnel covers and the center switch panel. I received the carbon fiber like vinyl covering from Corbeau that matches the panels in the seats. Looks like nice material. Made a couple small test panels and I think it’s going to work well and look good. I’m planning to cover the gauge panel as soon as the rest of the dash fabrication is completed.
Couple other brief updates. Received my “free” shift ball from Tremec. Found a Lokar shifter boot that I liked, and put together with the FF shifter trim ring. For the e-brake, couldn’t find a boot that seemed like it would work, so I asked FF what they used in their prototypes. They said they used the side mounted Roadster one and made it work. Which they included with the Coupe kit. So, found a Lokar trim ring that was the right size, and cut down the FF boot and glued to the bottom of the ring. It’s not perfect, but it's OK. I put 10-32 nutserts in the transmission tunnel cover in the right places and these are ready to install when the time comes.

Finally, similar to previous builds, got out the Fiebing’s leather finishing materials and dyed the door check straps. This is another one of those little touches that makes the car look more finished IMO.

That’s it. I think we finally have warmer weather here to stay. I put gas conditioner in the snow blower and banished it to the back of the garage. I'm done with that. My wife and I went on a nice cruise in #8674 today. Good to be out. Local events are starting up next weekend and into May. Ready to get back at it.
Last edited by edwardb; 04-21-2018 at 05:41 PM.
Build 1: Mk3 Roadster #5125. Sold 11/08/2014.
Build 2: Mk4 Roadster #7750. Sold 04/10/2017.
Build Thread
Build 3: Mk4 Roadster 20th Anniversary #8674. Sold 09/07/2020.
Build Thread and
Video.
Build 4: Gen 3 Type 65 Coupe #59. Gen 3 Coyote. Legal 03/04/2020.
Build Thread and
Video
Build 5: 35 Hot Rod Truck #138. LS3 and 4L65E auto. Rcvd 01/05/2021. Legal 04/20/2023.
Build Thread. Sold 11/9/2023.
-
04-22-2018, 05:45 AM
#262
Senior Member

As always, very nice work!!
-
04-22-2018, 07:26 AM
#263
Are you planning to keep the defroster vents as well as the extra dash vents? and please share details on the extra vent parts you added
thanks
David W
Mkll 4874 built in 2004
Gen 3 coupe #16 registered 2018 painted 2019
-
04-22-2018, 07:58 AM
#264
Senior Member
Originally Posted by
David Williamson
Are you planning to keep the defroster vents as well as the extra dash vents? and please share details on the extra vent parts you added
thanks
David W
Yes. Still will use the defrost vents. The inside heat/A-C unit has two outlets. The instructions show routing one duct to the dash vents and the other to the defrosters. My plan is add the center dash vents to the defroster duct. The center vents will have less airflow than the outside vents and always also airflow through the defrosters. But still (I hope) provide some additional circulation. If maximum defrost is needed, the idea is just to close the center dash vents. It's all pretty basic since the heat/A-C unit itself is pretty basic. I'm trying to stay away from adding additional valves, controllers, etc. I don't expect it to work like the multi-zone automatic climate control system in our SUV. Just provide some heat and cooling which I've never had in these builds anyway. We'll see. Please we have the heated seats described previously. The additional parts required are all readily available. I bought a couple Y connectors, additional duct, and the two vents from Summit. All Vintage Air parts. The vents are Vintage Air Louver 499193 which match the ones provided by FF on the front and are in the pictures I posted. Slightly different on the back (for a thinner dash) but will work fine for this application. I couldn't find the exact ones FF supplied, but the difference doesn't matter.
Last edited by edwardb; 04-22-2018 at 08:03 AM.
Build 1: Mk3 Roadster #5125. Sold 11/08/2014.
Build 2: Mk4 Roadster #7750. Sold 04/10/2017.
Build Thread
Build 3: Mk4 Roadster 20th Anniversary #8674. Sold 09/07/2020.
Build Thread and
Video.
Build 4: Gen 3 Type 65 Coupe #59. Gen 3 Coyote. Legal 03/04/2020.
Build Thread and
Video
Build 5: 35 Hot Rod Truck #138. LS3 and 4L65E auto. Rcvd 01/05/2021. Legal 04/20/2023.
Build Thread. Sold 11/9/2023.
-
04-22-2018, 09:54 AM
#265
Raer Quarter Window Recon
Originally Posted by
edwardb
One last follow-up item. Received the Gen 3 side windows as described and pictured in a previous update. There was an open question about the rear quarter windows since the kit comes with a scoop for that opening. Not too useful if you’re trying to keep the elements out. I received the backordered quarter windows that go with the windows. They are designed to go on the inside of the quarter window opening. The outside scoops wouldn’t need to be removed. But the inside panels would close the opening. Maybe the previous Coupes were the same way. But this is new to me and I had gotten a question or two.
EdwardB,
Catching up on your thread. I went to Barrett Jackson last week in FL(Awesome!) and I saw a Gen 2 Coupe with these inner rear quarter windows installed. It was hinged and latched. Not sure if this hardware comes with the kit. My questions are:
Coupe Rear Windowa.jpg
When unlatched and open, does the panel flap about under the wind pressure?
With the window latched and closed, does the seal hold against the wind pressure at speed.
I am sure this is a known amongst completed coupe owners.
By the way, I am curious if you plan to install the battery as the manual recommends.
Last edited by jdavis500; 04-22-2018 at 10:29 AM.
-
04-22-2018, 12:15 PM
#266
Senior Member
Originally Posted by
jdavis500
EdwardB,
Catching up on your thread. I went to Barrett Jackson last week in FL(Awesome!) and I saw a Gen 2 Coupe with these inner rear quarter windows installed. It was hinged and latched. Not sure if this hardware comes with the kit. My questions are:
Coupe Rear Windowa.jpg
When unlatched and open, does the panel flap about under the wind pressure?
With the window latched and closed, does the seal hold against the wind pressure at speed.
I am sure this is a known amongst completed coupe owners.
By the way, I am curious if you plan to install the battery as the manual recommends.
No hardware is provided for the inner windows other than screws for a fixed mount. Having them pivot is an interesting idea. At this stage I have no idea how all that will work, flap, seal, whatever. I'll get back to you in a year or so. 
Yes, I'm planning to put the battery in the kit recommended location in the front right behind the radiator tunnel. I've used the Breeze front mount kit on Roadster builds, and like that location a lot. I'm going to wait until I have the actual engine mocked up though to confirm the location since there's quite a bit going on up there.
Build 1: Mk3 Roadster #5125. Sold 11/08/2014.
Build 2: Mk4 Roadster #7750. Sold 04/10/2017.
Build Thread
Build 3: Mk4 Roadster 20th Anniversary #8674. Sold 09/07/2020.
Build Thread and
Video.
Build 4: Gen 3 Type 65 Coupe #59. Gen 3 Coyote. Legal 03/04/2020.
Build Thread and
Video
Build 5: 35 Hot Rod Truck #138. LS3 and 4L65E auto. Rcvd 01/05/2021. Legal 04/20/2023.
Build Thread. Sold 11/9/2023.
-
04-23-2018, 09:44 AM
#267
Found the rear quarter window insert detailed on mtwarog's coupe build. They are Russ Thompson for Gen 2.
https://thefactoryfiveforum.com/show...d-Thread/page4
-
04-23-2018, 11:55 AM
#268
Are you using aircraft style pneumatic flush rivets rather than the blind pop rivets? New tool?
-Steve
-
04-23-2018, 12:39 PM
#269
Senior Member
Originally Posted by
Straversi
Are you using aircraft style pneumatic flush rivets rather than the blind pop rivets? New tool?
-Steve
Nope, no new tools (darn it...). Those are 1/8-inch aluminum flush-mount solid rivets from McMaster. I've used them occasionally on several builds. Nothing very high tech or complicated happening. After making the hole and countersink, put the flat side on a small anvil and carefully set the other side with a hammer. They're pretty soft and it's not hard to do. I think they're pretty strong. At least as strong as 1/8-inch aluminum pop rivets. But I don't use them for anything structural. Mainly just for smaller things that I'm fabricating and want the fastener hidden/flush on the one side. Like what I guess you're seeing on the dash and gauge panel. Works perfect for that.
Last edited by edwardb; 04-23-2018 at 12:44 PM.
Build 1: Mk3 Roadster #5125. Sold 11/08/2014.
Build 2: Mk4 Roadster #7750. Sold 04/10/2017.
Build Thread
Build 3: Mk4 Roadster 20th Anniversary #8674. Sold 09/07/2020.
Build Thread and
Video.
Build 4: Gen 3 Type 65 Coupe #59. Gen 3 Coyote. Legal 03/04/2020.
Build Thread and
Video
Build 5: 35 Hot Rod Truck #138. LS3 and 4L65E auto. Rcvd 01/05/2021. Legal 04/20/2023.
Build Thread. Sold 11/9/2023.
-
04-26-2018, 10:59 PM
#270
Senior Member
Glovebox
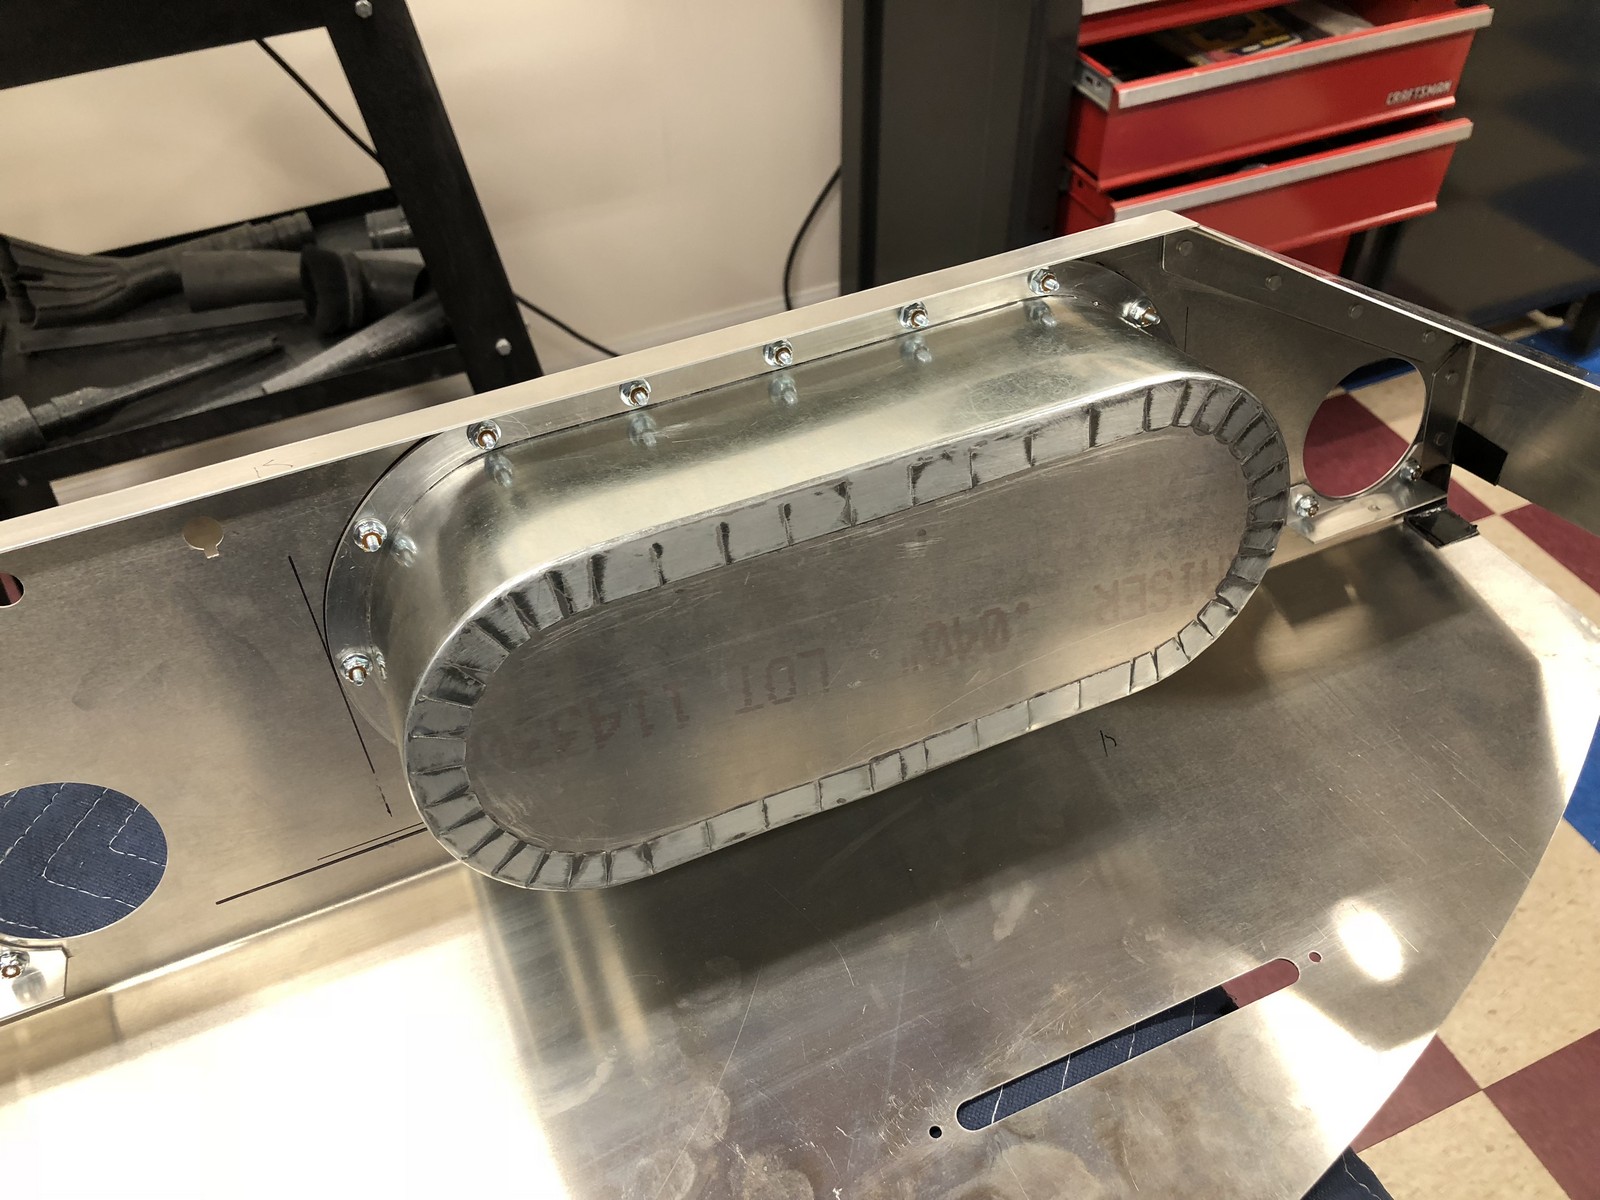
Busy week so not as much shop time. With warmer weather comes yard work. But did manage to get the glovebox mostly fabricated. I used very similar materials and methods as #8674, the same depth, but a different shape. I made three internal forms out of leftover shelf stock MDF bolted together with spacers between, a back out of .040 aluminum, and a front ring out of .090 aluminum. The sides are galvanized steel duct material from Home Depot. First wrapped the sides around the forms with about a 2-inch lap at the top held for now with JB Weld. Then a bunch of pie cuts and bent over onto the back. Then more pie cuts and bent around the front ring. Right now the back and front ring are also held together at the bends with JB Weld. Once it’s installed, the front ring will be bolted through the dash, and the lap on the top will have bolts from the latch. The back isn't going anywhere. Once it was done, wasn’t too easy to get the forms out. Ended up drilling holes in them and they broke pretty easily.
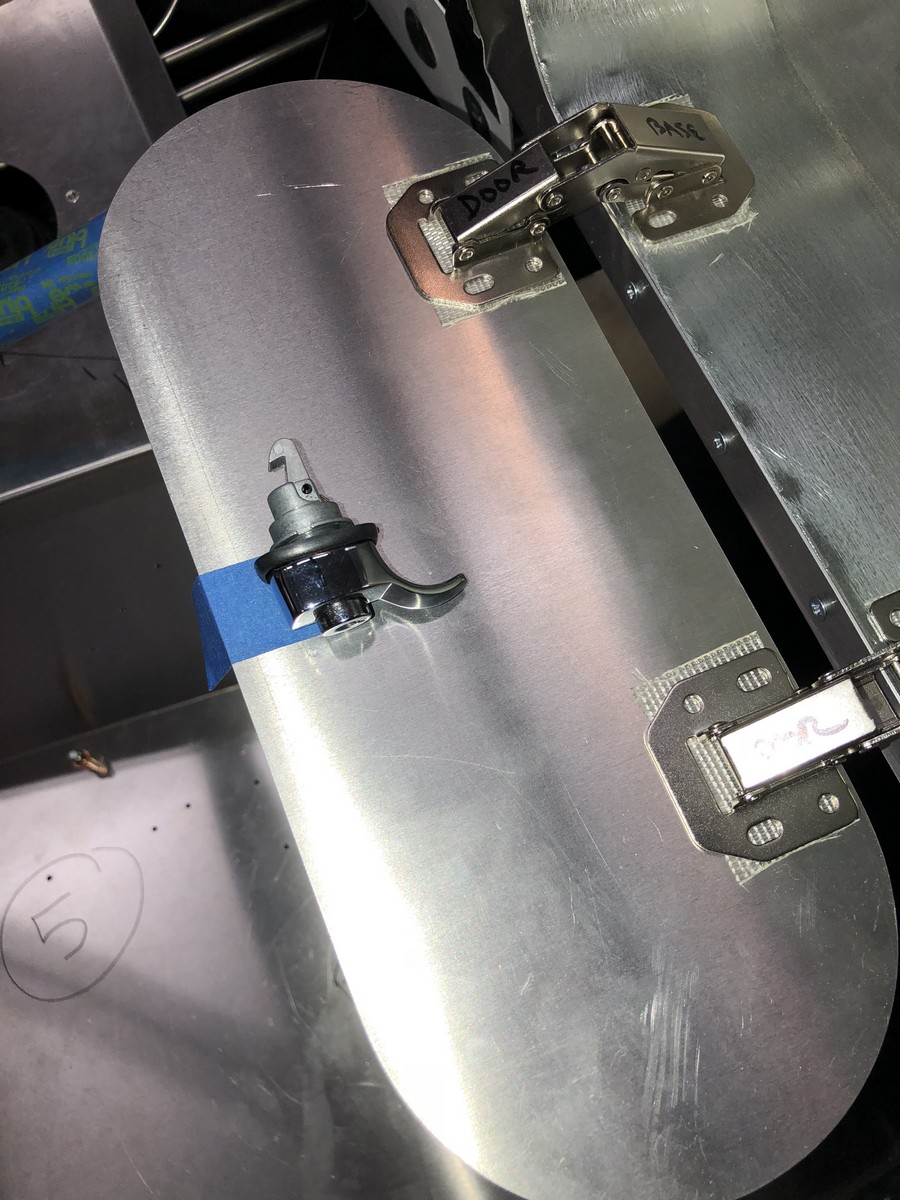
Then made the cutout in the dash, drilled mounting holes, and temporarily bolted into place. Still need to countersink the screws into the face of the dash. They’ll be buried under the dash covering. The glovebox will be removed while the covering is applied, with the covered wrapped through the opening and glued onto the back of the dash. The interior of the glovebox will also be covered, and that wrapped onto the front lip. Then bolted in placed with a nice finished transition when open. The door will be two pieces of .040 aluminum wrapped with covering and sandwiched together. I’m using the same 173167 Richelieu cabinet hinges from Lowes as #8674, which were also on #7750 from Alex’s Custom Roadster. They're a little chunky, but work very well and have the perfect geometry to lift and drop the zero clearance door out of the opening. I looked at a couple other possibilities but came back to those. Also using the same VW 111857131L pull/lock as #8674. Read about that one on the forum quite some time ago, and it’s also perfect for this application. Available lots of places. This one was $20 shipped from eBay.
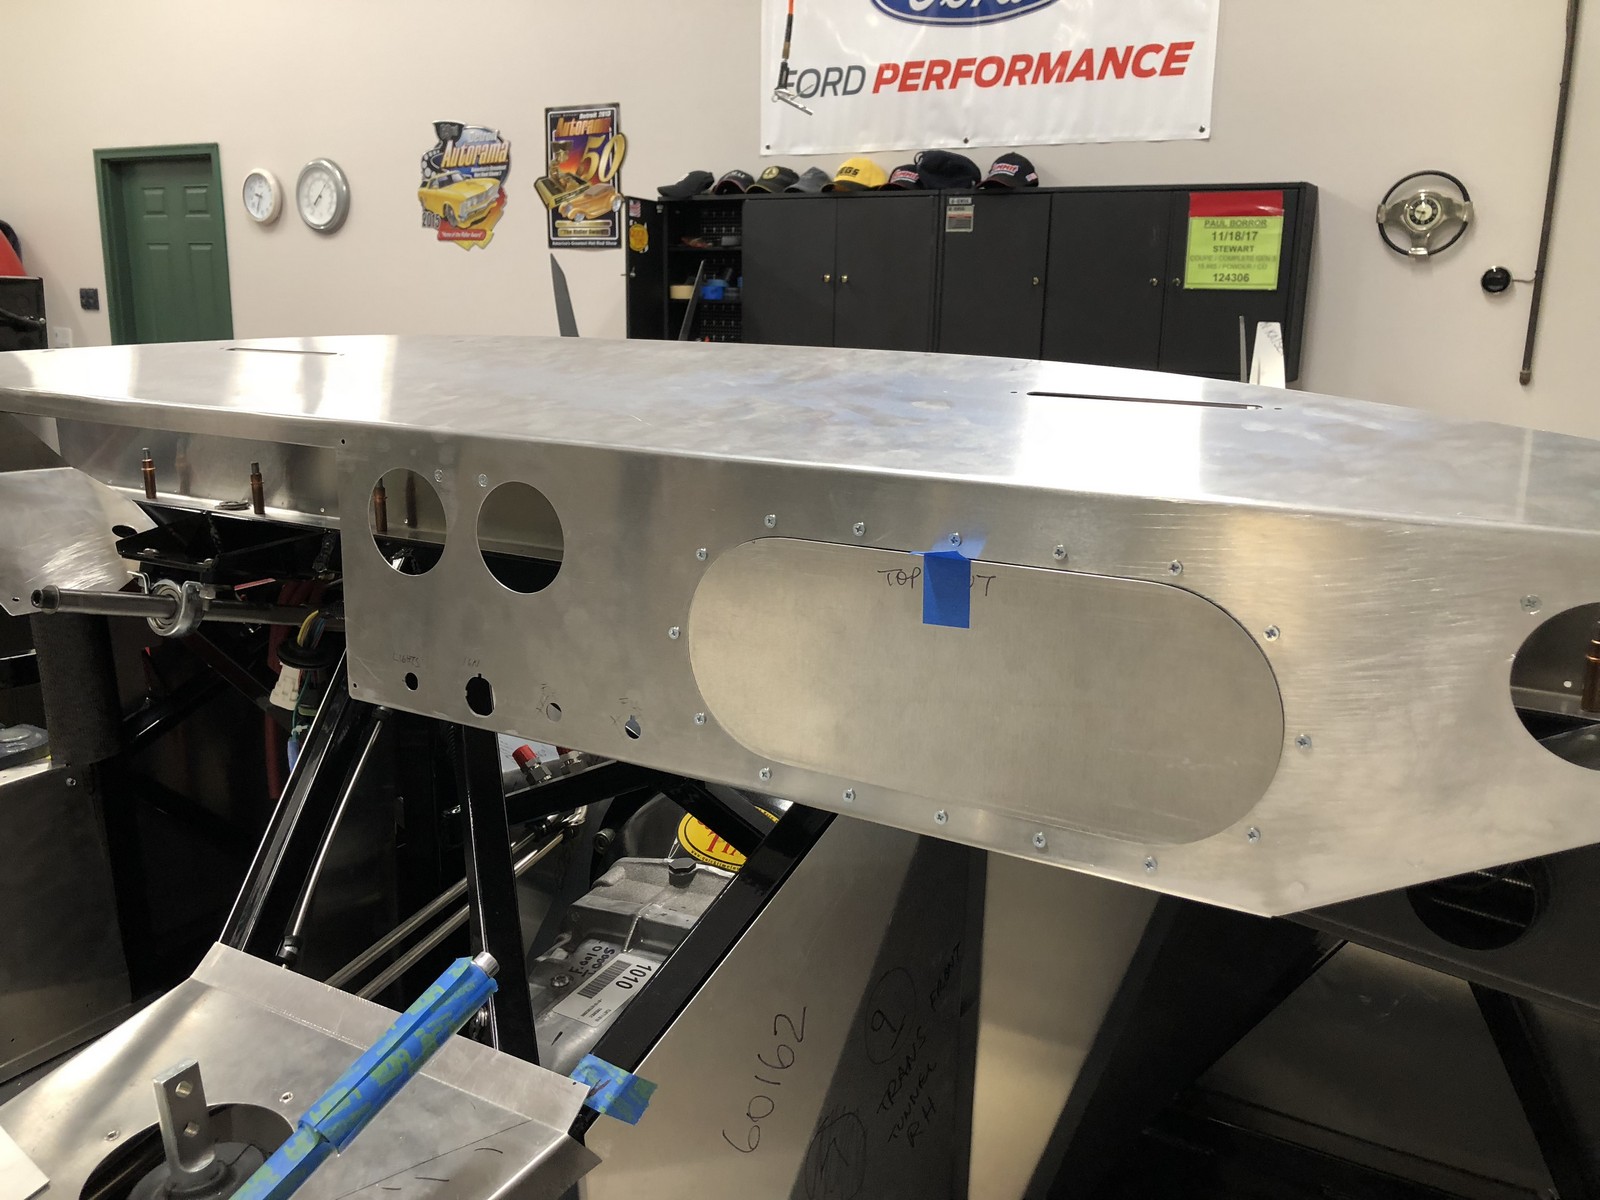
Here is the mostly finished glovebox installed in the dash.
In the chassis with a very temporarily mounted door half. When finally fitted and covered, the door will be completely flush with the face of the dash.
Interior checking the operation of the hinges, mounted temporarily with double back tape. As mentioned before, the mounting screws still need to be countersunk. I used maybe more screws than necessary. But once I had the hole cut, took a pretty big divot out of the dash and it was a little floppy. So using enough screws so that the glovebox puts some strength back into it. Feels solid.

This is the VW latch that will be installed in the door. I like it because the latch is spring loaded and is just push to close. To open, press the button and pull. The lock is only needed if you actually want to lock it. Some other latches require the key all the time. This one doesn’t.
I saw this in the shop while making the glovebox, and got a chuckle. I seem to be in the upper range of the “how many clecos does it take” contest. What about a new category? How many clamps does it take? This is gluing the front ring on the glovebox after bending the metal over onto it. The scrap piece of MDF is to make sure it ends up flat. Maybe I got a little carried away.

Most of the remaining work on the glovebox will be when it’s covered and then fitted for final assembly. Next up is the center switch console. With that fabricated, my dash will be nearing completion and ready for covering.
My Gen 3 Coupe update box arrived this week from Factory Five. Contained several updated aluminum panels, one pair of new aluminum panels, and updated hinges for the hatch. The good news is none of the panels that I’ve drilled and fit were included. Which is what I expected based on some advance information. One of the pieces was mounted for shipping. But the rest were from the loose aluminum box. The four pieces are: (1) Replacement front wheel rear lower splash. New pieces are quite different. (2) Replacement upper engine bay splash guards. The ones that are mounted inside the nose. Only minor changes. (3) New pieces, not received before, to mount in the front of the rear wheel well. Covers several openings in that area. (4) Replacement front wheel inside splash panels. These are the ones that were previously mounted. No big deal. In this picture the old piece is still mounted and the new piece below. The main difference is opening up the area where the headers exit. I’ve seen this mentioned in other builds where guys have cut the piece above the opening off. Now it's official I guess.

The revised hatch hinges apparently allow it to open further. I did have the old ones powder coated already. Oh well. Will include the new ones in my next batch. Thanks Factory Five for making continued improvements to the Gen 3 Coupe and supplying the updated parts to those of us who’ve already taken delivery. My understanding is they shipped 60 or so of these update boxes.
Big shoutout to my buddies at the 2018 Huntington Beach Cruise-In this weekend! Some day I’ll have to make it out to that event. I grew up not too far from there. This weekend we have a big Cars and Coffee to kick off the season. This one typically has 1000+ cars and is pretty crazy. Ford Performance is one of the features of this months event. Weather looks cool but so far dry. Looking forward to getting out.
Last edited by edwardb; 07-08-2018 at 08:00 PM.
Build 1: Mk3 Roadster #5125. Sold 11/08/2014.
Build 2: Mk4 Roadster #7750. Sold 04/10/2017.
Build Thread
Build 3: Mk4 Roadster 20th Anniversary #8674. Sold 09/07/2020.
Build Thread and
Video.
Build 4: Gen 3 Type 65 Coupe #59. Gen 3 Coyote. Legal 03/04/2020.
Build Thread and
Video
Build 5: 35 Hot Rod Truck #138. LS3 and 4L65E auto. Rcvd 01/05/2021. Legal 04/20/2023.
Build Thread. Sold 11/9/2023.
-
04-27-2018, 02:36 AM
#271
Senior Member

-
04-27-2018, 05:23 AM
#272
Senior Member

Looks great Paul. Steps like this really take your build to the next level. People at a car show will see a glove box and think nothing of it. Amazing how much work goes into the fine details!
Hopefully that warm weather that brings yard work also brings opportunity for a drive in 8674!!
MK4 #8900 - complete kit - Coyote, TKO600, IRS - Delivered 6/28/16 First Start 10/6/16 Go cart - 10/16/16 Build completed - 4/26/17 - 302 days to build my 302 CI Coyote Cobra - Registered and street legal 5/17/17
Build Thread
http://thefactoryfiveforum.com/showt...e-build-thread
PHIL 4:13 INSTAGRAM - @scottsrides
-
04-27-2018, 11:10 AM
#273
Paul, where is the cars and coffee and on what day? I will be all over MI this weekend and would love an opportunity to make it out if it fits my schedule.
Re: the "how many flecks" club, I was always amazed that you recommend fewer clecos than I have used with the number I see on each panel in your pictures!
-
04-27-2018, 11:35 AM
#274
Senior Member
Originally Posted by
JoeAIII
Paul, where is the cars and coffee and on what day? I will be all over MI this weekend and would love an opportunity to make it out if it fits my schedule.
Re: the "how many flecks" club, I was always amazed that you recommend fewer clecos than I have used with the number I see on each panel in your pictures!
The cars and coffee this weekend is at M1! Officially 8:00 am - 11:00 am. But GLCC members will be there early to park together and hopefully be on the infield area.
LOL. I'm always on the high side of the "how many clecos" club. Some guys say 10, 15, 20, etc. I probably have 100+, and sometimes run out. 
Build 1: Mk3 Roadster #5125. Sold 11/08/2014.
Build 2: Mk4 Roadster #7750. Sold 04/10/2017.
Build Thread
Build 3: Mk4 Roadster 20th Anniversary #8674. Sold 09/07/2020.
Build Thread and
Video.
Build 4: Gen 3 Type 65 Coupe #59. Gen 3 Coyote. Legal 03/04/2020.
Build Thread and
Video
Build 5: 35 Hot Rod Truck #138. LS3 and 4L65E auto. Rcvd 01/05/2021. Legal 04/20/2023.
Build Thread. Sold 11/9/2023.
-
04-27-2018, 01:36 PM
#275
For general info: Flat head blind rivets from Pop, a Black & Decker Co, > Pop number AK 66 H, Alum 3/16 with a 3/32 steel shank (thick wall). The countersink angle is about 140°. I use a 135° drill bit. Available from Mcm-Carr.
-
04-27-2018, 03:50 PM
#276
Senior Member
Originally Posted by
mickent
For general info: Flat head blind rivets from Pop, a Black & Decker Co, > Pop number AK 66 H, Alum 3/16 with a 3/32 steel shank (thick wall). The countersink angle is about 140°. I use a 135° drill bit. Available from Mcm-Carr.
Look like nice enough rivets. What's this in relation to?
Build 1: Mk3 Roadster #5125. Sold 11/08/2014.
Build 2: Mk4 Roadster #7750. Sold 04/10/2017.
Build Thread
Build 3: Mk4 Roadster 20th Anniversary #8674. Sold 09/07/2020.
Build Thread and
Video.
Build 4: Gen 3 Type 65 Coupe #59. Gen 3 Coyote. Legal 03/04/2020.
Build Thread and
Video
Build 5: 35 Hot Rod Truck #138. LS3 and 4L65E auto. Rcvd 01/05/2021. Legal 04/20/2023.
Build Thread. Sold 11/9/2023.
-
04-28-2018, 06:06 AM
#277
That's what I was afraid of. I am in Cadillac today, will be down that way tomorrow.
Maybe next time. I grew up in metro detroit, so I always have people trying to get me to come visit.
-
05-05-2018, 09:25 AM
#278
Senior Member
Instrument Panel Again
Slow going, but made some good progress I think since the last update. My instrument panel is coming together. First up was to fabricate the center switch panel described previously. It will fit between the bottom of the dash and rest on the front transmission tunnel cover. Made a template from file folder stock (that’s what it’s for, right?) and cut out the aluminum piece.
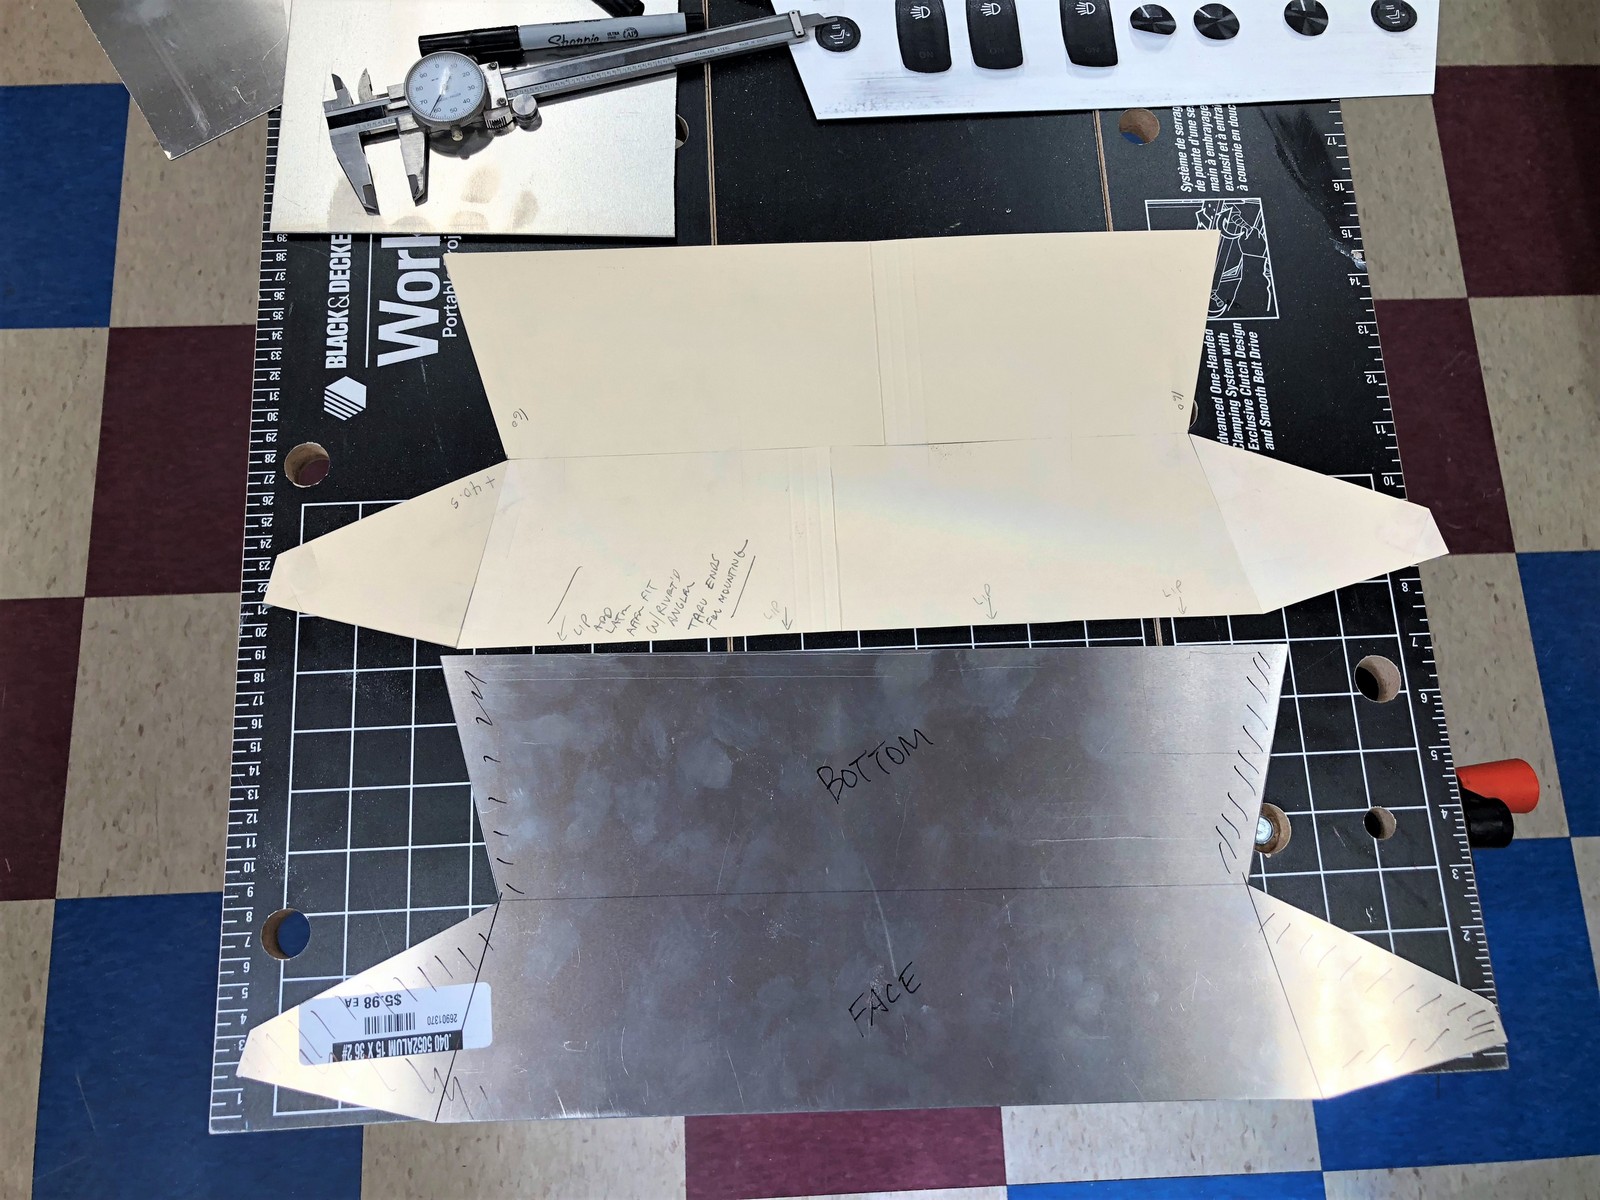
Then with a little persuasion on the brake plus a little more since it was beyond its capability, had the shape I was looking for. Used .040 5052 aluminum. First because I had some and it’s easy to work with. Plus that front bend might be a little too much for 6061. I didn’t try to bend tabs on the seams where it joins. Just didn’t trust that I could do it accurately enough, plus added more complexity to the bending. I flush riveted corner pieces on each end later to tie it together. Not pictured here.

Drilled holes in each end for the USB and auxiliary outlets, and mocked up under the dash. Happy with how it turned out. It will be attached to the tunnel cover and the front edge of the dash. Will hold it in place, plus give some support and solidity to the dash itself. Also in this picture is the new front transmission tunnel cover I made. Once again was faced with whether it was easier to mod the existing part or make new. I chose the latter. I wanted the center transmission cover (the one with the shifter and e-brake) to fit over a tab on the front cover. That way the center piece can be removed without removing the front one since I’m going to have them both removeable. Factory Five has it the opposite, requiring the front cover to be removed before the center cover (not easy with the switch panel and dash resting on it), and IMO should consider changing it. I could have spliced a piece on. But chose to make a whole new one. It was slightly more work but a little cleaner. The front cover will be held at the top with screws (vs. rivets) into the 2x2 frame tube and the tab at the bottom. The center cover will be held with screws through the sides. Just not an easy way to make the screws hidden like on #8674. But it will be OK.

Next moved to covering the gauge cluster panel. Here I’m using the sorta C-F looking vinyl that I got from Corbeau that matches panels in my seats mentioned previously. The material is a nice quality cloth backed vinyl with an added layer of open cell foam and another cloth layer. For this purpose, don’t want the added foam so pulled off the back cloth layer and scraped off the foam. Leaving just the top cloth backed vinyl. I would normally use my standard go-to DAP Weldwood Landau contact cement, but none on hand and not sure how much I’ll really need for this build. Only comes in gallons and isn't cheap. So instead used Weldwood Gel Formula contact cement. Stock item at Lowes. Doesn’t set up as quickly as the Landau, but for this purpose worked fine. After lots of gluing and cutting, got it covered. Put the gauges, lights and switches in and of course first thing had to see what it looked like all lit up. I like it.

The two small LED’s from Watson’s Streetworks are quite a bit brighter than the three LED’s in the Speedhut speedo. The red will be the MIL from the Coyote, so I’m OK if it’s bright. If it’s on, needs to get immediate attention. The amber light is my “fan running” indicator and I’ll tone it down a bit with a resister. Easy to do when things get wired up. Speaking of wiring, just a little bit of work to do on the backside.

Here’s how it looks installed in the dash.

Last edited by edwardb; 05-05-2018 at 07:15 PM.
Build 1: Mk3 Roadster #5125. Sold 11/08/2014.
Build 2: Mk4 Roadster #7750. Sold 04/10/2017.
Build Thread
Build 3: Mk4 Roadster 20th Anniversary #8674. Sold 09/07/2020.
Build Thread and
Video.
Build 4: Gen 3 Type 65 Coupe #59. Gen 3 Coyote. Legal 03/04/2020.
Build Thread and
Video
Build 5: 35 Hot Rod Truck #138. LS3 and 4L65E auto. Rcvd 01/05/2021. Legal 04/20/2023.
Build Thread. Sold 11/9/2023.
-
05-05-2018, 09:25 AM
#279
Senior Member
Instrument Panel Again (continued)
Wider shot showing the newly fabricated center switch panel with my simulated switches. With things finalized, need to get those ordered. The center switch panel will have the same C-F style vinyl. Everything else will be standard pebbled vinyl with some red stitching as described previously.

Still more to do, but its getting there. Real happy with how it's turning out so far.
Build 1: Mk3 Roadster #5125. Sold 11/08/2014.
Build 2: Mk4 Roadster #7750. Sold 04/10/2017.
Build Thread
Build 3: Mk4 Roadster 20th Anniversary #8674. Sold 09/07/2020.
Build Thread and
Video.
Build 4: Gen 3 Type 65 Coupe #59. Gen 3 Coyote. Legal 03/04/2020.
Build Thread and
Video
Build 5: 35 Hot Rod Truck #138. LS3 and 4L65E auto. Rcvd 01/05/2021. Legal 04/20/2023.
Build Thread. Sold 11/9/2023.
-
05-05-2018, 06:39 PM
#280
Edwardb,
Really like the dash layout. Seems very readable positions. Nice!
Len
1972 Corvette Stingray 350 c.i. Manual Steering & Brakes
2003 H-D Softail Deuce 88 c.i. TwinCam
Gen 3 Coupe Dreamer
 Posting Permissions
- You may not post new threads
- You may not post replies
- You may not post attachments
- You may not edit your posts
-
Forum Rules

Visit our community sponsor


 Reply With Quote
