-
Aluminum paint, clear, or powder coat?
The complete kit got delivered day before yesterday and I am already clearly on the fence about what to do with the aluminum panels. I have been lurking on the forums for about a year and all of the examples of paint, powder coat, truck bed liner or just a clear coat have looked great.
Why did you choose one method over the other? What was the practical benefits of one over the other? Drawbacks?
Thanks in advance for your help guys.
Don
-
I ended up with semi-polished bare aluminum. If I were to do it again I’d powder coat.
Last edited by steno; 01-23-2018 at 11:25 AM.
FFR 5136 Started as a donor...donor guages, engine, trans,etc. Now...TFS street intake,stage 1 cam, GT40p's,24# injectors and 80mm MAF,70mm TB,Z-spec t-5, and PSE Halibrand wrapped with Nitto 555 G2s. My ever evolving dream car!!
-
Senior Member

Like so many build choices, there are multiple considerations. What do you want the final job to look like? Some prefer the raw look of the aluminum. Some like the more finished look of paint or powder coat. There's also a cost consideration obviously. Powder coat cost varies, but figure it's a $750 - $1000 bill to do everything. Paint or other finishes can be DIY for less, but don't overlook how much work it is. I'm not a fan of truck bed liner on exposed panels. Not as finished looking and hard to keep it clean IMO. I personally do powder coat on my builds. Like the look and it stays that way for years.
Last edited by edwardb; 01-22-2018 at 12:35 PM.
Build 1: Mk3 Roadster #5125. Sold 11/08/2014.
Build 2: Mk4 Roadster #7750. Sold 04/10/2017.
Build Thread
Build 3: Mk4 Roadster 20th Anniversary #8674. Sold 09/07/2020.
Build Thread and
Video.
Build 4: Gen 3 Type 65 Coupe #59. Gen 3 Coyote. Legal 03/04/2020.
Build Thread and
Video
Build 5: 35 Hot Rod Truck #138. LS3 and 4L65E auto. Rcvd 01/05/2021. Legal 04/20/2023.
Build Thread. Sold 11/9/2023.
-
Senior Member

Powder coating is more durable, but I chose to paint my panels because I knew there was no way I'd capture everything I wanted powder coated in one or even two batches. In other words, I could paint panels (and components, like parking brake brackets, brake light switch bracket, the ears that go under the front quick jacks and up to the front turn signals, ...) as I needed them. Plus I can paint a panel and the next day its ready for permanent installation; no waiting for the powder coater (or driving to and from...that's a big deal in Northern VA). I used Rustoleum hammer tone engine paint on the surfaces facing the engine & headers (firewall, interior & front foot box panels), regular Rustoleum hammer tone on the outer foot box & trunk side panels, and truck bed liner on the road facing surfaces.
Of course, you could go a hybrid route, where you powder coat all the stuff you can think of and then paint to match the stuff you forgot.
John
P.S. In the drawback department, if you have a heater, figure out where the shutoff valve is going to go & protect that panel with something. My passenger foot box paint is scuffed because I didn't think about the valve until after I gooned up my paint while securing the heater hoses.
MK IV Roadster #8631
Ford 302, Holley Terminator EFI, T5z, 3.55 Rear End, IRS, 17 Halibrand Replicas (9 front, 10.5 rear), Nitto 555 G2s (275/40ZR17 front, 315/35ZR17 rear), Fast Freddies Power Steering, F5 Wilwood Brakes, FFMetals Firewall Forward, Fortes Hydraulic Clutch & Throttle Linkage
https://www.ffcars.com/threads/phile.../#post-4776313
-
I've clear coated the aluminum with either Rust-oleum spray can enamel or POR-15's "Glisten PC" two-part clear after wet-sanding with 220 grit paper. Neither is as durable as powder but they are good enough for a race car and have a nice finish. My budget was very tight for a few years and doing it this way allowed me to make progress in increments - essentially as John describes above. But it was, as Edward said, a lot of work, and also was not enjoyable work at all. I would not do that again, and would instead find the money to have the panels powder coated, assuming I could get the job done for around $1,000. If I couldn't get the job done for that amount, I'd probably prep them with a DA sander (to avoid hand sanding) and paint them silver.
-
Out Drivin'

Once done, not much of the aluminum is visible - pretty much just the foot boxes, firewall, F-panels, and part of the wheel wells (and the trunk, if you don't carpet it).
I prefer an old-school look, including dirt in the wheel wells, so I left mine alone - just the thin layer of clear anodizing that comes on it from FFR. I occasionally wipe the visible parts (except for the wheel wells) down with a rag that has some WD-40 on it and it still looks like new. I live in the Midwest, so not exposed to moisture in the air that has a salt content. If you live somewhere near the coast, you may have a different experience if left untreated.
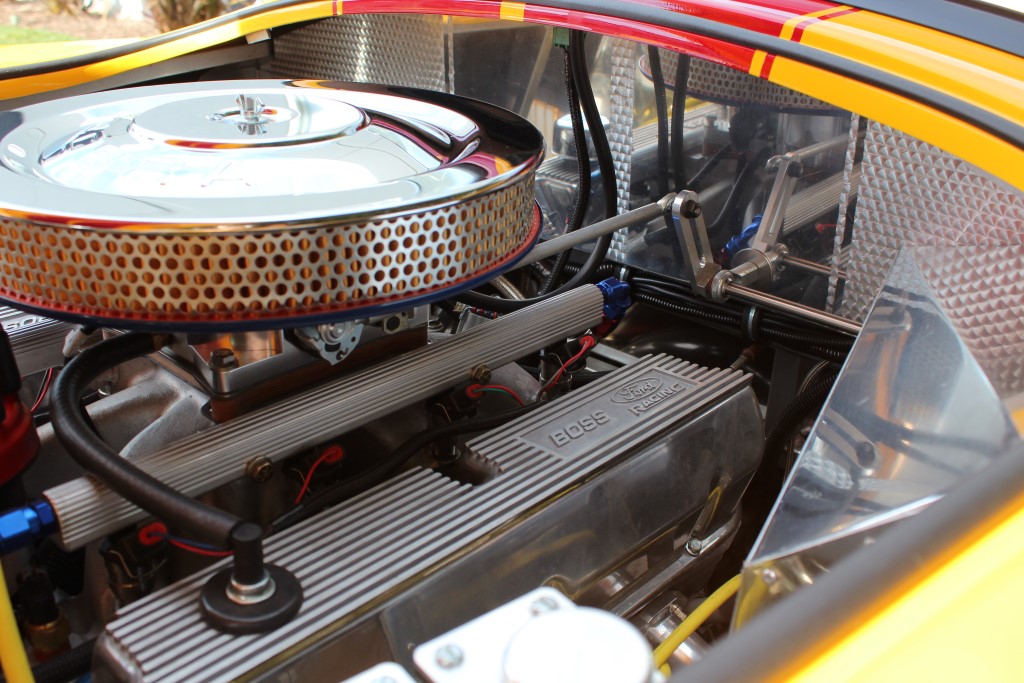
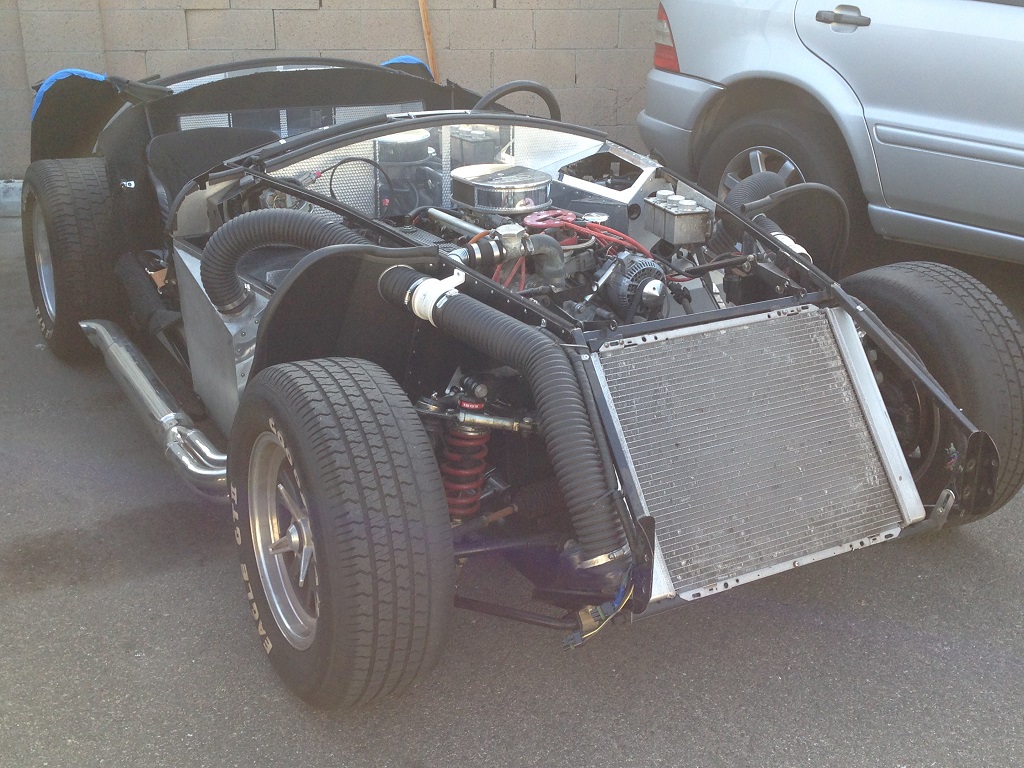
Here's a pic of what one of my front wheel well panels looks like after three years on the road and 10,000 miles. Note it's dirty where the tire throws road grime up, but clean and shiny behind the wheel. And this is a panel that doesn't get regular wipes with the WD-40 - those in the engine compartment look brand new still.

Here's an engine compartment shot - as you can see, not much of the aluminum is in view once the car is done.

Last edited by Gumball; 01-22-2018 at 01:50 PM.
Later,
Chris
"There are no more monsters to fear, and so, we have to build our own."
Mk3.1 #7074
-
On a roll

As Chris indicated above, there aren't that many panels that are visible once the build is complete. I powder coated the panels in the engine bay, and left everything else undone as those will either be unseen or covered by carpet. I chose a silver powder for the engine bay and I think it gives the car a nice, polished look. For small parts, I invested in a powder coating kit and oven. I'm happy with those results!
Mk IV Roadster - #8650 - delivered 7-17-2015 - first start 7-28-2018 - first go-kart 10-13-2018 - licensed and on the road 9-9-19: body/paint completed 3-17-2020.
Complete kit / 2015 Coyote / TKO600 / IRS / Wilwood brakes / Mid-Shift mod / Power Steering / Heater and Seat Heaters / RT turn signal / Breeze radiator shroud and mount
-
Thanks for the input guys. I went to the Build School in December and learned a lot, but the info on this forum is second to none.
-
I did mine with the rattle can bed liner. If I could wind the clock back, I'd likely have gone with raw aluminum. The bed liner seemed like a great idea until I found how easily the finish is scratched, chipped, etc. It's easy to fix, which is a benefit, but I wonder how it will hold up over the long haul. I think if your goal is to go with a color coat, powder coating is the way to go.
Dave
-
Member

If you decide to clear coat the visible panels be sure the clean them thoroughly with something like acetone. I inadvertently sprayed one of mine without cleaning it properly and several months later I started seeing fingers prints and other contaminants showing up. Fortunately it was not permantely installed so I was able to fix it. Knowing what I do now I'd leave the bar.
Purchased and un-assembled Mk3 in 2016. 5.0, Aluminum heads, Performer RPM Air gap, Quick Fuel 650 carb, BBK headers T5, 3.55 rear solid axle, Koni Shocks, PS with Hydra-boost. Also own two restored vintage Mustangs, two Model A fords, 1941 Chevy truck and several other hot rods.
-
Senior Member

If you decide on the Rustoleum Hammered, do your painting w/ the panels laying horizontally. The idea is your 3rd coat is so heavy it would run if they were vertical. This gives the maximum hammered effect. Also prime with this
https://www.rustoleum.com/product-ca...etching-primer
Another DIY option is to find an auto body shop supply place that can mix paint by code and put it in a rattle can. The one I deal with is fantastic. Along w/ primer and the color coat they also have two types of clear. I have only used the one part clear but they also offered a two part in a rattle can. The downside is that once you start using the 2 part you use the can or lose it. It mixes inside so there is no way to clean out the passages. OTOH, you could do all your panels at once pretty easily. Not cheap compared to Rustoleum but a step up toward powder coat. I paid about $85 for one can each of primer, color, and 1 part clear. IIRC, the 2 part clear would have been about $12 more.
FFR MkII, 408W, Tremec TKO 500, 2015 IRS, DA QA1s, Forte front bar, APE hardtop.
-
Senior Member

I painted mine like Phileas Fogg and have also gooned some of them up. There is another owner /builder 5 mins. from me who left his bare, he has been driving his for 2-3 years and his panels look great. Had I known this first I probably would have left my panels bare. I did coat the bottoms of the foot box panels and the floor panels with rattle can bed liner which I like.
JR
Mk4 complete kit #9059 ordered 1/19/17 delivered 3/23/17, 2015 IRS, Fortes/DART347,TKO 600, hyd clutch, P/S, 12.88 wilwood brakes front and rear, heater/defrost and vintage gauges
First start and go-cart 4/11/18. Taken To Whitby Motorcars Greensboro, N.C. 2/5/21 for body/paint
-
Not a waxer

-
Post Thanks / Like - 0 Thanks, 1 Likes
-
Seasoned Citizen

One word: Sharkhide. Yep, look it up if not familiar with this product. The easiest to use of all the choices listed above. Simply wipe it on clean aluminum and give it a few minutes before you install the pieces. There is a trick to the application so try it on some scrap first to get the desired look. Use a microfiber cloth and apply it in straight even strokes.
I built an aluminum flatbed for my truck and had the bright idea (pun intended) to polish everything. So to protect all that hard work I used Sharkhide. This truck is outside a lot and gets way more rough use than any FFR car and the Sharkhide does a great job of protecting the aluminum. And it works on any metal so those cad plated fasteners and suspension parts that take a beating -- coat them with Sharkhide. It never turns yellow like so many clear coats and is easy to maintain.
Look into this stuff before you commit to another process. Seems expensive put goes a long way.
-

Originally Posted by
Jeff Kleiner

I've posted this before but here goes again---maybe you'll find it helpful. When I built my own car I knew going in that I am not ambitious enough to polish the panels or dedicated enough to maintain them afterward if I was to do so and looked at some other options besides simply leaving the visible aluminum raw. Because it would be getting covered with carpet anyway I first experimented with the Hammertone on the trunk floor but wasn't happy with the results. Next I looked into powdercoating but couldn't get my local guy to commit to either a timeframe or ballpark price, so one Saturday morning I just grabbed the bull by the horns and did this:
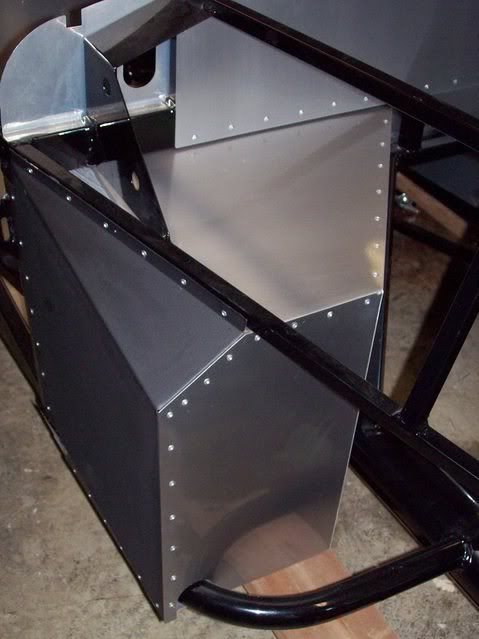
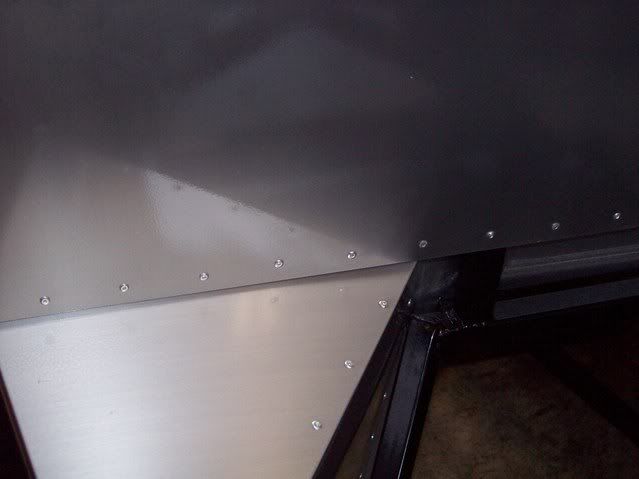
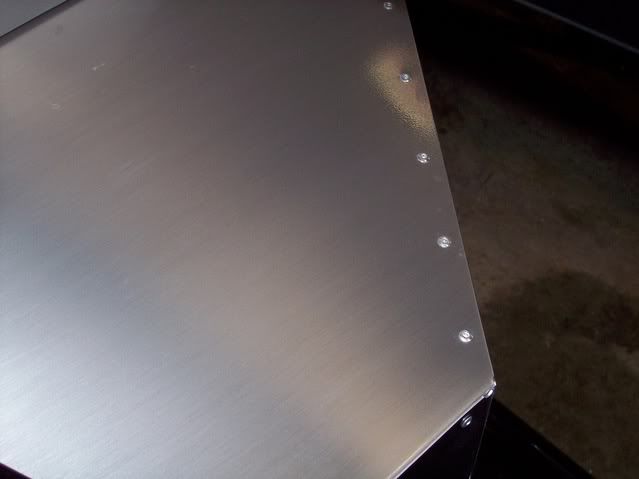
The recipe---
After drilling and fitting clean the panels with acetone to take off the surface oxydation and ink marking. Use a medium grit (green or gray) scotchbrite pad, and make long straight strokes to get a consistent "brushed" grain. I've heard of some guys doing this wet or with WD40 but I preferred the results by just doing it dry. Next clean them again with acetone and when you arent getting any more black on your rag follow up with lacquer thinner and blow them dry. Go with 2-4 coats of rattle can "crystal clear" from Rustoleum. Finally bake it on. For pieces small enough put them in the oven at 250 for 20 minutes or so (did I mention my wife was out of town when I did this

). For panels that were too large I focused a double 500 watt halogen light stand on them for an hour or so. The finish winds up hard and has proven to be durable and unaffected by engine compartment heat.
I did the engine bay, trunk sides & front wall, and the nose aluminum. After 11 years and 25ish thousand miles a wipedown with quick detailer spray every so often to get rid of dust and road grime keeps it looking like the day it was installed.
With all that said I have some cars that I built for customers with raw panels, some 8 years old, and while the panels do not have that fresh from the mill brightness they haven't gone gray or dull from oxidation either.
Good luck with whatever you decide to go with,
Jeff[
That looks fabulous.
-
Post Thanks / Like - 0 Thanks, 1 Likes
-


Hey Don
Yep lots of considerations.
Here is what I am doing and why and anything I have run into so far.
First I over analyzed this far too much. I had researched Anodize vs some sort of coating. Powder coating and other paints are basically the same (some chemist here may correct me) it boils down to application of the organic coating and the solvent for the wet applied coatings.
I ruled out the powder coating for cost and the practical limit I have on storing the dang things and not getting them scratched up.
I really wanted to do the anodizing thing as it seem just the right protection and I could get a translucent color that I wanted. In the end cost was high because of the prep work on the surface that would need to be done just before the process. I could not get a good estimate as well without running around town with my batch of panels for the companies to see to estimate. That was too much effort I didn't want to get into. In reality I was only concerned with the surface of the panels in the engine bay and the only panels there that needed a coating, in my opinion were the F panels and the foot box and fire wall panels. For the last two only one side needed this treatment. On the other side in the passenger compartment there will be heat and sound barrier of some sort applied on the aluminum and then carpet in most cases as well.
What I selected and this is part of the over analyzing, was an engine enamel with ceramic content for additional heat control between engine bay and passenger compartment.Specifically Dupli-Color Engine Enamel and primer from the local auto parts store. Color selection was reasonable.I like the look but it is easy to scratch the surfaces. It is a pain to get the panels cleaned and surface prepped. I am using scotch bright abrasive pads to help provide a better mechanical surface for the paint to bond to as well as blend in any scratches that may be on the panels. I am able to do this just before I put the panels on permanently, which I find is an advantage as I can work with the panels on fit and just having in place as I sort out stuff around them without too much kid glove treatment. Not that I am whacking them or anything but I am just clumsy enough that if I painted them and then cleco them on I would drop a wrench or part of the car on them and then I would have a paint touch up to deal with. One of the issues I am running into though here is climate is impacting on spaying them. I don't have a spray booth type place (yea I could make one but that's another project). If I warm up the garage to application temp I have to keep the doors closed and it isn't a healthy environment to be in and I really dislike the over-spray settling on things and then drying. I have a number of panels ready to paint for foot box and I am in wait mode until the temperature goes up enough that I can paint them. If you live in an area this isn't a factor then a non issue. For me it poses additional planning and sequence adjustments.
I am not going to be painting passenger compartment aluminum or trunk aluminum. Those areas will all have something covering the aluminum. I am not going to do anything with the surfaces under the car, at least not currently in my plan. If I did I would find myself also trying to figure out how to maintain the coating on those surfaces, that's not how I want to be spending my time on the car. So really the amount to coat isn't that much. For the elephant ears I have not made a final decision I cannot see it being this engine enamel though.
Oh so many decisions  . Welcome to the fun.
Ron
Those are my thoughts on this...
-
I had all aluminum panels powder coated black (cost me a total of $400 ten years ago). Then I bought a Powder Coating kit from Eastwood to do smaller parts - worked great and I still use it on car parts today. Yes, many of the panels get covered up, but I wanted them powder coated on both sides.
-
I used the scotchbrite as Jeff did then coated with the Shark Hide in the engine compartment. I bought a quart but a pint would have been more than enough. In the wheel wells I used a combination of spray-on under coat and brush-on bed liner, both worked well.
John
-
Administrator

I polish, engine turn and apply sharkhide for view-able surfaces, powder coat everything else for durability and "completeness". If polishing isn't your thing there's nothing wrong with sharkhide on "nude" panels, it keeps them looking new.
Personally, I like black PC or bedliner in the wheel wells...:
I painted the under-body black as well. It tidies up the whole package IMO. (Note driver's front splashguard not adjusted yet):
EDIT PS Like everyone else here would say, there's no "correct" answer here; it's up to you to decide what YOU want to see when you look in/over/under your car. It's all good.
FFR 5369 Pin Drive, IRS, Trigos, Torsen, Wilwoods, FMS BOSS 302 "B" cam , Mass-flo. CA SB100 (SPCN) Registered
Delivered 4/23/06. "Finished" 4/2012 (still not done!)
-
Seasoned Citizen
Wow David, that firewall is awesome. Way too cool.
-
Senior Member

I struggled with the options myself. Decided I like the aluminum look but wanted some protection. Thus, for the visible panels in the engine bay I'm doing the scotch bright scuff described by Jeff K and protecting it with the Sharkhide noted by NAZ. (Other builders are using this method as well.)
Given that I'm only getting started I can't speak to the longevity of the Sharkhide but as NAZ mentioned, it is very easy to use and puts a nice finish on the part. Because it is so easy to use I'm also applying it to some of the cast aluminum parts for the nice finish and to hopefully make them easy to clean down the road.
Cockpit and trunk will get Lizard Skin and carpet. Anything exposed to tire flung rocks will get bed liner or similar coating. Non-visible panels may get the Sharkhide without the scuff process.
No right or wrong answer, for the most part, just preference of what you want to see when you open the hood and how much time and/or money one wants to invest.
-
Senior Member
Super cool firewall David! Do you have some aviation in your background? That firewall is reminiscent of the craftsmanship seen in the early sheet metal aircraft of the 30's. (The Spirit of St. Louis engine cowl is probably the most famous.)
-
Senior Member

Originally Posted by
Driver_WT
I had all aluminum panels powder coated black (cost me a total of $400 ten years ago). Then I bought a Powder Coating kit from Eastwood to do smaller parts - worked great and I still use it on car parts today. Yes, many of the panels get covered up, but I wanted them powder coated on both sides.
Same for me, Powder Coating was the way to go. I bought a Powder Coating kit from Eastwood $150, a oven on craigslist $50, built my own booth out of Coyote crate box with 2 filters and a fan from Walmart $25 and good powder from Prismatic Powder Gloss Black, Cobra Gray, and a Clear Vision $100. Did every part that wasn't coated from FFR and all panels up front except the fire wall, fan shroud and driver foot box in home oven, couldn't fit these parts in. After a few tries and a sharp learning curve completed everything and very durable two coats of base and clear. It cost me only $150 at the powder coaters for the three big panels he let me bring in my powder for them to use. Probably could have done the big panels if I would have build an extension for the oven. And I can go back and powder coat anything I missed because I kept the booth together. I did that already forgot about the gas pedal mount and all the matching rivets for the engine compartment, powdered them in Cobra Gray to match all the panels and the wheels from FFR.
MKIV #9122 Ordered kit 5/24/17 received kit 8/11/17 MK4 Base kit +,First Start 4/7/18, First Go-Cart 4/22/18, In gelcoat, licensed and driving 8/11/18. Coyote gen2, T-56, 2015 IRS 3.31, 17" Halibrand replicas w/Nitto NT555 G2, Withby Motorcars power brake kit W/Wilwood pedals, 04 Cobra front brakes, 15 Mustang rear brakes with mods, power steering. Paint Jeff Miller Da Bat, Lexus Spectra Blue Mica W/Toyota Silver Sky Metallic strips. Build thread:
http://thefactoryfiveforum.com/showt...Paul2STL-Build
-
Post Thanks / Like - 0 Thanks, 1 Likes
-
Thanks guys for taking the the time to provide the input. I found a company here in Fort Worth that will powder coat with a silver color and then clear coat all of the panels for $400. Stuff on their website looks good. We’ll see in a week or so.
-
That's a great price for two-step powder coat.
Mk4 #8861 Complete kit. Delivered: 27 Apr 2016, currently a roller.
Gen-2 Coyote, clutch, TKO600, midshift, and solid axle from Forte. Many pieces from Breeze and Replicarparts.
-
Originally Posted by
Jeff Kleiner
I've posted this before but here goes again---maybe you'll find it helpful. When I built my own car I knew going in that I am not ambitious enough to polish the panels or dedicated enough to maintain them afterward if I was to do so and looked at some other options besides simply leaving the visible aluminum raw. Because it would be getting covered with carpet anyway I first experimented with the Hammertone on the trunk floor but wasn't happy with the results. Next I looked into powdercoating but couldn't get my local guy to commit to either a timeframe or ballpark price, so one Saturday morning I just grabbed the bull by the horns and did this:
The recipe---
After drilling and fitting clean the panels with acetone to take off the surface oxydation and ink marking. Use a medium grit (green or gray) scotchbrite pad, and make long straight strokes to get a consistent "brushed" grain. I've heard of some guys doing this wet or with WD40 but I preferred the results by just doing it dry. Next clean them again with acetone and when you arent getting any more black on your rag follow up with lacquer thinner and blow them dry. Go with 2-4 coats of rattle can "crystal clear" from Rustoleum. Finally bake it on. For pieces small enough put them in the oven at 250 for 20 minutes or so (did I mention my wife was out of town when I did this
). For panels that were too large I focused a double 500 watt halogen light stand on them for an hour or so. The finish winds up hard and has proven to be durable and unaffected by engine compartment heat.
I did the engine bay, trunk sides & front wall, and the nose aluminum. After 11 years and 25ish thousand miles a wipedown with quick detailer spray every so often to get rid of dust and road grime keeps it looking like the day it was installed.
With all that said I have some cars that I built for customers with raw panels, some 8 years old, and while the panels do not have that fresh from the mill brightness they haven't gone gray or dull from oxidation either.
Good luck with whatever you decide to go with,
Jeff[
This is the finish I am looking for. Looks great.
-
Senior Member

I did the same as Jeff. Wiped them down with acetone. Used a gray scotchbrite pad wetted with distilled water and a little dish soap to directionally sand them. Rinsed with distilled water and then wiped down with acetone. As soon as they were completely dry I sprayed them with satin engine clear coat. Don't wait to spray because the bare aluminum starts to oxidize almost immediately. Wear gloves! The unprotected aluminum picks up finger prints very easily.
I did all the panels that could be seen from the engine compartment (10? panels in total) this way on the inside. The F panels and elephant ears were done with black truck bed liner on the outside to black out the wheel wells. The rest of the panels are covered with carpet or out of sight.
HTH
Norm
Mk4 base kit 7721, 331 Stroker, Holley Sniper EFI, Wipers, Heater, Whitby Soft Top, Drop trunk mod and more
-
Senior Member

I do not have much else to offer that the above excellent recommendations have already made but had an analysis paralysis moment at your point. I really like bare AL and decided to brush my AL with Sand paper and a block using a straight edge clamped to the AL to keep the straight line after cleaning with Acetone and using WD40 as lubricant. Then I sealed my AL with Shark Hide.

FFR MK4 Roadster (9945) complete kit, delivered 12/4/2020, First start and go kart 5/7/2021. Legal 8/14/2021, Paint finished 7/18/2022 (Viking Blue). 347BPE CI, TKO600, Moser 8.8 3link 3.55, Halibrand 17x9 17x10.5, power steering. Carbon Fiber Dash. Carbon Fiber trans tunnel, adjustable Kirkey Lowback Vintage seats, Vintage gauges, RT drop trunk mod, FFmetal drop battery mod and trans tunnel, Forte front sway bar. Forte mechanical throttle linkage, RT gas pedal.
www.covespringsfarm.com
-
Senior Member

I left mine raw. I like the old school race car look. Nothing to peel, scratch, or flake.
Garage kept, and never driven in inclement weather. 10+ years and I can't see any difference from the day it was built.
-
Senior Member

Originally Posted by
AC Bill
I left mine raw. I like the old school race car look. Nothing to peel, scratch, or flake.
Garage kept, and never driven in inclement weather. 10+ years and I can't see any difference from the day it was built.
We too went with raw aluminum panels. I am still in the build process so can't comment how it holds up, but AC Bill's experience is helpful.
Why did we choose raw?
I have seen a Mk3 that has raw panels and they still looked great after many years so I wasn't too worried about that. Also, I couldn't justify the cost of powder coating when I like the look of the bare aluminum. I thought long and hard about painting it myself, but I have read too many people talk about how easy it is to scratch the paint. Since I like the raw look in the engine bay, it was hard to justify the extra work and cost with the risk of scratching the finish when installing.
-
Did the same prep as Jeff, but finished with two coats of Sharkhide. I really liked the Scotchbrite brushed finish. Just another option.
MK4 base kit, 2004 Mach 1 donor, 4.6L DOHC, TR-3650 5-speed, narrowed stock axle with 3.55 gears and TruTrac, PS, PB, ABS, 17" Halibrand replica wheels, dual roll bars, Kirkey high back seats, with paint by Jeff Miller, registered 9/2014, sold 3/1/2018.
New project, 1970 Mustang Fastback Coyote powered restomod. Started 10/14/16.
http://forums.vintage-mustang.com/bu...mod-build.html
-
What type of aluminum are the panels made from?
-
Originally Posted by
NAZ
One word: Sharkhide.
How do you think it would work on cast aluminum pieces, things like intake manifolds, IRS components, etc.?
-
Senior Member

I polished my engine bay panels to a near mirror finish and then coated them with Sharkhide. It was a huge amount of labor, but they turned out beautiful. Too bad you really can't see them. They have held up very well, but not perfect. I would powder coat if I were building again.
I would read the product instructions and data sheets before I tried a part that got hot like an intake. It isn't fun to take off. Basically lacquer thinner and lots of rags.
For suspension components, that basically spend their life in a low level sand blaster, I would either leave AL parts bare or powder coat. Do you plan on having the car on a lift in your living room, or driving it? Just saying that we can get carried away, and wonder why we bothered a few thousand miles and a couple stone chips in.
-
Senior Member

Originally Posted by
Avalanche325
For suspension components, that basically spend their life in a low level sand blaster, I would either leave AL parts bare or powder coat. Do you plan on having the car on a lift in your living room, or driving it? Just saying that we can get carried away, and wonder why we bothered a few thousand miles and a couple stone chips in.
Based on so many comments, I was coming to the conclusion that at least 60% of these cars never left the living room lift. ")
"living room lift", I like that. thanks
Mrk III, 331 stroker, Borla stack injection, T5, 3:55 IRS, Power steering and brakes. Kleiner body & paint
-
T6, 6061. This alloy is pretty hard. It can be formed, but once bent, that is it.
MK4 base kit, 2004 Mach 1 donor, 4.6L DOHC, TR-3650 5-speed, narrowed stock axle with 3.55 gears and TruTrac, PS, PB, ABS, 17" Halibrand replica wheels, dual roll bars, Kirkey high back seats, with paint by Jeff Miller, registered 9/2014, sold 3/1/2018.
New project, 1970 Mustang Fastback Coyote powered restomod. Started 10/14/16.
http://forums.vintage-mustang.com/bu...mod-build.html
-
Originally Posted by
Hurman
What type of aluminum are the panels made from?
T6, 6061. This alloy is pretty hard. It can be formed, but once bent, that is it.
MK4 base kit, 2004 Mach 1 donor, 4.6L DOHC, TR-3650 5-speed, narrowed stock axle with 3.55 gears and TruTrac, PS, PB, ABS, 17" Halibrand replica wheels, dual roll bars, Kirkey high back seats, with paint by Jeff Miller, registered 9/2014, sold 3/1/2018.
New project, 1970 Mustang Fastback Coyote powered restomod. Started 10/14/16.
http://forums.vintage-mustang.com/bu...mod-build.html


 Thanks:
  Likes:


 Reply With Quote


