Forte's

Visit our community sponsor

Thanks Thanks:  0
Likes Likes:  0
Results 1 to 13 of 13

Thread: Gen II GTM Body to Roll Cage Clearance

  1. #1
    VRaptor SpeedWorks, LLC's Avatar
    Join Date
    Feb 2011
    Posts
    1,462
    Post Thanks / Like

    Gen II GTM Body to Roll Cage Clearance

    Hello,

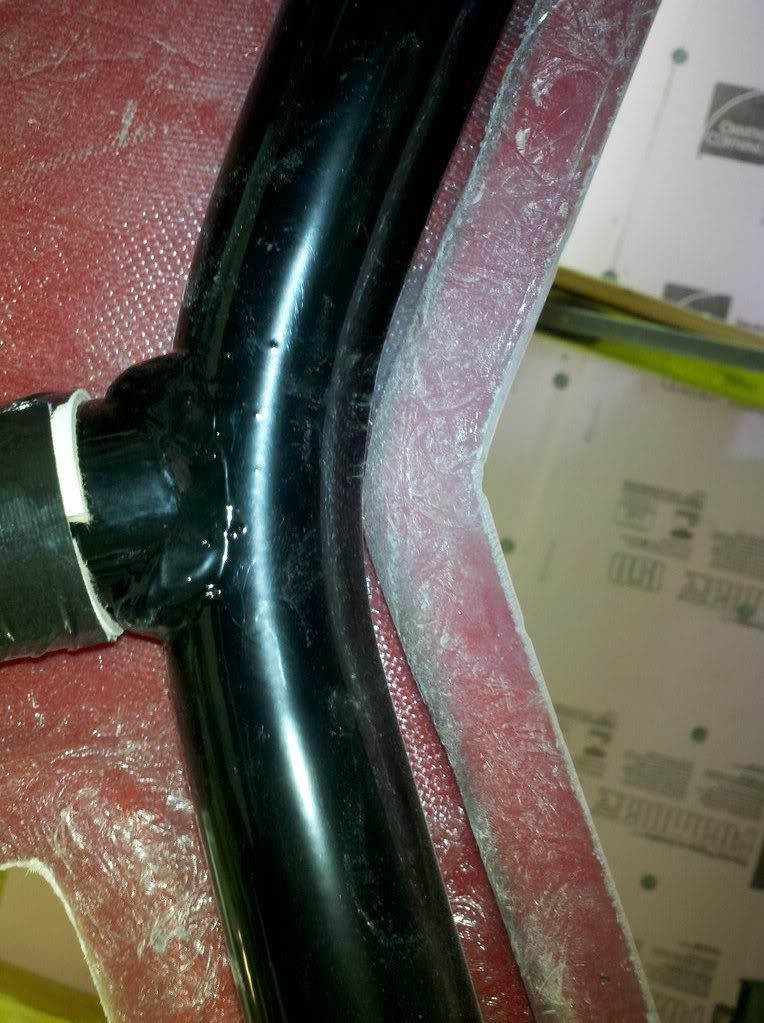
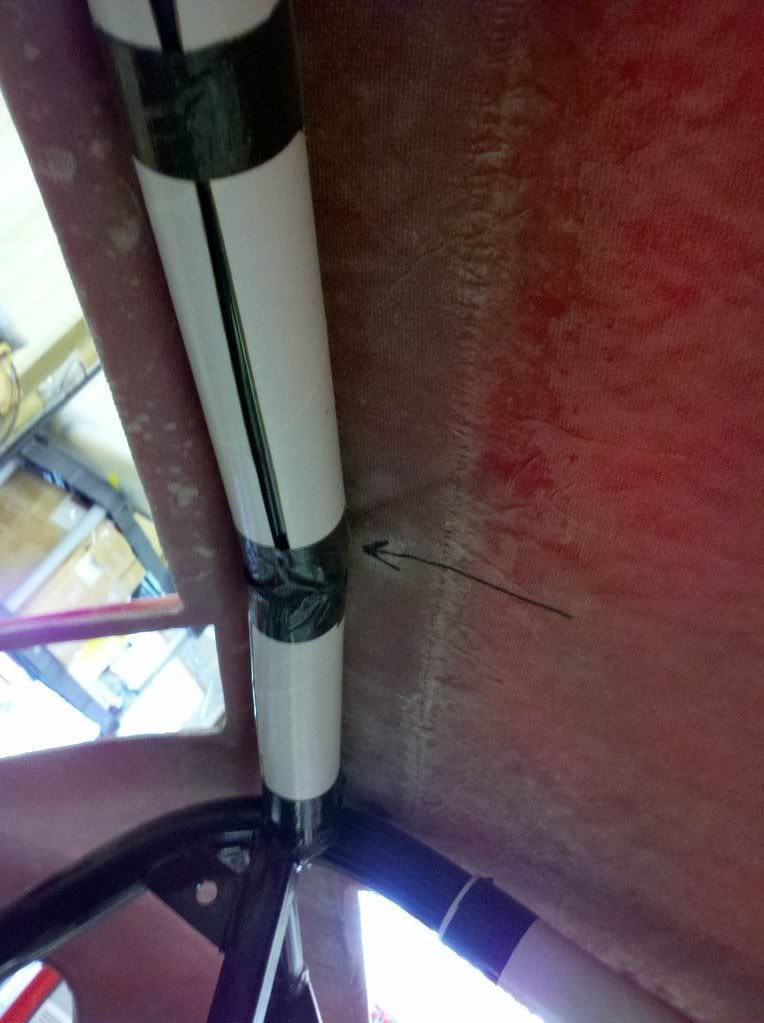
    I've built many, many Gen I GTMs now, and today I have started fitting the body to the chassis on my first Gen II kit. The biggest problem I'm having right now is the roof of the body is tight up agaisnt the roll cage about 9.5" forward from the rear of the the roll bar.....right where the bend is in the roll bar on both sides of the car.


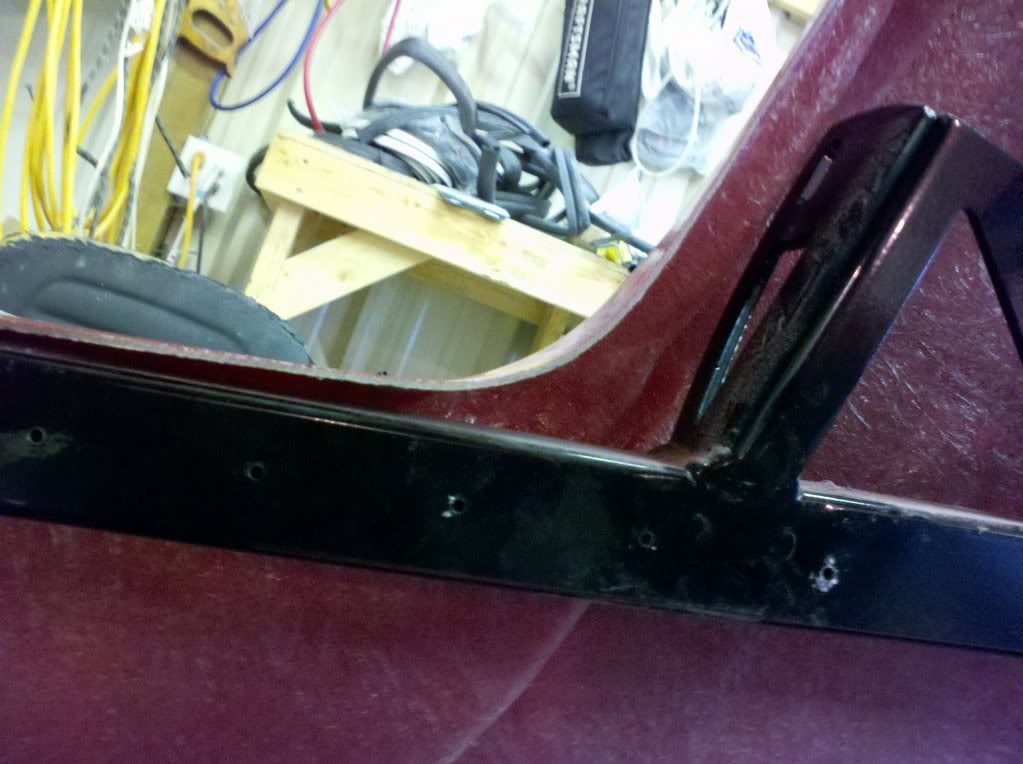
    And this is preventing me from getting the door sill area seated where it needs to be to rivet it:


    If I force the door sill down (3/16"), it arches the roof way up in the center and distorts the whole rear hatch area and fuel filler area by a considerable amount. All of the Gen I's I've built have always had plenty of clearance between the cage and body to clear the roll bar padding/covering. I'm pretty confident that if I force the door sill down and rivet it tight, it would not take very much driving or time in the sun once the car is completed for the roll cage to "print/spider-crack" thru the roof to the point it would be very noticable/visible. Any suggestions?
    Shane Vacek
    VRaptor SpeedWorks, LLC
    www.vraptorspeedworks.com
    Turn-key GTM, SL-C & Ultima GTR Built to Your Specs!
    Offering a full line of GTM Upgrades and Custom Parts

  2. #2
    VRaptor SpeedWorks, LLC's Avatar
    Join Date
    Feb 2011
    Posts
    1,462
    Post Thanks / Like
    Hello?........Anyone out there?
    Shane Vacek
    VRaptor SpeedWorks, LLC
    www.vraptorspeedworks.com
    Turn-key GTM, SL-C & Ultima GTR Built to Your Specs!
    Offering a full line of GTM Upgrades and Custom Parts

  3. #3
    Senior Member VD2021's Avatar
    Join Date
    Feb 2011
    Location
    Central, FL
    Posts
    958
    Post Thanks / Like
    Blog Entries
    2
    Shane,
    I'm not FFR Tech, but I can let you know what I am seeing on my build. I'm at work so I am only going from memory right now. I do have a 1/2" gap between the body and striker mount on the passenger side. I have 1/8 rivets in the door seal right now and did have to push down a little on the body there when I put them in. I haven't noticed any distortion of the hood, hatch or filler cap areas (I've taken a lot of picks of the car at its current state). I can give you more details or better yet give you a call this evening. My son has conditioning for football today that ends at about 7pm. I can call you after that.
    Last edited by VD2021; 07-18-2011 at 09:45 AM.
    R/s
    Vidal
    CURRENT STATUS: Interior Rework and Bodywork.
    GenII GTM #331. Delivered (23/9/10)
    BUILD LOG AND WEBSITE:
    http://gtmbuild.weebly.com/ .

  4. #4
    President, Factory Five Racing Dave Smith's Avatar
    Join Date
    Feb 2011
    Location
    Barrington, RI
    Posts
    1,811
    Post Thanks / Like
    Blog Entries
    2
    Shane,

    I will have one of the guys call you as soon as they get their legs under them from the weekend return. Dave
    Dave Smith, FFR 001
    President
    Factory Five Racing

  5. #5
    VRaptor SpeedWorks, LLC's Avatar
    Join Date
    Feb 2011
    Posts
    1,462
    Post Thanks / Like
    Thanks Dave!
    Shane Vacek
    VRaptor SpeedWorks, LLC
    www.vraptorspeedworks.com
    Turn-key GTM, SL-C & Ultima GTR Built to Your Specs!
    Offering a full line of GTM Upgrades and Custom Parts

  6. #6
    Senior Member VD2021's Avatar
    Join Date
    Feb 2011
    Location
    Central, FL
    Posts
    958
    Post Thanks / Like
    Blog Entries
    2

    The Same Issue

    I checked my body yesterday evening and it is exactly the same as what Shane has posted. Gen2 GTM#331. This being my first build I didn't realize it was an issue. I am mocking panels, louvers, diffuser, hood ect. and completing things on the body. Working my way to the doors that I will leave for the last item prior to going to the seams and blocking. So a timely solution would benefit me greatly.

    Thanks for having someone address this Dave.
    Last edited by VD2021; 07-19-2011 at 06:02 AM. Reason: typo
    R/s
    Vidal
    CURRENT STATUS: Interior Rework and Bodywork.
    GenII GTM #331. Delivered (23/9/10)
    BUILD LOG AND WEBSITE:
    http://gtmbuild.weebly.com/ .

  7. #7
    Tech Support, FFR Brian Z's Avatar
    Join Date
    Feb 2011
    Location
    Wareham MA
    Posts
    410
    Post Thanks / Like
    Shane,

    The top roll bar tube is welded in place with a GTM body sitting on the frame. What is the frame number on that car? Was the body screwed down to the frame on the side rail when the car shipped? I have shown the pictures to the welding manager and the chassis assembly guys.
    Brian Zakrzewski
    FFR Tech & Sales

  8. #8
    VRaptor SpeedWorks, LLC's Avatar
    Join Date
    Feb 2011
    Posts
    1,462
    Post Thanks / Like
    Thanks Brian. Chassis # is 330. I also have chassis #248 Gen I GTM in here and it is also tight in the same places, although not as bad as #330. I also found that the cage is tight to the roof at the front of that tube also on the passenger side......right before it bends down at the top front corner of the window opening. The LH side has a bit of clearance in that location. Chassis #248 is tight in all 4 locations.

    The biggest problem with this is that it's already 3/16" past tight.......just the bare chassis tube to bare fg. Once I get the roll bar cover on there and the headliner in there, and I try to install the freshly painted body onto the chassis when the car is nearly done.......it's going to completely change the way the body fits the chassis and now my freshly painted doors and hatch are no longer going to line up or fit the way they did before and after it's painted, there's not going to be any way to fix it.......and as I stated above, I'm sure over a very short time, all of that pressure on the roof will quicly either crack or print thru once the car is out in the sun and on the road.

    All of the other GTM's I've had in here have always had plenty of clearance between the roof and halo for the roll bar cover and headliner to fit with no problem. I think the "newest" GTM I've had in here prior to these cars has been #147. I've been working on some really early stuff for the past few years.....#13, #24, #17, #34........I think those are the right numbers.....in that range anyway.
    Shane Vacek
    VRaptor SpeedWorks, LLC
    www.vraptorspeedworks.com
    Turn-key GTM, SL-C & Ultima GTR Built to Your Specs!
    Offering a full line of GTM Upgrades and Custom Parts

  9. #9
    Senior Member
    Join Date
    Feb 2011
    Location
    Clarksville, MD
    Posts
    232
    Post Thanks / Like
    Any answers on this one? Many Gen 2 owners (like me) are at the body stage and would like to know if there's been any resolution.

    -Michael

  10. #10
    Senior Member VD2021's Avatar
    Join Date
    Feb 2011
    Location
    Central, FL
    Posts
    958
    Post Thanks / Like
    Blog Entries
    2
    Quote Originally Posted by Brian Z View Post
    Shane,

    The top roll bar tube is welded in place with a GTM body sitting on the frame. What is the frame number on that car? Was the body screwed down to the frame on the side rail when the car shipped? I have shown the pictures to the welding manager and the chassis assembly guys.
    Brian,
    I have #331 and it fits exactly as Shane describes. Have you come up with a solution for this that a Guy like myself, building in his two car garage can apply? If you want to send a tech down to Central Florida I would certainly welcome the support .

    Seriously though, I just reached the point where I can't move forward until I resolve this. Thanks.
    Attached Images Attached Images
    Last edited by VD2021; 08-01-2011 at 05:06 PM.
    R/s
    Vidal
    CURRENT STATUS: Interior Rework and Bodywork.
    GenII GTM #331. Delivered (23/9/10)
    BUILD LOG AND WEBSITE:
    http://gtmbuild.weebly.com/ .

  11. #11
    Tech Manager, FFR
    Join Date
    Feb 2011
    Posts
    211
    Post Thanks / Like
    Hi Vidal,

    I'll get back to you shortly with some measurements so that we can get a better idea of what you're working with.

    talk to you soon,

    Jason @ FFR

  12. #12
    Senior Member VD2021's Avatar
    Join Date
    Feb 2011
    Location
    Central, FL
    Posts
    958
    Post Thanks / Like
    Blog Entries
    2
    Quote Originally Posted by Jason Lavigne View Post
    Hi Vidal,

    I'll get back to you shortly with some measurements so that we can get a better idea of what you're working with.

    talk to you soon,

    Jason @ FFR
    Jason,
    Dan sent me an email this morning with instructions and pictures for taking some measurements. I'll take the measurements this evening and get the numbers back to Dan. Thanks.
    R/s
    Vidal
    CURRENT STATUS: Interior Rework and Bodywork.
    GenII GTM #331. Delivered (23/9/10)
    BUILD LOG AND WEBSITE:
    http://gtmbuild.weebly.com/ .

  13. #13
    VRaptor SpeedWorks, LLC's Avatar
    Join Date
    Feb 2011
    Posts
    1,462
    Post Thanks / Like
    Hey Vidal,

    This ended up being probably the biggest problem:


    This bar was so far to the RH side that I could not get the body pushed over to the LH side......basically it was racking the entire roof/body toward the right side of the car. Also taking into account the curve of the roof, moving that whole bar about 1/2" inboard and down about 1/4" took care of most of my problems.

    I had the measurements from the chassis to the rear wheel-well arch perfect from side to side before I moved the halo bar, and after I moved the bar and re-installed the body (attaching it in the same location at the rear as before), the wheel-well arches were 3/16" off side-to-side, so the entire body moved over by moving that RH halo bar.
    Shane Vacek
    VRaptor SpeedWorks, LLC
    www.vraptorspeedworks.com
    Turn-key GTM, SL-C & Ultima GTR Built to Your Specs!
    Offering a full line of GTM Upgrades and Custom Parts

Posting Permissions

  • You may not post new threads
  • You may not post replies
  • You may not post attachments
  • You may not edit your posts
  •  

Stewart Transport

Visit our community sponsor