BluePrint Engines

Visit our community sponsor

Thanks Thanks:  0
Likes Likes:  0
Results 1 to 31 of 31

Thread: First Ride with the Body on - What's that noise?

  1. #1
    Senior Member
    Join Date
    Oct 2012
    Location
    Tybee Island, GA
    Posts
    505
    Post Thanks / Like

    First Ride with the Body on - What's that noise?

    Made some good progress today. I'm experimenting with the body fit. I needed to turn the car around and I wanted to see how it looked while driving too, so I started it up while my wife filmed..

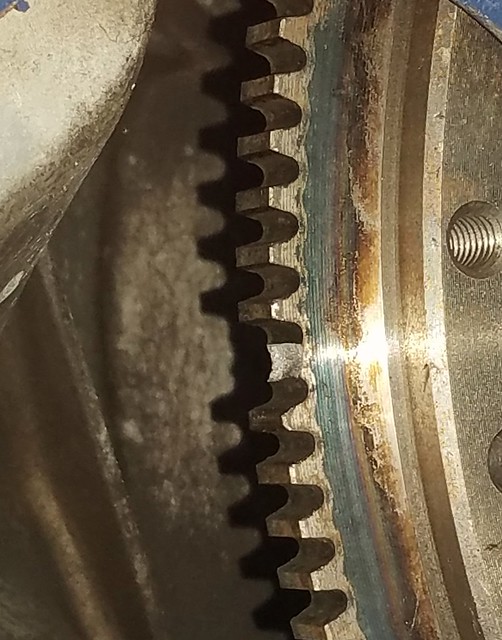
    Listen to the first few seconds of the car starting and there is a clunking while it starts. what is this sound? I don't think it's been there too long.

    Hope it's nothing, but that's not how it goes.
    Thanks,
    Dave

    https://www.youtube.com/watch?v=sEJxLhxURxo
    Dave
    Mk 3.1 - #6882 - 5.0L 302 - FiTech EFI - 3-Link - 3.08 Ratio - 15" Wheels
    Greenhorn and doing the best I can
    My photos are at: My Flickr acct
    Videos are at: YouTube Videos

  2. #2
    Seasoned Citizen NAZ's Avatar
    Join Date
    Feb 2016
    Location
    "The High Country", beautiful Flagstaff, AZ
    Posts
    2,443
    Post Thanks / Like
    My first thought is it sounds like a bad tooth on the flywheel but hard to tell from the video on my laptop speakers.

  3. #3
    Senior Member
    Join Date
    Oct 2012
    Location
    Tybee Island, GA
    Posts
    505
    Post Thanks / Like
    gosh, I hope not. New flywheel and new starter.
    Dave
    Mk 3.1 - #6882 - 5.0L 302 - FiTech EFI - 3-Link - 3.08 Ratio - 15" Wheels
    Greenhorn and doing the best I can
    My photos are at: My Flickr acct
    Videos are at: YouTube Videos

  4. #4
    Senior Member
    Join Date
    Aug 2016
    Location
    Northern VA
    Posts
    653
    Post Thanks / Like
    Dave,

    Listen for it the next 10 times you start it otherwise I wouldn’t sweat it

  5. #5
    Senior Member brewha's Avatar
    Join Date
    Aug 2013
    Location
    Somers, Ct
    Posts
    161
    Post Thanks / Like
    Do you know if the flywheel matches the flywheel housing? 302’s used a 157 or a 164 tooth flywheel and must have the correct flywheel housing for the starter to engage properly.

  6. #6
    Senior Member
    Join Date
    Oct 2012
    Location
    Tybee Island, GA
    Posts
    505
    Post Thanks / Like
    I'll check my notes, but 157 sounds familiar.

    It seems like a recent thing.
    Last edited by DadofThree; 03-03-2018 at 10:44 PM.
    Dave
    Mk 3.1 - #6882 - 5.0L 302 - FiTech EFI - 3-Link - 3.08 Ratio - 15" Wheels
    Greenhorn and doing the best I can
    My photos are at: My Flickr acct
    Videos are at: YouTube Videos

  7. #7
    Senior Member Fixit's Avatar
    Join Date
    Aug 2017
    Location
    Minneapolis 'Burbs
    Posts
    910
    Post Thanks / Like
    Sound is very rhythmic, slow in speed, and only during cranking. Small diameter wheel/circle hitting something every rotation... goes away when the engine fires.

    Disconnect the coil/ignition and have a helper crank the engine while you listen. My money's on a starter to flywheel tooth engagement problem.
    John D. - Minneapolis 'Burbs

    1965 El Camino - LT-1, 4L60e, 4wh discs, SC&C susp.
    2013 F-150 Platinum - Twin Turbo 3.5
    2018 Mk4 Roadster w/ Coyote - #9365 - Build Thread Delivery 7/3/18, 1st Start 1/4/19, 1st Road Mile 5/5/19, Legal 6/18/19, In Paint 2/25/21, Done (?) 4/2021

  8. #8
    Senior Member frankb's Avatar
    Join Date
    Feb 2014
    Location
    Marana, AZ
    Posts
    328
    Post Thanks / Like
    Dave:

    I agree with Fixit and NAZ. It sounds like a mesh problem with the starter to the flywheel. The timing of the sound matches with the engine RPM during cranking, so I would start by checking the flywheel runout. It doesn't take much runout to cause that noise. You may be able to remove the starter and see the interference marks on the bendix (starter gear) teeth or rotate the flywheel while looking through the starter hole and see it on the ring gear teeth. If it there is no visible marks on the teeth, mount a dial indicator on the bell housing with the plunger on the base of the ring gear and rotate the engine. If there is a high spot indicated, you may spot some wear marks there. This article (http://www.hotrod.com/articles/hot-r...tion-problems/) describes a similar (but worse) problem. Good luck!

    Frank B
    FFR MK4 #8317, 393 Cleveland, Lunati VooDoo solid roller, CHI 3V heads and intake, TKO 600, Std roadster seats, 8.8 3.55 diff, 17" Halibrand replica wheels, Ford "Magnetic Metallic", silver ghost stripe. (Sold 10/16/21)

  9. #9
    Senior Member
    Join Date
    Oct 2012
    Location
    Tybee Island, GA
    Posts
    505
    Post Thanks / Like
    Thank you for the replies. I'll take a look at the starter and flywheel.

    Here's the Starter that I purchased: Ford High Torque Mini Starter LRS-11002B

    Here's the Flywheel that I purchased: 157 Tooth Flywheel for 1982-1995 Small Block Ford 5.0L HO
    Dave
    Mk 3.1 - #6882 - 5.0L 302 - FiTech EFI - 3-Link - 3.08 Ratio - 15" Wheels
    Greenhorn and doing the best I can
    My photos are at: My Flickr acct
    Videos are at: YouTube Videos

  10. #10
    Senior Member Fixit's Avatar
    Join Date
    Aug 2017
    Location
    Minneapolis 'Burbs
    Posts
    910
    Post Thanks / Like
    Another testing trick/tip...

    If you've got some machinist's "Dykem", or a Sharpie marker (blue works well), pull the starter & paint the heck out of the teeth & valley's of the starter drive so they're totally blue. Reinstall the starter, disable the ignition, and crank it over several turns worth. Pull the starter again.

    Inspect the wear pattern on the starter drive teeth. There should be witness/wipe marks primarily on the "fat" part of the gear teeth, not all the way buried in the valleys. I'm suspecting the ring gear isn't perfectly round, it's buried in engagement, and the "high" point is bottoming against the starter gear teeth.

    (My experience is nil with this particular setup, but I know you can get shims for Chevrolet starters - move them down & away a few thousands to solve this problem.)
    John D. - Minneapolis 'Burbs

    1965 El Camino - LT-1, 4L60e, 4wh discs, SC&C susp.
    2013 F-150 Platinum - Twin Turbo 3.5
    2018 Mk4 Roadster w/ Coyote - #9365 - Build Thread Delivery 7/3/18, 1st Start 1/4/19, 1st Road Mile 5/5/19, Legal 6/18/19, In Paint 2/25/21, Done (?) 4/2021

  11. #11
    Senior Member
    Join Date
    Jul 2016
    Location
    Vermilion,OH
    Posts
    230
    Post Thanks / Like
    I spun the crank with a wrench after bolting up the bellhousing, an old Lakewood. Teeth were rubbing slightly in on spot, so off it came, and a little deburring took care of it. I was very glad I did that simple test.

  12. #12
    Senior Member
    Join Date
    Oct 2012
    Location
    Tybee Island, GA
    Posts
    505
    Post Thanks / Like
    The noise is a broken tooth on the flywheel. Frustrating as all the parts ares new inside the bell housing.

    This video shows the flywheel as it rotates.

    Broken Flywheel tooth Video


    2018-03-18_05-43-23 by D. R., on Flickr
    Last edited by DadofThree; 03-18-2018 at 04:52 PM.
    Dave
    Mk 3.1 - #6882 - 5.0L 302 - FiTech EFI - 3-Link - 3.08 Ratio - 15" Wheels
    Greenhorn and doing the best I can
    My photos are at: My Flickr acct
    Videos are at: YouTube Videos

  13. #13
    Senior Member Norm B's Avatar
    Join Date
    Mar 2012
    Location
    Head of St Margarets Bay, Nova Scotia
    Posts
    968
    Post Thanks / Like
    That sucks! I don't see any impact/interference marks on the surrounding teeth. Any idea what caused the failure.

    Norm

  14. #14
    Senior Member
    Join Date
    Oct 2012
    Location
    Tybee Island, GA
    Posts
    505
    Post Thanks / Like
    No, I don't know how it happened. I'll do some research. Also will research how to fix
    Dave
    Mk 3.1 - #6882 - 5.0L 302 - FiTech EFI - 3-Link - 3.08 Ratio - 15" Wheels
    Greenhorn and doing the best I can
    My photos are at: My Flickr acct
    Videos are at: YouTube Videos

  15. #15
    Senior Member Fixit's Avatar
    Join Date
    Aug 2017
    Location
    Minneapolis 'Burbs
    Posts
    910
    Post Thanks / Like
    Looking at your picture where the tooth broke off, the underlying metal looks "crystalline". I'd be suspect of improper hardening on the ring gear.
    (My experience with either flywheels or flexplates has been they are "hard", but still soft enough to take wear. The teeth will deform rather than snap off. My .02)
    John D. - Minneapolis 'Burbs

    1965 El Camino - LT-1, 4L60e, 4wh discs, SC&C susp.
    2013 F-150 Platinum - Twin Turbo 3.5
    2018 Mk4 Roadster w/ Coyote - #9365 - Build Thread Delivery 7/3/18, 1st Start 1/4/19, 1st Road Mile 5/5/19, Legal 6/18/19, In Paint 2/25/21, Done (?) 4/2021

  16. #16
    Not a waxer Jeff Kleiner's Avatar
    Join Date
    Feb 2011
    Location
    Bloomington, Indiana
    Posts
    8,067
    Post Thanks / Like
    Quote Originally Posted by DadofThree View Post
    ...Also will research how to fix
    I'm afraid there's only one way to fix it Dave. Man, that sucks

    Jeff

  17. #17
    Senior Member KDubU's Avatar
    Join Date
    May 2015
    Location
    Kennebunkport, ME
    Posts
    1,192
    Post Thanks / Like
    That really sucks. Was hoping to see good news.
    Kyle

    Complete Kit pickup 09/05/2015, 351w, QF680, 3.55, 3-Link, 15" Halibrands with MT's, Painted Viking blue with Wimbledon white stripes on 03/15/2017. Sold in 08/2018 and totally regret it.

  18. #18
    Senior Member frankb's Avatar
    Join Date
    Feb 2014
    Location
    Marana, AZ
    Posts
    328
    Post Thanks / Like
    Dave:

    What brand is the flywheel and where did you buy it? It seems to me that any good seller or manufacturer will replace it under warranty. Unfortunately, it still has to be disassembled...no way around that! Thats a bummer!!
    FFR MK4 #8317, 393 Cleveland, Lunati VooDoo solid roller, CHI 3V heads and intake, TKO 600, Std roadster seats, 8.8 3.55 diff, 17" Halibrand replica wheels, Ford "Magnetic Metallic", silver ghost stripe. (Sold 10/16/21)

  19. #19
    Senior Member
    Join Date
    Oct 2012
    Location
    Tybee Island, GA
    Posts
    505
    Post Thanks / Like
    Quote Originally Posted by frankb View Post
    Dave:

    What brand is the flywheel and where did you buy it? It seems to me that any good seller or manufacturer will replace it under warranty. Unfortunately, it still has to be disassembled...no way around that! Thats a bummer!!
    I purchased the flywheel from Jegs http://www.jegs.com/i/JEGS-Performan...01351/10002/-1

    I called Jegs and they offered to refund my money when they receive the item. I may order this Ford Performance one instead of getting a direct replacement.

    It's a bummer indeed, and my mind is all over the place with this one. Should I pull the motor/trans, should I just pull the motor, should I just drop the transmission, should I run it for a while and see if anything else shows up before pulling the motor/trans, should I just run it for the season with it? It seems that I start with the responsible choice and gravitate toward the easy way out. The power tour is in 2.5 months and I feel the clock ticking.

    On the other hand, I'm trying to remind myself that this not a big deal. "Dave, your toy broke, get over yourself."
    Last edited by DadofThree; 03-19-2018 at 09:04 AM.
    Dave
    Mk 3.1 - #6882 - 5.0L 302 - FiTech EFI - 3-Link - 3.08 Ratio - 15" Wheels
    Greenhorn and doing the best I can
    My photos are at: My Flickr acct
    Videos are at: YouTube Videos

  20. #20
    Not a waxer Jeff Kleiner's Avatar
    Join Date
    Feb 2011
    Location
    Bloomington, Indiana
    Posts
    8,067
    Post Thanks / Like
    If you try to run with it there is a good chance that it will eventually knock the starter drive out which will leave you dead in the water (unless you like being push started ).

    Jeff

  21. #21
    Senior Member
    Join Date
    Oct 2012
    Location
    Tybee Island, GA
    Posts
    505
    Post Thanks / Like
    Quote Originally Posted by Jeff Kleiner View Post
    If you try to run with it there is a good chance that it will eventually knock the starter drive out which will leave you dead in the water (unless you like being push started ).

    Jeff
    Hmmm...the voice of reason. You're right, Flywheel ordered. Keep it coming.

    okay, here's my plan (in a few weeks):
    drain transmission
    drain oil
    drain coolant
    remove fuel lines to Fitech
    unplug fitech harness
    remove gauge sensor wires for water and oil pressure
    remove air cleaner
    remove mechanical linkage
    remove driveshaft
    remove top coolant hose
    remove bottom coolant hose
    remove remote oil lines from oil filter mount
    remove clutch cable from clutch fork
    remove shifter
    remove motor mount nuts
    remove transmission mount nuts
    remove j pipes
    remove valve covers (interfere with chain)
    remove plug wires
    disconnect distributor
    remove power steering hoses

    lift engine / transmission out of engine bay
    remove bell housing bolts
    remove pressure plate
    remove clutch
    remove flywheel

    install new flywheel - when i get to this step, is there someway that I need to check the starter gear relative to the flywheel to be sure they don't interfere?

    What'd I forget? oh, I'll find out.

    I'm electing to do this method instead of laying on my back and trying to remove the transmission and bell housing upside down. Maybe one day I'll have a lift which will make my time under the car easier.

    If there's an easier way, I'm all ears.
    Last edited by DadofThree; 03-19-2018 at 12:56 PM.
    Dave
    Mk 3.1 - #6882 - 5.0L 302 - FiTech EFI - 3-Link - 3.08 Ratio - 15" Wheels
    Greenhorn and doing the best I can
    My photos are at: My Flickr acct
    Videos are at: YouTube Videos

  22. #22
    Not a waxer Jeff Kleiner's Avatar
    Join Date
    Feb 2011
    Location
    Bloomington, Indiana
    Posts
    8,067
    Post Thanks / Like
    Easier way---Yank the trans. Even laying on the ground it's easier than all that extra monkey motion much of which would have to be done from below anyway.

    Jeff

  23. #23
    Senior Member
    Join Date
    Oct 2012
    Location
    Tybee Island, GA
    Posts
    505
    Post Thanks / Like
    Quote Originally Posted by Jeff Kleiner View Post
    Easier way---Yank the trans. Even laying on the ground it's easier than all that extra monkey motion much of which would have to be done from below anyway.

    Jeff
    okay, but that's without a lift? Will I need to get the car off the ground higher than the bell housing is tall to get it out of the way after removal? Or if I separate the transmission first, will my extra long '95 input shaft be able to clear the bell housing during removal? Is there enough room to bring the transmission back that far?

    I can try to picture this as I don't have my cabin aluminum in place yet. But after a while, it looks the same to me (other than coolant and oil lines).

    Be sure can reach all bell housing bolts with existing alum in place
    measure distance between top of bell housing and frame - is it greater than depth of input shaft into pilot bearing? If not, prepare to move motor forward during transmission removal.
    raise car as high as possible (safely and secure)
    drain transmission fluid
    remove driveshaft
    remove clutch cable from clutch fork
    remove shifter
    remove transmission mount nuts
    remove air cleaner
    remove valve covers (interfere with chain)
    connect engine hoist to support engine when transmission is disconnected
    support transmission from above through tunnel frame (with no aluminum in place, put a strap around transmission and 2x4 resting on top of tunnel. this will support the tail while removing brace)
    remove transmission brace
    place jack under bell housing
    unbolt bellhousing from motor and remove (hopefully)
    I remember the bump out on the bell housing interfered with the frame during install.
    frame interference by D. R., on Flickr

    I don't have much room between bell housing and frame of car, so I may need to move the motor a little to remove I'll measure when I get home
    If bell housing doesn't clear dowel pins:
    remove nuts from motor mounts
    remove mechanical linkage
    remove fuel lines from fitech
    disconnect RF sending unit wires (water and oil)
    disconnect distributor
    raise motor mount studs out of mounts

    remove bell housing from alignment pins
    remove pressure plate
    remove clutch
    remove flywheel
    remove pressure plate alignment dowels from flywheel

    reinstall pressure plate alignment dowels into new flywheel
    install new flywheel (remember sealant) - when i get to this step, is there someway that I need to check the starter gear relative to the flywheel to be sure they don't interfere?
    Dave
    Mk 3.1 - #6882 - 5.0L 302 - FiTech EFI - 3-Link - 3.08 Ratio - 15" Wheels
    Greenhorn and doing the best I can
    My photos are at: My Flickr acct
    Videos are at: YouTube Videos

  24. #24
    Senior Member Fixit's Avatar
    Join Date
    Aug 2017
    Location
    Minneapolis 'Burbs
    Posts
    910
    Post Thanks / Like
    It's up to you... your assessment of the lesser of two evils.
    I have no experience (yet) of what it would take to do a clutch-job in one of these cars... (In your case it's really nothing more - as a good clutch replacement would involve a flywheel resurfacing).
    If it were me - two scenarios:
    #1 - no way to get the car "overhead". - bite the bullet and pull the engine/trans as an assembly - change the broken stuff dangling on the cherry-picker.
    #2 - car on a lift overhead - drop the trans out, supporting the engine with a "dead-man" post/steady-stick and attack.

    In my area there are a few outfits that rents shop space. Search "DIY auto repair", "My Mechanic's Space", etc. You can rent a shop bay with lift & tools by the hour. If you get all the pieces together, and the car over there, it may save you some grief.
    John D. - Minneapolis 'Burbs

    1965 El Camino - LT-1, 4L60e, 4wh discs, SC&C susp.
    2013 F-150 Platinum - Twin Turbo 3.5
    2018 Mk4 Roadster w/ Coyote - #9365 - Build Thread Delivery 7/3/18, 1st Start 1/4/19, 1st Road Mile 5/5/19, Legal 6/18/19, In Paint 2/25/21, Done (?) 4/2021

  25. #25
    Not a waxer Jeff Kleiner's Avatar
    Join Date
    Feb 2011
    Location
    Bloomington, Indiana
    Posts
    8,067
    Post Thanks / Like
    Dave, I'm afraid you're imagining it to be worse than it is. It's no walk in the park but except for the Mk2s it isn't horrible. Heck, I've seen several changed in the hotel parking lots at LCS over the years. Brendan Dougherty did one in about an hour last June---in the rain

    Jeff

  26. #26
    Senior Member
    Join Date
    Oct 2012
    Location
    Tybee Island, GA
    Posts
    505
    Post Thanks / Like
    Quote Originally Posted by Jeff Kleiner View Post
    Dave, I'm afraid you're imagining it to be worse than it is. It's no walk in the park but except for the Mk2s it isn't horrible. Heck, I've seen several changed in the hotel parking lots at LCS over the years. Brendan Dougherty did one in about an hour last June---in the rain

    Jeff
    So if I can just make it until LCS.....

    I always try to expect the worst case when starting a project so that I'm ready for it. Not a great trait, but it's also saved my butt a couple of times too.

    I just went around the bell housing to make sure I can reach all of the bolts. There is one that is hard to reach, PS just above the starter. But I was able to do so with an extension/ socket/ universal joint combo. I was able to loosen that bolt and tighten it back up. Now i know i can reach it. I think I can reach the rest ok. I'm glad to have the aluminum still out of the car to be able to get in through the cabin. Thank you to all of you for the replies.
    Dave
    Mk 3.1 - #6882 - 5.0L 302 - FiTech EFI - 3-Link - 3.08 Ratio - 15" Wheels
    Greenhorn and doing the best I can
    My photos are at: My Flickr acct
    Videos are at: YouTube Videos

  27. #27
    Senior Member CraigS's Avatar
    Join Date
    Feb 2011
    Location
    Blacksburg, Va
    Posts
    4,728
    Post Thanks / Like
    If you decide to pull the engine, think seriously about pulling just the engine. When there is no trans attached, the engine needs to move forward maybe 4 inches and then comes straight up. Minimal need to change it's angle. I do mine w/ a come-a-long from the ceiling. I just roll the car the 4 inches. I rig a closet rod dowel laying it across the tops of the two foot boxes, and then run a ratchet strap from the dowel down and around the bell housing. I push the strap rearward so it is actually around the main case w/ the bell housing keeping it from slipping forward. This rearward pull keeps the dowel against the firewall.
    Trans support by craig stuard, on Flickr
    FFR MkII, 408W, Tremec TKO 500, 2015 IRS, DA QA1s, Forte front bar, APE hardtop.

  28. #28
    Senior Member
    Join Date
    Oct 2012
    Location
    Tybee Island, GA
    Posts
    505
    Post Thanks / Like
    I'm up to my elbows in the repair. 5 hours in, and I was able to get the flywheel off, and am on my way to the autoparts store to buy a rear main seal. It looks like mine may be leaking. Not sure, but am going to go ahead and replace it.

    https://youtu.be/Sc5V5_1UJdQ
    Dave
    Mk 3.1 - #6882 - 5.0L 302 - FiTech EFI - 3-Link - 3.08 Ratio - 15" Wheels
    Greenhorn and doing the best I can
    My photos are at: My Flickr acct
    Videos are at: YouTube Videos

  29. #29
    Senior Member CraigS's Avatar
    Join Date
    Feb 2011
    Location
    Blacksburg, Va
    Posts
    4,728
    Post Thanks / Like
    Did you have a sealer on the flywheel to cranks bolt threads? The holes go all the way through the flywheel so oil can weep past the bolts if not sealed.
    FFR MkII, 408W, Tremec TKO 500, 2015 IRS, DA QA1s, Forte front bar, APE hardtop.

  30. #30
    Senior Member
    Join Date
    Oct 2012
    Location
    Tybee Island, GA
    Posts
    505
    Post Thanks / Like
    sealant was indeed on the bolts. It looked like it came from the rear seal.

    I replaced the rear seal and flywheel. I've gotten as far as putting on the bell housing, but still need to button up the rest. It took me the weekend, but I'm glad that I did it. I took a photo with the starter in the hole of the backing plate to see if the plate was out of round. The starter filled the hole completely, and there is no gap.

    Hopefully, I can get done after work tomorrow. Then it's time to move on.


    Quote Originally Posted by Jeff Kleiner View Post
    Dave, I'm afraid you're imagining it to be worse than it is. It's no walk in the park but except for the Mk2s it isn't horrible. Heck, I've seen several changed in the hotel parking lots at LCS over the years. Brendan Dougherty did one in about an hour last June---in the rain

    Jeff
    I can't imagine this being done in an hour and half, or even in a parking lot, after what I went through this weekend (as a first timer). That's crazy.
    Last edited by DadofThree; 03-25-2018 at 09:05 PM.
    Dave
    Mk 3.1 - #6882 - 5.0L 302 - FiTech EFI - 3-Link - 3.08 Ratio - 15" Wheels
    Greenhorn and doing the best I can
    My photos are at: My Flickr acct
    Videos are at: YouTube Videos

  31. #31
    Mark Dougherty's Avatar
    Join Date
    Feb 2011
    Location
    Hershey PA
    Posts
    722
    Post Thanks / Like
    twas not a hour and a half for sure.
    but we did do it in a parking lot while raining. laying in an inch of water.
    yeah that sucked.
    ( year later though we had a blast)
    The traveling Builder
    717-773-5624

Posting Permissions

  • You may not post new threads
  • You may not post replies
  • You may not post attachments
  • You may not edit your posts
  •  

Brown County Customs

Visit our community sponsor