Boig Motorsports

Visit our community sponsor

Thanks Thanks:  0
Likes Likes:  0
Results 1 to 13 of 13

Thread: Recommeded Routing for Seat Heater Wiring?

  1. #1
    Papa's Avatar
    Join Date
    Dec 2016
    Location
    Mexico, MO
    Posts
    5,602
    Post Thanks / Like

    Recommeded Routing for Seat Heater Wiring?

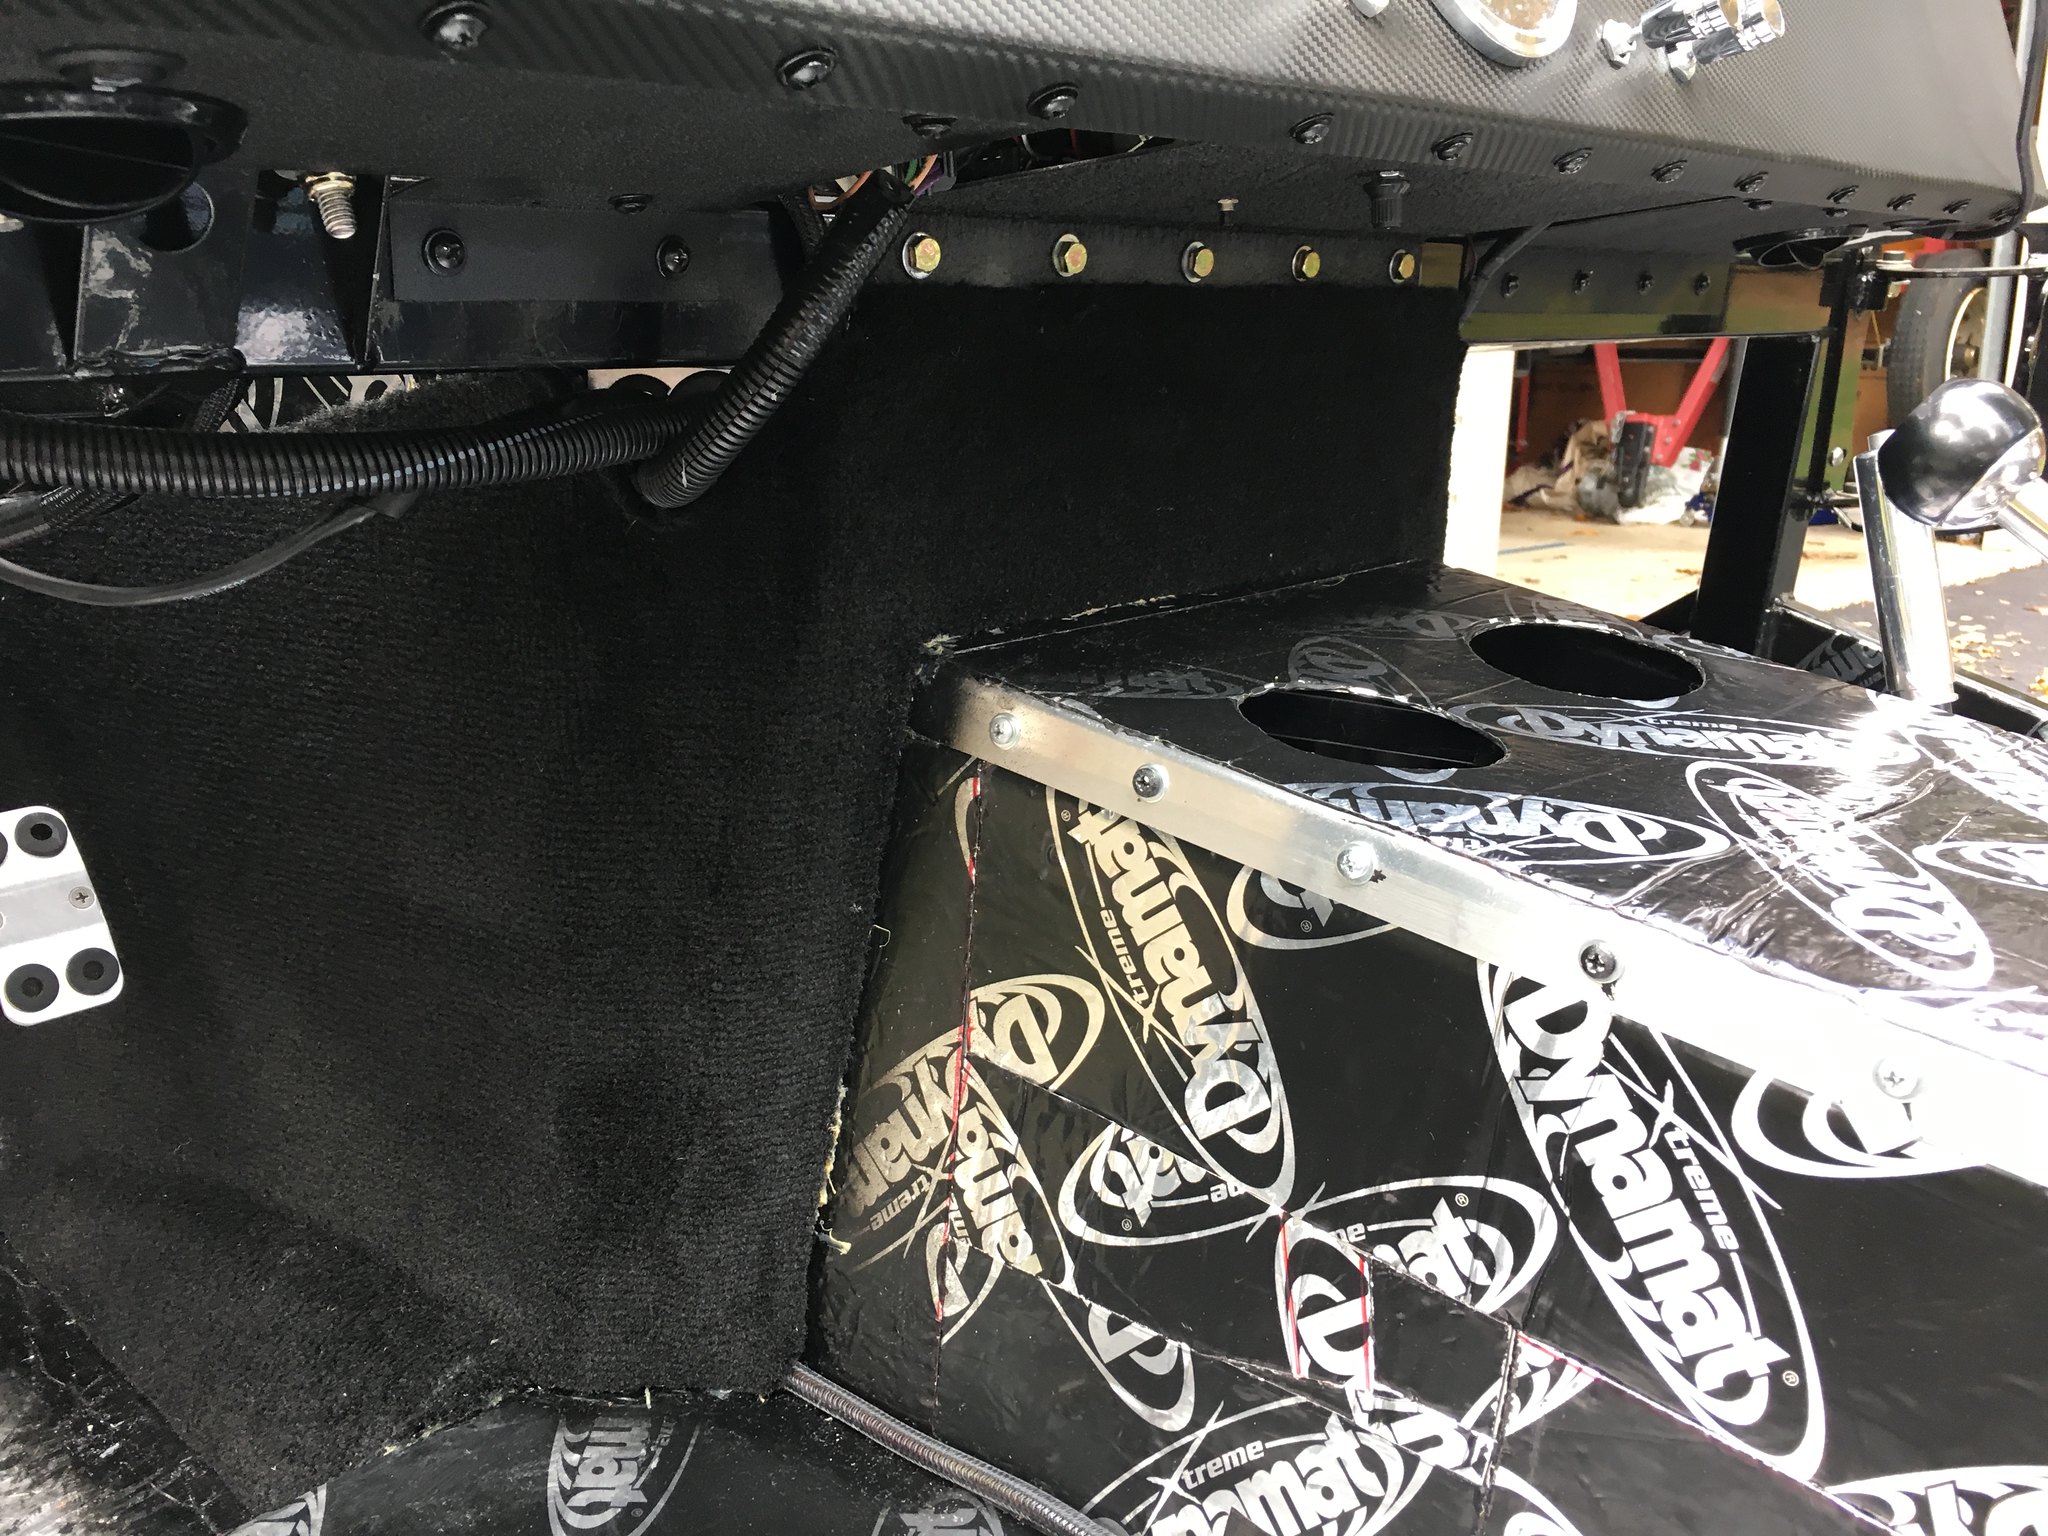
    I've installed the CobraHeat heaters in my leather roadster seats and will be using the Breeze inclined seat mounts. I plan to use the heater wire as the +12v source. I'd like to install the switches in the dash, so I'll need to extend the wiring between the seat plugs and the switches. I'm thinking of running the wires along the corner of the floor and trans tunnel or along the edge of the floor and wall on the outside of each compartment. I see some going through the trans tunnel wall, but prefer to not have additional openings unless that is the best routing.

    Thanks,
    Dave
    My Build Thread: http://thefactoryfiveforum.com/showt...ter-Build-9754
    (Most viewed Roadster build thread on this forum!)

    Delivered: 6/17/2017
    First Start: 12/30/2017
    Completed: 12/7/2019
    Legal: 1/30/2020

    Member of the Mile-Hi Cobra Club
    Dave's Cobra YouTube Channel: https://www.youtube.com/channel/UCbk...npK1UZHj4R-bYQ
    Agora 1:8 Scale Cobra Build: https://thefactoryfiveforum.com/show...l-Build-Thread

  2. #2
    Senior Member
    Join Date
    Apr 2016
    Location
    Ohio
    Posts
    249
    Post Thanks / Like
    I ran the DS down the 2x2 tube to the floor then along the corner where the floor meets the outer wall to the seats. On the PS down the tunnel at the firewall then along the corner where tunnel meets the floor to the seats. Being careful by the ebrake area. The carpet edges are very forgiving covering the wires as is the thermal insulation. Good luck
    JRL16
    Mk4 delivered 4/28/16. First start 10/15/16. First gocart 11/10/16. Engine Factory 427W. 750 carb. Tremec TKO600. 2015 IRS. Power steering. Whitby power brakes. Wilwood brakes. 18" wheels. Falken tires. Sway bars front and rear. Forte hydraulic clutch and mechanical throttle linkage. Scott's Hot Rods triple reservoir. Ceramic coated headers. Gas’n sidepipes. Heated seats. Herb Fraser walnut door panels. Wipers. Console.

  3. #3
    Senior Member phileas_fogg's Avatar
    Join Date
    Jun 2015
    Location
    Fairfax Station VA
    Posts
    1,235
    Post Thanks / Like
    I ran mine down the bend in the U-shaped aluminum at the front of the transmission tunnel and then along the inside corner of the cockpit.

    IMG_4178 by jhsitton, on Flickr

    You can see the left side wires exiting the inside corner of the carpet, and you can see the right side wires dropping down behind the carpet to the right of the right-most hex head bolt securing my center under dash panel.

    To better hide the wires, you may want to consider bending a cover plate of aluminum that goes over them and matches the bend in the U-panel. After all, if the wires are behind a cover with carpet that's glued in place, they'll be just as inaccessible as they with only carpet glued on top.

    My seat heater wires will pop up out of the floor carpet very close to the inner most seat belt mounting tab and just lay on the floor as they run to the back and center of the seat. That way they're free to move with the seat sliders and not get hung on anything.


    John
    Last edited by phileas_fogg; 01-15-2018 at 07:48 PM.
    MK IV Roadster #8631
    Ford 302, Holley Terminator EFI, T5z, 3.55 Rear End, IRS, 17” Halibrand Replicas (9” front, 10.5” rear), Nitto 555 G2’s (275/40ZR17 front, 315/35ZR17 rear), Fast Freddie’s Power Steering, F5 Wilwood Brakes, FFMetal’s Firewall Forward, Forte’s Hydraulic Clutch & Throttle Linkage
    https://www.ffcars.com/threads/phile.../#post-4776313

  4. #4
    Out Drivin' Gumball's Avatar
    Join Date
    Feb 2011
    Location
    Blackberry Township, IL
    Posts
    2,653
    Post Thanks / Like
    I used some "dummy" tubes to mimic the chassis tubes in the original cars that were visible between the dash and the transmission tunnel - the one on the left houses my speedo cable and the one on the right has my seat heater wiring.

    Later,
    Chris

    "There are no more monsters to fear, and so, we have to build our own."
    Mk3.1 #7074

  5. #5
    Senior Member Dave Howard's Avatar
    Join Date
    Feb 2012
    Location
    North Bay, Ontario
    Posts
    534
    Post Thanks / Like
    I have a battery cut off switch on the back wall between the seats. The heated seats get power direct from there. Cables are run in flexible cover inside the transmission tunnel. The wires come up through the tunnel behind the console. Switches mounted in the console. From the switch, cable back inside the transmission tunnel then into the cockpit behind the seat by the small angled piece that transitions the trans tunnel to the inside cockpit.

  6. #6
    Papa's Avatar
    Join Date
    Dec 2016
    Location
    Mexico, MO
    Posts
    5,602
    Post Thanks / Like
    Thanks everyone. Looks like pretty much anything that works is okay. Not a specific "preferred" approach.

    Dave
    My Build Thread: http://thefactoryfiveforum.com/showt...ter-Build-9754
    (Most viewed Roadster build thread on this forum!)

    Delivered: 6/17/2017
    First Start: 12/30/2017
    Completed: 12/7/2019
    Legal: 1/30/2020

    Member of the Mile-Hi Cobra Club
    Dave's Cobra YouTube Channel: https://www.youtube.com/channel/UCbk...npK1UZHj4R-bYQ
    Agora 1:8 Scale Cobra Build: https://thefactoryfiveforum.com/show...l-Build-Thread

  7. #7

    Moderator
    RoadRacer's Avatar
    Join Date
    Oct 2011
    Location
    Manor, TX
    Posts
    2,245
    Post Thanks / Like
    Can I ask a follow-up question? I haven't got my seats yet, but I'll be ordering the leather seat option when I order stage 2 hot rod. It's listed as "16213 - Upgrade: Leather Roadster Seats +$549.00" - which when I checked under the Mark 4, has the exact same option.

    So, assuming we're talking about the same seats, is it easy to install these seat heaters? Do the leather covers come off by design, or do you have to unstitch anything? Presumably these go directly below the leather and above the foam. I haven't seen anyone show details..
    James

    FFR33 #997 (Gen1 chassis, Gen2 body), license plate DRIVE IT says it all! build thread
    My build: 350SBC, TKO600, hardtop, no fenders/hood, 32 grill, 3 link, sway bars, 355/30r19
    Previous cars: GTD40, Cobra, tubeframe 55 Chevy, 66 Nova, 56 F100

  8. #8
    Papa's Avatar
    Join Date
    Dec 2016
    Location
    Mexico, MO
    Posts
    5,602
    Post Thanks / Like
    Quote Originally Posted by RoadRacer View Post
    Can I ask a follow-up question? I haven't got my seats yet, but I'll be ordering the leather seat option when I order stage 2 hot rod. It's listed as "16213 - Upgrade: Leather Roadster Seats +$549.00" - which when I checked under the Mark 4, has the exact same option.

    So, assuming we're talking about the same seats, is it easy to install these seat heaters? Do the leather covers come off by design, or do you have to unstitch anything? Presumably these go directly below the leather and above the foam. I haven't seen anyone show details..
    The heating pads are very simple to install. You don't need to unstitch anything, cut any hog rings, or anything major. The bottom cushion does require you to separate the leather that was glued to the bottom of the foam. Once that is done, the cover will come off the pad with very little effort. Set your bottom pad in place and use a little spray adhesive to keep it from moving. Replace the cover and use a little more spray adhesive to reattach the leather to the bottom of the cushion. For the back, you only need to slide a plastic clip off of a rod, then slide the pad into the opening between the cover and the foam pad and reattach the clip. I think I spent fifteen minutes per seat. I have pictures in my build thread starting at post number 297.

    http://thefactoryfiveforum.com/showt...l=1#post302175
    Last edited by Papa; 01-28-2018 at 12:12 AM.
    My Build Thread: http://thefactoryfiveforum.com/showt...ter-Build-9754
    (Most viewed Roadster build thread on this forum!)

    Delivered: 6/17/2017
    First Start: 12/30/2017
    Completed: 12/7/2019
    Legal: 1/30/2020

    Member of the Mile-Hi Cobra Club
    Dave's Cobra YouTube Channel: https://www.youtube.com/channel/UCbk...npK1UZHj4R-bYQ
    Agora 1:8 Scale Cobra Build: https://thefactoryfiveforum.com/show...l-Build-Thread

  9. #9

    Moderator
    RoadRacer's Avatar
    Join Date
    Oct 2011
    Location
    Manor, TX
    Posts
    2,245
    Post Thanks / Like
    Quote Originally Posted by Papa View Post
    The heating pads are very simple to install.
    Thanks Papa, much appreciated
    James

    FFR33 #997 (Gen1 chassis, Gen2 body), license plate DRIVE IT says it all! build thread
    My build: 350SBC, TKO600, hardtop, no fenders/hood, 32 grill, 3 link, sway bars, 355/30r19
    Previous cars: GTD40, Cobra, tubeframe 55 Chevy, 66 Nova, 56 F100

  10. #10
    Senior Member edwardb's Avatar
    Join Date
    Feb 2011
    Location
    Lake Orion, Michigan
    Posts
    10,567
    Post Thanks / Like
    Quote Originally Posted by Papa View Post
    The heating pads are very simple to install. You don't need to unstitch anything, cut any hog rings, or anything major. The bottom cushion does require you to separate the leather that was glued to the bottom of the foam. Once that is done, the cover will come off the pad with very little effort. Set your bottom pad in place and use a little spray adhesive to keep it from moving. Replace the cover and use a little more spray adhesive to reattach the leather to the bottom of the cushion. For the back, you only need to slide a plastic clip off of a rod, then slide the pad into the opening between the cover and the foam pad and reattach the clip. I think I spent fifteen minutes per seat. I have pictures in my build thread starting at post number 297.
    Yes, it's really about that easy with the newer seats that don't use hog rings any more. I personally haven't found it necessary to use spray adhesive on the pads. They have double back tape along the edges. Once you get them into place and are trapped between the covering and foam, they're not going anywhere. But it wouldn't hurt I guess. You'll probably find like I did that the factory applied adhesive on the bottom cushion isn't doing too much and either falling off or comes off real easy. I've done three sets, and they all were really loose. I would suggest marking around the edges of the vinyl/leather (both are the same) with a felt marker before taking it off. That way you know exactly where to locate when gluing back down. I use Dap Weldwood Gel Formula Contact Cement from Home Depot, Lowes, etc.. Works great and easier to control than spray adhesive. Probably more permanent too. This picture is a little dark, but gives the idea plus how I route the bottom cushion wire.

    Build 1: Mk3 Roadster #5125. Sold 11/08/2014. Build 2: Mk4 Roadster #7750. Sold 04/10/2017. Build Thread
    Build 3: Mk4 Roadster 20th Anniversary #8674. Sold 09/07/2020. Build Thread and Video. Build 4: Gen 3 Type 65 Coupe #59. Gen 3 Coyote. Legal 03/04/2020. Build Thread and Video
    Build 5: 35 Hot Rod Truck #138. LS3 and 4L65E auto. Rcvd 01/05/2021. Legal 04/20/2023. Build Thread. Sold 11/9/2023.

  11. #11
    Member Scubasommer's Avatar
    Join Date
    Feb 2018
    Location
    NorthWest Indiana
    Posts
    63
    Post Thanks / Like
    Quote Originally Posted by Papa View Post
    The heating pads are very simple to install. You don't need to unstitch anything, cut any hog rings, or anything major. The bottom cushion does require you to separate the leather that was glued to the bottom of the foam. Once that is done, the cover will come off the pad with very little effort. Set your bottom pad in place and use a little spray adhesive to keep it from moving. Replace the cover and use a little more spray adhesive to reattach the leather to the bottom of the cushion. For the back, you only need to slide a plastic clip off of a rod, then slide the pad into the opening between the cover and the foam pad and reattach the clip. I think I spent fifteen minutes per seat. I have pictures in my build thread starting at post number 297.

    http://thefactoryfiveforum.com/showt...l=1#post302175
    Papa
    Did you buy the regular pads or the weatherproof ones?

    Thanks
    Jimmy

  12. #12
    Papa's Avatar
    Join Date
    Dec 2016
    Location
    Mexico, MO
    Posts
    5,602
    Post Thanks / Like
    Quote Originally Posted by Scubasommer View Post
    Papa
    Did you buy the regular pads or the weatherproof ones?

    Thanks
    Jimmy
    Jimmy,

    I ordered the waterproof pads - you never know in an open cockpit car. It looks like your timing is good as they are on sale right now.

    http://www.cobraheat.com/WarmSeats-W...ater-_p_9.html

    Dave
    My Build Thread: http://thefactoryfiveforum.com/showt...ter-Build-9754
    (Most viewed Roadster build thread on this forum!)

    Delivered: 6/17/2017
    First Start: 12/30/2017
    Completed: 12/7/2019
    Legal: 1/30/2020

    Member of the Mile-Hi Cobra Club
    Dave's Cobra YouTube Channel: https://www.youtube.com/channel/UCbk...npK1UZHj4R-bYQ
    Agora 1:8 Scale Cobra Build: https://thefactoryfiveforum.com/show...l-Build-Thread

  13. #13
    Member Scubasommer's Avatar
    Join Date
    Feb 2018
    Location
    NorthWest Indiana
    Posts
    63
    Post Thanks / Like
    Quote Originally Posted by Papa View Post
    Jimmy,

    I ordered the waterproof pads - you never know in an open cockpit car. It looks like your timing is good as they are on sale right now.

    http://www.cobraheat.com/WarmSeats-W...ater-_p_9.html

    Dave
    Thanks Dave

    Good call, I jumped on the sale and they are on their way to me.

    Thanks your the best
    Jimmy

Posting Permissions

  • You may not post new threads
  • You may not post replies
  • You may not post attachments
  • You may not edit your posts
  •  

Replica Parts

Visit our community sponsor