-
Senior Member

Hood latches
I received the parts I ordered from McMaster to perform the hood latch mods others have done. I sent a PM to EdwardB and he informed me that he used a bushing with a 3/8" opening and filed down the edges of the square shaft on the latch for a tight fit, so that is what I did as well. I also ordered Nut Plates and bonded them underneath so that I could use 8-32 oval head machine screws rather than the self tapping screws provided. Like most everything, this was more work than I expected but I am glad that I did it and pleased with the results.
Parts I ordered from McMaster Carr:
98001A115 Low-Profile Narrow-Base Weld Nut, 8-32 Thread Size, Packs of 25
7815K23 Multipurpose Flanged Sleeve Bearing for 3/8" Shaft Diameter and 5/8" Housing ID, 3/4" Long
Here are all the parts prepped for installation. I ran a file along the corners of the latch post until it slid tightly into the bearings, I cut the bearings down to 1/4" length so there is no interference with the latch itself, and I drilled a couple extra holes into the nut plates to aid in bonding to the fiberglass.

Here is a view from the top after all the work was done and waiting for the Bondo Glass to cure. You can see that I had originally mounted the latches with the screws in a front to rear orientation - that was a mistake, this is what happens when you get ahead of yourself and follow the manual on a task rather than checking the forums first. There is not enough room for the nut plates unless the screw holes go side to side on the hood. Oh well, I just sanded them down a bit and filled them in. Another thing you will notice is that the hole on the top is opened up to 7/8" whereas the one on the bottom is 5/8" as in the manual. I originally drilled both sides 5/8" but then opened up the top to 7/8" go give myself a bit more room to fit the nut plates in. Do yourself a favor and make those holes into slots as shown in EdwardB's thread - makes it a lot easier to install as you can just thread a bolt into the plate and then slide it right into place. I was trying to feed them in from underneath and had a heck of a time getting them in the right position to screw them down. Once again, if I had to do it over again I would slot them.
Here is a shot from underneath that shows the nut plate being held in place with a bolt while the glass filler cures. I drilled a couple extra holes in each nut plate to allow the filler something else to grab onto.

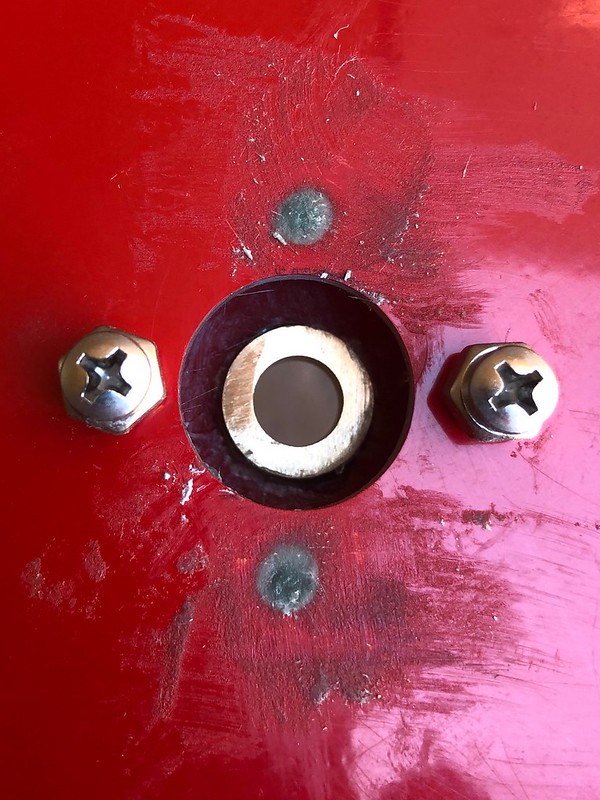
Here is the underside that shows the sleeve bearing after latch installation. After the Bondo Glass cured, I put a small fillet of JB weld around it and on the inside to help secure it. A couple notes on the bearing - first you need to cut it down to around 1/4" length to allow the latch to seat properly. Also, as the painter pointed on on Facebook, don't buy the oil impregnated ones if you intend to paint over it. Oil and paint don't mix so well 

And finally here is a shot of the latches screwed down and the hood in place. Next up is the catches on the underside of the body, and yes I guess I will make my own with a curved recess so that the paddles "snap" into place. Can't leave well enough alone.

-
Post Thanks / Like - 1 Thanks, 0 Likes


 Thanks:
  Likes:


 Reply With Quote