-
08-03-2019, 08:26 PM
#361
Senior Member

Windshield Mounted
This afternoon I got the windshield installed with the help of my son. It was not without incident, as usual. I manage to strip one of the threaded holes in the brass insert on the drivers side. It certainly doesn't take much to strip it, it seems I was barely turning it and none of them seem to fit very tight - gaps at the top. I guess I will go ahead and pester Whitby's to fill my order and I'll have the painter swap them out for the SS inserts when he has to pull the windshield back off. From the advice I received in my other thread, I measured down 13" from the bottom screw hole and marked the side bars and then cut the excess off at a 45 degree angle with my angle grinder. Once I got enough of the openings in the body opened up for the windshield to fit properly, measuring 27" from the top of the body above doors to the top screw, I reached in and marked the holes. I pulled it back out again, center punched them, and used a series of drill bits to get it up to the 27/64 bit and then tapped the holes to 1/2" - 13. When I installed the bolts I found that the drivers side was flush to the body mount but there was a small gap on the passenger side, and I used a couple 1/2" washers (about 1/8" thick) as spacers and then tightened everything down. I still need to square and clean up the windshield rubber and get the trim rings mounted, but otherwise I am done with this for now.


-
08-03-2019, 08:33 PM
#362
Senior Member
-
08-11-2019, 02:04 PM
#363
Senior Member
-
08-11-2019, 02:17 PM
#364
Senior Member
-
08-11-2019, 05:29 PM
#365
Not a waxer


Originally Posted by
shark92651

...For now I am using stacks of washers and standard hex nuts on the plungers. Later, I plan to dress that up with some spacers cut to length and some cap nuts.

If you're talking about the stack of washers shown in the photo...and intend to send the car here for body & paint...don't bother with making spacers because when all is said and done there's about a 90% chance that things will change once the doors and body positions are finalized.
Jeff
-
08-11-2019, 08:44 PM
#366
Senior Member
Originally Posted by
Jeff Kleiner
If you're talking about the stack of washers shown in the photo...and intend to send the car here for body & paint...don't bother with making spacers because when all is said and done there's about a 90% chance that things will change once the doors and body positions are finalized.
Jeff
Absolutely, i plan on that being one of my "back from paint" projects
-
08-13-2019, 07:46 AM
#367
Senior Member
-
08-13-2019, 08:01 AM
#368
Senior Member
-
08-17-2019, 09:15 PM
#369
Senior Member
-
08-18-2019, 03:08 PM
#370
Senior Member
-
08-18-2019, 03:31 PM
#371
Senior Member
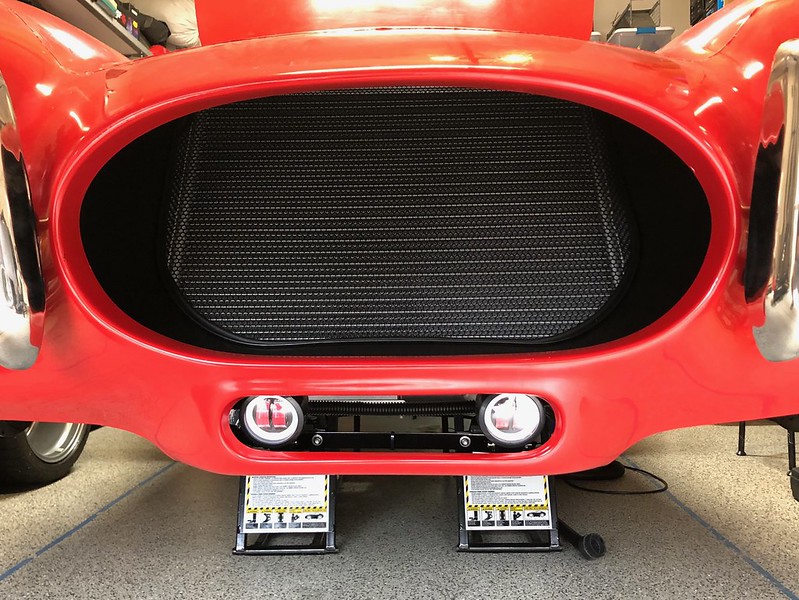
Wind wings, sun visors, and mirrors installed
I also got the wind wings, sun visors, and mirrors installed today. When I first started researching for my build I decided I wanted all these options. The wind wing mounted side-view mirrors and the windshield mounted rear-view mirror with the bracket from Dark Water Customs were recommended by several as providing superior visibility to the stock mirrors and location on the body. Besides, there are a few less holes to put in the body and I really like they way they look.
The wind wings were pretty easy to assemble and install on the windshield side bars. The sun visors had me a little concerned as the brass is easy to strip and I read that the screws can bottom out on the glass. I test fitted all the screws with the brackets and it did not feel to me like anything was bottoming out. I installed the screws until I could just feel some resistance, just snug. In each case the bracket felt secure so I felt pretty good about it. I then removed the screws one at a time and put a little blue loctite on each one and reinstalled.

The rear-view bracket from Dark Water was a completely different story, however. At first I tried to use the supplied hex nuts but I just could not get them to hold securely. At first I tried using the end of a small screwdriver to keep the nut from turning while tightening, but that didn't work very well and the bracket was still loose. Also, the supplied screws were bottoming out on the metal inside the windshield frame. I took a look at EdwardB's thread and saw that he used some rectangular nut plates to install his. I have some 8-32 nut plates left over from my hood latch installation so I cut those down and drilled/tapped them to 5mm - .80 to match the supplied screws. I used my dremel to cut off both sides of the nut plates and my grinder with a flap disk. I had to take some material off the top and bottom, and also reduce the thickness to get it to slide into the frame. I also had to take a bit off the length of the screws to keep them from bottoming out. It sure is a lot of work to have to make your own nuts 


-
08-25-2019, 08:00 AM
#372
Senior Member
Anti-sub belts
I pulled my seats again to install the anti-submarine belts (should have planned ahead and done this when I riveted in the seat bracket). I drilled a 1/2" hole through the bottom seat bracket and through the floor and attached with the supplied hardware. Hopefully the next time I pull the seats will be after paint when I am installing the carpet.

-
08-25-2019, 08:23 AM
#373
Senior Member
-
Post Thanks / Like - 0 Thanks, 1 Likes
-
08-26-2019, 09:21 PM
#374
Senior Member
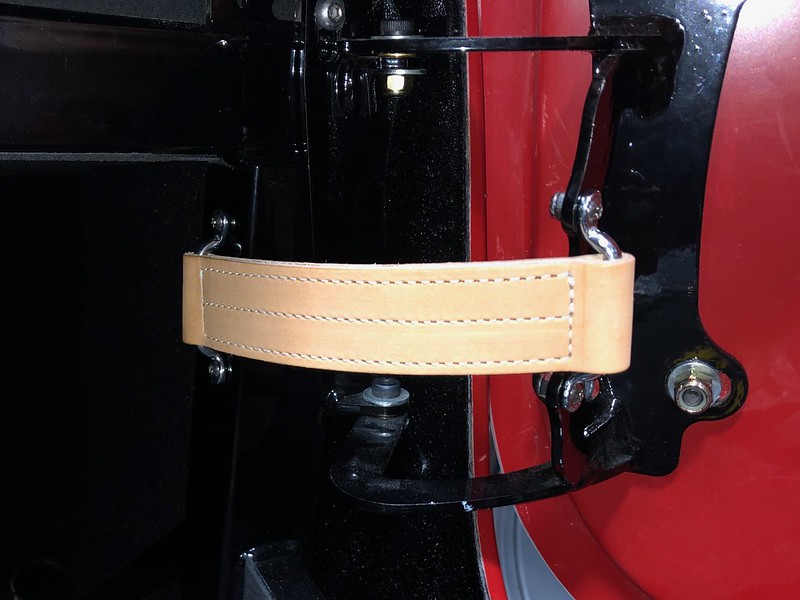
Vinegaroon chemistry lesson
Thanks to a tip from Jeff Kleiner, I made up some Vinegaroon and turned my check straps black tonight. Vinegaroon is basically just vinegar with dissolved/rusted steel wool in it. It causes a chemical reaction with the tannins in the leather that turns it black. Unlike dye it will not rub off and it doesn't change the color of the threads so it makes for a cool look. Literally took 30 seconds to do and no stained fingers.


https://www.instructables.com/id/Vin...k-Leather-Dye/
-
Post Thanks / Like - 0 Thanks, 1 Likes
-
08-27-2019, 09:37 AM
#375
Senior Member

Originally Posted by
shark92651
Thanks to a tip from Jeff Kleiner, I made up some Vinegaroon and turned my check straps black tonight. Vinegaroon is basically just vinegar with dissolved/rusted steel wool in it. It causes a chemical reaction with the tannins in the leather that turns it black. Unlike dye it will not rub off and it doesn't change the color of the threads so it makes for a cool look. Literally took 30 seconds to do and no stained fingers.
https://www.instructables.com/id/Vin...k-Leather-Dye/
Thats awesome, I'm doing that. I never liked the tan leather strap, a chemistry experiment for the family what awesome fun!
-
09-03-2019, 07:45 PM
#376
Senior Member
-
09-03-2019, 09:25 PM
#377
Senior Member

I too will be running it in gel coat. I have been following a guy on youtube called boat works today https://www.youtube.com/channel/UC0k...zdqFUk3oTaHBuA to learn how to sand and polish the gelcoat. so I bought some red gelcoat from http://www.mertons.com/index.html in Mass IMG_20190707_130039.jpg
-
09-04-2019, 08:13 AM
#378
Senior Member

Congrats on getting her there! She looks great now enjoy as much driving as you can the remains in the year.
Kyle
Complete Kit pickup 09/05/2015, 351w, QF680, 3.55, 3-Link, 15" Halibrands with MT's, Painted Viking blue with Wimbledon white stripes on 03/15/2017. Sold in 08/2018 and totally regret it.
-
09-09-2019, 07:53 AM
#379
Senior Member
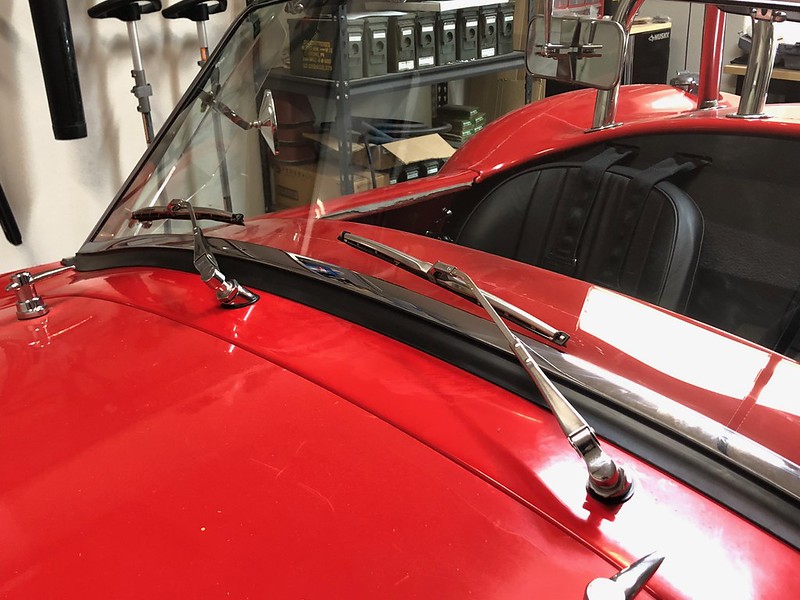
Wipers installed
On Saturday I got the wipers installed, which is something I needed to finish before inspection. In hindsight I probably should have just gone with some temporary clip-on wipers, but I bought these when I ordered the kit so I was going to install them. They were pretty straight forward to install following the instructions, but I do have a few tips. The holes are drilled at a pretty steep angle and to a size of 5/8". At first I tried to use the jig they provide while drilling. I found that that size bit was just grabbing too much on the jig or the body itself and was not working very well. I was hoping to find a 5/8" hole saw at Home Depot, but they don't sell one that small. In the end I just used the jig to mark the starting location with a Sharpie and then used a smaller bit, holding the drill next to the jig to approximate the angle. After I got a small hole started I used a step-bit up to 1/2", and clamped the jig back in place and ran the 5/8" bit to set the final size of the hole. With a 1/2" "pilot" hole already in place the 5/8" bit ran just fine in the jig.
I gave up trying to flare that stainless tubing they provide. It was just way too hard and my only attempt to flare it ended up with a lopsided flare. This was using the Eastwood flaring tool I borrowed from a friend. I ditched the stainless, went to Autozone and picked up a piece of the basic steel 5/16" tubing and flared that easily.
Another thing that wasn't completely obvious to me at first is that when you are ready to install the cable in the wheelboxes, you really need to remove the wheelboxes from the body and feed the cable into them while putting the tubing in place. At first I thought it just snapped into place but that doesn't work, at least not for me. And finally I did use a torch and bent the arms just a bit to bring the wipers down and more parallel with the base of the windshield. They work, but they don't really feel like quality wipers to me and in the end I'll probably rely more on Rain-X than the wipers.

-
Post Thanks / Like - 0 Thanks, 3 Likes
-
09-09-2019, 04:57 PM
#380
Looks great.... as you drive it in Gel-Coat, you will find little things that need to be tweaked. You'll be glad you are not painted yet. Your body looks really good as well. Now go put some miles on it.
-
09-11-2019, 05:18 PM
#381
Senior Member
Originally Posted by
BadAsp427
Looks great.... as you drive it in Gel-Coat, you will find little things that need to be tweaked. You'll be glad you are not painted yet. Your body looks really good as well. Now go put some miles on it.
Appreciate the comments. I have insurance and just picked up my temp 30 day tag and taking it for an alignment and inspection on Friday. Hopefully I will be done with the entire title/registration process soon.
-
09-13-2019, 01:42 PM
#382
Senior Member
Alignment and inspection complete
This morning I took the car to an ASE Master Technician for the inspection and alignment. This was the first time I took the car outside of my neighborhood and wouldn't you know it that on the way home a guy in a BMW wanted to race already  Now I have to find somewhere to get a weight certification, fill out a few other forms, and then get it to the Tax office and hopefully I can get this baby titled and registered.

-
09-15-2019, 08:14 PM
#383
Senior Member
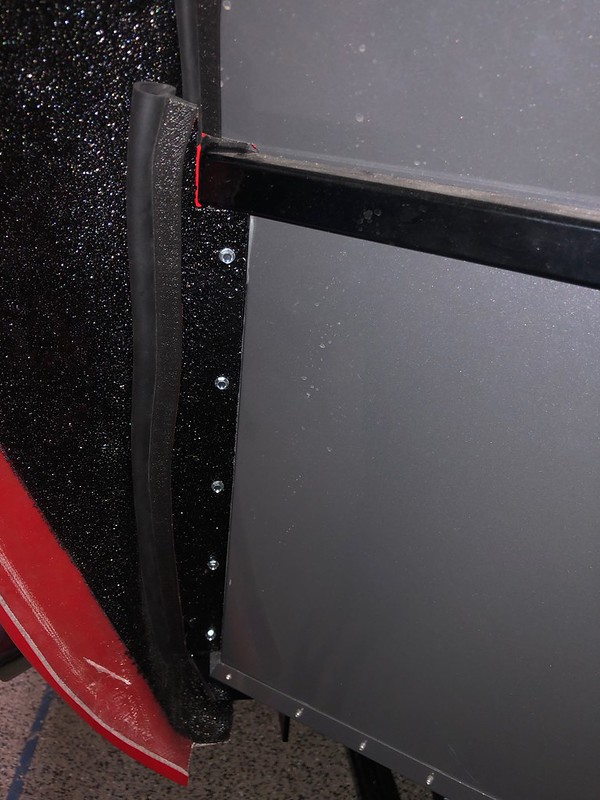
Blocking engine heat to the cockpit
Despite all my efforts to insulate my foot boxes, floor, and firewall, a lot of heat is coming in from the gap between the body and the top and sides of the footboxes. Today I pulled off all my wheels and removed all my splash guards (again, I hope for the last time for awhile). I also removed my louvers so that I could get better access to block this air path. I bought some black pool noodles online and cut then into appropriately sized pieces and shoved them in to fill the gaps the best I could. I put a light in the seat shining towards the front to more easily spot the gaps. I blocked the gaps on both sides and, as you can see, it should be a lot cooler in there now. This is just temporary as Kleiner is going to install some better insulation in this area before he re-installs the body after paint.
Before

After

Last edited by shark92651; 09-15-2019 at 08:21 PM.
-
Post Thanks / Like - 0 Thanks, 1 Likes
-
09-15-2019, 08:19 PM
#384
Senior Member
Steering wheel badge
There are few "finishing touches" I can do before paint, but I went ahead and installed the steering wheel badge. I did as others suggested and drilled a small hole above the o-ring to relieve air pressure if I have the need to pry it off later. Looks good 

-
Post Thanks / Like - 0 Thanks, 1 Likes
-
09-17-2019, 06:42 PM
#385
Senior Member
-
Post Thanks / Like - 0 Thanks, 1 Likes
-
09-20-2019, 06:15 PM
#386
Senior Member
-
09-20-2019, 06:16 PM
#387
Senior Member
Name plate installed
I went ahead and riveted on the F5R name plate. After input from others I decided to put it on top of the passenger side footbox.

Last edited by shark92651; 09-20-2019 at 06:18 PM.
-
09-21-2019, 06:12 PM
#388
Senior Member
-
Post Thanks / Like - 0 Thanks, 3 Likes
-
09-26-2019, 08:02 AM
#389
Senior Member
Title, registration, and tags
This past Monday I took all my paperwork to the county tax office and got everything submitted to get my title, registration, and tags. I did all my homework up front so was able to get out of there in about 20 minutes with my registration sticker and 60 day temp paper tags. They said I should expect to receive my title and permanent license plate in about 3-4 weeks.
I also finished up my "Kleiner modded" license plate holder. I found that I needed just a bit more room to get the plate to fit without touching the trunk latch so I removed everything and cut a couple notches in the bottom of the "bridge" that holds the lights to allow the plates to slip all the way up into the holder. I also opened up the mounting holes in the trunk just a bit so that I could bring the entire unit up just a bit and that allows it to fit so I shouldn't have to modify the plate itself at all. For a plate mount I purchased an inexpensive license plate blank on Amazon and modified it to fit. I cut a notch in the top to clear the light housing and secured it to the license plate holder with some #10 flathead screws cut down to about 1/4" length so that they will not touch the trunk. I also drilled some access holes in it so that the entire unit can be easily removed from the trunk without removing the plate mount.

-
09-26-2019, 08:15 AM
#390
Originally Posted by
shark92651
This morning I took a short road trip, about 50 miles in total, to go get a weight certification. It was the first time I've had her up to highway speeds, around 80 most of the way and it was a blast. It was a good opportunity to shake things out, and quite literally I did shake something loose - one of the nuts on the driver's side door hinge came loose and fell off - guess I forgot to tighten that one. Otherwise it was pretty uneventful, but a blast to drive! I like my choice of the .64 5th gear as it cruises right along at 80 mph at 2500 rpm.
The car weighs in at 2360 with a full tank of gas and is pretty well balanced. I have all my paperwork in order and will go to the tax office next week to hopefully get title, registration, and tags.

I took a couple more photos in the driveway when I got home. Here is the current state of the car at this point. I've pretty much done about all I can do until body work and paint, other than go out and have fun!

This is great. I'm only about 2 (2 and a half) years behind you.
-
09-30-2019, 02:52 PM
#391
Senior Member
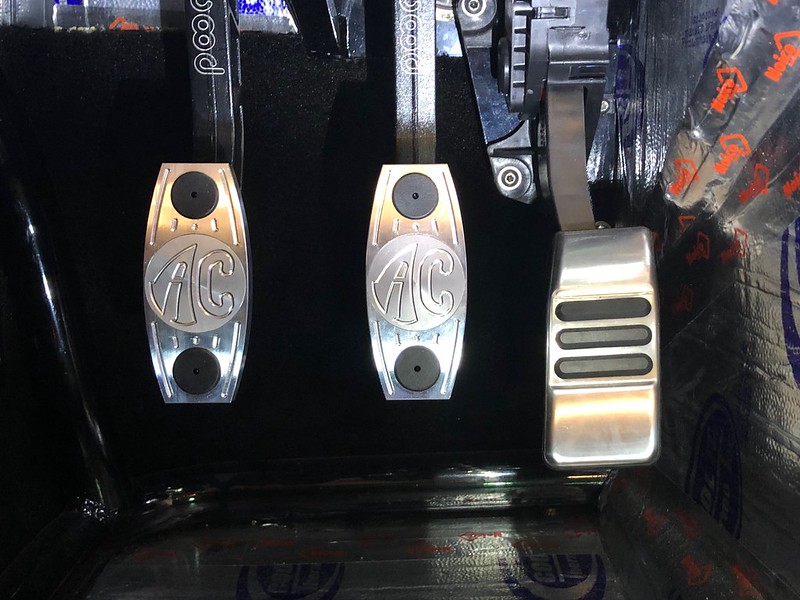
Forte AC Cobra pedals
The stock Wilwood pedal pads weren't really working out for me and I wanted a bit more room to reach my dead pedal. After seeing what others had done I decided I wasn't crazy about the look after cutting them down so I decided to order the bolt on AC Cobra pedals from Mike Forte. The pedals are a little too thick for the rubber inserts to hold properly in place so I used a couple drops of super glue under each one and attached the center cover with a bit of leftover silicon caulk. I like the look and feel of these pedals, they are quality parts.
-
09-30-2019, 03:08 PM
#392
Senior Member
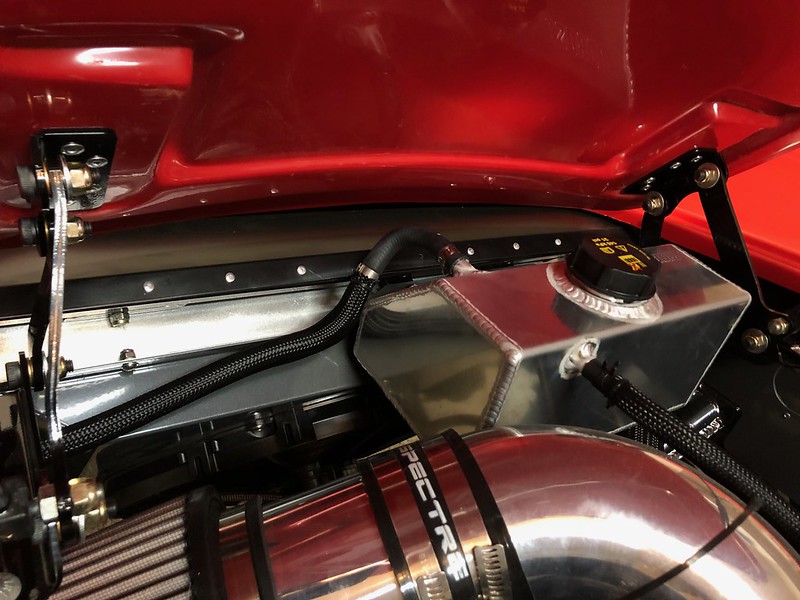
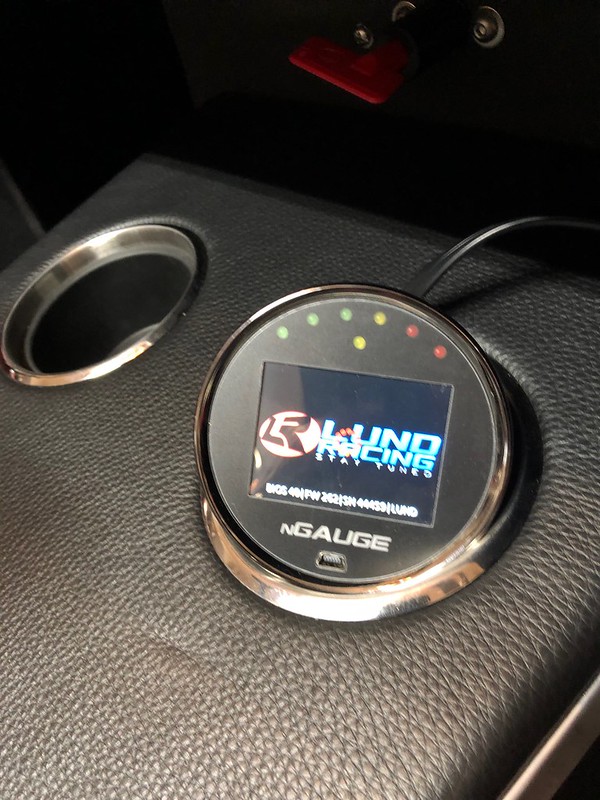
Lund Racing custom tune
A couple weeks ago I ordered an nGauge unit and custom tune from Lund Racing. Several people on the forums have recommended them so I felt it was a good choice. I'm optimistic that the custom tune will optimize the engine performance and I will feel it was worth the investment. I am about 1/2 way done with the turning process at this point. The Lund tuner asked me a few questions as to parts in my build (air intake, exhaust, fuel pump size) and asked for a photo of my intake. He asked me about a "PATS delete" and I had to Google that. I think is an anti-theft system but I don't know if that is even present in the crate motor and control pack. He then asked me about if I "locked the IMRC open", again I had to go to Google. I believe that has to do with the CMVC system and I told him it was plumbed as normal but I have no idea if/how it functions on the crate motor. He asked me to perform a "read vehicle" function and send him the file. He then informed me that it looks like the IMRC is "locked open" with the stock tune, I have no idea if that is correct or not but I'll trust his knowledge on this. He also sent me a base tune which I flashed to the PCM. I then performed the requested data logging at idle, holding engine at various RPM, and then performing slow RPM climbs on the street and sent the data logs over the weekend. This morning, they send me an "R2" tune which I have loaded. They now want me to perform the same data logging as before but add in a WOT from 2,500 to 5,000 RPM and then send the logs again. I will keep you posted as to my results. So far I must say I am impressed with their quick turn around and customer service.
-
09-30-2019, 03:49 PM
#393
Looking good! I also installed the Forte billet pedals. Nice product. Even with them the brake and gas pedal were a little too close so I move the brake and clutch pads over by using only the right most screw holes in the pads and the left most holes in the Wilwood arms. Very solid and much better spacing.
MKIV #9542 Complete Kit, Coyote, IRS - Delivered - 2/19/19, First start - 9/8/19, Go Cart - 9/14/19
1965 Mustang Convertible 4v 289
Build Thread
HERE
-
10-06-2019, 02:11 PM
#394
Senior Member
Fire extinguisher
I picked up a small H3R Hal Guard fire extinguisher and a billet bracket from Eddit Motorsports. The bracket is is quite a bit cheaper than the one from H3R and I like the look of it. It is advertised as for 2.75" cylinders and the small H3R is 2.6". I bought it anyway as I figured I could use a wrap or two of electrical tape or a piece of rubber to fill the gap. In the end, it clamps down tight on the cylinder without doing anything so that was a nice surprise. I mounted it on the rear wall above the U-Joint cover. At first I thought I could get the bracket to fit on top of the rectangular frame tube at that spot and just drill/tap all four corners. The bottom holes were drilling into the edges of the tube, so I had to bring it down a bit, and used rivnuts through the aluminum at the bottom, and tapped the top holes for 10-32 screws. I just filled the extra holes I drilled with some JB Weld and it will all get covered up with carpet anyway.

Other that installing the fire extinguisher, not much to do at all on the car until after paint. I did receive an updated tune file from Lund. After loading the new tune, I was asked to add a WOT from 2500 to 5000 rpm in my next data logging session. I did that this morning and sent the file back to Lund. I suspect we are really close to the full WOT dyno test, probably after the next tune update I expect to get back on Monday.
It's fall but here in Texas it's still in the mid-90's. It is supposed to drop to the 60's by next Friday. Can we at least get a couple weeks of actual fall weather before winter arrives, please? I want to drive the car without sweating!
-
10-12-2019, 03:46 PM
#395
Senior Member
-
01-12-2020, 10:28 PM
#396
Looks fantastic. When is paint?
-
01-13-2020, 03:04 PM
#397
Senior Member
Originally Posted by
ZachT
Looks fantastic. When is paint?
Waiting to get the word from Kleiner. He said "late winter" so I am in a holding pattern until I get more details.
-
01-25-2020, 04:38 PM
#398
Senior Member
-
02-08-2020, 03:13 PM
#399
Senior Member
Hood Scoop prepped
Today was a fairly warm, sunny Texas day for February at 63 degrees so took the car for a cruise and to run some errands. When I got home I started looking at the hood scoop so decided to go ahead and prepare that for mounting to the hood. I picked up a fine point white paint pen marked a centerline in the flange all the way around. I then found the center of the top of the scoop - not a simple thing to do with a curved piece like this so I double and triple checked it. Earlier I had decided to use 25 bolts with one in the center of the top and the two at the bottom that are .5" from the end. I did my best to measure the circumference of the scoop to figure out my hole spacing. After a bit of trial and error, and a little math, I found that if I used spacing of of 2.172" between holes that I ended up with the last hole at .5" from the end. I set my calipers to 2.172" and started from the top-center mark and worked my way around marking all the locations with a pencil. Once satisfied with the locations, I went back over them with the paint pen.

To avoid drill bit walking, I center-punched each location and then drilled each with a small 1/16" bit, then moved up to the 11/64" that allows the 8-32 bolts to drop in. I bought 8-32 x 5/8" torx buttonhead stainless bolts for the scoop, along with some clear polyurethane washers and stainless acorn nuts. I'm probably not going to bother to cut a hole in my hood since it isn't needed for the Coyote.

Last edited by shark92651; 02-08-2020 at 03:23 PM.
-
Post Thanks / Like - 0 Thanks, 1 Likes
-
02-09-2020, 07:58 AM
#400
Nice job... I've been trying to decide if I want to cut the hole in the hood or not also. I know that the performance increase w/o a turkey pan will be just about nil but wonder about water and dirt getting in even more that it does all ready. I'm thinking the only advantage to having the hole is some cool air in the engine compartment. Then I wonder, if I do not cut the hole, how hard is it going to be to keep it clean up under the hood scoop.


 Thanks:
  Likes:


 Reply With Quote