For the first 2 gaps I would try clamping before any cutting/shaping. Try clamping at the narrowest places, then gradually clamping the wide gap but if you wait a few days the edges may be easier to close the bigger gap. Heat or bright sun may help. I don't understand the 3rd and 4th photos so can you take a shot from further away?
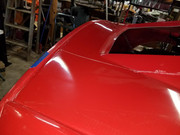
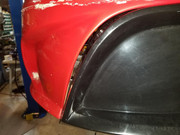
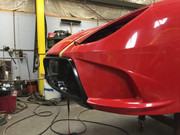
You asked in a PM about mounting the coupe top. I mounted the side pods per the FFR manual as a 818S, then converted to a coupe. I had to adjust the spacing of the rear of the side pods to fit the hardtop, which was not difficult at all. But, the alignment of the door openings and the hardtop was tough. My driver side was okay but the passenger side looked like this:
Note how the side pod needs to be moved back to align with the hardtop. Since the side pod was already fitting at the rear and at the A pillar gap, I elected to add fiberglass and paint to the top (B pillar) rather than change everything else. If I were building a coupe, I would mount the top first, then mount the side pods to fit at the B pillars, then at the rear. You could then lift the top off to work on other stuff, like the interior or engine. When mounting the hardtop, you'll want to bolt it at the front as low as possible to reduce the A pillar gap (top/hood/fender/door). After I fixed the B pillar gap I refitted the door so the gap is now even.
Last edited by AZPete; 08-20-2018 at 05:39 PM.
Reason: photo
818S/C : Chassis #25 with 06 WRX 2.5 turbo, ABS, cruise, PS, A/C, Apple CarPlay, rear camera, power windows & locks, leather & other complexities. Sold 10/19 with 5,800 miles.
Mk3 Roadster #6228 4.6L, T45, IRS, PS, PB, ABS, Cruise, Koni's, 17" Halibrands, red w/ silver - 9K miles then sold @ Barrett-Jackson Jan 2011 (got back cash spent).
Thanks Peter. Good info.
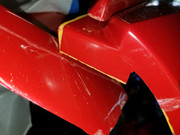
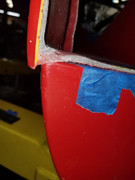
My Bad: 3rd photo is taken looking at front of pass side pod showing how you would have to grind off alot to allow you to pull it in and mount to top of sill.
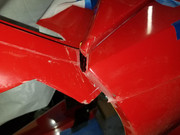
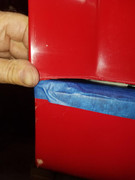
4th: My hand is holding the bottom of drv fender looking at side of sill showing to have to grind and pull down, stressing the fender to connect it to sill.
Frank, re the 3rd & 4th, I think grind carefully until the fender fits. Mine needed only a little grinding at the rear "point". Just go carefully and check often so you don't have to add any back.
818S/C : Chassis #25 with 06 WRX 2.5 turbo, ABS, cruise, PS, A/C, Apple CarPlay, rear camera, power windows & locks, leather & other complexities. Sold 10/19 with 5,800 miles.
Mk3 Roadster #6228 4.6L, T45, IRS, PS, PB, ABS, Cruise, Koni's, 17" Halibrands, red w/ silver - 9K miles then sold @ Barrett-Jackson Jan 2011 (got back cash spent).
In your 4th picture, leave the side sail alone (the part that has the blue tape on it). You will probably need to take the tape off as you grind/test-fit. On my car, I only had to do a small amount of grinding/filing on some excess gel coat on the bottom of the fender below where your thumb is. Nothing that I ground down is visible after the fender is attached to the side sail.
For the nose piece, you just have to do the best you can. The nose piece might be slightly mis-shaped. Looking down from the front my car, you can see that one side is inset more than the other. The bottom also protrudes on one end more than the other. I ended up with the lip of the black piece protruding forward between 1/4 to 3/8 of an inch forward of the red fender, and that ended up looking pretty good. I don't know what you have already attached, but I recommend fitting the black nose piece to the fenders first, then working on how the fenders mount to the body. My fenders had to be pushed/pulled into place pretty hard in some spots to get the hood to drop in alignment.
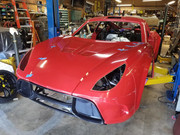
Mine is a gen one body. I put the front end together with tape and clamps to get everything aligned before I put it on the frame. That method worked well for me.
I did no (ZERO) trimming on the body. My goal was to get out on the track. My plan was to work on the body over the winter. Didn't happen.
Thanks for helpful replies.
I Talked to Tony at FFR and he was adamant that I use the 5/8 setback and if I did that the front would come together. Therefore I did set mine to 5/8 from the delivery values of about 7/8.
Front did come together better and spring clamps overnight along with warm weather help close the gap on the previous pictures pass side.
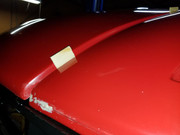
2nd picture I attached does show the hood stickup vs the fender on drivers side. How much have others had to sand hood to obtain same height as fenders?
I trimmed most of the "flange" off of the sides of the hood to get it to sit approximately flush. There is really no way to incorporate weatherstripping around the hood opening without trimming that off. However, that flange is what provides rigidity for the hood. Once you trim it off it gets pretty flexible/floppy. I will be adding some reinforcement to the underside of my hood soon. I'll have pictures on my build thread.
I trimmed most of the "flange" off of the sides of the hood to get it to sit approximately flush. There is really no way to incorporate weatherstripping around the hood opening without trimming that off. However, that flange is what provides rigidity for the hood. Once you trim it off it gets pretty flexible/floppy. I will be adding some reinforcement to the underside of my hood soon. I'll have pictures on my build thread.
Thanks Zach. Sounds like it might be good idea to reinforce hood before I do the trimming.
Can someone explain to me why FF left such a large gap between the new nose and the hood. There must be 1/4" - 1/2" gap there. Looks shabby, or am I doing something wrong? You see it int he posts above so didn't add a picture.
Can someone explain to me why FF left such a large gap between the new nose and the hood. There must be 1/4" - 1/2" gap there. Looks shabby, or am I doing something wrong? You see it int he posts above so didn't add a picture.
I talked to Tony about at FFR and he said that is normal, about 3/8 or so. If u look at FFR website at 818 shots, u see same thing. He said it naturally fits easist , flange to flange, and that yields about 3/ 8 out. You could do what u prefer with some cutting.
Once I trimmed the flanges down the sides of the hood, the front seemed to settle down in place, although I didn't look very closely so I'll have to do that on my next test-fit. I also had to do a little bit of light filing at the very front corner of the fenders where they meet the nose of the hood. The seams run into those corners and result in some built-up gel coat that won't let the hood sit flush.


 Thanks:
  Likes:


 Reply With Quote