BluePrint Engines

Visit our community sponsor

Thanks Thanks:  0
Likes Likes:  0
Results 1 to 14 of 14

Thread: Mk4 power steering install

  1. #1
    Senior Member Packer fan's Avatar
    Join Date
    Sep 2017
    Location
    Janesville, WI
    Posts
    235
    Post Thanks / Like

    Mk4 power steering install

    Hi,
    It seems as if the steering shaft is a little too long. With the steering shaft all the way against the lower bearing there is not enough room to put the end on the power steering rack. I called ffv and they said to dismount the rack and put the bottom on the end before mounting the rack. I did this and it is very tight. In fact to be able to slide the upper shaft into the upper bearing the bottom moves the steering rack.

    Some possible solutions.

    1. Let it bind- I don’t know if that will reduce the life of the steering rack, the lower bearing, or the u joints.

    2. Move the lower bearing to the opposite side of the firewall- I would have to clearance the pedal mount plate. There already isn’t much space between the mounting bolt and the edge.

    3. Cut and shorten the steering shaft about an inch- the shaft is Chrome plated and I would want to re chrome it.

    I’m leaning towards option 3.

    D9DBF17C-E341-4B8B-8A65-CA2F65C626F6.jpeg
    Mk4 ordered 1/3/18, IRS, Coyote, T56 Magnum

  2. #2
    Senior Member edwardb's Avatar
    Join Date
    Feb 2011
    Location
    Lake Orion, Michigan
    Posts
    10,568
    Post Thanks / Like
    It's a no brainer. Option 2. Move the bearing inside. Don't clearance the pedal mount plate. Just takes a slight flat spot on the bearing shells to clear. I've done this on several builds and so have many others. It's a very simple solution.

    With all due respect, I can't believe they suggested to dismount the rack to put in the steering shaft. You'll have the steering shaft off/on several times during the build. With the Coyote, it has to be disconnected and swung out of the way to install/remove the engine. It would be silly to have to unbolt and move the rack every time. Not particularly easy to do once.

    BTW, I don't think the shaft is chrome plated. Pretty sure it's nickle plated.
    Build 1: Mk3 Roadster #5125. Sold 11/08/2014. Build 2: Mk4 Roadster #7750. Sold 04/10/2017. Build Thread
    Build 3: Mk4 Roadster 20th Anniversary #8674. Sold 09/07/2020. Build Thread and Video. Build 4: Gen 3 Type 65 Coupe #59. Gen 3 Coyote. Legal 03/04/2020. Build Thread and Video
    Build 5: 35 Hot Rod Truck #138. LS3 and 4L65E auto. Rcvd 01/05/2021. Legal 04/20/2023. Build Thread. Sold 11/9/2023.

  3. #3

    Join Date
    Feb 2011
    Location
    Norton, MA USA earth
    Posts
    3,341
    Post Thanks / Like
    The last car I built had the bearing on the inside and was still very tight to get in. It did finally go though. They should make the shaft 1/4 shorter.
    Mike

  4. #4
    Senior Member edwardb's Avatar
    Join Date
    Feb 2011
    Location
    Lake Orion, Michigan
    Posts
    10,568
    Post Thanks / Like
    Quote Originally Posted by michael everson View Post
    They should make the shaft 1/4 shorter. Mike
    Can't argue with that Mike!
    Build 1: Mk3 Roadster #5125. Sold 11/08/2014. Build 2: Mk4 Roadster #7750. Sold 04/10/2017. Build Thread
    Build 3: Mk4 Roadster 20th Anniversary #8674. Sold 09/07/2020. Build Thread and Video. Build 4: Gen 3 Type 65 Coupe #59. Gen 3 Coyote. Legal 03/04/2020. Build Thread and Video
    Build 5: 35 Hot Rod Truck #138. LS3 and 4L65E auto. Rcvd 01/05/2021. Legal 04/20/2023. Build Thread. Sold 11/9/2023.

  5. #5
    Senior Member Packer fan's Avatar
    Join Date
    Sep 2017
    Location
    Janesville, WI
    Posts
    235
    Post Thanks / Like
    I just pulled it apart and checked out moving it to the back side and clearancing it. Mine would require a good amount of clearancing. What if I were to put it on the back side and use a washer as thick as the pedal mount. That would make extra space. The bearing wouldn’t be flush against the firewall, but I don’t think the bearings need the extra strength.

    ???
    Mk4 ordered 1/3/18, IRS, Coyote, T56 Magnum

  6. #6
    BTHWarrior's Avatar
    Join Date
    Feb 2017
    Location
    Lewisville, TX
    Posts
    51
    Post Thanks / Like
    Option 2, I did that with my Mk4 to get the extra clearance for the shaft. I had no issues with the pedal mount. (Paul's build threads have been a tremendous wealth of info).
    Mk4 Roadster #9054, 2001 Mustang GT donor, 4.6 SOHC engine, automatic transmission, ABS brakes

  7. #7
    Senior Member edwardb's Avatar
    Join Date
    Feb 2011
    Location
    Lake Orion, Michigan
    Posts
    10,568
    Post Thanks / Like
    Quote Originally Posted by Packer fan View Post
    I just pulled it apart and checked out moving it to the back side and clearancing it. Mine would require a good amount of clearancing. What if I were to put it on the back side and use a washer as thick as the pedal mount. That would make extra space. The bearing wouldn’t be flush against the firewall, but I don’t think the bearings need the extra strength. ???
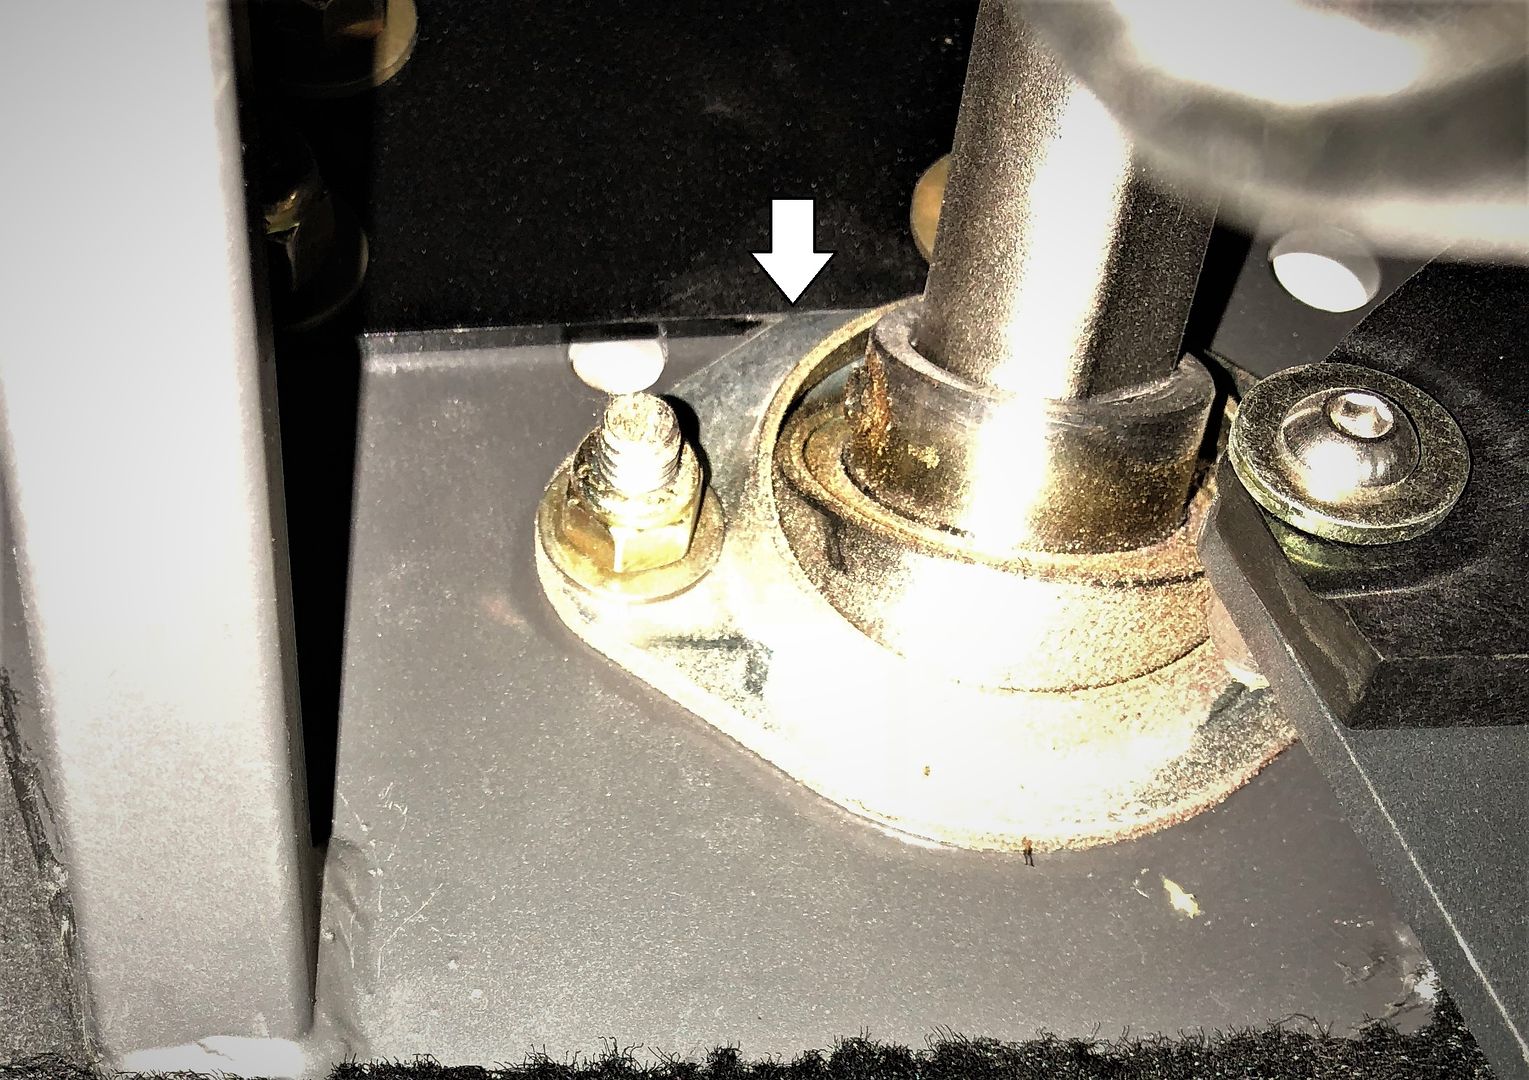
    I don't think anything has changed since the two Mk4's where I've put the bearing inside as recommended. It requires grinding or sanding along the top half of the two bearing shells. It's not enough to compromise their strength or ability to continue holding the bearing itself. But still enough to fit right below the pedal box mount. It's not a very friendly place to take a picture in a completed build, but I just (after several attempts) managed to stick my phone up in there and get a little bit of an image. Sorry for the quality. Cropped and adjusted it as best I could. The arrow is showing where the flat needs to be made so it fits next to the pedal box mount. Sorry I couldn't get more but the steering column and accelerator mount are in the way. Personally, I think this is easier and better than making a spacer. Installed this way, it's still bolted directly to the footbox front. Hope that helps.

    Last edited by edwardb; 05-09-2018 at 06:54 PM.
    Build 1: Mk3 Roadster #5125. Sold 11/08/2014. Build 2: Mk4 Roadster #7750. Sold 04/10/2017. Build Thread
    Build 3: Mk4 Roadster 20th Anniversary #8674. Sold 09/07/2020. Build Thread and Video. Build 4: Gen 3 Type 65 Coupe #59. Gen 3 Coyote. Legal 03/04/2020. Build Thread and Video
    Build 5: 35 Hot Rod Truck #138. LS3 and 4L65E auto. Rcvd 01/05/2021. Legal 04/20/2023. Build Thread. Sold 11/9/2023.

  8. #8
    Senior Member Packer fan's Avatar
    Join Date
    Sep 2017
    Location
    Janesville, WI
    Posts
    235
    Post Thanks / Like
    38D72106-A4A7-4E93-8D3C-578EC07A5971.jpeg38D72106-A4A7-4E93-8D3C-578EC07A5971.jpegI had a little stainless sitting around and made this. A little better than washers.
    Mk4 ordered 1/3/18, IRS, Coyote, T56 Magnum

  9. #9
    Senior Member Packer fan's Avatar
    Join Date
    Sep 2017
    Location
    Janesville, WI
    Posts
    235
    Post Thanks / Like
    Quote Originally Posted by edwardb View Post
    I don't think anything has changed since the two Mk4's where I've put the bearing inside as recommended. It requires grinding or sanding along the top half of the two bearing shells. It's not enough to compromise their strength or ability to continue holding the bearing itself. But still enough to fit right below the pedal box mount. It's not a very friendly place to take a picture in a completed build, but I just (after several attempts) managed to stick my phone up in there and get a little bit of an image. Sorry for the quality. Cropped and adjusted it as best I could. The arrow is showing where the flat needs to be made so it fits next to the pedal box mount. Sorry I couldn't get more but the steering column and accelerator mount are in the way. Personally, I think this is easier and better than making a spacer. Installed this way, it's still bolted directly to the footbox front. Hope that helps.

    Thanks,
    Maybe I did something wrong because the piece you clearances is flush with the firewall. It looks like you have spacers behind it.
    Mk4 ordered 1/3/18, IRS, Coyote, T56 Magnum

  10. #10
    Senior Member edwardb's Avatar
    Join Date
    Feb 2011
    Location
    Lake Orion, Michigan
    Posts
    10,568
    Post Thanks / Like
    Quote Originally Posted by Packer fan View Post
    Thanks,
    Maybe I did something wrong because the piece you clearances is flush with the firewall. It looks like you have spacers behind it.
    What you're looking at is exactly what I described. The two halves of the bearing shell had flats sanded on my disk sander and the complete assembly (two bearing shells and the bearing) are bolted directly to the footbox front. In this case the silver part. (This is the 20th Anniversary Roadster with the special powder coat). The black is the pedal box mount that I painted black. There are no spacers. I don't know what you're seeing in the picture. Seems pretty clear to me, plus I know what I did.

    Do what you think is best.
    Last edited by edwardb; 05-09-2018 at 07:11 PM.
    Build 1: Mk3 Roadster #5125. Sold 11/08/2014. Build 2: Mk4 Roadster #7750. Sold 04/10/2017. Build Thread
    Build 3: Mk4 Roadster 20th Anniversary #8674. Sold 09/07/2020. Build Thread and Video. Build 4: Gen 3 Type 65 Coupe #59. Gen 3 Coyote. Legal 03/04/2020. Build Thread and Video
    Build 5: 35 Hot Rod Truck #138. LS3 and 4L65E auto. Rcvd 01/05/2021. Legal 04/20/2023. Build Thread. Sold 11/9/2023.

  11. #11
    Senior Member edwardb's Avatar
    Join Date
    Feb 2011
    Location
    Lake Orion, Michigan
    Posts
    10,568
    Post Thanks / Like
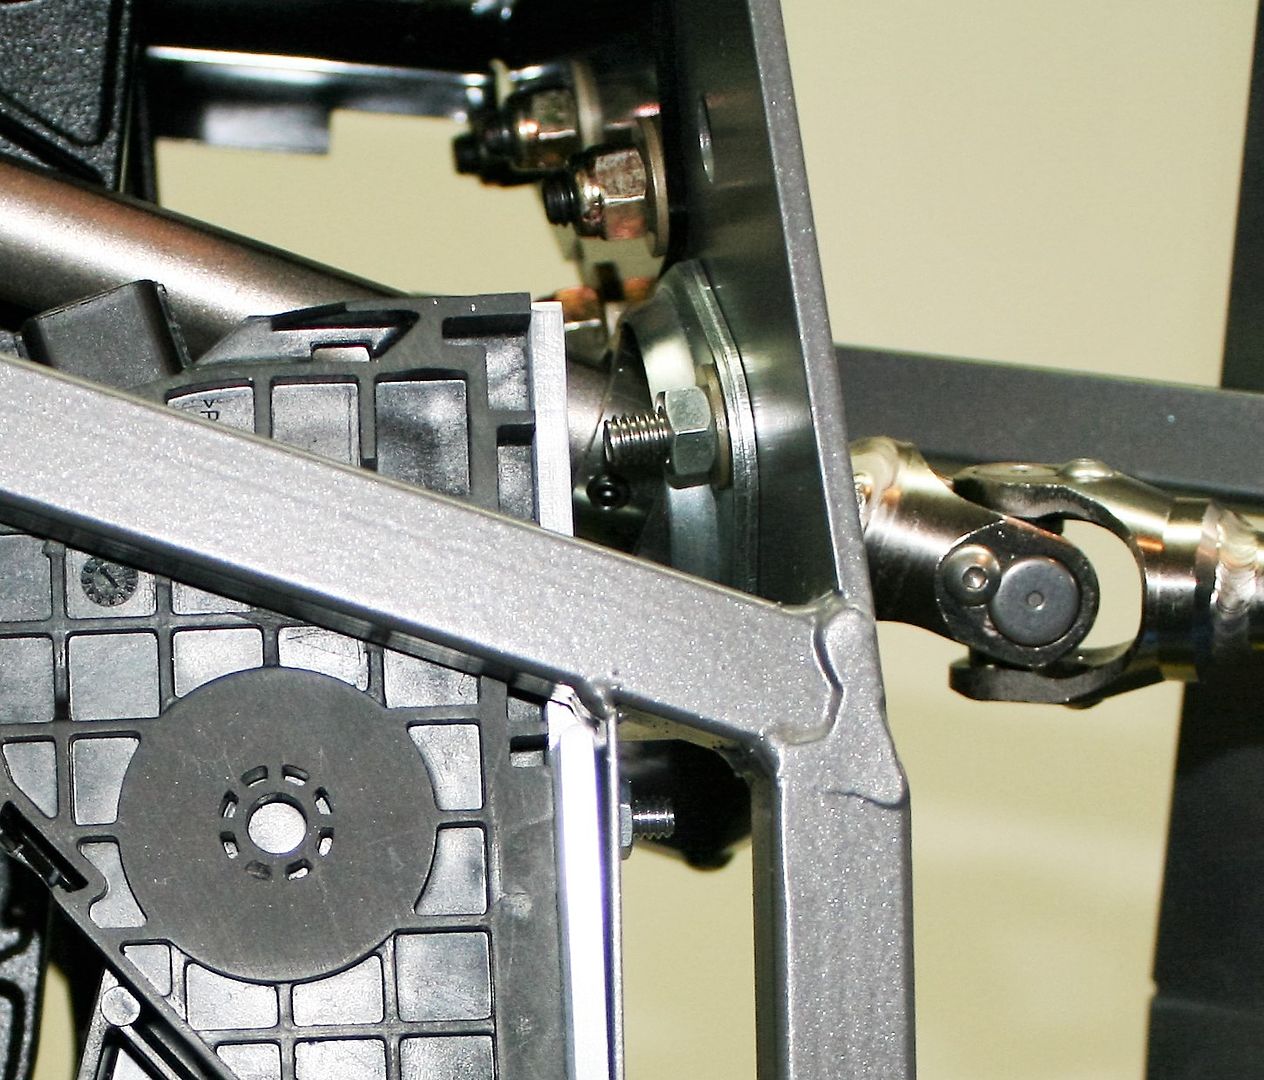
    Found another picture in my build pics, that I cropped down showing the bearing assembly inside the footbox. Before any panels were installed (obviously...), from the side, with the trimmed down Coyote accelerator assembly in the foreground. Again, can see the trim off the top of the bearing shells and sitting against the footbox front right below the pedal box mount. Note this was early in the build and I didn't have the lock nuts on yet. I typically save those until I'm pretty sure I won't be taking it apart again.

    Last edited by edwardb; 05-09-2018 at 07:35 PM.
    Build 1: Mk3 Roadster #5125. Sold 11/08/2014. Build 2: Mk4 Roadster #7750. Sold 04/10/2017. Build Thread
    Build 3: Mk4 Roadster 20th Anniversary #8674. Sold 09/07/2020. Build Thread and Video. Build 4: Gen 3 Type 65 Coupe #59. Gen 3 Coyote. Legal 03/04/2020. Build Thread and Video
    Build 5: 35 Hot Rod Truck #138. LS3 and 4L65E auto. Rcvd 01/05/2021. Legal 04/20/2023. Build Thread. Sold 11/9/2023.

  12. #12
    Junior Member
    Join Date
    Jun 2015
    Posts
    15
    Post Thanks / Like
    I had same issue and mount bearing inside of footbox, with trim off top edge for clearance..
    image.jpg

  13. #13
    Senior Member Packer fan's Avatar
    Join Date
    Sep 2017
    Location
    Janesville, WI
    Posts
    235
    Post Thanks / Like
    Here is the finished product.
    It’s not perfect. By changing the pivot point I now had to add a couple washers under the top bearing to keep the steering shaft from rubbing at the top. The real answer was given above. Have ffv shorten it but 3/4”.

    Thanks for the help
    Attached Images Attached Images
    Mk4 ordered 1/3/18, IRS, Coyote, T56 Magnum

  14. #14
    Senior Member
    Join Date
    Dec 2016
    Location
    Kirkland, WA
    Posts
    287
    Post Thanks / Like
    Interesting - my steering shaft is fairly tight with the bearing on engine side of the wall, and I've just gotten used to disconnecting and lifting the steering rack up and away. I don't have the heavy preload like the OP, it's just about line-on-line which I thought was desirable to avoid movement of the steering shaft and loading the set screw on the rack splint flat.

    I can see that moving the steering rack would have significantly more PITA factor after the fluid lines are connected and front end aligned.
    Mk4 #8861 Complete kit. Delivered: 27 Apr 2016, currently a roller.
    Gen-2 Coyote, clutch, TKO600, midshift, and solid axle from Forte. Many pieces from Breeze and Replicarparts.

Posting Permissions

  • You may not post new threads
  • You may not post replies
  • You may not post attachments
  • You may not edit your posts
  •  

Martin's Dent and Collision Shop

Visit our community sponsor