-
03-22-2020, 02:36 PM
#481
Thanks, guys! I like that idea of the ebrake a little closer - that's a nice mod! Although since it sounds like a lot of people do loop the cable under the 4 inch tube without a problem, I think we'll stick with what we have built so far. Thanks for the valuable input!
-
03-22-2020, 05:13 PM
#482
-
03-22-2020, 09:08 PM
#483
Senior Member

-
Post Thanks / Like - 1 Thanks, 0 Likes
-
03-29-2020, 09:41 PM
#484
-
Post Thanks / Like - 0 Thanks, 3 Likes
-
03-29-2020, 09:46 PM
#485
one issue - clicking clutch cable
One issue that has developed recently is a relatively loud click from the clutch cable near the front of the footbox when we release the clutch. I've poked around a little on the forum and it sounds like the clutch cable can fray and then catch on something causing this sort of click. We've only driven a few miles in go cart phase but this sounds like it could be our issue. And I guess it sounds like the fraying cable could eventually snap. I've seen people recommend replacing the clutch cable with the one from Mike Forte. Unless you guys think there's a better solution, I think i'll order a cable from him. What do you guys think?
Thank you, as always!
-
03-30-2020, 07:36 PM
#486

Originally Posted by
PeteMeindl

One issue that has developed recently is a relatively loud click from the clutch cable near the front of the footbox when we release the clutch. I've poked around a little on the forum and it sounds like the clutch cable can fray and then catch on something causing this sort of click. We've only driven a few miles in go cart phase but this sounds like it could be our issue. And I guess it sounds like the fraying cable could eventually snap. I've seen people recommend replacing the clutch cable with the one from Mike Forte. Unless you guys think there's a better solution, I think i'll order a cable from him. What do you guys think?
Thank you, as always!
If you do call Forte, he has a set of 2 cables for like $50, which is barely more than one cable costs elsewhere. Then you'll have a spare.
Mk4 #8861 Complete kit. Delivered: 27 Apr 2016, currently a roller.
Gen-2 Coyote, clutch, TKO600, midshift, and solid axle from Forte. Many pieces from Breeze and Replicarparts.
-
Post Thanks / Like - 1 Thanks, 0 Likes
-
03-30-2020, 07:46 PM
#487
Senior Member

If this is the one Forte is selling, that's what you want: Ford Performance M-7553-C302. If not, well... Highly recommended by a bunch of us. Rock solid cable and really smooth.
Build 1: Mk3 Roadster #5125. Sold 11/08/2014.
Build 2: Mk4 Roadster #7750. Sold 04/10/2017.
Build Thread
Build 3: Mk4 Roadster 20th Anniversary #8674. Sold 09/07/2020.
Build Thread and
Video.
Build 4: Gen 3 Type 65 Coupe #59. Gen 3 Coyote. Legal 03/04/2020.
Build Thread and
Video
Build 5: 35 Hot Rod Truck #138. LS3 and 4L65E auto. Rcvd 01/05/2021. Legal 04/20/2023.
Build Thread. Sold 11/9/2023.
-
Post Thanks / Like - 1 Thanks, 0 Likes
-
03-31-2020, 08:40 AM
#488
Originally Posted by
edwardb
If this is the one Forte is selling, that's what you want: Ford Performance M-7553-C302. If not, well... Highly recommended by a bunch of us. Rock solid cable and really smooth.
Thanks for the part #, Paul - I appreciate it!
-
03-31-2020, 01:52 PM
#489
Senior Member

Originally Posted by
PeteMeindl
Thanks for the part #, Paul - I appreciate it!
Hi Pete,
Amazon has the best price on that cable. I bought it too.
MK IV - #9586, Gen 2 Coyote, TKO 600
-
Post Thanks / Like - 1 Thanks, 0 Likes
-
03-31-2020, 11:48 PM
#490
Senior Member

Pete, did you file the edges on the clutch pedal top where the cable travels through it?

Bradley
Build thread - Mk4, Coyote, IRS, Wilwood brakes, old-style soft top and accessories.
The distance between "finished" and finished is literally infinite.
-
Post Thanks / Like - 1 Thanks, 0 Likes
-
04-01-2020, 08:47 AM
#491
Originally Posted by
GTBradley
Pete, did you file the edges on the clutch pedal top where the cable travels through it?
Hi Bradley - Thanks a lot! I didn't think of that. And I could see how that could cause this problem. I'll try that out - thank you very much! Hope you're doing well.
-
Post Thanks / Like - 1 Thanks, 0 Likes
-
04-01-2020, 08:12 PM
#492
Senior Member

Originally Posted by
D02G
Amazon has the best price on that cable. I bought it too.
Forget Bezos — that guys is wealthy enough.
Please support Mike Forte.
For all Mike has done to support our builds throughout the years, he deserves our help during this downturn.
Chris
Mark IV Roadster #7679
Coyote 5.0, T56, Hydraulic Clutch, IRS, Torsen Diff, Wilwoods, Hydraboost, ABS Power Brakes, Power Steering, & tons more extras.
-
04-01-2020, 10:53 PM
#493
Senior Member
Originally Posted by
PeteMeindl
Hi Bradley - Thanks a lot! I didn't think of that. And I could see how that could cause this problem. I'll try that out - thank you very much! Hope you're doing well.
Doing great Pete, I hope you and family are staying safe. Isn’t it great having this project when you're stuck at home anyway?
Hey don’t forget to drip some oil inside the cable sheath before installation. And tell Mike you need a firewall tensioner too.
Last edited by GTBradley; 04-02-2020 at 04:32 PM.
Bradley
Build thread - Mk4, Coyote, IRS, Wilwood brakes, old-style soft top and accessories.
The distance between "finished" and finished is literally infinite.
-
Post Thanks / Like - 1 Thanks, 0 Likes
-
04-02-2020, 09:55 PM
#494
Senior Member
Originally Posted by
D02G
Did I post in your thread? You can buy from whoever you want....
I could be interpreting this the wrong way, but you're comment appears like you took offense to what I said. 
FWIW it wasn't directed at you.
If what I said somehow offended you, know it wasn't personal.
Obviously you don't need my permission to buy from Amazon and are free to purchase from whoever you like.
I spoke to Mike Forte this week and can tell you guys he needs our support.
I receive no benefit from his sales.
I'm asking we support the vendors who have been helping us build our dreams.
Now lets get back on topic. 
Originally Posted by
GTBradley
Hey dont forget to drip some oil inside the cable sheath before installation. And tell Mike you need a firewall tensioner too.
Not sure what y'all are using for cable lube but I've been using Cable Life cable lube happily for decades on my bikes. I was a bike mechanic years ago. AFAIK it is still a go-to in the motorcycle community. It comes with a tube to press into a traditional cable lube tool but you don't need to go that route. Another option is to spray a little lube into a lint-free rag, pull the cable out from the jacket and draw the cable through the lubed rag. This helps to reduce some of the mess that inevitably comes from using the cable lube tool. HTH
Last edited by chrisarella; 04-02-2020 at 10:18 PM.
-
04-04-2020, 11:39 AM
#495

a big milestone! plus speedometer/odo calibration issues...
Hi guys! Thanks to everyone for all of their good suggestions - we really appreciate it. So we have some big news over here.  We've taken the car out and driven it beyond just our little 1/10 of a mile street for the first time. It felt good! We were able to get up into third gear and drive around for a couple miles, just on little local streets. Really fun. And it feels like we've really made it close to the finish line in terms of building the car! Huge thanks to Paul, Dave, Bradley, Jeff, and so many others that have made this possible. No way we could've gotten here without you. Thank you!
We're not done, of course. Still lots to do. But driving it around the neighborhood with the body on it just felt like what i thought it would feel like when we first dreamed of this idea. On the things-to-do, one thing we've tried to do is calibrate our speedo/odo. We have the autometer ultra lite gauges (the ones that come with the basic ff package). To calibrate, we depress the speedo button, hold it down while we start the car, wait til the needle goes full scale, then let out the button. We drive to the beginning of our two mile stretch and hit the button again. The needle goes to straight up (middle of the gauge) as it should and the odo starts racking up some big numbers. Then we have fun and drive our two miles and hit the button again. The needle drops to 0 as it should and i think everything is good and we are calibrated. But then the needle jumps up to between 20-30 mph and stays there, even when we are stopped. We've tried to calibrate 3 times and this happens each time. Also, interestingly the odometer read something in the 6000s when we started and after 3 calibration tries of 2 miles apiece, the odometer has added 7 miles, which seems about right but not sure why we're in the 6000's. Anyone have any issues like this before? I've poked around on the internet and haven't been able to figure it out yet. I'll try contacting autometer as well to see if they have any advice. Thanks for any suggestions!
I haven't looked into this issue at all but it seems the car is using more gas than I expected. We did a 4 mile drive and it seemed to use about a gallon of fuel. Maybe the small size of this run and my imprecise measurements are causing me to overstate this so I'm not sure. But just wondering if I'm burning too much fuel.
Thanks, guys! Hope everyone is healthy.
-
04-04-2020, 01:54 PM
#496
Senior Member
Originally Posted by
PeteMeindl
I haven't looked into this issue at all but it seems the car is using more gas than I expected. We did a 4 mile drive and it seemed to use about a gallon of fuel. Maybe the small size of this run and my imprecise measurements are causing me to overstate this so I'm not sure. But just wondering if I'm burning too much fuel.
Thanks, guys! Hope everyone is healthy.
Pete, I’d be very surprised if the Coyote is actually using fuel like that, especially if it’s running well (no black smoke/soot from the side pipes, etc). I’m tracking my fuel consumption closely and can report that 17 mpg with not much highway and running it hard here and there is what I’m getting on average. I got 20 mpg on one trip with mostly highway. This is all before I got it professionally tuned, so it may get better yet.
is it possible the tank burped? How are you measuring the fuel usage?
Bradley.
Bradley
Build thread - Mk4, Coyote, IRS, Wilwood brakes, old-style soft top and accessories.
The distance between "finished" and finished is literally infinite.
-
Post Thanks / Like - 1 Thanks, 0 Likes
-
04-04-2020, 08:55 PM
#497
Originally Posted by
GTBradley
Pete, I’d be very surprised if the Coyote is actually using fuel like that, especially if it’s running well (no black smoke/soot from the side pipes, etc). I’m tracking my fuel consumption closely and can report that 17 mpg with not much highway and running it hard here and there is what I’m getting on average. I got 20 mpg on one trip with mostly highway. This is all before I got it professionally tuned, so it may get better yet.
is it possible the tank burped? How are you measuring the fuel usage?
Bradley.
Thanks, Bradley - that's good to hear. Yeah, I imagine it could be something like a burp. I don't notice any smoke from the pipes or anything like that. Thanks!
-
04-05-2020, 06:48 AM
#498
Senior Member
Originally Posted by
PeteMeindl
Thanks, Bradley - that's good to hear. Yeah, I imagine it could be something like a burp. I don't notice any smoke from the pipes or anything like that. Thanks!
I doubt very much you had any kind of burp in the tank. It's vented and won't trap air between the fuel and the sender. Also doubt you're getting 4 MPG with your Coyote. It would likely smoke, as stated, or smell extremely rich. Also if running really rich beyond what the PCM could adjust for, would throw DTC's. Ask me how I know about that. My Gen 2 Coyote gets 17-20 MPG as well. Very dependent on my right foot. You'll need to get used to your fuel gauge. Very likely it's not 100% linear as the tank is emptied.
Build 1: Mk3 Roadster #5125. Sold 11/08/2014.
Build 2: Mk4 Roadster #7750. Sold 04/10/2017.
Build Thread
Build 3: Mk4 Roadster 20th Anniversary #8674. Sold 09/07/2020.
Build Thread and
Video.
Build 4: Gen 3 Type 65 Coupe #59. Gen 3 Coyote. Legal 03/04/2020.
Build Thread and
Video
Build 5: 35 Hot Rod Truck #138. LS3 and 4L65E auto. Rcvd 01/05/2021. Legal 04/20/2023.
Build Thread. Sold 11/9/2023.
-
Post Thanks / Like - 1 Thanks, 0 Likes
-
04-05-2020, 09:26 AM
#499
Originally Posted by
edwardb
I doubt very much you had any kind of burp in the tank. It's vented and won't trap air between the fuel and the sender. Also doubt you're getting 4 MPG with your Coyote. It would likely smoke, as stated, or smell extremely rich. Also if running really rich beyond what the PCM could adjust for, would throw DTC's. Ask me how I know about that. My Gen 2 Coyote gets 17-20 MPG as well. Very dependent on my right foot. You'll need to get used to your fuel gauge. Very likely it's not 100% linear as the tank is emptied.
Thanks, Paul! I'm sure you guys are right that the gas mileage is much better. Our method of measurement was pretty approximate, too. Our gas gauge was right on E and we had about a gallon of gas in a gas can which we added. Then we drove the car about 4-5 miles or so and when we got back to our garage, the needle was about where it was when we started before putting in the gas. So not precise in any way and a small sample, for sure. Certainly a better way would be to use a full tank and see what mileage we get. So I won't worry about that for now, especially since the engine seems to be running fine and we don't have any unusual exhaust. Thanks, guys!
On the autometer ultralite speedo/odo calibration issue, has anyone had a similar problem? I'll post if I hear from autometer about what might be going on.
Thanks, guys! Hope everyone's doing ok.
-
04-05-2020, 11:04 AM
#500
Senior Member
BY installing a Coyote you’ve done yourself a real favor in mileage. Beyond value, weight, dependability, power, support, etc. you also have range. I’ve been reading that the sbf crowd get single digits for gas mileage. Twice the range is a very good thing in my book, of course I’ll be diving longer distances, for just putzing around town I guess it wouldn’t matter. Good luck with the gauges, sorry I can’t help there.
Bradley
Build thread - Mk4, Coyote, IRS, Wilwood brakes, old-style soft top and accessories.
The distance between "finished" and finished is literally infinite.
-
Post Thanks / Like - 1 Thanks, 0 Likes
-
04-06-2020, 03:22 PM
#501
Senior Member

Last summer with about 100 miles on the car, Mrs. Fixit & I took it to our lake cabin for the 4th of July weekend. +/- 360 miles round trip, 90% of it on highway between 55 & 70 mph.
Remind you that this is a fresh out of the crate Coyote, no tune, and nothing more than "There's no leaks, it runs good, lets go".
Best on the trip was 20.6 mpg on a 100-mile leg. Since then there's 2400 more miles on it, and depending upon the RH foot setting, it averages around 17 mpg.
John D. - Minneapolis 'Burbs
1965 El Camino - LT-1, 4L60e, 4wh discs, SC&C susp.
2013 F-150 Platinum - Twin Turbo 3.5
2018 Mk4 Roadster w/ Coyote - #9365 - Build Thread Delivery 7/3/18, 1st Start 1/4/19, 1st Road Mile 5/5/19, Legal 6/18/19, In Paint 2/25/21, Done (?) 4/2021
-
Post Thanks / Like - 1 Thanks, 0 Likes
-
04-10-2020, 10:13 PM
#502
-
Post Thanks / Like - 0 Thanks, 1 Likes
-
04-11-2020, 05:29 AM
#503
Senior Member

Very nicely done, looks like youre all set for a summer of fun driving, perfect timing. Good choice on the GasNs, they not only look fantastic but sound great.
Just a note on SBFs fuel mileage, it depends a lot on your right foot and goes for every engine. With my 351w, I averaged 21mph on the highway cruising at 70-75 on the three hour cruises to the Open House. The Coyote should do the same, its around town and stoplights that get you and again how quick one launches.
Kyle
Complete Kit pickup 09/05/2015, 351w, QF680, 3.55, 3-Link, 15" Halibrands with MT's, Painted Viking blue with Wimbledon white stripes on 03/15/2017. Sold in 08/2018 and totally regret it.
-
Post Thanks / Like - 1 Thanks, 0 Likes
-
04-12-2020, 04:53 PM
#504
adjusting the parking brake
Hi guys, today we worked on adjusting the parking brake. It was working somewhat before in that it would hold the car on a slight slope but wasn't as strong as i would like it to be - if we all tried to push the car when the brake was on, we could. So today we removed the e brake cable & clevis's from the rod shown in the picture below (from the ffr manual):

We then shortened that rod by screwing it in some and reattached the clevis's. The cable's much tighter now and the brakes are stronger, which is good. However, I notice that the left brake is notably stronger than the right. In looking along the e brake cable as well as through the forum, I can't seem to find a good way to tighten just one side of the e brake mechanism. I'm sure I'm missing something straightforward here so I apologize... but is there an easy way to tighten one side of the ebrake mechanism? Thanks, guys!
-
04-12-2020, 06:56 PM
#505
If you can post a pic of the cable ends on the e brake end, I am sure something can be suggested.
20th Anniversary Mk IV, A50XS Coyote, TKO 600, Trunk Drop Box, Trunk Battery Box, Cubby Hole, Seat Heaters, Radiator hanger and shroud.
-
Post Thanks / Like - 1 Thanks, 0 Likes
-
04-12-2020, 08:57 PM
#506
Originally Posted by
Railroad
If you can post a pic of the cable ends on the e brake end, I am sure something can be suggested.
Thanks, Railroad - good point. Here's a picture - I think I could put something like a little washer (that's not quite completely circular so it could fit onto that cable) in where the green arrow is.

-
04-12-2020, 09:20 PM
#507
Senior Member
You shouldn't have to shim the cable like you're suggesting. Don't recall seeing anyone doing that. Certainly haven't myself. I'm not familiar with the brakes you have, but e-brakes typically have an internal adjustment mechanism. Sounds like yours are out of adjustment. Work there. Not on jury rigging the cables.
Build 1: Mk3 Roadster #5125. Sold 11/08/2014.
Build 2: Mk4 Roadster #7750. Sold 04/10/2017.
Build Thread
Build 3: Mk4 Roadster 20th Anniversary #8674. Sold 09/07/2020.
Build Thread and
Video.
Build 4: Gen 3 Type 65 Coupe #59. Gen 3 Coyote. Legal 03/04/2020.
Build Thread and
Video
Build 5: 35 Hot Rod Truck #138. LS3 and 4L65E auto. Rcvd 01/05/2021. Legal 04/20/2023.
Build Thread. Sold 11/9/2023.
-
Post Thanks / Like - 1 Thanks, 0 Likes
-
04-13-2020, 10:44 AM
#508
Senior Member
Unless you have a separate caliper solely for E-brake, the service brake(s) caliper has an internal "screw-jack" mechanism for E-brake. This mechanism is also your self-adjuster for the rear brake pads. When the lever is pulled on the caliper, the piston is mechanically jacked out to press the pads. When released, it basically releases the mechanical pressure against the piston, and the piston stays where it was pushed.
With the E-brake lever down/off, the caliper levers at the stops/relaxed, and if your actuator cables are taut, but one wheel isn't grabbing as hard as the other I'd suspect one of the calipers isn't adjusted as "tight" as the other.
I have aftermarket 4wh discs on my '65 El Camino - using Caddy Seville rear calipers. One of the things stressed in the installation & maintenance instructions was to use the E-brake regularly, or cycle the E-brake a dozen or so times every so often to jack the pistons out to proper adjustment.
A quick check would be to (at the wheel) manually crank the actuator lever until there's resistance, and compare the throw side to side.
John D. - Minneapolis 'Burbs
1965 El Camino - LT-1, 4L60e, 4wh discs, SC&C susp.
2013 F-150 Platinum - Twin Turbo 3.5
2018 Mk4 Roadster w/ Coyote - #9365 - Build Thread Delivery 7/3/18, 1st Start 1/4/19, 1st Road Mile 5/5/19, Legal 6/18/19, In Paint 2/25/21, Done (?) 4/2021
-
Post Thanks / Like - 1 Thanks, 0 Likes
-
04-14-2020, 08:31 AM
#509
Thanks, Paul and John! I'll try those ideas out this weekend - thanks for the suggestions!
-
05-09-2020, 03:24 PM
#510
hood latch pins
Hi guys, hope everyone is doing ok. One small thing to update on over here - we installed some little hairpin cotter pins on the hood latch posts. A number of you have posted the good idea of adding something like this just in case the small allen screw comes loose and the latch is no longer tight up on the post. This will keep it from falling off and onto the ground during a drive. Thanks for the good idea, guys!

Other than this, we've been wrestling with the speedometer and odometer and trying to sort out our issues there. From talking to Autometer, it sounds like we're getting some extra power into the speedometer, perhaps from a bad diode in the alternator, they suggest... I'll post an update on that once we make a little more progress figuring it out... Enjoy the weekend!
Last edited by PeteMeindl; 05-09-2020 at 04:05 PM.
2018 Factory Five Mk IV, Gen 2 Coyote, Tremec TKO 600 5 speed, complete kit, standard brakes and rear axle;
Delivered: 5 Sept 2018
First start: 31 Aug 2019
First go-cart: 22 Sept 2019
Basically done except paint: May 2020
Graduation: June 2021
-
05-10-2020, 04:59 AM
#511
Not a waxer

Originally Posted by
PeteMeindl
]
Other than this, we've been wrestling with the speedometer and odometer and trying to sort out our issues there. From talking to Autometer, it sounds like we're getting some extra power into the speedometer, perhaps from a bad diode in the alternator...
Pete,
I'm not following that logic but...you can quickly determine if it's at play by simply unplugging the alternator and running just off the battery while calibrating and/or taking a short test drive.
Jeff
-
05-10-2020, 11:07 AM
#512
Originally Posted by
Jeff Kleiner
Pete,
I'm not following that logic but...you can quickly determine if it's at play by simply unplugging the alternator and running just off the battery while calibrating and/or taking a short test drive.
Jeff
Thanks, Jeff! Yeah, that's exactly our plan to test the idea out. Right now we have a few things taken apart on the car so it can't run but once we put them back together, we'll test this out. Thanks!
2018 Factory Five Mk IV, Gen 2 Coyote, Tremec TKO 600 5 speed, complete kit, standard brakes and rear axle;
Delivered: 5 Sept 2018
First start: 31 Aug 2019
First go-cart: 22 Sept 2019
Basically done except paint: May 2020
Graduation: June 2021
-
05-25-2020, 06:13 PM
#513
trunk carpet
Hi guys!
It's been a little quiet over here on the car front lately. Kind of hard to believe but most things on the car are in pretty good shape these days. We've been driving a little with the warmer weather just for fun - the car feels good and we're enjoying it! We do have a few loose ends to tie up, of course. One of those we worked on this weekend. First we installed the aluminum panels in the trunk that cover the access areas to the fuel tank. Here they are:

Then we installed the trunk carpet - our first foray into carpeting... It seemed to go well, I think.

One side note. We've had such a good time stumbling along through this project that, as we near the end of it here, we've begun to think of the next project. This may make a lot of you laugh , but we're thinking of trying to learn a little about engines and maybe buying an old 911 and seeing if we can figure out how to work on that. We'll see... We'll need to find a forum that's equally as helpful, that's for sure!
Hope everyone is doing well and enjoying the memorial day weekend!
2018 Factory Five Mk IV, Gen 2 Coyote, Tremec TKO 600 5 speed, complete kit, standard brakes and rear axle;
Delivered: 5 Sept 2018
First start: 31 Aug 2019
First go-cart: 22 Sept 2019
Basically done except paint: May 2020
Graduation: June 2021
-
Post Thanks / Like - 0 Thanks, 1 Likes
-
06-01-2020, 07:48 PM
#514
We installed the rubber boot around the shifter this weekend - it looks good and it feels much more polished than the old hole in the aluminum. Today we took the car out for a quick drive, and unfortunately, with the boot and the metal ring installed, the gear shift has a tendency to pop out of both 1st gear and reverse. It seems there's a little too much stuff between the shifter and the transmission tunnel with the carpet and the rubber boot and all. It looks like some others on the forum have had similar problems sometimes... We're trying to cut out as much carpet as we can to minimize this issue. But we may end up trying to get a bigger boot & ring or one made of another material if that might solve the issue.
2018 Factory Five Mk IV, Gen 2 Coyote, Tremec TKO 600 5 speed, complete kit, standard brakes and rear axle;
Delivered: 5 Sept 2018
First start: 31 Aug 2019
First go-cart: 22 Sept 2019
Basically done except paint: May 2020
Graduation: June 2021
-
06-04-2020, 03:18 PM
#515
Senior Member
Originally Posted by
PeteMeindl
We installed the rubber boot around the shifter this weekend - it looks good and it feels much more polished than the old hole in the aluminum. Today we took the car out for a quick drive, and unfortunately, with the boot and the metal ring installed, the gear shift has a tendency to pop out of both 1st gear and reverse. It seems there's a little too much stuff between the shifter and the transmission tunnel with the carpet and the rubber boot and all. It looks like some others on the forum have had similar problems sometimes... We're trying to cut out as much carpet as we can to minimize this issue. But we may end up trying to get a bigger boot & ring or one made of another material if that might solve the issue.
I'm sure you know this already, but I thought I'd check: which side do you have the shifter rod mounted on? It'll mount on either side but to get it centered in the hole it needed to be on the left side on mine.

Last edited by GTBradley; 06-05-2020 at 10:04 AM.
Bradley
Build thread - Mk4, Coyote, IRS, Wilwood brakes, old-style soft top and accessories.
The distance between "finished" and finished is literally infinite.
-
Post Thanks / Like - 0 Thanks, 1 Likes
-
06-05-2020, 09:49 AM
#516
Thanks, Bradley! Good thought. Yes, I have my shifter mounted on the left side to get it centered as best I can, just like you have it on yours. I may need to widen out my hole in the aluminum a bit - that might help solve the problem. There's enough room to shift and have it stay in gear without the boot on, but the shifter gets quite close to the aluminum when in gear. Then I think throwing in the material from the boot into that small space between the aluminum and the shifter puts inward pressure on the shifter and it sometimes pops out of gear. So maybe a wider boot or a bigger hole in the aluminum will solve it. Thanks for the suggestion - have a great weekend! By the way, I like that Porsche quote you have on your signature!
2018 Factory Five Mk IV, Gen 2 Coyote, Tremec TKO 600 5 speed, complete kit, standard brakes and rear axle;
Delivered: 5 Sept 2018
First start: 31 Aug 2019
First go-cart: 22 Sept 2019
Basically done except paint: May 2020
Graduation: June 2021
-
06-05-2020, 10:10 AM
#517
Senior Member
Thanks, I hope you get some fun test drives in this weekend.
The hole I cut was 4", but I did have some difficulty getting the ring and boot to clear the shifter at first. What I discovered was that the whole tunnel cover was hanging up on the sides and sitting higher than it should have been. I used the 3m dual lock to hold the tunnel cover down and it clears just fine now.
Bradley
Build thread - Mk4, Coyote, IRS, Wilwood brakes, old-style soft top and accessories.
The distance between "finished" and finished is literally infinite.
-
Post Thanks / Like - 1 Thanks, 0 Likes
-
06-08-2020, 09:26 PM
#518
Originally Posted by
GTBradley
Thanks, I hope you get some fun test drives in this weekend.
The hole I cut was 4", but I did have some difficulty getting the ring and boot to clear the shifter at first. What I discovered was that the whole tunnel cover was hanging up on the sides and sitting higher than it should have been. I used the 3m dual lock to hold the tunnel cover down and it clears just fine now.
That's a great idea - thanks a lot, Bradley! Our tunnel cover sits a little high as well - in fact, it sort of arches up a little bit over the top. If I could pull that down as you mention, that would certainly help my situation. Thanks a lot!
2018 Factory Five Mk IV, Gen 2 Coyote, Tremec TKO 600 5 speed, complete kit, standard brakes and rear axle;
Delivered: 5 Sept 2018
First start: 31 Aug 2019
First go-cart: 22 Sept 2019
Basically done except paint: May 2020
Graduation: June 2021
-
Post Thanks / Like - 0 Thanks, 1 Likes
-
06-28-2020, 02:35 PM
#519
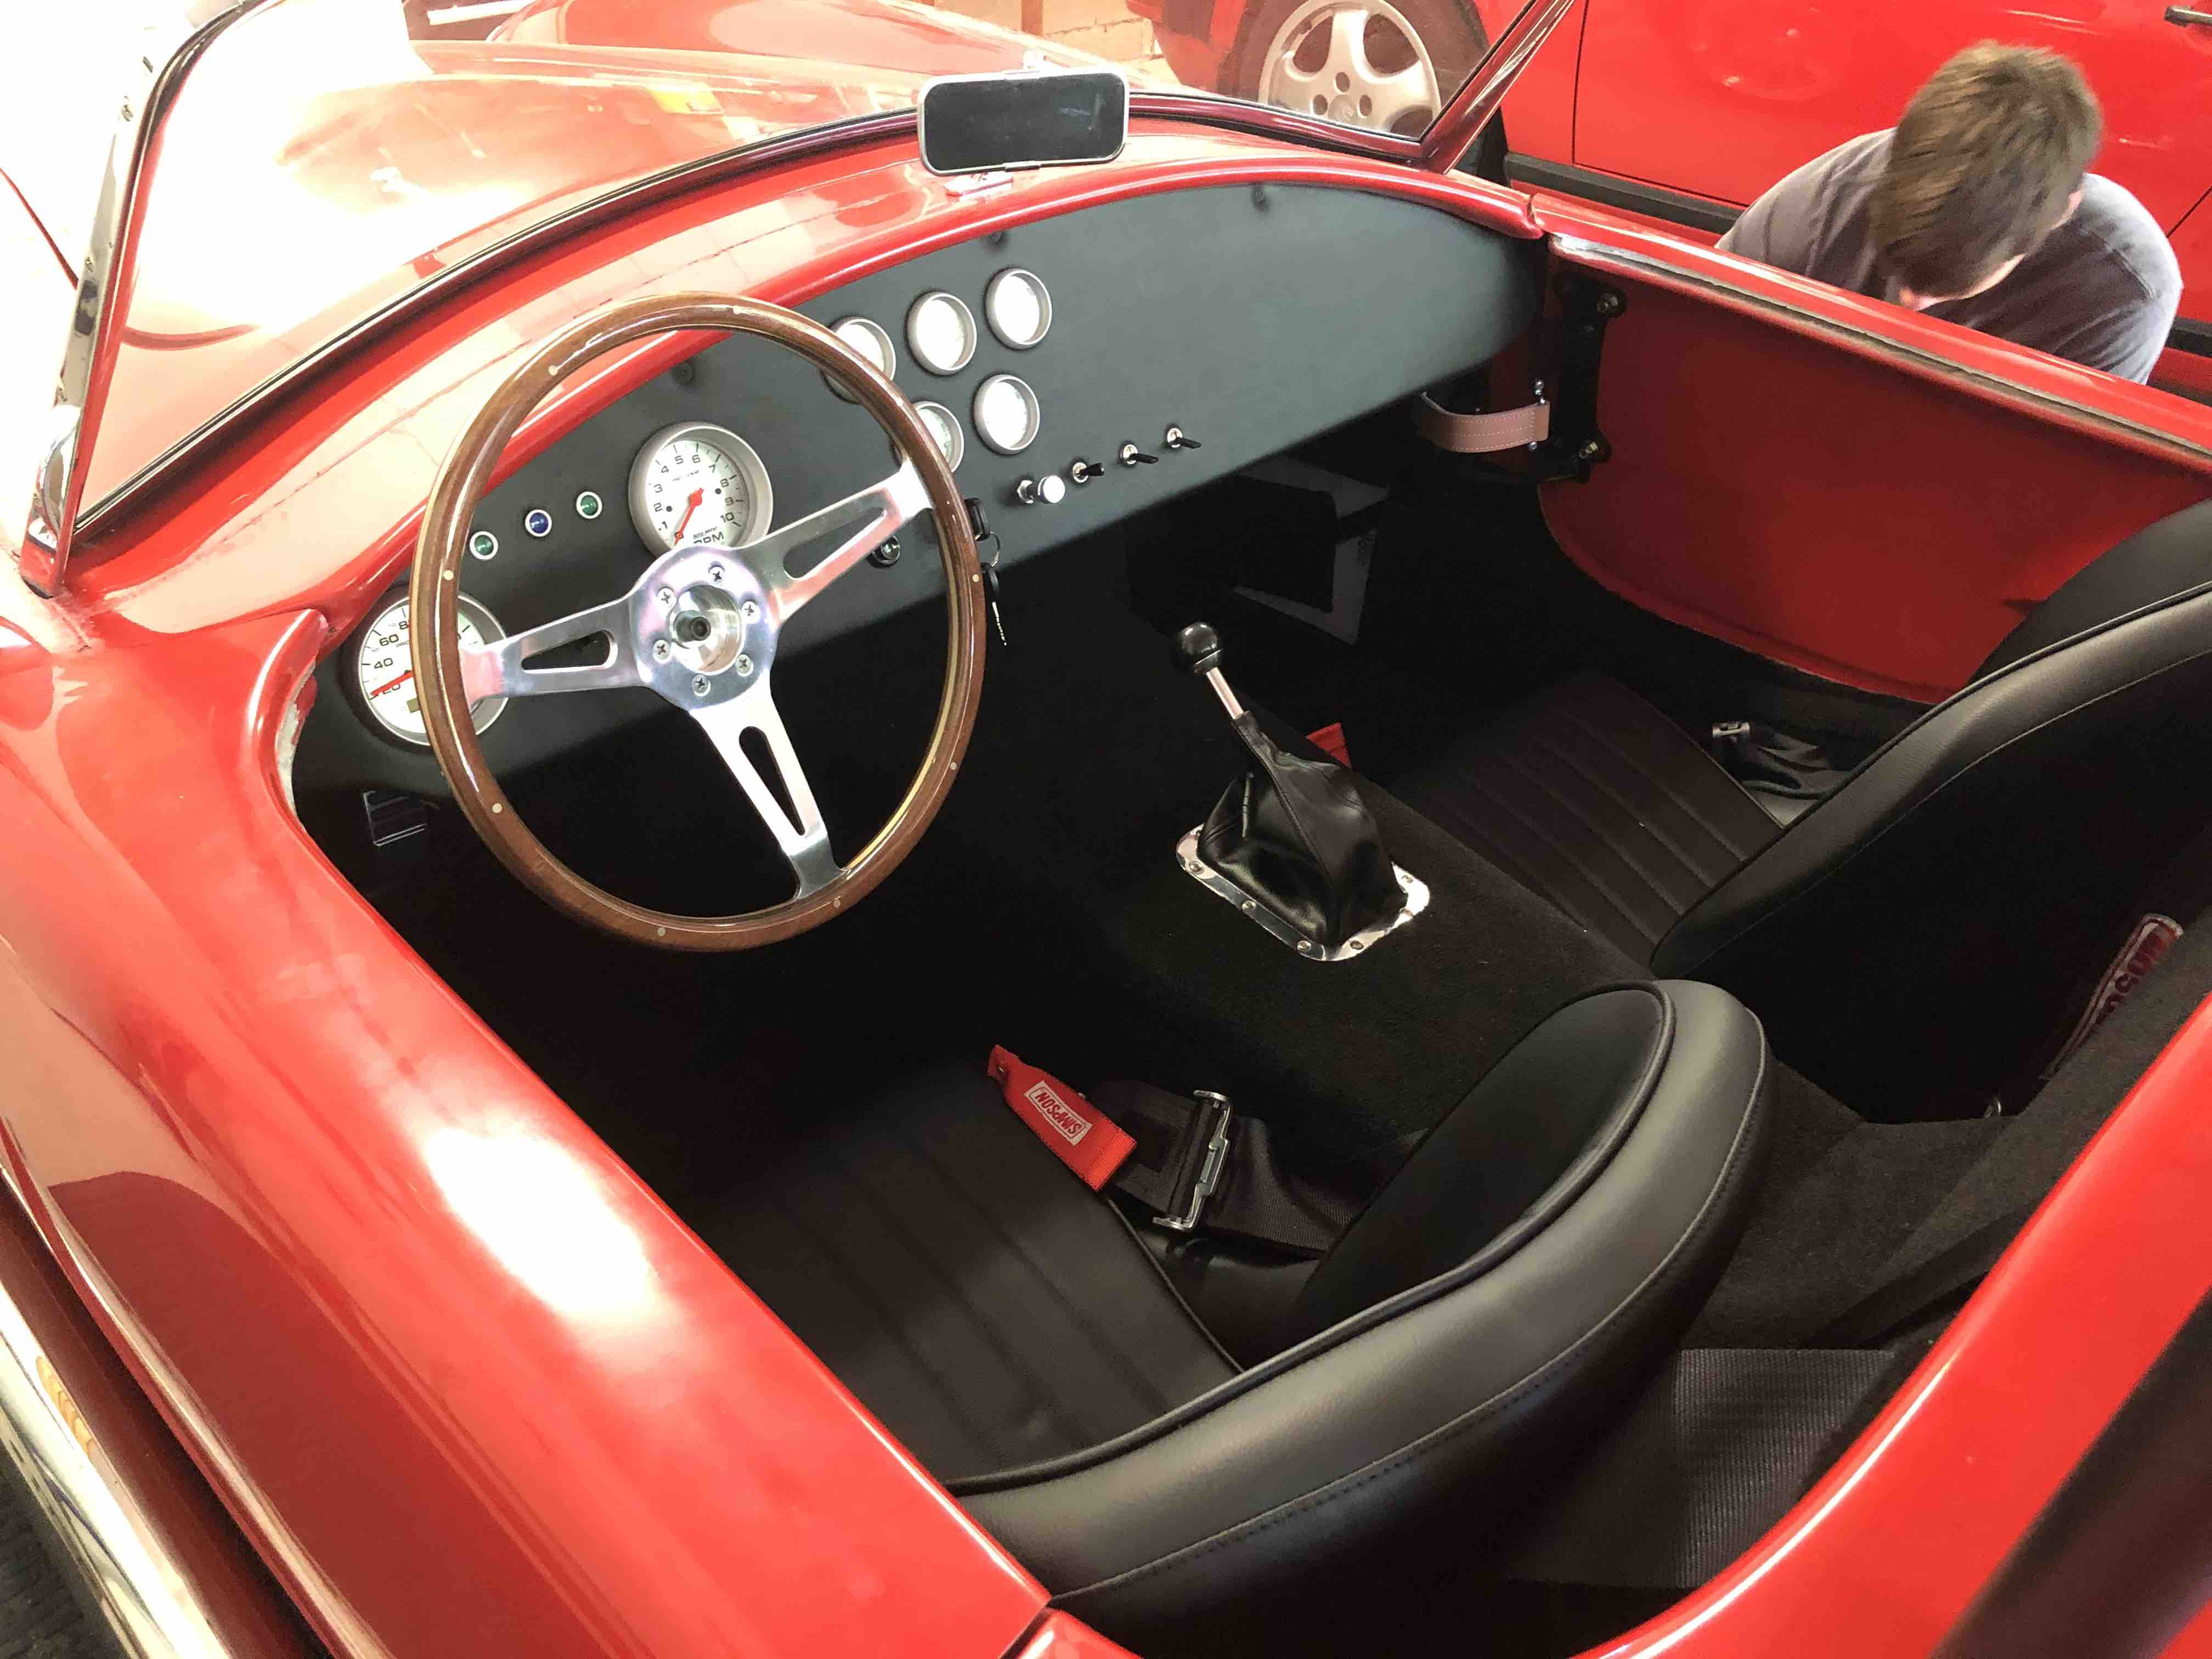
shifter boot
Hi guys! We bought a wider shifter boot from Lokar and installed this recently. With the stock FFR shifter boot, the transmission would often pop out of gear and go into neutral, as mentioned above. The wider base of this shifter seems to solve the problem. Here's a picture of our cockpit with the new shifter.
2018 Factory Five Mk IV, Gen 2 Coyote, Tremec TKO 600 5 speed, complete kit, standard brakes and rear axle;
Delivered: 5 Sept 2018
First start: 31 Aug 2019
First go-cart: 22 Sept 2019
Basically done except paint: May 2020
Graduation: June 2021
-
06-28-2020, 02:54 PM
#520
completion plate
Hi guys,
My wife Sarah, who has been just as involved in this build as I or my 2 sons have been, just got us this little metal plate to install in the car to memorialize the completion of the build. We still need to paint, of course, and there are some bugs that we still haven't worked out, but in general, we've been done with the car for a few weeks now and it's been running well. We've been really enjoying it!
We as a family owe so much to so many people on this forum for all the help you've given us to make this happen. Paul, Dave, Bradley, Jazzman, Scott, Fixit, Carl, Boydster, Yamabro, and so many more. As you all know, we came into this with little skill (and that's where we still are...) but with your generous and patient help we were able to do this. It's been a great experience to share with our 2 sons these last two years before they leave home this fall and it would never have happened without you. Thank you so much!
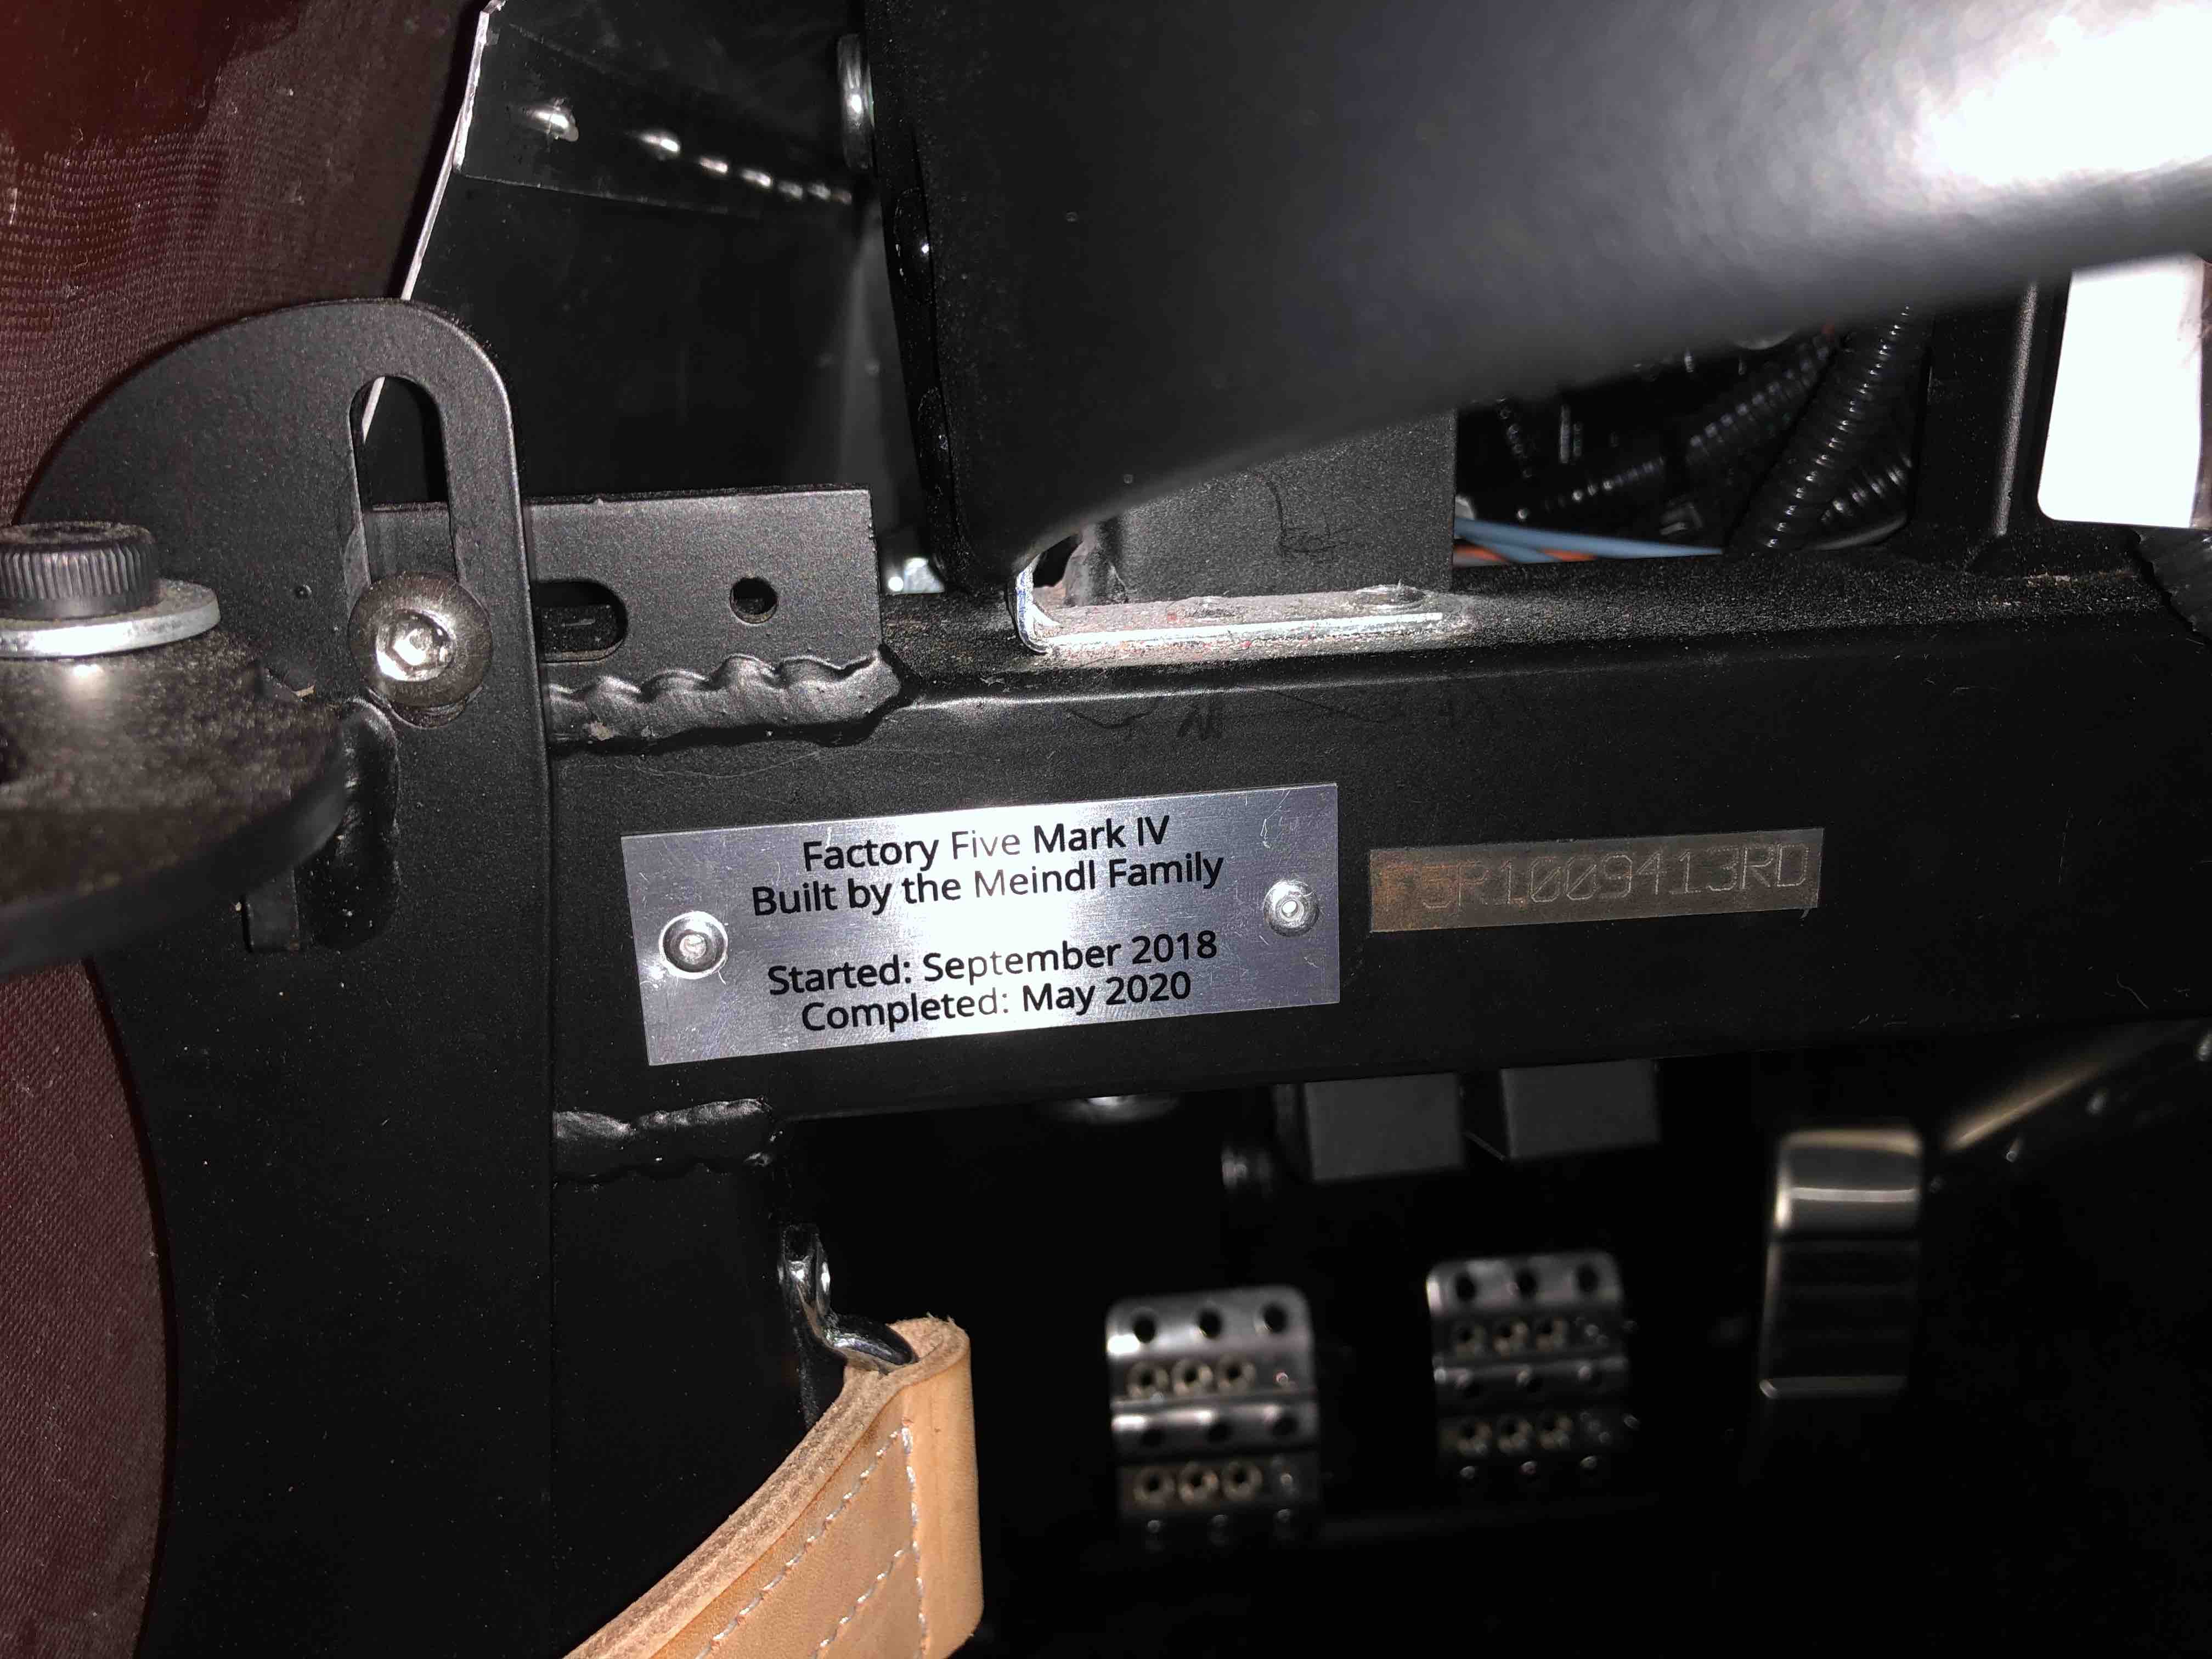
I'll keep you posted on anything of note for us (such as paint or if we manage to fix that speedometer...). In the meantime, we're trying to learn a little about engines by working on an old 911. We'll be just as in over our heads on that as we were here...
Last edited by PeteMeindl; 06-28-2020 at 02:57 PM.
2018 Factory Five Mk IV, Gen 2 Coyote, Tremec TKO 600 5 speed, complete kit, standard brakes and rear axle;
Delivered: 5 Sept 2018
First start: 31 Aug 2019
First go-cart: 22 Sept 2019
Basically done except paint: May 2020
Graduation: June 2021
-
Post Thanks / Like - 0 Thanks, 3 Likes


 Thanks:
  Likes:


 Reply With Quote

