
Visit our community sponsor

Thanks:
38

Likes:
152
-


Windshield Installed
So today was windshield day... Actually it went pretty well. I actually followed a couple of other's threads and it really wasn't too bad. Below, I do not really repeat what is in those two threads so IMO it is must reading if you are getting ready to do your windshield. Espically the one from Gumball as he was very detailed in his post. I had a friend over to help me maneuver it around. So to start with, the two threads that I read, reread and then for giggles, read them again and pretty much followed to the letter.
First one is a post from Paul (EdwardB) on another thread and I quoted it below for quick reference: CLICK HERE

Originally Posted by
edwardb

It's tight on the DS, but as long as you don't block the opening behind the dash, you can reach back in there. One tip that makes installing the windshield a whole bunch easier that I also mentioned in my last build thread. Probably one of the best tips Ive tried in a long time. Saw it somewhere on one of the forums and tried it for the first time. Instead of just drilling out the 1/2-inch holes in the windshield side bars, drill them 27/64-inch and cut threads with a 1/2-inch x 13 tap. Easy to cut threads in the brass. That way you only have to put in a bolt from one side in each of the holes when mounting and aligning the windshield. Way easier than bolt + nut + wrench on each side while chasing around a moving windshield. When tightened, they're nice and strong. Put a nut and washer on each bolt during final assembly, but before then they hold the windshield solidly during the build.
Second one and the most informative is from (Gumball) CLICK HERE
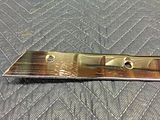
The biggest thing and I have to tell you that I can not thank EdwardB enough for stressing this in his post, Tap threads into the support bars. It made the install absolutely a breeze and only took me about 30 minutes to drill and tap the 4 holes, worth EVERY MINUTE!!!!!!
So to start off with I completed all of the prep work that is discussed in the second thread listed above. Only thing I did not have to worry about was the edge of my windshield. I found it to be smooth all the way around and not the "chipped" up look as was evident on Gumball's. I did have a couple of the mounting screws that go through the mount frame into the windshield frame that were a tad too long so I adjusted them with the bench grinder. Nothing much, just a couple seconds on each one. Then with the help of a friend, we found that the pre-cut body holes from FF were not exactly correct. So we were able to mark the actual needed area to be cut out of the body and started with that. Once we were able to actually drop the frame bars into the body cutouts, things started to take shape. I found that on the drivers side, the support bar was perfectly flat against the chassis mount. I mean, no gap, no pressure, just sitting perfect. Then I started making measurements and comparing both sides. I found that from the rear door opening, the corner closest to the seat to the bottom of the frame where it dropped into the body was exactly 32" on both sides... perfect so far.... Then I measured from that exact same point up to the top frame screw, 27 1/2" on both sides. Next I marked the holes with a sharpy, of course the passenger side is pretty simple. The Drivers side was not hard, but took a bit of feeling around to find the mounting holes to mark... Done. Good marks, pulled the windshield out removed and center punched the bars and went to the drill press to begin cutting in the 27/64" hole to prepare to tap it to the 1/2" - 13 required... Like I said, DO THIS, You will thank yourself... Next, put the frames back on the windshield (taking note to install the two shorter screws back in their proper holes) and dropped it back onto the body.
As I said the drivers side was flat against the frame mount so it was as easy as putting a washer on the bolt and threading it in finger tight. Then on the PS I found that the bottom hole needed one thick washer and the top hole needed two thick washer to ensure there was no unneeded stress on the windshield. At least it sure seems that way. I tightened down the PS bolts finger tight and then again checked my measurements. I found I was off a bit and loosened up the bolts ever so slightly and found my centered point again with the 32" and 27 1/2" measurements. (FYI, these are my measurements, everyone's could be a bit different and if your planning to install a top, I believe the measurement is to be 27", follow the install manual for that information) Snugged down the bolts, remember, they are threaded into the support bars in the holes that I tapped out. They actually tightened up really nice. Then I was able to thread on some serrated based self locking nuts to lock everything in place. I have not yet put a lock nut on the PS Bottom bolt as the frame bar directly next to the hole is so close that I can not get a nut on the bolt.... Still trying to figure what I'm going to do there. Perhaps just some red Locktite. TBD. And there you have it, a windshield... and what a difference it makes in the look of the car...
Sure, there was a little extra time involved in prep work, but to keep as much stress off of the windshield frame up front I hope will be worth it and prevent my windshield from cracking. Time will tell. Whooo Hoooo!
Oh, Jeff Kleiner, you will have a little extra work to do to clean up the openings in the body where I had to open them up from the FF cutouts... Not too bad, but a little...
Here are some photos I took along the way.
All the parts laid out and ready. I actually was ready to use some of the spacer
shims from the brakes if needed, but ended up not needing them at all.
IMG_3114.jpg
And here are the rest of the photos that I took. Again, if you have not read the above two threads, I would highly recommend you do before you install your windshield.
IMG_3118.jpg IMG_3125.jpg IMG_3127.jpg IMG_3128.jpg IMG_3131.jpg IMG_3132.jpg IMG_3133.jpg IMG_3129.JPG
Last edited by BadAsp427; 12-23-2018 at 06:25 PM.
 Posting Permissions
- You may not post new threads
- You may not post replies
- You may not post attachments
- You may not edit your posts
-
Forum Rules

Visit our community sponsor


 Reply With Quote