-
JPPT in Australia Mark IV Coyote Build
Hi everyone
We live in Hervey Bay which is a small town on the east coast of Australia. Our Cobra full kit and Coyote engine are hopefully being unloaded in next couple of days in the nearest port (Brisbane). After customs (assuming the exhaust pipes are not stuffed full of cocaine), it has to be delivered to the local Factory Five agent and then I have to arrange delivery to my home about 4 hours away. So maybe before Christmas! Maybe not! I refuse to get too excited but cross fingers.
Our cobra journey started with Covid and teenage boys. We were stuck at home during various forms of lock-downs and my sons started watching every episode of Top Gear ever made. In one episode, they go on about Caterham kit cars and my now 16yo asked me if we could make one. Now, as pointed out to me by my other 18yo son - the sensible one like his mother - we know nothing about cars. I still dont really know what a carburetor does and conversations about alternators and camshafts remain a complete mystery to me. My mechanical experience is limited to tinkering on bicycles. Once, I forgot to put oil in my car for 24 months until the engine seized completely (many many many years ago)! This gives you an idea of my level of aptitude. But as I get older, I do love fixing stuff and trying to figure out how things work and I have always had a secret desire to do something like a car. I am now aware of the importance of oil.  By day, I'm a medical person which I guess is a detail oriented occupation and I can generally work things out - except that in a work setting I have lots of sophisticated tools and support systems to rely on.
So we started looking up kits on the internet. Constrained by our limited knowledge and abilities we fell upon Factory Five, which seemed like the most complete package and the neatest car. So we put a deposit down in Sept 21. We paid up in full in April 22 and we have been waiting since. There are a few other Australian customers involved in this order and I think we are all a bit nervous about how things are going to go with the delivery. Certainly, it is not usual in Australia to pay everything up front, and from the other side of the world with no physical contact, the longer the wait, the less certain we have been about how real or secure Factory Five actually is. Also, stories of incomplete inventories cause a little anxiety, because if it takes 15 months to get a car, how long will it take to get missing parts? But I guess we ultimately have to have faith in the system - and build a couple of canoes while we have been waiting.
I only discovered this forum about a fortnight ago. And it's great! And I am amazed how respectful and civilized you all are to each other. It is a credit to you all. Going through the forum, some of you are so clever and innovative that I sway between a completeIy overwhelmed, "we're never going to do it properly" feeling and then feeling "yes we can do this and it's going to be fun". I look forward to hopefully getting lots of help (I know we're going to need it) and making new friends in the process.
So with the internet, you tube, local car nuts, a helpful local Factory Five agent and resources like this amazing forum, I am quietly hopeful we can manage this. Honestly, Im more interested in the building and learning process than the car as such, though I'm sure it will be fun once it is done. I expect moments of total frustration but overall a sense of achievement and bonding with the boys. Unfortunately, the eldest (uninterested, sensible) is leaving home for University in 6 weeks. Hopefully, he'll be home on weekends and holidays. The more enthusiastic youngest one is entering his final year at High School in 6 weeks. He wants to go to Medical School so I will try not to distract him too much. When we finish, I will hopefully still be married, and plan to drive with my wife on local roads, no racing - and my sons probably hope that they will pick up chicks with it though Australian rules disallow them from driving a V8 for another couple of years.
While we have been waiting, we have prepared the shed (everyone has a shed where I live). As it gets more real, we have built a dolly, purchased a crane and things like clecos, and many tools which have been longingly fiddled with but not yet used. I have to admit stupidity and lack of preparation/planning with all the options that I did not really know about until I started reading this forum. I guess we'll work it out as we go along. We have simply ordered the complete kit with 3 link suspension. We have ordered the Gen 3 Coyote engine - it seemed like the "least complicated" option. Hopefully they have sent us the right hand drive kit! Until we have the inventory done, I am not entirely sure what else we should be doing or ordering separately or in advance to make life easier and avoid delays later on (I don't want to build any more canoes). Any suggestions appreciated.
Unfortunately, where we live, salty sea air and humidity mean corrosion is a real issue. All the surfaces of my shed tools start rusting within days without protection. Even wood rusts according to my engineer neighbour.... so I guess it will be an extra challenge to deal with. I also imagine that Australian roadworthy certification is going to be super painful. They have rules and regulations for everything and everyone here. We cannot pass wind without the proper emissions certificate. I know for sure that seatbelts, seats and lights will have to be different. Not sure how the metric/imperial thing is going to go in terms of local supplies or how much it will matter. Initially I'm not sure whether we're going to powder coat the frame on top of the Factory Five job nor do I really know what to do with the aluminium panels. Certainly, some of the lengths some people have gone to on the aluminium requires the sort of patience we almost certainly do not have.
So, this build thread is a little bit of a diary of our journey but mainly a place where we hope we can lean on your help and experience.
Cheers
JP and Paul and Toivo
-
Post Thanks / Like - 0 Thanks, 1 Likes
-
Senior Member

G'day JP,
I started along this path in 2011 with Mk4 and gen1 Coyote. I also paid up front and waited just over 7 months to get my stuff. It was a long and somewhat risky wait. Besides losing the money, I didnt know if I could handle the many "I told you so" comments that I would get if it fell through. As promised everything turned up in one piece. I can give you support with the ADR requirements, there are many and I estimate it added 2 years to my 7 year build. You are a bit far away from me, but just reach out as needed.
The end result is worthwhile:
This was a rough road, these cars handle it in comfort and without fuss.
I will send you a PM with my email and phone number. Feel free to call anytime. Hope customs and delivery go well. Expect to be overwhelmed when you get it all in your shed. I just planned to do one thing every day. Sometimes it was just picking up a bolt or 2 from the fastener supplier.
Cheers,
Nigel
Mk.4 FFR supplied Right hand drive
Received 12/2012 completed 12/2019
Gen1 Coyote / TKO600 / IRS
Lots of mods to make compliant for Australian design rules
-
Post Thanks / Like - 1 Thanks, 0 Likes
-
Welcome from upstate New York, USA!! You are on a journey of a life time. It's up to you how smooth or bumpy that journey is. I received my Daytona Coupe in June of this year and will be go-karting in the next few days. I had never taken on a project of this magnitude either. Just take everything slow and deliberate. There is a lot of information in the build threads on this forum. Use them! Stay organized! And most important, if you are confused or don't know what to do post your question here. You will get an answer. Good luck and Happy building!
-
Post Thanks / Like - 1 Thanks, 0 Likes
-
Senior Member

Welcome and good luck with the journey. Like you, I had limited mechanical knowledge prior to starting this process. There isn't much nowadays that you can't learn from forums or youtube.
I think it takes longer for international kits as FFR tries to make sure the kit is complete as possible before crating it up and shipping it out. here in the states, we'll get "most" of the stuff and get the remainder in installments as it rolls in from their vendors.
Starting a build thread was a cool thing that I can look back on now and reread and also allows other members to point out my mistakes as they were happening in real time.
-
Post Thanks / Like - 0 Thanks, 1 Likes
-
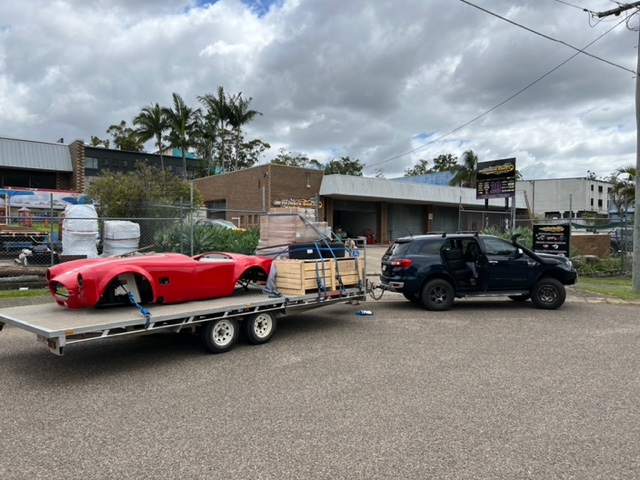
 Any ideas getting packed car crate safely off flatbed trailer appreciated
Hi guys, thanks for your welcome and advice.
Nigel, I'll be sure to take you up once I get going. I have found a local engineer who does ICV certification "Independently Constructed Vehicles" - but he mainly does motorbikes and has no experience with something like this kit. The video is great, gives me something to aim for.
Scott, I had to build a shed too - my wife wasn't having her car parked outside for a year (or two). We had to wait for 9 months because everything seems to take time these days. I will attempt to embed a picture...it has walls now (and unfortunately already full of rubbish)

egchewy, yes, hopefully will stay organised and get help when I need it! I hope you're right about FF packing everything into the crate before it left!
So, the local agent tells me the crates will be at his place today  We're trying to figure out how to pick it up. Main issue is going to be getting it into the shed (which has no driveway - that was a step too far for the wife). I'm thinking hiring a car trailer, picking it up this weekend, backing into the shed. I have to fit it in between about 3 Christmas parties but it might be a perfect excuse to avoid a couple.
To get off the trailer, I have a mobile gantry but I think the trailer is wider than the gantry. we have access to 2 engine cranes but I guess we may have issues getting the legs around the trailer tyres. Clever and practical neighbour suggests lifting front of crate onto a couple of dollies on the trailer bed, then going to the back of the crate of with crane and lifting the back and then rolling whole arrangement back off the trailer until I guess we gently lower the back onto the ground and then go round to the front and lift that down off the trailer. Sounds perilous for fingers and toes but he has experience with heavy machinery.
If anyone has safe and clever way of getting the crate off a flatbed trailer, please let me know.
-
Senior Member

Welcome aboard, JPPT. I looked up Hervey Bay in Google Maps. Looks like a beautiful area.
Congrats on the imminent arrival of your kit. Exciting times! I admire your courage to take the plunge and begin this adventure. As a fellow builder with only basic mechanical experience, I can relate. You are coming at it with a strong curiosity and willingness to learn--no doubt these will propel you forward throughout the build. I think you will have a blast. As I complete each part of my build, my confidence grows. Overcoming challenges throughout my build has been very rewarding. For me, the forum is absolutely indispensable. So helpful! Looking forward to seeing you get through your first challenge of getting the crate off the trailer and into your shed.
P.S. where I come from we would say you built yourself a nice shop.  I bet it will be a great setup for your build.
Chris
Coupe complete kit: arriving ~ 4/22/24!
Build Thread. Coyote. T-56. IRS w/3.55. Wilwoods. PS. HVAC. Side windows.
MK4 Complete kit.
Build Thread Index. Delivered: 10/15/2020. Legal: 7/25/23. Coyote Gen3. TKO600 (0.64 OD). IRS w/3.55. PS. Wilwoods. Sway bars. This build is dedicated to my son, Benjamin.
Build Thread.
-
Post Thanks / Like - 0 Thanks, 1 Likes
-
Senior Member
Clever and practical neighbours are indispensable. I think his idea for unloading is a good one. If the crate is anything like the one mine came in, it honestly weighed more than the chassis and body combined. Anyone would think timber grows on trees in the US! I am still repurposing my crate 10 years later. It might be worthwhile sliding the crate off the back of the trailer and onto the ground in front of the entrance to your shed. It would then be a simple matter of breaking the sides down on the crate, removing the body shell and then dragging the chassis into the shed. Using pipe as rollers could make it easy. (Perhaps recruit a few people from those Christmas parties you are meant to be attending).
I got 6 mates around and we were able to man handle the chassis out of the crate and lift it onto axle stands.
We then looked at it for quite a while and quite a few beers. (Great excuse to catch up with a few old mates).
Work safely, but don't overthink this task. It's not too difficult and won't take too long
Last of all, make sure to take plenty of photos. I didn't take many and it is the chief regret of my build journey.
Great Christmas present!
Cheers,
Nige
Mk.4 FFR supplied Right hand drive
Received 12/2012 completed 12/2019
Gen1 Coyote / TKO600 / IRS
Lots of mods to make compliant for Australian design rules
-
 Early Christmas!
Hooray! Christmas has arrived early!
The crates and cars arrived earlier than expected so I hired a car trailer, woke my wife up 4am on Saturday morning and 4 hours later, Glenn at Horsepower World was helping us load it all on. He was super helpful.
It wasn't in a crate as expected but that made things easier in the end.

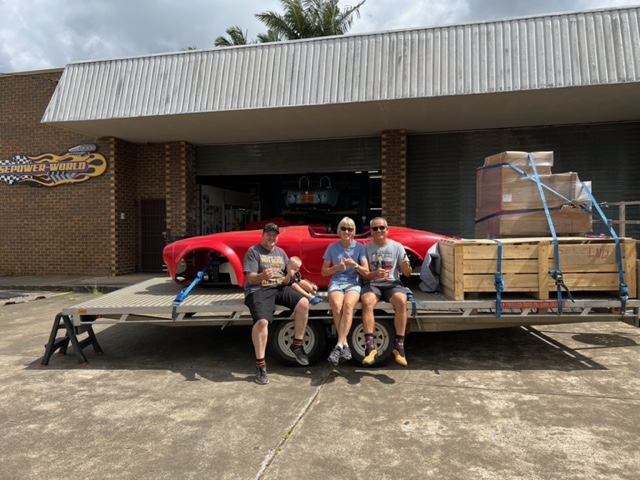
Box 17 was most precariously placed and on the trip home, we have never looked in a side mirror so often while driving to check on whether Box 17 was still there.
Nige, you were absolutely right, I was over-thinking the whole delivery process and with two semi-helpful teenage boys, an enthusiastic neighbour and a super wife, all done and dusted by 3pm.

The whole exercise gave me the perfect excuse to plead tiredness and skip a Christmas party and start inventory instead.
In the end, all pretty seamless. There is no engine which is a little frustrating but hopefully on the next shipment. All the boxes easy to carry. Box 32 (the windscreen wipers) is missing also (unless it was on top of Box 17).
So inventory next. Yesterday I was supposed to fly overseas to NZ for first Xmas with parents since Covid, but my work colleague has Covid and I have had to stay back to cover her. I sent the rest of the family away as planned and hopefully joining them at the end of the week. Apart from keeping the cat alive, I can dedicate my time to getting through all those boxes. Like my son pointed out, each box is like a surprise Christmas present....
-
Post Thanks / Like - 0 Thanks, 2 Likes
-
Senior Member
Merry Christmas indeed! I'm curious if your POL list is shorter than others since you're overseas. I think FFR tries to get these as complete as possible prior to shipping to keep shipping costs down.
-
Senior Member

Originally Posted by
egchewy79

Merry Christmas indeed! I'm curious if your POL list is shorter than others since you're overseas. I think FFR tries to get these as complete as possible prior to shipping to keep shipping costs down.
I had only one item on POL and only the rear springs incorrect. They sent new springs 2 weeks later.
Mk.4 FFR supplied Right hand drive
Received 12/2012 completed 12/2019
Gen1 Coyote / TKO600 / IRS
Lots of mods to make compliant for Australian design rules
-
Half the issue is I don’t really know what all the various parts are and what they actually do. I wouldn’t know if I had the wrong springs until I get there! I’m referring to the build manual a lot to try and work out what is what.
Speaking of manuals, I was kind expecting the manual to be in colour but I have a monochrome photocopy - is that normal? I have found the colour pdf on line but I like paper better.
Thanks for your welcome and encouragement Chris. I had a chance to look at your thread and it’s going to be great resource!
-
Senior Member
I think FFR can provide you a digital copy in color
-
We're back!
So inventory is a little challenging because I don't really know what is what. There may be parts that I have counted as missing which aren't and vice-versa. I guess we'll discover more along the way.
Some of the Aluminium footbox panels are confusing me (easily done). RHD makes it more so. But short of assembling it, I'll just have to trust and wait until I get that far.
More obvious items are the wipers box (#32), a radiator hose set, flexible fuel line and brake hose, power steering pump and a few elbow barbs.
For some of the nuts and bolts missing, Im not really how precise I should be. There are not many of them and it may be more practical to try and ask the local nuts and bolts shop to find them but I know nothing about the quality/grade I would be getting or should be asking for. Also, some of the imperial might be harder to find where I live.
I'm definitely sure that the engine and transmission are missing though! Hopefully next shipment.
Yesterday we took the body off the chassis. No major incidents. No divorces.


Now I'm off to build the body buck and work out how to hang it up on the ceiling. My shed has a 4 metre ceiling and I don't like ladders so it's going to be interesting.
-
Question: which silicone to use?
I went to a couple of car supply shops and Home Depot equivalent yesterday looking for silicones. The choice was overwhelming. Some were marine, some roof and guttering, some trailers and caravans, others appeared to be more automotive related with heat resistant qualities but those ones were acetic curing or polyurethane based.  I showed one assistant about neutral curing which seems to be the gist in the FFR manual - and he recommended a polyurethane based adhesive/sealant. In these sorts of shops, any assistant with grey hair counts as an expert but I wasnt sure.
Does it really matter which silicone I go for (I guess Im thinking about panels to the chassis and eventual gaps)?
-
I think any general purpose silicone seems to be fine for aluminum etc. You can choose blackor clear, depending what might make it easiest to hide/not see against the color of parts you'll have.
-
Senior Member
Sikaflex 227 is available in grey or black from Bunnings. Use the grey on the aluminium panels and the Black on everything else. it is much easier to apply than normal silicone and has great adhesive qualities.
Don't forget to grab the nozzles as Bunno's often has them stored somewhere else and they are a different size nozzle to the average tube of silicone.
1 of each, will get you to go kart stage.
Cheers,
Nigel
Last edited by Nigel Allen; 01-14-2023 at 11:53 PM.
Mk.4 FFR supplied Right hand drive
Received 12/2012 completed 12/2019
Gen1 Coyote / TKO600 / IRS
Lots of mods to make compliant for Australian design rules
-


Originally Posted by
JPPT
I went to a couple of car supply shops and Home Depot equivalent yesterday looking for silicones. The choice was overwhelming. Some were marine, some roof and guttering, some trailers and caravans, others appeared to be more automotive related with heat resistant qualities but those ones were acetic curing or polyurethane based.
I showed one assistant about neutral curing – which seems to be the gist in the FFR manual - and he recommended a polyurethane based adhesive/sealant. In these sorts of shops, any assistant with grey hair counts as an “expert” but I wasn’t sure.
Does it really matter which silicone I go for (I guess I’m thinking about panels to the chassis and eventual gaps)?
I worked for a major silicone manufacturer for over 30 years. There are pros and cons to both silicone and polyurethane sealants. Polyurethanes offer easy water cleanup, fast cure, low odor and lower price. They have limited movement once cured and over time will dry out, crack, do not do well with extreme temperature changes and lose adhesion. Silicones are harder to clean up, take longer to cure, can give off strong odor during cure and are more expensive. The plus side is that the have excellent movement capability, do not dry out, are not effected by extreme temperature changes and if applied correctly will not lose adhesion.
IMO using a neutral cure silicone is your best option. Clean up with Toluene or Acetone before the silicone skins over. Do not use an Acetoxy based silicone. (You can tell if it's acetoxy based as it will clean out your sinus) It gives off acetic acid during cure!
-
Post Thanks / Like - 1 Thanks, 1 Likes
 JPPT
JPPT thanked for this post
-
Body buck done.

-
-
Senior Member

According to my records, those lower control arm lock nuts are 1/2-13. But I'd confirm that. They are though grade 8 distorted thread flange nuts. I wouldn't suspect super common at regular stores. Even here in the U.S. Seen in this picture. From my Coupe build but the same part.
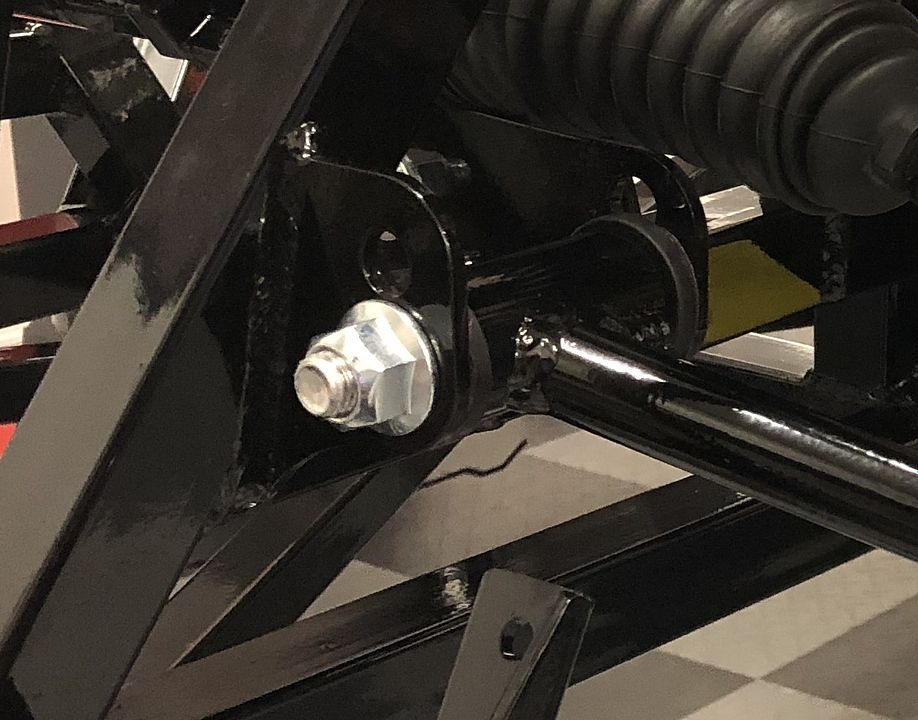
Your upper control arms are correct. A common question. The solid welded part will be on the front on one side and the back on the other side. No problem. Refers to that in the build manual BTW. It's common to have to shorten the bolts and the sleeve to get the shorter dimension recommended for power steering. These are purchased assemblies by Factory Five. Obviously the missing lock nut should be there. Missing from the vendor or fell off somehow. It should be the same as the others. Sorry I don't know the exact details.
Last edited by edwardb; 01-22-2023 at 07:28 AM.
Build 1: Mk3 Roadster #5125. Sold 11/08/2014.
Build 2: Mk4 Roadster #7750. Sold 04/10/2017.
Build Thread
Build 3: Mk4 Roadster 20th Anniversary #8674. Sold 09/07/2020.
Build Thread and
Video.
Build 4: Gen 3 Type 65 Coupe #59. Gen 3 Coyote. Legal 03/04/2020.
Build Thread and
Video
Build 5: 35 Hot Rod Truck #138. LS3 and 4L65E auto. Rcvd 01/05/2021. Legal 04/20/2023.
Build Thread. Sold 11/9/2023.
-
Post Thanks / Like - 1 Thanks, 0 Likes
JPPT thanked for this post
-
Busy times.
Eldest son left home for University, doesn't miss us in the slightest but I supposed that's better than if he missed us terribly. Looks like we're going to have a dentist in the family. He informed us about 2 days before he left home! I'll feel guilty about not flossing(but I'm quietly proud)
Youngest son too busy in final year high school to help out much which is a shame. I keep waiting to do parts of each step with him but I might eventually give up and go faster myself......
Upper control arms. After staring at the instruction manual measurements for 3 days and coming up with creative ways to make the measurements fit, I finally worked out that I had to cut/trim the rear bolts and sleeve. Apart from edwardb's answer above (Thanks edwardb, you're a superstar in so many threads), good threads on this were:
https://thefactoryfiveforum.com/show...-Alignment-Mk4
https://thefactoryfiveforum.com/show...ition&p=470767
Rear differential:a weekend of reading about different oils - synthetic, non synthetic, limited slip differential additives - lots of opinions!! Filled it to the fill hole edge. 2.6 quarts (plus another half on the rest of the workshop floor and clothes). I went full synthetic with pre-added LSD additive. We'll see.....
Painted the front brake calipers. Probably didn't clean them well enough before spray paint VHT calliper paint plus clear coats. Wife refused to let me cure in home oven and a good thing too, they stank. Used a camping bench-top oven I bought for $50. Should hopefully do better on the rear calipers.
Traction look brackets on rear axle this weekend. The bolt holes son't quite align but the gist of the forum threads about this seems to be to use a BFH tool. I have lots of tools but it took me half an hour of Google to find out what a BFH tool was!
Local nuts/bolts shop has now decided to be closed on weekends which adds inevitable delays whenever I discover a missing bolt on Friday night/Saturday morning but I'm determined to stay relaxed!
Last edited by JPPT; 03-09-2023 at 03:50 AM.
-
-
Senior Member
make sure pads are centered on the rotor, but this will otherwise work itself out. I found that rotors didn't spin easily until after I put the tire on and had more leverage.
-
-
-
Pedalbox question #3 - hydraulic clutch instructions anywhere?
And I have a hydraulic FFR clutch. I don't see anything referring to Mike Forte bits in any of my inventory. For the life of me, I cannot find instructions about this anywhere. Can anyone point me in the right direction?
-
Senior Member
Originally Posted by
JPPT
Onto the pedal box.
I have two switches like this:

The manual shows a switch like this for the brake pedal side but a different type of switch for the clutch. Does this matter?? Can I just use these on both sides??
For your Coyote build, if you're using the Ford Performance control pack (don't see it mentioned in your thread so far) you don't use the Factory Five supplied clutch switch. The control pack includes a clutch interlock switch that is installed in a different location. Hopefully you have the Factory Five Coyote installation instructions. Shown there.
Build 1: Mk3 Roadster #5125. Sold 11/08/2014.
Build 2: Mk4 Roadster #7750. Sold 04/10/2017.
Build Thread
Build 3: Mk4 Roadster 20th Anniversary #8674. Sold 09/07/2020.
Build Thread and
Video.
Build 4: Gen 3 Type 65 Coupe #59. Gen 3 Coyote. Legal 03/04/2020.
Build Thread and
Video
Build 5: 35 Hot Rod Truck #138. LS3 and 4L65E auto. Rcvd 01/05/2021. Legal 04/20/2023.
Build Thread. Sold 11/9/2023.
-
Time for an update.
The engine and various bits arrived in April. There wasn't much of an inventory attached to this one and the local agent forgot to forward a box of parts which confused me no end until he found it.
Very unfortunately the local agent has subsequently closed his doors and Factory Five apparently no longer have a representative in Australia. It's a real shame. I assume he was caught in a perfect storm: this is conjecture but initial shipments had arrived partially which made for very uptight customers - in Australia, it is highly unusual to pay full amounts upfront. I believe they had a lot of frustration dealing with FF directly, who kept referring them back to the agent. The agent said he had no control in the process. They also felt that the Australian market is so small and insignificant that they were not really being taken too seriously by FF.
Subsequently, I believe FF decided that they would have as complete an inventory before delivery. This meant we had to wait 20 months for delivery (probably made worse by Covid), which led to more uptight and frustrated Aussie customers and the same sort of interaction with FF. Now, we have 95%+ of our inventories (well at least I think I have) but there are still a few bits missing and possibly mixed up between customers. In defence of FF and the agent, despite doing a careful inventory, I did not always know which parts were actually what so my missing list was probably longer than it really needed to be. However, the FF packing list is definitely not perfect.
So my understanding is that for the missing parts, FF have told the agent that their packing is perfect and that any missing parts are his problem and his cost. The agent is trying to honour his customers and it has all got too hard and he has given up. He is a nice person, he was always pleasant and helpful, so a shame all round. I don't know the full story and I may have misunderstood important bits.
Onto build stuff!
I spend half my life looking for things, whether they be tools or parts. I have been through boxes 16 and 22 about 150 times and I still don't know what's in them. My son has been very helpful in that regard. We scanned the inventories list into a PDF file that is on my phone and on my iPad. Now, when I am looking for an item, I can simply search the name or the number and I will be taken to the correct place and inventories page immediately. It is almost always in either box 16 or 22…they will haunt me for a long time.
Which brings me onto my son. He is 17 years old and in his final year of high school. His final exams are about 6 weeks away. He is the one who wanted to do this project in the first place but in the 20 months that it took for the delivery to take place, he has lost interest. I try to keep him engaged and we manage to do about half an hour each day of the weekends together but he gets bored/distracted pretty easily. I do not really know what to do except be patient. While I am waiting for him to come and do more interesting bits that I have prepared for him, it gives me time to do all the aluminium panels!
I have installed the fuel tank. I had to ratchet away the inner down post to fit the tank in and now that it is released, it still pushes on the edge of the tank above the flange, though it does not dent it. I am not really sure whether I should be worried about this or not. I have a flat thin piece of plastic to try and spread the pressure between the down post and the tank.
I also had to use smaller (metric) bolts for the fuel strap ends because the ones I had certainly did not fit without modifying the loops. I think it gives me a little bit more working space.
I got well down the fuel assembly instructions that were in the manual before I realised that I have an EFI system. I then made the discovery of all the supplemental instructions that are on the factory 5 website. What an idiot! Now that I have found them (I wish I had known about in 3 months ago), I have been able to answer lots of questions about the fuel system, right hand drive, the motor ect. It has also helped me work out what a lot of the parts actually do. However, I would be lying if I did not admit that I also enjoy sitting next to the car and staring at problematic steps and just thinking about them, going to the Forum and trying to figure it out myself.
I have spent a lot of time staring at the master cylinders! I did shorten the rods by three quarters of an inch as is suggested in the manual but I really do wonder if I have done the wrong thing? By shortening the thread, I can no longer fully depress the pedal before it reaches the front of the foot box (unless the thread is not all the way through the balance bar). I do not know if this is a problem or not. Maybe it all goes away once the brake fluid is in the system.
I think I will go with a Tilton 3 reservoir box like many others have in the Forum.
Because it is a right-hand drive, I will be putting the brake lines on the right hand side (driver's side) and I guess the fuel lines will go on the left hand side. I am still waiting for my fuel regulator, onr of those parts that is lost between factory 5 and the agent or possibly another customer in Australia who unknowingly has 2 fuel regulators. Also, the connectors that I have received for the fuel system from factory 5 seem to be a little bit all over the place, so I have instead chosen to use AN-6 fittings, which are an (expensive) pleasure to use. The other major right-hand drive issue which I think I am going to run into is that the Coyote computer seems to be made for mounting on the right hand side which I do not have much space for because my pedal box is on that side. I guess I will work this out more once I start doing more fitting.
Quite a lot of caliper paint has a flaked off my rear brake calipers. I am not sure why that has happened because I did exactly the same for the rear ones as I did for the front ones (thorough clean, all several coats, oven cure), which are fine. I cannot be bothered doing it again. Also on the rear brake calipers, the little shim plates were far too tight to allow me to put in the brake pads so I have put in the brake pads without the plates (but there are still springs), as it seems to be something that other people on the Forum have had to do. If anyone is reading this and is horrified because it is a safety issue, please let me know.
The thrust bearing in the old flywheel had me stumped for a few days. I live in a small town, so if I haven't worked out what I need by Saturday morning, I have to spend the rest of the weekend wishing I had access to a 24hour car hardware store. So in Australia, they seem to call them pivot bearings or spigot bearings. I see that I have a bronze bushing in the supplied McLeod clutch which has all the correct dimensions and I have been assured by at least 2 "experts" that that is fine to use instead of a bearing. Again, if anyone who has made it this far is horrified, please let me know.
I have spoken to certifying engineer about road worthy considerations in Australia and he has given me a list of things I have to think about. Like a typical engineer, he has not offered me solutions but just pointed out the problems. More on this to follow!
Here is his provisional list:
Having a collapsible steering column with a breakaway mount on the dash
Having glare in the field of view such as a polished windscreen surround and shiny gauges on the dash
Side repeater indicators
A compliant steering wheel - no wood rimmed wheels
Windscreen washers
Exhaust exit at the rear
I am still having lots of fun. I am glad that I am not on a time budget (or too tight of a financial budget) because otherwise I think it could be a lot more stressful. I am learning a lot about cars. Every day, I thank the world that has made YouTube readily available to people like me. So when my father complains about what the world is coming too, I remind him a project like this would simply not be possible for me before the Internet came along.
Anyway, that is all I can think of at the moment.


 Thanks:
  Likes:


 Reply With Quote
