BluePrint Engines

Visit our community sponsor

Thanks Thanks:  0
Likes Likes:  0
Results 1 to 26 of 26

Thread: ball joints

  1. #1
    On a roll Al_C's Avatar
    Join Date
    Aug 2014
    Location
    Wheaton, IL
    Posts
    1,415
    Post Thanks / Like

    ball joints

    This is killing me - yet another crisis of confidence. Thank God for this forum! I'm trying to keep everything in perspective, but progress is pretty darn slow... (time available isn't helping!)

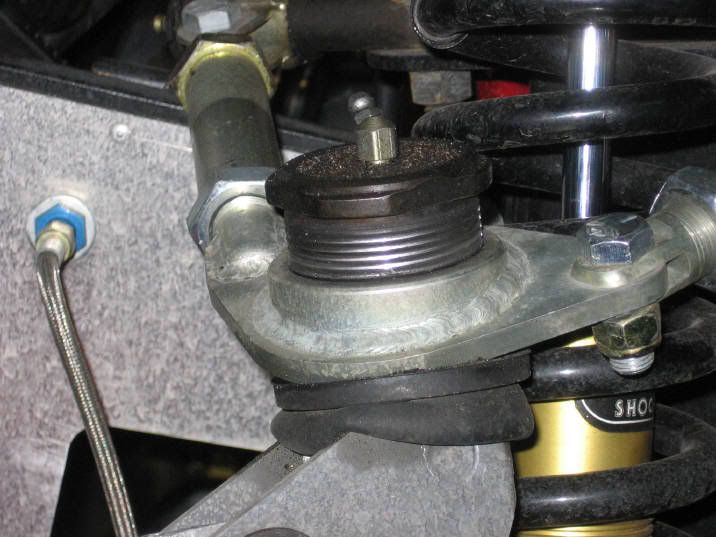
    OK - check out the photos. So I get the ball joint threaded into the UCA. Nice and smooth. Easy to turn by hand, actually. It would appear that the threads do not go all the way to the "cap" on the ball joint. The question is - how far do I need to thread this on? The manual doesn't seem to indicate one way or the other. This is one thing I didn't photograph at build school! Does it need to bottom out on the cap of the ball joint, or do I have this screwed on far enough? ( I used blue thread locker on it already...)

    ball1.jpgball2.jpg
    Mk IV Roadster - #8650 - delivered 7-17-2015 - first start 7-28-2018 - first go-kart 10-13-2018 - licensed and on the road 9-9-19: body/paint completed 3-17-2020.
    Complete kit / 2015 Coyote / TKO600 / IRS / Wilwood brakes / Mid-Shift mod / Power Steering / Heater and Seat Heaters / RT turn signal / Breeze radiator shroud and mount

  2. #2
    Senior Member Hotyacht's Avatar
    Join Date
    Jul 2014
    Location
    Auckland, New Zealand
    Posts
    159
    Post Thanks / Like
    Hmmmm. Well the manual shows the ball joint in a bench vice and a dude swinging on the UCA. It says "Tighten the ball joint using the arm for leverage with a Vice holding the ball joint"
    I certainly read tighten as ......well, tighten. as in screwed right in hard using reasonable force. So mine are screwed right in tight, which is not what you appear to have done.
    Anybody else?
    FFR MkIV 8419 - Right Hand Drive
    427W with Inglese 8 Stack injection - 560hp
    TKO600 5 Speed, 8.8 Detroit Trutrak LSD IRS
    VPM Adjustable Sway Bars
    Vintage Wheels 17" Pin Drive

  3. #3
    Senior Member BEAR-AvHistory's Avatar
    Join Date
    May 2015
    Location
    Raleigh NC, OIB NC
    Posts
    1,600
    Post Thanks / Like
    The FFR supplied upper ball joints are a bit spotty as to the way the fit & thread in. They should go in fully to the shoulder. Some of us canned them & installed MOOG K772 instead. Perfect fit.
    Kevin
    MKIV #8234
    Coyote '14/TKO-600/3-Link 3:55 Rear
    I love the smell of 100 octane in the morning.
    NITTO NT01 275X40X17ZR - 315X35ZRX17
    Delivered 2/7/14 - Plate "COYOTE NC1965" 3/25/15

  4. #4
    Senior Member edwardb's Avatar
    Join Date
    Feb 2011
    Location
    Lake Orion, Michigan
    Posts
    10,576
    Post Thanks / Like
    They need to go all the way down to the shoulder. Did you do the vise approach like FFR described? There's actually a specific ball joint socket made for those. Thought about that. But mine wouldn't thread on at all. Couldn't get the Moog's to work either. Ended up with Howe Racing ball joints. Very nice but a little pricier.
    Build 1: Mk3 Roadster #5125. Sold 11/08/2014. Build 2: Mk4 Roadster #7750. Sold 04/10/2017. Build Thread
    Build 3: Mk4 Roadster 20th Anniversary #8674. Sold 09/07/2020. Build Thread and Video. Build 4: Gen 3 Type 65 Coupe #59. Gen 3 Coyote. Legal 03/04/2020. Build Thread and Video
    Build 5: 35 Hot Rod Truck #138. LS3 and 4L65E auto. Rcvd 01/05/2021. Legal 04/20/2023. Build Thread. Sold 11/9/2023.

  5. #5
    Not a waxer Jeff Kleiner's Avatar
    Join Date
    Feb 2011
    Location
    Bloomington, Indiana
    Posts
    8,083
    Post Thanks / Like
    Al,
    They screw all the way in and seat on the shoulder. At this point you may need some heat to break the Locktite so that you can get them loose, clean up the residue and apply fresh before installing them fully.

    Jeff

  6. #6
    Senior Member
    Join Date
    May 2014
    Location
    Burlington, WI
    Posts
    689
    Post Thanks / Like
    Blog Entries
    1
    As I recall from the school, we were informed that more often than not the supplied ball joints present a challenge. They did mention that the vice install method is the simplest way to install the ball joints, but, they often require taking a steel brush to the threads. And, yes, there is a Chrysler ball joint install tool you may find at a local rent-a-tool if you are so inclined. As I mentioned in a previous post, I was fortunate enough to have them seat smoothly and tight. But, it's not the norm.

    I assume that we are all receiving the Mev Tech MK772 ball joints - made in china.

  7. #7
    Senior Member CraigS's Avatar
    Join Date
    Feb 2011
    Location
    Blacksburg, Va
    Posts
    4,730
    Post Thanks / Like
    When I install BJs I lube the threads w/ bearing grease. Makes them easier to thread in fully. Then I put a short tack weld to keep them there. I don't know what the setup time is for blue Loctite but maybe it is hardening before you get it threaded fully.
    FFR MkII, 408W, Tremec TKO 500, 2015 IRS, DA QA1s, Forte front bar, APE hardtop.

  8. #8
    On a roll Al_C's Avatar
    Join Date
    Aug 2014
    Location
    Wheaton, IL
    Posts
    1,415
    Post Thanks / Like
    Thanks for all the input! I used the socket on the first attempt - I think it's time for the vise. So.... step one - Undo current set up (loosen thread locker and take it out). Step two - reassemble and bottom it out. It still bothers me that the thread doesn't cover the entire length, but I'd rather exhaust attempts with these before I buy others...
    Mk IV Roadster - #8650 - delivered 7-17-2015 - first start 7-28-2018 - first go-kart 10-13-2018 - licensed and on the road 9-9-19: body/paint completed 3-17-2020.
    Complete kit / 2015 Coyote / TKO600 / IRS / Wilwood brakes / Mid-Shift mod / Power Steering / Heater and Seat Heaters / RT turn signal / Breeze radiator shroud and mount

  9. #9
    Senior Member PaulW's Avatar
    Join Date
    Feb 2011
    Location
    Ottawa, Ontario, Canada
    Posts
    223
    Post Thanks / Like
    As others have said the FFR supplied parts are spotty at best. One of mine screwed right in but the other went only about 2/3 od the way on. I happened to have a pair of good MOOG ball joints and used them instead. They screwed right in to the collar easy as pie. The thread definition on the FFR parts is pretty bad whereas the Moogs have clean cut threads.
    One FFR and one VFR. I like symmetry

  10. #10
    Senior Member edwardb's Avatar
    Join Date
    Feb 2011
    Location
    Lake Orion, Michigan
    Posts
    10,576
    Post Thanks / Like
    Quote Originally Posted by PaulW View Post
    The thread definition on the FFR parts is pretty bad whereas the Moogs have clean cut threads.
    Interesting. I must have the worst luck. I agree the thread definition on the Mevotech's I received from FFR was very poor. They would just barely start threading in and then lock up hard. There was no way I was going to clamp them in a vise and try to force them in. I bought Moog's from two different places (Amazon and Jegs) and they looked almost exactly the same. Went in a few turns but no more.
    Last edited by edwardb; 09-28-2015 at 07:02 PM.
    Build 1: Mk3 Roadster #5125. Sold 11/08/2014. Build 2: Mk4 Roadster #7750. Sold 04/10/2017. Build Thread
    Build 3: Mk4 Roadster 20th Anniversary #8674. Sold 09/07/2020. Build Thread and Video. Build 4: Gen 3 Type 65 Coupe #59. Gen 3 Coyote. Legal 03/04/2020. Build Thread and Video
    Build 5: 35 Hot Rod Truck #138. LS3 and 4L65E auto. Rcvd 01/05/2021. Legal 04/20/2023. Build Thread. Sold 11/9/2023.

  11. #11
    Senior Member Hotyacht's Avatar
    Join Date
    Jul 2014
    Location
    Auckland, New Zealand
    Posts
    159
    Post Thanks / Like
    And yet I had absolutely no issues with the FFR supplied items - they threaded straight in by hand no problem at all. Lucky I guess?
    FFR MkIV 8419 - Right Hand Drive
    427W with Inglese 8 Stack injection - 560hp
    TKO600 5 Speed, 8.8 Detroit Trutrak LSD IRS
    VPM Adjustable Sway Bars
    Vintage Wheels 17" Pin Drive

  12. #12
    Out Drivin' Gumball's Avatar
    Join Date
    Feb 2011
    Location
    Blackberry Township, IL
    Posts
    2,653
    Post Thanks / Like
    I agree with the advice to use the vise method and get them tightened all the way down. Then, either give them a tack weld or a bit of JB Weld (on the shoulder) to hold them - in addition to LockTite.
    Later,
    Chris

    "There are no more monsters to fear, and so, we have to build our own."
    Mk3.1 #7074

  13. #13

    Join Date
    Feb 2011
    Location
    Colorado Springs
    Posts
    1,383
    Post Thanks / Like
    That portion of the arm is available in a couple of thread pitches. Make sure yours match the threads on the ball joints.

    Tack welding is a good idea. I found this after only a few hundred miles. And, yes, there was lock-tite red on the threads.

    .boB "Iron Man"
    NASA Rocky Mountain, TTU #42, HPDE Instructor
    BDR 1642: Coyote, 6 Speed Auto, Edelbrock Supercharger
    Member: www.MileHiCobraClub.com
    www.RacingTheExocet.com

  14. #14
    Senior Member Norm B's Avatar
    Join Date
    Mar 2012
    Location
    Head of St Margarets Bay, Nova Scotia
    Posts
    970
    Post Thanks / Like
    I forgot I had purchased a set of Moog ball joints with a bunch of other parts from Summit Racing. The supplied ball joints from FFR installed without issue in my control arms, but I was helping someone else with his build and we couldn't get the supplied ones to work. He used my left over Moog ones and they went in without a problem. Seems to be hit and miss.

    Good Luck
    Norm

  15. #15
    Senior Member BEAR-AvHistory's Avatar
    Join Date
    May 2015
    Location
    Raleigh NC, OIB NC
    Posts
    1,600
    Post Thanks / Like
    Quote Originally Posted by Bob Cowan View Post
    That portion of the arm is available in a couple of thread pitches. Make sure yours match the threads on the ball joints.

    Tack welding is a good idea. I found this after only a few hundred miles. And, yes, there was lock-tite red on the threads.

    Great example of why you need to get the car up off the ground on a regular basis so you can check all the bolts & fittings. Have yellow paint stick markings on all of them for a quick visual check.
    Kevin
    MKIV #8234
    Coyote '14/TKO-600/3-Link 3:55 Rear
    I love the smell of 100 octane in the morning.
    NITTO NT01 275X40X17ZR - 315X35ZRX17
    Delivered 2/7/14 - Plate "COYOTE NC1965" 3/25/15

  16. #16
    Senior Member AC Bill's Avatar
    Join Date
    Feb 2011
    Location
    Vancouver Island BC Canada
    Posts
    1,878
    Post Thanks / Like
    Al, can't help but notice your ball joint boots are blue, vs the usual black rubber ones they usually come with. Are they replacements, and do they actually stay on?
    The black boots were terrible to fit on the ball joints. Once they popped off, bloody impossible to get back on, least when the car is finished. Some builders have switched to aftermarket silicone boots.
    FFR6803RD, MK 3.1, 302 EFI, fr/rr disc brakes, WC-T5, c/w Hurst Competition Plus shifter, 3 link rear, Koni adjustable coil over shocks, dual roll bars, BBK 4-4 headers, 3.55 rear gears, BBK rear lower control arms c/w poly bushings. Ivy Green Metallic Arrived-02/08, On road 09/2010

  17. #17
    Senior Member BEAR-AvHistory's Avatar
    Join Date
    May 2015
    Location
    Raleigh NC, OIB NC
    Posts
    1,600
    Post Thanks / Like
    Have blue ones. Think they came with the MOOG parts. They are still in place @ 1056 miles.
    Kevin
    MKIV #8234
    Coyote '14/TKO-600/3-Link 3:55 Rear
    I love the smell of 100 octane in the morning.
    NITTO NT01 275X40X17ZR - 315X35ZRX17
    Delivered 2/7/14 - Plate "COYOTE NC1965" 3/25/15

  18. #18
    Senior Member Jdav's Avatar
    Join Date
    Sep 2016
    Location
    ATL GA
    Posts
    443
    Post Thanks / Like
    Quote Originally Posted by Bob Cowan View Post
    That portion of the arm is available in a couple of thread pitches. Make sure yours match the threads on the ball joints.

    Tack welding is a good idea. I found this after only a few hundred miles. And, yes, there was lock-tite red on the threads.

    So one of my ball joints looks like this.

    #1: How does this happen?
    #2: how do I fix it?
    #3: how do i prevent it from happening again?
    MK4 #9028 - Coyote - TKO600
    Delivery: 1/30/17 First Start: 7/23/17 Legal: 10/5/17 Graduated: 10/15/18
    Build thread: http://thefactoryfiveforum.com/showt...8-Build-Thread

  19. #19
    Junior Member
    Join Date
    Nov 2013
    Posts
    21
    Post Thanks / Like
    I had the same problem. When you get them removed, try putting them in the freezer for a few hours and then try to reinstall. The small amount of contraction in the ball joint threads allowed them to screw in all the way.

  20. #20
    Senior Member Jdav's Avatar
    Join Date
    Sep 2016
    Location
    ATL GA
    Posts
    443
    Post Thanks / Like
    Quote Originally Posted by KauaiMK4 View Post
    I had the same problem. When you get them removed, try putting them in the freezer for a few hours and then try to reinstall. The small amount of contraction in the ball joint threads allowed them to screw in all the way.
    When I initially installed them, they were seated all the way. After a few hundred miles, it looks like this
    MK4 #9028 - Coyote - TKO600
    Delivery: 1/30/17 First Start: 7/23/17 Legal: 10/5/17 Graduated: 10/15/18
    Build thread: http://thefactoryfiveforum.com/showt...8-Build-Thread

  21. #21
    Junior Member
    Join Date
    Nov 2013
    Posts
    21
    Post Thanks / Like
    Apologies Jdav…………….I was responding to the initial problem Al was having with getting them initially threaded on.

  22. #22

    Join Date
    Feb 2011
    Location
    Colorado Springs
    Posts
    1,383
    Post Thanks / Like
    Quote Originally Posted by Jdav View Post
    So one of my ball joints looks like this.

    #1: How does this happen?
    #2: how do I fix it?
    #3: how do i prevent it from happening again?
    Tack weld it in place. Just a small one. If can easily be cut through if needed.

    Some people have drilled a hole and placed drift pin. But I'm not sure how you would get that out if needed.
    .boB "Iron Man"
    NASA Rocky Mountain, TTU #42, HPDE Instructor
    BDR 1642: Coyote, 6 Speed Auto, Edelbrock Supercharger
    Member: www.MileHiCobraClub.com
    www.RacingTheExocet.com

  23. #23
    Senior Member broku518's Avatar
    Join Date
    Sep 2017
    Location
    Jupiter, FL
    Posts
    472
    Post Thanks / Like
    Hi AL,
    Yes, all the way. I used wise to do that, couldn't get a big enough wrench. Hope you are good now.
    Life is short, so start living it.
    Build thread: http://thefactoryfiveforum.com/showt...-in-the-garage!
    delivery date: 10/31/2017, first start 2/24/2018, title and registration passed 6/22/2018

  24. #24
    Senior Member Jdav's Avatar
    Join Date
    Sep 2016
    Location
    ATL GA
    Posts
    443
    Post Thanks / Like
    Quote Originally Posted by Jdav View Post
    So one of my ball joints looks like this.

    #1: How does this happen?
    #2: how do I fix it?
    #3: how do i prevent it from happening again?
    I got a loaner ball joint socket from my local auto parts store and it screwed back in pretty easily. I added some Lockridge, so hopefully it won’t happen again, but something I’ll check regularly
    MK4 #9028 - Coyote - TKO600
    Delivery: 1/30/17 First Start: 7/23/17 Legal: 10/5/17 Graduated: 10/15/18
    Build thread: http://thefactoryfiveforum.com/showt...8-Build-Thread

  25. #25
    Boydster's Avatar
    Join Date
    Aug 2014
    Location
    Maryville, TN
    Posts
    1,104
    Post Thanks / Like
    Quote Originally Posted by Bob Cowan View Post
    [snip] Some people have drilled a hole and placed drift pin. But I'm not sure how you would get that out if needed.
    Example: drill the hole 1/4" deep, install a pin thats 3/8" or 1/2" long. Easy to pry out with a pair of side cutters... used gently.
    ---Boyd---
    MkIV #9042 build thread
    www.boss427.us
    427W, TKO600, Moser 3.55 rear.
    Delivered Feb 2017, Graduated Nov 4, 2019

  26. #26
    On a roll Al_C's Avatar
    Join Date
    Aug 2014
    Location
    Wheaton, IL
    Posts
    1,415
    Post Thanks / Like
    Wow - a three year-old thread got revived! I looked at this and said "I started this???" I'm glad others are benefiting from the collective wisdom on ball joints. Mine are tightened down with thread locker - we'll see how they do in the coming months.
    Mk IV Roadster - #8650 - delivered 7-17-2015 - first start 7-28-2018 - first go-kart 10-13-2018 - licensed and on the road 9-9-19: body/paint completed 3-17-2020.
    Complete kit / 2015 Coyote / TKO600 / IRS / Wilwood brakes / Mid-Shift mod / Power Steering / Heater and Seat Heaters / RT turn signal / Breeze radiator shroud and mount

Posting Permissions

  • You may not post new threads
  • You may not post replies
  • You may not post attachments
  • You may not edit your posts
  •  

Breeze

Visit our community sponsor