-
Senior Member

Initial body fitment advice
I need some advice with body fitment.
Past threads have been helpful, but I still have some specific questions.
My plan is to get the car plated and drive it in Gel Coat before final bodywork and paint done by someone else.
Currently, the body is on the frame, bulb weather stripping in place. I did not trim the cockpit opening before hand. Also the body seems to need to shift to the rear and passenger side. But the Race Jacks line up pretty well. The driver side rear wheel well seems to be too low. The passenger side seems good.
Questions:
1) How much trimming of the dash lip and rear cockpit wall is needed? What is the normal clearance needed for each in inches? I realize it will need to be customized some.
2) I think I may need to raise the body up at the driver rear wheel. I remember someone mentioning using a "1/4 inch thick runner" to raise the body up for proper hood fitment.
What specifically is this and what material?
Thanks
-
1) my front body to dash clearance was good but check it and have about 3/16-1/4” clearance and 1/4-3/8” on the rear and you’ll be good.
2) don’t raise the body. The issue is the hood curve at the rear of the hood. Use a ratchet strap and curve the hood a bit more with it, then use a mild heat source like a painters light to evenly warm the hood to to a temp similar to where it would be setting in the sun on a 90 degree day. Then let it cool and after it’s cool remove the strap it and check figment. If you need more curve do it again. Also use the bumpers and latches as they a big part to get the hood to curve correctly. Once set the hood keeps the bend so don’t over do it.
Mk4, Moser M88 rear end, Eaton truetrak, Craft Racing 461 Windsor, MMR pro trans, Glenns 1,000 hp cobra fuel system and lots of other parts.
-
Senior Member
Thanks for the clearance measurements.
I do not have a hood fitment issue, although others have.
What I have is a rear wheel well and tire clearance issue on the driver side. The driver side sits significantly lower than the passenger side. Trimming to lower the passenger side will just make tire fitment worse.
So, I was thinking I may need to somehow raise the driver side rear up some by putting something between the trunk frame/aluminum. Bulb weather stripping is in place.
But first, I am going to trim back the cockpit fiberglass which will give me some wiggle room to move the body around some, which may solve the issue. Right now the cockpit is wedged up against the dash on the passenger side and behind the driver seat.
After doing a further search it was Jeff Kleiner that suggested to someone having hood fitment issues to raise the driver side up by adding a 1/4 inch thick runner.
Scott
Last edited by Scott Zackowski; 10-23-2018 at 01:20 PM.
-
Senior Member

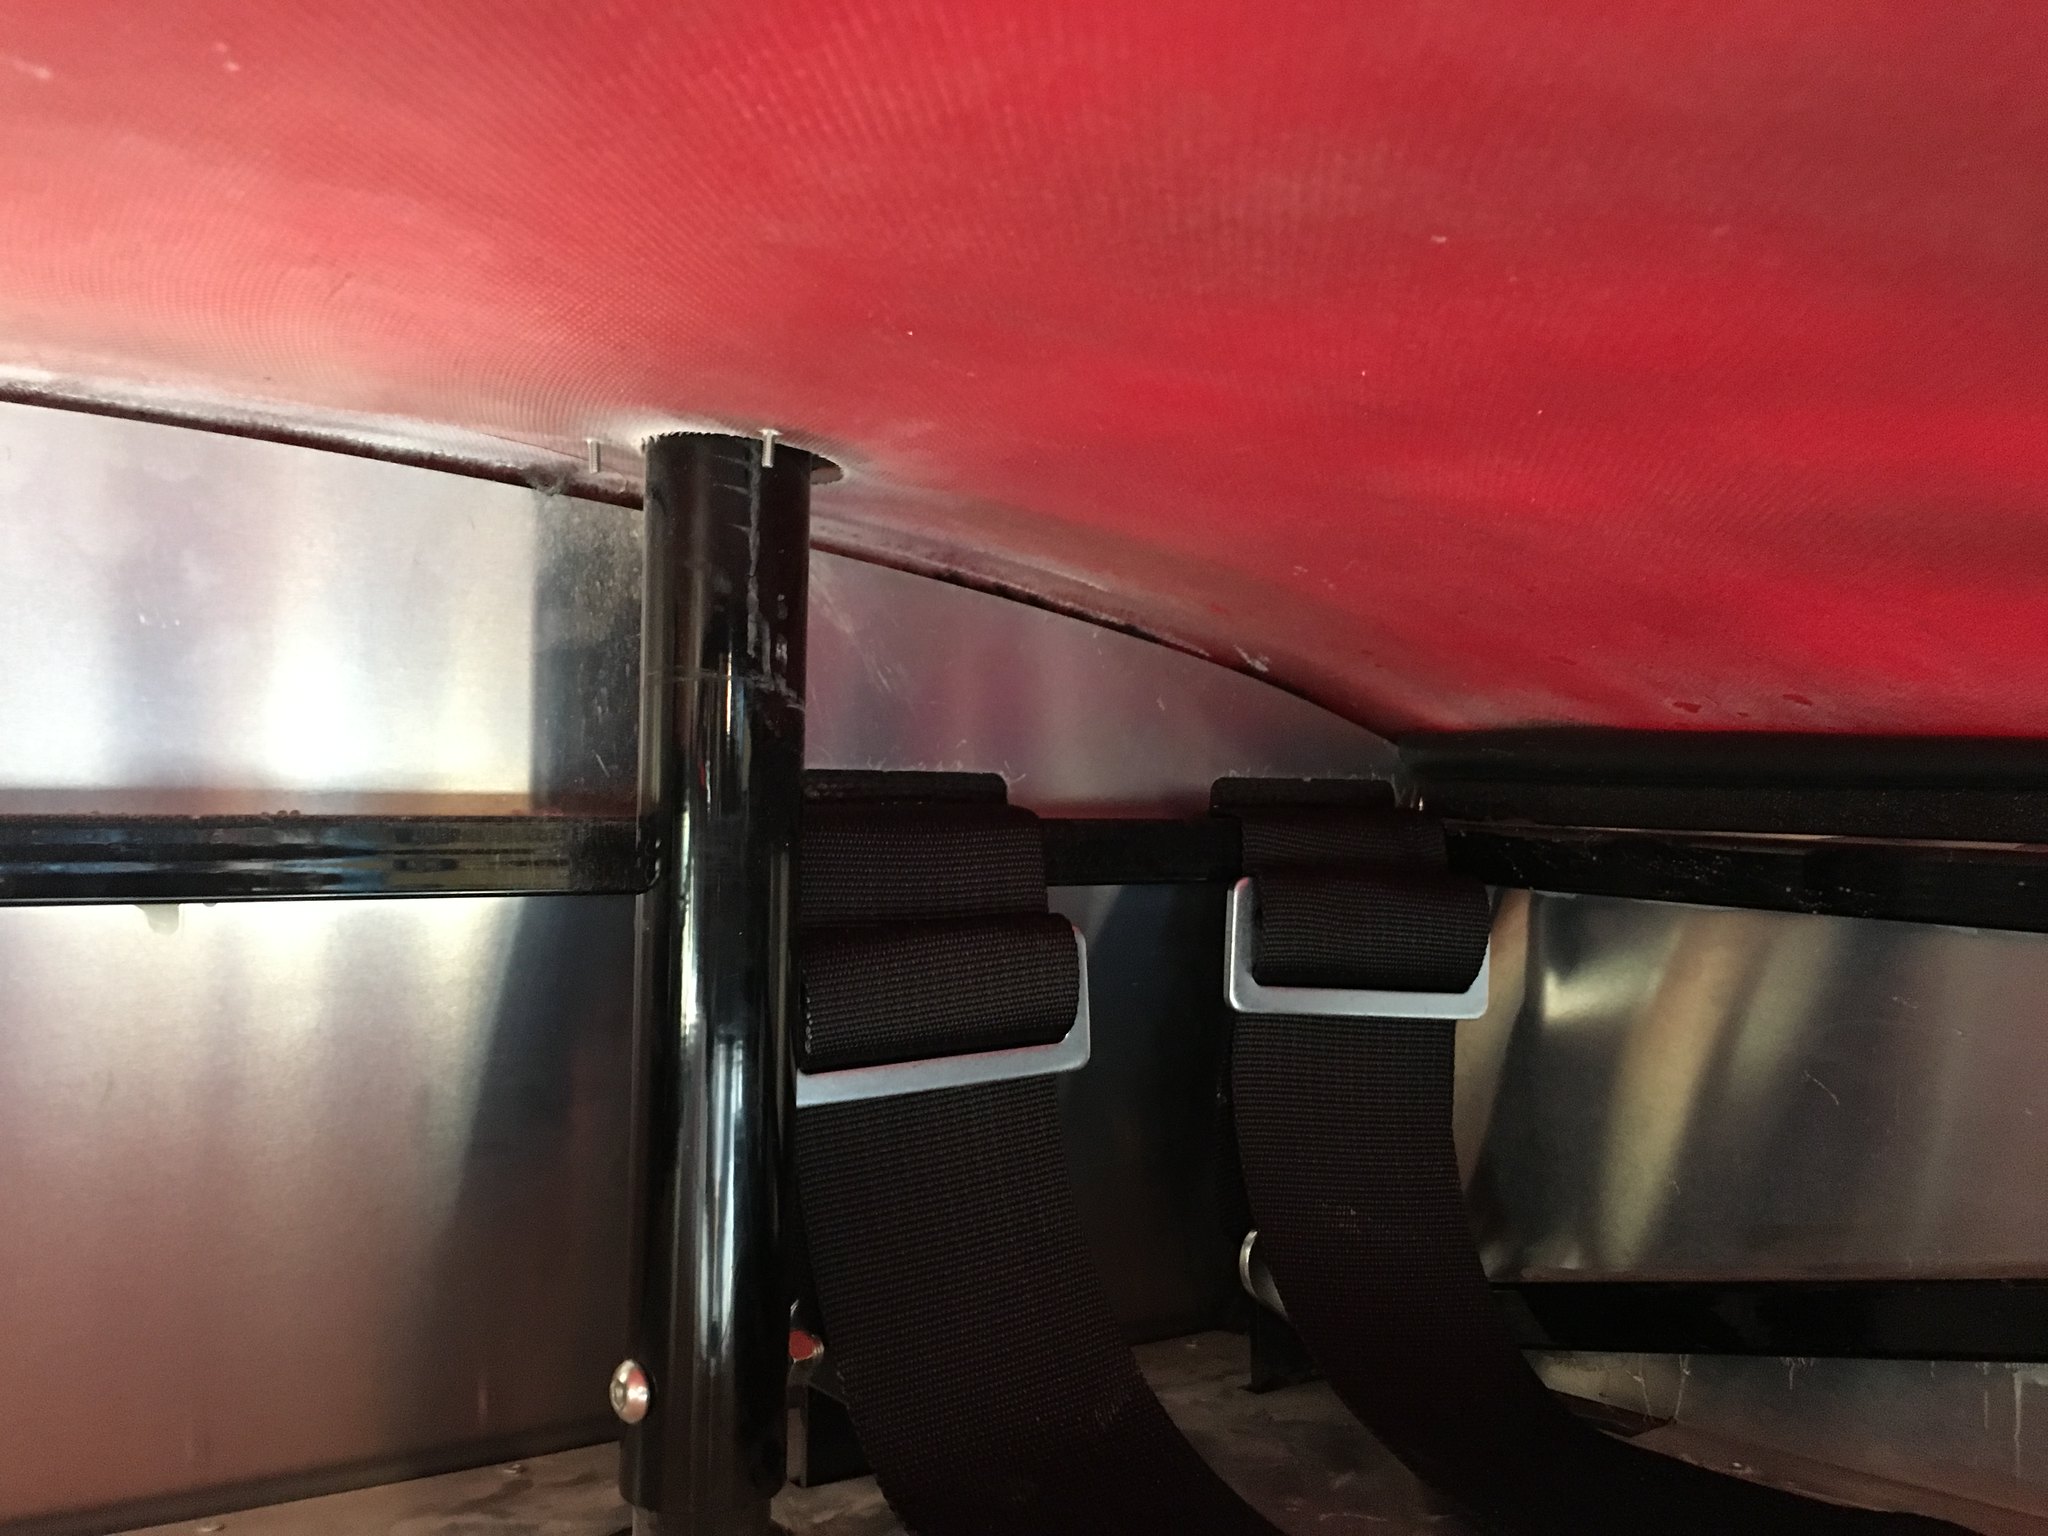
Check that the rear cockpit corner aluminum isn't so wide that it's preventing the body from seating fully (mine was). Another indicator is up under the trunk; the body should be sitting within 1/8"-1/4" of the rear cockpit aluminum, like in the picture below. On my car, the body was nearly 3/4" higher than the rear cockpit aluminum. A little judicious trimming in the corners, some gentle smooshing between the roll bars, and some time in the sun got the body to sit much better.
John
 IMG_4380 by jhsitton, on Flickr
MK IV Roadster #8631
Ford 302, Holley Terminator EFI, T5z, 3.55 Rear End, IRS, 17 Halibrand Replicas (9 front, 10.5 rear), Nitto 555 G2s (275/40ZR17 front, 315/35ZR17 rear), Fast Freddies Power Steering, F5 Wilwood Brakes, FFMetals Firewall Forward, Fortes Hydraulic Clutch & Throttle Linkage
https://www.ffcars.com/threads/phile.../#post-4776313
-
Post Thanks / Like - 0 Thanks, 1 Likes
-
Senior Member

You need to do the initial fitting WITHOUT the bulb seal on. That goes on after everything else is fitted and it's the last time the body goes on.
-
Senior Member

Originally Posted by
phileas_fogg

Check that the rear cockpit corner aluminum isn't so wide that it's preventing the body from seating fully (mine was). Another indicator is up under the trunk; the body should be sitting within 1/8"-1/4" of the rear cockpit aluminum, like in the picture below. On my car, the body was nearly 3/4" higher than the rear cockpit aluminum. A little judicious trimming in the corners, some gentle smooshing between the roll bars, and some time in the sun got the body to sit much better.
John
IMG_4380 by
jhsitton, on Flickr
I think smooshing is the operative word with this whole body fitment.
I will take a closer look inside the trunk.
Scott
-
Senior Member
Originally Posted by
rich grsc
You need to do the initial fitting WITHOUT the bulb seal on. That goes on after everything else is fitted and it's the last time the body goes on.
Unfortunately, the bulb seal is on, although I suspect it is going to get all tore up when I pull the body, resulting in the purchase of new bulb seal.
I am not sure if I understand why that would make a difference.
Eventually the body will go on over the bulb seal and have to fit properly.
Obviously if the Al panels need timing the bulb seal will need to be removed.
-
Senior Member

Is your body bolted/screwed to the underside of the 2x2 frame in the rocker panel area? Are the rear quick jack mounts installed? What wheels/tires are you using? The MkIV body has fairly generous room for rear tires so I wonder that you have a clearance problem.
FFR MkII, 408W, Tremec TKO 500, 2015 IRS, DA QA1s, Forte front bar, APE hardtop.
-
Senior Member
Originally Posted by
Scott Zackowski
Unfortunately, the bulb seal is on, although I suspect it is going to get all tore up when I pull the body, resulting in the purchase of new bulb seal.
I am not sure if I understand why that would make a difference.
Eventually the body will go on over the bulb seal and have to fit properly.
Obviously if the Al panels need timing the bulb seal will need to be removed.
So you can see where the aluminum needs to be trimmed and how much.
-
Senior Member
Originally Posted by
rich grsc
So you can see where the aluminum needs to be trimmed and how much.
I like it!
Simple answer that makes sense.
Thanks
-
Senior Member
Originally Posted by
CraigS
Is your body bolted/screwed to the underside of the 2x2 frame in the rocker panel area? Are the rear quick jack mounts installed? What wheels/tires are you using? The MkIV body has fairly generous room for rear tires so I wonder that you have a clearance problem.
1) Front and Rear Quick Jacks installed.
2) Rocker panel underside screws not in. The body fits nicely over the 2x2 frame on both sides. I did play with adjusting this in and out. Does not seem to make any significant difference but does help with door fitment.
3) FFR Wheels. Rear tires are AVON 295/50/15, pretty standard.
The weird thing is that the passenger side has good clearance. It is almost like the body needs to twist or shift to the passenger side. More than enough clearance on the passenger side (some to spare) and too tight on the driver side.
That is why I want to first trim the cockpit fiberglass some (not too much) and see if that gives some wiggle room for adjustment.
I don't recall trimming the Al trunk elephant ears along the top but did along rear edge.
Also, I did re-confirm the the ride height is equal on both sides.
Scott
Last edited by Scott Zackowski; 10-24-2018 at 01:42 PM.
-
Senior Member

Originally Posted by
Scott Zackowski
Unfortunately, the bulb seal is on, although I suspect it is going to get all tore up when I pull the body, resulting in the purchase of new bulb seal.
You should always tape some plastic sheeting over the bulb seal, for test fitting the body. This prevents the seal from getting messed up from the body's rough underside.
I left the plastic on, even after the last time the body went on. Before fastening the body, I pulled the plastic out. Works great, seal was still like new.
FFR6803RD, MK 3.1, 302 EFI, fr/rr disc brakes, WC-T5, c/w Hurst Competition Plus shifter, 3 link rear, Koni adjustable coil over shocks, dual roll bars, BBK 4-4 headers, 3.55 rear gears, BBK rear lower control arms c/w poly bushings. Ivy Green Metallic Arrived-02/08, On road 09/2010
-
Originally Posted by
AC Bill
You should always tape some plastic sheeting over the bulb seal, for test fitting the body. This prevents the seal from getting messed up from the body's rough underside.
I left the plastic on, even after the last time the body went on. Before fastening the body, I pulled the plastic out. Works great, seal was still like new.
What gauge plastic sheeting do you use to protect the Bulb seal please? I'm about to fit my body and was told to do so with all the bulb seal etc. in place...
.now I'm confused. I understand that the aluminum panels might need to be trimmed but also figured that the bulb seal might make up the difference in the high/low spots. Obviously if there is too much aluminum it will never sit down enough. I guess that still happens with these builds. Figured at this point the panels would be pretty consistent as long as the build is true.
Build#1: MKIV Roadster #9320
-
Senior Member

Originally Posted by
stevant
What gauge plastic sheeting do you use to protect the Bulb seal please? I'm about to fit my body and was told to do so with all the bulb seal etc. in place...…….now I'm confused. I understand that the aluminum panels might need to be trimmed but also figured that the bulb seal might make up the difference in the high/low spots. Obviously if there is too much aluminum it will never sit down enough. I guess that still happens with these builds. Figured at this point the panels would be pretty consistent as long as the build is true.
Several comments about this: While it's not a bad idea to check fit the body without the bulb seal to see if there are any high points in the aluminum, I also wouldn't panic if you haven't. I've completed two Mk4's and neither needed any of the aluminum trimmed. I think the newer Mk's are better than previous and IMO some of the advice is based on experience from older versions. It wouldn't be that hard to go back and trim if necessary. But I'm betting you won't need to. One of the main candidates is probably the rear trunk sill. There it might be necessary to trim some aluminum to get the best fit for the trunk lid, e.g. using the rear quick jack mounts to draw in the bottom edge of the trunk opening. But you won't find out if that's necessary until the body fitting is further along including with the bulb seal and then fitting the trunk lid. The more important concern regarding the body fitting IMO is the front and back of the cockpit opening on the body itself. The front will need to be trimmed/straightened to get the best fit for the dash. The rear will need to also be trimmed/straightened, and probably a little more aggressively, to allow the rear cockpit wall with insulation and carpet to fit.
As far as damaging the bulb seal, several things. Take a couple minutes to clean up and sand the rear body edge. The edge scrapes across the bulb seal on the trunk sides as you stretch the body around it while installing. A smooth rounded edge helps a lot to reduce damage. Plus it's easier on your hands. Then cover the bulb seal with something as you slide the body into place. Left exposed, there's a very good chance you'll damage it. The plastic sheeting is a good idea. I actually have used plain old towels and made sure they stayed in place while installing. Whether plastic or anything else, pretty easy to left the body slightly and get the material out once the body is in place and before attaching the rear quick jack bolts.
Last edited by edwardb; 10-25-2018 at 09:44 AM.
Build 1: Mk3 Roadster #5125. Sold 11/08/2014.
Build 2: Mk4 Roadster #7750. Sold 04/10/2017.
Build Thread
Build 3: Mk4 Roadster 20th Anniversary #8674. Sold 09/07/2020.
Build Thread and
Video.
Build 4: Gen 3 Type 65 Coupe #59. Gen 3 Coyote. Legal 03/04/2020.
Build Thread and
Video
Build 5: 35 Hot Rod Truck #138. LS3 and 4L65E auto. Rcvd 01/05/2021. Legal 04/20/2023.
Build Thread. Sold 11/9/2023.
-
Senior Member

Students at the build school are instructed, one of the first steps in the build process, prior to removing the body and aluminum from your freshly shipped project, is to take a Sharpie and scribe the aluminum panels that will be fitted with bulb seal. The body of the Sharpie rests on the underside of the roadster body. Scribe a line on the aluminum. Trim where necessary. Don't worry that the panel may not go exactly in the same position on final assembly. The bulb seal will make up for any slight differences. It worked for me.
Good point made about the sharp lower edges on the body. They can make short order of bulb seal. BTW...I put the bulb seal on prior to any fitting, and I too had to trim significant material from the front and back of the cockpit opening to get the proper fit and clearance. Some material around the wheel wells also. Mostly aesthetic.
MkIV #7854, Kit picked up September 2012, Coyote/BOSS 302 intake tuned at 488HP, TKO600, Center Force, Moser 8.8, driveshaft safety hoop, Stainless Header 4x1x4 headers, Gas-N-sidepipes, rad shroud, Wilwoods, NO PS/PB, heater/defroster, heated seats, wipers, Herb door panels, Dynamat Extreme sound/heat dampening, premium Rodtop top, Fast Freddie lexan wind screen, Nitto 555R, drop trunk battery, drop trunk storage,
-
Thank you for your responses...….looks like I will do some sanding to the front and rear of the cockpit opening even prior to fitting. Both of those areas are rough to say the least and visually inconsistent as you follow them side to side.
Thanks again!!!
Build#1: MKIV Roadster #9320
-
Senior Member
All good suggestions
Thanks
-
Senior Member

I would like to add a couple of things to check to your list. You did not mention the type of rear suspension you are using. Is the ride height equal and are the wheels centred on the frame? Make sure the body is centred side to side. At the front measure from the top of the wheel opening to the frame on both sides. Do not rely on the hood opening frames to judge centre. I had to move my forward quick jack mounts 3/4 of inch to the right. Do the same at the rear. Check nothing is between the rocker panel curl under and the frame. The plastic end cap came off the end of a vertical frame and stuck in between the body and frame during my initial body fitment. This messed with things until I found it. I would put the doors in place. The front of the drivers side rear wheel opening normally needs to be pulled/pried out from the frame at the bottom to match the door.
I used Jeff Kleiners' Mk4 Body Work thread as guide during my build and found it extremely valuable. It is on the other forum and here's a link https://www.ffcars.com/forums/17-fac...rk-thread.html.
HTH
Norm
-
Senior Member
Originally Posted by
Norm B
I would like to add a couple of things to check to your list. You did not mention the type of rear suspension you are using. Is the ride height equal and are the wheels centred on the frame? Make sure the body is centred side to side. At the front measure from the top of the wheel opening to the frame on both sides. Do not rely on the hood opening frames to judge centre. I had to move my forward quick jack mounts 3/4 of inch to the right. Do the same at the rear. Check nothing is between the rocker panel curl under and the frame. The plastic end cap came off the end of a vertical frame and stuck in between the body and frame during my initial body fitment. This messed with things until I found it. I would put the doors in place. The front of the drivers side rear wheel opening normally needs to be pulled/pried out from the frame at the bottom to match the door.
I used Jeff Kleiners' Mk4 Body Work thread as guide during my build and found it extremely valuable. It is on the other forum and here's a link
https://www.ffcars.com/forums/17-fac...rk-thread.html.
HTH
Norm
Excellent suggestions
1) Ride height is equal. It is one of the first things I verified.
2) 3-Link Rear
3) Wheels centered on frame. I will recheck though.
4) Yes, I have read Jeff's Body Work thread. It is excellent and very informative.
On first fitment my Quick Jacks lined up well but it seemed the body needed to rotate clockwise, front towards the passenger side and rear towards driver side.
I am finishing the cockpit fiberglass trimming that should give me some wiggle room to shift the body around some, and we will see how that helps.
It's an adventure - got to love it!
Scott
-
Senior Member
Originally Posted by
stevant
What gauge plastic sheeting do you use to protect the Bulb seal please?
Sorry for the delay in answering..I actually used some plastic that came on a new mattress, so I'm not sure. I'm thinking it had to be at least 6 mil., possibly thicker. The stuff used for greenhouses should work well. Very strong, and not easily torn.


 Thanks:
  Likes:


 Reply With Quote
