-
06-23-2019, 10:43 AM
#121
Senior Member


Originally Posted by
VAHokie

Replacement coil sleeve was also damaged and wouldn't accept the shock seat. Email to FFR and hope to have another one this upcoming week. A little frustrating, but I recognize it's not their fault and they were great in getting a new one out to me this past week without delay. I trust it'll be the same this week. Without the shock sleeve, I couldn't wrap up the IFS, but I did proceed with building one of the shocks.
Tony, is it that the seats won’t thread on to the shock sleeves? I had a real time with that. What I did was smooth the threads down with scotch brite. I didn’t use any tools on the the ring as I knew it would mar the surface, but continually working the ring on and off with my hands and some DW40 finally freed them up. The only thing I can figure is there are unseen burs on the the threads.
Bradley
Build thread - Mk4, Coyote, IRS, Wilwood brakes, old-style soft top and accessories.
The distance between "finished" and finished is literally infinite.
-
06-23-2019, 07:54 PM
#122
Senior Member

Originally Posted by
VAHokie
Thanks, Cruzzz. I have the alignment thread bookmarked and will be taking care of that. On that note, my one bushing I had to coerce in has no side to side movement given how tight the fit is. I'll have to take a look at that to ensure I have the needed adjustability.
I used the breeze bushings as well and found the mounts to be VERY tight. I didnt technically have to Dremel out the mount hole at all, but using the spacer as directed I had zero adjustability in the system. Before taking anything out I tested the rack multiple times and just got lucky that it was centered so I just torqued it in.
-
06-24-2019, 07:09 PM
#123
Senior Member

Originally Posted by
GTBradley
Tony, is it that the seats won’t thread on to the shock sleeves? I had a real time with that. What I did was smooth the threads down with scotch brite. I didn’t use any tools on the the ring as I knew it would mar the surface, but continually working the ring on and off with my hands and some DW40 finally freed them up. The only thing I can figure is there are unseen burs on the the threads.
Yep, that's exactly it. Used scotch brite and a couple of other things with no luck. No problem though, new parts are on their way and we'll be back in business in no time.
MKIV Complete Kit #9494 l Delivered 1/5/19 l First Start
11/28/20 l First Go-kart
4/11/21 l Carb'd 347 l Mid-shift TKO600 l 3.55 IRS l P/S l Forte Mechanical Throttle Linkage l RT Turn Signal, Drop Trunk l Breeze Upper/Lower Radiator Support, Fan Shroud l Boig Upper/Lower Cool Tubes & Quiet Pipes l 18" FFR Gasser Wheels l
Build Thread
-
06-27-2019, 04:18 PM
#124
Senior Member
That must be a really common problem now. I hope the new ones work better. Oddly enough, I have a bunch of those seats sitting around too, but only because they sent too many with the kit. They all had the same sticking issue.
Bradley
Build thread - Mk4, Coyote, IRS, Wilwood brakes, old-style soft top and accessories.
The distance between "finished" and finished is literally infinite.
-
07-15-2019, 07:52 PM
#125
Senior Member
After a little time off for vacation, waiting for the new shock sleeve and seat from FFR, and getting a couple of panels sample PC'd by a local shop, I was able to get back into the garage. First up was installing rivnuts in the back edge of each F panel to use for attaching the splash guards, which helps with accessibility of the area down the road. I ended up using a wrench-drive rivet nut installation tool from McMaster with their low-profile steel rivet nut in size 10-32. After opening the holes in the F panel back up to the appropriate size, it was a pretty straight forward process once I got the hang of the tool (tested on scrap pieces first). In total, ended up with 8 rivnuts on each F panel.
Here's a pic of the tools used:

Here's a pic of the installation tool in-progress:


MKIV Complete Kit #9494 l Delivered 1/5/19 l First Start
11/28/20 l First Go-kart
4/11/21 l Carb'd 347 l Mid-shift TKO600 l 3.55 IRS l P/S l Forte Mechanical Throttle Linkage l RT Turn Signal, Drop Trunk l Breeze Upper/Lower Radiator Support, Fan Shroud l Boig Upper/Lower Cool Tubes & Quiet Pipes l 18" FFR Gasser Wheels l
Build Thread
-
07-15-2019, 08:02 PM
#126
Senior Member
With the F panels PC'd and the rivnuts installed, it was time to install them on the frame. I took the route of applying the Clear GE Silicone II directly to the frame, followed by clecoing the panels in place, and finally riveting them in permanently. I used a hand rivet gun and it wasn't bad at all - ask me again after another 1,000+ pulls though. To ensure I didn't apply the silicone passed the F panel contact points on the frame, I test fitted them and marked the outer edges with painters as a guide.

Here's the silicone going on - I was a little too liberal on this side (DS) which led to a little clean-up after install. I think I found the right balance on the PS.

Here's the finished DS F panel in place - 13 rivets in total. Same on the PS.

Nothing earth shattering here, but hopefully the extra info and pics will help a future newbie like myself.
MKIV Complete Kit #9494 l Delivered 1/5/19 l First Start
11/28/20 l First Go-kart
4/11/21 l Carb'd 347 l Mid-shift TKO600 l 3.55 IRS l P/S l Forte Mechanical Throttle Linkage l RT Turn Signal, Drop Trunk l Breeze Upper/Lower Radiator Support, Fan Shroud l Boig Upper/Lower Cool Tubes & Quiet Pipes l 18" FFR Gasser Wheels l
Build Thread
-
07-15-2019, 08:24 PM
#127
Senior Member
With the F panels in place, I could now proceed with installing the IFS. Two key things to callout, both of which others have cited in their builds as well: 1) The locknuts on the ends of the pivot shaft interfere with the F panel to the point if you don't screw them on slightly prior to install you'll find it hard to tighten them down without marking up your F panels; 2) The lock nut for the aft bolt that affixes the UCA to the frame is impossible to get a socket or wrench around it given the limited clearance. I ended up having to bring the wrench in perpendicular to the locknut from the rear to hold it while I torqued it to 110 ft-lbs.
Here's a pic of the DS.

I still need to make adjustments to the UCAs, torque them down, and grease the fittings, as well as torque down the shock bolts, and install the rest of the IFS (spindles, hub, etc.), but hoping folks can take a look and let me know if they see anything out of place. The ball joint mount and shocks should be oriented in the right direction.
Quick question: For the shock spacers, is it recommended to put some protectant on them, e.g. clear engine enamel, to protect against rust?
MKIV Complete Kit #9494 l Delivered 1/5/19 l First Start
11/28/20 l First Go-kart
4/11/21 l Carb'd 347 l Mid-shift TKO600 l 3.55 IRS l P/S l Forte Mechanical Throttle Linkage l RT Turn Signal, Drop Trunk l Breeze Upper/Lower Radiator Support, Fan Shroud l Boig Upper/Lower Cool Tubes & Quiet Pipes l 18" FFR Gasser Wheels l
Build Thread
-
07-15-2019, 10:53 PM
#128
Senior Member
Originally Posted by
VAHokie
With the F panels in place, I could now proceed with installing the IFS. Two key things to callout, both of which others have cited in their builds as well: 1) The locknuts on the ends of the pivot shaft interfere with the F panel to the point if you don't screw them on slightly prior to install you'll find it hard to tighten them down without marking up your F panels; 2) The lock nut for the aft bolt that affixes the UCA to the frame is impossible to get a socket or wrench around it given the limited clearance. I ended up having to bring the wrench in perpendicular to the locknut from the rear to hold it while I torqued it to 110 ft-lbs.
Here's a pic of the DS.
I still need to make adjustments to the UCAs, torque them down, and grease the fittings, as well as torque down the shock bolts, and install the rest of the IFS (spindles, hub, etc.), but hoping folks can take a look and let me know if they see anything out of place. The ball joint mount and shocks should be oriented in the right direction.
Quick question: For the shock spacers, is it recommended to put some protectant on them, e.g. clear engine enamel, to protect against rust?
Personally I didn’t but wouldn’t be too difficult during the build. The only one that really sticks out now as it has a noticeable layer on it is the longer spacer for the front sway bar. Even assembled I plan to take that one off and probably just send it through the next round of powder coat. Curious to hear what others have done.
Can’t tell from the picture, but this is a good time to trim the rear UCA adjuster sleeve if you haven’t yet and plan to. At others recommendations as well anti-seize it good on re-assembly.
-
07-16-2019, 06:29 AM
#129
Senior Member

Looking good Tony. I'll be doing the same with the F panels and splash guards.
JR
Mk4 complete kit #9059 ordered 1/19/17 delivered 3/23/17, 2015 IRS, Fortes/DART347,TKO 600, hyd clutch, P/S, 12.88 wilwood brakes front and rear, heater/defrost and vintage gauges
First start and go-cart 4/11/18. Taken To Whitby Motorcars Greensboro, N.C. 2/5/21 for body/paint
-
07-16-2019, 06:51 PM
#130
Senior Member
Originally Posted by
MSumners
Personally I didn’t but wouldn’t be too difficult during the build. The only one that really sticks out now as it has a noticeable layer on it is the longer spacer for the front sway bar. Even assembled I plan to take that one off and probably just send it through the next round of powder coat. Curious to hear what others have done.
Can’t tell from the picture, but this is a good time to trim the rear UCA adjuster sleeve if you haven’t yet and plan to. At others recommendations as well anti-seize it good on re-assembly.
Thanks for the input. If no one else weighs in, I'll probably hit them with the clear enamel. Tough to see in the pic as you noted, but I trimmed the adjustment sleeves, bolts, and applied some anti-seize (see post #73).
Originally Posted by
jrcuz
Looking good Tony. I'll be doing the same with the F panels and splash guards.
JR
While I have yet to reap the benefits from this mod, others speak highly of it so glad to hear you're planning to do it.
MKIV Complete Kit #9494 l Delivered 1/5/19 l First Start
11/28/20 l First Go-kart
4/11/21 l Carb'd 347 l Mid-shift TKO600 l 3.55 IRS l P/S l Forte Mechanical Throttle Linkage l RT Turn Signal, Drop Trunk l Breeze Upper/Lower Radiator Support, Fan Shroud l Boig Upper/Lower Cool Tubes & Quiet Pipes l 18" FFR Gasser Wheels l
Build Thread
-
07-20-2019, 02:04 PM
#131
Senior Member

Looking good Tony.
For your rivnuts (& for JR too), I'll gladly loan you my Astro 1442 Setter...and if the weather cools off I'll run it up to you in my Roadster to boot. It won't get your money back, but after setting 50+ of those little buggers, you'll likely prefer the Astro to the McMaster.
John
MK IV Roadster #8631
Ford 302, Holley Terminator EFI, T5z, 3.55 Rear End, IRS, 17 Halibrand Replicas (9 front, 10.5 rear), Nitto 555 G2s (275/40ZR17 front, 315/35ZR17 rear), Fast Freddies Power Steering, F5 Wilwood Brakes, FFMetals Firewall Forward, Fortes Hydraulic Clutch & Throttle Linkage
https://www.ffcars.com/threads/phile.../#post-4776313
-
07-20-2019, 02:53 PM
#132
Senior Member
Originally Posted by
phileas_fogg
Looking good Tony.
For your rivnuts (& for JR too), I'll gladly loan you my Astro 1442 Setter...and if the weather cools off I'll run it up to you in my Roadster to boot. It won't get your money back, but after setting 50+ of those little buggers, you'll likely prefer the Astro to the McMaster.
John
Thanks for the offer, John! The wrench-drive McMaster tool is surprisingly easy to use and requires little effort. You're always welcome to take a ride out this way, tool in-hand or not.
MKIV Complete Kit #9494 l Delivered 1/5/19 l First Start
11/28/20 l First Go-kart
4/11/21 l Carb'd 347 l Mid-shift TKO600 l 3.55 IRS l P/S l Forte Mechanical Throttle Linkage l RT Turn Signal, Drop Trunk l Breeze Upper/Lower Radiator Support, Fan Shroud l Boig Upper/Lower Cool Tubes & Quiet Pipes l 18" FFR Gasser Wheels l
Build Thread
-
07-23-2019, 11:16 AM
#133
Originally Posted by
VAHokie
While I'm waiting on my replacement coil sleeve to show up, decided to start tackling components of the IRS. First up was replacing the wheel studs that come installed on the hubs. My neighbor, who is an ex-Ford mechanic, has an air hammer and it made quick work of the studs that came installed in the hubs.

The hubs suffered a few dings from the air hammer but nothing I'm too concerned about.

As I was pulling in my second stud, I recalled a few others had notched the heads to avoid clearance issues with the bearing seal. Took a look at the first one I installed and sure enough, it was touching.

I stewed on this all day, reached out to a few guys on the forum to see what they encountered/did and recommended (thanks for your input, everyone!). Ultimately decided to back out the two that were in and notch the heads with an angle grinder. Plenty of clearance now and I have peace of mind.

To pull the studs through, I used the same technique that most everyone else does: hub in a vise, two hardened washer, a hardened bolt, 3/4 inch socket and good ol fashioned brute force. Actually, it wasn't terribly hard.

Here's a shot of a complete hub, the studs that were removed, and all the tools used for the job.

I have reading build threads and I keep missing the info as to why everyone switches out the wheel studs. Changing to stainless steel and longer?
-
07-23-2019, 03:19 PM
#134
It is so that all of your lugs are the same thread... I guess the mustang ones that you remove are a different thread... and this way all 16 lugs are the same..
-
07-23-2019, 04:56 PM
#135
Senior Member

Originally Posted by
BadAsp427
It is so that all of your lugs are the same thread... I guess the mustang ones that you remove are a different thread... and this way all 16 lugs are the same..
Correct. The front hubs are SAE 1/2-20, and so are the all lug nuts with Factory Five wheels if you buy from them. The 2015+ Mustang IRS setup is metric. So the studs are switched out so that the whole car is 1/2-20.
Build 1: Mk3 Roadster #5125. Sold 11/08/2014.
Build 2: Mk4 Roadster #7750. Sold 04/10/2017.
Build Thread
Build 3: Mk4 Roadster 20th Anniversary #8674. Sold 09/07/2020.
Build Thread and
Video.
Build 4: Gen 3 Type 65 Coupe #59. Gen 3 Coyote. Legal 03/04/2020.
Build Thread and
Video
Build 5: 35 Hot Rod Truck #138. LS3 and 4L65E auto. Rcvd 01/05/2021. Legal 04/20/2023.
Build Thread. Sold 11/9/2023.
-
08-04-2019, 06:56 PM
#136
Senior Member
Over the past couple of weeks I buttoned up more of the IFS, just need to install the hubs, rotors and brakes. They're all getting some paint: POR15 for the back of the hubs and rotor centers, and caliper paint for the calipers. Temps and humidity this time of year aren't ideal for application, so holding on those until September/October for some cooler temps. Same is true for the IRS differential and IRS hubs and rotors.
Here's the DS IFS all torqued and lubricated.

Same for the PS.

I had one thing left for the IRS wheel hubs before setting them aside, which was torqueing them down to the 100 ft-lbs. The first hub went smoothly, but a couple of turns on the first stud on the second hub and I had a free spinning nut. Backed it off ever so carefully but the damage was done. The nut and stud threads were shredded. Quick call to FFR and got another two sent out in the mail - one for the replacement and the other to have on hand if ever I need it, and picked up a new nut (well, actually 10 of them) from my local Fastenal. Items received, new stud installed, all five torqued down, and back on the shelf for cooler temps.
Here's the damaged stud.

And here's the damaged nut.

MKIV Complete Kit #9494 l Delivered 1/5/19 l First Start
11/28/20 l First Go-kart
4/11/21 l Carb'd 347 l Mid-shift TKO600 l 3.55 IRS l P/S l Forte Mechanical Throttle Linkage l RT Turn Signal, Drop Trunk l Breeze Upper/Lower Radiator Support, Fan Shroud l Boig Upper/Lower Cool Tubes & Quiet Pipes l 18" FFR Gasser Wheels l
Build Thread
-
08-04-2019, 07:04 PM
#137
Senior Member
As you saw in in previous posts, I started installing the steering rack and encountered a couple of issues:
1) The PS mounting tab attached to the X member didn't align with the front mount and steering rack. I'll need to open that up a bit, but opted to hold on doing that until I can resolve #2 as getting some movement in the bushing might address this.
2) The PS Breeze offset bushing in the steering rack required some persuasion to go in and not surprisingly it's a snug fit with now movement side-to-side. I suspect this should have side-to-side movement as the DS spins freely and will even slide out of the rack if you let it. Thoughts on how to address the PS? I was thinking taking an emery cloth to the bushing and/or inside of the steering rack mount hole - thoughts?
3) I noticed in the instructions from Breeze that it mentions possible getting the rack extenders from FFR and also needing to ground the tabs. Looking at a bunch of threads and it didn't appear that others needed to purchase or make this adjustment to the tabs - anyone running power steering with the Breeze offsets that can share what they did?
MKIV Complete Kit #9494 l Delivered 1/5/19 l First Start
11/28/20 l First Go-kart
4/11/21 l Carb'd 347 l Mid-shift TKO600 l 3.55 IRS l P/S l Forte Mechanical Throttle Linkage l RT Turn Signal, Drop Trunk l Breeze Upper/Lower Radiator Support, Fan Shroud l Boig Upper/Lower Cool Tubes & Quiet Pipes l 18" FFR Gasser Wheels l
Build Thread
-
08-04-2019, 07:15 PM
#138
Senior Member
Despite the pauses in the build, there's always something else you can work on, so I moved on to the pedal box and have brought my started but unfinished phases in the build to 4 (IFS, IRS, Steering Rack, Pedal Box). To be honest, I hate moving on to something else without first fully completing what I had started, but I want to keep wrenching! Couple of quick pedal box questions for the group:
1) In the online build video it shows mounting the rear clutch side mounting bolt upside down, I suspect because doing it the other way will interfere with the clutch system. I'm planning on a hydraulic clutch so I suspect that this doesn't apply to me and I can mount the same as the other three mounting bolts - sound right?
2) In the instructions for mounting the pedal box to the firewall, it states to use the three 3/8" x 1" socket head screws from the pedal box hardware kit (#11029) and the one included in "this" pedal assembly. I looked all over for another 3/8" x 1" socket head screw that matched the three black ones included, but could only find two stainless steel ones from #16292 - can someone confirm i'm supposed to use one of these as the fourth mounting position? The pics in the manual show four of the black socket head screws but my inventory only shows I should receive three of them.
Here are the bolts in question:

MKIV Complete Kit #9494 l Delivered 1/5/19 l First Start
11/28/20 l First Go-kart
4/11/21 l Carb'd 347 l Mid-shift TKO600 l 3.55 IRS l P/S l Forte Mechanical Throttle Linkage l RT Turn Signal, Drop Trunk l Breeze Upper/Lower Radiator Support, Fan Shroud l Boig Upper/Lower Cool Tubes & Quiet Pipes l 18" FFR Gasser Wheels l
Build Thread
-
08-05-2019, 08:09 AM
#139
Senior Member
Originally Posted by
VAHokie
As you saw in in previous posts, I started installing the steering rack and encountered a couple of issues:
1) The PS mounting tab attached to the X member didn't align with the front mount and steering rack. I'll need to open that up a bit, but opted to hold on doing that until I can resolve #2 as getting some movement in the bushing might address this.
I've got nothing helpful here; sorry.
Originally Posted by
VAHokie
2) The PS Breeze offset bushing in the steering rack required some persuasion to go in and not surprisingly it's a snug fit with now movement side-to-side. I suspect this should have side-to-side movement as the DS spins freely and will even slide out of the rack if you let it. Thoughts on how to address the PS? I was thinking taking an emery cloth to the bushing and/or inside of the steering rack mount hole - thoughts?
You can clean up the inside of the steering rack with one of these: https://smile.amazon.com/gp/product/...?ie=UTF8&psc=1. This brush is also useful for cleaning out the insides of your roll bar down tubes so that they slip easily over the mounts. I've got one you can borrow if you like.
Originally Posted by
VAHokie
3) I noticed in the instructions from Breeze that it mentions possible getting the rack extenders from FFR and also needing to ground the tabs. Looking at a bunch of threads and it didn't appear that others needed to purchase or make this adjustment to the tabs - anyone running power steering with the Breeze offsets that can share what they did?
Breeze sent me the Unisteer rack; I did not need rack extenders. I suspect that whatever rack you get from Breeze Mark has already made any adjustments you need; give him a call to confirm or refute.
I did have to grind the frame tabs as indicated below.
 IMG_1690 by jhsitton, on Flickr
 IMG_1693 by jhsitton, on Flickr
A test fit midway through. I did clean the edges up after this!
 IMG_1694 by jhsitton, on Flickr
 IMG_1697 by jhsitton, on Flickr
MK IV Roadster #8631
Ford 302, Holley Terminator EFI, T5z, 3.55 Rear End, IRS, 17 Halibrand Replicas (9 front, 10.5 rear), Nitto 555 G2s (275/40ZR17 front, 315/35ZR17 rear), Fast Freddies Power Steering, F5 Wilwood Brakes, FFMetals Firewall Forward, Fortes Hydraulic Clutch & Throttle Linkage
https://www.ffcars.com/threads/phile.../#post-4776313
-
08-05-2019, 08:16 AM
#140
Senior Member
Also, the black oxide bolts will rust if you don't treat them. Many folks just swap them out for stainless. Also, I think those bolts receive conventional (not Nylock) nuts; use blue Loc-Tite to secure them. I don't recall how many bolts I received; if I was short I bought a replacement from Fastenal.
John
MK IV Roadster #8631
Ford 302, Holley Terminator EFI, T5z, 3.55 Rear End, IRS, 17 Halibrand Replicas (9 front, 10.5 rear), Nitto 555 G2s (275/40ZR17 front, 315/35ZR17 rear), Fast Freddies Power Steering, F5 Wilwood Brakes, FFMetals Firewall Forward, Fortes Hydraulic Clutch & Throttle Linkage
https://www.ffcars.com/threads/phile.../#post-4776313
-
08-05-2019, 10:28 PM
#141
Senior Member
Originally Posted by
phileas_fogg
You can clean up the inside of the steering rack with one of these:
https://smile.amazon.com/gp/product/...?ie=UTF8&psc=1. This brush is also useful for cleaning out the insides of your roll bar down tubes so that they slip easily over the mounts. I've got one you can borrow if you like.
Thanks, John. I'll connect with you offline about borrowing the tool.
Originally Posted by
phileas_fogg
Also, the black oxide bolts will rust if you don't treat them. Many folks just swap them out for stainless. Also, I think those bolts receive conventional (not Nylock) nuts; use blue Loc-Tite to secure them. I don't recall how many bolts I received; if I was short I bought a replacement from Fastenal.
I recall reading this with respect to the fuel tank mounting strap bolts, so makes sense that the same would apply here.
MKIV Complete Kit #9494 l Delivered 1/5/19 l First Start
11/28/20 l First Go-kart
4/11/21 l Carb'd 347 l Mid-shift TKO600 l 3.55 IRS l P/S l Forte Mechanical Throttle Linkage l RT Turn Signal, Drop Trunk l Breeze Upper/Lower Radiator Support, Fan Shroud l Boig Upper/Lower Cool Tubes & Quiet Pipes l 18" FFR Gasser Wheels l
Build Thread
-
08-11-2019, 08:53 PM
#142
Senior Member
Continued work on the pedal box and made some good progress. I opted to swap out the black oxide bolts for the reasons everyone has mentioned here and in their threads with some stainless steel versions from Home Depot. I ran into the same issue that others have with the clutch pedal hitting the 3/4" tube. I made a steel bracket that I'll mount underneath the tube after cleaning it up and spraying it with some black paint. Thanks to Fixit for the idea for this one. Couple of pics below in the hope that some folks can check my work, as well as a few questions.
Here's the clutch pedal stop template and bracket. I drilled some 1/4" holes that i'll use to anchor it to the 3/4" tube with some stainless steel bolts.

Nothing crazy here but the backside of the front plate with the four (4) 3/8"-16x1 bolts and the 3/4" tube that the clutch pedal stop will mount too. Quick note for builders approaching this step. Your kit, if it's like mine, will provide three 3/8"-16x1 in the pedal box hardware kit in box 2a, but the instructions direct you to install four. Apparently, after speaking to FFR, Wilwood changed something around and the kit components haven't been adjusted yet. Not an issue as I ended up getting the stainless steel versions anyways, but it was a bit of a head scratcher at fi

Rear pedal box mounting arms. Even though this isn't tightened down yet, it's clear the fender washer under the bolt head isn't going to sit flush, but this is no different than what the manual shows. Does this look/sound right?

In order for the rear pedal box mounting holes to sit flush to the pedal box, I had to adjust the hex nuts on the switches all the way down - is this what everyone else has done?

Here's the pedal box as it sits right now, with both the front (top) and rear (bottom) cylinders in place. I cut the instructed 5/8" off the threaded shaft with my Dremel, which left 1 1/8" of the shaft remaining. I'm going with a hydraulic clutch, so there will be a third down at the bottom once that gets here.

MKIV Complete Kit #9494 l Delivered 1/5/19 l First Start
11/28/20 l First Go-kart
4/11/21 l Carb'd 347 l Mid-shift TKO600 l 3.55 IRS l P/S l Forte Mechanical Throttle Linkage l RT Turn Signal, Drop Trunk l Breeze Upper/Lower Radiator Support, Fan Shroud l Boig Upper/Lower Cool Tubes & Quiet Pipes l 18" FFR Gasser Wheels l
Build Thread
-
08-12-2019, 06:38 AM
#143
Senior Member
Looking good Tony. I guess I'm 1 of the lucky ones who didn't have to modify the 3/4" tubes for the clutch pedal. I did change out the black bolts for stainless.
JR
Mk4 complete kit #9059 ordered 1/19/17 delivered 3/23/17, 2015 IRS, Fortes/DART347,TKO 600, hyd clutch, P/S, 12.88 wilwood brakes front and rear, heater/defrost and vintage gauges
First start and go-cart 4/11/18. Taken To Whitby Motorcars Greensboro, N.C. 2/5/21 for body/paint
-
08-12-2019, 08:36 AM
#144
Senior Member
I like it.
In the second picture, I'd like to see at least 1 1/2 to 2 threads sticking out past the end of the nylok nut. Otherwise, the bolt may come loose. If the bolt is too short to get that protrusion, you need a longer bolt.
For the washer under the bolt head in the third picture, grind a flat on the washer so that it will sit flush. Also, grind the powder coating under the nut-side washer off the 3/4" tube; you'll be using that as a ground for your fuse box. If you've got a non-GPS speedometer, you may want to grind the powder coating under the nut-side washer off on the other side as well (I found that the pulses from the speedometer sensor were back feeding into my ECU and push button start).
Your brake switch looks remarkably like mine.  Will you be installing a clutch safety switch? All you need is a second mounting tab which you can get from F5 for a nominal charge. When you call to place the order ask them to just mail it in a business envelope; that'll save you ~$10 in shipping.
Regarding which brake cylinder goes where, think about how you're going to run your brake lines. The cylinder doesn't care if it's the inboard or outboard one, but swapping them side to side may make your brake lines easier (or harder) to run.
John
 IMG_1642 by jhsitton, on Flickr
MK IV Roadster #8631
Ford 302, Holley Terminator EFI, T5z, 3.55 Rear End, IRS, 17 Halibrand Replicas (9 front, 10.5 rear), Nitto 555 G2s (275/40ZR17 front, 315/35ZR17 rear), Fast Freddies Power Steering, F5 Wilwood Brakes, FFMetals Firewall Forward, Fortes Hydraulic Clutch & Throttle Linkage
https://www.ffcars.com/threads/phile.../#post-4776313
-
08-12-2019, 07:57 PM
#145
Senior Member
Originally Posted by
phileas_fogg
I like it.
In the second picture, I'd like to see at least 1 1/2 to 2 threads sticking out past the end of the nylok nut. Otherwise, the bolt may come loose. If the bolt is too short to get that protrusion, you need a longer bolt.
For the washer under the bolt head in the third picture, grind a flat on the washer so that it will sit flush. Also, grind the powder coating under the nut-side washer off the 3/4" tube; you'll be using that as a ground for your fuse box. If you've got a non-GPS speedometer, you may want to grind the powder coating under the nut-side washer off on the other side as well (I found that the pulses from the speedometer sensor were back feeding into my ECU and push button start).
Your brake switch looks remarkably like mine.
Will you be installing a clutch safety switch? All you need is a second mounting tab which you can get from F5 for a nominal charge. When you call to place the order ask them to just mail it in a business envelope; that'll save you ~$10 in shipping.
Regarding which brake cylinder goes where, think about how you're going to run your brake lines. The cylinder doesn't care if it's the inboard or outboard one, but swapping them side to side may make your brake lines easier (or harder) to run.
Thanks, John.
For the second picture, everything is just hand tight right now, so there won't be any issues getting the appropriate number of threads through the nut - good looking out, though! The kit actually comes with two switches and mounting tabs, one for the brakes and an optional clutch safety switch, which I elected to install. Good call on the placement of the master cylinders. I'll need to take another look at that and possibly swap positions so that the rear cylinder (currently inboard) is outboard as my brake line path will likely be through the front right of the DS footbox floor and back down the 4" frame tubes.
MKIV Complete Kit #9494 l Delivered 1/5/19 l First Start
11/28/20 l First Go-kart
4/11/21 l Carb'd 347 l Mid-shift TKO600 l 3.55 IRS l P/S l Forte Mechanical Throttle Linkage l RT Turn Signal, Drop Trunk l Breeze Upper/Lower Radiator Support, Fan Shroud l Boig Upper/Lower Cool Tubes & Quiet Pipes l 18" FFR Gasser Wheels l
Build Thread
-
08-26-2019, 07:34 PM
#146
Senior Member
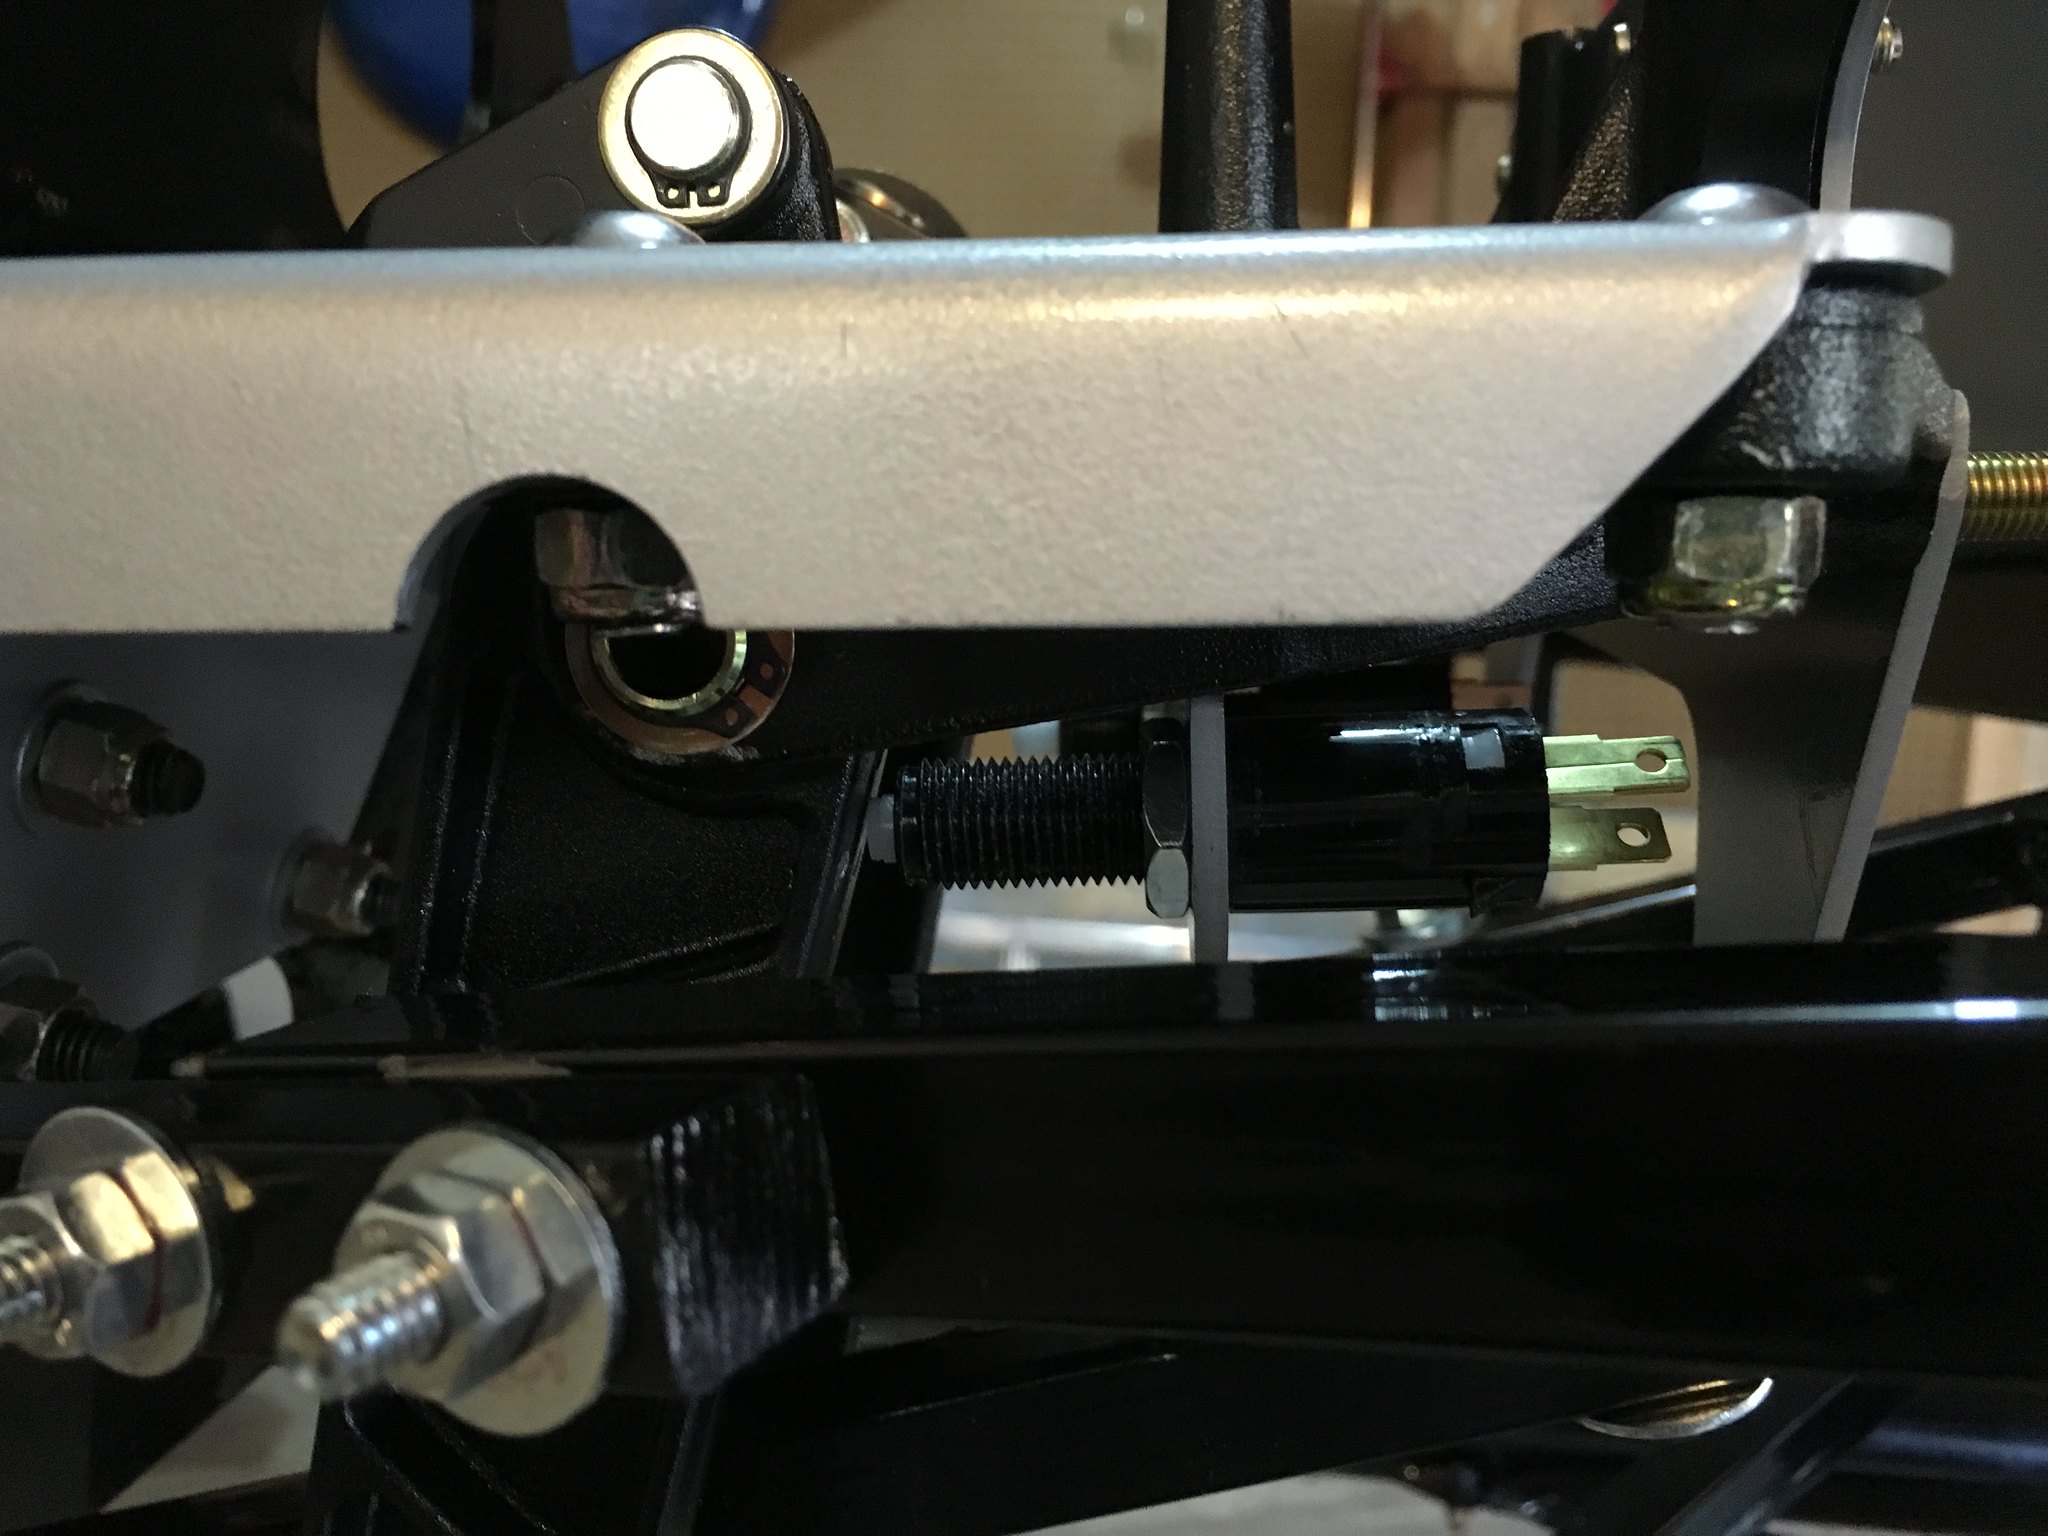
Work and a quick family trip slowed progress the past couple of weeks, but managed to get a couple of hours in this past weekend. Continued work on the pedal box which is ~90% complete. I ran into a slight delay in that I didn't have any 5/16-24 lock nuts included in the kit or supplied Wilwood components. There weren't any listed in my inventory list, so not surprised they weren't included, but that's what is needed for the master cylinder mount studs. Quick trip to Fastenal and back in business. I still need to tackle the balance bar adjustment having just threaded the master cylinder shafts in until they were flush on the other side of the mount. I've read a lot of folks recommend not spending too much time on the adjustment at this stage as it's best to do it once there's fluid in the system. So question for the group, do I work through some minor adjustments now or just wait until later.
Also interested to get thoughts on how much of the 90 degree brake line adapter thread is still showing once installed in the master cylinder. As you can see in the pic, there are 3-4 threads engaged with 3 still remaining. Turning it anymore felt as though it would strip the threads and I left as-is. It appears to match the pics in the manual.

MKIV Complete Kit #9494 l Delivered 1/5/19 l First Start
11/28/20 l First Go-kart
4/11/21 l Carb'd 347 l Mid-shift TKO600 l 3.55 IRS l P/S l Forte Mechanical Throttle Linkage l RT Turn Signal, Drop Trunk l Breeze Upper/Lower Radiator Support, Fan Shroud l Boig Upper/Lower Cool Tubes & Quiet Pipes l 18" FFR Gasser Wheels l
Build Thread
-
08-26-2019, 07:42 PM
#147
Senior Member
Also resolved the clearance issue in the one steering rack sleeve to allow the Breeze bushing to move freely and do what it's intended. Believing a drum sander or some other mechanically enabled sanding machine might be a bit overkill and/or take too much off, I opted for a medium grit emery cloth wrapped around a 7/8 socket.

Couple of turns, test fit, couple of more turns, test fit... you get the idea. After a few minutes and we have success.

I also taped off the steering rack as I plan to spray it with a couple coats of clear to help with rust prevention. The pic below doesn't have the steering shaft or either of the two ends masked off, but they will be before getting started.

MKIV Complete Kit #9494 l Delivered 1/5/19 l First Start
11/28/20 l First Go-kart
4/11/21 l Carb'd 347 l Mid-shift TKO600 l 3.55 IRS l P/S l Forte Mechanical Throttle Linkage l RT Turn Signal, Drop Trunk l Breeze Upper/Lower Radiator Support, Fan Shroud l Boig Upper/Lower Cool Tubes & Quiet Pipes l 18" FFR Gasser Wheels l
Build Thread
-
08-27-2019, 06:48 AM
#148
Senior Member
HI Tony, I just went out and checked the 90 deg. adapters on my m/c's and there are about 3 threads showing. I like the clear idea on the steering rack.
JR
Mk4 complete kit #9059 ordered 1/19/17 delivered 3/23/17, 2015 IRS, Fortes/DART347,TKO 600, hyd clutch, P/S, 12.88 wilwood brakes front and rear, heater/defrost and vintage gauges
First start and go-cart 4/11/18. Taken To Whitby Motorcars Greensboro, N.C. 2/5/21 for body/paint
-
08-27-2019, 07:58 PM
#149
Senior Member
Originally Posted by
jrcuz
HI Tony, I just went out and checked the 90 deg. adapters on my m/c's and there are about 3 threads showing. I like the clear idea on the steering rack.
JR
Thanks for taking a look and confirming, Jerry. I can't take credit for the idea to apply clear to the steering rack, that was a suggestion by BadAsp427. I plan to do the same for the rear CV axles as others have done.
MKIV Complete Kit #9494 l Delivered 1/5/19 l First Start
11/28/20 l First Go-kart
4/11/21 l Carb'd 347 l Mid-shift TKO600 l 3.55 IRS l P/S l Forte Mechanical Throttle Linkage l RT Turn Signal, Drop Trunk l Breeze Upper/Lower Radiator Support, Fan Shroud l Boig Upper/Lower Cool Tubes & Quiet Pipes l 18" FFR Gasser Wheels l
Build Thread
-
Post Thanks / Like - 0 Thanks, 1 Likes
-
08-27-2019, 09:50 PM
#150
Things are starting to look really nice! Keep up the great work. It won’t be long and you’ll be wondering what else is there to do?
-
Post Thanks / Like - 0 Thanks, 1 Likes
-
09-15-2019, 08:18 PM
#151
Senior Member
This post serves as my work on the build for this weekend as there wasn't much time for anything else. But I did spend the last couple of weekends wrapping up the steering rack and RT turn signal install. For the steering rack, I started another thread here to get a few questions answered based on Karlos' great steering rack install/set-up post. After a bit of work, I think I have everything in the right place.
Here's the DS all torqued down.

Here's the PS.

I also took this time to get the steering wheel centered before I bolted everything down. I suspect there will be future adjustments needed, but this gets me in the ballpark.
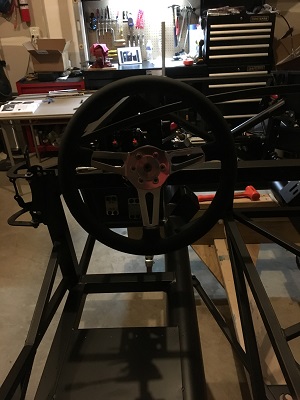
Question for the group: Safe to assume that as I tighten down the socket head screw that holds the steering wheel to the upper steering shaft that it will pull it through so its closer to being flush? The upper steering shaft has a taper and any gentle persuading I do isn't getting it to seat further into the hub.

MKIV Complete Kit #9494 l Delivered 1/5/19 l First Start
11/28/20 l First Go-kart
4/11/21 l Carb'd 347 l Mid-shift TKO600 l 3.55 IRS l P/S l Forte Mechanical Throttle Linkage l RT Turn Signal, Drop Trunk l Breeze Upper/Lower Radiator Support, Fan Shroud l Boig Upper/Lower Cool Tubes & Quiet Pipes l 18" FFR Gasser Wheels l
Build Thread
-
09-15-2019, 08:39 PM
#152
Senior Member
As noted above, I also installed the RT Turn Signal assembly. Russ sends a lot of great detailed instructions which are easy to follow, which I supplemented with Fixit's post #159 and #160 from his build thread. John does a great play-by-play in his thread so I won't parrot it back here, but there are a couple of things I will call out.
To get the approximate upper steering shaft angle across the front 2x2 cross tube, I first installed the pillow block provided by the kit, mocked everything up, and placed some painters tape on either side where it crossed to serve as a guide. As I positioned the RT Turn Signal mounting plate for final fitment, I used these as a rough initial guide. I will echo John's cautionary note about needing to pay careful attention to the placement of the mounting plate and the slip fit on the steering shaft. I had to make adjustments a couple of times before getting everything right with no binding. It seemed every time I went to tighten down the pillow block and mounting plate, the steering shaft would bind. You can also see where I eventually drilled the holes for the adapter plate.

Here it is installed.

MKIV Complete Kit #9494 l Delivered 1/5/19 l First Start
11/28/20 l First Go-kart
4/11/21 l Carb'd 347 l Mid-shift TKO600 l 3.55 IRS l P/S l Forte Mechanical Throttle Linkage l RT Turn Signal, Drop Trunk l Breeze Upper/Lower Radiator Support, Fan Shroud l Boig Upper/Lower Cool Tubes & Quiet Pipes l 18" FFR Gasser Wheels l
Build Thread
-
Post Thanks / Like - 1 Thanks, 0 Likes
-
09-22-2019, 08:09 AM
#153
Senior Member
IRS Install
Finally got around to installing the IRS differential this weekend. First order of business was chasing the front ears with a 5/8 bit. As others have reported, you have to go slow as it will grab and do a number on your wrist/arm. I started with my handheld 20V cordless drill and wasn't getting very far. Borrowed by neighbors drill and with a slow and steady approach, we achieved the needed 5/8 opening.
Next up was getting it off the ground and in a position where I could mask it off with blue painters tape, clean it up, clear it and drain/refill the fluids. Used two saw horses and a couple of 2x4s running perpendicular at ~15" apart to get it situated. It's a little nerve wracking having the diff a couple feet off the ground, but it worked just fine. I then used acetone and a clean rag to clean the markings off the casing. As others have reported, my diff came with a coating on the steel portion of the casing. Original plan was to POR15 this, but after reading what others have done, probably fine with what it came with so I just masked it off and hit it with a couple coats of duplicolor clear.

I then drained the diff and replaced the fluids. It probably would have been alright to leave as-is but decided to change it out for two reasons: 1) There's not external marking indicating the diff is filled with the appropriate fluids, at least that I could tell, and 2) There's no guarantee it's filled properly, although I'm sure it is. My OCD kicks in and $66 later, 1.5L of the gear oil and 4 oz. of the friction modifier are in. I posed a question to the forum on the correct amount of friction modifier to put in as the manual states 3-3.5 and the Ford workshop manual has 4. Thanks to Gordon, Paul and Carl for the quick reply and in went 4 oz. A little blue Loctite on the plug threads and torqued down to 25 ft-lb per the Ford manual.

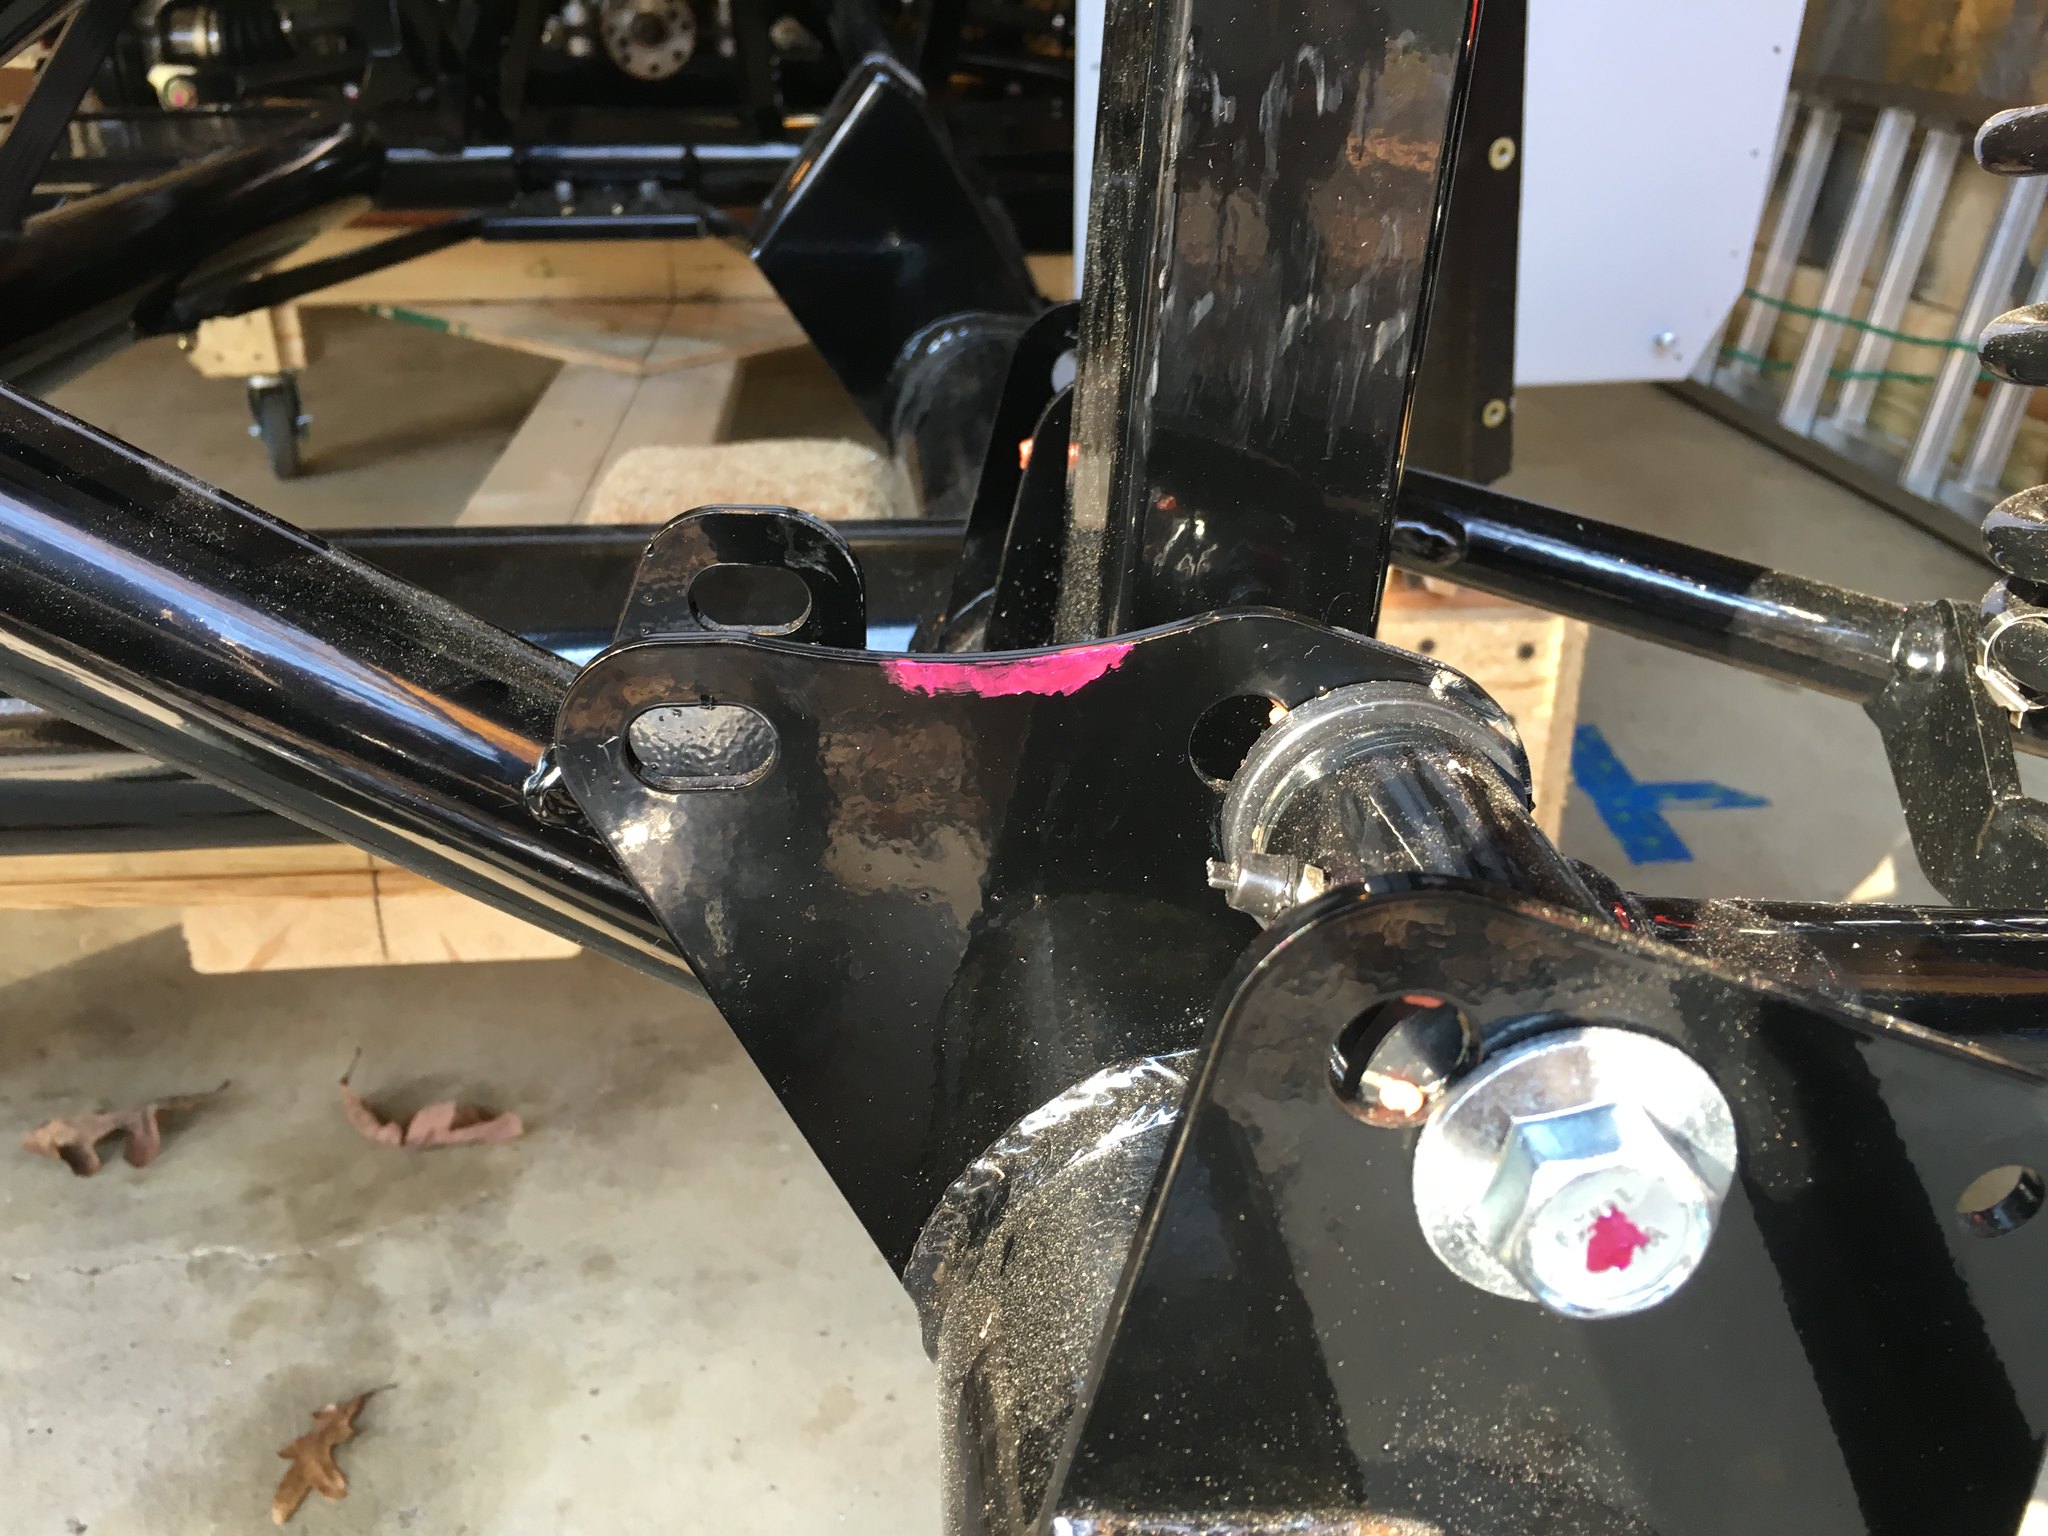
I won't detail all the steps for the IRS install as many others have done so in great detail already, but we did end up using a combination of the floor jack to get it up in position and some ratchet straps to hold and maneuver it into place. I will definitely say that the more people you can have helping the better, as I had three other guys assisting in the process: one working the floor jack from behind, two on either side from underneath and one directing the front end from within the cockpit. Here it is installed. Love the F5 logo.

I don't have the bolts torqued down just yet as I wanted to run something by the group. The front mounting bushing sleeves protrude about 1/16" on either side. Assuming that's OK? For the rear mounting bushing sleeves, I have it flush to the bushing on the rear of the mounting, but there's ~1/8" gap between the end of the sleeve and the bushing on the front, as you can see below. Should this gap be equalized on both sides of the bushing sleeve or does it even matter? Hoping it's fine as-is as I don't want to pull the diff and have to reinstall it!

MKIV Complete Kit #9494 l Delivered 1/5/19 l First Start
11/28/20 l First Go-kart
4/11/21 l Carb'd 347 l Mid-shift TKO600 l 3.55 IRS l P/S l Forte Mechanical Throttle Linkage l RT Turn Signal, Drop Trunk l Breeze Upper/Lower Radiator Support, Fan Shroud l Boig Upper/Lower Cool Tubes & Quiet Pipes l 18" FFR Gasser Wheels l
Build Thread
-
09-22-2019, 11:06 AM
#154
Senior Member
IMO go ahead and torque those IRS diff bolts and you'll be fine. The mounting is quite rigid and it's not going anywhere. Been done on a whole bunch of builds with that combination of bushings and sleeves. For an earlier question you posted, without a response, yes the steering shaft will pull flush with the hub when you use the socket bolt and washer. It's a tight fit, but will pull right in. Don't be in a hurry though, unless you like using a wheel puller. Unlikely it will come back off any other way. FWIW, I have this one and it's cheap and does the job. https://www.harborfreight.com/automo...set-62620.html.
Build 1: Mk3 Roadster #5125. Sold 11/08/2014.
Build 2: Mk4 Roadster #7750. Sold 04/10/2017.
Build Thread
Build 3: Mk4 Roadster 20th Anniversary #8674. Sold 09/07/2020.
Build Thread and
Video.
Build 4: Gen 3 Type 65 Coupe #59. Gen 3 Coyote. Legal 03/04/2020.
Build Thread and
Video
Build 5: 35 Hot Rod Truck #138. LS3 and 4L65E auto. Rcvd 01/05/2021. Legal 04/20/2023.
Build Thread. Sold 11/9/2023.
-
10-10-2019, 08:34 PM
#155
Senior Member
Continued with the IRS diff install above by torqueing everything down. One thing to call out here: there are different torque specs for these bolts listed in the supplemental instructions. In the step-by-step instructions that mirror the manual, it states 100 ft-lb, but on the last page where it lists all of the specs, it states 129 ft-lb. Quick email to F5 tech and Dan confirmed 100 ft-lb is the right spec. After getting the front bolts torqued down, I noticed that there was still some gap in the rear between the frame mount and diff, which was looking uneven on both sides due to the bushing slightly protruding. Spent some time examining, measuring, examining, and measuring again and finally convinced myself everything is equal on both sides despite visually appearing to be off because of the bushing. I also recall reading in some other threads that other builds had a slight gap here as well. If anyone has any thoughts here, please chime in.
Here's a pic of the DS forward mount and gap.

And here's a pic of the PS forward mount and gap. You can see here that the bushing is flush vs the DS above.

MKIV Complete Kit #9494 l Delivered 1/5/19 l First Start
11/28/20 l First Go-kart
4/11/21 l Carb'd 347 l Mid-shift TKO600 l 3.55 IRS l P/S l Forte Mechanical Throttle Linkage l RT Turn Signal, Drop Trunk l Breeze Upper/Lower Radiator Support, Fan Shroud l Boig Upper/Lower Cool Tubes & Quiet Pipes l 18" FFR Gasser Wheels l
Build Thread
-
10-10-2019, 08:47 PM
#156
Senior Member
Part of the reason I haven't wrapped up the IRS install is that I've taken advantage of the cooler temps to paint my brake calipers and apply POR15 to the front/rear hubs and IRS knuckles. For the brake calipers, I used Duplicolor's Red Caliper Paint Kit which worked well in my opinion. You get a lot of product and I have quite a bit left over. For the POR15, I purchased the small starter kit on Amazon that so many else have used. A few words of caution that others have shared and one unique experience of my own: 1) Be careful not to get this on anything you don't want to get ruined, because it will if you do and 2) Don't use red solo cups to hold the POR15 for painting - whatever is in POR15 ate right through the bottom of the solo cup and left a nice stain on my garage floor, as well as a nice trail from point A to B when I at first didn't realize it had seeped through. A good reminder that this stuff is potent!
Here are the front and rear brake calipers taped up and ready for paint. I found a spare 8' 2x4 across saw horses and clothes hangars made for a nice system to paint these.

Here are the finished pieces and a close-up of one of the calipers. I was careful to tape off or not paint any areas where I didn't want to create extra friction for the brake pads - I think I covered them all.


Here are the finished IRS knuckles and hubs. Although not visible in this shot, I used clear silicone to fill the ABS sensor hole. Quick and easy.

MKIV Complete Kit #9494 l Delivered 1/5/19 l First Start
11/28/20 l First Go-kart
4/11/21 l Carb'd 347 l Mid-shift TKO600 l 3.55 IRS l P/S l Forte Mechanical Throttle Linkage l RT Turn Signal, Drop Trunk l Breeze Upper/Lower Radiator Support, Fan Shroud l Boig Upper/Lower Cool Tubes & Quiet Pipes l 18" FFR Gasser Wheels l
Build Thread
-
10-10-2019, 11:30 PM
#157
Senior Member
Nice work Tony, I sure hope you work for NASA because you are amazingly detail oriented.
Bradley
Build thread - Mk4, Coyote, IRS, Wilwood brakes, old-style soft top and accessories.
The distance between "finished" and finished is literally infinite.
-
10-11-2019, 07:01 AM
#158
Senior Member
Good work Tony. I only coated the IRS diff with POR15 the knuckles turned out looking great wish I had done mine now.
JR
Mk4 complete kit #9059 ordered 1/19/17 delivered 3/23/17, 2015 IRS, Fortes/DART347,TKO 600, hyd clutch, P/S, 12.88 wilwood brakes front and rear, heater/defrost and vintage gauges
First start and go-cart 4/11/18. Taken To Whitby Motorcars Greensboro, N.C. 2/5/21 for body/paint
-
10-15-2019, 07:04 PM
#159
Senior Member
Originally Posted by
GTBradley
Nice work Tony, I sure hope you work for NASA because you are amazingly detail oriented.
Thanks, Bradley. Just the OCD/Type A in me!
Originally Posted by
jrcuz
Good work Tony. I only coated the IRS diff with POR15 the knuckles turned out looking great wish I had done mine now.
JR
Thanks, Jerry!
MKIV Complete Kit #9494 l Delivered 1/5/19 l First Start
11/28/20 l First Go-kart
4/11/21 l Carb'd 347 l Mid-shift TKO600 l 3.55 IRS l P/S l Forte Mechanical Throttle Linkage l RT Turn Signal, Drop Trunk l Breeze Upper/Lower Radiator Support, Fan Shroud l Boig Upper/Lower Cool Tubes & Quiet Pipes l 18" FFR Gasser Wheels l
Build Thread
-
10-20-2019, 10:10 AM
#160
Senior Member
Before getting back to the IRS install, I took some time to clear the CV axles and paint the front/rear brake rotors. None of this is necessary, but does add some extra protection (for the CV axles) and aesthetics (for the rotors).
Here's a pic of the CV axles taped and ready to have clear applied.

Here's a pic of the rotors all taped up in my makeshift paint booth with the VHT satin black caliper paint applied. Note, I only applied this to the center section of the rotors and taped off anything that would be in contact with the brake pads.

Here's the finished product with the tape removed - came out great IMO!

While I had the VHT out, I removed the Kleiner mod couplers from the rear, sanded them down with a medium grit emory cloth to scuff the surface and applied the paint. Nothing crazy and easy enough to do.

MKIV Complete Kit #9494 l Delivered 1/5/19 l First Start
11/28/20 l First Go-kart
4/11/21 l Carb'd 347 l Mid-shift TKO600 l 3.55 IRS l P/S l Forte Mechanical Throttle Linkage l RT Turn Signal, Drop Trunk l Breeze Upper/Lower Radiator Support, Fan Shroud l Boig Upper/Lower Cool Tubes & Quiet Pipes l 18" FFR Gasser Wheels l
Build Thread


 Thanks:
  Likes:


 Reply With Quote


