-
-
One quick question - the front hubs have dust caps covering the spindle nuts but I didn't see any similar caps for the rear hubs/nuts. Are there supposed to be dust caps on the rear hubs?
MkIV Roadster build: Gen 2 Coyote, IRS, TKO600. Ordered 10/24/18. Delivered 1/29/19. Engine installed 8/8/21. First start 9/12/21. First go-kart 9/17/21. Off to paint 4/11/22. Back from paint 12/30/22.
Build thread here.
-
Senior Member


Originally Posted by
JohnK

One quick question - the front hubs have dust caps covering the spindle nuts but I didn't see any similar caps for the rear hubs/nuts. Are there supposed to be dust caps on the rear hubs?
Nope.
Your build is looking great BTW. Nice and clean and I really like the silver powder coat.
Build 1: Mk3 Roadster #5125. Sold 11/08/2014.
Build 2: Mk4 Roadster #7750. Sold 04/10/2017.
Build Thread
Build 3: Mk4 Roadster 20th Anniversary #8674. Sold 09/07/2020.
Build Thread and
Video.
Build 4: Gen 3 Type 65 Coupe #59. Gen 3 Coyote. Legal 03/04/2020.
Build Thread and
Video
Build 5: 35 Hot Rod Truck #138. LS3 and 4L65E auto. Rcvd 01/05/2021. Legal 04/20/2023.
Build Thread. Sold 11/9/2023.
-
Thank you so much! I really like the look of the 20th anniversary roadsters like yours, so I was going for a similar look.
MkIV Roadster build: Gen 2 Coyote, IRS, TKO600. Ordered 10/24/18. Delivered 1/29/19. Engine installed 8/8/21. First start 9/12/21. First go-kart 9/17/21. Off to paint 4/11/22. Back from paint 12/30/22.
Build thread here.
-
-
While I'm talking about F-panels and elephant ears, let me ask a few questions about attaching the two together. I'm planning to use Nutserts to connect them. Which side should the screw head be on? I'm planning to use Alex's wheel well liners so I believe that the wheel well side won't be visible, so should the screw heads be on the inside (facing the headers? This way, the view from inside the engine compartment is clean? Second, I'm guessing the "safest" way to proceed is to drill the F panel and install the nutserts but not drill the elephant ears until I have the body on and am doing final fitment. Is that right?
Thanks,
John
MkIV Roadster build: Gen 2 Coyote, IRS, TKO600. Ordered 10/24/18. Delivered 1/29/19. Engine installed 8/8/21. First start 9/12/21. First go-kart 9/17/21. Off to paint 4/11/22. Back from paint 12/30/22.
Build thread here.
-


I was doing some work on the DS foot box sheet metal last night, and one of the pieces I drilled was the foot box top access panel cover. I actually spent a good deal of time on that little piece, cleaning up the edges with a file, getting the bend angle right, and then getting it positioned and drilled/cleco'd in preparation for installing nutserts to secure it. It wasn't until later that evening, in re-reading through some other build threads, that I made the sad discovery that the body covers several of the mounting holes I'd drilled. I debated all sorts of clever ways to rig up dummy screws in a few holes, but in the end a quick call to FFR and $19 later, I have a new access panel cover in the mail. At least this screw-up was pretty cheap. Hopefully, all my mistakes will be this cheap and easy to fix. At this rate, I'll have a nice little "wall of shame" with all the parts I've managed to screw up in the course of the build.
MkIV Roadster build: Gen 2 Coyote, IRS, TKO600. Ordered 10/24/18. Delivered 1/29/19. Engine installed 8/8/21. First start 9/12/21. First go-kart 9/17/21. Off to paint 4/11/22. Back from paint 12/30/22.
Build thread here.
-
-
Senior Member
Surprised to see. But the previous interference problem was way before that. Insulation and carpet will take up some of that space. And depending on your clutch setup you may need a stop before getting all the way to the back anyway. One of the common solutions was to take a little bite out of the side of the clutch arm where it interferes. It's plenty strong enough. Engineers (which I am not...) have posted detailed data that confirms. You could wait until you see if you really need to trim it. But then it would be a lot harder to get in and out or reach. Or you could put a block of wood on the frame location and a couple bumps with a big hammer would clear it. That's just thinwall tubing there. I cringe when I type that, because not my style. But I do know that was one of the recommended solutions before.
Last edited by edwardb; 05-18-2019 at 08:09 PM.
Build 1: Mk3 Roadster #5125. Sold 11/08/2014.
Build 2: Mk4 Roadster #7750. Sold 04/10/2017.
Build Thread
Build 3: Mk4 Roadster 20th Anniversary #8674. Sold 09/07/2020.
Build Thread and
Video.
Build 4: Gen 3 Type 65 Coupe #59. Gen 3 Coyote. Legal 03/04/2020.
Build Thread and
Video
Build 5: 35 Hot Rod Truck #138. LS3 and 4L65E auto. Rcvd 01/05/2021. Legal 04/20/2023.
Build Thread. Sold 11/9/2023.
-
Thank you. Yes, I was quite surprised to see it too. I'd read about your mods in your build thread but had subsequently read that this issue had gone away, so I was questioning whether it was something I did wrong. I'm more inclined to mod the clutch pedal than to try to massage the tubing. I don't think it would take much material removal from the pedal to clear it, and I guess now would be as good a time as any to do it since the whole car and shop are covered in metal shavings and bits from all the sheet metal drilling.
MkIV Roadster build: Gen 2 Coyote, IRS, TKO600. Ordered 10/24/18. Delivered 1/29/19. Engine installed 8/8/21. First start 9/12/21. First go-kart 9/17/21. Off to paint 4/11/22. Back from paint 12/30/22.
Build thread here.
-
Mine is a 2017, and I had to clearance it. I took some off the pedal. It required less than the depth of the flange that was touching, and never approached the web of the clutch leg. I smoothed it all out so there were no sharp edges, painted it up and never looked back.
-
Senior Member

My frame is an early 2018, and I had a very similar clearance issue. It would just hit with a fraction of travel left.
Take a look here - I made up a small stop-block. Now that the car is together and running, this fraction of travel isn't noticed/needed for full clutch disengagement, and gives peace of mind that you're pressing against a purpose-built stop, not the frame or footbox tin.
John D. - Minneapolis 'Burbs
1965 El Camino - LT-1, 4L60e, 4wh discs, SC&C susp.
2013 F-150 Platinum - Twin Turbo 3.5
2018 Mk4 Roadster w/ Coyote - #9365 - Build Thread Delivery 7/3/18, 1st Start 1/4/19, 1st Road Mile 5/5/19, Legal 6/18/19, In Paint 2/25/21, Done (?) 4/2021
-
Thank you both. Boyd, in the end this is exactly what I decided to do also. I took some material off the side of the pedal and it now goes all the way to the back wall. I still need to paint it, but I'm glad to have dealt with it now. John, I like you pedal stop design a lot. I may implement it once I've got the hydraulic clutch set up and bled, and I know where I want to position it.
Thanks,
John


MkIV Roadster build: Gen 2 Coyote, IRS, TKO600. Ordered 10/24/18. Delivered 1/29/19. Engine installed 8/8/21. First start 9/12/21. First go-kart 9/17/21. Off to paint 4/11/22. Back from paint 12/30/22.
Build thread here.
-
I did what Fixit did. Plenty of travel to actuate my hydraulic clutch before it hits the chassis

-
Greek Guys' Garage Roadster Build #9509 (driveline assembly and more sheetmetal)
A bit of work going on on several fronts lately. I'm continuing to work on drilling all the sheetmetal. So far both footboxes and everything forward of the firewall are done, as is the passenger floor. I've also fabbed up a patch panel to cover up the e-brake hole since I'll be installing an E-Stopp instead of an e-brake handle.
It's not much to look at as far as sheetmetal fabrication goes, but it's my first attempt at making a panel so I'm proud of it nonetheless. 
I also received the replacement DS footbox access cover that I ordered after realizing that I drilled a bunch of holes in areas where I won't be able to access screws once the body is on. Question - here's the old cover. I've numbered the holes I drilled 1 - 13. Which of these should I not drill in the new piece? From photos I've seen, I think I should not drill holes 4 - 9. Is that right?

On a separate front, I've been working on some driveline assembly. I had all sorts of fun with dial indicating the bellhousing. I won't go into it here since It's covered ad nauseam in a separate dedicated thread. You can read about it here.
Thankfully, that's behind me now and I did a bit more work re-installing the clutch and pressure plate, getting the clutch arm angle set, and finally bolting on the bellhousing for the (hopefully) last time. I wanted to double-check that this clutch arm angle looks OK?
I have a few leftover parts from Quicktime. I think I know what most of them are, but there are a couple I don't recognize and want to make sure I didn't accidentally leave something out that should have been installed.

From the bottom up - one of the two adapter rings will go between the bellhousing and transmission. I'll see which one is the right fit for the TKO600. The assortment of parts in the middle are for other types of clutch release setups, so are truly extra. The two bushings along the top, though, are puzzling me. Can someone tell me what those are for?
Thanks,
John
Last edited by JohnK; 06-06-2019 at 09:09 PM.
MkIV Roadster build: Gen 2 Coyote, IRS, TKO600. Ordered 10/24/18. Delivered 1/29/19. Engine installed 8/8/21. First start 9/12/21. First go-kart 9/17/21. Off to paint 4/11/22. Back from paint 12/30/22.
Build thread here.
-
Greek Guys' Garage Roadster Build #9509 (more driveline assembly)
I didn't have a lot of time to devote to the build today, but I did manage to get the transmission married up with the engine. I'm pretty happy about this milestone even though I won't be ready to drop it in for a little while. I still have a lot of little engine/trans prep details to address but so far I've installed the big items - Moroso oil pan, alternator, KRC power steering pump, removal of oil cooler.
I'm wondering if it's OK to leave the transmission hanging off the engine like shown or should it be supported while stored like this?
Also, any input on my question above about drilling the DS footbox access cover would be much appreciated.
Thanks,
John

MkIV Roadster build: Gen 2 Coyote, IRS, TKO600. Ordered 10/24/18. Delivered 1/29/19. Engine installed 8/8/21. First start 9/12/21. First go-kart 9/17/21. Off to paint 4/11/22. Back from paint 12/30/22.
Build thread here.
-
John,
For the footbox cover, this is what mine looked like when I received the kit. So not drilling holes 4-9 looks about right to me...
-
Post Thanks / Like - 0 Thanks, 1 Likes
-
Thank you! I had photographed all the sheetmetal before I pulled it off, but I didn't take any pictures of the sheetmetal before removing the body, so that's very helpful.
MkIV Roadster build: Gen 2 Coyote, IRS, TKO600. Ordered 10/24/18. Delivered 1/29/19. Engine installed 8/8/21. First start 9/12/21. First go-kart 9/17/21. Off to paint 4/11/22. Back from paint 12/30/22.
Build thread here.
-
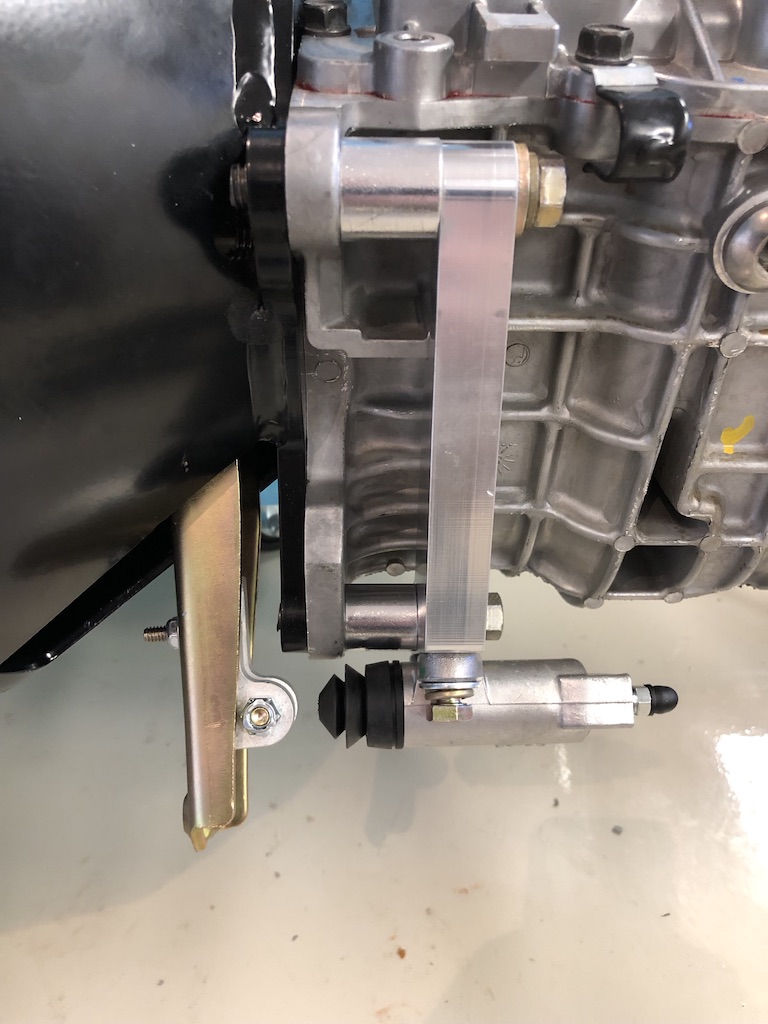
Quick question regarding the installation of Forte's hydraulic clutch. All the photos I've seen of the adapter that goes on the clutch fork show the bolt installed somewhere on the outer pair of holes, and the bracket hanging out past the edge of the clutch fork. There's actually another hole further in, and if I flip the bracket around and install it through that hole the end of the bracket isn't hanging out past the end of the fork. Is there any reason not to install it this way? (I am planning to cut that little bolt shorter once I know where exactly I'm planning to mount the bracket.
Thanks,
John


MkIV Roadster build: Gen 2 Coyote, IRS, TKO600. Ordered 10/24/18. Delivered 1/29/19. Engine installed 8/8/21. First start 9/12/21. First go-kart 9/17/21. Off to paint 4/11/22. Back from paint 12/30/22.
Build thread here.
-
Thank you for posting all of the pics. You have helped me to be able to move forward. We have almost identical kits. MKIV with 5.0 Coyote but added the Boss intake, TKO 600, Moser 8.8 with 3.55s i believe, and the Halibrandt 18x9s in front and 18x11s in back........
-
It's been a while since I updated this thread, but I'm finally back on the build after a few months off. I'm starting back in with a few small items to get my feet wet, so to speak. First, I worked on getting the gas tank assembled. I put together the Walbro fuel pump on the Pro-M fuel pump hanger, and then went ahead and installed it into the tank. The instructions indicate that you have to cut a couple of notches in the tank opening, but I seemed to recall at least one person mentioning that they were able to get the assembly into the tank without any cutting, so I figured I'd give it a try. Nothing to lose, right? Sure enough, with some very careful maneuvering and some slight flexing of the return tube, I was able to gently coerce the fuel pump/hanger assembly into position without having to make any cuts. That was a huge relief to not have to worry about cleaning out a bunch of metal shavings out of the tank. I then tested the fuel level sender and installed it, along with the Breeze big bore check valve and the filler neck. However, when I went to install the tank I ran into the issue that many others have encountered, namely the front two bolts are not quite long enough to be able to get the tank straps on them. Normally this would be a quick trip to the hardware store but with the current shelter in place a "quick trip to the hardware store" involves standing in a line outside the store (appropriately spaced 6' apart) for an hour waiting to get in. So, I've ordered the bolts (along with some other things) from McMaster and I'll hopefully be able to install the tank on Tuesday.


Next I decided I'd work on the mounting bracket for the CNC triple reservoirs. I've spent a fair amount of time looking into the various approaches that others here have used to mount the reservoirs. After some consideration I decided I'd fabricate the bracket out of some 2" x 3" by 1/4" thick aluminum angle stock. I wanted the reservoir to be level with the ground (or at least parallel with the 4" main tubes) so this would require some interesting angling of the reservoir on the bracket.

This is where I'm planning to mount it. This position puts the front edge of the reservoir 9.5" forward of the footbox, and the edge of the mounting bracket is 10" from the footbox. Does this sound reasonable? What I'd read is that 12" was the max. distance from the footbox before it interferes with the hood strut, so I think I'm OK here but would love some feedback before drilling the 3/4" tube and mounting the bracket.
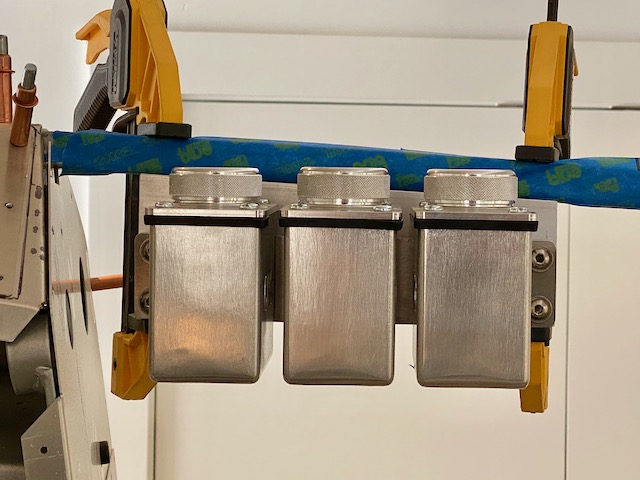
Here it is, all fabbed up and ready for powder coat and mounting to the 3/4" tube. Shorter bolts are on order from McMaster. These are just some I had laying around for a mockup:

-John
Last edited by JohnK; 04-27-2020 at 09:59 AM.
MkIV Roadster build: Gen 2 Coyote, IRS, TKO600. Ordered 10/24/18. Delivered 1/29/19. Engine installed 8/8/21. First start 9/12/21. First go-kart 9/17/21. Off to paint 4/11/22. Back from paint 12/30/22.
Build thread here.
-
Senior Member
I think that aluminum angle should be able to hold the reservoirs.  That's a beefy piece. The location should work out fine. Nice work.
Build 1: Mk3 Roadster #5125. Sold 11/08/2014.
Build 2: Mk4 Roadster #7750. Sold 04/10/2017.
Build Thread
Build 3: Mk4 Roadster 20th Anniversary #8674. Sold 09/07/2020.
Build Thread and
Video.
Build 4: Gen 3 Type 65 Coupe #59. Gen 3 Coyote. Legal 03/04/2020.
Build Thread and
Video
Build 5: 35 Hot Rod Truck #138. LS3 and 4L65E auto. Rcvd 01/05/2021. Legal 04/20/2023.
Build Thread. Sold 11/9/2023.
-
Thanks! Yes, 1/4" thick is definitely overkill, but it was the only thickness that McMaster had available in aluminum angle stock that large. The bracket is not as heavy as it looks, and the thickness provided for a full 5 threads of engagement on the top screws that are tapped into it.
MkIV Roadster build: Gen 2 Coyote, IRS, TKO600. Ordered 10/24/18. Delivered 1/29/19. Engine installed 8/8/21. First start 9/12/21. First go-kart 9/17/21. Off to paint 4/11/22. Back from paint 12/30/22.
Build thread here.
-
Senior Member
Originally Posted by
JohnK
Thanks! Yes, 1/4" thick is definitely overkill, but it was the only thickness that McMaster had available in aluminum angle stock that large. The bracket is not as heavy as it looks, and the thickness provided for a full 5 threads of engagement on the top screws that are tapped into it.
Just pulling your chain. Looks fine.
Build 1: Mk3 Roadster #5125. Sold 11/08/2014.
Build 2: Mk4 Roadster #7750. Sold 04/10/2017.
Build Thread
Build 3: Mk4 Roadster 20th Anniversary #8674. Sold 09/07/2020.
Build Thread and
Video.
Build 4: Gen 3 Type 65 Coupe #59. Gen 3 Coyote. Legal 03/04/2020.
Build Thread and
Video
Build 5: 35 Hot Rod Truck #138. LS3 and 4L65E auto. Rcvd 01/05/2021. Legal 04/20/2023.
Build Thread. Sold 11/9/2023.
-
Post Thanks / Like - 0 Thanks, 1 Likes
-
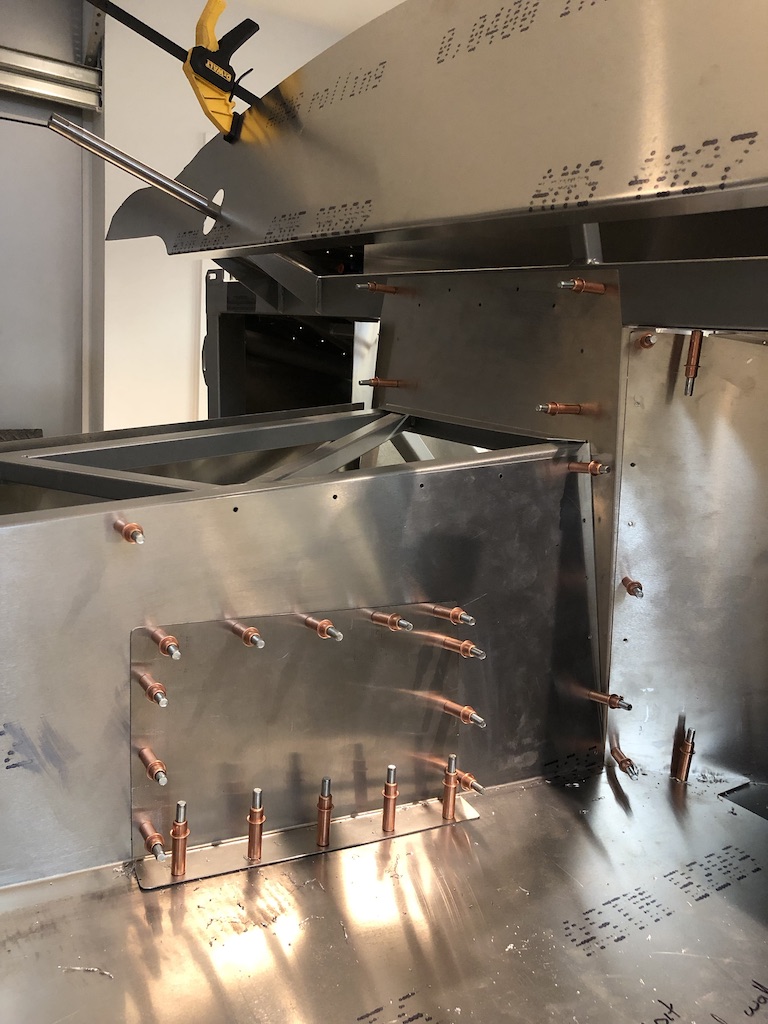
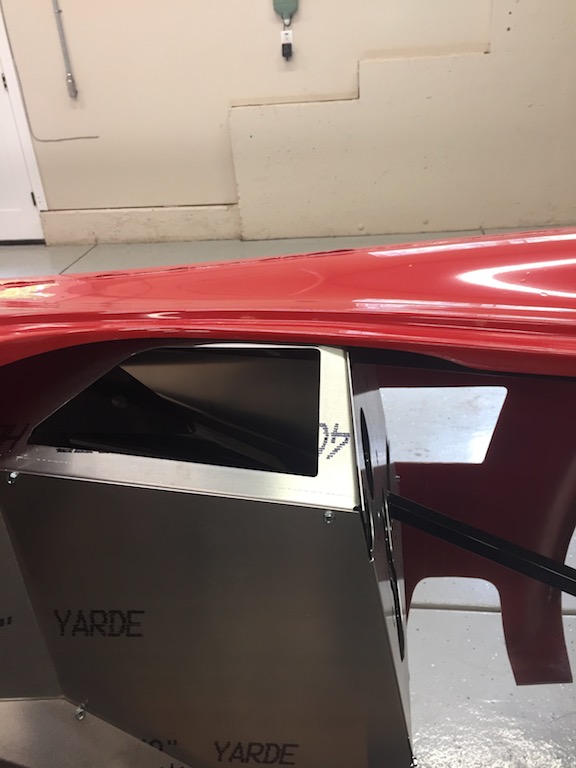
I'm continuing work on the seemingly never-ending sheetmetal fitting. I'm going to breathe a big sigh of relief (and then spend 10 hours vacuuming aluminum shavings in the garage) when I'm finished fitting all the sheetmetal. Over the last few days I've been working on the Russ Thompson drop trunk mod, and I'm pleased with how it turned out. I don't have a lot (OK, any) experience with sheetmetal work prior to starting this build, so I deliberated for a looooong time on whether I wanted to tackle the drop trunk mod, but in the end I decided to do it and am so glad I did. I learned a lot along the way. Here's what it looks like at the moment:

I'm now working my way through the rest of the trunk aluminum, so the end is in sight, but I have a couple of questions:
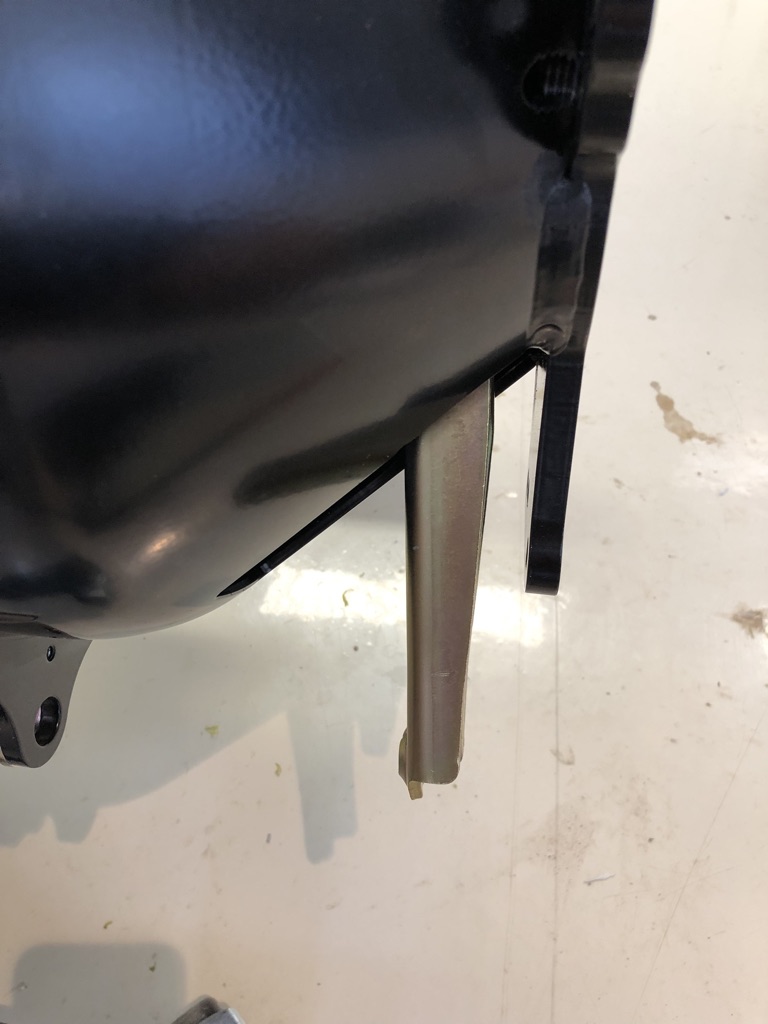
1) When I drilled/cleco'ed the rear of the lower trunk floor, it caused the rearmost part that just hangs out there to get really wavy. (see photo below). I'm thinking of sandwiching on another piece of aluminum underneath it to stiffen it up. Is this normal? Do you think sandwiching on another piece of .040 wll straighten it out, or is .090 needed to give enough stiffness?
2) Regarding the little blank-off piece that fills in the hole on the passenger side rear fuel tank strap - if I install it so that it covers the hole (see photo below), it seems that there would be no way to be able to drop the gas tank in the future, as the blank-off plate wouldn't allow the strap to swing or be removed. I'm tempted to install this blank-off with rivnuts so it can be removed in the future if needed. The other options are to set it further back so that the eye of the strap could fit through the hole (but that would leave a big hole) or just drill out the rivets if I ever needed to drop the tank in the future (sounds like a PITA). Thoughts? BTW - the big chunk missing from the powder coat on the tank strap is from pounding on it to try to make it round enough for a bolt to pass through. That'll have to get re-painted prior to final assembly.
Thanks,
John


MkIV Roadster build: Gen 2 Coyote, IRS, TKO600. Ordered 10/24/18. Delivered 1/29/19. Engine installed 8/8/21. First start 9/12/21. First go-kart 9/17/21. Off to paint 4/11/22. Back from paint 12/30/22.
Build thread here.
-
Senior Member

I have a few leftover parts from Quicktime. I think I know what most of them are, but there are a couple I don't recognize and want to make sure I didn't accidentally leave something out that should have been installed.
From the bottom up - one of the two adapter rings will go between the bellhousing and transmission. I'll see which one is the right fit for the TKO600. The assortment of parts in the middle are for other types of clutch release setups, so are truly extra. The two bushings along the top, though, are puzzling me. Can someone tell me what those are for?
Thanks,
John[/QUOTE]
The bushings at the top of the photo, the concentric counterbore and offset counterbore are for the bolts that go through the dowel holes into the cylinder block. The offset counterbore piece goes on the right side.20200410_152611.jpg
Last edited by Kool AC; 05-06-2020 at 07:05 AM.
MkIV Complete Kit #9423, Gen 3 Coyote, TKO-600, IRS Torsen 3.73, Wilwoods, DA Konis - Delivered 9/14/18
-
Originally Posted by
Kool AC
The bushings at the top of the photo, the concentric counterbore and offset counterbore are for the bolts that go through the dowel holes into the cylinder block. The offset counterbore piece goes on the right side.
20200410_152611.jpg
Thanks for that! Any idea what their purpose is? I'm sure some engineer spent a lot of time designing them, but for the life of me I can't figure out what they do. My bell housing seems to have gone together perfectly well without them so I'm wondering if I bother putting them in. I've not seen them in anyone else's Coyote assembly photos either.
MkIV Roadster build: Gen 2 Coyote, IRS, TKO600. Ordered 10/24/18. Delivered 1/29/19. Engine installed 8/8/21. First start 9/12/21. First go-kart 9/17/21. Off to paint 4/11/22. Back from paint 12/30/22.
Build thread here.
-
Senior Member
Originally Posted by
JohnK
I'm now working my way through the rest of the trunk aluminum, so the end is in sight, but I have a couple of questions:
1) When I drilled/cleco'ed the rear of the lower trunk floor, it caused the rearmost part that just hangs out there to get really wavy. (see photo below). I'm thinking of sandwiching on another piece of aluminum underneath it to stiffen it up. Is this normal? Do you think sandwiching on another piece of .040 wll straighten it out, or is .090 needed to give enough stiffness?
2) Regarding the little blank-off piece that fills in the hole on the passenger side rear fuel tank strap - if I install it so that it covers the hole (see photo below), it seems that there would be no way to be able to drop the gas tank in the future, as the blank-off plate wouldn't allow the strap to swing or be removed. I'm tempted to install this blank-off with rivnuts so it can be removed in the future if needed. The other options are to set it further back so that the eye of the strap could fit through the hole (but that would leave a big hole) or just drill out the rivets if I ever needed to drop the tank in the future (sounds like a PITA). Thoughts? BTW - the big chunk missing from the powder coat on the tank strap is from pounding on it to try to make it round enough for a bolt to pass through. That'll have to get re-painted prior to final assembly.
1. I had the same thing happen on one of my Mk4 builds, although not that pronounced. I did add a doubler along the bottom edge from .090 aluminum. Didn't 100% solve it but made it better and when done and carpeted, isn't noticeable. I don't think .040 would do too much. Curious what other suggestions you might get on this one.
2. I would just rivet it. That's what I've done. Yes, you could drill them out if needed. But I've dropped the tanks several times by only taking the front bolts out. Not the back ones. The straps are flexible enough that with the front bolts out, the tank is easy enough to get out. A little gloss black paint will fix that chip. Won't be noticeable and will prevent it from getting rusty.
Build 1: Mk3 Roadster #5125. Sold 11/08/2014.
Build 2: Mk4 Roadster #7750. Sold 04/10/2017.
Build Thread
Build 3: Mk4 Roadster 20th Anniversary #8674. Sold 09/07/2020.
Build Thread and
Video.
Build 4: Gen 3 Type 65 Coupe #59. Gen 3 Coyote. Legal 03/04/2020.
Build Thread and
Video
Build 5: 35 Hot Rod Truck #138. LS3 and 4L65E auto. Rcvd 01/05/2021. Legal 04/20/2023.
Build Thread. Sold 11/9/2023.
-
Senior Member
Originally Posted by
JohnK
Thanks for that! Any idea what their purpose is? I'm sure some engineer spent a lot of time designing them, but for the life of me I can't figure out what they do. My bell housing seems to have gone together perfectly well without them so I'm wondering if I bother putting them in. I've not seen them in anyone else's Coyote assembly photos either.
The holes in the bell housing that fit over the dowels on the cylinder block are larger than the head of the bolt. The bushings are basically just washers to cover the larger hole.
MkIV Complete Kit #9423, Gen 3 Coyote, TKO-600, IRS Torsen 3.73, Wilwoods, DA Konis - Delivered 9/14/18
-
Post Thanks / Like - 1 Thanks, 0 Likes
 JohnK
JohnK thanked for this post
-
Just a quick update on the rear trunk floor issue. One suggestion I received from a forum member was that this issue was a result of the lower part of the rear frame being bowed inward. The thought that this might be the case was bothersome after I'd already been through this issue once, but removing the trunk floor sheetmetal and laying a 4' level across the lower 3/4" frame member revealed that this was indeed the case. It wasn't out of straight by much (maybe 3/16") but enough that when the trunk floor sheetmetal was cleco'ed to it, it pulled it out of shape. Cursing about it wasn't going to fix it (trust me, I tried). I also tried "persuading" it back in place by laying a piece of 2x6 against it and striking it as hard as I had the nerve to with a mini-sledge. The last thing I wanted to do was crack a weld, so I decided to just work around it. I ended up creating a 3/4" wide by 22" long shim out of .090 sheetmetal that I put between the sheetmetal and frame roughly between the two rear uprights that the gas tank sits against to fill most of the gap. I also added a 2-1/2" wide strip of .090 aluminum underneath the overhanging part. The combination of filling the gap with the shim and adding the stiffener did the trick. The waviness is now totally gone. I'm not super-happy about that frame member being bent (slightly) again, but it is what it is and I'm moving on.

MkIV Roadster build: Gen 2 Coyote, IRS, TKO600. Ordered 10/24/18. Delivered 1/29/19. Engine installed 8/8/21. First start 9/12/21. First go-kart 9/17/21. Off to paint 4/11/22. Back from paint 12/30/22.
Build thread here.
-
Post Thanks / Like - 0 Thanks, 2 Likes
-
-
Post Thanks / Like - 1 Thanks, 5 Likes
Alec thanked for this post
-
-
Post Thanks / Like - 0 Thanks, 2 Likes
-
25th Anniversary #9772

Originally Posted by
JohnK
I've been working on the install of the E-Stopp electric parking brake for a bit now. I've been throwing around several ideas for places to mount it, and I thought I had finally come up with a pretty good solution that I had asked for feedback on in a separate thread
here. I had a local shop fab the mounting tray for me out of 1/8" 5052 aluminum. Based on the feedback in that thread, I thought the location in the upper trunk would work OK, but still had some nagging concerns about accessibility of roll bar bolts and harness mounts so I took one more look around to see if there was anywhere else I could mount it that would be out of the way and wouldn't impact accessibility of other items. One other location I'd seen used for the E-Stopp was the area under the trunk floor in front of the fuel tank. After some measuring and checking, it turned out that the mounting tray would fit in there nicely, with only minor modifications to my original design.
- The first photo shows the mounting tray I had fabricated with the E-Stopp and cable guides installed.
- The second photo shows the tray with the E-Stopp temporarily held in place against the upper trunk floor where it will be installed.
- The third photo shows the mounting tabs I installed on the tray. These are made out of .090 aluminum and installed on the tray with 3/16" stainless steel rivets. The tabs sit against the 3/4" frame tubes and are held onto the frame tubes with 10-32 rivet nuts.
- The fourth photo shows the tray in its final position. It's now all ready to be powder coated along with the rest of the sheet metal.
The entire tray can be dropped if the E-Stopp ever needs to be serviced or repaired (though it will likely involve dropping the gas tank). All in all, I like this location much better than mounting it in the trunk as I had previously planned.
wow that's a honkin piece of install - looks awesome! assuming you're not going to use the FFR provided cables? seems way too long IMHO
-
Thanks! No, I'll be using a set of Wilwood universal trim-to-fit parking brake cables. They come 8' long and you trim them to the specific length you need.
MkIV Roadster build: Gen 2 Coyote, IRS, TKO600. Ordered 10/24/18. Delivered 1/29/19. Engine installed 8/8/21. First start 9/12/21. First go-kart 9/17/21. Off to paint 4/11/22. Back from paint 12/30/22.
Build thread here.
-
Post Thanks / Like - 0 Thanks, 1 Likes
-
Senior Member

Originally Posted by
JohnK
Once again John thanks for posting this up! I was just in my garage yesterday looking at my three hoses thinking how I was going to make them fit properly with a grommet in the clutch hole....you just answered my question.
Build looks great!
-
Thanks Travis. My work time on the car lately has been really sporadic... an hour here, a couple hours there... so I've been mostly tackling small items. I'm almost done with the sheetmetal mods and I'm hoping to be able to drop off the entire batch of sheet metal to the powder coaters soon and move on the brake and fuel lines.
MkIV Roadster build: Gen 2 Coyote, IRS, TKO600. Ordered 10/24/18. Delivered 1/29/19. Engine installed 8/8/21. First start 9/12/21. First go-kart 9/17/21. Off to paint 4/11/22. Back from paint 12/30/22.
Build thread here.
-
Post Thanks / Like - 0 Thanks, 1 Likes
-
Senior Member
Originally Posted by
JohnK
Thanks Travis. My work time on the car lately has been really sporadic... an hour here, a couple hours there... so I've been mostly tackling small items. I'm almost done with the sheetmetal mods and I'm hoping to be able to drop off the entire batch of sheet metal to the powder coaters soon and move on the brake and fuel lines.
I am in the same situation, summer is busy for me with work and family stuff... I try and get some build time in each week, it is definitely therapy for me! Although, I have to be careful too, I want my wife to actually like this car... gotta balance out the time between them both
We all appreciate you documenting your build, always nice to pick up some tips during this process! I am also hoping to start my brake lines soon...
-
Post Thanks / Like - 0 Thanks, 2 Likes
-
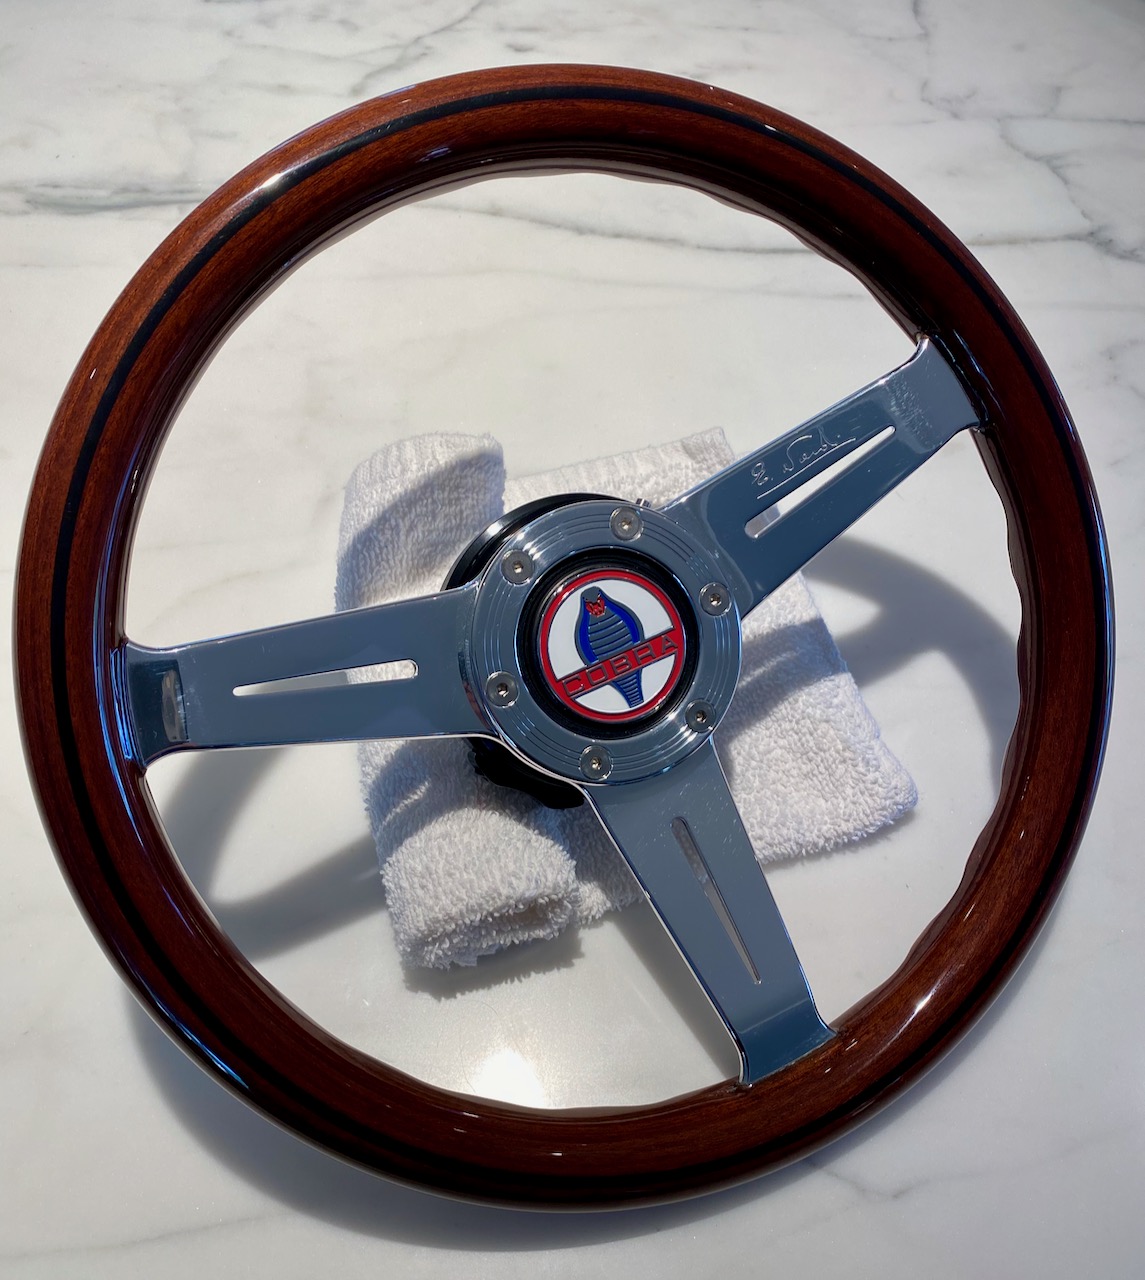
Here's another small update, but another item that I've been working on in the background for several months. I decided pretty early on that I liked the look of a wood steering wheel, but wanted something that was smaller diameter and thicker grip than the FFR wood steering wheel. I had found what seemed like the perfect steering wheel (for me) - a Nardi 330mm "Classic" wood steering wheel. The problem was how to mount it to the Russ Thompson turn signal hub, as it's a different bolt pattern than the FFR Moto-lita bolt pattern. A few months went by and I saw how several folks had added the NRG quick release to their Russ Thompson turn signal hubs, and I decided that I'd like to add that as well. It turns out that this actually solved a big problem for me, as the NRG hub already has bolt patterns for Momo/Sparco and Nardi/personal (70mm and 74mm 6-bolt patterns). I still had to drill and tap the RT hub like the others have done, but I didn't need to drill a new bolt pattern in the steering wheel. Viola' - how to mount the steering wheel had been solved.
Now the last remaining piece to the puzzle was a purely cosmetic one, but I wanted a Shelby Cobra emblem in the center of the steering wheel. It turns out that finding a Shelby Cobra emblem for a Nardi steering wheel is like searching for hens' teeth. However, after a lot of searching I finally found a source online that sells vintage Nardi steering wheels and center emblems for a number of different brands (Aston Martin, Bentley, BMW, Ferrari, etc.). Some of their vintage NOS wheels are just incredible (and incredibly expensive!) But, lo and behold, after some e-mail back and forth with the very nice lady that runs the company, it turns out that they had a vintage Cloissonne' (enameled metal) emblem that would fit my wheel. This is literally the jewel to top off the whole setup. I finally got it all put together today and I'm sooo excited. It'll be many months before I get to drive the car, but being able to cross this off my list of a million little challenges to solve is a biggie.


MkIV Roadster build: Gen 2 Coyote, IRS, TKO600. Ordered 10/24/18. Delivered 1/29/19. Engine installed 8/8/21. First start 9/12/21. First go-kart 9/17/21. Off to paint 4/11/22. Back from paint 12/30/22.
Build thread here.
-
Post Thanks / Like - 0 Thanks, 2 Likes
-
Senior Member

Very nice! I won't lie, I'm envious.
MKIV Complete Kit #9822 l BluePrint 347 EFI l TKO600 l Power Steering l Heater/Defrost l
Build Thread
-
Post Thanks / Like - 1 Thanks, 1 Likes
JohnK thanked for this post
-
Senior Member

That is a nice steering wheel! Good find on the center piece but I noticed youd did not include the name of said company you got it from? 
Kyle
Complete Kit pickup 09/05/2015, 351w, QF680, 3.55, 3-Link, 15" Halibrands with MT's, Painted Viking blue with Wimbledon white stripes on 03/15/2017. Sold in 08/2018 and totally regret it.
-
Post Thanks / Like - 1 Thanks, 0 Likes
JohnK thanked for this post


 Thanks:
  Likes:


 Reply With Quote


