-
11-30-2019, 10:37 AM
#361
Senior Member


Originally Posted by
Pat427

In that case, do you have issues with heat on your foot?
You can always just trim down the brake, clutch and gas pedals. I have a foot pad on the sidewall sewn into the carpet and after a bit of trimming of the pedals, I can fit my hand in-between the wall and gas pedal, with room to spare.
-
12-03-2019, 06:20 PM
#362
Senior Member

More Progress
I finished carpeting the trunk today. I had previously tried laying down the kit provided carpet using a spray on 3M adhesive, but was disappointed in the outcome. This time, I used an after market carpet and the adhesive that edwardb recommend in his thread. Its a Weldwood DAP adhesive. I think it worked great and would recommend it to others. I'm not totally happy with the outcome, as there are a couple places that don't look great, but all in all, I'm happy and will address the imperfections tomorrow.

Not the best picture, but you get the idea.
The Russ Thompson drop trunk was a little difficult to navigate, but I managed to make it look alright.
Next, I installed a second pulley for my E-brake. I originally had a single pulley, but it wasn't wide enough to accommodate both E-brake cables. Now each cable has its own pulley. I'm happier with this setup.

Last, a question for the forum. I have some extra wires in my trans tunnel and wanted to double check with everyone to make sure I can cut this stuff out?

and

Thanks for yalls help,
Patrick
-
12-04-2019, 06:55 PM
#363
Senior Member
Cockpit
I finished the cockpit today.
I put the seats in just for the picture. Things turned out alright. Its not perfect, but I think it'll work.

-
Post Thanks / Like - 0 Thanks, 1 Likes
-
12-04-2019, 08:20 PM
#364


Originally Posted by
Pat427
More Progress
I finished carpeting the trunk today. I had previously tried laying down the kit provided carpet using a spray on 3M adhesive, but was disappointed in the outcome. This time, I used an after market carpet and the adhesive that edwardb recommend in his thread. Its a Weldwood DAP adhesive. I think it worked great and would recommend it to others. I'm not totally happy with the outcome, as there are a couple places that don't look great, but all in all, I'm happy and will address the imperfections tomorrow.
Not the best picture, but you get the idea.
The Russ Thompson drop trunk was a little difficult to navigate, but I managed to make it look alright.
Next, I installed a second pulley for my E-brake. I originally had a single pulley, but it wasn't wide enough to accommodate both E-brake cables. Now each cable has its own pulley. I'm happier with this setup.
Last, a question for the forum. I have some extra wires in my trans tunnel and wanted to double check with everyone to make sure I can cut this stuff out?
and
Thanks for yalls help,
Patrick
Pat,
Carpet looks very nice - great job! On the wires you showed, the first looks like a relay, but not sure what it would go to as I don't have the same in my harness. The second plug is for the speed sensor if you have a mechanical speedo. You can remove the plug and seal up the wires or just tie it up out of the way in case you ever need it down the road.
Did you plug the speed sensor port on the trans? If not, you need to remove the plastic shipping plug and put a real plug in that spot.
Something like one of these examples:
https://www.amazon.com/Tremec-30-360...0&sr=8-1-fkmr0
https://www.summitracing.com/parts/i...kaAsTTEALw_wcB
Dave
-
12-05-2019, 06:39 PM
#365
Senior Member

I’m guessing it has one. I purchased my Tremec less than a year ago through Forte’s and they had started shipping them with a metal plug in it already.
Bradley
Build thread - Mk4, Coyote, IRS, Wilwood brakes, old-style soft top and accessories.
The distance between "finished" and finished is literally infinite.
-
12-11-2019, 04:23 PM
#366
Senior Member
Rear Quick Jacks
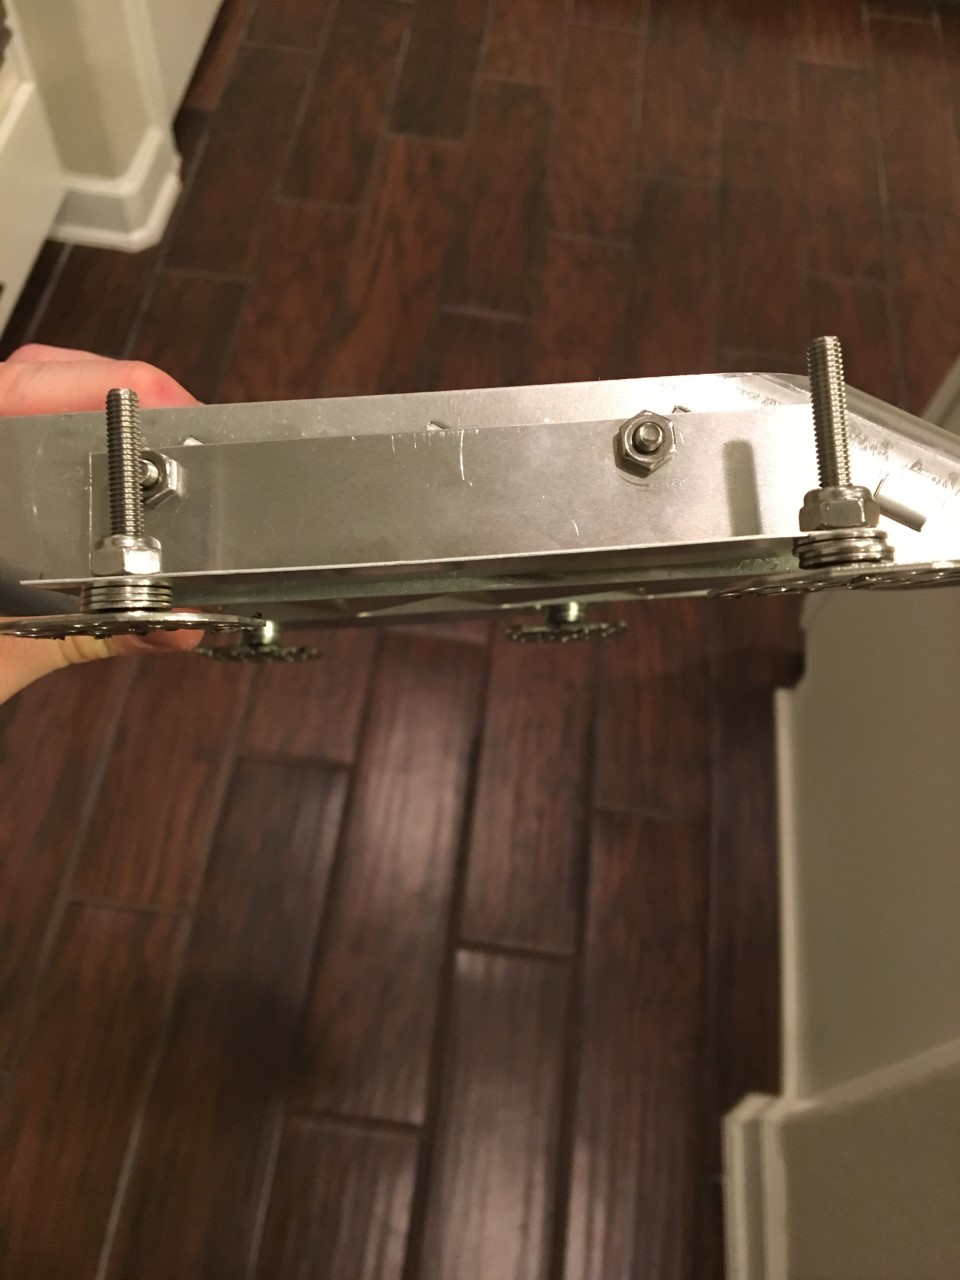
So I tackled the rear quick jack issue today.
Basically, it's impossible to use the kit supplied bolts for the rear quick jacks unless you lower the fuel tank, which is something I didn't want to do, so I went with the Kleiner modification to fix the issue.
I used a piece of threaded bar (7/16-14), which I cut into pieces that were about 1.5 inches long. I then pushed those pieces through the mounting bracket. I then tightened on a nylock nut to secure the piece of bar in place. I then screwed on the coupler nut from the other side.
The upper one was hard to do because getting the nylock nut onto the threaded bar was very difficult given how tight the space. This took a good amount of time, 3 beers and several four letter words, but I was finally able to get everything tightened down.
Passenger side, lower:

Passenger side, upper and lower:

Drivers side, upper and lowers:

View from the trunk:

Not the most difficult of tasks, but I feel pretty good that I was able to get this done today.
Last edited by Pat427; 12-11-2019 at 04:28 PM.
MK4-IRS, 427w, TKO-600
-
12-11-2019, 05:49 PM
#367
Originally Posted by
Pat427
Rear Quick Jacks
So I tackled the rear quick jack issue today.
Basically, it's impossible to use the kit supplied bolts for the rear quick jacks unless you lower the fuel tank, which is something I didn't want to do, so I went with the Kleiner modification to fix the issue.
I used a piece of threaded bar (7/16-14), which I cut into pieces that were about 1.5 inches long. I then pushed those pieces through the mounting bracket. I then tightened on a nylock nut to secure the piece of bar in place. I then screwed on the coupler nut from the other side.
The upper one was hard to do because getting the nylock nut onto the threaded bar was very difficult given how tight the space. This took a good amount of time, 3 beers and several four letter words, but I was finally able to get everything tightened down.
Passenger side, lower:
Passenger side, upper and lower:
Drivers side, upper and lowers:
View from the trunk:
Not the most difficult of tasks, but I feel pretty good that I was able to get this done today.
That's exactly how I did mine.
-
12-11-2019, 08:41 PM
#368
Senior Member
Originally Posted by
Papa
That's exactly how I did mine.
Yea, I had your build thread post pulled up on my computer while working today.
-
Post Thanks / Like - 0 Thanks, 1 Likes
 Papa
Papa liked this post
-
12-13-2019, 03:44 PM
#369
Senior Member
Hood Latches
Not a lot of updates today, but I did manage to get a few nagging things done.
I installed my hood latches. Pretty straight forward installation.

I also ordered the seat mounting system from Breeze.
Then I wrapped up the day by installing my dash support aluminum. I kinda forgot about that until now, but was able to get it into place without issue.
I feel like I'm starting to close in on wrapping this thing up. I still have to install the roll bar and the side louvers and then put the body back on and wire up the lights. Other than that, I feel like I'm getting near the end. I'll keep ya'll posted.
Pat
-
12-13-2019, 11:24 PM
#370
Senior Member
Turn Signal Switch
Does anyone know the brand of toggle switch used for the turn signal? One of the male prongs on the back of my switch broke off and I need to replace it.
Thanks,
Pat
-
12-13-2019, 11:31 PM
#371
Senior Member

I did a search and they're hard to source, at least from what I was able to find. are you needing an on-off-on toggle? I'm planning on using a momentary (on)-off-(on) toggle with the signal dynamics self cancelling unit, so you could have mine if you'd like.
-
12-13-2019, 11:50 PM
#372
Originally Posted by
Pat427
Turn Signal Switch
Does anyone know the brand of toggle switch used for the turn signal? One of the male prongs on the back of my switch broke off and I need to replace it.
Thanks,
Pat
FFR will sell you one for about $5.00 + S&H.
-
12-14-2019, 06:43 AM
#373
Not a waxer

Originally Posted by
Pat427
Hood Latches
Not a lot of updates today, but I did manage to get a few nagging things done.
I installed my hood latches. Pretty straight forward installation.
Pat's photo made me think of a couple things that might be useful for those of you playing along at home.
1. I recommend that you turn the hood latch bases 90 degrees so that they are oriented side to side rather than front to back. When they are front to back there is a good chance that one or more of the screws will break through the side of the underside rib unless you are 100% spot on (and lucky!) with their placement.
2. I also suggest holding off on mounting the hood scoop until the body is on so that it can be located based on the centerline of the entire car and not the center of the hood. If you measure and place the scoop using only the hood it's not going to be straight or true because the hood itself is not in the center nor is it straight with the body. Want proof---

Just a couple things that may save you &/or your body guy some grief down the road.
Jeff
-
Post Thanks / Like - 1 Thanks, 0 Likes
-
12-14-2019, 06:49 AM
#374
Senior Member

Won’t be using mine and will send one out if you want it. PM me with address if you want it.
-
12-15-2019, 04:07 PM
#375
Senior Member
Originally Posted by
Jeff Kleiner
Pat's photo made me think of a couple things that might be useful for those of you playing along at home.
1. I recommend that you turn the hood latch bases 90 degrees so that they are oriented side to side rather than front to back. When they are front to back there is a good chance that one or more of the screws will break through the side of the underside rib unless you are 100% spot on (and lucky!) with their placement.
2. I also suggest holding off on mounting the hood scoop until the body is on so that it can be located based on the centerline of the
entire car and not the center of the hood. If you measure and place the scoop using only the hood it's not going to be straight or true because the hood itself is not in the center nor is it straight with the body. Want proof---
Just a couple things that may save you &/or your body guy some grief down the road.
Jeff
Jeff,
Thank you for the advice. I think I managed to avoid both of those pitfalls. The bolts that hold the latch hardware do not break through the side of the under rib of the hood. Also, I aligned my hood scoop with the body, so I think its centered. Plus, when I cut the hood, I cut the hole slightly smaller than the size of the scoop, that way if the hood scoop needs to be moved slightly to make it straight, then that would be easily done since there is some "extra"hood still remaining.
Last edited by Pat427; 12-15-2019 at 04:37 PM.
MK4-IRS, 427w, TKO-600
-
12-15-2019, 04:36 PM
#376
Senior Member
Set Back?
Welp, I think I've hit a bit of a setback today.
I was looking over my car today and noticed there is different amount of wear on the rotors. Basically, when the rotors were new, they were painted black. However, I noticed the black paint on the front rotor has been stripped away by the brake pad from my little drives around the neighborhood.

However, the back rotors still had a lot of black paint on them, which made me think the rear brake pads were not working correctly.

Therefore, I decided to bleed my rear brakes again. When I started to bleed the rear brakes, I noticed there was a hissing/ fluid whooshing sound coming from the rear master cylinder.
There is no fluid leak anywhere in the system and all my connections appear to be really tight. When I bleed the caliper, only fluid squirts out, but no air bubbles come out. When I pump the brake pedal, the pedal will start to feel firm, but when I let the pedal out, there will be that sound again and then the pedal will feel loose and floppy and go all the way to the floor without much resistance.
After taking to BadAsp427, I'm concerned there is a faulty master cylinder. If anyone wants to hear the sound I'm talking about, please Private Message me your cell number and I can text you a video I took that has the sound I'm talking about.
I'd greatly appreciate any help on this one.
Thanks,
Patrick
Last edited by Pat427; 12-15-2019 at 04:41 PM.
MK4-IRS, 427w, TKO-600
-
12-15-2019, 04:48 PM
#377
Pat,
It sounds to me like you have air in the MC. Is it possible that when your were re-bleeding the calipers that the reservoir got low and sucked air in? The uneven front-to-back wear on the "paint" on the rotors isn't an issue. There is a lot less braking force on the rears and they will take longer to rear the coating off the rotors.
I'd recommend re-bleeding the MCs and then redo the calipers RR, LR, RF, LF. Be sure the reservoir doesn't run low during the process.
Dave
-
12-31-2019, 11:58 AM
#378
Senior Member
Master Cylinder and More
I called Factory Five about the master cylinder for my rear brakes. They agreed that it sounded like there was a leak somewhere and promptly sent me a new one. I received the new master cylinder and was able to install it without too much fuss.
I bled the system in an "open fashion, which I saw on a Youtube video and it worked well. My brake pedal is now pretty darn firm. When I press the brake pedal, there is about an inch or two of easy movement, but then the pedal effort becomes very stiff, which I think is correct.
Also, a big thank you to everyone that offered to send me a switch for my turn signal and to MSummers for sending me one. The generosity on this forum is awesome.

I also received my seat mounting system from Breeze. Another great product and one that I'm already glad I purchased even though I haven't really driven my car yet. I haven't bolted the seats into the floor yet, instead I just mounted the seats to the brackets for now. The instructions say to have the body on first before final mounting of the seats, which is my next project.
Oh, and I also re-did the carpet in the cockpit. There were some imperfections that would have always irritated me, so I pulled all the carpet out (HUUGE PITA) and laid down new carpet that I purchased from Factory Five. FYI, they sell replacement carpet in 1-yard sheets. It's not cheap, but it's good stuff. I'm much happier with the final product.
-
01-04-2020, 01:59 AM
#379
I don’t want to hijack Pat’s build thread but if Jeff K happens to check back here I’d love some elaboration on his post #373 here. I can’t tell if my eyes are playing tricks on me or not and haven’t been around here long enough to have seen other comments about crooked/off-centre hoods and scoops but the pic you posted looks very drunk to me. Am I imagining that? The fore-aft distance from the leading edge of the radiator opening to the brake duct openings looks to be much greater on the driver’s side than the passenger side. Presumably this is just an indication that the car in the photo is not completely head-on to the camera but is rotated slightly? I can’t imagine why it would be skewed like that in reality.
The leading edge of the hood also looks canted towards the driver’s side but, again, I’m not sure whether that’s true or whether it’s just a not-quite-head-on shot exaggerating things. Anyway - would be great to hear some of the typical things you see over and over again with the body. Cheers
-
01-07-2020, 01:45 PM
#380
Senior Member
Spacers
I installed transmission spacers that I ordered from Forte. I'm really glad I did this. At first, I had just put washers between the A-frame and the hard rubber mount on the bottom of the transmission, which was probably not a great idea and a little dicey as the washers weren't actually bolted in place, instead it was just the weight of the transmission keeping them in place.
I installed the Forte spacers with minimal hassle and the transmission feels much more secure.

-
01-07-2020, 02:12 PM
#381
Not a waxer
Originally Posted by
mad_dr
I don’t want to hijack Pat’s build thread but if Jeff K happens to check back here I’d love some elaboration on his post #373 here. I can’t tell if my eyes are playing tricks on me or not and haven’t been around here long enough to have seen other comments about crooked/off-centre hoods and scoops but the pic you posted looks very drunk to me. Am I imagining that? The fore-aft distance from the leading edge of the radiator opening to the brake duct openings looks to be much greater on the driver’s side than the passenger side. Presumably this is just an indication that the car in the photo is not completely head-on to the camera but is rotated slightly? I can’t imagine why it would be skewed like that in reality.
The leading edge of the hood also looks canted towards the driver’s side but, again, I’m not sure whether that’s true or whether it’s just a not-quite-head-on shot exaggerating things. Anyway - would be great to hear some of the typical things you see over and over again with the body. Cheers
You're seeing the exact point I was making---the bodies are not symmetrical and vary side to side and the hood is skewed (among other things---like the headlights being crosseyed with one farther forward than the other, etc.) which is why I recommended against placing the scoop only taking the hood into consideration because that may not be correct once you see the big picture.
Here's a photo that I took a couple of weeks ago that quite by accident happens to show that the hood opening is not dead center.

Things are wonky on the back end too but we'll save that for another time 
Jeff
-
Post Thanks / Like - 0 Thanks, 1 Likes
-
01-07-2020, 05:07 PM
#382
Senior Member
America
I decided to add an American flag to the engine compartment. I covered the footbox access panel with an aviation decal. I think it looks pretty good.

-
Post Thanks / Like - 0 Thanks, 4 Likes
-
01-08-2020, 07:33 PM
#383
Senior Member
Cowl
I started to install the Breeze engine cowl today. I took a page out of Papa's build and decided to use nutserts instead of the pop rivets that come with the kit. I figure this would make the cowl easily removable in case I had to work on the radiator for any reason. I think it's going to make the engine compartment look clean.

I'm not completely done yet, but should be able to wrap it up tomorrow.
-
01-08-2020, 08:11 PM
#384
Looking good, Pat. You're getting close now!
Dave
-
Post Thanks / Like - 1 Thanks, 0 Likes
-
01-10-2020, 05:06 PM
#385
Senior Member
Side Louvers and More
I've had the past four days off of work and had big plans to possibly finish the build. Well, that plan quickly came to a halt. I learned that in order for a car to pass inspection in Texas, it has to have windshield wipers. When I started my build, I was not planning on installing windshield wipers, but it looks like I'm going to have to install them.
I ordered the windshield wiper kit from Factory Five on Monday of this week and have yet to receive the kit. I called FF today to inquire on the status of my order. As I was talking to the lady from FF, it was clear there was some mix up with the order. I'm not sure what was going on, but about 10 minutes after hanging up, I got an email from FF stating the package was ready for shipping.
I was planning on putting the body back on during this 4 day window, but elected not to until I can install the wiper kit. So basically, I wasted 4 days not making a lot of progress, which has been annoying. Oh well.
Today, prepped my side louvers. I bolted the 90 degree brackets to the louvers using 8-32 bolts and screws.


I got a lot of help from my shop assistant in the background
I'm waiting for the mounting tabs to get delivered from McMaster. I'm also waiting for the HSRF to get delivered from Amazon. Thanks to BadAsp427 and Edwardb for the detailed write-ups on how to install these things. I read both of those posts several times. Hopefully once I get the rest of my supplies I can get the louvers installed.
Then it'll be windshield wiper kit and then hopefully I can get the body back on and get on with the rest of the build.
Question: Should I drill the holes in the frame for the aluminum panels that surround the radiator before putting the body on, or can these holes be drilled when the body is on?
-
01-10-2020, 05:16 PM
#386
Pat,
A couple of tips on the louvres. First, the angle brackets will need to sit back from the edge of the louvre enough to account for the height of the mounting studs, unless you have a different mounting method planned. It's maybe 1/16" of an inch or so. You can just oblong the holes in the bracket for the mounting bolts you used to get some adjustability. If you don't account for the stud thickness, your louvres won't sit flush against the body.

The other tip I have for you is simple. Flip those mounting screws over so that the button head is what you see rather than the nut.

Dave
Last edited by Papa; 01-10-2020 at 05:23 PM.
-
Post Thanks / Like - 1 Thanks, 0 Likes
-
01-10-2020, 05:29 PM
#387
Senior Member
Dave,
Thank you for the tips. I'll be making those adjustments.
Originally Posted by
Papa
Pat,
A couple of tips on the louvres. First, the angle brackets will need to sit back from the edge of the louvre enough to account for the height of the mounting studs, unless you have a different mounting method planned. It's maybe 1/16" of an inch or so. You can just oblong the holes in the bracket for the mounting bolts you used to get some adjustability. If you don't account for the stud thickness, your louvres won't sit flush against the body.
The other tip I have for you is simple. Flip those mounting screws over so that the button head is what you see rather than the nut.
Dave
-
01-10-2020, 06:41 PM
#388
Why don't you put the screw and nuts in from the other side. Allen head button screw shows instead of the nut.
Looks good. I am at the point I need to install mine. Thanks for the tip on the set back of the bracket.
20th Anniversary Mk IV, A50XS Coyote, TKO 600, Trunk Drop Box, Trunk Battery Box, Cubby Hole, Seat Heaters, Radiator hanger and shroud.
-
01-15-2020, 09:25 PM
#389
Senior Member
Louvers 2.0
I had a few hours to tinker in the garage today. I worked on prepping the side louvers for installation. I listened to the forum and flipped the button head screws so the heads of the screws are visible.

Also, I oblonged the holes in the bracket with a Dremel. This allows me to move the bracket to make room for the thickness of the mounting tabs, which will ensure the louvers sit flush against the body.
For the time being, I put a bunch of washers between the mouting tab and bracket. These washers are just for keeping the bracket lifted away from the body when applying the HSRF. This way the bracket and louver won't get covered in HSRF.

 Tomorrow, I'll get the mounting tabs bonded to the inside of the body. Then I'm going to remove those washers and remount the louvers and I'm hopefully the louvers will be flush with the body
Last edited by Pat427; 01-15-2020 at 09:36 PM.
MK4-IRS, 427w, TKO-600
-
01-16-2020, 06:19 PM
#390
Senior Member
Louvers Cont.
I managed to get the mounting tabs attached to the body. I used 3M HSRF. Not cheap, but that is some serious stuff. Once it hardened, those mounting tabs were rock solid.
This is a picture of when the HSRF was hardening. After it set up, I took off the louver and removed the washers. This took a little work with the Dremel, but I got it all cleaned up and it appears the louvers are lined up and flush with the body.

(It looks like there is a gap between the louver and the upper opening of the body, but there isn't, it's just the angle of the photo)
Now I have to grind the opening in the body to match the size and slant of the louvers.
Last edited by Pat427; 01-16-2020 at 06:21 PM.
MK4-IRS, 427w, TKO-600
-
01-21-2020, 02:30 PM
#391
Senior Member
Updates
I had a few hours in the garage today and knocked out a couple of things.
First, I finished the side louver body openings. I basically followed the instructions from EdwardBs and BadAsp427's build threads. It took a little longer than I expected to grind out the openings using my Dremel, but I was able to get things looking pretty good. They're not perfect, but it looks better than before.

Next, I was able to mount the windshield wiper motor to the firewall. It was pretty straightforward. I had a little interference from the busbar that was mounted on the cockpit side of the firewall, but I was able to get things tightened down without too much fuss.

Tomorrow I'll be finishing the windshield wiper install.
-
01-22-2020, 01:10 PM
#392
Senior Member
Fuel Line Replacement Part 1:
I had originally used the kit supplied hard lines for my fuel send and return lines. (5/16th and 1/4in). However, it was brought to my attention that my 427 engine and Holley Sniper would require larger lines in order to function properly. Therefore, I'm going to replace my fuel lines with 3/8th inch line.
Well, this is easier said than done.
The biggest issue is the fact I had to replace my fuel pump hanger. Currently, I have the hanger that came with my kit, which has send and return ports that are 5/16 and 1/4in. So I went ahead and purchased this hanger from Pro-M Racing https://www.promracing.com/high-flow...-mustangs.html.
This was recommended to me by BadAsp427 way earlier in my build and recently by Papa. Thank you both for the recommendation.
I received the hanger last night and installed it today. The biggest issue with this hanger is the fact you have to modify the hole in the fuel tank. Here is a picture from the instructions that come with the hanger:

The hard part about this modification was preventing any metal chips from falling into the tank. I was able to remove my old hanger without too much hassle (although the white filter on the bottom of the pump fell off into the tank and I had to retrieve it with a coat hanger).
I then took a couple pieces of Gorilla Tape and covered the hole in the tank from the inside with the sticky part of the tape pointed upwards. Kinda tricky to do this. I then used my Dremel to make the modification. The metal shavings all fell onto the sticky tape and I was then able to remove the tape without letting the metal shavings fall into the tank.
I then took apart my old hanger and moved the fuel pump (Walbro 255) onto the new hanger, attached the wires and used heat shrink to make good connections. I was then able to get the new pump/hanger assembly into the tank. I think everything went alright, but I'm always nervous about whether or not any of those wires came loose as I was wiggling it though the hole in the tank.

Then I proceeded to remove my hard fuel lines. Not too much to talk about here, except the spilling of gas in my garage is probably going to upset my wife when she smells it. 
Next, I have to order new fuel hose and AN fittings. I'm going with flexible hose this time. I know there has been chatter about this topic, but I just don't have the energy to mess around with flaring and bending tube. I'm going with PTFE lined 3/8th line this time.
I'll keep yall posted.
Last edited by Pat427; 01-22-2020 at 02:13 PM.
MK4-IRS, 427w, TKO-600
-
Post Thanks / Like - 0 Thanks, 1 Likes
Papa liked this post
-
01-22-2020, 02:06 PM
#393
You have already done the work, so this is kinda a moot point. But, did you try to install the Pro-M without modifying the fuel tank flange? I was just BARELY able to get mine in without filing anything down. I had to line up the bends in the lines of the hanger with the notches in the flange and it worked.
You may have experience with braided lines and know this, but this was the first time I have ever installed AN fittings. I found that cutting the line with battery cable cutters made the job super easy. Definitely easier than taping the line to prevent fraying and cutting with a saw. I cut the line, and immediately installed the fitting with no fraying problems at all. When I first tried the saw method, it was a total PITA.
MK IV Build #9659, 3 link, 17's, Forte 347, Sniper EFI, power steering, built for a freak sized person with 17" Kirkey Vintage seats, RT drop trunk, RT turn signal, lots of stuff from Breeze Automotive, Wilwood brakes, paint by Jeff Miller
-
01-22-2020, 02:16 PM
#394
Senior Member
Terry,
I might take you up on that idea of using battery cable cutters. I messed around with AN fittings earlier in my build and almost lost my mind with getting my fingers poked with the sharp frayed ends of the tube.
Originally Posted by
TMartinLVNV
You have already done the work, so this is kinda a moot point. But, did you try to install the Pro-M without modifying the fuel tank flange? I was just BARELY able to get mine in without filing anything down. I had to line up the bends in the lines of the hanger with the notches in the flange and it worked.
You may have experience with braided lines and know this, but this was the first time I have ever installed AN fittings. I found that cutting the line with battery cable cutters made the job super easy. Definitely easier than taping the line to prevent fraying and cutting with a saw. I cut the line, and immediately installed the fitting with no fraying problems at all. When I first tried the saw method, it was a total PITA.
-
01-22-2020, 02:33 PM
#395

Originally Posted by
Pat427
Terry,
I might take you up on that idea of using battery cable cutters. I messed around with AN fittings earlier in my build and almost lost my mind with getting my fingers poked with the sharp frayed ends of the tube.
This is how my buddy that owns a hydraulic hose shop showed me how to do it:
-After cutting, create a slight bevel on the inner rubber hose, basically take off the 90 angle. I have a deburring tool for reloading ammo that worked perfectly. Insert the cone end of the deburring tool and take off just a smidge.
-Put a light coating of oil on the metal male end of the AN fitting and press into the hose. I was able to do this using just my hands, no vice, no clamp necessary. Give it a hard push and twist. I used gun oil as that is what happened to be next to me at the time. One drop and spread it around with my finger.
-Tighten down the locking nut. Nice and snug. Not overly tight. The seal is created by the male tube on the female hose. Not the nut.
-Use AN wrenches if you want it to look pretty.
This was my first time using AN fittings. I have 7 on my fuel lines and none leaked at all. My only fuel leak was at the filter and it wasn't an AN fitting.
MK IV Build #9659, 3 link, 17's, Forte 347, Sniper EFI, power steering, built for a freak sized person with 17" Kirkey Vintage seats, RT drop trunk, RT turn signal, lots of stuff from Breeze Automotive, Wilwood brakes, paint by Jeff Miller
-
01-23-2020, 03:24 AM
#396

Originally Posted by
Pat427
Fuel Line Replacement Part 1:
I had originally used the kit supplied hard lines for my fuel send and return lines. (5/16th and 1/4in). However, it was brought to my attention that my 427 engine and Holley Sniper would require larger lines in order to function properly. Therefore, I'm going to replace my fuel lines with 3/8th inch line.
Well, this is easier said than done.
The biggest issue is the fact I had to replace my fuel pump hanger. Currently, I have the hanger that came with my kit, which has send and return ports that are 5/16 and 1/4in. So I went ahead and purchased this hanger from Pro-M Racing
https://www.promracing.com/high-flow...-mustangs.html.
This was recommended to me by BadAsp427 way earlier in my build and recently by Papa. Thank you both for the recommendation.
I received the hanger last night and installed it today. The biggest issue with this hanger is the fact you have to modify the hole in the fuel tank. Here is a picture from the instructions that come with the hanger:
The hard part about this modification was preventing any metal chips from falling into the tank. I was able to remove my old hanger without too much hassle (although the white filter on the bottom of the pump fell off into the tank and I had to retrieve it with a coat hanger).
I then took a couple pieces of Gorilla Tape and covered the hole in the tank from the inside with the sticky part of the tape pointed upwards. Kinda tricky to do this. I then used my Dremel to make the modification. The metal shavings all fell onto the sticky tape and I was then able to remove the tape without letting the metal shavings fall into the tank.
I then took apart my old hanger and moved the fuel pump (Walbro 255) onto the new hanger, attached the wires and used heat shrink to make good connections. I was then able to get the new pump/hanger assembly into the tank. I think everything went alright, but I'm always nervous about whether or not any of those wires came loose as I was wiggling it though the hole in the tank.
Then I proceeded to remove my hard fuel lines. Not too much to talk about here, except the spilling of gas in my garage is probably going to upset my wife when she smells it.
Next, I have to order new fuel hose and AN fittings. I'm going with flexible hose this time. I know there has been chatter about this topic, but I just don't have the energy to mess around with flaring and bending tube. I'm going with PTFE lined 3/8th line this time.
I'll keep yall posted.
It looks to me like you haven't fully seated the locking ring on the Pro-M hanger.
-
Post Thanks / Like - 1 Thanks, 0 Likes
-
01-24-2020, 11:16 AM
#397
Senior Member
-
01-24-2020, 11:24 AM
#398
Pat,
I'll send you a couple.
Dave
-
01-24-2020, 01:19 PM
#399
Senior Member
Wow! Thanks Dave!
Originally Posted by
Papa
Pat,
I'll send you a couple.
Dave
-
01-24-2020, 01:44 PM
#400
No problem, Pat. They're in the mail.
Dave
-
Post Thanks / Like - 0 Thanks, 2 Likes


 Thanks:
  Likes:


 Reply With Quote
