-
01-25-2020, 02:23 PM
#401
Senior Member

Clutch Adjuster
Not much to report today. I installed my clutch adjuster today. Went together fairly easily. I drilled and tapped 10-24 holes in the footbox and then screwed on the adjuster. I ended up dinging up the footbox aluminum panel getting the old clutch adjuster out. I'll touch up the powder coat later with some matte paint.

Last edited by Pat427; 01-25-2020 at 06:56 PM.
MK4-IRS, 427w, TKO-600
-
01-27-2020, 04:11 PM
#402
Senior Member
-
01-27-2020, 06:46 PM
#403
Senior Member
Windshield Wiper Wiring Question
Probably a silly question, but I thought I'd run it past the forum to be sure.
In the diagram for the windshield wiper wiring, there is a picture that shows two wires (purple & white) docking to the same location on the wire motor.

In order to accomplish this, do I simply twist those two wires together and then insert them into one of the provided connectors as seen below?
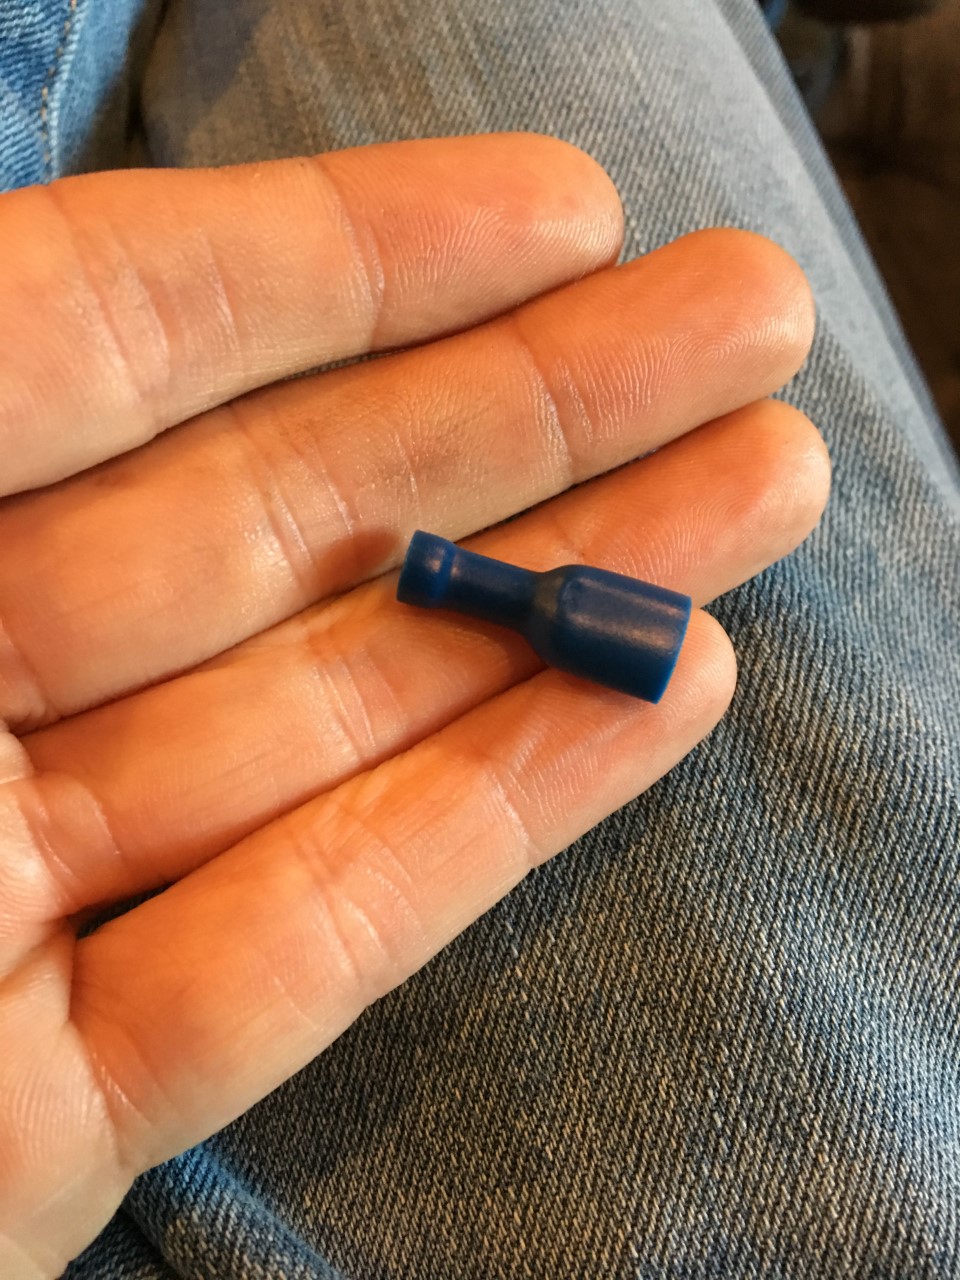
Thanks,
Patrick
-
01-27-2020, 07:06 PM
#404
-
Post Thanks / Like - 1 Thanks, 0 Likes
-
01-28-2020, 02:34 PM
#405
Senior Member
Wiper Wiring
Not much to report today. I finished the windshield wiper wiring today. It was pretty simple. Not sure where I'm going to mount the switch. I haven't decided if I'm going to put it on the dashboard or mount it under the dash.

Also, I received the 6AN hose that I'll be using to build my new fuel lines. Hopefully the 6AN hose will satisfy the Holley Sniper which requires 3/8th lines. Still waiting on the 6AN fittings to get delivered before I can start that project.
Last edited by Pat427; 01-28-2020 at 03:56 PM.
MK4-IRS, 427w, TKO-600
-
01-29-2020, 11:55 AM
#406
Senior Member
-
01-29-2020, 12:26 PM
#407
Non-compatible fitting for the filter. Could use a 6AN to barb fitting or change out filter.
Also not sure why they have the fuel line routed that way either. Should be able to relocate to inlet port #1 on back of throttle body.
Fuel Inlets.png
Do you have the regulator mounted to the firewall?
Here is old post when you mounted it https://Post #148
Not needed, Sniper has it's own internal fuel regulator.
You installed a new pump hanger, the sock on that hanger is the first filter, you can eliminate one of your inline filters and install the 10 micron inline.
Last edited by Greg K; 01-29-2020 at 01:17 PM.
-
01-29-2020, 01:47 PM
#408
Senior Member
Greg,
I previously removed the regulator on the firewall since the Sniper has its own.
My engine builder already has the fuel line going from the other side of the filter to Port #2.
The reason I would like to use the existing fuel filter is because in order to remove the filter, I would have remove my power steering pump in order to access the AN fittings on the outlet side of the filter.
So, ideally, I'd like to figure out a way to attach my 6AN fuel hose to the male barb on the filter. You mentioned a 6AN barb fitting. Is this what I would need? https://www.amazon.com/Derale-98204-.../dp/B004XOR9T4. It seems like a piece like this would require a plain piece of tube to connect to the barb on the filter?

Originally Posted by
Greg K

Non-compatible fitting for the filter. Could use a 6AN to barb fitting or change out filter.
Also not sure why they have the fuel line routed that way either. Should be able to relocate to inlet port #1 on back of throttle body.
Fuel Inlets.png
Do you have the regulator mounted to the firewall?
Here is old post when you mounted it
https://Post #148
Not needed, Sniper has it's own internal fuel regulator.
You installed a new pump hanger, the sock on that hanger is the first filter, you can eliminate one of your inline filters and install the 10 micron inline.
Last edited by Pat427; 01-29-2020 at 01:49 PM.
MK4-IRS, 427w, TKO-600
-
01-29-2020, 02:18 PM
#409
Can you not disconnect the line up top at the throttle body and pull it down? You don't need to three filters and the additional fuel line around and under the engine and can eliminate the barb connection.
Last edited by Greg K; 01-29-2020 at 02:22 PM.
-
01-29-2020, 03:56 PM
#410
Senior Member
Greg,
For clarification, I have already bypassed the fuel filter that came with the kit.
So as it stands, the fuel goes through the filter that is on the bottom of the in-tank hanger and then goes to the filter that my engine builder already installed (1st picture in post #406). From that filter it goes to the Sniper.
I could disconnect that fuel line from the Sniper, but the other end of the line is still connected to filter outflow port. I would have to remove my power steering pump in order to reach the AN fittings and loosen it, which I really don't want to do.
I would prefer to leave the filter in place and get that 6AN fuel line to go through the filter. I just have to figure out a way to get the 6AN fittings to attach to the male in-flow port on the filter.
Originally Posted by
Greg K
Can you not disconnect the line up top at the throttle body and pull it down? You don't need to three filters and the additional fuel line around and under the engine and can eliminate the barb connection.
Last edited by Pat427; 01-29-2020 at 04:05 PM.
MK4-IRS, 427w, TKO-600
-
01-29-2020, 04:16 PM
#411
Senior Member

I think you'd have to use the barb fitting and connect with a rubber hose and clamps. Personally. I would change out the filter to one that works with braided AN fittings. A little more work, but that's with just about everything.
-
01-29-2020, 04:29 PM
#412
Thought you still had the filter back by the tank. Do they have some bracket or clamp holding the fuel filter or fuel line in place behind the PS pump?
Could always put the filter back in that came with kit, you have all the lines for it from the tank. IMO, it would be a much cleaner and serviceable install in the end.
Originally Posted by
Pat427
Greg,
For clarification, I have already bypassed the fuel filter that came with the kit.
So as it stands, the fuel goes through the filter that is on the bottom of the in-tank hanger and then goes to the filter that my engine builder already installed (1st picture in post #406). From that filter it goes to the Sniper.
I could disconnect that fuel line from the Sniper, but the other end of the line is still connected to filter outflow port. I would have to remove my power steering pump in order to reach the AN fittings and loosen it, which I really don't want to do.
I would prefer to leave the filter in place and get that 6AN fuel line to go through the filter. I just have to figure out a way to get the 6AN fittings to attach to the male in-flow port on the filter.
-
01-29-2020, 05:30 PM
#413
Senior Member
Greg,
The filter is bolted to the engine block by a hose clamp. It would be impossible to get a wrench on that bolt and the AN fitting that holds the fuel line to the out flow side of the filter with the power steering pump still in place.
Originally Posted by
Greg K
Thought you still had the filter back by the tank. Do they have some bracket or clamp holding the fuel filter or fuel line in place behind the PS pump?
Could always put the filter back in that came with kit, you have all the lines for it from the tank. IMO, it would be a much cleaner and serviceable install in the end.
-
01-29-2020, 06:13 PM
#414
What's another hour or two...your call, I know what I'd do. 
-
01-29-2020, 06:54 PM
#415


Pat,
Just my opinion. The filter you engine builder put in will some day have to be removed to replace it with a new filter, right? If that is the case and it is that hard to get too now then I would suggest moving it now so that in the future, with a completed car, painted, etc you are able to replace it with ease. The mounting location that the manual shows back in the rear of the car makes the replacement much easier.
Also, the fitting that is on the current filter that your engine builder gave you is designed for a simple rubber hose and hose clamp be attached to it. There are end pieces that are designed to "hide" the hose clamp and give the appearance of the actual hose fittings. This photo is an example of that type of fitting (just a bit larger).
Again, however, I would find a place to install your filter that is much easier to get to and replace when the time comes that you need to replace it from normal use. Just because your engine builder put it there does not mean it is the best for your build.
Hope my opinion helps...
Carl
IMG_2307.jpg
-
Post Thanks / Like - 1 Thanks, 0 Likes
-
01-29-2020, 08:03 PM
#416
Senior Member
Carl,
As always, your advice much appreciated and I'll be taking you up on finding a more easily accessible location for my filter for all the reasons you mentioned.
Originally Posted by
BadAsp427
Pat,
Just my opinion. The filter you engine builder put in will some day have to be removed to replace it with a new filter, right? If that is the case and it is that hard to get too now then I would suggest moving it now so that in the future, with a completed car, painted, etc you are able to replace it with ease. The mounting location that the manual shows back in the rear of the car makes the replacement much easier.
Also, the fitting that is on the current filter that your engine builder gave you is designed for a simple rubber hose and hose clamp be attached to it. There are end pieces that are designed to "hide" the hose clamp and give the appearance of the actual hose fittings. This photo is an example of that type of fitting (just a bit larger).
Again, however, I would find a place to install your filter that is much easier to get to and replace when the time comes that you need to replace it from normal use. Just because your engine builder put it there does not mean it is the best for your build.
Hope my opinion helps...
Carl
IMG_2307.jpg
-
01-29-2020, 08:12 PM
#417
Senior Member
Wiper Support
I originally saw this modification in EdwardBs thread, but have seen several others do the same. I took a piece of 3/4in tubing and cut new supports for the windshield wiper wheelboxes. These metal support replace the rubber ones that came with the wiper kit. Fairly simple project and I'm pleased with the results.

-
01-30-2020, 03:10 PM
#418
Senior Member
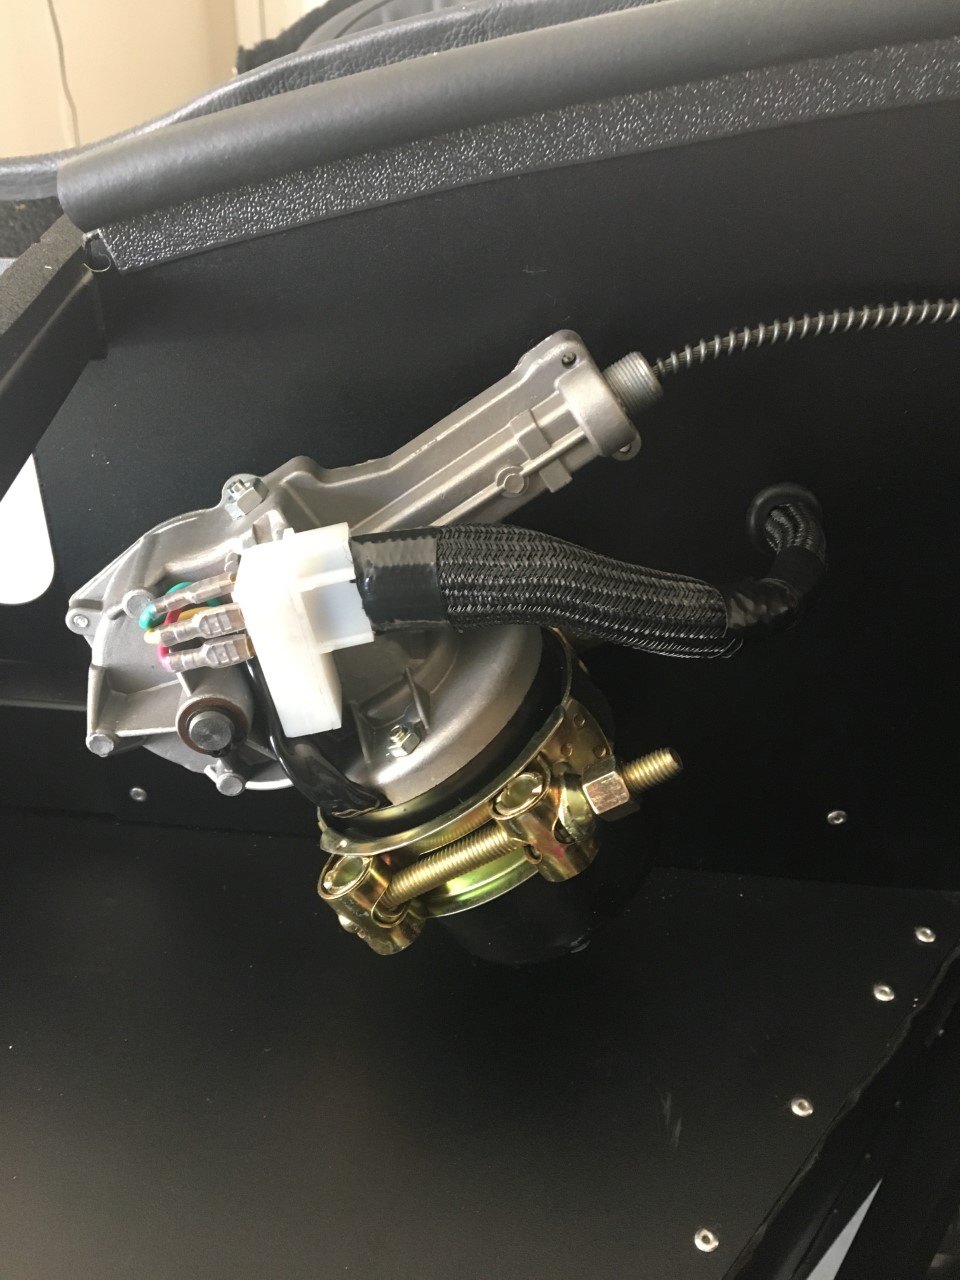
Fuel Line Routing
With respect to the flexible PTFE fuel hose, is it okay to route the hose on top of the engine manifold or is this a no-no?
For example, in this picture, would it be okay to route the hose where the red arrow is pointing?

-
01-30-2020, 03:52 PM
#419
Why not cut it shorter and use port #1 on the rear? Just swap the fittings on the throttle body.
-
Post Thanks / Like - 1 Thanks, 0 Likes
-
01-30-2020, 04:19 PM
#420
I second that. The inlet and outlet on the back of the TB should be used. No need for a fuel line to have to be routed to the front.
-
Post Thanks / Like - 1 Thanks, 0 Likes
-
01-30-2020, 04:30 PM
#421
Definitely swap to the rear input -- much cleaner.
-
01-30-2020, 05:41 PM
#422
Senior Member
Roger that.
Thanks for the advice guys.
Originally Posted by
Papa
Definitely swap to the rear input -- much cleaner.
-
01-31-2020, 04:42 PM
#423
With everything you've done and been through, I really am looking forward to seeing this car run and done. Especially when I look back to your first post... "I have no knowledge or experience when it comes to building a car." Yer gettin it done!
-
Post Thanks / Like - 1 Thanks, 1 Likes
 Papa
Papa liked this post
-
01-31-2020, 04:58 PM
#424
Senior Member
Thanks Boydster! I've definitely learned a lot over this past year. This forum has helped more than I ever imagined. I think I'm getting close to being able to wrap up the build soon. I'm looking forward to seeing it done too.
Originally Posted by
Boydster
With everything you've done and been through, I really am looking forward to seeing this car run and done. Especially when I look back to your first post... "I have no knowledge or experience when it comes to building a car." Yer gettin it done!
Last edited by Pat427; 01-31-2020 at 05:35 PM.
MK4-IRS, 427w, TKO-600
-
Post Thanks / Like - 0 Thanks, 1 Likes
Papa liked this post
-
01-31-2020, 05:38 PM
#425
Senior Member
Holding Pattern
Still waiting for my PTFE hose fittings to arrive in the mail, so I'm kind of in a holding pattern today. I decided to mock up my cockpit today just for fun.


-
Post Thanks / Like - 0 Thanks, 1 Likes
-
02-07-2020, 02:07 PM
#426
Senior Member
Warning?
As outlined in a previous post, I installed the Pro-M Racing Fuel Pump Hanger.
I installed the hanger without too much hassle. It required that I grind the opening of the fuel tank a little but, which was fairly straightforward. Of note, I did this modification/installation with 1/4 tank of gas in the tank.
I saw this warning on the Installation Instructions and ignored it, but now I'm getting ready to start my engine again and I'm growing scared and wanted to run this past the forum.

I did not, "thoroughly clean" the tank before installation of the hanger. Again, I installed the hanger with fuel still in the tank, so there was no cleaning to be had. I'm not sure if I needed to drain the tank and clean it or what. I'm not sure what/how a fire or explosion would happen, but I was hoping someone could shed some light on this?
Thank you guys,
Patrick
-
02-07-2020, 02:19 PM
#427
Grinding on the tank may have caused a spark to ignite any fuel that may be in the tank. Nothing to do with attempting to start engine once more.
-
Post Thanks / Like - 0 Thanks, 1 Likes
-
02-07-2020, 03:21 PM
#428
I did not have to grind my tank. The Pro M lines will flex enough to go in, without damage or grinding.
Watch the wires on the sharp metal edges.
20th Anniversary Mk IV, A50XS Coyote, TKO 600, Trunk Drop Box, Trunk Battery Box, Cubby Hole, Seat Heaters, Radiator hanger and shroud.
-
02-07-2020, 04:45 PM
#429
Senior Member
Railroad,
You read my mind.
I too was a little worried about the wires getting damaged by the sharp edges. My paranoia got the best of me, so I decided to check it out. I removed the fuel filler and took a picture. I poked the wires around with a chopstick to make sure there were not any exposures or damage. Things looked okay. Pic below.

Originally Posted by
Railroad
I did not have to grind my tank. The Pro M lines will flex enough to go in, without damage or grinding.
Watch the wires on the sharp metal edges.
-
02-07-2020, 05:35 PM
#430
Originally Posted by
Railroad
I did not have to grind my tank. The Pro M lines will flex enough to go in, without damage or grinding.
Watch the wires on the sharp metal edges.
That's how I did mine too. It was tricky, but no modifications were necessary.
-
02-07-2020, 05:37 PM
#431
Originally Posted by
Pat427
Railroad,
You read my mind.
I too was a little worried about the wires getting damaged by the sharp edges. My paranoia got the best of me, so I decided to check it out. I removed the fuel filler and took a picture. I poked the wires around with a chopstick to make sure there were not any exposures or damage. Things looked okay. Pic below.
It is looking good Pat. You will be happy that you went with the bigger lines and hanger when it is all finished up.
-
Post Thanks / Like - 1 Thanks, 0 Likes
-
02-07-2020, 05:58 PM
#432
Originally Posted by
Pat427
Railroad,
You read my mind.
I too was a little worried about the wires getting damaged by the sharp edges. My paranoia got the best of me, so I decided to check it out. I removed the fuel filler and took a picture. I poked the wires around with a chopstick to make sure there were not any exposures or damage. Things looked okay. Pic below.
Looks good, Pat. Good decision to do the proper lines now. What did you end up doing for the filter? I have a nice Holley filter with -6AN inlet and outlet and some mounting rings that I didn't use if you are interested. Not cheap, but top-shelf and I'll save you some money over retail.
Dave
-
02-08-2020, 10:26 AM
#433
Senior Member
Dave,
As of now, I ended up using the existing filter that came with the kit. It was already in place, so I just used it. I considered using an aftermarket Holley filter, but I’m not sure if it’s needed.
Is there a specific advantage to using an aftermarket Holley filter?
Originally Posted by
Papa
Looks good, Pat. Good decision to do the proper lines now. What did you end up doing for the filter? I have a nice Holley filter with -6AN inlet and outlet and some mounting rings that I didn't use if you are interested. Not cheap, but top-shelf and I'll save you some money over retail.
Dave
-
02-08-2020, 11:04 AM
#434
Originally Posted by
Pat427
Dave,
As of now, I ended up using the existing filter that came with the kit. It was already in place, so I just used it. I considered using an aftermarket Holley filter, but I’m not sure if it’s needed.
Is there a specific advantage to using an aftermarket Holley filter?
No specific advantage I can think of as long as it can be easily replaced and keeps the crud out of the injectors or jets.
Dave
-
02-08-2020, 05:22 PM
#435
Pat:
Thanks for your build information. You are a year ahead of me. I'm just doing the suspension and I already had several of the issues you raised. You are going to save me a lot of head scratching. I've only read your first two pages and skipped to the end to thank you. I'm looking forward to how you dealt with the issues I'm sure are upcoming for me. Also, thanks to everyone who has helped you, they are also helping me.
One question, what is the trick you used to spread mounting brackets that are too tight? So far I've used a 24 inch Crescent wrench. Maybe you have a better technique.
-
02-08-2020, 05:30 PM
#436
Originally Posted by
SteveP
One question, what is the trick you used to spread mounting brackets that are too tight? So far I've used a 24 inch Crescent wrench. Maybe you have a better technique.
Get a piece of threaded rod, a pair of nuts, and a pair of washers. put the nuts on the rod and thread them toward the center of the rod. slip the rod between the tabs with the rod running through the tab's bolt holes. slip a washer larger than the tab's holes onto the rod inside the tabs on both ends. spin the nuts back out toward the ends of the rod until they are holding the washers against the inside of the tabs. continue to wrench on the nuts until the tabs are spread apart to the desired width. If you need to pull the tabs closer together, just put the nuts and washers on the outside of the tabs instead of the inside.


Last edited by Papa; 02-08-2020 at 06:15 PM.
-
02-09-2020, 02:38 PM
#437
Thank you. A much more elegant solution than bending the flange with my 24 inch crescent wrench.
-
Post Thanks / Like - 0 Thanks, 1 Likes
-
02-09-2020, 06:00 PM
#438
Senior Member
Unhappy Camper
I had planned on tightening up all my fuel line connections today and attempt to start my engine, but I ran into a snag.
I had assembled a short piece of fuel line to connect my new Pro-M Hanger to the fuel filter. Well, when I was tightening the fitting onto the hanger, the dang fitting stripped on me.

I had tried to save some money and had ordered a cheaper fitting for this particular connection and now I'm paying for it. So, I've ordered a new one (Vibrant Performance from Summit). I've been happy with the other Vibrant Performance fittings, so hopefully once this arrives, I can get that little piece of fuel line hooked up and attempt to fire the engine.
-
02-09-2020, 09:16 PM
#439
ugh.... I know that feeling, Pat! I broke a fitting on a flexible fuel line - same thing where i thought, "Maybe I should tighten this just a little bit more just to be safe" and bam, I broke it... Hope you get a replacement soon!
-
Post Thanks / Like - 1 Thanks, 0 Likes
-
02-16-2020, 07:51 PM
#440
Senior Member
New Builder
I haven't been in the garage much recently for a really good reason. I've been busy welcoming a new member to the forum. This is our first son. Welcome to the build, Emmett!

-
Post Thanks / Like - 0 Thanks, 7 Likes


 Thanks:
  Likes:


 Reply With Quote


