-
04-16-2020, 03:58 PM
#521
Senior Member

-
04-17-2020, 03:38 PM
#522
Senior Member
Throttle Mount
I broke down and finally purchased a throttle cable plate from FAST. I just wasn't happy with the way the existing throttle connection looked.

I had to grind the base plate a little bit (red arrow) because it was interfering with the coil. I then spray painted the area to cover up the grinder marks.
The cable is much straighter and looks cleaner.
Question: Is there a better way to connect the cable to that L-brakcet (blue arrow)? I'm worried that the only thing connecting the cable to the throttle is a little set screw.
Last edited by Pat427; 04-17-2020 at 03:57 PM.
MK4-IRS, 427w, TKO-600
-
04-17-2020, 03:55 PM
#523
Pat,
Ask and we'll help you spend a bit more of your money. This connector from Lokar is a great choice to replace the one from the kit that your are using:
https://www.amazon.com/gp/product/B0...?ie=UTF8&psc=1
A cheaper option is to run a second set screw in the kit-provided connector so that you pinch the cable between two set screws.
Dave
-
04-17-2020, 04:02 PM
#524
Senior Member
Dave,
You've become a really good spender of my money during the build.  . I've seen this connector in other build threads and I like it. Thanks for the link.

Originally Posted by
Papa

Pat,
Ask and we'll help you spend a bit more of your money. This connector from Lokar is a great choice to replace the one from the kit that your are using:
https://www.amazon.com/gp/product/B0...?ie=UTF8&psc=1
A cheaper option is to run a second set screw in the kit-provided connector so that you pinch the cable between two set screws.
Dave
-
04-17-2020, 04:51 PM
#525
Neat looking set up, but I think you can do better with those throttle return springs.
They should be in line with the travel of the throttle shaft bracket. Ideally they should pull opposite of the travel. I see a couple of places to hook them, that would not require much work. JMO
20th Anniversary Mk IV, A50XS Coyote, TKO 600, Trunk Drop Box, Trunk Battery Box, Cubby Hole, Seat Heaters, Radiator hanger and shroud.
-
04-18-2020, 02:25 PM
#526
Senior Member
Wiring Question
I'm trying to get my lights wired today, however I've hit a wall.
Coming out of the Dash Harness are three wires (see pic)

There is a light blue wire called HDLT SW-DIM, red LOW BEAM and a brown wire HIGH BEAM.
Where do these go?
According to the wiring diagram, these are supposed to connect to the Front Harness, but I don't see how that is possible. It seems to me they need to connect to the Headlight Switch, but my headlight switch only has two free male connections.
Any help would be appreciated
-
04-18-2020, 03:06 PM
#527
Originally Posted by
Pat427
Wiring Question
I'm trying to get my lights wired today, however I've hit a wall.
Coming out of the Dash Harness are three wires (see pic)
There is a light blue wire called HDLT SW-DIM, red LOW BEAM and a brown wire HIGH BEAM.
Where do these go?
According to the wiring diagram, these are supposed to connect to the Front Harness, but I don't see how that is possible. It seems to me they need to connect to the Headlight Switch, but my headlight switch only has two free male connections.
Any help would be appreciated
Pat,
Here is how they go on the kit-provided switch (On-On switch):

I ended up using a relay wired like this:
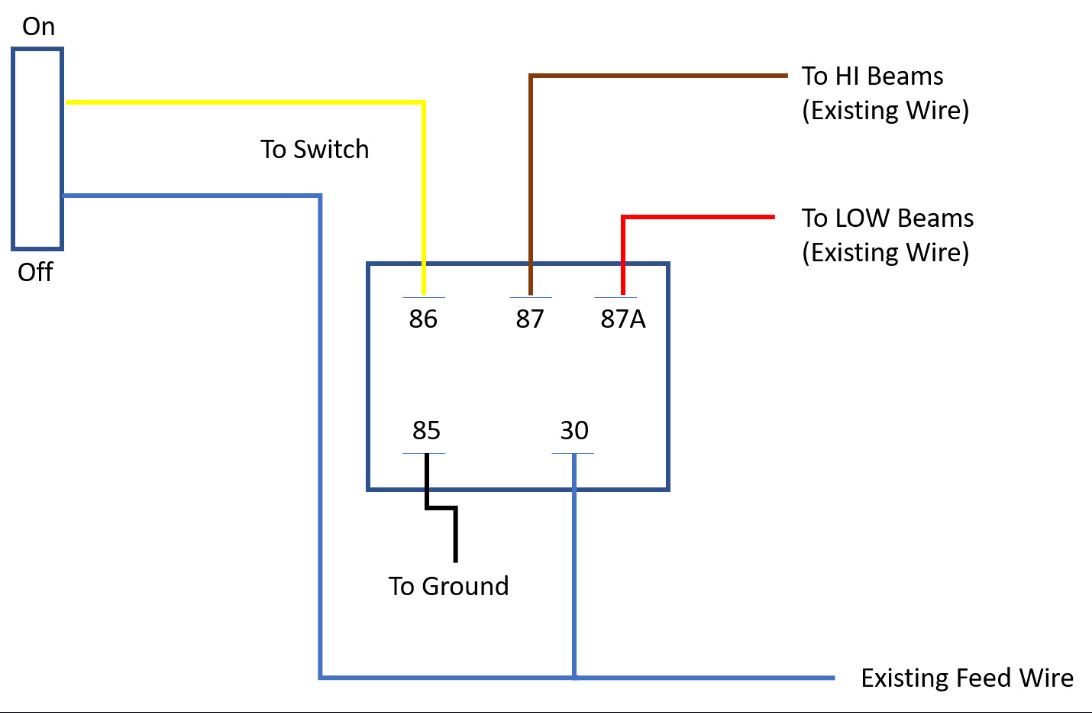
With is setup, if the switch fails, I still have low-beams by default.
Dave
Last edited by Papa; 04-18-2020 at 03:18 PM.
-
Post Thanks / Like - 1 Thanks, 0 Likes
-
04-18-2020, 03:48 PM
#528
Senior Member
Dave,
Thank you for the picture. I was totally off with my thinking. I was able to get the lights working properly. Very happy to see the lights on for the first time.
Originally Posted by
Papa
Pat,
Here is how they go on the kit-provided switch (On-On switch):
I ended up using a relay wired like this:
With is setup, if the switch fails, I still have low-beams by default.
Dave
-
04-18-2020, 03:57 PM
#529
Senior Member
-
04-18-2020, 07:54 PM
#530
Senior Member
Turn Signal
On the front passenger turn signal lights:

On the RF harness, there is a Tan, Light Blue and Black.
On the Turn Signal, there is a Yellow&Red wire and a Green wire.
Does anyone know the mating pattern with these wires?
Much thanks,
Patrick
Last edited by Pat427; 04-18-2020 at 07:56 PM.
MK4-IRS, 427w, TKO-600
-
04-18-2020, 08:03 PM
#531


In the rear:
The Ron Francis harness is set up so that all 4 lamps are illuminated for tail lights with one on each side used for brake lights and the other on each side used for turn signals. I prefer to orient them so that the uppers are brake lights for better visibility. When using that configuration:
---Tan harness wire at each corner is for tail lights and will go to the low element on all four light assemblies via the red/yellow lamp wire.
---Purple harness wire at each corner is for brake lights and will go to the bright element on the upper light assembly per side via the green lamp wire.
---Yellow harness wire on the driver's side is for left turn and goes to the bright element on the lower light assembly via the green lamp wire.
---White harness wire on the passenger side is for right turn and goes to the bright element on the lower light assembly via the green lamp wire.
---Black wire on all joins with the black harness ground.
In front:
---Tan harness wire at each corner is for the amber parking/running lights and will go to the low element on both light assemblies via the red/yellow lamp wire.
---Dark green harness wire on the driver's side is for left turn and goes to the bright element on the light assembly via the green lamp wire.
---Light blue harness wire on the passenger side is for right turn and goes to the bright element on the light assembly via the green lamp wire.
---Black wire on both joins with the black harness ground.

-
04-18-2020, 08:12 PM
#532
Senior Member
Awesome! Thanks Papa!
Originally Posted by
Papa
In the rear:
The Ron Francis harness is set up so that all 4 lamps are illuminated for tail lights with one on each side used for brake lights and the other on each side used for turn signals. I prefer to orient them so that the uppers are brake lights for better visibility. When using that configuration:
---Tan harness wire at each corner is for tail lights and will go to the low element on all four light assemblies via the red/yellow lamp wire.
---Purple harness wire at each corner is for brake lights and will go to the bright element on the upper light assembly per side via the green lamp wire.
---Yellow harness wire on the driver's side is for left turn and goes to the bright element on the lower light assembly via the green lamp wire.
---White harness wire on the passenger side is for right turn and goes to the bright element on the lower light assembly via the green lamp wire.
---Black wire on all joins with the black harness ground.
In front:
---Tan harness wire at each corner is for the amber parking/running lights and will go to the low element on both light assemblies via the red/yellow lamp wire.
---Dark green harness wire on the driver's side is for left turn and goes to the bright element on the light assembly via the green lamp wire.
---Light blue harness wire on the passenger side is for right turn and goes to the bright element on the light assembly via the green lamp wire.
---Black wire on both joins with the black harness ground.
-
04-19-2020, 10:50 AM
#533
Senior Member
Lights
I was able to get the headlights and turn signal lights to turn on, but the turn signal doesn't work when I toggle the turn signal switch. Below is a picture of the lights on. The other picture is the turn signal switch wiring.
Could the switch be bad?


Thanks,
Pat
-
04-19-2020, 11:39 AM
#534
Senior Member

Is ignition keyed on? I think the power supply for the turn signals only work with key on as opposed to the hazards, which have constant power with key off (pink wire)
-
04-19-2020, 12:25 PM
#535
Senior Member
egchewy79,
Thank you for the advice. I turned the key to the "On" position and then tried the turn signals again. This time, both turn signal lights blink like what I would expect the Hazard lights to do. I guess I've got something mixed up.
Originally Posted by
egchewy79
Is ignition keyed on? I think the power supply for the turn signals only work with key on as opposed to the hazards, which have constant power with key off (pink wire)
-
04-19-2020, 01:09 PM
#536
Pat,
On the hazard switch, run the two red wires to the two center pins on the 6 pin switch. Then, put both the left and right wires on the two pins on just one end of the switch. It doesn't matter which end or which order the wires are placed. The pins on the other end of the switch will not have anything connected to them.
Dave
-
04-19-2020, 01:29 PM
#537
Senior Member
Hazard Switch
Does this look correct?

I'm concerned because the light blue and green wires say they are Front Turn wires. It doesn't seem like those wires should be on a Hazard switch?
Last edited by Pat427; 04-19-2020 at 01:38 PM.
MK4-IRS, 427w, TKO-600
-
04-19-2020, 01:52 PM
#538
Not a waxer

That is correct. The 4 way hazards power the wires for LF and RF turn signals as well as the LR and RR turn signals. The LF and LR tie together downstream in the harness as do the RF and RR.
Jeff
-
04-19-2020, 03:00 PM
#539
Senior Member
Wiring Continues
Alright, so I've made some progress, but things still seem mixed up.
When I toggle the Hazard switch to the "On" position (just like in the picture above), the turn signal lights will work properly. However, if I toggle the Hazard switch to the, "Off" position, the turn signal lights will both blink.
-
04-19-2020, 08:26 PM
#540
Senior Member
Brake Switch
Ok, so here's the current situation with the wiring:
The rear lights will only turn on if I also turn on the headlights. Once I pull the headlight handle out one notch, the rear lights of the car will light up. At that point, the turn signal will also work. However, if I turn off the headlights, the rear lights turn off, turn signal doesn't work and the brake lights won't turn on when the brake pedal is pushed.
I'm mostly concerned the brake lights don't work when the brake is pushed. I took a picture of my Brake Switch: Does this look right?

The white plunger on the Brake Switch is being pressed when the pedal is at rest. Once I press the pedal, the pedal is pushed away from the Brake Switch plunger and the plunger extends. Is this correct?
-
04-19-2020, 08:44 PM
#541
Pat,
Two things for you to consider:
1. For the turn signals to work, they all have to be hooked up. It sounds like you have then connected, but just want to be sure.
2. A bad ground connection in either side of the Weatherpack connector can cause weird results. Check the harness side of the connector with a volt meter to see if you are getting power on each of the tan, purple, yellow, and white pins with the ground pins in the connectors. If all those check out, use an ohm meter to do a continuity test on the lamp side connectors using the pins in the connector. If those check out, you have good connections and should work.
The brake light switch looks correct, but check the harness as described above with a helper or by wedging the brake pedal. There is an error in my version of the manual and I had to move the wires to the other two spades on the switch as my brake lights were on with the pedal at rest and would turn off when the pedal was pressed. Also, make sure the plunger comes out far enough to actuate the switch or the lights will never come on.
Dave
-
04-20-2020, 10:41 AM
#542
Senior Member
Thanks for the response, Dave.
I was able to get all the lights on the car working properly except for the brake lights, I still haven't figured them out yet. The brake lights WILL light up, but only if I pull on the knob on the headlight switch. So, it seems like the wiring and grounds are good to those lamps. Without much knowledge on the subject, I'm convinced the issue is with the brake switch. I'm gonna mess with that today and see if I can make any progress.
Originally Posted by
Papa
Pat,
Two things for you to consider:
1. For the turn signals to work, they all have to be hooked up. It sounds like you have then connected, but just want to be sure.
2. A bad ground connection in either side of the Weatherpack connector can cause weird results. Check the harness side of the connector with a volt meter to see if you are getting power on each of the tan, purple, yellow, and white pins with the ground pins in the connectors. If all those check out, use an ohm meter to do a continuity test on the lamp side connectors using the pins in the connector. If those check out, you have good connections and should work.
The brake light switch looks correct, but check the harness as described above with a helper or by wedging the brake pedal. There is an error in my version of the manual and I had to move the wires to the other two spades on the switch as my brake lights were on with the pedal at rest and would turn off when the pedal was pressed. Also, make sure the plunger comes out far enough to actuate the switch or the lights will never come on.
Dave
-
04-20-2020, 01:08 PM
#543
Your brake light switch should have a hot at all times lead, if you want the brake lights to work with the key off and headlight switch off.
The other wire(s) should go to the bright filament on the upper bulb on the rear of the car.
20th Anniversary Mk IV, A50XS Coyote, TKO 600, Trunk Drop Box, Trunk Battery Box, Cubby Hole, Seat Heaters, Radiator hanger and shroud.
-
04-21-2020, 06:57 PM
#544
Senior Member
Functionally Complete
After getting advice from the forum, I ended up replacing one of the fuses in the fusebox and BAM! The brake lights are working as intended. I'm very excited about this because now the car is functionally complete.
All systems are currently working: lights, gauges, engine, fan, brakes, transmission, horn, wiper motor. This is a pretty big day for me. Obviously, I have a lot of work until the car is totally complete, but I'm feeling good at the moment. Obviously, I would never have been able to get to this point without the help of BadAsp427, Papa, EdwardB, TMartinLVNV, Skidd, Kleiner, Wareaglescott, Boydster, Railroad, Mark Eaton, among multiple others. Thank you all for your help!
I'll keep you guys posted.
Last edited by Pat427; 04-21-2020 at 08:35 PM.
MK4-IRS, 427w, TKO-600
-
Post Thanks / Like - 0 Thanks, 2 Likes
-
04-22-2020, 01:39 AM
#545

Originally Posted by
Pat427
Functionally Complete
After getting advice from the forum, I ended up replacing one of the fuses in the fusebox and BAM! The brake lights are working as intended. I'm very excited about this because now the car is functionally complete.
All systems are currently working: lights, gauges, engine, fan, brakes, transmission, horn, wiper motor. This is a pretty big day for me. Obviously, I have a lot of work until the car is totally complete, but I'm feeling good at the moment. Obviously, I would never have been able to get to this point without the help of BadAsp427, Papa, EdwardB, TMartinLVNV, Skidd, Kleiner, Wareaglescott, Boydster, Railroad, Mark Eaton, among multiple others. Thank you all for your help!
I'll keep you guys posted.
Grab an ice cold beer and savor it while looking at your accomplishments in your garage.
MK IV Build #9659, 3 link, 17's, Forte 347, Sniper EFI, power steering, built for a freak sized person with 17" Kirkey Vintage seats, RT drop trunk, RT turn signal, lots of stuff from Breeze Automotive, Wilwood brakes, paint by Jeff Miller
-
Post Thanks / Like - 0 Thanks, 1 Likes
-
04-23-2020, 05:40 PM
#546
Senior Member
The Build Goes On
Not much to report today. I started on the modifications to the door handles. I was only able to work on where the knob attaches to the lever. According to other builders, the little knob can wiggle loose and fall off the lever. The recommendation is to drill and tap a 10-32 hole into the knob, which is what I did. Not too difficult and I was able to complete this with minimal fuss.

-
04-24-2020, 05:52 PM
#547
Senior Member
Chipping Away
I'm still chipping away at the remainder of the build. Work has been crazy recently, so not a ton of time to dedicate to the garage. I received my Lokar throttle linkage today and was able to get it installed. Pretty straightforward. Looks and feels much better than the kit supplied part.

-
04-24-2020, 06:47 PM
#548
Looks good Pat. In the FAST bracket kit, you should have a couple of other pieces that came with it that will allow you to bring those return springs over a bit and not have them at such a sharp angle. That's what that unused slot is beside the one where you attached the throttle cable.

-
04-24-2020, 08:00 PM
#549
Senior Member
Ahh, I see it now. Yes, There are other brackets in the FAST box. I'll use one of those extra pieces and then I will be able to hook the springs in a better way.
Originally Posted by
Papa
Looks good Pat. In the FAST bracket kit, you should have a couple of other pieces that came with it that will allow you to bring those return springs over a bit and not have them at such a sharp angle. That's what that unused slot is beside the one where you attached the throttle cable.
-
04-26-2020, 04:37 PM
#550
Senior Member
Spring Fix
I used an extra throttle mounting tab that came with the FAST kit and attached it to the underside of the base plate and was then able to hook the springs more parallel with the throttle cable.


I'm not entirely sure if this makes a functional difference, but it certainly looks more clean.
With the help of my wife pushing on the brake pedal, I was also able to get my front CV nut torqued to 250ft/lbs. I still have to torque the rears. That'll be on the list of things to do tomorrow.
Last edited by Pat427; 04-26-2020 at 04:40 PM.
MK4-IRS, 427w, TKO-600
-
04-26-2020, 04:42 PM
#551
That looks great, Pat. I may have to go fix mine now.
Dave
-
Post Thanks / Like - 1 Thanks, 0 Likes
-
04-26-2020, 06:27 PM
#552
20th Anniversary Mk IV, A50XS Coyote, TKO 600, Trunk Drop Box, Trunk Battery Box, Cubby Hole, Seat Heaters, Radiator hanger and shroud.
-
Post Thanks / Like - 1 Thanks, 0 Likes
-
04-27-2020, 05:07 PM
#553
Senior Member
Body
I put the body back on today. I'm going to have to move it forward about an inch or so. However, that will have to wait for another day since today is our anniversary and the wife will kill me if I spent the whole day in the garage.

-
04-27-2020, 05:19 PM
#554
-
Post Thanks / Like - 1 Thanks, 0 Likes
-
05-01-2020, 06:41 PM
#555
Senior Member
C'mon Georgie
I'm once again in a holding pattern. I ordered Gas'n Side Pipes about 2 months ago and they still have not arrived due to the fact that Gas'N is shut down by this quarantine.
I called Georgie from Gas'N a few weeks ago and he didn't really give me a timeframe due to the uncertainty of the lockdown. Annoying, but understandable.
In the meantime, I'm trying to get as much done as possible. I'm going to tackle the windshield this weekend. I have the needed tap to make the modification that EdwardB mentioned in his thread.
I'll keep ya'll posted.
-
05-11-2020, 04:48 PM
#556
Senior Member
Trans Cover
I finally buttoned up the transmission tunnel cover today. This was more of a P.I.T.A than I had anticipated. Basically, after I put the heat shield and carpet in the cockpit and leather on the tunnel cover, it wouldn't fit very well. I ended up having to drill and tap 1/4-20 holes in order to get the cover to get secured properly.
In the front, I put the bolts on the sides of the cover and in the rear, I put them on top. I'll probably replace those ones with black bolts later on. I wasn't pleased with this at first, but it started to grow on me after a while.


Last edited by Pat427; 05-11-2020 at 06:56 PM.
MK4-IRS, 427w, TKO-600
-
05-11-2020, 05:11 PM
#557
I love the cover. Good job. The silver bolt heads are not bad, but black chrome would probably look a little cleaner.
MK IV Build #9659, 3 link, 17's, Forte 347, Sniper EFI, power steering, built for a freak sized person with 17" Kirkey Vintage seats, RT drop trunk, RT turn signal, lots of stuff from Breeze Automotive, Wilwood brakes, paint by Jeff Miller
-
05-11-2020, 05:53 PM
#558
Senior Member
Thanks Terry. I agree with you.
Originally Posted by
TMartinLVNV
I love the cover. Good job. The silver bolt heads are not bad, but black chrome would probably look a little cleaner.
-
05-11-2020, 08:53 PM
#559
-
Post Thanks / Like - 0 Thanks, 1 Likes
-
05-12-2020, 06:01 PM
#560
Senior Member
Quick Jacks
I mocked up the Quick Jacks today.
I think I'm going to end up putting on chrome overriders instead of the quickjacks, but for now, this will have to do. The ends of the threaded rods are still ugly, but I'll clean those up eventually.

Anyone with recommendations for where I can get good chrome overriders?
Thanks,
Pat


 Thanks:
  Likes:


 Reply With Quote
