-
05-12-2020, 10:03 PM
#561

Originally Posted by
Pat427

Quick Jacks
I mocked up the Quick Jacks today.
I think I'm going to end up putting on chrome overriders instead of the quickjacks, but for now, this will have to do. The ends of the threaded rods are still ugly, but I'll clean those up eventually.

Anyone with recommendations for where I can get good chrome overriders?
Thanks,
Pat
Pat,
I recommend the FFR overriders. They fit without modification and are very nice quality polished stainless steel.
Dave
-
05-13-2020, 03:51 AM
#562
Also suggest FFR over riders for FFR cars. I have the ********** pieces, and they can make your brain hurt.
-
05-13-2020, 04:31 AM
#563
Not a waxer

Make that 3 for the FFR stainless overriders.
Jeff
-
05-13-2020, 04:40 PM
#564
Senior Member

Brake Light
Does anyone know where I can source a single brake light?
-
05-13-2020, 04:51 PM
#565
Originally Posted by
Pat427
Brake Light
Does anyone know where I can source a single brake light?
Order it with your overriders from FFR! Ignore the stock warnings on their order site and call them. They often have items available or will put you in the queue to ship when they receive the parts.
http://www.factoryfiveparts.com/10622-red-tail-light/
http://www.factoryfiveparts.com/1201...er-bumper-kit/
Dave
-
05-14-2020, 03:04 PM
#566
Senior Member
Tailights
Not much to report today. I installed the taillights. I had to expand the holes in order for the weatherpack to fit through, which I was able to do with my Dremel. The holes don't look very good, but you can't tell because the lights cover them.
I called FF today in order to get a new brake light. I was only able to leave a voicemail and I haven't heard back yet. Basically, on one of the lights, the threaded rod on the back had come loose so that it just spins around and therefore won't allow the locknut to be screwed down.
But for now, I'm just using one bolt to hold that one in place.

-
05-18-2020, 03:49 PM
#567
Senior Member
Progress
I made a little progress today. I got the hood mounted. A little tricky to get the hood hinge brackets tightened so the hood sits correctly, but I was ultimately able to get it done. I also noticed the hood scoop has become warped somehow and doesn't look good at all. I'm definitely gonna have to get a new scoop from FF. Oh well.
Plus, I picked up a nifty piece from Breeze Automotive. It's a bracket that holds the lower radiator tube to the X-member on the frame. Looks clean. Very happy with it.

Last edited by Pat427; 05-18-2020 at 03:52 PM.
MK4-IRS, 427w, TKO-600
-
05-18-2020, 11:49 PM
#568
Senior Member

Hi Patrick,
Your build is looking amazing! Just wanted to thank you for such a detailed and thorough build thread. It has been very helpful to me as I get started on my own project. Good luck getting to the finish line!
- JB
-
Post Thanks / Like - 1 Thanks, 0 Likes
-
05-21-2020, 05:52 PM
#569
Senior Member
Door Latch: Continued
I completed the rest of the modification to the door handles. I inserted a carriage bolt in the hole in the handle mechanism and secured it down with a lock nut. There's a couple catches here: First, I had to grind the four sides of the carriage bolt down in order for it to fit into the square hole. Secondly, once I secured the lock nut, I had to cut off the excess threads in order for the decorative chrome cover to fit. Last, I had to grind the domed back of the carriage bolt so the whole mechanism will fit flush against the door.


I started eyeballing the frame getting prepared for installing the windshield. Really nervous about that.
-
05-24-2020, 11:13 AM
#570
Senior Member
-
Post Thanks / Like - 0 Thanks, 5 Likes
-
05-24-2020, 10:25 PM
#571
Great progress Pat. You are really trucking right along. That last pic is adorable! No vomiting in daddy's Cobra!
MK IV Build #9659, 3 link, 17's, Forte 347, Sniper EFI, power steering, built for a freak sized person with 17" Kirkey Vintage seats, RT drop trunk, RT turn signal, lots of stuff from Breeze Automotive, Wilwood brakes, paint by Jeff Miller
-
05-25-2020, 01:31 PM
#572
Senior Member
Seatbelts
I started to mock up my seatbelts today. I haven't found really clear instructions on how to do this, so I wanted to check with the forum to see if anyone has a good resource/pictures of the specifics of how to mount the lap belt and crotch?
It's been a while since I went to the Mott Build School, so my memory is a bit fuzzy. Any help would be appreciated.
Below is a quick picture I took of the Drivers Side outer mounting tab. Do I insert the bolt from the outside as shown in the pic? Or should I insert from the inside of the tab?

-
05-28-2020, 12:56 PM
#573
Senior Member
New Clutch Cable
On the recommendation of TMartinLVNV, I got a new clutch cable. I've seen this topic previously discussed in various places on this forum and decided to heed the advice and replace the cable.
I ordered the part recommended by Edwardb. Part number M7553C302. I'm very happy with the cable. It is much heavier than the kit supplied cable and feels like it is high quality. I was able to get it installed without issue and the clutch pedal is working well.

Also, I got my drivers side door installed. This was a huge PITA because I could not get the latch to line up with the handle mechanism. I was able to determine the issue was the frame mount where the door striker attaches was at a slightly wrong angle. This caused the striker to be out of line with the latch mechanism. I ended up having to use some washers between the latch mechanism and door in order to get everything lined up.
Next, I'm gonna mount the seats. I feel like I'm getting close to wrapping up the build. Fingers crossed.
-
05-28-2020, 06:31 PM
#574
Remember, you started as "mechanical knowledge none" and now your "close to wrapping up the build" I will tell you that you have a lot more to go, but your are closer now then you were the day you dropped it off the dolly. Oh, was I not suppose to say that?
-
Post Thanks / Like - 0 Thanks, 1 Likes
-
05-29-2020, 09:08 PM
#575
Senior Member
Carl, don't remind me of that disastrous start. Palm-to-forehead just thinking about it. And don't for a second forget that I wouldn't be to this point without your help. Much thanks again. I'm sure I've got a lot more work ahead of me that I just haven't anticipated yet, but I feel optimistic at the moment. Fingers crossed.
Originally Posted by
BadAsp427
Remember, you started as "mechanical knowledge none" and now your "close to wrapping up the build" I will tell you that you have a lot more to go, but your are closer now then you were the day you dropped it off the dolly. Oh, was I not suppose to say that?
-
05-29-2020, 09:15 PM
#576
Senior Member
Gas Cap
I decided to replace the kit supplied screws that hold the gas cap in place with 10-32 screws. I used 1 inch screws. I originally bought 3/4 inch screws, but they aren't quite long enough. I secured the screws with lock nuts. Feels much more secure.


Thats all for today.
-
05-30-2020, 07:56 AM
#577
Good job, do not forget the washers on for the final install.
20th Anniversary Mk IV, A50XS Coyote, TKO 600, Trunk Drop Box, Trunk Battery Box, Cubby Hole, Seat Heaters, Radiator hanger and shroud.
-
05-30-2020, 12:39 PM
#578
Originally Posted by
Pat427
Tip Toeing Along
So, I had intentions of mocking up my wiring harnesses today, but decided instead to re-do my brake lines. I just wasn't completely happy with the way they looked, so I got another roll of NiCopp line and started over. It's amazing how much faster I was able to get this done the second time. Although the pictures might not look drastically different, I can assure you that up close the lines look much cleaner. I just knew I would always be annoyed if I had not fixed them, so I'm very happy I re-did them.

Next, a big thank you to the forum and a big palm-to-my-forehead with respect to the fuel regulator issue. I have confirmed that my Holley Sniper already has a fuel regulator, so there is no need for the one that I spent all day mounting.

So, I removed the fuel regulator.
I then started on my wiring harness. I was able to get the fuse box mounted, ground wire drilled into the frame, brake and clutch safety wires connected. I also drilled a couple holes in the firewall using a hole saw and got some of the wires to go through. Thats all I had in me for the day.

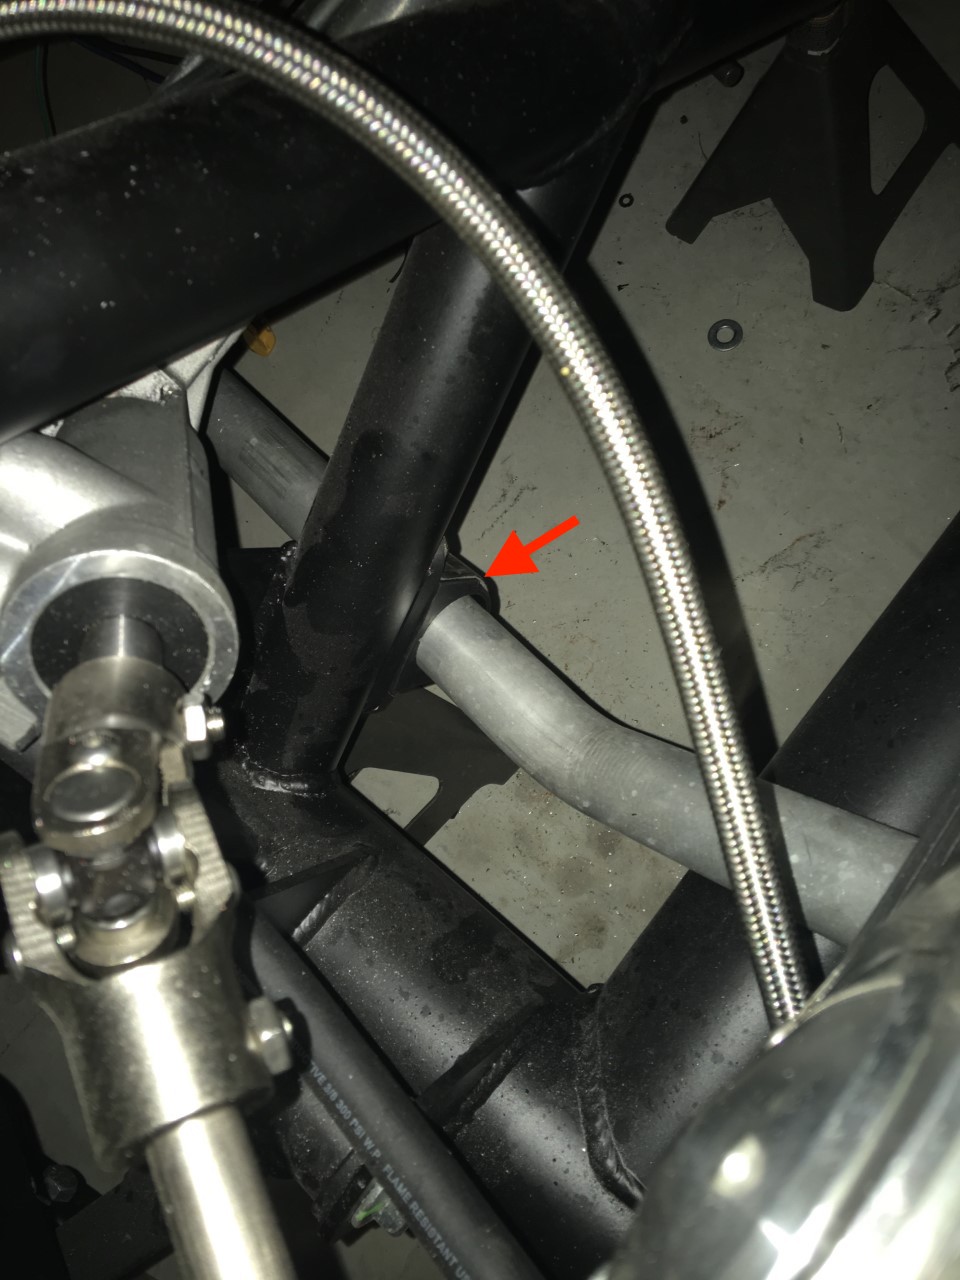
Last, I just wanted to double check with the forum that I am supposed to cut this mounting flange off of my TKO-600?

Thanks,
Patrick
What Steering rack are you using, and how did you get it to sit so high up? I have mine just clearing the mounting frame.
-
05-31-2020, 09:13 PM
#579
Senior Member
I'm using the FF supplied power steering rack.
All I had to do was align the rack with the mounting holes in the frame and it went into place pretty easily. I'm not sure why you're having a difficult time getting your rack higher in the frame. Is there interference somewhere that is preventing you from getting it aligned with the frame mounting holes?
-
05-31-2020, 10:41 PM
#580
Senior Member
Overriders
I ordered the Factory Five OVER RIDERS. I received them today. I had read they are easy to install and good quality, which is why I bought them. Well, it came as no surprise that I hit a wall very quickly during the installation.
On the rear of the car, I did the Kleiner mod using the threaded rod and coupler nuts technique as seen here:

This is great if you're using the Quick Jacks because the holes in the Quick Jacks are big enough so the threaded rod goes through the holes without any issue (you can then put a nut on the threaded rod and tighten everything down).
However, if you're using the OVERRIDERS, then it's a whole other story.
Why you ask? Well, the holes in the OVER RIDERS that receive the threaded rod are themselves threaded! See pic:

So with the threaded rods coming from the back of the body (see pic below) you cannot get them to screw into the threaded hole in the OVER RIDER!

There have been times in this build that frustrated me, but this one takes the cake. I had to walk away from the garage tonight and cool off. I was under the assumption these OVER RIDERS were going to be a breeze to install, but now it appears this is going to be another headache.
I'm assuming I'm going to have to drill the threads out of the OVER RIDER and get those holes big so the threaded rod can pass through and then put a nut on the distal most end of the threaded rod in order to tighten everything down?
If anyone has any suggestions on how to navigate this problem, please let me know.
Thank you,
Pat
Last edited by Pat427; 05-31-2020 at 10:43 PM.
MK4-IRS, 427w, TKO-600
-
06-01-2020, 06:10 AM
#581
Senior Member

Originally Posted by
Pat427
There have been times in this build that frustrated me, but this one takes the cake. I had to walk away from the garage tonight and cool off. I was under the assumption these OVER RIDERS were going to be a breeze to install, but now it appears this is going to be another headache.
I'm assuming I'm going to have to drill the threads out of the OVER RIDER and get those holes big so the threaded rod can pass through and then put a nut on the distal most end of the threaded rod in order to tighten everything down?
If anyone has any suggestions on how to navigate this problem, please let me know.
Thank you,
Pat
Yes, for this mod if you're using overriders it's normal to drill out the threads. No big deal really. You'll have a little fun getting a nut and washer on the inside of the overrider. But just be patient. Works fine. If this is the most frustrating part of your build you got off easy. 
Build 1: Mk3 Roadster #5125. Sold 11/08/2014.
Build 2: Mk4 Roadster #7750. Sold 04/10/2017.
Build Thread
Build 3: Mk4 Roadster 20th Anniversary #8674. Sold 09/07/2020.
Build Thread and
Video.
Build 4: Gen 3 Type 65 Coupe #59. Gen 3 Coyote. Legal 03/04/2020.
Build Thread and
Video
Build 5: 35 Hot Rod Truck #138. LS3 and 4L65E auto. Rcvd 01/05/2021. Legal 04/20/2023.
Build Thread. Sold 11/9/2023.
-
Post Thanks / Like - 1 Thanks, 0 Likes
-
06-01-2020, 09:50 AM
#582
Not a waxer
OR---You screw the all thread about an inch into the overrider and add the sleeve and whatever trim you use at the body (I prefer a stainless washer against the sleeve and rubber washer against the body). Push it through the holes and thread the two jamb nuts loosely inside the trunk then push it tight to the body and turn the threaded rod so that while it is unscrewing out of the overrider it is screwing into the coupler. Once you only see 2 or 3 threads left inside the overrider use the inner jamb nut to lock it tight to the coupler and turn the outer one so that it's snug against the inside of the body. I'll be doing one this afternoon and try to remember to take some photos for you.
Jeff
-
06-01-2020, 09:59 AM
#583
Or … you ship the overriders with the car to Jeff and let him do all the work for you.
-
Post Thanks / Like - 0 Thanks, 1 Likes
-
06-01-2020, 10:20 AM
#584
Senior Member
Jeff,
Thank you. Yes, I would really appreciate some pictures to help clarify this sequence.
Originally Posted by
Jeff Kleiner
OR---You screw the all thread about an inch into the overrider and add the sleeve and whatever trim you use at the body (I prefer a stainless washer against the sleeve and rubber washer against the body). Push it through the holes and thread the two jamb nuts loosely inside the trunk then push it tight to the body and turn the threaded rod so that while it is unscrewing out of the overrider it is screwing into the coupler. Once you only see 2 or 3 threads left inside the overrider use the inner jamb nut to lock it tight to the coupler and turn the outer one so that it's snug against the inside of the body. I'll be doing one this afternoon and try to remember to take some photos for you.
Jeff
-
06-01-2020, 11:17 AM
#585
Senior Member
Originally Posted by
Jeff Kleiner
OR---You screw the all thread about an inch into the overrider and add the sleeve and whatever trim you use at the body (I prefer a stainless washer against the sleeve and rubber washer against the body). Push it through the holes and thread the two jamb nuts loosely inside the trunk then push it tight to the body and turn the threaded rod so that while it is unscrewing out of the overrider it is screwing into the coupler. Once you only see 2 or 3 threads left inside the overrider use the inner jamb nut to lock it tight to the coupler and turn the outer one so that it's snug against the inside of the body. I'll be doing one this afternoon and try to remember to take some photos for you.
Jeff
Haven't done it that way myself. But no reason that wouldn't work too.
Build 1: Mk3 Roadster #5125. Sold 11/08/2014.
Build 2: Mk4 Roadster #7750. Sold 04/10/2017.
Build Thread
Build 3: Mk4 Roadster 20th Anniversary #8674. Sold 09/07/2020.
Build Thread and
Video.
Build 4: Gen 3 Type 65 Coupe #59. Gen 3 Coyote. Legal 03/04/2020.
Build Thread and
Video
Build 5: 35 Hot Rod Truck #138. LS3 and 4L65E auto. Rcvd 01/05/2021. Legal 04/20/2023.
Build Thread. Sold 11/9/2023.
-
06-01-2020, 11:54 AM
#586
-
06-02-2020, 06:32 AM
#587
Not a waxer
-
Post Thanks / Like - 1 Thanks, 0 Likes
-
06-02-2020, 04:22 PM
#588
Senior Member
Thanks Jeff!
I was tinkering in the garage and I was able to figure out this technique. It works great! Thank you for the pictures and description. It was much appreciated.
Originally Posted by
Jeff Kleiner
-
06-06-2020, 12:02 PM
#589
Senior Member
Can't Catch a Break
I took my car out for a spin around my neighborhood today. It drove really nice. I drove it for about 5 miles.
Once I returned to my garage, I noticed a hissing sound. Turns out there is a large gash in the back left tire and it was gushing air. Palm-to forehead.
I don't think this is going to be fixable with a patch. Looks like I'll be hitting the web to buy another tire.
At least the car drove nicely.
-
06-06-2020, 12:04 PM
#590
Originally Posted by
Pat427
Can't Catch a Break
I took my car out for a spin around my neighborhood today. It drove really nice. I drove it for about 5 miles.
Once I returned to my garage, I noticed a hissing sound. Turns out there is a large gash in the back left tire and it was gushing air. Palm-to forehead.
I don't think this is going to be fixable with a patch. Looks like I'll be hitting the web to buy another tire.
At least the car drove nicely.
Pat,
Was it caused by a road hazard or something on the car that it rubbed on?
Dave
-
06-06-2020, 01:00 PM
#591
Senior Member
Dave,
I’m fairly certain it was a puncture. I went through an area where houses are being built and I drove over some questionable terrain that had a lot of construction debris. Plus, as I was driving I didn’t hear any thuds or clinks of the tire hitting anything. Plus the hole in the tire is on the vertical edge of the tire tread, which leads me to believe I drove over something. But, I guess ultimately I’m unsure what the culprit was.
Last edited by Pat427; 06-06-2020 at 09:48 PM.
MK4-IRS, 427w, TKO-600
-
06-06-2020, 10:18 PM
#592
You most likely have road hazard insurance on the tire itself... Depending on where you bought it from
-
06-16-2020, 03:38 PM
#593
Senior Member
Moved..Again
I started this build in South Carolina, but ended up moving to Texas about 6 months ago. When we first moved to Texas we rented a house while we built a new home.
Well, the new house is done and my wife and I have finally moved in.
Pro Tip: try not to move the location of your build. Expert Tip: don't move the build twice.
Moving the car, parts, tools is a huge PITA and has been a huge headache.
I was able to get the car moved to the new house. It was about 12 miles from our rental. I had it towed on a flatbed truck. I considered just driving it, but I was too nervous, plus the car isn't insured or registered, so I went with the legal and safe choice and had it towed.
Our new neighborhood has really long paved roads which makes it enjoyable to drive the car around. The car continues to drive nicely. There is some variation in the RPMs when I first fire up and it sounds like it wants to stall, but I rev it a little and it stays running.
Plus, I was able to get a little work bench and tool cabinet. Feels nice to get organized.
Next on the agenda is to mount the seats permanently. Then wind wings and mirror.


-
Post Thanks / Like - 0 Thanks, 2 Likes
-
06-19-2020, 02:05 PM
#594
Senior Member
Help!
I was going to take the car around the neighborhood today, but no such luck. The car won't start.
When I turn the key, the fuel pump is making a weird rumbling/grumbling noise instead of the humming sound it usually makes. Then, when I crank the engine, all I hear is clicking noise.
I took a short video of these sounds and would be happy to text it to anyone that wants to hear it. PM your cell number if you want to see the video.
I'm assuming something is wrong with my fuel pump. Any advice would be much appreciated.
Pat
-
06-19-2020, 03:51 PM
#595
Not a waxer
Sounds like your battery is nearly dead. Even if the fuel pump failed the engine should crank normally. What does your voltmeter show when you turn the key on?
Jeff
-
06-19-2020, 05:41 PM
#596
Senior Member
Jeff,
After talking to Terry and Carl, I think the battery is the issue. The volts are reading 9.5, which I have learned is too low. I purchased a battery charger and will try to either charge the battery or just jump the car to see if that’s the issue. If it’s the battery I’ll be relieved, but annoyed because that battery was like $200. And Jeff! Let’s talk paint! When can we chat?
Originally Posted by
Jeff Kleiner
Sounds like your battery is nearly dead. Even if the fuel pump failed the engine should crank normally. What does your voltmeter show when you turn the key on?
Jeff
-
06-19-2020, 06:47 PM
#597
Not a waxer
Is it an Optima battery?
Jeff
-
06-19-2020, 07:35 PM
#598
Senior Member
-
06-19-2020, 07:56 PM
#599
Pat,
Let me help you spend a little more of your money.
https://www.amazon.com/gp/product/B0...?ie=UTF8&psc=1
Dave
-
06-20-2020, 05:14 AM
#600
Not a waxer
Originally Posted by
Pat427
Yes. It’s an Optima
Wow! I'm shocked! (In case you didn't notice the sarcasm font was on when I typed that)
Instead of spending 90 bucks and having to keep the car plugged into the wall all the time so that you can keep an unreliable battery charged (not that I'm speaking from experience or anything...again sarcasm font) just spend that same money on a good ol' lead acid battery from Interstate, Autozone, etc.
Jeff
-
Post Thanks / Like - 0 Thanks, 1 Likes


 Thanks:
  Likes:


 Reply With Quote


