-
10-09-2019, 10:47 PM
#201
Senior Member

-
Post Thanks / Like - 0 Thanks, 2 Likes
-
10-11-2019, 08:19 PM
#202
Great progress on the build, keep up the good work!
-
Post Thanks / Like - 1 Thanks, 0 Likes
-
10-13-2019, 10:24 PM
#203
Senior Member
Nothing earth shattering but still plugging away when time allows. Working on the side trunk panels and got the RT signal positioned.


-
10-15-2019, 09:57 PM
#204
Senior Member
I’m planning on ordering some SS Gas’n sidepipes soon. The headers FF sends are shown below. I assume these will work, but what are advantages or disadvantages to using either these or the ones that Gas’n sells?

-
10-16-2019, 05:04 PM
#205
Senior Member
-
Post Thanks / Like - 0 Thanks, 1 Likes
-
10-16-2019, 08:49 PM
#206

Originally Posted by
MSumners

Nice and clean! Love the PC color.
-
Post Thanks / Like - 1 Thanks, 0 Likes
-
10-17-2019, 09:12 PM
#207
Senior Member
-
10-18-2019, 05:39 AM
#208
Senior Member

Can't help you with the Replicaparts panel. Haven't used one. But for the other two -- Yes, a lifting plate on the intake works great. Seems a little scary hanging your engine and trans on there, but it's been done that way for decades and works very well. I've done it a bunch of times. You'll need to play around a little to see which hole gives the best balance location. I've typically used the front one. That's gives the best down angle to get the trans under the firewall, which may still need some pushing as you lower it into place. Some use a load leveler, but I haven't found that necessary when lifting from the carb location. Good luck.


For the steering column and hub, yes it's a tight friction fit. If there are any burrs or whatever, yes clean them up. But with the aluminum hub over the steel shaft, normally it will make its way in place using the mounting screw and a large washer. Then it will be tight with zero slop, which is exactly what you want. In my experience, once in place, you won't get it back off without using a puller. So be warned.
Build 1: Mk3 Roadster #5125. Sold 11/08/2014.
Build 2: Mk4 Roadster #7750. Sold 04/10/2017.
Build Thread
Build 3: Mk4 Roadster 20th Anniversary #8674. Sold 09/07/2020.
Build Thread and
Video.
Build 4: Gen 3 Type 65 Coupe #59. Gen 3 Coyote. Legal 03/04/2020.
Build Thread and
Video
Build 5: 35 Hot Rod Truck #138. LS3 and 4L65E auto. Rcvd 01/05/2021. Legal 04/20/2023.
Build Thread. Sold 11/9/2023.
-
10-19-2019, 08:55 AM
#209
On my #9042, the Replicaparts underdash panel fit perfect. I believe F5 made changes to the steering support bracket since mine, and chances are that Mikes panel is designed for the older setup. You probably just have to do some small trimming to make it fit.
But I would check with Mike first. He may have a more detailed answer.
-
10-19-2019, 10:44 AM
#210
Senior Member
Will do, thanks again for the info and I’ll check with Mike. Just wanted to make sure I wasn’t missing something obvious or fitting it wrong somehow.
Originally Posted by
Boydster
On my #9042, the Replicaparts underdash panel fit perfect. I believe F5 made changes to the steering support bracket since mine, and chances are that Mikes panel is designed for the older setup. You probably just have to do some small trimming to make it fit.
But I would check with Mike first. He may have a more detailed answer.
-
10-19-2019, 09:53 PM
#211
Senior Member
Preparing to possibly install the engine and trans tomorrow and I was reviewing the manual and some build threads. For the transmission mount do I need the plate labeled ‘1’ below? I can’t seem to find it and don’t see anything similar in build pictures I reviewed.

-
Post Thanks / Like - 1 Thanks, 1 Likes
-
10-19-2019, 10:22 PM
#212
Senior Member
Originally Posted by
MSumners
Preparing to possibly install the engine and trans tomorrow and I was reviewing the manual and some build threads. For the transmission mount do I need the plate labeled ‘1’ below? I can’t seem to find it and don’t see anything similar in build pictures I reviewed
Not required for your engine. Used on Coyote and (I think) mod motors because they're not as long. But for sure not yours.
Build 1: Mk3 Roadster #5125. Sold 11/08/2014.
Build 2: Mk4 Roadster #7750. Sold 04/10/2017.
Build Thread
Build 3: Mk4 Roadster 20th Anniversary #8674. Sold 09/07/2020.
Build Thread and
Video.
Build 4: Gen 3 Type 65 Coupe #59. Gen 3 Coyote. Legal 03/04/2020.
Build Thread and
Video
Build 5: 35 Hot Rod Truck #138. LS3 and 4L65E auto. Rcvd 01/05/2021. Legal 04/20/2023.
Build Thread. Sold 11/9/2023.
-
Post Thanks / Like - 1 Thanks, 1 Likes
-
10-20-2019, 08:25 AM
#213
Senior Member

Mike - I'm around this afternoon / evening, so if you do install the motor today let me know if you want an extra set of hands.
-Jason
-
10-20-2019, 09:39 PM
#214
Senior Member
With the help of my old man and a fellow forum member (thanks Jason) we were able to get the engine and trans in without any issues.
I do have a question about the engine mounts where they meet up to the chassis mount as shown below.
On each side there is about 0.5-1mm space between contact at only the front edge of the mount. On both sides the pins are in the correct slots. The transmission is at the correct height with the 0.75 spacer and appears aligned. The distorted lock nuts have not been tightened down yet.
Before tightening these down I figured I would ask, should these be completely flush? Something else I'm missing or should check?

-
10-22-2019, 05:31 PM
#215
Senior Member
To answer my own question, after the trans was raised to the correct height for pinion angle and the distorted lock nuts are turned down all is flat, solid and well.
Originally Posted by
MSumners
With the help of my old man and a fellow forum member (thanks Jason) we were able to get the engine and trans in without any issues.
I do have a question about the engine mounts where they meet up to the chassis mount as shown below.
On each side there is about 0.5-1mm space between contact at only the front edge of the mount. On both sides the pins are in the correct slots. The transmission is at the correct height with the 0.75 spacer and appears aligned. The distorted lock nuts have not been tightened down yet.
Before tightening these down I figured I would ask, should these be completely flush? Something else I'm missing or should check?
-
10-22-2019, 06:52 PM
#216
Senior Member
Glad to hear it, Mike. I enjoyed helping you get that motor put in place. You've got a great looking build! Looking forward to hearing you go-karting around the area soon.
-
10-23-2019, 10:16 AM
#217
Senior Member
-
Post Thanks / Like - 0 Thanks, 2 Likes
-
10-23-2019, 11:11 AM
#218
Damn that looks good! I love the simplicity of a pushrod Ford motor in the engine bay!
MK IV Build #9659, 3 link, 17's, Forte 347, Sniper EFI, power steering, built for a freak sized person with 17" Kirkey Vintage seats, RT drop trunk, RT turn signal, lots of stuff from Breeze Automotive, Wilwood brakes, paint by Jeff Miller
-
10-23-2019, 11:12 AM
#219
Damn that looks good! I love the simplicity of a pushrod Ford motor in the engine bay!
MK IV Build #9659, 3 link, 17's, Forte 347, Sniper EFI, power steering, built for a freak sized person with 17" Kirkey Vintage seats, RT drop trunk, RT turn signal, lots of stuff from Breeze Automotive, Wilwood brakes, paint by Jeff Miller
-
10-23-2019, 01:48 PM
#220
Senior Member
Looks really good. I'm assuming you're going to take it back out to finish the DS footbox? Might be possible to rivet the inside pieces with the engine there. But wouldn't be particularly easy IMO. Very common to leave the outer top and outside side pieces off until the very last, e.g. right before the body goes on. But the inside not so much. Also, I'd recommend going ahead and bending your dash ends. You'll need to trim some length off on the PS to clear the short firewall piece on that side. Not required to trim the length on the DS, but I do just to keep things simpler. Maybe you already know all that. 
Build 1: Mk3 Roadster #5125. Sold 11/08/2014.
Build 2: Mk4 Roadster #7750. Sold 04/10/2017.
Build Thread
Build 3: Mk4 Roadster 20th Anniversary #8674. Sold 09/07/2020.
Build Thread and
Video.
Build 4: Gen 3 Type 65 Coupe #59. Gen 3 Coyote. Legal 03/04/2020.
Build Thread and
Video
Build 5: 35 Hot Rod Truck #138. LS3 and 4L65E auto. Rcvd 01/05/2021. Legal 04/20/2023.
Build Thread. Sold 11/9/2023.
-
10-23-2019, 07:22 PM
#221
Senior Member
Good eye and thanks for looking out! The footbox was actually overlooked. I did realize it afterwards and looked at the clearance for getting rivets in place. The DS footbox is actually no problem but the U shaped piece in front of the trans cover is. I'm going to cleco everything in place and determine exactly what I can and cannot reach. If the direction of the rivets bothers me too much I'll just pull the engine partially out while I rivet them in place. Possibly I'll just use the black head rivets from Mcmaster and not worry about it because the only ones I can't reach will basically be hidden by the engine and body.
Thanks for the recommendation on the dash ends. I'm just starting to work on the dash and was determining fitment and where to bend them. They essentially just bend behind the hinges? I was tentatively planning on bending them around a small paint can. I just received supplies of carbon and leather and plan to work on the dash concurrently with finishing off fuel lines to the engine and working on the wiring harness. I'm fully prepared for the dash to be similar to the brake lines in that it'll likely be the third or fourth iteration I ultimately keep.
Originally Posted by
edwardb
Looks really good. I'm assuming you're going to take it back out to finish the DS footbox? Might be possible to rivet the inside pieces with the engine there. But wouldn't be particularly easy IMO. Very common to leave the outer top and outside side pieces off until the very last, e.g. right before the body goes on. But the inside not so much. Also, I'd recommend going ahead and bending your dash ends. You'll need to trim some length off on the PS to clear the short firewall piece on that side. Not required to trim the length on the DS, but I do just to keep things simpler. Maybe you already know all that.
-
10-24-2019, 08:45 PM
#222
Senior Member
I haven’t actually raised the tail of the transmission to the adequate height yet for pinion angle but noticed that the SFI bell housing does hang below the frame. It appears with adequate spacing on the trans it will be close, as others have encountered. It will likely be close to 1.25” spacer
If I have to trim the lower lip of the bell housing a bit, is the plasma cutter the way to go?
If so any recommendations?
Last edited by MSumners; 10-24-2019 at 08:48 PM.
-
10-25-2019, 06:13 AM
#223
Senior Member
I cut mine with an air cut off tool. Cleaned/straightened with a belt sander, and touched up with black paint. Even a Dremel with a cut-off wheel could be used, but might go through a couple wheels. It's pretty tough. Plasma cutter would be a little overkill and rough IMO. But that's me. Plus I don't have one... I've had to do it a couple times. I cut it even with the level of the oil pan. So it's not the lowest point not matter what. Both of those were with Moroso pans on a Coyote, so may not be exactly the same with your setup.
Build 1: Mk3 Roadster #5125. Sold 11/08/2014.
Build 2: Mk4 Roadster #7750. Sold 04/10/2017.
Build Thread
Build 3: Mk4 Roadster 20th Anniversary #8674. Sold 09/07/2020.
Build Thread and
Video.
Build 4: Gen 3 Type 65 Coupe #59. Gen 3 Coyote. Legal 03/04/2020.
Build Thread and
Video
Build 5: 35 Hot Rod Truck #138. LS3 and 4L65E auto. Rcvd 01/05/2021. Legal 04/20/2023.
Build Thread. Sold 11/9/2023.
-
Post Thanks / Like - 1 Thanks, 0 Likes
-
10-25-2019, 08:04 AM
#224
MSummers,
x2 on what Paul said, plasma cutter is definitely over kill but if it fits into the budget they are a lot of fun to use on other projects! Another tool which will trim the bell housing is an angle grinder such as this one
https://www.homedepot.com/p/DEWALT-1...402W/206743975
These tools are super handy for these builds if you don't already have one.
-
10-25-2019, 05:37 PM
#225
I've had my angle grinder and cut off wheel from Harbor Freight for 7 years...and they are still chugging. Save some money and take a visit if you have one close by. The only thing I wouldn't buy from there are portable, battery driven tools, but then again, HF is getting some upgraded versions of those as well.
-
10-25-2019, 09:50 PM
#226
Senior Member
Thank you gentlemen. Sounds like I don't 'have' to buy a plasma cutter yet, but also seems like so much fun. I actually do have the same dewalt angle grinder and have found it useful for so many things in this build so far. I agree very useful. Once I get the panels figured out, riveted and trans raised appropriately I'll decide how much to take off. Initially looking at the bell housing it looks like a major thing to cut but sounds like it goes reasonably well with the cutoff tool.
Thanks again!
Last edited by MSumners; 10-26-2019 at 09:51 PM.
-
11-05-2019, 10:21 PM
#227
Senior Member
-
11-06-2019, 08:39 PM
#228
Senior Member
Anyone have recommendations for an adhesive for dash work?
I just acquired all the supplies and it’s planned to be a combination of layers; Aluminum,carbon,leather.
Thanks for any tips.
-
11-06-2019, 10:08 PM
#229
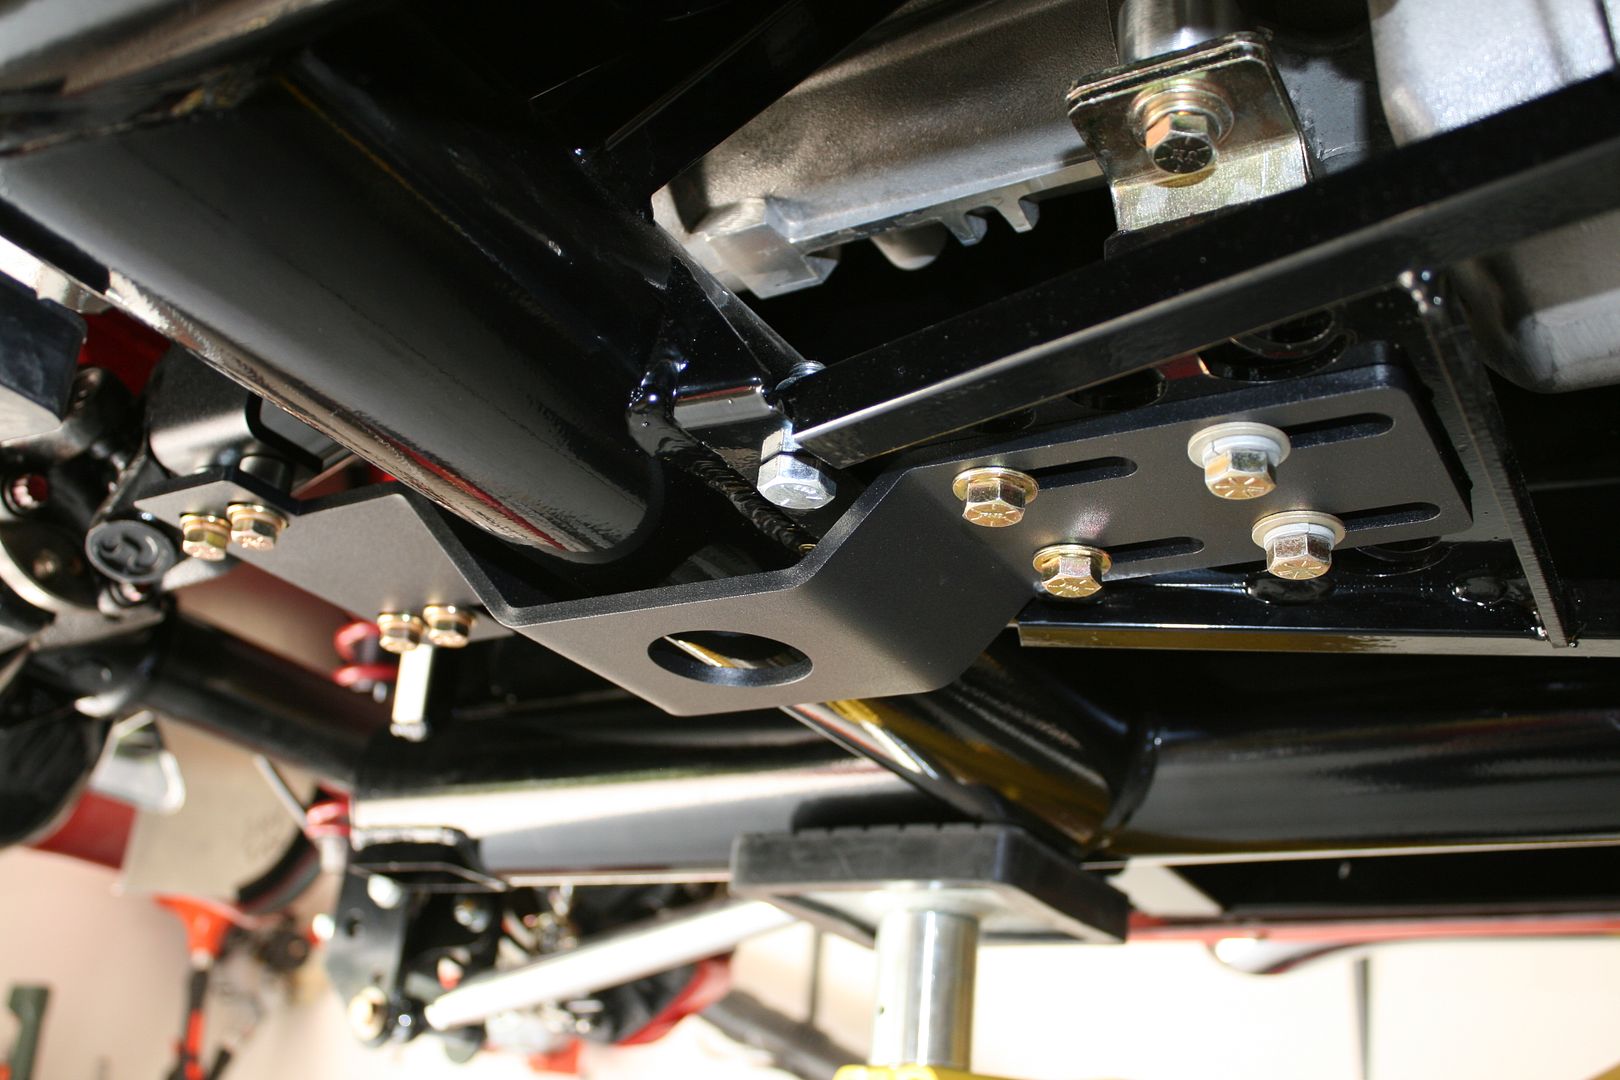
Senior Member
Went to install the Metco driveshaft safety loop this evening. With the lower support mount flush and in place, I ended up with only about 3mm of clearance between the loop and the driveshaft as shown.
Is this typical or should spacing be a bit more?

-
11-07-2019, 08:05 AM
#230
Senior Member
Originally Posted by
MSumners
Anyone have recommendations for an adhesive for dash work?
I just acquired all the supplies and it’s planned to be a combination of layers; Aluminum,carbon,leather.
Thanks for any tips.
I've used multiple times and highly recommend DAP Weldwood Landau Top & Trim HHR Contact Cement. It's a professional product and used extensively in automotive and trip shops. If you've watched any of the car shows on TV (or seen in person) where they're spraying adhesive using a gun for interior work, 99.9% chance it was this stuff. I've found it can be brushed like regular contact cement. It flashes off very rapidly and makes a permanent bond. If you know someone at a local shop, you could maybe get a small quantity. They get it in large cans. Or you can buy gallons online. I haven't seen it in any retail stores. Not cheap but works as good as anything I've tried. I get it here: https://www.yourautotrim.com/noname37.html. There are also a number of different 3M (and perhaps other brands) spray can products. Others can recommend what works best for them. I've tried several and not nearly as happy with them as the DAP Landau product. Plus you really have to watch the overspray. It's a bit messy.
Originally Posted by
MSumners
Went to install the Metco driveshaft safety loop this evening. With the lower support mount flush and in place, I ended up with only about 3mm of clearance between the loop and the driveshaft as shown.
Is this typical or should spacing be a bit more?
Yeah, that's too tight. Many of us have put spacers between the bottom bracket and the loop. May need to get longer bolts as a result. Will raise the loop up over the driveshaft to a more acceptable gap. Just visible in this pic.
Build 1: Mk3 Roadster #5125. Sold 11/08/2014.
Build 2: Mk4 Roadster #7750. Sold 04/10/2017.
Build Thread
Build 3: Mk4 Roadster 20th Anniversary #8674. Sold 09/07/2020.
Build Thread and
Video.
Build 4: Gen 3 Type 65 Coupe #59. Gen 3 Coyote. Legal 03/04/2020.
Build Thread and
Video
Build 5: 35 Hot Rod Truck #138. LS3 and 4L65E auto. Rcvd 01/05/2021. Legal 04/20/2023.
Build Thread. Sold 11/9/2023.
-
11-08-2019, 07:17 PM
#231
Senior Member
Thanks for the recommendations again. I bought a gallon of the dap adhesive mentioned as that was the smallest one I could find and I should probably be set for life on that.
Added some spacers to the safety loop.
Good clearance?

-
11-08-2019, 08:55 PM
#232
Senior Member
That spacing on the driveshaft loop with IRS should be fine. You're right, a gallon of that DAP adhesive should last a while. Just make sure to keep it well sealed. The solvent will evaporate and it can become unusable if you don't. Has happened to me. Also use it with a lot of ventilation. You'll see what I mean when you use it.
Build 1: Mk3 Roadster #5125. Sold 11/08/2014.
Build 2: Mk4 Roadster #7750. Sold 04/10/2017.
Build Thread
Build 3: Mk4 Roadster 20th Anniversary #8674. Sold 09/07/2020.
Build Thread and
Video.
Build 4: Gen 3 Type 65 Coupe #59. Gen 3 Coyote. Legal 03/04/2020.
Build Thread and
Video
Build 5: 35 Hot Rod Truck #138. LS3 and 4L65E auto. Rcvd 01/05/2021. Legal 04/20/2023.
Build Thread. Sold 11/9/2023.
-
11-09-2019, 07:16 PM
#233
Senior Member
This is about the point I decided the air rivet gun was a wise purchase.

-
Post Thanks / Like - 0 Thanks, 1 Likes
-
11-10-2019, 11:57 PM
#234
Senior Member
Almost ready for lizard skin. Going to spend some time sealing up all of the small gaps and then masking everything off.

-
11-11-2019, 09:43 PM
#235
That’s good looking. Too bad it gets covered up.
-
11-14-2019, 05:55 PM
#236
Senior Member
Masking and lizard skin day. Spraying sound control and I’ll do the insulation Saturday.

-
11-16-2019, 11:14 PM
#237
Senior Member
The lizard skin experience. I initially ordered the lizard skin set of sound control and ceramic insulation with the plan to get it sprayed when the weather was warmer. It does state in the instructions that it should be at least 60 degrees to set up correctly. I ended up taking longer, as usual, and getting sidetracked doing the drop trunk, switching out the fuel pump etc.
so ultimately I was ready to mask everything off and do the insulation but the snow is flying. I decided to heat the garage and get the spraying done but after the second coat 1- my 100lb propane tank ran dry and almost immediately blew a breaker and lost power. This left it sitting overnight at about 30degrees. I came back to it expecting to see a disaster but mostly it still set up well. There were 2 small areas that peeled away and may have been in fact some degree of silicone I didn’t completely get removed.


I still have to spray the ceramic insulation and will just focus this up front and in the foot boxes. I think I’ll probably do a small area of dynamat where I had trouble spraying around the DS
Notes about the lizard skin
1- disassemble and clean the spray gun extensively after every coat.
2- the recommended 55psi seemed to work very well.
3- between masking and spraying I probably have about 18 hours into this process so I’m not sure if it’s a time saver at all over other methods but have nothing to compare to.
Any recommendations on what to do with the small areas that peeled up, if anything?
Last edited by MSumners; 11-16-2019 at 11:24 PM.
-
11-17-2019, 07:45 AM
#238
Senior Member
Originally Posted by
MSumners
Any recommendations on what to do with the small areas that peeled up, if anything?
Hard to say what happened there. As you said, the surface could have been contaminated. The way it's cracked though, almost seemed like a curing issue which could be related to the low temps. Perhaps it was thicker there, which wouldn't be unusual in a corner like that. Personally, I'd scrape off what's loose and re-apply a few layers with a brush. It's in an area that won't be seen, plus covered by more coating and carpet. Shouldn't be an issue. Good luck with your next step. FWIW, long term forecasts show slightly warmer temps. But we're off to an early cold start here in MI.
Build 1: Mk3 Roadster #5125. Sold 11/08/2014.
Build 2: Mk4 Roadster #7750. Sold 04/10/2017.
Build Thread
Build 3: Mk4 Roadster 20th Anniversary #8674. Sold 09/07/2020.
Build Thread and
Video.
Build 4: Gen 3 Type 65 Coupe #59. Gen 3 Coyote. Legal 03/04/2020.
Build Thread and
Video
Build 5: 35 Hot Rod Truck #138. LS3 and 4L65E auto. Rcvd 01/05/2021. Legal 04/20/2023.
Build Thread. Sold 11/9/2023.
-
11-17-2019, 07:06 PM
#239
Senior Member
Thanks for the advice!
I’m still working on putting lizard skin down in 2 small areas that wanted to peel up. In the downtime I started working on the power steering lines. As usual I consulted Mark at Breeze and he set me up great fittings. All of his solutions always work perfect.
Below is how I created and ran the high pressure PS lines. There is plenty of clearance around the steering shaft and belt. Nothing is tightened down yet.
If anyone sees any issues let me know.


Last edited by MSumners; 11-17-2019 at 07:09 PM.
-
11-21-2019, 09:11 PM
#240
Senior Member


 Thanks:
  Likes:


 Reply With Quote


