-
Senior Member

Johns Excellent Oil Pan Adventure
Almost everyone advises new owners to take their car to an autocross to find out how the car behaves. I decided to heed the recommendation, but was unsure if my stock setup could cope with the demands of an event. A couple of respected builders recommended that I change the stock oil pan to one more suited to racing. So I called Gordon Levy and purchased his Road/Race Pan setup.
Gordon provides a Champ oil pan (https://www.champpans.com/products/p/cp302lt-rr/), associated oil pickup, and dipstick/dipstick tube. The drain plugs and dipstick bungs are 1/2”-20. If you don’t have an oil temperature sensor, you’ll need to purchase a 1/2” NPT plug for the pan’s bung. You’ll also need an oil pan gasket; I chose the Fel-Pro OS 34508 R one-piece gasket based on lots of great reviews here and on the other forum.
PRO TIP #1: With the drain plugs in place, fill the pan with water & check for leaks (you’re gonna want that bung; otherwise you end up with a counter full of water!). On mine, the forward plug was fine, but the rear plug leaked at least a drop of water per minute. I switched out the crush washer for a fiber one, and the leak went away. My buddy Scott skipped this test, and he’s got an oil leak, which in light of my test, he thinks is probably at the drain plug.
PRO TIP #2: [EDIT: original text deleted, 'cuz it was bad information] New tip: With the dipstick in place, fill the pan with enough water to just reach the windage tray. Then add two quarts more. [This two quarts represents the oil that's in the upper engine at operating temperature. I chose 2 quarts based on this: http://garage.grumpysperformance.com...ge-tray-do.64/]. Check this level against your dipstick, and adjust accordingly. Neither Scott nor I did this test initially.
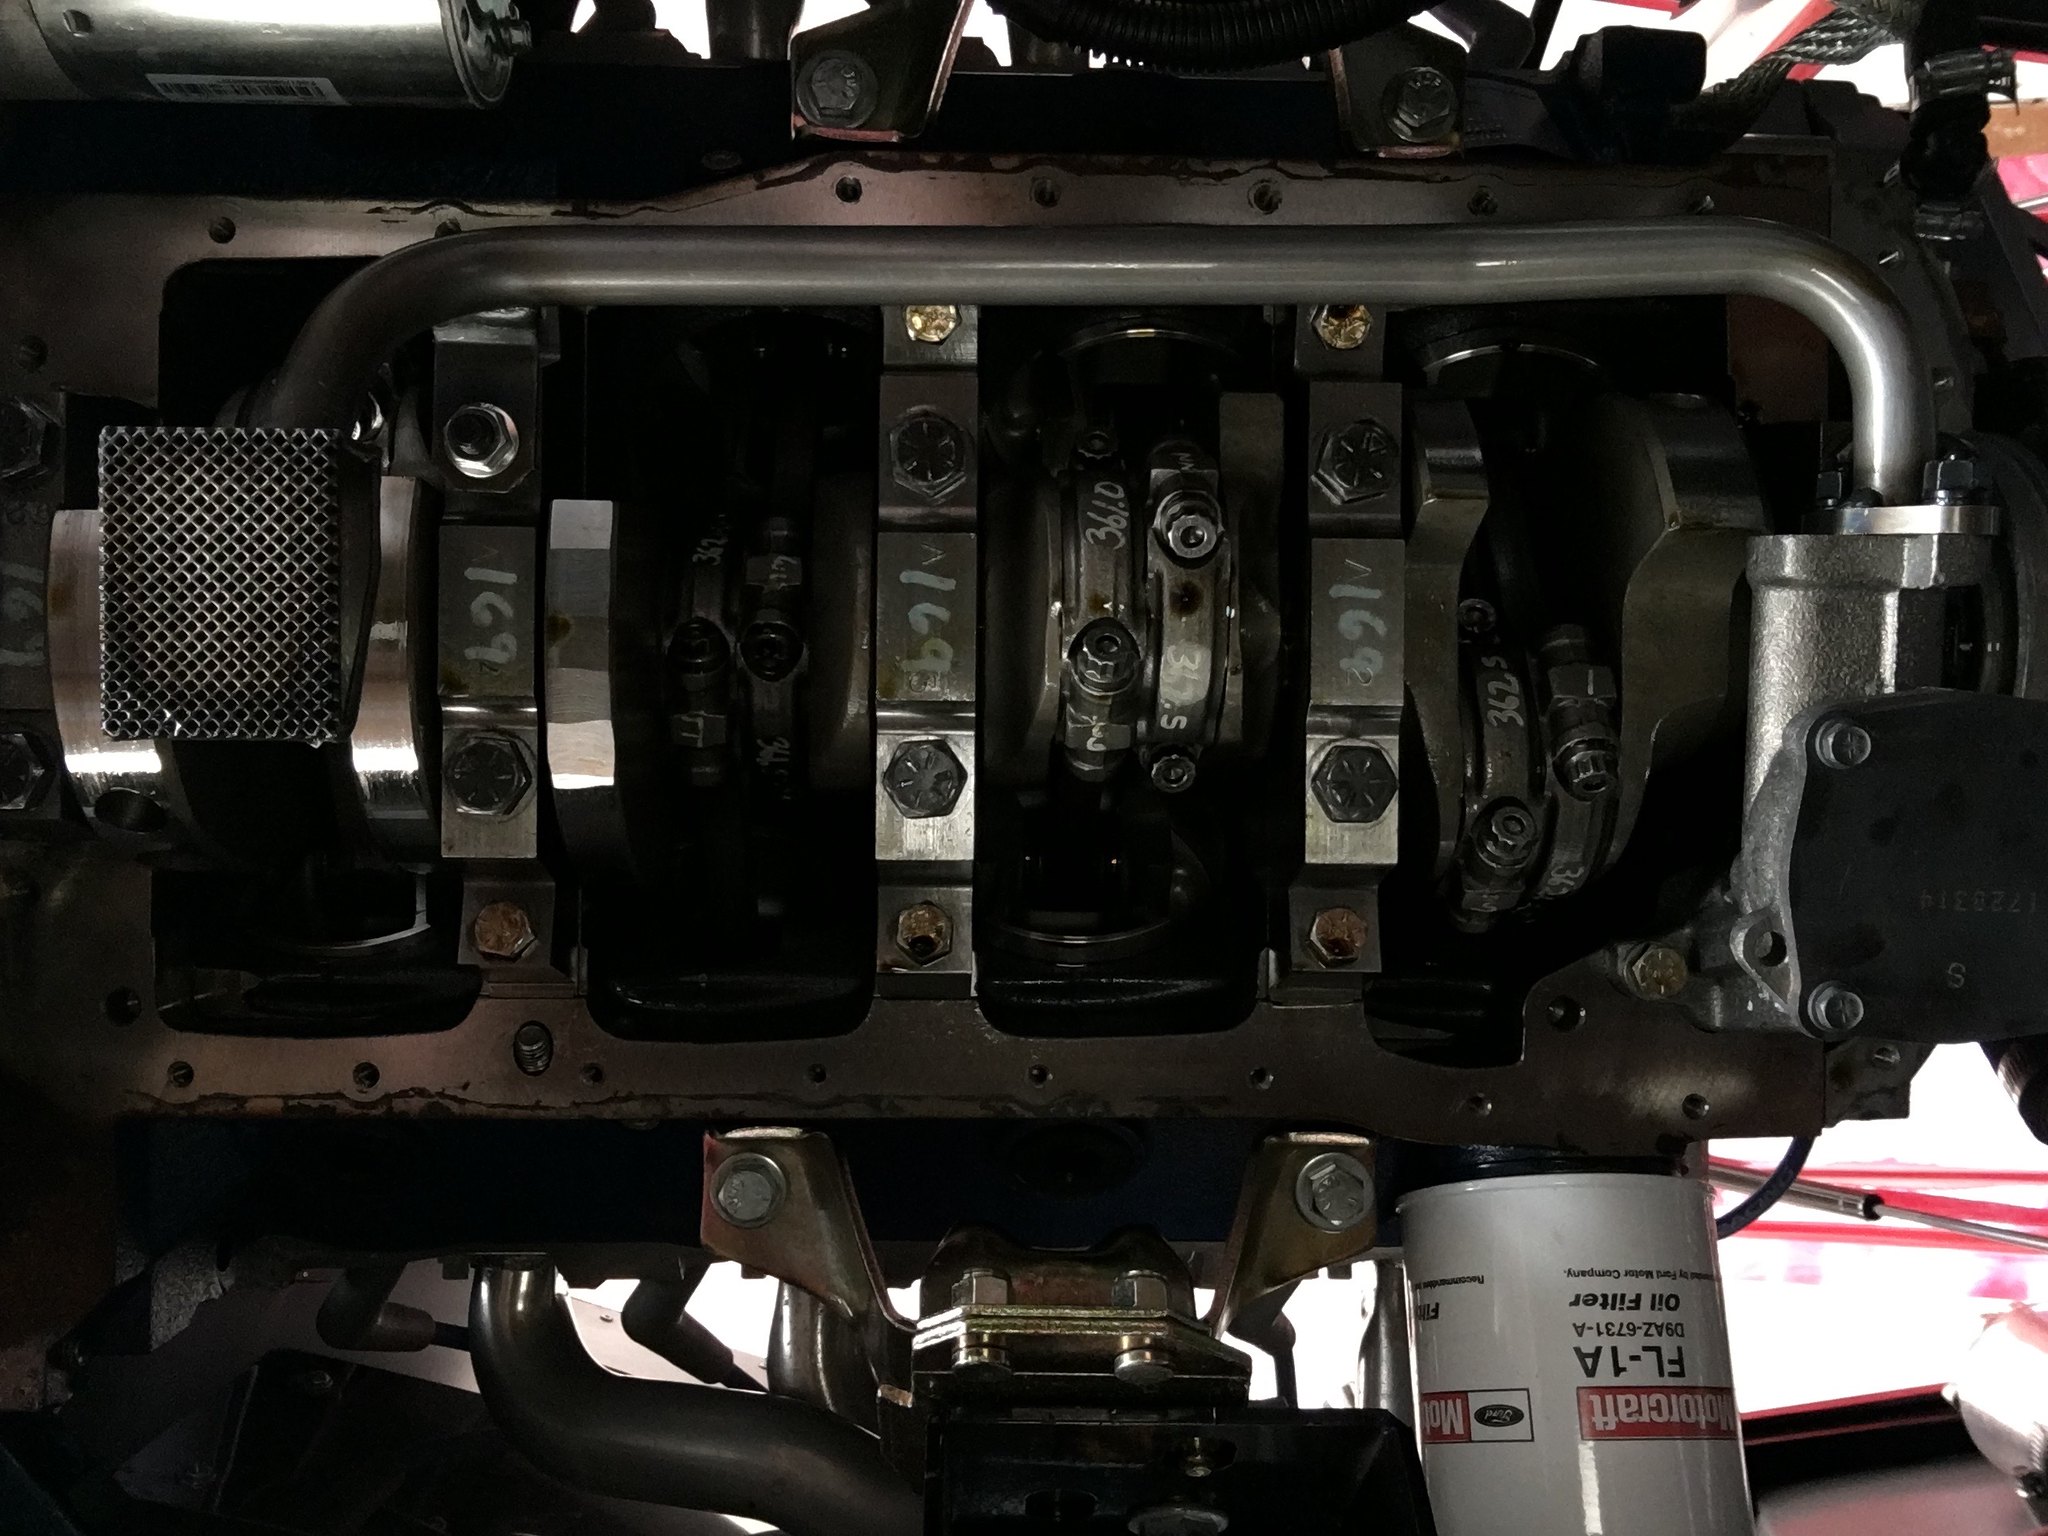
Removing the old pan was a piece of cake. A 3/8” socket for the smaller bolts, a 1/2” socket for the four bolts at the corners, and the pan pretty much drops straight down. I had to tilt the front of my stock pan down first so that the rear of the pan would clear the bump outs on the bell housing block off plate. Once the pan was out of the way, I could see the stock set up:
 IMG_5486 by jhsitton, on Flickr
Removing the stock pick up was easy-peasy. Installing the new pickup proved a little more problematic.
I replaced the pickup bolts with Arp studs. The problem is, I tried to torque the studs into the oil pump, and promptly broke the cheap-a$$ pot metal. So now I had to replace the oil pump. The bolts into the block were secured with red loc-tite (the bolts for the pickup weren’t), so it took a bit of heat to get them loose. I went to Napa and bought a new pump (https://www.napaonline.com/en/p/SEP22441118); I did NOT replace the oil pump drive shaft as it was an Arp and had less than 700 miles on it. I re-used the Grade 6 oil pump bolts (with a light-to-moderate dose of red loc-tite) and torqued them to spec (23-38 foot-pounds; I chose 25).
Once the pump was in place I hand-tightened the studs and tried to fit the pickup onto the studs. No joy. The studs were just a hair too close together. So I drilled the pickup’s mounting holes 1/32” larger in diameter, & finally was able to set the new pickup into place. It was then that I noticed the main cap stud had to be moved.
 IMG_5502 by jhsitton, on Flickr
A panicked call to a couple of friends revealed I “should” be able to swap the stud with the main cap bolt. I confirmed this with Mike Forte (who answered his cell on a Saturday afternoon…you don’t get customer service like this very often; thanks Mike!). So I broke out my breaker bar, swapped the stud & bolt, and torqued each to 65 foot-pounds. After that I was able to install the pickup (torquing the bolts to the oil pump to 25 foot-pounds and the nut on the main cap stud to 30 foot-pounds; I used a drop of red loc-tite on each).
 IMG_5503 by jhsitton, on Flickr
I then dry fit the pan into place. It took some fiddling, but I was able to get the pan into place working around the bump outs on the bell housing block off plate.
PRO TIP #3: You do NOT need to remove the starter. If you do, you’ll figure out there’s no way to get the starter back into place with the oil pan installed. Ask me how I know.
Another test fit or two to verify the space between the bottom of the oil pickup and the oil pan (mine cleared with a little less than 7/16”) and to get my fitting process dialed and I was ready for the real thing.
I smeared a pea-sized drop of Permatex Ultra Black RTV onto the corners of the gasket (both engine side & pan side) and set the gasket into place. I was only able to use three of the Fel-Pro fitting studs due to the bell housing block off plate. For the fourth, I used a long 1/4” bolt with a nut screwed onto it about an inch. I slipped the pan onto the fitting studs & then the metal side supports. Finally I screwed all the bolts into place hand tight and let the RTV cure for an hour per the instructions.
I torqued the bolts to spec (10-12 foot-pounds for the 1/4” bolts, 15 foot pounds for the 3/8”) in three stages, working from the middle of the pan out to the ends & and swapping sides a la the pattern used to torque the intake. Getting to the bolts on the opposite side of the sump was a real pain; you absolutely need a flex drive socket and long extension.
At last the pan was in place.
 IMG_5507 by jhsitton, on Flickr
The final step was to bend the dip stick tube to fit around the engine block. I used a piece of 3” PVC pipe to get the tube to curve smoothly. You’ll want the first curve to start right at the fitting to the oil pan, so either use a tube bender or a vise to hold the tube & PVC in place.
This project turned out to be a TON of work, mostly because I’ve never done it before. If you’re thinking about autocross or track days, I urge you to have your engine provider install a race-ready pan, or at least make the swap before the engine is in the car (& preferably before the bell housing is bolted on).
John
Last edited by phileas_fogg; 04-15-2019 at 06:18 PM.
MK IV Roadster #8631
Ford 302, Holley Terminator EFI, T5z, 3.55 Rear End, IRS, 17 Halibrand Replicas (9 front, 10.5 rear), Nitto 555 G2s (275/40ZR17 front, 315/35ZR17 rear), Fast Freddies Power Steering, F5 Wilwood Brakes, FFMetals Firewall Forward, Fortes Hydraulic Clutch & Throttle Linkage
https://www.ffcars.com/threads/phile.../#post-4776313
-
Post Thanks / Like - 0 Thanks, 1 Likes
-
Senior Member
Road Test
After letting the RTV cure for 24 hours, I filled the pan with oil. No leaks overnight, so today I took the car for a test drive. After returning from an hour-long run…I’ve got a leak at the rear. 
I re-torqued the pan bolts, but I’m pretty sure I get to take the pan off and start over. I’m thinking I probably can’t re-use the brand-new Fel-Pro gasket.
And I’m guessing my problem is either not enough RTV in the back corners, or the gasket “hoops” are not straight in the channel. The gasket did seem a little loose; I assumed it was supposed to be that way.
Can anybody confirm?
John
EDIT: At least the oil pump & pickup worked. Pressure started at 65 psi, then dropped to 45-55 when cruising (36 psi at idle when warm).
Last edited by phileas_fogg; 04-11-2019 at 04:08 PM.
MK IV Roadster #8631
Ford 302, Holley Terminator EFI, T5z, 3.55 Rear End, IRS, 17 Halibrand Replicas (9 front, 10.5 rear), Nitto 555 G2s (275/40ZR17 front, 315/35ZR17 rear), Fast Freddies Power Steering, F5 Wilwood Brakes, FFMetals Firewall Forward, Fortes Hydraulic Clutch & Throttle Linkage
https://www.ffcars.com/threads/phile.../#post-4776313
-
Senior Member

What is the reason for the shape of the pan bottom & how do you do am oil change with that pan?
BTW on the 8QT dipstick measure, do the measurement on the stick after the engines is run so the oil galleries & filter are full.
EDIT: Some very important comments have been posted to the "other" site, might save an engine.
Last edited by BEAR-AvHistory; 04-12-2019 at 12:17 PM.
-
Post Thanks / Like - 1 Thanks, 0 Likes
-
Senior Member

I feel for you John. Sounds like my experience last year when I changed my oil pan. I still haven't tried to fix the rear leak. I did not enjoy the whole job. I will have to save the Royal Purple I used (that stuff ain't cheap). The QuickJack lifts should make the job a lot easier.
Mk4 complete kit #9059 ordered 1/19/17 delivered 3/23/17, 2015 IRS, Fortes/DART347,TKO 600, hyd clutch, P/S, 12.88 wilwood brakes front and rear, heater/defrost and vintage gauges
First start and go-cart 4/11/18. Taken To Whitby Motorcars Greensboro, N.C. 2/5/21 for body/paint
-
Post Thanks / Like - 1 Thanks, 0 Likes
-
Senior Member

Originally Posted by
BEAR-AvHistory

What is the reason for the shape of the pan bottom & how do you do am oil change with that pan?
The pan is basically stock except the rear sump has been cut out & a slightly shallower but much wider box has been welded in. That gives the additional capacity vs stock.
Just like stock, there are two oil drains on the pan: one at the front & one at the back. The rear drain is the pans low point & has a magnet on the pan side of the plug.
John
P.S. Yes, the responses on the other forum are very helpful. For starters, the 8-quart capacity is for a FULL filter & FULL oil galleries. Ill be editing my initial post accordingly.
MK IV Roadster #8631
Ford 302, Holley Terminator EFI, T5z, 3.55 Rear End, IRS, 17 Halibrand Replicas (9 front, 10.5 rear), Nitto 555 G2s (275/40ZR17 front, 315/35ZR17 rear), Fast Freddies Power Steering, F5 Wilwood Brakes, FFMetals Firewall Forward, Fortes Hydraulic Clutch & Throttle Linkage
https://www.ffcars.com/threads/phile.../#post-4776313
-
Post Thanks / Like - 1 Thanks, 0 Likes
-
We find all aftermarket pans have a rocker to them from the additional welding. Although FEL PRO says no, we smear a thin film of RTV, we use the gasket maker stuff (right stuff) expensive but only doing this once. We use this film of sealant all the way around first on the pan and then on the gasket or block which ever is easiest we put the gasket on the block with the pins and then put the pan on torque and leave overnight. Fill pan run for 5 minutes and mark the dipstick if not using the supplied dipstick, or verify the supplied dipstick. JMHO, HTH, Richard.
Richard Oben FFR builder
www.northracecars.com
Need help finishing your project we can help here or at your shop.
FFR GTM #34 first GTM with working AC. 400 hp LS1 w/G50
FFR coupe 3617CP 331 Stack EFI T-5 IRS Cobra brakes, AC/heat.
Both cars by NRC, we can build (and have built) any FFR product.
We also make and sell a ton of great parts for the FFR community.
Brake kits, AC systems, #1 supplier of Team III wheels.
-
Post Thanks / Like - 2 Thanks, 0 Likes
-
Senior Member
On Thursday I re-did my oil pan gasket. While the pan was out, I checked the oil level. This is the level with a little less than 6 1/2 quarts of oil:
 IMG_5531 by jhsitton, on Flickr
Using Grumpy’s rule of thumb that ~2 quarts of oil is circulating in the engine, the 8 quart capacity recommended by Champ appears spot on. The dip stick, however, is still marked way low.
Back to the installation, this time, I followed Frank Messina’s instructions.
Originally Posted by
Frank Messina
You wont want to hear this but you are going to redo that oil pan gasket. Here's the deal. In addition to the RTV you apply to the corners of the block where the main caps meet the block, you have to run a 1/4" bead down the pan rails but not the ends, completely encircling each bolt hole. Wait 10 to 15 minutes then put the pan up without smearing the RTV everywhere and let it sit overnight to cure. Blue RTV works great for this. Black is overkill and messy. I suggest a couple dry trial fits first to figure out how to wangle the pan around to get it up there without a lot of cussing and mess.
Frank
I applied the blue RTV as Frank directed to the engine side of the interface, let it set up a bit, and then secured the gasket to the engine by bolting the plates that go under the stock pan into place (hand tight; no torque). After letting the RTV set up for 15 minutes, I applied the blue RTV to the pan, unbolted the plates, and set the pan in place. Even though I’d practiced, there was still plenty of mess and cussing.
Once all the pan bolts were torqued, I let the pan sit for 36 hours and then filled it with oil. On Saturday, I took it for a drive, and…
No leaks! So this upgrade is complete. Thanks Frank!
John
NOTE: If I ever have to replace an oil pan gasket again, I’ll let the engine-side RTV set up for more like 30-60 minutes. At 15 minutes, the gasket still wanted to drop away from the block.
EDIT: While I had the pan out, I also measured the flange for flatness. In agreement with Richard Oben's findings, there was a slight rocker to each side of the pan; the center of each side was a little less than 1/16" lower than the same-side corners. So to my uneducated mind, that adds credence to Frank's recommendation to install the gasket with RTV rather than dry.
Last edited by phileas_fogg; 04-24-2019 at 01:10 PM.
MK IV Roadster #8631
Ford 302, Holley Terminator EFI, T5z, 3.55 Rear End, IRS, 17 Halibrand Replicas (9 front, 10.5 rear), Nitto 555 G2s (275/40ZR17 front, 315/35ZR17 rear), Fast Freddies Power Steering, F5 Wilwood Brakes, FFMetals Firewall Forward, Fortes Hydraulic Clutch & Throttle Linkage
https://www.ffcars.com/threads/phile.../#post-4776313
-

Steve >> aka: GoDadGo

Having The Sump At The Back Of The Pan Is A Huge Upgade For Sure!
.You now have a much better chance to suck up oil under those hard launches instead of oily air.
-
Post Thanks / Like - 1 Thanks, 0 Likes
-
Junior Member

phileas_fogg - thats a nice looking mill there / can i ask your motor specs?
-
Senior Member
Thanks Joe. I bought my 302 from Forte; it's a https://performanceparts.ford.com/part/M-6007-X302E. All the specs are in the link. Unfortunately that specific engine is no longer available, but I'm sure you can find its equivalent.
John
MK IV Roadster #8631
Ford 302, Holley Terminator EFI, T5z, 3.55 Rear End, IRS, 17 Halibrand Replicas (9 front, 10.5 rear), Nitto 555 G2s (275/40ZR17 front, 315/35ZR17 rear), Fast Freddies Power Steering, F5 Wilwood Brakes, FFMetals Firewall Forward, Fortes Hydraulic Clutch & Throttle Linkage
https://www.ffcars.com/threads/phile.../#post-4776313
-
Junior Member
I saw the splayed caps and an aftermarket crank and i got excited- nice setup - i think you are pretty much indestructible 
-
Post Thanks / Like - 0 Thanks, 1 Likes
-
John,
I have the FRPP x302b motor- same as yours but with a different cam.
I find myself needing to swap the oil pickup tube just like you did.
Did you simply remove the one cap bolt, remove the stud-bolt, and swap the two and torque to spec?
I see the main cap bolt torque spec here:
https://performanceparts.ford.com/do...10-BOSS302.PDF
Thanks,
Dave
Gen III Coupe #17
-
Senior Member
Yep; that's exactly what I did.
John
MK IV Roadster #8631
Ford 302, Holley Terminator EFI, T5z, 3.55 Rear End, IRS, 17 Halibrand Replicas (9 front, 10.5 rear), Nitto 555 G2s (275/40ZR17 front, 315/35ZR17 rear), Fast Freddies Power Steering, F5 Wilwood Brakes, FFMetals Firewall Forward, Fortes Hydraulic Clutch & Throttle Linkage
https://www.ffcars.com/threads/phile.../#post-4776313
-
Champ pan in...
2nd Canton pan with a leak at the weld- hard to say the cause but they hung down ~1/8" below my frame.
Canton pickup support was cracked...
Champ pan is in, 1/2" shallower and is above the frame rails.
Did the stud to bolt swap and done, no issues.
Dave
Gen III Coupe #17
FRPP X302b
IMG_2733.JPGIMG_2731.JPGIMG_2727.JPGIMG_2722.JPGIMG_2725.JPGIMG_2724.JPG
-
Post Thanks / Like - 0 Thanks, 1 Likes
-
I am building a 302 and struggling with some parts combinations. One thing I think that may have not been mentioned here is the oil pan gasket recommended, the fel pro blue one looks great and I have a new one here also from research but the 2 pans I am looking at, the champ and aviaid both start with an early style pan that has the ribs, that gasket states 86 and up and also has ridges that may not work well with the indents of the rib areas, as the later style pans are smooth. Also i spoke to aviad and he failed to mention the part about running the motor before marking the dipstick, i thought of that being an issue and have not started assembly yet but feel that should have been more clear.
There is a gasket that looks decent on eBay by soupys#sg-65 that has a single ridge down the middle and would have a good flat surface even on the earlier pans but not metal lined. Does anyone know of a better one piece gasket for early pans?


 Thanks:
  Likes:


 Reply With Quote

