-
09-26-2019, 12:39 PM
#841
Senior Member

Crash, thanks for he info as I have been trying different blades with various success, I will get one like the one you mentioned and give it a whirl, has to be better than what I was using.
-
09-27-2019, 09:29 AM
#842
Already ordered one. Yeah, from what you're saying it has to be light years better than what I've been using. The regular body saw blades...you can get about 10-15 minutes of use out of each blade and they're completely shot.
Shane Vacek
VRaptor SpeedWorks, LLC
www.vraptorspeedworks.com
Turn-key GTM, SL-C & Ultima GTR Built to Your Specs!
Offering a full line of GTM Upgrades and Custom Parts
-
10-11-2019, 09:26 PM
#843
Finally got the new dash pod bolted down. It fits like a glove!
MVIMG_20191010_173748.jpgMVIMG_20191010_173832.jpg
That's more than I can say for the PSG side piece, which was simply skinned.
I'm not sure why it's not matching the contour any longer, but it couldn't have
grown that much?
MVIMG_20191010_174550.jpgMVIMG_20191010_175028.jpg
I'm not sure what to do with the center console, most likely a flat CF.
This whole body and interior is coming out again soon. I just wont be happy
unless it's done over from scratch. The video will explain more. 
Custom LCD Gauges , Data Loggers, Control Touch Screens
www.LCDdash.com \\ 647-522-9953 \\ Voice & Text
Proud new owner of GTM Gen 1., #105 - 08/27/11
LQ9 Powered, G96.00 6 speed transaxle
-
Post Thanks / Like - 0 Thanks, 1 Likes
-
12-02-2019, 03:51 PM
#844
The tear down has begun. I'm ripping out all of the wiring and starting fresh. While the interior is gutted,
the console is getting chopped to make room for a bigger touchscreen. The red line in the photo is the
planned shape.

Also having some thicker gauge vent covers made up. I'm not liking the bent aluminum look very much.

Lastly, the LCD system got a fresh graphic. It's a mix of LaFerrari, McLaren 720S, and some personal
touches. I've given up on the space-tech theme and going with a more performance oriented feel.
Last edited by LCD Gauges; 12-02-2019 at 05:16 PM.
Custom LCD Gauges , Data Loggers, Control Touch Screens
www.LCDdash.com \\ 647-522-9953 \\ Voice & Text
Proud new owner of GTM Gen 1., #105 - 08/27/11
LQ9 Powered, G96.00 6 speed transaxle
-
12-02-2019, 04:25 PM
#845
Shane Vacek
VRaptor SpeedWorks, LLC
www.vraptorspeedworks.com
Turn-key GTM, SL-C & Ultima GTR Built to Your Specs!
Offering a full line of GTM Upgrades and Custom Parts
-
Post Thanks / Like - 1 Thanks, 1 Likes
-
12-08-2019, 07:48 AM
#846


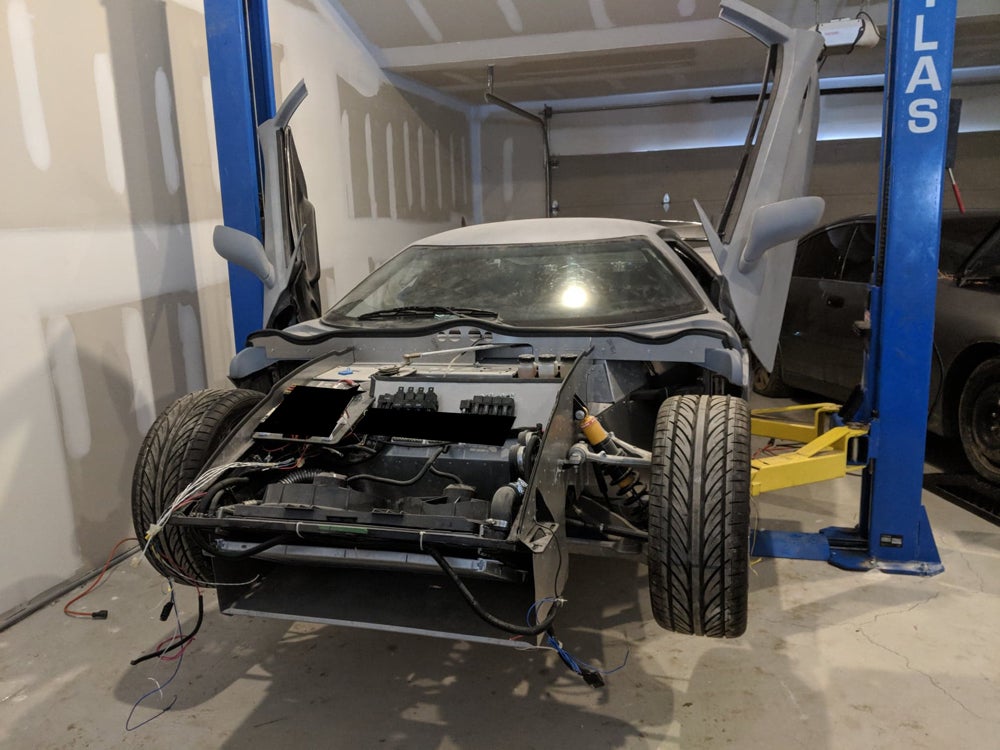
Most of the front end wiring has been removed, and not a moment too soon. Besides wanting to clean up the original wiring,
and matching fuse positions to functions, I've always wanted to re-locate or re-position the battery for easier access and removal.
gtmWirePull.jpg
As I removed the negative cables, it was apparent that my battery had slid backward. The scary part is that the painted frame
and design of the battery case saved me from absolute and inevitable damage.
batt1.pngbatt2.jpg
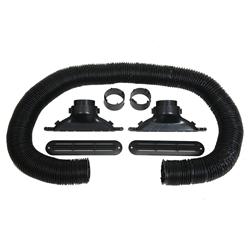
I'm getting a quote on new air vents for the windshield defrost. Draft one isn't bad, but I'll have to move
the screw holes inward so the heads are not exposed at the edge. If anyone likes the design and wants the
CAD file, I'll send it (Fusion - .F3D). I'm hoping to get a 3D print done by tomorrow for test fitting.
newVent.png
Custom LCD Gauges , Data Loggers, Control Touch Screens
www.LCDdash.com \\ 647-522-9953 \\ Voice & Text
Proud new owner of GTM Gen 1., #105 - 08/27/11
LQ9 Powered, G96.00 6 speed transaxle
-
01-04-2020, 08:03 AM
#847
Beeman is rubbing off on me, I'm cutting up my car!  The center console section is getting dropped down
8 inches to fit a bigger LCD screen in place of the Double DIN unit.
The shifter is lower by 5 inches as it sits. I'll have to stick the seat in there to get a feel for everything
before the welding begins.
consoleAfter.png12inchLCD.jpgconsoleDesign.png
If anyone wants some decent software for making wiring diagrams, give TinyCAD a try. It also does
simulation if you're doing some advanced projects. Digikey also has a wiring CAD, but it's only available
online. TinyCAD is not as pretty, but it will let you visualize the gauge, and also get the colour down
just like the vehicle wiring harness. You can move objects around, and the wiring will remain intact
which is nice.
cad.png
Test fitting of the new vent design looks good. It's currently sitting on top of the existing
cover, but it will sit flush once screwed down. No more bent, aluminum! I think I'll get
them done with a Black, anodized finish?
ventBefore.png
A new kill switch which is a bit prettier than my previous switch.
kill.jpg
Custom LCD Gauges , Data Loggers, Control Touch Screens
www.LCDdash.com \\ 647-522-9953 \\ Voice & Text
Proud new owner of GTM Gen 1., #105 - 08/27/11
LQ9 Powered, G96.00 6 speed transaxle
-
01-04-2020, 10:48 AM
#848
Senior Member

The great thing about the GTM - build it how you want it!
Just remember that FFR used CAD and FEA to design the chassis for rigidity. The center backbone gives the chassis rigidity in the region of the door openings since there are no full length door bars. I doubt you would even notice changes in chassis rigidity after modifying the backbone in a street car with the roof structure intact. I modified my roof structure so I added beefy door bars...
I ended up buying a windshield vent kit from Summit, it has pretty nice black plastic vents.
https://www.summitracing.com/parts/sum-991104-2
Last edited by beeman; 01-04-2020 at 11:10 AM.
MK3.1 2004 Mach 1 donor. ABS, PS, TC.
GTM #304 LPE 525hp LS3
2000 C5 Lingenfelter LS1@489hp
1999 Corvette FRC/Z06 track car
-
Post Thanks / Like - 0 Thanks, 2 Likes
-
01-04-2020, 08:43 PM
#849

Originally Posted by
beeman

I doubt you would even notice changes in chassis rigidity after modifying the backbone in a street car with the roof structure intact.
Actually, I did notice a bit of a 'buckle' with only one bar cut.
The chassis is also supported by the hoist at the insides of
the wheel wells where the footwell and fuel tanks meet.
I'd imagine it would be worse with weight on wheels.
It makes me want to extend the bar to the HVAC enclosure
and build an 'x' bar in between.
Last edited by LCD Gauges; 01-04-2020 at 08:46 PM.
Custom LCD Gauges , Data Loggers, Control Touch Screens
www.LCDdash.com \\ 647-522-9953 \\ Voice & Text
Proud new owner of GTM Gen 1., #105 - 08/27/11
LQ9 Powered, G96.00 6 speed transaxle
-
01-04-2020, 11:30 PM
#850
Senior Member
That buckle you felt was just the result of tension created in the chassis metal from expansion/contraction by the welding process, not anything bad. Your GTM just let out a sigh of relief.
Last edited by beeman; 01-04-2020 at 11:32 PM.
MK3.1 2004 Mach 1 donor. ABS, PS, TC.
GTM #304 LPE 525hp LS3
2000 C5 Lingenfelter LS1@489hp
1999 Corvette FRC/Z06 track car
-
01-05-2020, 10:53 AM
#851
Originally Posted by
beeman
That buckle you felt was just the result of tension created in the chassis metal from expansion/contraction by the welding process, not anything bad. Your GTM just let out a sigh of relief.
Tough to say as the blade got jammed as if the interior folded inward, but I was expecting the upper cage to hold it back. In any case,
I hope you're correct!
At the very least, I'm going to weld in some matching tube stock (the green outline) and maybe add the third piece depending on how
the structure reacts when I cut the second bar:
weld_in.png
Now...the fun of lowering the parking brake, and making close-out panels. What have you done with your tunnel pieces? I suppose
buying some sheets of aluminum and cut-to-fit?
Last edited by LCD Gauges; 01-05-2020 at 11:28 AM.
Custom LCD Gauges , Data Loggers, Control Touch Screens
www.LCDdash.com \\ 647-522-9953 \\ Voice & Text
Proud new owner of GTM Gen 1., #105 - 08/27/11
LQ9 Powered, G96.00 6 speed transaxle
-
01-05-2020, 11:24 PM
#852
-
01-06-2020, 06:24 AM
#853
Man, that carbon fiber looks superbly awesome!
Originally Posted by
Procision-Auto
Finally got the new dash pod bolted down. It fits like a glove!
MVIMG_20191010_173748.jpgMVIMG_20191010_173832.jpg
That's more than I can say for the PSG side piece, which was simply skinned.
I'm not sure why it's not matching the contour any longer, but it couldn't have
grown that much?
MVIMG_20191010_174550.jpgMVIMG_20191010_175028.jpg
I'm not sure what to do with the center console, most likely a flat CF.
This whole body and interior is coming out again soon. I just wont be happy
unless it's done over from scratch. The video will explain more.
-
Post Thanks / Like - 1 Thanks, 0 Likes
-
01-06-2020, 06:31 AM
#854
Yes Sir!
How did you get the epoxy to stay consistent with the curves and contours? Thats a really good job!
Originally Posted by
Procision-Auto
Getting somewhere with this interior (finally!). The Carbon Fiber is just beautiful; the vinyl can no longer stay! Over the Winter I'm
hoping to have the doors skinned with CF and the remainder of the console covered with a flat CF.
The gauges are alive, but not yet connected to the sensors. I'll be digging away all week to get a functional video of this thing in action.
Sorry about the blacked out squares, there are just too many eye-sores happening with wires and unfinished interior.
The new pod fits very nicely. It's not screwed down yet, but the contour matches well.
Attachment 114448Attachment 114447Attachment 114449
The Double DIN is roughed-in. I'll need a 90 degree adapter to get more clearance for cable in the rear,
then it will sit flush with the console. The LCD is a live shot, but there's no bezel over the display yet.
I'm trying to find the best method to cut Carbon Fiber straight and clean.
Attachment 114452Attachment 114450Attachment 114451
This is a little photo edit of how it will look with trimmed and finished.
Attachment 114453Attachment 114455
P.S. This pod and trim plate is for sale (Carbon or Fiberglass). Message me if interested. A proper thread will be posted later this week!
-
01-06-2020, 08:51 AM
#855
Originally Posted by
Aircontroller
Yes Sir!
How did you get the epoxy to stay consistent with the curves and contours? That’s a really good job!
I can't pretend to take a shred of credit for that work. I sent
those out to a local boat guy that does FG and CF for a living.
The mold is made, so if you (or anyone else) wants a carbon or
Fiberglass copy, let me know.
Custom LCD Gauges , Data Loggers, Control Touch Screens
www.LCDdash.com \\ 647-522-9953 \\ Voice & Text
Proud new owner of GTM Gen 1., #105 - 08/27/11
LQ9 Powered, G96.00 6 speed transaxle
-
Post Thanks / Like - 0 Thanks, 1 Likes
-
01-06-2020, 05:06 PM
#856
-
01-07-2020, 12:21 PM
#857
This Rear Diffuser is going to be "fun" to make. Start with cardboard and thin sheets of wood to get the basic shape, then add fiberglass?
What would "GTM Jesus" do (besides watch YouTube how-to videos)?

Last edited by LCD Gauges; 01-07-2020 at 12:51 PM.
Custom LCD Gauges , Data Loggers, Control Touch Screens
www.LCDdash.com \\ 647-522-9953 \\ Voice & Text
Proud new owner of GTM Gen 1., #105 - 08/27/11
LQ9 Powered, G96.00 6 speed transaxle
-
01-07-2020, 12:45 PM
#858
Senior Member

Originally Posted by
Procision-Auto
This is going to be "fun" to make. Start with cardboard and thin sheets of wood to get the basic shape, then add fiberglass?
What would "
GTM Jesus" do (besides watch YouTube how-to videos)?
Tino I'm not understanding what your trying/asking to do - - Is it the wing that your trying to make?
Thanks
Ron
"May you be in heaven a full half hour before the Devil knows you're dead"
-
01-07-2020, 12:52 PM
#859
Rear diffuser. Just wondering how the pros do this before I break out my scissors and reciprocating saw.
Custom LCD Gauges , Data Loggers, Control Touch Screens
www.LCDdash.com \\ 647-522-9953 \\ Voice & Text
Proud new owner of GTM Gen 1., #105 - 08/27/11
LQ9 Powered, G96.00 6 speed transaxle
-
01-07-2020, 01:38 PM
#860
You can watch videos where people use just modeling clay covered with foil and then fiberglass. Then they remove all the clay and are left with a fiberglass panel. You could certainly do this with any kind of support such as wood or cardboard also. Fact is, I have some videos I haven't posted yet where I say that those that want to do fiberglass panels should become wood working craftsmen first because you will basically make a ton of stuff out of wood first. The real issue is if you want a professional finish or just something that "works"? The proper way is to shape what you want from wood, cardboard, whatever. Usually filling in blanks with lots of body filler. I have used 18 gallons of body filler on my revised GTM body so far, along with lots of wood and about a gallon of expanding foam. Once you have the shape exactly as you want then coat the "plug" with a quality primer and paint to make the surface clean and smooth. Once that is done, cover the plug with release agent and make a mold. Plenty of videos on how to do this online. Then make finished parts from the mold. Hand layup will work just fine but if you want a part that is half the weight then infusion is the way to go.
Kinda surprised you haven't done this process already on this project?
This guy has some good videos...https://www.youtube.com/watch?v=H5A7_oPAw9c
Last edited by crash; 01-07-2020 at 01:44 PM.
-
Post Thanks / Like - 1 Thanks, 1 Likes
-
01-07-2020, 01:51 PM
#861
Originally Posted by
crash
Kinda surprised you haven't done this process already on this project?
Thanks Mike, I'll check it out.
Body work is something I've always feared. Not because I'm scared to try something new, but more that I want the paint to be
perfect and this was not a project that I wanted to test my skills upon. In fact, our good buddy Ron was invited up here because
I wanted an experienced GTM guy/bodyman to show me the ropes.
Sanding, filling, and shaping - I've learned a great deal.
As for actually making something from scratch, it has never been done on my part (until now). I'll be revamping the console
for the LCD touchscreen, and while I'm doing that I'll attack the diffuser. Let's see where it goes!
Custom LCD Gauges , Data Loggers, Control Touch Screens
www.LCDdash.com \\ 647-522-9953 \\ Voice & Text
Proud new owner of GTM Gen 1., #105 - 08/27/11
LQ9 Powered, G96.00 6 speed transaxle
-
01-07-2020, 01:53 PM
#862
Senior Member
Okay. Now it comes down to how inexpensive, and labor intensive you want to go
Quick hit one time shot: mock up CAD (carboard aided design) to get the desired shaped. cover it with silver tape, parchment paper whatever so it the fiberglass or carbon won't stick to it, and lay your material down.
If you have deep pockets money is no object you can still CAD make a sturdy model, take it to your guy that did your dash pods. 
Thanks
Ron
"May you be in heaven a full half hour before the Devil knows you're dead"
-
Post Thanks / Like - 1 Thanks, 0 Likes
-
01-07-2020, 02:19 PM
#863
Originally Posted by
Presto51
take it to your guy that did your dash pods.
That's pretty much a given; I'd like to wrap it in carbon.
I guess I'll buy some wood and get started my CAD design
Custom LCD Gauges , Data Loggers, Control Touch Screens
www.LCDdash.com \\ 647-522-9953 \\ Voice & Text
Proud new owner of GTM Gen 1., #105 - 08/27/11
LQ9 Powered, G96.00 6 speed transaxle
-
01-08-2020, 09:40 AM
#864
Are you using the stock diffuser and modifying it/adding to it.....or are you planning on making the entire diffuser from scratch?
Shane Vacek
VRaptor SpeedWorks, LLC
www.vraptorspeedworks.com
Turn-key GTM, SL-C & Ultima GTR Built to Your Specs!
Offering a full line of GTM Upgrades and Custom Parts
-
01-08-2020, 09:56 AM
#865
Originally Posted by
VRaptor SpeedWorks, LLC
Are you using the stock diffuser and modifying it/adding to it.....or are you planning on making the entire diffuser from scratch?
Have to start fresh because of my little gizmo thingie [oil accumulator] behind the transaxle

Custom LCD Gauges , Data Loggers, Control Touch Screens
www.LCDdash.com \\ 647-522-9953 \\ Voice & Text
Proud new owner of GTM Gen 1., #105 - 08/27/11
LQ9 Powered, G96.00 6 speed transaxle
-
01-08-2020, 12:04 PM
#866

Well, from your photoshop pics above, it looks like you're going for something similar to the stock diffuser, lowered down like the Gen II....so hopefully you can at least use your existing diffuser and cut it up/modify it to create the "base" for moulding your new piece. Yeah.....this is a lengthy and tedious process as to do it right, you will have to fabricate exaclty what you want, then create a mould from that part, then create a part from that mould. Been there many times. I would suggest using urethane pour foam #3 to get an initial shape of something like you have shown in the center of that first photoshop pic. Build your "platform" out of the stock diffuser, pour the foam right on top of it inside a simple box/dam to contain the foam from just spreading out everywhere, then tear away the box from the foam once it sets up and from there you can use a saw and surform cheesegrater to get the shape you're looking for, then sand the foam smooth with sandpaper and then you can paint over the foam with latex paint and then use mould release agent and make your mould. The fiberglass resin will eat the foam almost instantly, so you have to be sure that the foam is 100% covered with latex paint before you attempt to fiberglass over it.
You also have to keep in mind all of your angles to be sure that whatever you're taking a mould of can be removed from the mould and your finished part can be removed from the mould.
Shane Vacek
VRaptor SpeedWorks, LLC
www.vraptorspeedworks.com
Turn-key GTM, SL-C & Ultima GTR Built to Your Specs!
Offering a full line of GTM Upgrades and Custom Parts
-
01-08-2020, 01:48 PM
#867
Senior Member
Would your Accusump fit in the huge space behind one of the rear tires on a simple frame/mount?
Or like Shane said, if you modify your current Accusump mounts, you could probably leave it where it is and just angle the diffuser down like the Gen 2, which is better than the Gen 1 for evacuating heat and is probably a more effective diffuser angle (I'm not quite to that point on my build).
Last edited by beeman; 01-08-2020 at 01:51 PM.
MK3.1 2004 Mach 1 donor. ABS, PS, TC.
GTM #304 LPE 525hp LS3
2000 C5 Lingenfelter LS1@489hp
1999 Corvette FRC/Z06 track car
-
01-08-2020, 04:06 PM
#868
Originally Posted by
beeman
Would your Accusump fit in the huge space behind one of the rear tires on a simple frame/mount?
No can do. There is some plumbing and a priming valve on the left, gauge on the right. We'll see if I can manage this task; the wood has been
purchased. Let the good times roll.
rearDif3.jpg
Originally Posted by
VRaptor SpeedWorks, LLC
Well, from your photoshop pics above, it looks like you're going for something similar to the stock diffuser, lowered down like the Gen II
Yes, I want the air gap like the Gen II. Unfortunately, I gave away the Gen 1 diffuser - didn't like the look, so I'm really making it
difficult on myself!
Last edited by LCD Gauges; 01-08-2020 at 04:10 PM.
Custom LCD Gauges , Data Loggers, Control Touch Screens
www.LCDdash.com \\ 647-522-9953 \\ Voice & Text
Proud new owner of GTM Gen 1., #105 - 08/27/11
LQ9 Powered, G96.00 6 speed transaxle
-
01-08-2020, 05:02 PM
#869
Pretty sure I have an extra Gen II diffuser here if you are interested in it.....the shipping would be the killer....especially to Canada...can't even imagine what that would come to?
Shane Vacek
VRaptor SpeedWorks, LLC
www.vraptorspeedworks.com
Turn-key GTM, SL-C & Ultima GTR Built to Your Specs!
Offering a full line of GTM Upgrades and Custom Parts
-
Post Thanks / Like - 1 Thanks, 0 Likes
-
01-08-2020, 06:12 PM
#870
Originally Posted by
VRaptor SpeedWorks, LLC
Pretty sure I have an extra Gen II diffuser here if you are interested in it.....the shipping would be the killer....especially to Canada...can't even imagine what that would come to?
Thank you for the generous offer, but I'm not sure it would fit with the additional mount. I'm going to give this fabrication a try!
Custom LCD Gauges , Data Loggers, Control Touch Screens
www.LCDdash.com \\ 647-522-9953 \\ Voice & Text
Proud new owner of GTM Gen 1., #105 - 08/27/11
LQ9 Powered, G96.00 6 speed transaxle
-
01-09-2020, 11:52 AM
#871
Senior Member
Working with the pourable foam and shaping it is not a bad idea at all and is pretty simple to do..
-
Post Thanks / Like - 0 Thanks, 1 Likes
-
01-09-2020, 12:25 PM
#872
We generally combine plasma-cut pieces of aluminum along with the pour foam. Create a "grid" or rows of CNC cut alum parts that represent the outer surface shape we're after, bond those pieces in place on the part we're building off of/modifying, pour the spaces in between the alum parts full of foam and then sand the foam down to the aluminum to get the final shape. This way you can produce very symmetrical parts for both RH and LH sides of the car...because you're using the same CNC cut alum shape for both sides. Before I had my own CNC plasma table, I did the same thing by drawing the parts out in CAD, printing the CAD parts off on paper, gluing the paper to sheets of thin plywood (underlayment) and cutting the parts out with a bandsaw. Use hot glue to stick the wood parts grid down to a surface and then pour foam between them.
Shane Vacek
VRaptor SpeedWorks, LLC
www.vraptorspeedworks.com
Turn-key GTM, SL-C & Ultima GTR Built to Your Specs!
Offering a full line of GTM Upgrades and Custom Parts
-
Post Thanks / Like - 1 Thanks, 1 Likes
-
01-09-2020, 12:28 PM
#873
0807280001.jpg
Look familiar?
Shane Vacek
VRaptor SpeedWorks, LLC
www.vraptorspeedworks.com
Turn-key GTM, SL-C & Ultima GTR Built to Your Specs!
Offering a full line of GTM Upgrades and Custom Parts
-
Post Thanks / Like - 0 Thanks, 1 Likes
-
01-09-2020, 12:39 PM
#874
Originally Posted by
VRaptor SpeedWorks, LLC
We generally combine plasma-cut pieces of aluminum along with the pour foam. Create a "grid" or rows of CNC cut alum parts that represent the outer surface shape we're after, bond those pieces in place on the part we're building off of/modifying, pour the spaces in between the alum parts full of foam and then sand the foam down to the aluminum to get the final shape. This way you can produce very symmetrical parts for both RH and LH sides of the car...because you're using the same CNC cut alum shape for both sides. Before I had my own CNC plasma table, I did the same thing by drawing the parts out in CAD, printing the CAD parts off on paper, gluing the paper to sheets of thin plywood (underlayment) and cutting the parts out with a bandsaw. Use hot glue to stick the wood parts grid down to a surface and then pour foam between them.
This hurts my head...
I guess it's like anything, you have to try in order to build the skills and get the experience.
Better yet, how much to fly you down here and make me one? 
Last edited by LCD Gauges; 01-09-2020 at 02:57 PM.
Custom LCD Gauges , Data Loggers, Control Touch Screens
www.LCDdash.com \\ 647-522-9953 \\ Voice & Text
Proud new owner of GTM Gen 1., #105 - 08/27/11
LQ9 Powered, G96.00 6 speed transaxle
-
01-09-2020, 02:40 PM
#875
Senior Member
Originally Posted by
VRaptor SpeedWorks, LLC
Sure does! One of my favorite GTM mods EVER!
MK3.1 2004 Mach 1 donor. ABS, PS, TC.
GTM #304 LPE 525hp LS3
2000 C5 Lingenfelter LS1@489hp
1999 Corvette FRC/Z06 track car
-
Post Thanks / Like - 0 Thanks, 1 Likes
-
01-09-2020, 08:40 PM
#876
The steering wheel plate I did was a cake walk compared to this discussion
I’m starting small and hope to work up to a large rear window replacement, similar to a Lambo type design, but one off. All this stuff is way down the road for me, but I love learning new things so I’m enjoying the reading here.
-
01-18-2020, 10:22 PM
#877
Curious to see what you can come up with! As discussed in other posts, effectiveness of the diffuser requires it to sit so much lower than the stock position, but it's hard to do and keep the aggressive good looks of the steep angle that the kit comes with.
-
05-27-2020, 04:38 PM
#878
A few updates as the nicer weather is motivating me to get back on the road! The rear diffuser is now being shaped by foam, glue, and a hot knife. It seems this approach will allow better lines and ease of mock up.
As I'm reviewing the car in more detail, I've found even more issues with the cooling system. I have no idea how this thing held together as long
as it did. Some hoses were loose fit without clamps, or incorrect sized clamps were used. The core valve was hanging by one rivet. Cracked heater core hose...a couple ends looked as though the were hacked by a dog's mouth?
MVIMG_20200527_140155.jpgMVIMG_20200527_133151.jpg
I've also decided to remove the aluminum barrier between the fans and battery area. Definitely a cleaner look. The new fuse box and relays
cleans up well.
hoodB4andAfter.jpg
I'm going to attempt relocating the A/C canister to allow better access to the battery. Will be a tough task with such rigid hoses.
The final resting place for the console has been decided. New aluminum panels will be made for each side.
Loving the glass on the dash and removal of turn/wiper stocks. Buttons will be placed on the steering wheel
and touchscreen.
MVIMG_20200527_161344.jpg
Last edited by LCD Gauges; 05-27-2020 at 04:40 PM.
Custom LCD Gauges , Data Loggers, Control Touch Screens
www.LCDdash.com \\ 647-522-9953 \\ Voice & Text
Proud new owner of GTM Gen 1., #105 - 08/27/11
LQ9 Powered, G96.00 6 speed transaxle
-
12-17-2020, 01:20 PM
#879
What a crazy world right now. Not much motivation for me to work on the car, and that was already a problem
before this hammer dropped.
Slow moving, but I've added a new master kill switch and some black poly for mounting the electrical components.
gtmFuses.jpg
I hope you're all doing well during this difficult time. If anyone's interested, I'm giving away/selling some old parts
that are no longer needed.
Give Away (shipping)
Light controller for 2017 Mustang, or 2017 Ford GT (if you want to sound cool).
LightSwitch.jpg
FFR GTM coils, Gen 1
20170507_160850.jpg
For Sale (PM for details)
High torque, mini starter for Chev/Pontiac SB
20170507_161502.jpg
3 inch, polished aluminum sleeve
20170507_160417.jpg
C5 door handles
20170507_160551.jpg
More to come later.
Last edited by LCD Gauges; 12-17-2020 at 01:25 PM.
Custom LCD Gauges , Data Loggers, Control Touch Screens
www.LCDdash.com \\ 647-522-9953 \\ Voice & Text
Proud new owner of GTM Gen 1., #105 - 08/27/11
LQ9 Powered, G96.00 6 speed transaxle
-
04-05-2021, 10:05 PM
#880
Happy day after Easter everyone, I hope it was a good one.
Some snails-pace work on my car again. I'm making some paddles for a steering controller to operate
a few items from turn signals, flash to pass/High beam, wiper mist, media center, and even the horn.
Not having a turn stalk, or wiper stalk is nice on the eyes.
After a night of sleeping on buttons, I've decided to go with 2-tone black and white, as
opposed to colour coded.
leftPaddle.pngwordMockUP.pngSWC_GTM2.pngclockSpring.png
The newest skin based on the Lambo SVJ is going to be one of the graphics for the LCD display. I'm also
able to pick off the gear position with 4 limit switches and reverse signal from the transaxle.
svjSKin_Street.pngLaFerrari_dark.png
Custom LCD Gauges , Data Loggers, Control Touch Screens
www.LCDdash.com \\ 647-522-9953 \\ Voice & Text
Proud new owner of GTM Gen 1., #105 - 08/27/11
LQ9 Powered, G96.00 6 speed transaxle


 Thanks:
  Likes:


 Reply With Quote


