-
Senior Member

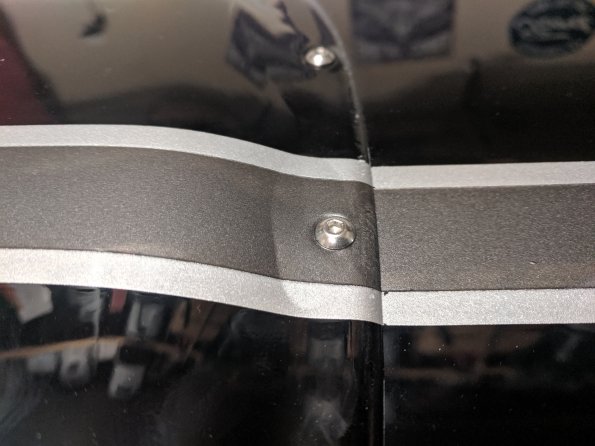
Paint Bubble on Scoop :(
Sad Day... discovered the paint coming away from a spot on my hood scoop.
I presume I failed to get good adhesion for some reason. I did use some of that bulldog adhesion promoter.. but.. either way.
Looks like I might be re-spraying the scoop. Good thing I have some left over paint and clear still.
2016 MK4 | '99 Explorer 5.0 | E303&600cfm carb | T5z + 3.55 | 3-link | SN95 | PB/PS | FR500 17" 315&275 |
-
Senior Member

Bummer. At least it is on a small removable part. It also looks like it is just the stripe.
Good luck on the re-do.
-
I CONCUR......that's a bubble...….best of luck...da Bat
-
Senior Member
After closer inspection... there is another huge bubble along the passenger side near the cap-screws, and a bunch (6+) smaller ones around the the other various cap screws. Looks like I get to learn how to re-spray a hood scoop!
2016 MK4 | '99 Explorer 5.0 | E303&600cfm carb | T5z + 3.55 | 3-link | SN95 | PB/PS | FR500 17" 315&275 |
-
Well brother, they are just little #8s.....43ft lbs of torque is just a bit much. I tighten mine just until they don't wiggle. You are going to need to strip it to the bone (very sucky job) when I shoot BullDog I give it two light coats.....mist coats. Have had trouble with the o'l "If a little is good a lot must be better" in the past. Also, spray it in the shade and not direct sunlight, let dry on its own (no force dry). Wish I was there to help you out...….NOT!...Da Bat
-
Senior Member
4.3in-lbs... 43ft-lbs.. meh, close enough 
I suspect I did over tighten those screws a bit.. but.. I did use nylocks just so I wouldn't have to snug-them. Don't know my own strength I guess.
Any suggestions for stripping it down ? All the way to the ABS? Paint Stripper?
2016 MK4 | '99 Explorer 5.0 | E303&600cfm carb | T5z + 3.55 | 3-link | SN95 | PB/PS | FR500 17" 315&275 |
-

Hate to say it but 150gr. If you have an orbital sander try to get as much with that as you can and then hand sand the rest.....if it were me (NOT THAT I WOULD EVER HAVE A BLUNDER THAT BIG) (this is where Kleiner shows a pic I sent of a brain fart cutting the hood scoop on the wrong end of the hood,,,,easy remedy, bought a new hood)….to be honest, as hard as it is for me to be, I have had that happen. One was bad because of force drying the Bulldog and primer (bought a new scoop). The other was one small spot so I feathered and re-primed. Your whole scoop is suspect and that's why I suggest stripping. After stripping with 150 I would orbital those scratches with 220 then 320 followed by 2 mist coats of Bully Doggy and two medium to light coats of urethane primer. I would go right to 500-600 wet...no blocking then finish.....I DIDN'T GET AS GOOD AS I AM BY NOT MAKING MISTAKES ! Anyone can pull a trigger, a painter can fix his mistakes, a master painter fixes those mistakes on the run. Like I say.....There are 132 ounces of potential problems in every gallon of paint...da bat
-
Senior Member
Or.. do I spend $85 on a new scoop and spend the effort making the holes line up perfectly?
http://www.factoryfiveparts.com/1551...ood-scoop-kit/
2016 MK4 | '99 Explorer 5.0 | E303&600cfm carb | T5z + 3.55 | 3-link | SN95 | PB/PS | FR500 17" 315&275 |
-
Making the holes line up....I so got this..... Bolt the scoop back on, use a rusty nail and make a deep scratch around the perimeter of the scoop, place new scoop within the scratch line, clamp with the biggest vicegrips you can find and drill new holes.....CAKE !. I would strip the one you have and re-shoot ...that is.... unless you want to just be a monkey with a spray gun.....OWN IT ! FIX YOUR MISTAKE !, it's a personal growth thing.....or just buy a new one. HELL! I got no dog in this fight. What do I care.....AND WHY DO YOU CARE IF I...….SORRY! ,got me on a rum soaked Friday night....and that's on you. Everyone knows you don't ask da Bat a question on Friday after 5.....4...….3.....ok, I started at 2:30 but I didn't really rev it up untill5....4....2......ok, 2:45.
-
Post Thanks / Like - 0 Thanks, 1 Likes
-
Senior Member
Hey.. I just realized... my Beginners Luck finally ran out!!
2016 MK4 | '99 Explorer 5.0 | E303&600cfm carb | T5z + 3.55 | 3-link | SN95 | PB/PS | FR500 17" 315&275 |
-
Not a waxer


Originally Posted by
j.miller

... (NOT THAT I WOULD EVER HAVE A BLUNDER THAT BIG) (this is where Kleiner shows a pic I sent of a brain fart cutting the hood scoop on the wrong end of the hood….
Hey, I wasn't even going to go there, especially after whining and crying on your shoulder when I had an adhesion issue of my own a few months ago. Yeah, 132 (or 128 but who's counting) ounces of problems in every gallon which goes up exponentially after 5:00...or 4:00...or 3:00...OK, 2:30 (and keep this in mind Brother Bat---thanks to the time zone change by the time 2:30 rolls around for you I'VE ALREADY BEEN AT IT FOR 3 HOURS  )
)
Captain O
-
Post Thanks / Like - 0 Thanks, 1 Likes
-
Senior Member

I honestly don’t know how you guys manage to not go completely insane painting these things. I had painted cars in the past with good results and have tried to do two lately. It is a lot harder than it was with the old paint formulas. In Canada, the tree hugging, bunny loving, Birkenstock wearing, bicycle riding Bolsheviks have got our weak kneed government to legislate low voc paints. If your off by 1/2 a degree on temp or 1 psi on pressure it won’t work. I have resolved to leaving this to the pros. My wife made fun of me when I decided to paint the second car. I had told her I would never ever do that again after the first one.
Good luck with your repair
Norm
-
Senior Member
Hey.. you paint fume sniffing masochists! (aka Body and Paint experts)...
I'm hoping to tackle this bubbling hood scoop sometime soon. no current pics.. but.. the bubbles are pretty bad. The whole edge of the scoop is pulling way.
Nothing on the bottom or top flat surfaces. Just at that curve next to the screws, and into the screws.
anyway... Question.
I can very easily see now that the paint has pulled away from the plastic itself. In one of the bubbles that is breaking open.. "black plastic" is showing clear as day.
So.. now I know my failure point. The very 1st layer.
I did use some of that bulldog adhesion promoter (aerosol can).. but.. clearly I did something wrong.
Any tips for the do-over?
Do I need to take it ALL down to the plastic? Assuming the adhesion is questionable everywhere? Or just where it's bubbling? I'm assuming all of it.
If so.. do I just go-to-town with the DA sander? All the way to the black plastic?
Or .. do I get some paint stripper and let it eat everything off? (this sounds like a bad idea, despite the less work).
Then.. any advice on how to avoid another "It aynt stickin'"??
2016 MK4 | '99 Explorer 5.0 | E303&600cfm carb | T5z + 3.55 | 3-link | SN95 | PB/PS | FR500 17" 315&275 |
-
Senior Member

Hey.. you paint fume sniffing masochists! (aka Body and Paint experts)...
I'm hoping to tackle this bubbling hood scoop sometime soon. no current pics.. but.. the bubbles are pretty bad. The whole edge of the scoop is pulling way.
Nothing on the bottom or top flat surfaces. Just at that curve next to the screws, and into the screws.... Question.
I can very easily see now that the paint has pulled away from the plastic itself. In one of the bubbles that is breaking open.. "black plastic" is showing clear as day.
So.. now I know my failure point. The very 1st layer.
I did use some of that bulldog adhesion promoter (aerosol can).. but.. clearly I did something wrong.
Any tips for the do-over?
Do I need to take it ALL down to the plastic? Assuming the adhesion is questionable everywhere? Or just where it's bubbling? I'm assuming all of it. Yes.
If so.. do I just go-to-town with the DA sander? All the way to the black plastic? Yep and be careful with the power of the DA, and your going to need to do some final hand sanding, follow DA Bat's suggestion.
Or .. do I get some paint stripper and let it eat everything off? (this sounds like a bad idea, despite the less work). NO!! if you go this route just buy another one.
Then.. any advice on how to avoid another "It aynt stickin'"?? Follow the DA BAT's suggestion, he mentions it earlier.
Ron
"May you be in heaven a full half hour before the Devil knows you're dead"
-
Post Thanks / Like - 0 Thanks, 1 Likes
-
Senior Member
Thanks .. I guess I was hoping for a "Yeah kid.. you obviously screwed on in doing X and Y .... so.. do Z this way next time". But.. now that I re-read it.. ho on earth is anybody supposed to know where I screwed up. Bats comments really do sum it up.
Though.. since it was clearly teh layer at the plastic.. I was wondering if there is more to that bulldog stuff.. or.. important "tricks".. or.. "Hey.. avoid doing .... ". or even.. "Nah.. don't bother with it".. .. "throw the Aerosol in teh trash?". Dump the aerosol contents into the hvlp gun and spray it that way? Jump in the car with a trunk full of Rum and bribe daBat in person to fix it for me? ROAD TRIP!!
2016 MK4 | '99 Explorer 5.0 | E303&600cfm carb | T5z + 3.55 | 3-link | SN95 | PB/PS | FR500 17" 315&275 |
-
Senior Member
Originally Posted by
skidd
Thanks .. I guess I was hoping for a "Yeah kid.. you obviously screwed on in doing X and Y .... so.. do Z this way next time". But.. now that I re-read it.. ho on earth is anybody supposed to know where I screwed up. Bats comments really do sum it up.
Though.. since it was clearly teh layer at the plastic.. I was wondering if there is more to that bulldog stuff.. or.. important "tricks".. or.. "Hey.. avoid doing .... ". or even.. "Nah.. don't bother with it".. .. "throw the Aerosol in teh trash?". Dump the aerosol contents into the hvlp gun and spray it that way? Jump in the car with a trunk full of Rum and bribe daBat in person to fix it for me? ROAD TRIP!!
Or
Throw that plastic scoop in the trash and get a fiberglass scoop, that will solve the adhesion, just sand the gelcoat and paint it LOL. ")
Ron
"May you be in heaven a full half hour before the Devil knows you're dead"
-
Not a waxer
Originally Posted by
Presto51
Or
Throw that plastic scoop in the trash and get a fiberglass scoop, that will solve the adhesion, just sand the gelcoat and paint it LOL.
Ron
But opens up other "issues"---the fiberglass scoops are not symmetrical side to side and are raw, need to have the oversized flange trimmed and are unfinished glass on the underside which take a good bit of work to finish if you want them to be smooth. It's always something; pick your poison.
Jeff
-
New scoop....Sand scoop with 320, Two medium-light coats of Bulldog , two medium coats urethane primer, wet sand 500-600gr wet or dry......paint. ….fixing adhesion problem....couldn't tell ya. No way to know where the wheels came off...da Bat
-
Senior Member
Finally got around to fixing the hood scoop. The paint had pretty much started to come away from almost the whole thing at the edge. 
Don't tell him, but I took millers advice. sanded it down to abs, and started over. At least I only had to do 1 side.
Just finished the last coat of clear. Turned out not bad IMO. A little orange on the side, but the top seems to be leveling out nice.
Nothing a bit of wet-sanding and buffing can't fix.
Lets hope it stays on this time!!

2016 MK4 | '99 Explorer 5.0 | E303&600cfm carb | T5z + 3.55 | 3-link | SN95 | PB/PS | FR500 17" 315&275 |
-
Post Thanks / Like - 0 Thanks, 2 Likes
-
Originally Posted by
skidd
Finally got around to fixing the hood scoop. The paint had pretty much started to come away from almost the whole thing at the edge.
Don't tell him, but I took millers advice.
sanded it down to abs, and started over. At least I only had to do 1 side.
Just finished the last coat of clear. Turned out not bad IMO. A little orange on the side, but the top seems to be leveling out nice.
Nothing a bit of wet-sanding and buffing can't fix.
Lets hope it stays on this time!!
Head is swelling as I type ! When you put it back on the hood only tighten the screws down till they just kiss......just...da Bat


 Thanks:
  Likes:


 Reply With Quote
