-
Senior Member

Fiberglass Repair Advice Please
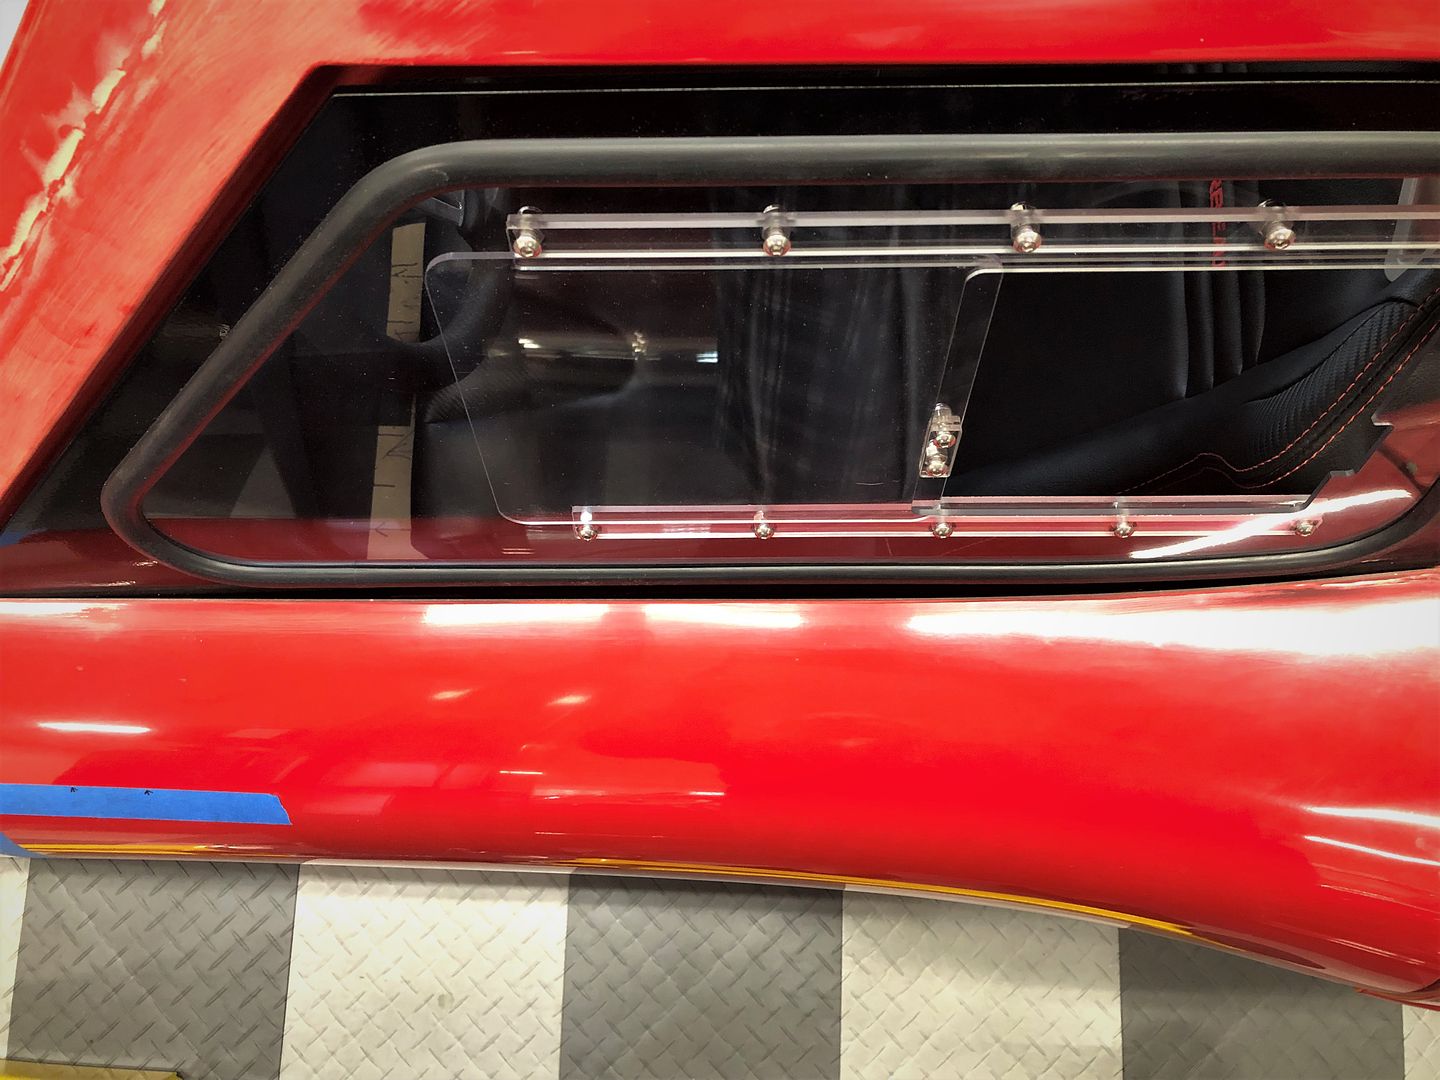
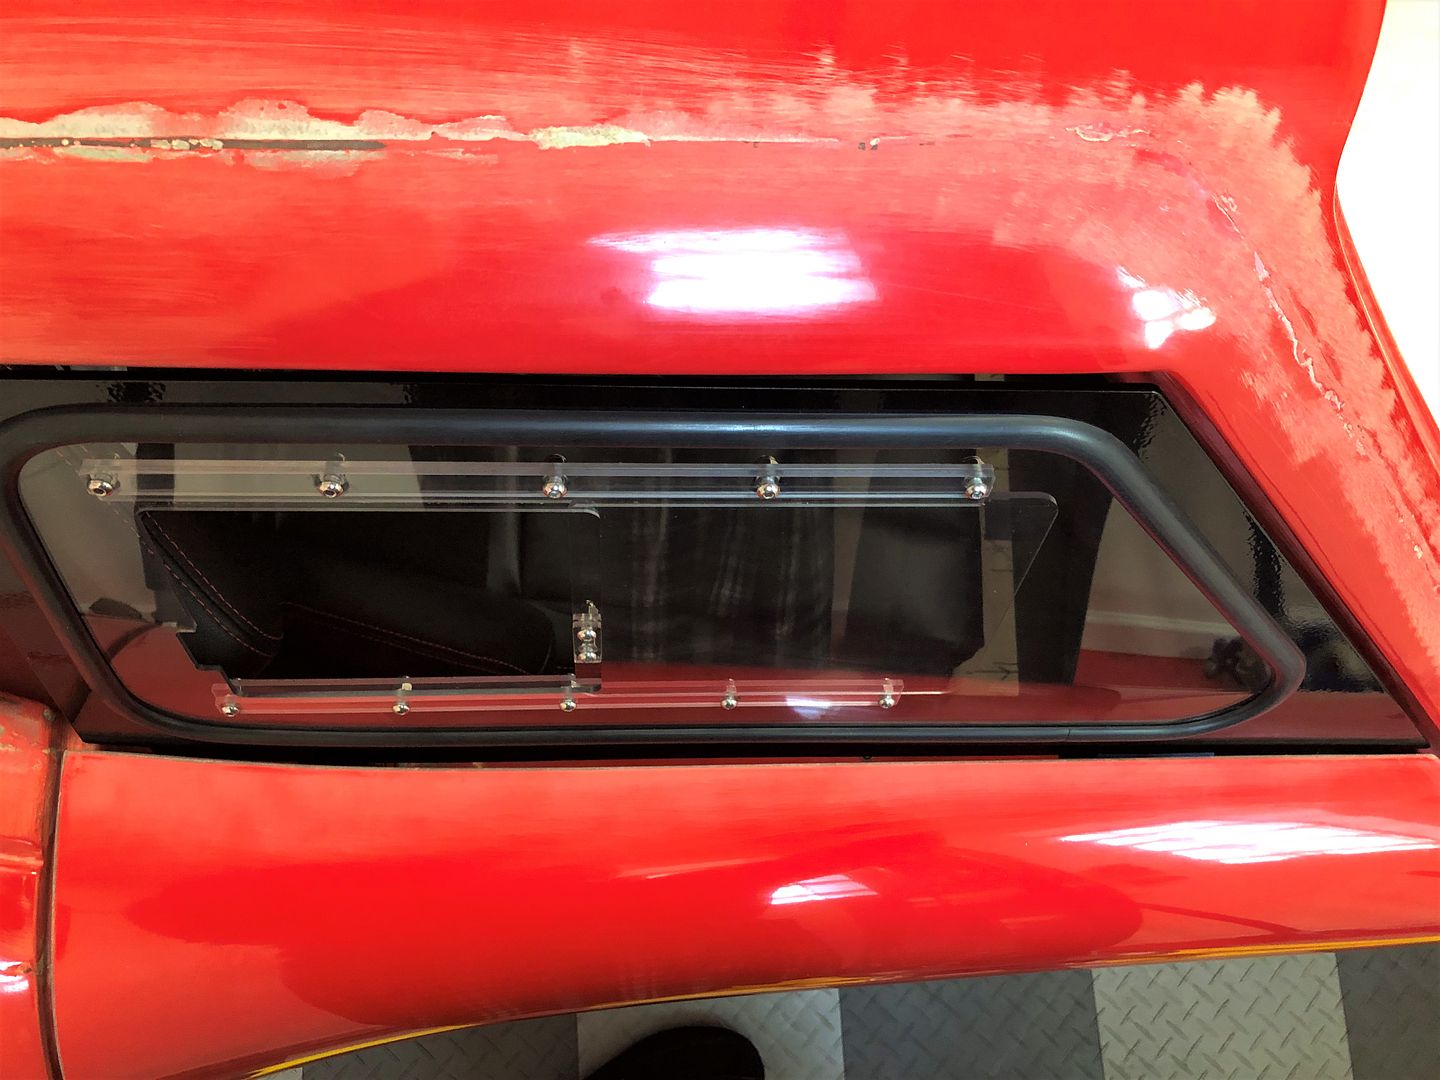
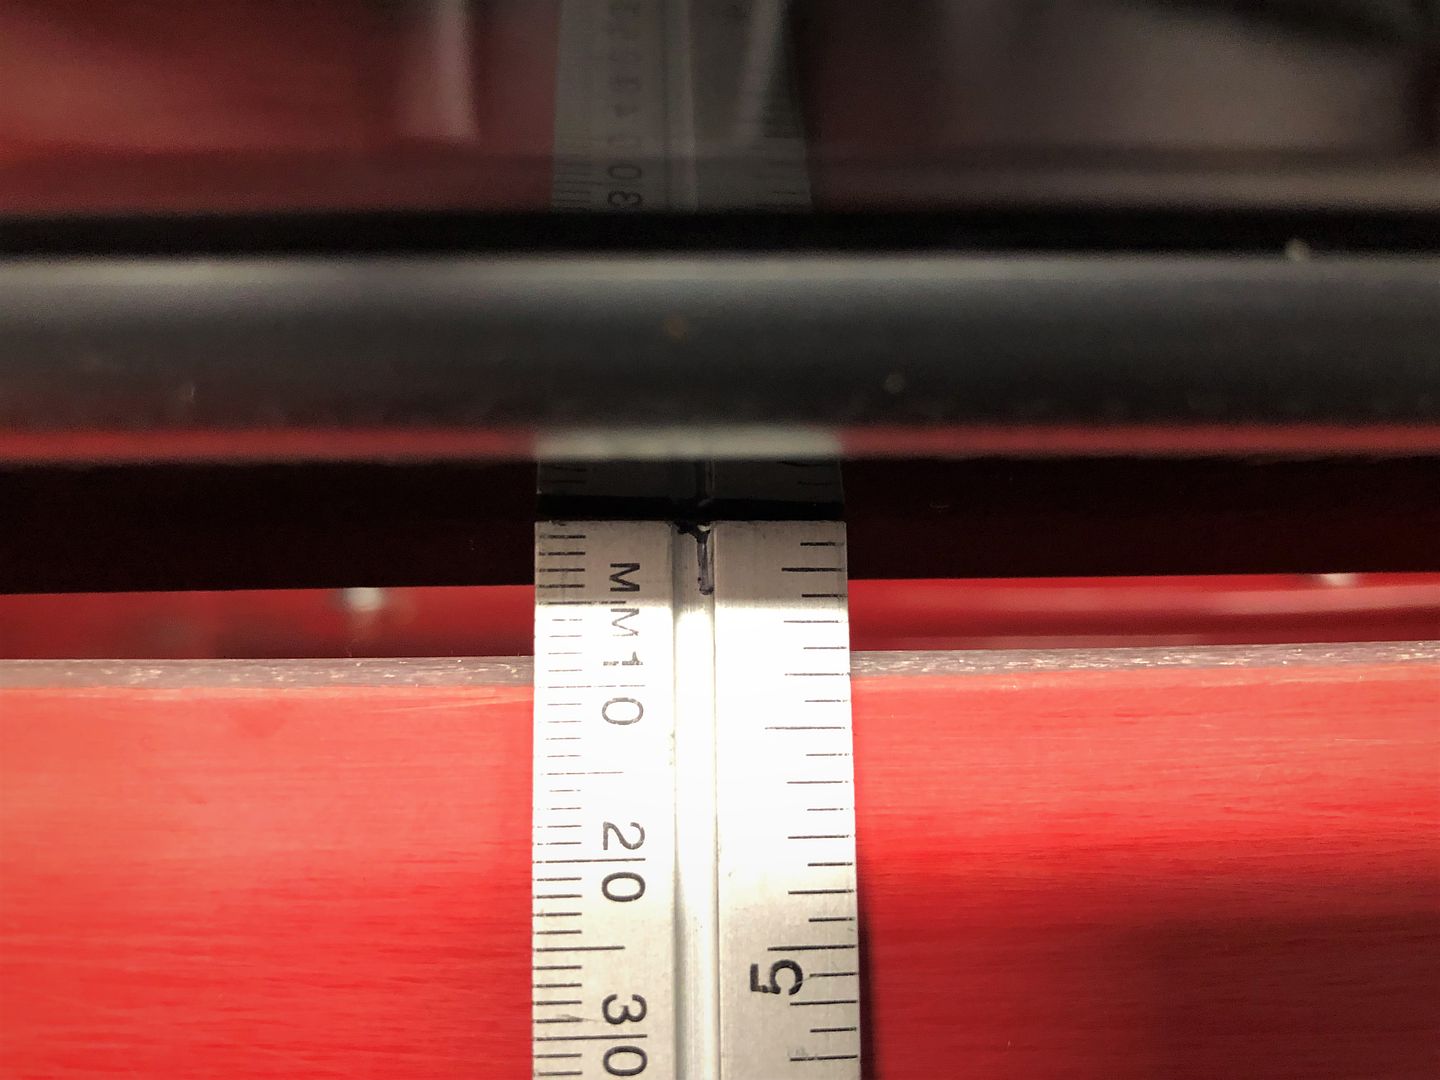
Getting down to some final details on my Gen 3 Coupe build before paint. I'm fitting the Factory Five window kit and deciding I'm not happy with the mis-match between the straight windows and the curved edge of the doors. I've seen a couple in person, and seems typical and the solution is to put a cushion or gasket of some kind along the door edge. That would work but there's not a lot of contact area on either the door or the window and seems to me straightening the door edge would be the better choice. Especially since I'm at a stage where that's possible. The max gap is about 1/4-inch on the DS, and 5/16-inch on the PS. I'd like to build up the edge to make the door edge straight and close the gap. I suspect the windows will be left on most of the time, so the edge would be relatively protected. But I don't know that for sure. Either way it needs to be strong and also not picture through to the paint. Looking for suggestions. Don't pretend to be an expert about this at all.
I've done some searching and watched some videos. Seems I need to taper back on the top and bottom so there's something to grip plus reduce the chance of a line showing through. That's easy enough and assume I need to remove the gel coat near the joint anyway. I'm thinking I would put some tape or whatever on the window and use as a mold for the edge. Then some foam or gasket or whatever along the bottom to create a dam. Then fill the edge and coat/recoat/sand as needed to blend. I have some vinyl ester resin and chopped glass. That's one choice although I admit don't particularly like to work with that stuff. I also have 3M HSRF, which I've had great luck with would like to use unless someone has a better suggestion. Worried though this might be too large a gap to fill that way. Looking for some expert opinions here. Thanks in advance.
Driver side. About 1/4-inch max gap.
Passenger side. About 5/16-inch max gap.
Last edited by edwardb; 05-31-2019 at 07:14 AM.
Build 1: Mk3 Roadster #5125. Sold 11/08/2014.
Build 2: Mk4 Roadster #7750. Sold 04/10/2017.
Build Thread
Build 3: Mk4 Roadster 20th Anniversary #8674. Sold 09/07/2020.
Build Thread and
Video.
Build 4: Gen 3 Type 65 Coupe #59. Gen 3 Coyote. Legal 03/04/2020.
Build Thread and
Video
Build 5: 35 Hot Rod Truck #138. LS3 and 4L65E auto. Rcvd 01/05/2021. Legal 04/20/2023.
Build Thread. Sold 11/9/2023.
-

Steve >> aka: GoDadGo

Paul,
My fiberglass repair skills may be a bit rusty, but I think I might have a fairly easy solution or two for you. We'd use the 2nd option when we built fiberglass boats because Fiber Tech didn't exist back in the stone age when I was in my early 20's. (56 Now)
Option #1
Evercoat makes a high strength filler known as Fiber Tech which has fiberglass and kevlar strands in it.
This is what I'll be using to build up my doors on my MK-4 near where they meet near the cowl. This stuff is pretty good and it is typically used on Corvettes and other fiberglass projects to patch holes and to build up areas that need a more robust material. Just know that it sets fast since it is a resin based material so your working time may be short.
https://youtu.be/JwAErvc2tN4
What you can do, after you sand the gel-goat down, is apply it to the area that you'd like to build up. Just make sure to wipe the fiberglass down with Acetone to get to ready to apply the filler so that you get the best bond possible. To get the gap taken care of the easy way, simply take a piece of cardboard and cover it with wax paper and insert it over your window frame. Push and/or work Fiber Tech filler into the opening and let it harden and remove the cardboard once it has completely set. The wax paper will allow the cardboard to be released, but you will need to wipe the contact area down with Acetone to remove the residual wax before you start sanding.
This will give you a nice starting point since the cardboard will basically create the gap that I think you are looking for.
Option 2
Your other option is to get Vinylester resin, micro bubbles and cut up some fiberglass matting to essentially make your own kitty hair style filler. If you decide to go down this path then the build up process will be the same.
Hope This Helps!
Steve
Last edited by GoDadGo; 05-31-2019 at 08:02 AM.
-
Senior Member

Originally Posted by
GoDadGo

Paul,
My fiberglass repair skills may be a bit rusty, but I think I might have a fairly easy solution or two for you. We'd use the 2nd option when we built fiberglass boats because Fiber Tech didn't exist back in the stone age when I was in my early 20's. (56 Now)
Option #1
Evercoat makes a high strength filler known as
Fiber Tech which has fiberglass and kevlar strands in it.
This is what I'll be using to build up my doors on my MK-4 near where they meet near the cowl. This stuff is pretty good and it is typically used on Corvettes and other fiberglass projects to patch holes and to build up areas that need a more robust material. Just know that it sets fast since it is a resin based material so your working time may be short.
https://youtu.be/JwAErvc2tN4
What you can do, after you sand the gel-goat down, is apply it to the area that you'd like to build up. Just make sure to wipe the fiberglass down with Acetone to get to ready to apply the filler so that you get the best bond possible. To get the gap taken care of the easy way, simply take a piece of cardboard and cover it with wax paper and insert it over your window frame. Push and/or work Fiber Tech filler into the opening and let it harden and remove the cardboard once it has completely set. The wax paper will allow the cardboard to be released, but you will need to wipe the contact area down with Acetone to remove the residual wax before you start sanding.
This will give you a nice starting point since the cardboard will basically create the gap that I think you are looking for.
Option 2
Your other option is to get Vinylester resin, micro bubbles and cut up some fiberglass matting to essentially make your own kitty hair style filler. If you decide to go down this path then the build up process will be the same.
Hope This Helps!
Steve
Thanks Steve. That's great feedback. Much appreciated! So my question is, how are either different than 3M HSRF? Which claims to be vinyl ester resin and has fiberglass strand reinforcement. Per their literature: "3M™ Marine High Strength Repair Filler is a uniquely modified vinyl ester structural filler formulated with short strand fiberglass for non-fairing applications. The fiberglass fibers interlock to give our filler additional strength compared to regular fillers."
Not trying to be argumentative. Just trying to learn and understand.
Build 1: Mk3 Roadster #5125. Sold 11/08/2014.
Build 2: Mk4 Roadster #7750. Sold 04/10/2017.
Build Thread
Build 3: Mk4 Roadster 20th Anniversary #8674. Sold 09/07/2020.
Build Thread and
Video.
Build 4: Gen 3 Type 65 Coupe #59. Gen 3 Coyote. Legal 03/04/2020.
Build Thread and
Video
Build 5: 35 Hot Rod Truck #138. LS3 and 4L65E auto. Rcvd 01/05/2021. Legal 04/20/2023.
Build Thread. Sold 11/9/2023.
-
Steve >> aka: GoDadGo
Originally Posted by
edwardb
Thanks Steve. That's great feedback. Much appreciated! So my question is, how are either different than 3M HSRF? Which claims to be vinyl ester resin and has fiberglass strand reinforcement. Per their literature: "3M™ Marine High Strength Repair Filler is a uniquely modified vinyl ester structural filler formulated with short strand fiberglass for non-fairing applications. The fiberglass fibers interlock to give our filler additional strength compared to regular fillers."
Not trying to be argumentative. Just trying to learn and understand.
I think either will work fine.
The 3M filler high strength filler will likely be a bit tougher to sand. Also, most boats that tend to stay in the water use Vinylester gel-coats and the first layer of glass will also be vinylester to avoid bottom blistering. They tend to then go with the polyester resin after the 1st layer since it is so much cheaper.
The reason the 3M is vinyester based is to avoid blistering since it can be used below the water line.
Again, I think either will work fine or you can make a micro-bubble and glass strand paste using vinylester resin to tackle the task.
Resin Grade Order:
1. Epoxy,
2. Vinylester,
3. Polyester
NOTE: Get one of these little sanding suckers if you don't already have one.
https://www.harborfreight.com/air-an...der-93629.html
If it only lasts long enough to tackle this project and knock out your parting lines then it will be well worth the $30.00!
I'm 99.99% Sure That You'll Knock This Little Task Out Of The Ball Park!
Last edited by GoDadGo; 05-31-2019 at 09:27 AM.
-
Senior Member

Another Idea From the Peanut Gallery
With the gaps that you are trying to bridge, I'm not a big fan of reinforced filler, I personally don't think they are strong enough to hold up over time.
Have you thought about using/making your own fiberglass patch/filler panels?
On a piece of scrap metal,( I like to use a clean automotive oil drip pan, it has built in edges to contain the extra resin) covered with wax paper, or my favorite, parchment paper, the wet fiberglass doesn't stick to it.
I like to lay down about five layers of cloth and mat to make the part, you can more or less depending how strong you think you need it to be. .The steps go like this:
In the pan with the wax or parchment paper lay one layer of cloth, wet out with resin (you want to really soak it down for each layer)
Lay layer of mat over the cloth, and wet, try to work out as many air pockets as you can, but don't waste too much time trying for perfection.
Lay another layer of cloth, wet it out.
Lay another layer of mat, wet it out.
Lay another layer of cloth, wet it out.
After you have laid out all of your layers, make sure all layers have enough resin for a really good wet out, I like to take a new, clean body filler spreader and work out all the air bubbles before the resin kicks.
Come back after this all cures, take it off the paper, cut/shape, out the proper size to fill the gap, prepare the surface that you are bonding to, either use more resin mix, or I prefer to us 3M 8115.
I know this is more information then you might have liked, but it's a least another option, and you get to practice your fiberglass skills. ")
Good luck
Ron
"May you be in heaven a full half hour before the Devil knows you're dead"
-
Post Thanks / Like - 1 Thanks, 0 Likes
-
Senior Member

I’m curious and hoping to see what the two Jeff’s have to say about this one....
I would think that Steves option #2 would be kind of like Ron’s patch idea except it would be all one piece instead of bonding a patch in there? You would still get a fiberglass reinforced resin area, just not laid in layers. Just a random thought..... 3M’s HSRF seems to be a premade Steves # 2 option.
Kurt
Last edited by SSNK4US; 05-31-2019 at 03:55 PM.
If everything seems under control, youre just not going fast enough....
Build thread
MKIV complete kit # 9395 delivered 7/31/18
-
Senior Member
Follow-up to this thread. I documented what I did in my build thread here: https://thefactoryfiveforum.com/show...l=1#post369979.
Build 1: Mk3 Roadster #5125. Sold 11/08/2014.
Build 2: Mk4 Roadster #7750. Sold 04/10/2017.
Build Thread
Build 3: Mk4 Roadster 20th Anniversary #8674. Sold 09/07/2020.
Build Thread and
Video.
Build 4: Gen 3 Type 65 Coupe #59. Gen 3 Coyote. Legal 03/04/2020.
Build Thread and
Video
Build 5: 35 Hot Rod Truck #138. LS3 and 4L65E auto. Rcvd 01/05/2021. Legal 04/20/2023.
Build Thread. Sold 11/9/2023.


 Thanks:
  Likes:


 Reply With Quote