-
Double-check my bellhousing alignment please
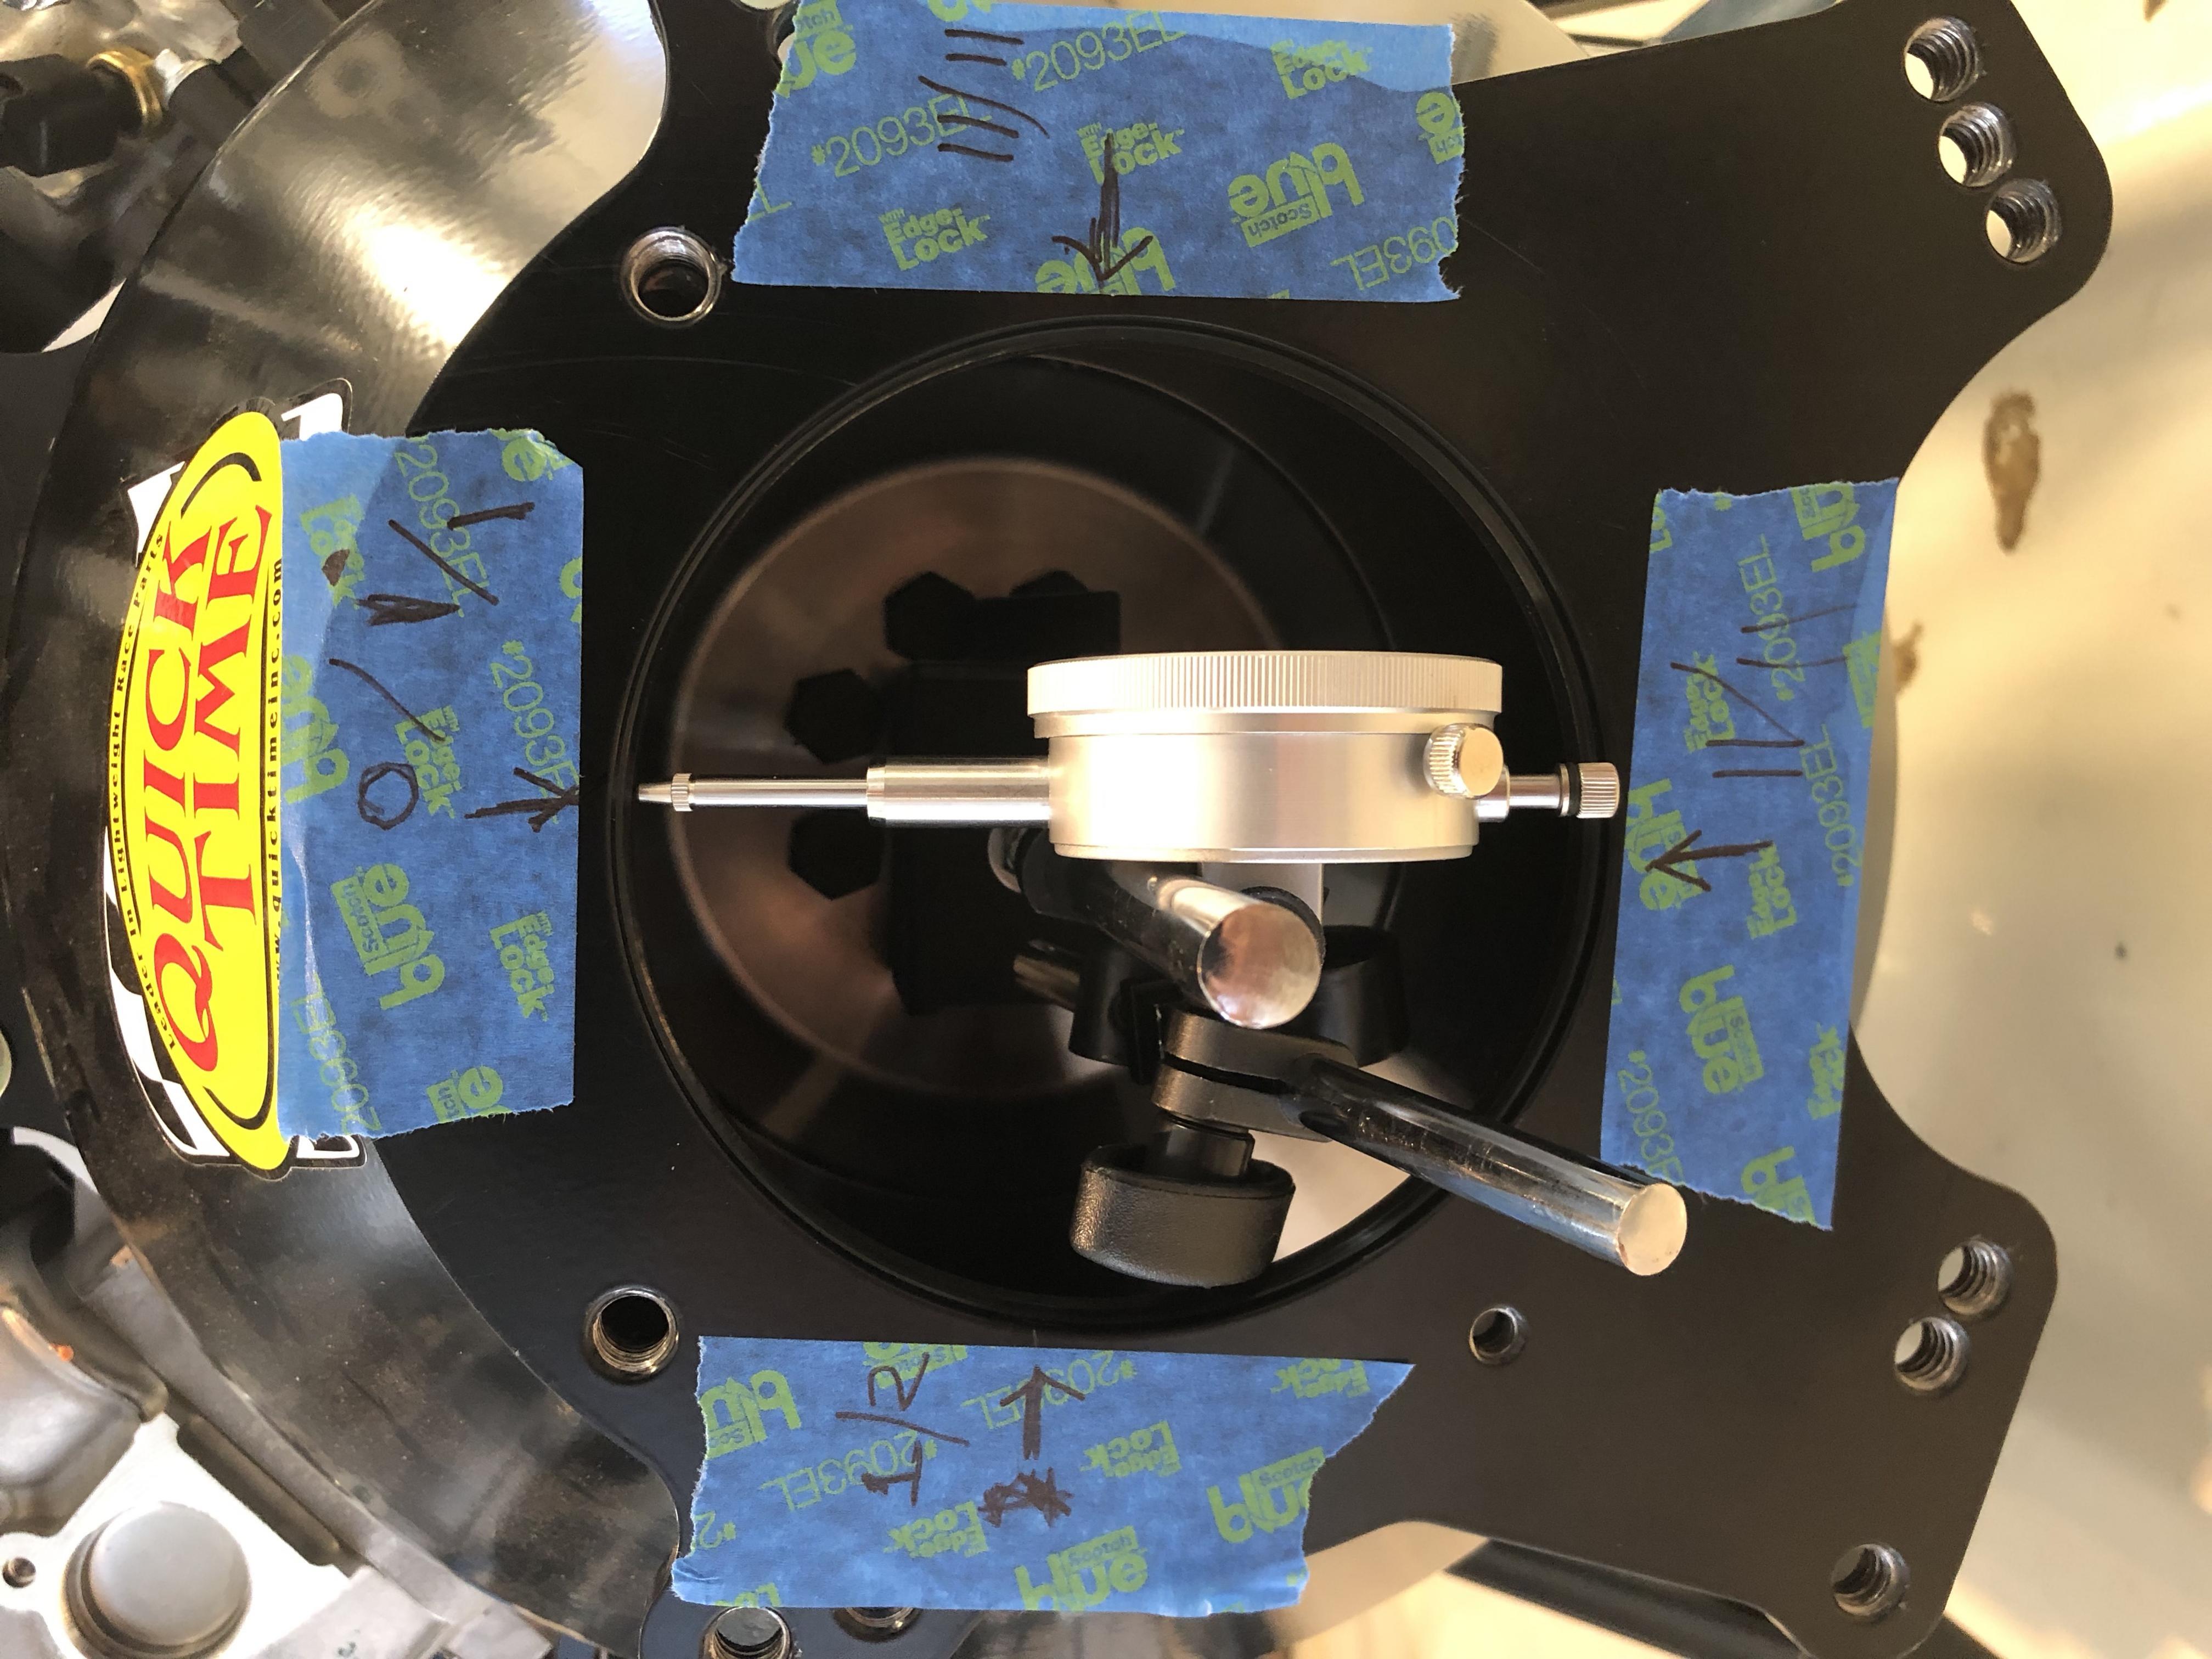
I took a stab at checking the concentricity of my bellhousing this afternoon. I'm using a relatively inexpensive dial indicator that I picked up on Amazon, so I went all the way around a couple of times to make sure I was getting repeatable results. Here are the readings I got:
12 o'clock: 0, +1, +1
3 o'clock: +11, +11
6 o'clock: +11, +11
9 o'clock: +1, +2
So in the horizontal plane I have .009" - .010" total, or .005" runout, and in the vertical plane I have .010" total, or .005" runout. It seems to be to be barely in spec but in spec nonetheless. Thoughts?
Thanks,
John
MkIV Roadster build: Gen 2 Coyote, IRS, TKO600. Ordered 10/24/18. Delivered 1/29/19. Engine installed 8/8/21. First start 9/12/21. First go-kart 9/17/21. Off to paint 4/11/22. Back from paint 12/30/22.
Build thread here.
-
Senior Member

Agree that it appears you're just in spec. And I assume you know the ability to change them with the Coyote setup is limited. But you're numbers are a little unusual. First, they suggest the hole in the bell is out of round, not out of concentric which is usually the case when out of spec. Typically when you see a positive reading in one axis, it's negative on the other side. Your difference is always positive all the way around. But having said that, not sure I understand your numbers either. You set it at zero at 12 o'clock? Then measured 3, 6, 9 and back to 12? You should be back to zero at 12 o'clock. That confirms your indicator is staying put, it's accurate, etc. Looks like it didn't return to zero? Now .001 (if that's what I understand) isn't a huge difference to say the least. I'd try a different location for the magnetic base. Maybe it's not completely solid where you have it. I'd believe your numbers a lot more if you returned to zero at your starting place each time you go around.
Build 1: Mk3 Roadster #5125. Sold 11/08/2014.
Build 2: Mk4 Roadster #7750. Sold 04/10/2017.
Build Thread
Build 3: Mk4 Roadster 20th Anniversary #8674. Sold 09/07/2020.
Build Thread and
Video.
Build 4: Gen 3 Type 65 Coupe #59. Gen 3 Coyote. Legal 03/04/2020.
Build Thread and
Video
Build 5: 35 Hot Rod Truck #138. LS3 and 4L65E auto. Rcvd 01/05/2021. Legal 04/20/2023.
Build Thread. Sold 11/9/2023.
-
Looks like you started at zero and came back to .001 at the quick time decal. I think the numbers were repeatable and show the major axis of non-concentricity to be along the 4:30/10:30 line with the Quick Time decal being at 12:00. What's not shown is the angle of the dial indicator in relation to the face of the bellhousing. The numbers on the indicator would be multiplied by the cosine of that angle which will reduce them somewhat. Example: if the angle is 30 degrees, the numbers would be multiplied by .866. Also the quality of the indicator and stiffness of the setup will affect the repeatability. The numbers should be read as the indicator is slowly moving and always in the same direction of rotation. As edwardb said, the all positive numbers are suspicious but the method of taking the numbers and quality of setup/indicator could explain it. At lease the error is +/- .001.
-


Thank you both. Yes, to clarify the process I used: I set up the dial indicator, turned it to 12:00 and zero'ed the dial there. I then took readings at 3, 6, and 9 and then came back to 12:00 hoping to see zero again. When I saw .001 I was a little concerned, so went around again. Most of the readings were identical (one other was off by .001) and then I returned to 12:00 and saw .001 again so concluded that this was as accurate a set of measurements as I was going to get with this dial. The major weakness of the dial, based on my observations and the reviews on Amazon, is the strength of the magnetic base. On a flat surface it would probably be fine, but getting it to sit solidly on the heads of the flywheel bolts took several attempts. It's also possible that in the process of zero'ing it at 12:00 I may have slightly jostled it, and it then "settled in" and the .001 at 12:00 is the true reading. Does this process sound correct?
The dial indicator was at an angle to the face of the bellhousing, as it was too large to fit in the hole. Here's a shot of the angle that it was sitting at.
In the end, I think the readings are accurate to within .001. I'm not happy about the fact that I'm right at the limit of the spec but not sure if it's worth doing something about or just accepting that barely within spec is still within spec. If I went with the Holley/QuickTime .007 offset dowels I would then be off by .002 in the opposite direction - correct?

MkIV Roadster build: Gen 2 Coyote, IRS, TKO600. Ordered 10/24/18. Delivered 1/29/19. Engine installed 8/8/21. First start 9/12/21. First go-kart 9/17/21. Off to paint 4/11/22. Back from paint 12/30/22.
Build thread here.
-
Seasoned Citizen

John, it appears that you are doing the best you can with what you have. I'm a machinist and I would be challenged to get a solid, stable platform to run an indicator with that set-up. The indicator is way too big to fit in the ID you're trying to indicate and the angle will cause deviation if the plunger does not track true around the ID. You may interpret to mean your alignment is better than indicated and that MAY be true, however, not having a repeatable result and a proper set-up means you just can't be sure.
I know precision machinist tools are expensive (I have thousands invested in them) but using the correct tool for the job makes it easier and provides better results. For your application I'd use a miniature mag base (like the photo below) that I could sit on a flat portion of the flywheel and and indicator like the one below that I can squarely set the stylus on the ID of the bell register.
indicator.jpg
mag base.jpg
Dart Little M 406" SBC 800 HP N/A & 1,100 HP on nitrous, 2-spd Powerglide with trans brake, 6,000 RPM stall converter, narrowed Moser 88 3.90:1 spool with 35-spline gun-drilled axles & Torino bearings, custom parallel four-link, custom tube chassis & roll cage NHRA certified for 8.5-sec (only two FFR Hot Rods have this cert).
33 Hot Rod Super Pro Drag Racer Build:
33 HR NHRA Cert Roll Cage Build
-
Thanks NAZ. Yes, I suspect you're right in that I'm a bit handcuffed by the quality of the gauge I'm using. Since I appear to be bumping up against the tolerance limit it's worthwhile to get a reading with a better quality gauge. Unfortunately, I've checked with all the local auto and engine-building places and nobody rents anything like this. Do you have a recommendation for a good online source for a decent-quality tool or recommendations for specific brands to be looking at (or avoiding)?
Thanks,
John
MkIV Roadster build: Gen 2 Coyote, IRS, TKO600. Ordered 10/24/18. Delivered 1/29/19. Engine installed 8/8/21. First start 9/12/21. First go-kart 9/17/21. Off to paint 4/11/22. Back from paint 12/30/22.
Build thread here.
-
I took one more attempt this afternoon at getting as accurate a set of readings as I could with the el-cheapo dial indicator setup. I was able to get the magnet onto the flat part of the flywheel, and get the dial completely into the bore of the bellhousing so that the plunger was making contact perpendicular to the surface (and in the middle of the flat part of the bore). I used the same process as last time, where I set up the dial, brought it around to 12:00, then zero'ed it and began taking readings.
I went around three full times, and got the following results (all measurements in thousandths)
12 o'clock: 0, 0, 0, 0.5
3 o'clock: 8, 8, 8
6 o'clock: 6, 6.5, 6
9 o'clock: -2, -1.5, -1.5
So in the vertical (12:00 - 6:00) direction I have .0055 - .0065 total runout, and in the horizontal (3:00 - 9:00) direction I have .0095 - .010 total runout. Dividing by two, I get ~.003 vertical and .005 horizontal. I'm encouraged by the fact that I came back to zero almost every time at 12:00, but I wouldn't exactly call the data completely repeatable. The whole setup did feel more stable. This still leaves me right at the allowable tolerance in one direction. So, my options are to either buy a (much) more expensive dial indicator and hope I get a different result, or call Quicktime and see what they have to say.
Thoughts?
Thanks,
John


MkIV Roadster build: Gen 2 Coyote, IRS, TKO600. Ordered 10/24/18. Delivered 1/29/19. Engine installed 8/8/21. First start 9/12/21. First go-kart 9/17/21. Off to paint 4/11/22. Back from paint 12/30/22.
Build thread here.
-
Seasoned Citizen
John, try MSC they have good quality tools, reasonable prices, and fast shipping. I buy top of the line precision instruments but for your specific application you can get away with a middle of the road indicator and save some $$. As a general rule of thumb, if I'm holding tolerances to .000" I use a tool with a precision of .0000". The vendor's catalog should also give you the accuracy of the indicator so you can compare between the catalog selections.
As for the mag base, get one with a very small footprint (1" diameter base would be good) and lots of articulation. And don't be afraid to modify it or add to it to get where you need to put the indicator. You can even make a mag base out of strong magnet from McMaster-Carr and drill rod to fit a special need and save some $$. You can buy the clamps separately and MSC should carry these. The important thing is to have a rigid set-up that won't move while rotating the crank and articulates enough to place the indicator where you need it.
Dart Little M 406" SBC 800 HP N/A & 1,100 HP on nitrous, 2-spd Powerglide with trans brake, 6,000 RPM stall converter, narrowed Moser 88 3.90:1 spool with 35-spline gun-drilled axles & Torino bearings, custom parallel four-link, custom tube chassis & roll cage NHRA certified for 8.5-sec (only two FFR Hot Rods have this cert).
33 Hot Rod Super Pro Drag Racer Build:
33 HR NHRA Cert Roll Cage Build
-
Seasoned Citizen
John, you must have posted your last as I was posting mine above. I'd tend to believe your last indications. And at .010" TIR it appears your alignment is within the max allowable (.005" misalignment). If this was a SBF you could get offset dowels and easily get closer to zero. Sounds like this is not so easy with the Coyote so you might consider it good as it's in spec.
Dart Little M 406" SBC 800 HP N/A & 1,100 HP on nitrous, 2-spd Powerglide with trans brake, 6,000 RPM stall converter, narrowed Moser 88 3.90:1 spool with 35-spline gun-drilled axles & Torino bearings, custom parallel four-link, custom tube chassis & roll cage NHRA certified for 8.5-sec (only two FFR Hot Rods have this cert).
33 Hot Rod Super Pro Drag Racer Build:
33 HR NHRA Cert Roll Cage Build
-
Thanks NAZ. I appreciate all the input.
I had also heard that it's not easy to adjust the bellhousing on the Coyote. Not sure if this is a relatively new part or what, but it does appear that Holley/Quicktime do make offset dowel pins for the Coyote engine. Here are the .007 offset pins:
https://www.summitracing.com/parts/qti-rm-140
I'm wondering if I should give these a try or just call it good enough with the tolerances I currently have.
MkIV Roadster build: Gen 2 Coyote, IRS, TKO600. Ordered 10/24/18. Delivered 1/29/19. Engine installed 8/8/21. First start 9/12/21. First go-kart 9/17/21. Off to paint 4/11/22. Back from paint 12/30/22.
Build thread here.
-
Senior Member
FWIW, that's exactly how I've attached the dial indicator on the several that I've done, e.g. to the flywheel and around the corner like that. With a very similar style indicator. I agree the numbers look OK. And as mentioned, your options to adjust the Coyote with offset dowels aren't the same as SBF's (and others) since the "dowels" are actually hollow bushings with a though mounting bolt. I say you're good to go.
Build 1: Mk3 Roadster #5125. Sold 11/08/2014.
Build 2: Mk4 Roadster #7750. Sold 04/10/2017.
Build Thread
Build 3: Mk4 Roadster 20th Anniversary #8674. Sold 09/07/2020.
Build Thread and
Video.
Build 4: Gen 3 Type 65 Coupe #59. Gen 3 Coyote. Legal 03/04/2020.
Build Thread and
Video
Build 5: 35 Hot Rod Truck #138. LS3 and 4L65E auto. Rcvd 01/05/2021. Legal 04/20/2023.
Build Thread. Sold 11/9/2023.
-
Senior Member

Originally Posted by
JohnK

Thanks NAZ. I appreciate all the input.
I had also heard that it's not easy to adjust the bellhousing on the Coyote. Not sure if this is a relatively new part or what, but it does appear that Holley/Quicktime do make offset dowel pins for the Coyote engine. Here are the .007 offset pins:
https://www.summitracing.com/parts/qti-rm-140
I'm wondering if I should give these a try or just call it good enough with the tolerances I currently have.
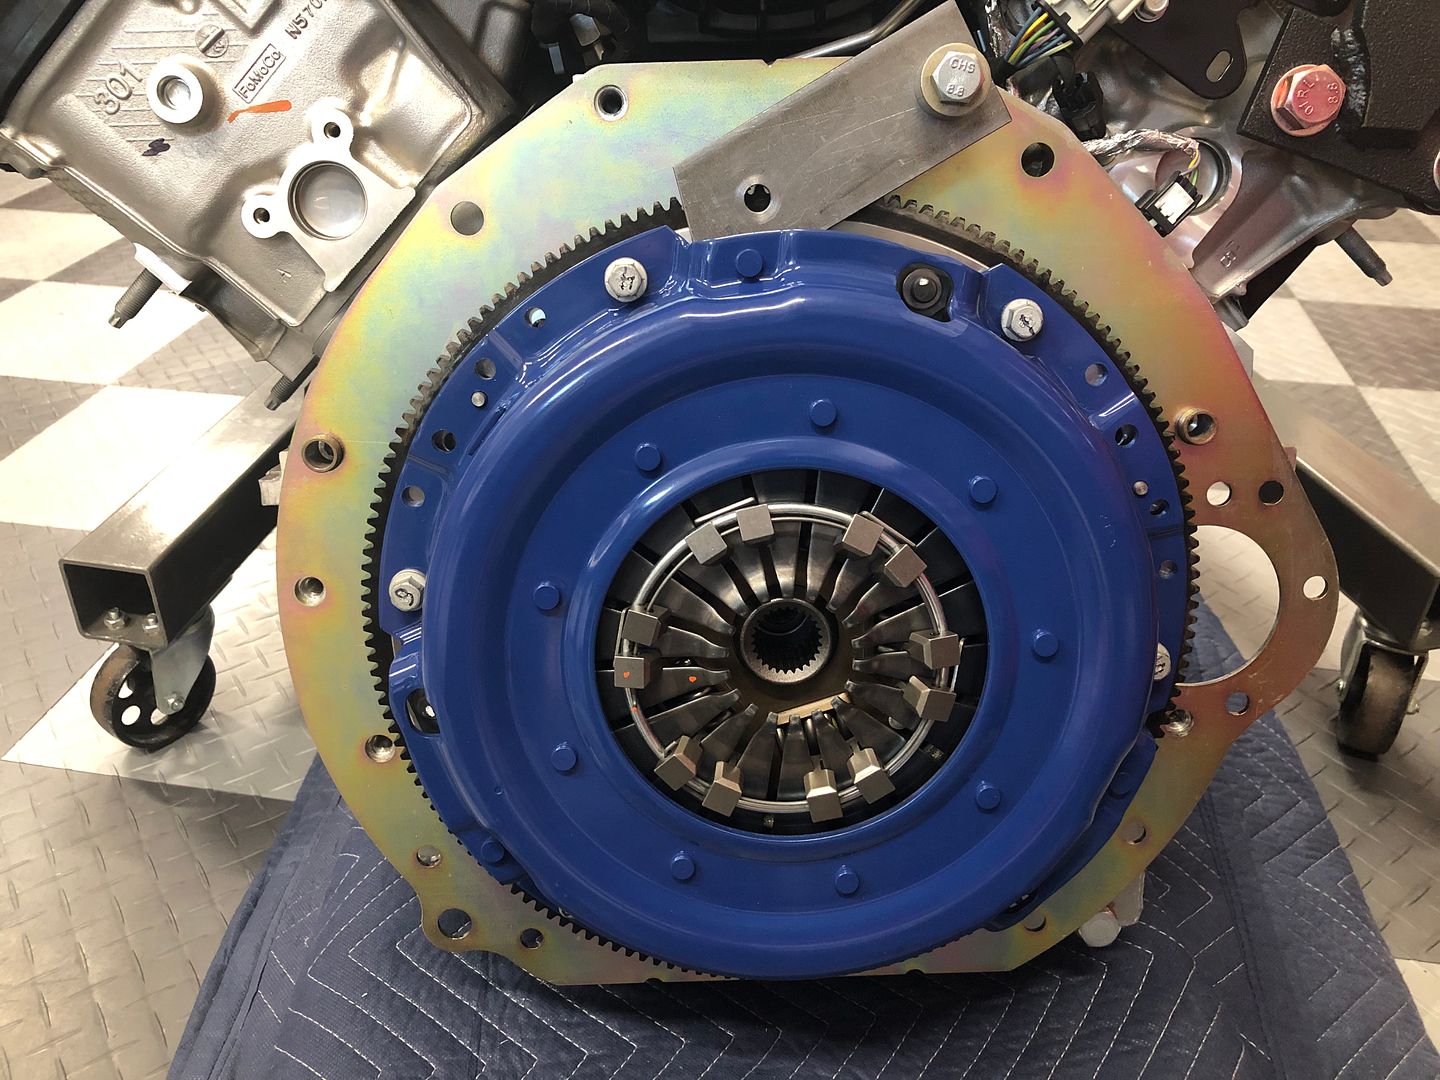
Maybe someone can explain how those apparently solid offset dowels work in a Coyote. It uses hollow bushings to register the bell as I mentioned. You can see them in this picture from my Coupe build. Which indexed to within several thousands BTW.
Build 1: Mk3 Roadster #5125. Sold 11/08/2014.
Build 2: Mk4 Roadster #7750. Sold 04/10/2017.
Build Thread
Build 3: Mk4 Roadster 20th Anniversary #8674. Sold 09/07/2020.
Build Thread and
Video.
Build 4: Gen 3 Type 65 Coupe #59. Gen 3 Coyote. Legal 03/04/2020.
Build Thread and
Video
Build 5: 35 Hot Rod Truck #138. LS3 and 4L65E auto. Rcvd 01/05/2021. Legal 04/20/2023.
Build Thread. Sold 11/9/2023.
-
Post Thanks / Like - 0 Thanks, 1 Likes
-
Seasoned Citizen
John, call Holley Monday and ask them if these are truly for the Coyote, if so you can get your alignment closer. The photo may not accurately reflect the actual part and they may be hollow offset bushing made for the Coyote -- but then again...
Dart Little M 406" SBC 800 HP N/A & 1,100 HP on nitrous, 2-spd Powerglide with trans brake, 6,000 RPM stall converter, narrowed Moser 88 3.90:1 spool with 35-spline gun-drilled axles & Torino bearings, custom parallel four-link, custom tube chassis & roll cage NHRA certified for 8.5-sec (only two FFR Hot Rods have this cert).
33 Hot Rod Super Pro Drag Racer Build:
33 HR NHRA Cert Roll Cage Build
-
A couple of quick updates:
I had originally purchased the transmission from Liberty's Gears so I gave them a call yesterday. This whole issue is ultimately a transmission warranty issue, so I wanted to hear what they had to say. After giving them my readings at the various positions, they agreed that it was close to the tolerance limit but they felt that it was fine and wouldn't affect the performance or reliability of the transmission. So the smart money would be to leave well enough alone and call it good enough and move forward from here.
Unfortunately, I've never been one to leave well enough alone, and I was very curious about these offset bushings that claim to be for the coyote so I ordered a set of them the other day and they arrived this morning. They do indeed appear as if they'd work! They are not as pictured on the website. They're hollow, and have one end that has two flats machined in it so it can be adjusted. Ultimately I'm doing this whole project to learn some new skills, so in the interest of learning how to remove old bushings and install new ones and get the whole shebang dialed in, I may try to install these and see if I can't get it a bit closer. I'll report back - hopefully with success.


MkIV Roadster build: Gen 2 Coyote, IRS, TKO600. Ordered 10/24/18. Delivered 1/29/19. Engine installed 8/8/21. First start 9/12/21. First go-kart 9/17/21. Off to paint 4/11/22. Back from paint 12/30/22.
Build thread here.
-
Seasoned Citizen
Outstanding! Others will be interested in your find.
Dart Little M 406" SBC 800 HP N/A & 1,100 HP on nitrous, 2-spd Powerglide with trans brake, 6,000 RPM stall converter, narrowed Moser 88 3.90:1 spool with 35-spline gun-drilled axles & Torino bearings, custom parallel four-link, custom tube chassis & roll cage NHRA certified for 8.5-sec (only two FFR Hot Rods have this cert).
33 Hot Rod Super Pro Drag Racer Build:
33 HR NHRA Cert Roll Cage Build
-
I wanted to follow up and give an update on this little odyssey. This may be a bit long, but I wanted to capture my thoughts while they're still fresh in case anyone else decides to try this at home. As previously mentioned, the new offset bushings arrived the other day and they looked like they'd work, so I set about the task of removing the old ones. Removing the factory dowel bushings is complicated by a couple of factors. The first is that there is a threaded hole for an M10-1.5 bolt in them. The second is that one of these (left side) is a blind hole while the other one (right side) is a through-hole. I tackled the right side first. I was going to try the technique where you pack the hole full of grease and then use hydraulic pressure to force the bushing out, so I needed to somehow plug the backside of the hole. It's a very tight fit on the backside of that hole, so I ended up cutting the head off an old bolt and slotting the end to make a makeshift setscrew that I threaded in from the back side.

I pushed in some grease from the front and let it bleed out the back to let out any trapped air, then put the setscrew in. I used an old rod I had on hand that was the same diameter as the ID of the bushing, and after considerable pounding, the technique actually worked and the bushing came out. The top few threads of the hole got a little marked up, but a chase with a tap cleaned it up nicely. One down, one to go...
The next one would be trickier since it's a blind hole. I attempted to pack it full of grease but there was just too much trapped air, and pounding the rod in the hole just pounded it against the top of the threaded portion. I couldn't risk destroying the threaded hole so had to abandon that technique. The threaded hole is just too deep to be able to get a good air-free pack of grease for that technique to work on the left side. I tried applying some heat to the block and then trying to twist it off with some channel locks. I can definitively report back that this is a TERRIBLE idea. Don't do this. It basically just chewed up and tore off part of the bushing, and now I was left with a mangled remnant of a bushing. This was quickly turning into a bit of a s*%show. I decided that more brains and less force was in order, so I decided to drill the remains of the bushing out. The OD of the bushing is 0.630". I didn't want to go all the way up to a 5/8" drill bit, as I needed to preserve the original ID of the bore so that the new bushing would fit snugly. I gradually stepped up to a 9/16" drill bit and was hoping that the bushing would eventually get thin enough that it would spin out with the drill bit, and that's exactly what happened (thank God). After cleaning out copious amounts of grease and metal shavings and cleaning up the top of the threads with a tap, I was now ready for new bushings. Phew!
One of these came out the easy way, and one came out the hard way...

Now that the old bushings were out and the holes cleaned up, I inserted the new bushings. I put them in at a 45* angle given that my prior readings showed that the offset error was down and to the right by roughly the same amount. One note here, the new bushings are pretty thin-walled, and the process of pounding them into the hole distorted the ends a tiny bit, but just enough that the bellhousing wouldn't go on. It's a pretty tight-tolerance fit. A little cleanup of the edges with a file and some sandpaper and the bellhousing slipped on. On to the next step - time to re-measure to see if the bushings did the trick.
I got out my el-cheapo Amazon dial indicator and attempted to get it set up as I'd had it before. The clamps that join the sections of arms together and attach the dial indicator to the arm are all pretty cheap plastic and stamped metal deals. I couldn't get the clamp that holds the dial tight enough to keep the dial from moving a tiny amount, and in the process of trying to tighten it down a bit more, it just exploded in my hand. At this point, I decided that this was a sign that I should quit for the night, so I went inside, ordered a new gauge and base online, and called it a night.
My new gauge and magnetic base showed up today. Nothing super expensive but considerably more than my first set. It's a Mitutoyo 2416S dial indicator and a Noga DG1033 magnetic base with 176 lb. holding power. It's a considerably nicer setup than the previous one. If you're still following along, do yourself a favor and buy a decent gauge to begin with. It'll save you a whole lot of heartache.

I got the gauge set up and took some readings and immediately had to laugh as the offset error was now twice as much as it was before. Apparently, the direction the offset bushings need to be installed is not intuitive - at least to me. So the bellhousing came off one more time, the bushings were turned 180*, and everything went back together. Again. I got the dial set up again and ended up with the following readings. Note that this dial isn't "zero'able" so the numbers are whatever they happen to be based on how the gauge was set up. (all measurements in thousandths)
12:00: -19
3:00: -21
6:00: -18
9:00: -17
So if I find the difference and divide by two, I've got 0.0005 vertical offset, and 0.002 horizontal offset. Nearly dead-on vertically, and FAR better than what I had before.
So, in the end here are my thoughts:
I'm ecstatic with the final outcome. Despite the fact that everyone was telling me that it was good enough and I should go with it, I wasn't super-happy about being right at the spec before and now I have peace of mind that it's good to go. That said, it was a royal PITA to remove those bushings and the risk of damaging the engine block caused me considerable angst a few times. All's well that ends well, I guess, but to anyone reading this that's right at the border of needing to do this I'd caution you to have a good plan on how you're going to remove those bushings before starting. Not sure I'd recommend either of the methods I ended up using as the "right" way to do it. A few posts back I said I wanted to attempt this at least in part for the learning. I can now say that I've added one more thing to the "been there, done that" file.
Last edited by JohnK; 06-06-2019 at 04:29 PM.
MkIV Roadster build: Gen 2 Coyote, IRS, TKO600. Ordered 10/24/18. Delivered 1/29/19. Engine installed 8/8/21. First start 9/12/21. First go-kart 9/17/21. Off to paint 4/11/22. Back from paint 12/30/22.
Build thread here.
-
Post Thanks / Like - 0 Thanks, 2 Likes
-
Seasoned Citizen
Congratulations! Persistence usually pays off and the struggles we go through are part of the learning experience that makes similar jobs easier next time.
FWIW and for othersfollowing along, one of the techniques I use for removing stubborn broken bolts is to drill the broken piece the tap drill size (minor thread diameter) and carefully using a small chisel I will tap on the exposed OD and fold the thin wall into itself until it release from the threaded bore. A needle nose vice grip can then "worry" it loose. That method will also work for a hollow or solid dowel (or bushing) by using a drill as close to the OD of the dowel as possible -- the trick is to get the drill exactly in the center of the bolt or dowel. The most common mistake is not getting it centered and drilling into the bore and damaging the hole. Drilling the part to a thin wall will significantly reduce the grip on the bore and the thin wall makes folding it inward easy and reduces the grip to nothing.
Good job John.
Dart Little M 406" SBC 800 HP N/A & 1,100 HP on nitrous, 2-spd Powerglide with trans brake, 6,000 RPM stall converter, narrowed Moser 88 3.90:1 spool with 35-spline gun-drilled axles & Torino bearings, custom parallel four-link, custom tube chassis & roll cage NHRA certified for 8.5-sec (only two FFR Hot Rods have this cert).
33 Hot Rod Super Pro Drag Racer Build:
33 HR NHRA Cert Roll Cage Build
-
Thanks NAZ. That's a great tip. I'll have to file that away for use down the road.
-John
MkIV Roadster build: Gen 2 Coyote, IRS, TKO600. Ordered 10/24/18. Delivered 1/29/19. Engine installed 8/8/21. First start 9/12/21. First go-kart 9/17/21. Off to paint 4/11/22. Back from paint 12/30/22.
Build thread here.


 Thanks:
  Likes:


 Reply With Quote


