
Visit our community sponsor

Thanks:
0

Likes:
0
-
Senior Member

Hydraulic Clutch Pedal Throw
Using a Forte hydraulic clutch setup with a T56 on my coupe and I'm running into a bit of trouble getting enough throw on the clutch. With the clutch pedal adjusted where I want it, I can't disengage it at all. If I adjust the pedal out further, I can eventually disengage it but it only happens about an inch from the firewall.
It looks like the slave cylinder moves quite rapidly first, but then slows down as I reach the end of the pedal movement. Is this an indication of it not being bled well enough? I would think it'd be the opposite (slow movement at first while the air compresses). I'll bleed it again just to be sure, but I thought I did a pretty good job.
As per Mike's suggestion I've made sure that the slave cylinder is completely at the beginning of its travel before its mounted you have to compress it a bit to overcome the internal spring.
The only other thing I can think is that maybe I'm not testing it correctly I'm turning the drive shaft by hand until it gives. Is this a reliable way to test it being disengaged, or do you really need the movement of the engine flywheel to break the static friction in order to truly know where it's disengaged?
Are there any other ways you can think of to adjust the amount of throw needed to disengage without switching cylinder sizes?
-
When I installed a Coyote/TKO600 setup, I set the clutch pivot ball too high. This kept the clutch permanently engaged despite the pedal position and proper hydraulic clutch installation. I still am not positive if I got wrong info on the pivot ball height from the person who sold me the package or if I was misunderstanding him. Sounds like you have more experience than I do, but a thought.
-

For what it's worth:
I had the same problem with a homemade hydraulic clutch setup on my Type 65. The transmission is a T-5, and a picture of the brackets I made is below. I started with a 7/8" master and a 7/8" Speedway push-type slave cylinder. The pedal travel required to disengage was what I'd expect on a tractor trailer, not a race car. A switch to a 1.25" master made it better, but I'd still like a shorter pedal throw. I have a 3/4" slave cylinder from Forte, not yet installed, which should make it perfect. I can also adjust the brackets to be closer to the transmission, giving a little more clutch fork travel for any given amount of pedal thrown. But I don't imagine you want to, or should have to, re-engineer something you paid good money for.
Unless re-bleeding it fixes it, I think your best option is to change master or slave cylinder sizes. The latter is easier to change, as far as I am concerned. Mike may still have some 3/4" CNC slave cylinders in stock; I know I got one of the last ones. Also, I agree with your assumption about slave cylinder movement - if you had air in there I would expect what you expect. You might be seeing what happens with the pedal box geometry as the pedal moves to the far end of the arc of travel. Hopefully this doesn't seem pedantic, but you sure don't want to have the throwout bearing preloaded so that the clutch disengages!
Cheap Hydro Clutch 1.JPG
-
Senior Member

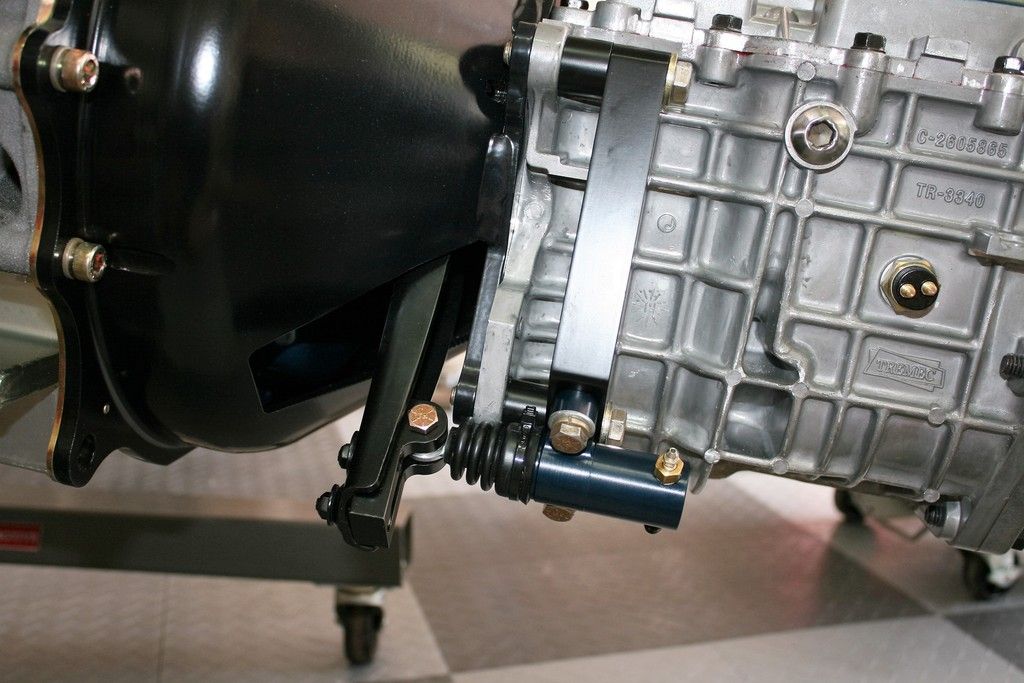
I've always tested them by turning a slip yoke in the transmission. I have a loose one I purchased just for that purpose. You should be getting 1 to 1-1/8 inch of throw at the slave. The linkage should be loose with the pedal released, e.g. maybe 1/8-inch or so of slack. With the clutch pedal all the way down, you should be able to turn the slip yoke (or driveshaft) freely. As you start lift the clutch pedal, in an inch or so you can hear the clutch disk and pressure plate start to spin against each other. Another 1/2-inch or so it will get very hard to turn and not much further it's locked. That for me has been a normal test and the clutches have worked fine in actual use. The picture below is the setup in my #8674 Roadster. This is a Wilwood 1 inch MC, CNC 7/8 inch slave cylinder, Forte brackets, pushrod, TKO trans mount. The system is super easy to bleed, so hard to imagine it has air in it. But doesn't hurt to try again. Other culprits: Clutch arm pivot, TOB installed improperly, wrong combination of MC and slave.
Build 1: Mk3 Roadster #5125. Sold 11/08/2014.
Build 2: Mk4 Roadster #7750. Sold 04/10/2017.
Build Thread
Build 3: Mk4 Roadster 20th Anniversary #8674. Sold 09/07/2020.
Build Thread and
Video.
Build 4: Gen 3 Type 65 Coupe #59. Gen 3 Coyote. Legal 03/04/2020.
Build Thread and
Video
Build 5: 35 Hot Rod Truck #138. LS3 and 4L65E auto. Rcvd 01/05/2021. Legal 04/20/2023.
Build Thread. Sold 11/9/2023.
-
Senior Member
Thanks everyone for the ideas. I did a few more measurements and here's what I'm seeing:
- MC is .813 bore. I asked Mike and this is the size he says he uses.
- Not sure of the SC bore, but it's the one Mike sent me.
- Clutch pedal travel to firewall is about 6.5". Clutch seems to disengage at around the 6" mark or so.
- Slave cylinder moves just slightly over 1"
- There is absolutely zero free play in the clutch fork with the SC removed. edwardb, you mentioned maybe 1/8-inch or so of slack?
Follow-up questions:
1. Should there be a small amount of free-play in the clutch fork when it has no pressure on it? If so, maybe the ball pivot is adjusted incorrectly (can it even be adjusted)? (Although I would assume that zero free-play would actually get me better travel than with some free-play).
2. Is 6" of dead travel perfectly reasonable for this setup? It feels more like a tractor, as Jacob says, but maybe my expectations are just off?
3. I'm not entirely sure how moving the SC forwards or backwards or adjusting the length of the arm would make any difference— 1 inch of travel is 1 inch of travel no matter where you start. The only thing I could think that would make a difference would be to pre-load it— but as we all know, that is a horrible idea.
Any additional thoughts?
Last edited by Alphamacaroon; 07-05-2019 at 05:37 PM.
-
Senior Member
I'm assuming you're using Mike's replacement for the now unavailable CNC slave cylinder. So I can't relate to the MC and slave combos he's currently using. Just checked my #8674 Roadster with his setup in a Coyote + TKO. The pedal movement is right around 6 inches. Similar to other builds I've done both cable and hydraulic. The Coupe is also in that range, although maybe slightly less. But that's a Tilton HRB setup, so not applicable here. I don't think you want it much less than 6 inches or so, e.g. by going large on the MC or smaller on the slave, because the effort is going to go up. And it's already not the lightest clutch around. You say yours is disengaging around the 6-inch mark. Is that just starting to disengage, which wouldn't be normal in my experience and maybe does sound like what you're describing? If so, that's not normal. Or completely disengaged, which as I've described, is about what I've seen.
The CNC slave (sorry the only one I've had experience with) was rated for approx 1-1/8 inch travel. I adjusted mine via the clutch pedal and the MC size to move approx 1 inch. That managed the clutch engagement just fine. The clutch would start disengaging in the first inch or two of pedal movement, down to completely disengaged at approx 6 inches, e.g. against the back wall. If you're getting 1 inch with your slave and it the clutch isn't working properly, then I'd suggest the problem isn't with the hydraulic setup. But that's just a guess based on the description.
Regarding a little bit of slack in the system, that's what Mike recommends and I've always followed it. You definitely don't want any pre-load. And for sure not in an attempt to shorten the pedal throw. That will kill the TOB in short order. Don't think it would be good for the clutch either. I've read where the Ford TOB is designed to be in light contact with the clutch fingers. Perhaps with a cable. But not how I was told to set up the hydraulic. FWIW, here's a video I did during my #7750 Roadster build. The slack is a little exaggerated here. But gives you an idea about how that system worked. Still working today with 10K + miles.
https://youtu.be/MgQvEP-gfGQ
Build 1: Mk3 Roadster #5125. Sold 11/08/2014.
Build 2: Mk4 Roadster #7750. Sold 04/10/2017.
Build Thread
Build 3: Mk4 Roadster 20th Anniversary #8674. Sold 09/07/2020.
Build Thread and
Video.
Build 4: Gen 3 Type 65 Coupe #59. Gen 3 Coyote. Legal 03/04/2020.
Build Thread and
Video
Build 5: 35 Hot Rod Truck #138. LS3 and 4L65E auto. Rcvd 01/05/2021. Legal 04/20/2023.
Build Thread. Sold 11/9/2023.
-
Senior Member

Originally Posted by
edwardb

You say yours is disengaging around the 6-inch mark. Is that just starting to disengage, which wouldn't be normal in my experience and maybe does sound like what you're describing? If so, that's not normal. Or completely disengaged, which as I've described, is about what I've seen.
It's a good question—it's really hard to tell if it's partially engaged or not because it literally seems to go from impossible to turn to easy to turn in an instant. Doesn't seem like there is much in between. I'll play around with it some more by seeing if I can get a better grip. It's pretty awkward to put much force on it by gripping it from the side, so maybe it is partially disengaged but I just can't tell. My gut says that if it's freely turning at 6" with my hands it means it's fully disengaged and that it partially disengages before that, but I just don't have enough grip to turn it.
The encouraging thing is that it seems like my pedal throw of ~6" isn't completely off the mark. I guess the problem I'm seeing now is that in order to get that 6+" of throw on the clutch, the Coyote accelerator pedal is now quite a bit behind the other pedals. I guess I need to decide if I'm okay with that or if I'm going to need to put a spacer behind it to move it out.
What do you guys think? Do you put all of your pedals exactly in line with each other? In some ways I do like the accelerator pedal to be slightly behind the clutch and brake pedals because it's more natural with heel-toe blips under threshold braking. But I also worry that might make it more difficult to slide my right foot over to the brake pedal in a hurry. Thoughts?
Last edited by Alphamacaroon; 07-06-2019 at 12:27 PM.
-
Senior Member
Sounds like it might be working OK. When turning things by hand, agreed it goes from able to turn to unable to turn in short order. As you slowly release the clutch pedal while turning the driveshaft/slip yoke, you should hear the clutch disk start to rub against the pressure plate as I described before. There's going to be a little bit of continued clutch movement where you still may be able to turn, but it gets harder and then impossible very quickly. Bottom line, if the slave is slightly loose with the clutch at the top, and you can spin the driveshaft freely with it pushed all the way down, likely it's OK. At least has been for me.
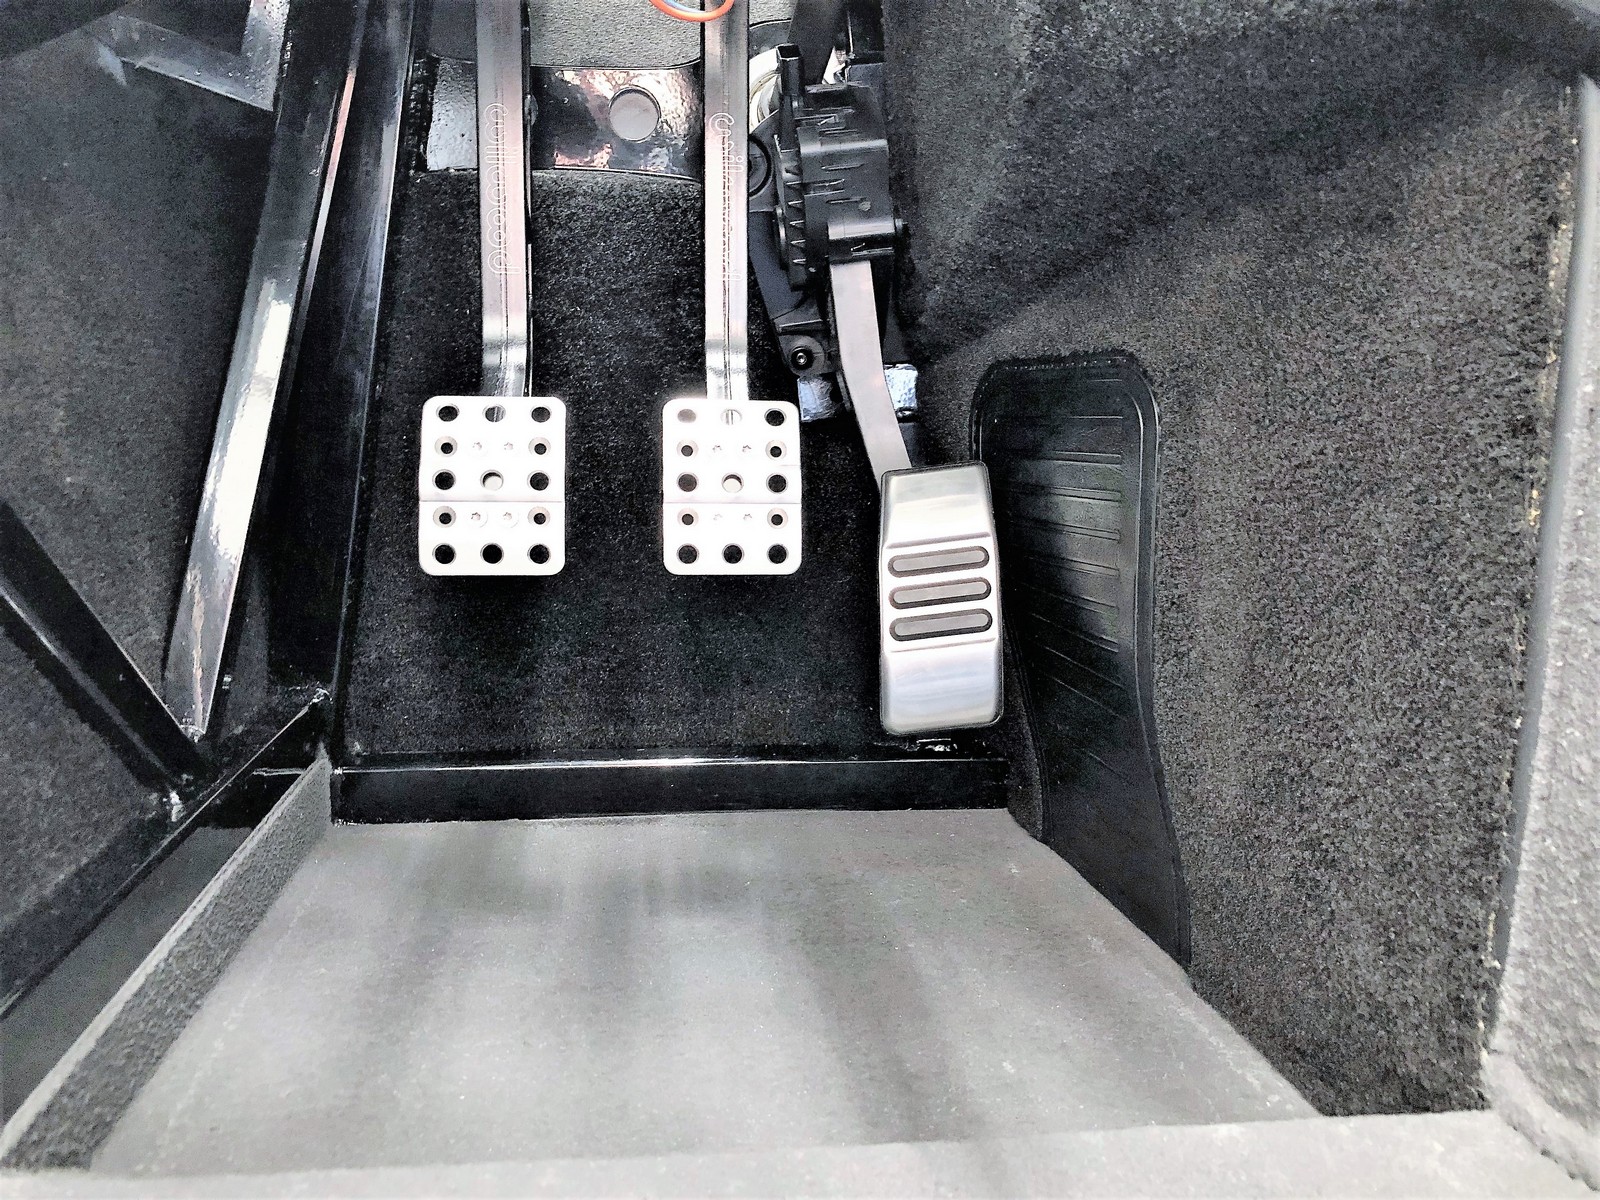
For pedal placement, I always put the brake and clutch exactly even, and the accelerator about 1-inch below the brake/clutch pedals. Works fine for me, and most DD's are set up similar to this. For my street driving, I don't attempt heel and toe. But if you look at various descriptions and videos, they don't put them all in a line either. Basically the accelerator is somewhat below the brake, roughly even when the braking action is happening. This is my Coupe footbox. I've since moved the Wilwood pedals to the left on row of screws and like the horizontal spacing to the accelerator a little better. The accelerator is about 1-inch lower as mentioned. Feels good to me.
Build 1: Mk3 Roadster #5125. Sold 11/08/2014.
Build 2: Mk4 Roadster #7750. Sold 04/10/2017.
Build Thread
Build 3: Mk4 Roadster 20th Anniversary #8674. Sold 09/07/2020.
Build Thread and
Video.
Build 4: Gen 3 Type 65 Coupe #59. Gen 3 Coyote. Legal 03/04/2020.
Build Thread and
Video
Build 5: 35 Hot Rod Truck #138. LS3 and 4L65E auto. Rcvd 01/05/2021. Legal 04/20/2023.
Build Thread. Sold 11/9/2023.
-
Senior Member
When you say lower, do you mean vertically? Or front-to-back? I was referring to the front-to-back axis— viewing it from the side, the accelerator pedal is closer to the firewall by a few inches.
-
Senior Member
Originally Posted by
Alphamacaroon
When you say lower, do you mean vertically? Or front-to-back? I was referring to the front-to-back axis— viewing it from the side, the accelerator pedal is closer to the firewall by a few inches.
Lower as in closer to the firewall (or footbox back) than the brake and clutch pedals. With the brake pedal is pushed down, as I described, the brake pedal and accelerator are roughly the same distance from the firewall. If yours are different by a few inches, that's kind of a lot IMO.
Where you put the pedals side-to-side is a matter of what's comfortable for you, shoe size, etc. The Wilwood box only has one location. But you can move the pedals around using the different mounting screw locations. Some even narrow the pedals to make more room. The Coyote DBW location can be adjusted some. Also the pedal mod has some flexibility. What I did on my Coupe build was use the existing Coyote pedal pad moved up much like the instructions show. Earlier mods had you use the pedal pad from the kit provided accelerator pedal. That's what I have in my Roadster. Works OK, but I think I like this method better.
Last edited by edwardb; 07-07-2019 at 12:47 PM.
Build 1: Mk3 Roadster #5125. Sold 11/08/2014.
Build 2: Mk4 Roadster #7750. Sold 04/10/2017.
Build Thread
Build 3: Mk4 Roadster 20th Anniversary #8674. Sold 09/07/2020.
Build Thread and
Video.
Build 4: Gen 3 Type 65 Coupe #59. Gen 3 Coyote. Legal 03/04/2020.
Build Thread and
Video
Build 5: 35 Hot Rod Truck #138. LS3 and 4L65E auto. Rcvd 01/05/2021. Legal 04/20/2023.
Build Thread. Sold 11/9/2023.
-
Senior Member
Okay that sounds about right. When depressed, the brake pedal is about even with the accelerator pedal. So it looks like I might be in the right ballpark. Thanks again for all the help!
-
Following... thanks for the info.
 Posting Permissions
- You may not post new threads
- You may not post replies
- You may not post attachments
- You may not edit your posts
-
Forum Rules

Visit our community sponsor


 Reply With Quote