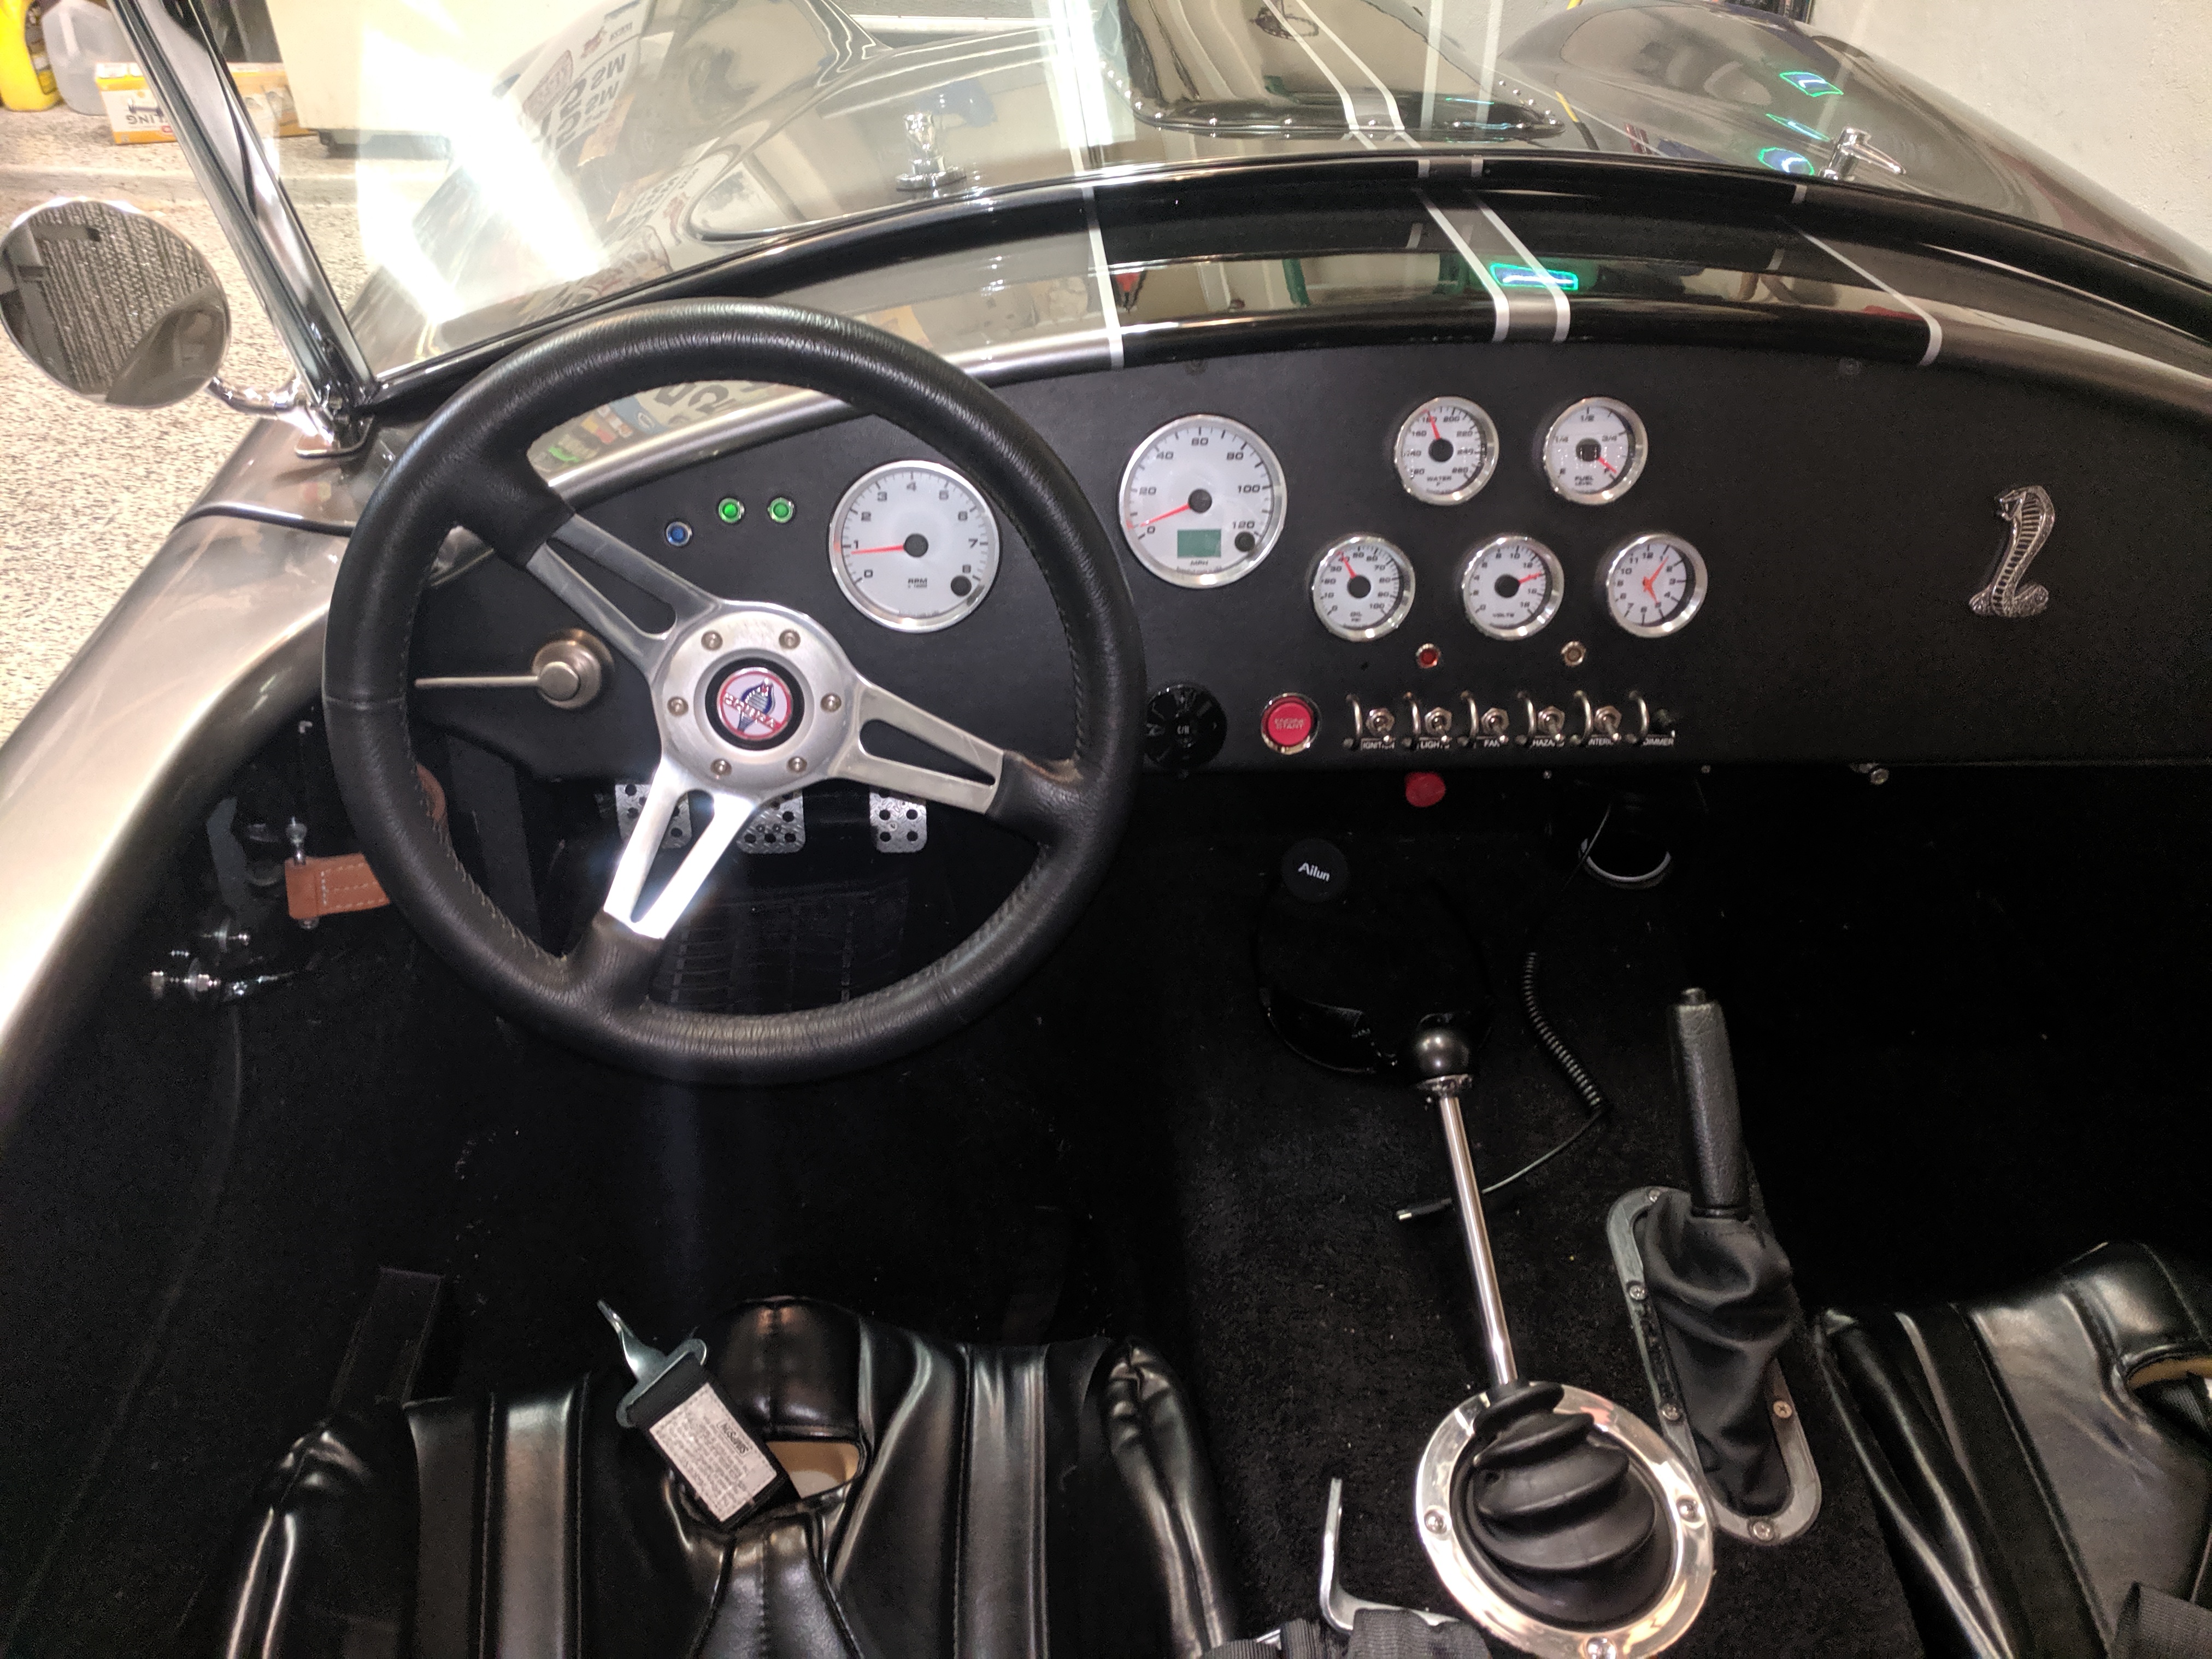
Would like to request those who have completed their builds to post pics of the dash. I'm unsure of where I want to place my gauges and I'm also thinking of adding some design to the dash. I got to look at Jetheft's cobra last night and I really dig the extra dash work he put into his. I would post a pic for those who do not know but I haven't hit 20 post to be approved.
Standard FFR layout on their formed composite dash works well for me. With my height, I see right down clearly through the steering wheel to the tach and speedometer.
MKIV Complete Kit: 3-link, vintage gauges, glove-box dash, chrome roll bars, 17" wheels, B/T leather seats, Gas-N side pipes and headers; Drive train: Levy 408w w/carb, TKO600, Moser 8.8 with 3.55s and GT rear brakes; Paint: Jeff Miller Ford Magnetic Grey Metallic with BMW Titan Silver stripes Ordered: 4/5/16, Order completion: 5/14/16, Delivered: 5/24/16, First start: 6/22/19, Registered and legal: 10/28/19
I'll play. Modified competition layout starting with a blank FFR dash. With Speedhut gauges, homemade glovebox, all hidden mountings, under dash courtesy lights and auxiliary power ports. The leather seats that came with the 20th Anniversary edition Roadster inspired me to do an all leather interior. Dash, center console, and door cards are all from one automotive grade leather hide with 1/8-inch closed cell padding.
Last edited by edwardb; 07-20-2019 at 05:03 AM.
Build 1: Mk3 Roadster #5125. Sold 11/08/2014. Build 2: Mk4 Roadster #7750. Sold 04/10/2017. Build Thread Build 3: Mk4 Roadster 20th Anniversary #8674. Sold 09/07/2020. Build Thread and Video. Build 4: Gen 3 Type 65 Coupe #59. Gen 3 Coyote. Legal 03/04/2020. Build Thread and Video Build 5: 35 Hot Rod Truck #138. LS3 and 4L65E auto. Rcvd 01/05/2021. Legal 04/20/2023. Build Thread. Sold 11/9/2023.
I set my seat & wheel in place, and then used paper cutouts to get the sight lines exactly the way I wanted them. I covered the dash in 3M 1080 vinyl with a carbon fiber pattern, which is not particularly glossy. If you use the 1080, (1) paint the underlying aluminum to match the color of whatever vinyl you use; that way if you nick the vinyl while installing a switch the imperfection won't be obvious, and (2) let the vinyl set up for a week or so before populating the dash. The 1080 needs some time to "cure" to full hardness.
I mocked up my dash gauges by taking a photo with my phone and printing the gauges in the proper size. Then I laminated the photos and placed them on the dashboard so I could sit in the driver seat and make sure I could see them properly. I used the Semi-Comp (SC) dash setup and modified it a little. While sitting in the seat I was able to place the gauges exactly where I liked them.
Build School: July 14-16, 2017
Kit purchased: July 25, 2017
Kit delivered: September 13, 2017
First Start: December 22, 2018
Body painted and kit completed and drivable: July 2019 (but still not done)
CA SB100 Registration: January 2020
Mk4 - 289 USRRC Roadster kit, Roush 427SR with Schneider Racing custom camshaft, Fitech EFI, TKO600 (.64-5th gear), 15" wheels, stock brake calipers, under car exhaust with Spintech 7000 muffler, no roll bar, Russ Thompson turn signal, removable steering wheel, and many other small upgrades and modifications
In my 289 USRRC, when I installed the A/C I had to relocate the speedometer, which left a hole in the dash...what to do? I tried a faux glovebox door but I did not like the location it had to be to cover the hole. So...I ordered a bezel from SpeedHut and mounted the FFR badge recessed into a piece of the dash material. I thought about inserting the AC steeering wheel emblem but I like the Factory Five emblem...and after all, it is a Factory Five and I am proud to have built it. I still might swap it out with the AC emblem...an easy swap. Or maybe use it as a picture frame! ac_dash.jpgff5Emblem.jpgACEmblem.jpgpictureframe.jpg
[QUOTE=
hazards, high/low beam, wipers, and what other toggles are there for? How difficult is it to change over to a push button?[/QUOTE]
Like you mentioned, those are what Im using them for with additional toggles for driver and passenger foot box fans, manual radiator fan, 2 rockers for seat heaters, horn pushbutton, knob for headlight switch, and knob for panel light dimmer.
To change over to pushbutton should be easy as long as they are not too long. It should be a matter of just drilling out the correct size diameter hole in the dash.
Build School: July 14-16, 2017
Kit purchased: July 25, 2017
Kit delivered: September 13, 2017
First Start: December 22, 2018
Body painted and kit completed and drivable: July 2019 (but still not done)
CA SB100 Registration: January 2020
Mk4 - 289 USRRC Roadster kit, Roush 427SR with Schneider Racing custom camshaft, Fitech EFI, TKO600 (.64-5th gear), 15" wheels, stock brake calipers, under car exhaust with Spintech 7000 muffler, no roll bar, Russ Thompson turn signal, removable steering wheel, and many other small upgrades and modifications
Underdash supports are something that is a vestige from the original cars - there were a couple of tubes that ran from behind the top of the dash all the way down to the main chassis tubes - and they were exposed between the dash and the transmission tunnel. Many builders opt to add the supports to mimic the original cars. I used mine to run the speed cable up to the back of the speedometer and the other contains some wiring - specifically for the seat heaters.
My gauges are Smiths mechanical (with a couple being electric) throughout - oil pressure, coolant temp, tach, oil temp, voltage, fuel, and speedo.
The myriad of lights, switches and knobs on my dash are for the following - from left to right.
Ignition switch (reproduction '65 Ford part with red "charge" light above it - from FFR)
Cold air pull for foot box vent (one at both far outboard positions on the dash)
Two silver metal push-buttons are horn and windshield squirter pump
Blue hi-beam indicator (from FFR)
Single green directional flasher light (from FFR)
Headights (reproduction '65 Ford)
Lighter (reproduction '65 Ford)
Toggles for cooling fan override (it's thermostatically actuated, though) and 4-way flashers
Windshield wipers
Heater
Choke (now abandoned, as carb no longer has choke function due to a high-performance blueprinting job)
Map lamp and switch
Not really visible are the Russ Thompson turn signal switch that is on the right side of the steering wheel, the hi-beam switch ('65 Ford reproduction part foot switch on the floor), under-dash 12v power outlet, and the seat heater switches (on the side under each seat).
Lots of stuff going on in a very small area!!!
Later,
Chris
"There are no more monsters to fear, and so, we have to build our own."
Mk3.1 #7074
Generation 3 Type 65 Daytona Coupe Complete Kit #151885 received May 6, 2022. Gen 3 Coyote, IRS, Tremec TKX, American Powertrain hydraulic throwout bearing & Wilwood brakes.
MK4 Basic Kit #7404, 347 EFI - Pro M Racing ECM, 30# injectors, 70 mm throttle body, 80 mm MAF, Edelbrock Performer aluminum heads & RPM II intake, all new G-Force T5, 3:55 gears, Pro 5.0 shifter, 3-link, carbon fiber dash/custom Speedhut gauges and paint by Da Bat.
Moved all switches to console, only Gauges, indicator lights and push button start on dash. The space to the right of the Tach is for my cell phone (epoxied a super magnet in dash to hold phone), enjoy
Mark IV base kit, 2015 Coyote, Wilwood brakes, IRS-3.55 TruTrac, T56, ABS, PS, Nitto G2, Carbon fiber Dash
I made a blank dash (with 3/32" material vs stock .040") and rearranged the gauges as many others did (competition dash). With the stiffer dash and an aluminum brace plate (3/32") approx 12" wide, mounted in the center above the tunnel from the dash to the frame, makes the dash pretty solid. The firewall is 3/32" too, to add some stiffness, needed because of the large hole for the heater push-out box.
I also made a heater push-out box (2 1/4" out) and made a glove box. Mine is welded together, but could easily be a riveted assembly. With the push-out, the glove box is 3" deep at the top and 4" at the bottom.
I went the path of the competition dash with a little twist. Real Carbon fiber that is currently getting clearcoated. Speedhut Revolution Gauges with all billet push buttons. Headlight switch and ignition key are on home made dash supports under the dash. Seeing that all the gauges are programmable with LED warning lights, I decided to center the auxiliary gauges around the speedo in the center. High beam indicator and turn signals are integral to the GPS speedometer as well.
Built FFR9457. 351 Windsor, TKO600, 3.73. Fitech EFI. Russ Thompson throttle pedal, turn signal, and trunk pan. Carbon Fiber dash with Speedhut Revolution gauges. Paint by Jeff Kleiner.
Preformed dash. Set up just like the manual says. Extra box between the dash support the factory offers with a bias adjuster, electric steering adjuster, clock adjust, GPS speedo adjust, and electric plugs for phone.
20th Anniversary MK4 Roadster, #8752, 18 of 20, Delivered 12/03/15, 1st Start 01/28/2017, off to paint 4/13/2017, Forte 351w/ Holley EFI, Forte throttle linkage, TKO 600/Forte Hyd. Clutch, UniSteer Electra Steering, RT's turn Signals, many Breeze parts, Paint by the Jeff Miller. Finished on 10/08/2017. 500 mile inspection on 10/21/2017, 3000 mile inspection on 1/14/19.
Moved all switches to console, only Gauges, indicator lights and push button start on dash. The space to the right of the Tach is for my cell phone (epoxied a super magnet in dash to hold phone), enjoy
Your pic or pics did not attach but I'd like to see your setup.
Moved all switches to console, only Gauges, indicator lights and push button start on dash. The space to the right of the Tach is for my cell phone (epoxied a super magnet in dash to hold phone), enjoy
Originally Posted by RR20AC
Preformed dash. Set up just like the manual says. Extra box between the dash support the factory offers with a bias adjuster, electric steering adjuster, clock adjust, GPS speedo adjust, and electric plugs for phone.
Originally Posted by Ducky2009
I made a blank dash (with 3/32" material vs stock .040") and rearranged the gauges as many others did. With the stiffer dash and an aluminum brace plate (3/32") approx 12" wide, mounted in the center above the tunnel from the dash to the frame, makes the dash pretty solid. The firewall is 3/32" too, to add some stiffness, needed because of the large hole for the push-out box.
I also made a heater push-out box (2 1/4" out) and made a glove box. Mine is welded together, but could easily be a riveted assembly. With the push-out, the glove box is 3" deep at the top and 4" at the bottom.
So by pushing the heater box in more into the engine bay as you did allowed for you to creat a deeper glove box correct? The way you made your glove box is how I planned to make mine. All aluminum. I have access to metal fab shop.
Competition dash covered in leather with home made glove box. Ignition on the left, Russ Thompson turn signal lever with horn button on the stalk. Single malfunction Indicator light above steering wheel, turn signal and high beam indicator lights in speedometer. Head light pull with high beam toggle above. Seat fan knobs and foot box fan toggles above. Battery cut-off, fuel pump kill toggle and hazard toggle with switch guards in the panel below the dash, through the firewall. Seat heater switches are mounted on seat mounting brackets out of sight.
Carbon Fibre dash FFR used to sell. Quality was not that good with some flaws so after I had two sent to me I laminated them together and polished them and the dash came out pretty well. Console is mad out of 1/8" alum sheet riveted together and laminated with Sapele wood and carbon fibre sheeting. Dash.jpg
Carbon Fibre dash FFR used to sell. Quality was not that good with some flaws so after I had two sent to me I laminated them together and polished them and the dash came out pretty well. Console is mad out of 1/8" alum sheet riveted together and laminated with Sapele wood and carbon fibre sheeting. 20190302_090358.jpg
So by pushing the heater box in more into the engine bay as you did allowed for you to creat a deeper glove box correct? The way you made your glove box is how I planned to make mine. All aluminum. I have access to metal fab shop.
Correct... This allowed for a deeper glove box. Notice the difference... 3" top, 4" bottom. The heater has an angled backface. I have a 1/8" "consistent" gap, which was enough space to add some insulation. After shaping the glove box, I added a lip and bolted it to the dash using flat head screws. I drilled holes in the dash and inserted flat head screw (Backed up with a steel block, drilled and counter-sunk large enough) and hammered the screw to form the counter sink shape in the dash, allowing the screw head to be flush to the face of the dash.
ALSO: You'll need a 4-way valve for the heater. It allows water to flow through the heater when open, and circulate from left to right head (needed per Ford) when closed. You can find it on Amazon or most auto parts store. P/N 74809 Had to make an angle bracket to mount it to the firewall.


 Thanks:
  Likes:


 Reply With Quote