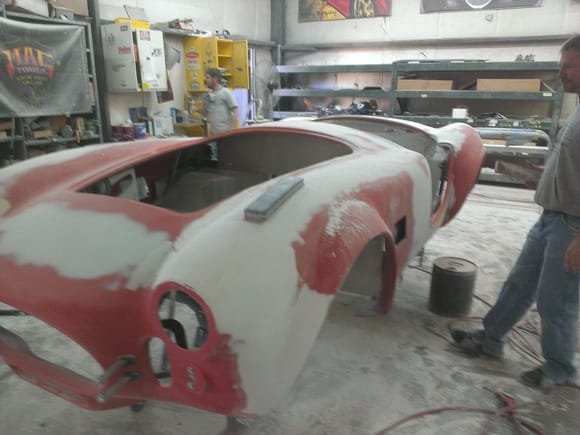
Looks like someone is doing a great job to me. I am not a paint and body worker, but you cannot ascertain the amount of filler needed by a picture. With the setting of the shop, it looks like a body shop. My interpretation is the worker is doing some very good blending. Just my opinion.
20th Anniversary Mk IV, A50XS Coyote, TKO 600, Trunk Drop Box, Trunk Battery Box, Cubby Hole, Seat Heaters, Radiator hanger and shroud.
Warning: You are about to read text written by a rookie who stumbled through his own bodywork! Don't take my opinion to heart.
It looks like it could be appropriate for the nose. This could also be a "work in progress" photo with regards to the quarter panel closest to us in the photo, so it may be a mute question.
When I did my body, I would start with broad covering too, but it would sand down to a lot less. It looks like more than I have, but I can't say if it's "too much".
Dave
Dave
Mk 3.1 - #6882 - 5.0L 302 - FiTech EFI - 3-Link - 3.08 Ratio - 15" Wheels
Greenhorn and doing the best I can
My photos are at: My Flickr acct
Videos are at: YouTube Videos
Work in progress. Background car is the same as the car questioned by the OP but with a bit more work on it. Foreground car is further along in the process. They put a lot of hand labor into each car so they do take time to finish even when they get to your car.
Very hard to question their process when you see the results of the work. That said the communication flow many times sucks so be prepared & give as much time as you can to the process.
FWIW the finish does hold up long term, picture taken today. Plates issues in 3/15 & driven daily since then. No special care or protection finishes on the paint with 12,000 miles current picture.
Last edited by BEAR-AvHistory; 01-03-2020 at 12:57 PM.
Kevin
MKIV #8234
Coyote '14/TKO-600/3-Link 3:55 Rear I love the smell of 100 octane in the morning.
NITTO NT01 275X40X17ZR - 315X35ZRX17
Delivered 2/7/14 - Plate "COYOTE NC1965" 3/25/15
JUST BECAUISE IT'S ON THE CAR NOW DOESN'T MEAN IT'S STAYING ON THE CAR....(wasn't yelling, didn't notice caps lock....SORRY !) So if it's their first one or only done a few they don't know just how much they have to feather in. Looks like some of my first few from years ago. I'm really good at knowing how much and how wide to put it on. My guy, Jose (primary job bodywork) can do the same as me with 25-30% less waste then me and I don't waste much. (he really is that good) I still guess a little wide and HE IS ON THE MONEY ! I would be much more worried if the pic showed 1-1.5in of filler on a parting line...da Bat
JUST BECAUISE IT'S ON THE CAR NOW DOESN'T MEAN IT'S STAYING ON THE CAR....(wasn't yelling, didn't notice caps lock....SORRY !) So if it's their first one or only done a few they don't know just how much they have to feather in. Looks like some of my first few from years ago.
I would be much more worried if the pic showed 1-1.5in of filler on a parting line...da Bat
lol...
Seeing the end result - I knew it didn't stay on the car.
Fact being - I don't even know how anyone would ever get that much on a fender.
I've had trouble with a golfball sized portion hardening up to "unworkable" before I could it all worked in where I needed it.
Between the quantity visible on the fender, and what was already (sanded off) on the concrete floor - I just wasn't really sure what to think about what I saw there.
Id say it looks about right to me. I see many cars on here finished nicely and the panel edges matching nicely, but still not fair. I put a batten over my bodywork when on the chassis and filled and sanded along the body so they are all fair - hopefully the reflections will show this in the completed paintwork. I see many on here were the reflections are quite wobbly - often dip at the front of the doors, even though the edges match. One of the issues with near flat GRP panels is that as the fibreglass resin cures it shrinks and therefore pulls hollows into the flatter panels - the aras that were obvious to me in this regard were the following:
*nose ahead of the hood opening
*panel under the windscreen between the hood opening and cockpit
*doors
*the panel between the cockpit and trunk opening
So once I faired all of these with a batten I has significantly more fairing on the body that I have typically seen in photos of other cars, but I work in the world of superyachts and so I get a bit anal about the reflections and I am guessing most wont even tell the difference. IMG_3846red.jpgIMG_3849red.jpg
Last edited by Hotyacht; 01-03-2020 at 10:09 PM.
FFR MkIV 8419 - Right Hand Drive
427W with Inglese 8 Stack injection - 560hp
TKO600 5 Speed, 8.8 Detroit Trutrak LSD IRS
VPM Adjustable Sway Bars
Vintage Wheels 17" Pin Drive
This one looks a lot closer to what I would expect to see - I was mostly looking at the quantity filler on top of the front fenders - Specifically the driver's front fender in the original image.
This one looks a lot closer to what I would expect to see - I was mostly looking at the quantity filler on top of the front fenders - Specifically the driver's front fender in the original image.
Well I think as some have suggested, much of the filler ends up on the floor. The more practice you get at putting it on the less sanding you will do and the less filler on the floor. With the superyachts it is usual for the entire vessel to be coated in filler and then long boarded back until hitting the high spots, so to begin with it looks more like a cake than a boat, but eventually there will mostly only be a whisper of filler left.
FFR MkIV 8419 - Right Hand Drive
427W with Inglese 8 Stack injection - 560hp
TKO600 5 Speed, 8.8 Detroit Trutrak LSD IRS
VPM Adjustable Sway Bars
Vintage Wheels 17" Pin Drive
"Too much filler?" The answer to that is "It depends." One major variable is how well the mold panels were matched when the bodies were laid up. I've had good ones and bad ones. If you start with a pretty clean, well matched body like this:
It will not take as much filler as is necessary on one that has significant misalignment like this:
I've said before that even though they're all alike they are all different! Well, except for the part about lots of dust winding up on the floor---that's pretty consistent!
BTW, I think Bear has things swapped in the photo where he says the one in the foreground is farther along in the process---it appears that one only has the parting lines knocked down and blocked with no filler yet applied.
Cheers,
Jeff
Last edited by Jeff Kleiner; 01-05-2020 at 07:13 AM.
As a first time "Novice Builder" I'm one of the very few fellows that Jeff Kleiner speaks of to get one of those really good bodies that will require minimal use of filler.
In addition, I've also been very fortunate to have been given a lot of expert advice from "Sir Jeffski" so hopefully once I'm done it will really be something special.
Filler is subjective to the accuracy of the body. Each is different and as long as it’s being done correctly it’s going to take what it takes. As to sethmatks questions, no never leave filler exposed to the elements it will obsorb water and you’ll have to sand it off and redo it. Along those lines a regular high build primer is also pours and will not seal the filler from the elements with the exception being epoxy primer. My suggestion is leave it until your ready to do body work then just do it. If something goes wrong with body work it usually requires a lot of time and repaint to fix. If your lucky spot repairs may be ok but the rest of the work is always questionable. For seam grinding you can use an angle grinder with a small disk in various grits to do it fast.
Mk4, Moser M88 rear end, Eaton truetrak, Craft Racing 461 Windsor, MMR pro trans, Glenns 1,000 hp cobra fuel system and lots of other parts.
On a related note... i took down the flashing on my 33 body and would like to fill the voids and drive the car until I can paint it.
What is the best tool for grinding the seam?
Can filler be exposed to the elements?
My goal is to have the car prepped for a finish as best as I can and then enjoy driving it. I’ll paint it next winter. I want to enjoy it this summer.
Personally, unless you are really REALLY experienced with a grinder, I would stay away from the power tools and do it by hand. The gelcoat is easy and quick to work, which means it is easy to take off too much. I did the majority of mine by hand with a panel file and then used sandpaper with a quality flexible block. It doesn't take long by hand and it may save you additional work later on. You say that you have already taken down the 'flashing'? so not sure what you intend by grinding the seam? It has been explained before, but there are no joins in the moulded bodies, so technically there are no seams, just uneven gelcoat where the mould parts are bolted together before laminating.
Last edited by Hotyacht; 01-05-2020 at 04:39 PM.
FFR MkIV 8419 - Right Hand Drive
427W with Inglese 8 Stack injection - 560hp
TKO600 5 Speed, 8.8 Detroit Trutrak LSD IRS
VPM Adjustable Sway Bars
Vintage Wheels 17" Pin Drive
I would stay away from the power tools and do it by hand. The gelcoat is easy and quick to work, which means it is easy to take off too much. I did the majority of mine by hand with a panel file and then used sandpaper with a quality flexible block.
+1
I knocked down my seams with drywall screen on a block.
HA! I knock my parting lines down with a 3500rpm 9in softpad and 36gr paper. One shot. Cut and prepped for filler...da bat
Look at you! I use 40 on a 6 inch. You can just stop right there if you’re going to start spouting off about your 9 vs my 6...you know what they say about how it’s not the size that matters but how ya’ use it
Look at you! I use 40 on a 6 inch. You can just stop right there if you’re going to start spouting off about your 9 vs my 6...you know what they say about how it’s not the size that matters but how ya’ use it
Jeff
DUDE ! I command that 9in like a Roman Gladiator…...I hear you like gladiator movies.....ever been naked in a mens locker room Jeffy...da bat


 Thanks:
  Likes:


 Reply With Quote


