-
Seasoned Citizen

Karl, consider this when deciding how to cut the studs. If you cut them before installing them you can easily dress the end of the threads on your belt sander. Not so easy when the studs are pressed into the hubs. If you don't dress the end you cut it will be difficult to spin a nut on the stud. If you use a angle grinder to cut them when installed you are more likely to damage the mounting surface of the spacer depending on the spacer configuration you're using.
Threads are cut on a 60-deg inclusive angle so you can easily dress the the cut end by carefully sanding the rough edge while holding the stud at a 30-deg angle to the sanding belt. I typically use a portaband or band-saw for cutting threaded fasteners or all-thread as it makes a cleaner cut than a cutoff wheel and easier to control. Just a tip from a very old machinist.
Dart Little M 406" SBC 800 HP N/A & 1,100 HP on nitrous, 2-spd Powerglide with trans brake, 6,000 RPM stall converter, narrowed Moser 88 3.90:1 spool with 35-spline gun-drilled axles & Torino bearings, custom parallel four-link, custom tube chassis & roll cage NHRA certified for 8.5-sec (only two FFR Hot Rods have this cert).
33 Hot Rod Super Pro Drag Racer Build:
33 HR NHRA Cert Roll Cage Build
-
Post Thanks / Like - 1 Thanks, 0 Likes
-
Karl,
Here's a photo of my finished and installed 1" spacer ring and bolts. I chose to assemble and mount everything to essentially as shown, measure or magic marker mark the bolts at the cut off points, then remove the 1" spacer, nuts and very carefully hacksaw off the ends of the bolts to the markets lengths. File smooth the bolt ends and threads and remount everything to as shown. Hacksawing with a new blade isn't really that bad. Doing it this way you get the exact bolt length desired, slightly recessed below the spacer surface.
Yes, I know, ignore the standard Mustang GT Brake calipers, painted.

-
Post Thanks / Like - 1 Thanks, 0 Likes
-
Top Notch Builder


Originally Posted by
GashF16

I'm getting ready to put on my 1" Eibach rear wheel spacers, same ones edwardb used. I see in his thread that I need to cut off the ends of my FF studs to be able to mount my wheels. edwardb, if you read this...how much did you cut off? Just the end part of the studs where there's no thread, or did you go deeper with the cuts, into the threads? I'd like to do the stud cutting now before I press them in. Easier this way, and I'm hoping to only need to cut once.
I ordered these. No cutting necessary https://www.amazon.com/gp/product/B0...?ie=UTF8&psc=1
Results shown here. I have a picture of how they turned out.
https://thefactoryfiveforum.com/show...l=1#post360775
But it looks like cutting them is very effective.
I am feeling your enthusiasm and excitement reading your thread! Congrats on the car and the build to come.
Last edited by P100DHG; 11-02-2019 at 02:40 PM.
-
Post Thanks / Like - 1 Thanks, 1 Likes
-
Member


Thanks so much guys for all the tips and links. Very helpful!
NAZ, that's some great advice, much appreciated.
Bob, I didn't see that you replied before I called you. Thanks for letting me interrupt you at the restaurant!
P100DHG, thanks for the Amazon link. I ordered the shorter studs...cheap(ish) and one less thing to mess with.
So now here's my forehead slap of the day. Before all my questions here this morning, I figured I'd press in a stud using my handy dandy 12-ton hydraulic press. Crank-crank-crank-done. The stud went in like butter. Easy right? Well when I looked at the hub surface, there's a slight 1mm or less warp in the surface because I didn't have sufficient arbor support in the press. The stud is not tilted; it's still perpendicular to the surface. I'm not sure if I need to throw it away and buy a new hub assembly, or if it's okay to use, especially since a spacer will be on top of it all, thus keeping a flat surface in contact with the back of the wheel when it's torqued on. Thoughts?

I'm going to hammer out the stud and wait for the shorter studs to come from Amazon. Meanwhile, my 16-year old son is laughing at me. He says he now gets a "freebie" if he screws something up during the build since right now it's Dad: 1 / Son: 0
Last edited by GashF16; 11-03-2019 at 12:22 PM.
Building Gen 3 Coupe complete kit / 2018 Gen 3 5.0 Coyote / T-56
-
Senior Member

Originally Posted by
GashF16
So now here's my forehead slap of the day. Before all my questions here this morning, I figured I'd press in a stud using my handy dandy 12-ton hydraulic press. Crank-crank-crank-done. The stud went in like butter. Easy right? Well when I looked at the spindle surface, there's a slight 1mm or less warp in the surface because I didn't have sufficient arbor support in the press. The stud is not tilted; it's still perpendicular to the surface. I'm not sure if I need to throw it away and buy a new spindle, or if it's okay to use, especially since a spacer will be on top of it all, thus keeping a flat surface in contact with the back of the wheel when it's torqued on. Thoughts?
I'm going to hammer out the stud and wait for the shorter studs to come from Amazon. Meanwhile, my 16-year old son is laughing at me. He says he now gets a "freebie" if he screws something up during the build since right now it's Dad: 1 / Son: 0
Looks like you posted an attachment? Maybe of the hub? But nothing is showing up. To be honest, it's hard for me to imagine that the pressure required to press in those studs would be enough to bend the face of the hub. Even if not supported. They're pretty stout. But anything's possible I guess. If it really is distorted, I personally wouldn't use it. That's a great big road grader of a wheel/tire mounted back there, and you want it running as true as possible. I personally wouldn't trust that the spacer would sit true if the mating surface isn't. At least not without further checking or measurements. And I'm not sure what that would be. The replacement hub is Ford part number FR3Z-1104-G, and roughly a $120 part. I've had lessons learned more expensive that that. By a lot...
Build 1: Mk3 Roadster #5125. Sold 11/08/2014.
Build 2: Mk4 Roadster #7750. Sold 04/10/2017.
Build Thread
Build 3: Mk4 Roadster 20th Anniversary #8674. Sold 09/07/2020.
Build Thread and
Video.
Build 4: Gen 3 Type 65 Coupe #59. Gen 3 Coyote. Legal 03/04/2020.
Build Thread and
Video
Build 5: 35 Hot Rod Truck #138. LS3 and 4L65E auto. Rcvd 01/05/2021. Legal 04/20/2023.
Build Thread. Sold 11/9/2023.
-
Member
Here's the slightly bent hub face. You have to look at the lines on the side to see how they have a little wave in them.

And here's a non-bent face for comparison.
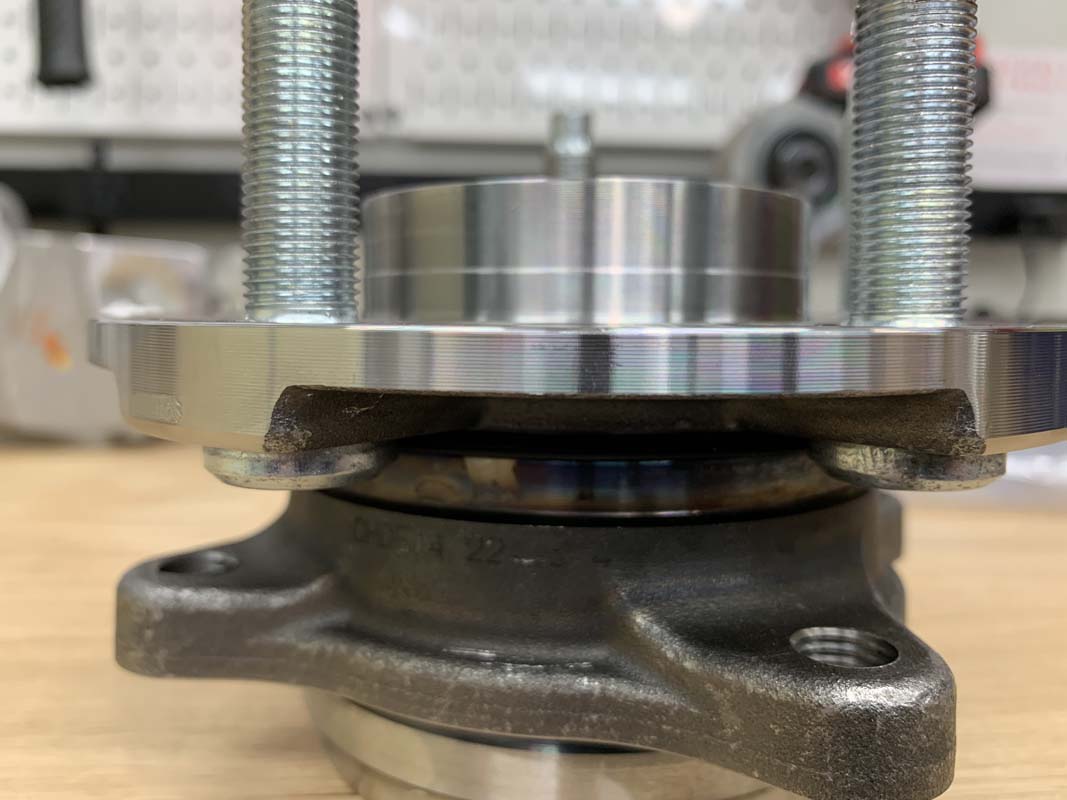
You know what edwardb, I think I'm just going to buy a new hub/bearing assembly. I'm planning on driving this car fast on the track, and I don't want to have this little defect in the back of my mind all the time. Besides, I didn't drop this kind of coin on a race car just so that I could save $120 on a pretty important part.
Building Gen 3 Coupe complete kit / 2018 Gen 3 5.0 Coyote / T-56
-
Seasoned Citizen
I agree, that hub is trash. When pressing the studs in use some oil on the knurl to help reduce the force required to seat them.
Dart Little M 406" SBC 800 HP N/A & 1,100 HP on nitrous, 2-spd Powerglide with trans brake, 6,000 RPM stall converter, narrowed Moser 88 3.90:1 spool with 35-spline gun-drilled axles & Torino bearings, custom parallel four-link, custom tube chassis & roll cage NHRA certified for 8.5-sec (only two FFR Hot Rods have this cert).
33 Hot Rod Super Pro Drag Racer Build:
33 HR NHRA Cert Roll Cage Build
-
Senior Member
Absolutely. Replace the hub. I'm still surprised it was able to be bent like that. A press is a nice way to put the studs in I guess. But obviously needs to be done with proper support. Also stopping once seated. My guess is pressure was continued in this case after the stud was all the way in. Having done these several times, as I said before, it's just hard to imagine the force required to push the knurl through the hole is enough to bend the hub itself. Lube isn't a bad idea either. I don't have a press, and pull them in with an air driver, washer, sacrificial hardened nut (e.g. not one of the actual lug nuts), and a liberal dose of chassis grease on the washer and nut. They pull right in.
Last edited by edwardb; 11-03-2019 at 07:13 AM.
Build 1: Mk3 Roadster #5125. Sold 11/08/2014.
Build 2: Mk4 Roadster #7750. Sold 04/10/2017.
Build Thread
Build 3: Mk4 Roadster 20th Anniversary #8674. Sold 09/07/2020.
Build Thread and
Video.
Build 4: Gen 3 Type 65 Coupe #59. Gen 3 Coyote. Legal 03/04/2020.
Build Thread and
Video
Build 5: 35 Hot Rod Truck #138. LS3 and 4L65E auto. Rcvd 01/05/2021. Legal 04/20/2023.
Build Thread. Sold 11/9/2023.
-
Member
Making progress the last few days and I've come up with a couple of questions:
1. The M14-2.0 100mm bolts supplied by FFR for the center section rear mounts are too short to go all the way through the chassis bushings and then through the rear mounts on the center section. I looked in my boxes for something longer, but these bolts were specifically called out in the "rear differential" packing list. Can't figure out why FFR sent 100mm bolts. I just drove all over town looking for something at least 120mm long, but nobody in Phoenix stocks bolts longer than 100mm. Has anybody else run into this problem with too-short bolts?
2. There are no nuts provided with the bolts to attach the rear hubs to the knuckles. Is that correct? No nuts required here?
I bought a new rear hub to replace the one I bent. The bent hub will be used for a future woodworking project. I think I'll use it to make a lazy susan round tabletop for my wife. Update on studs for the rear hubs that needed to be shorter for my 1" spacer: I ordered 10 ea. Dorman Wheel Studs part no. 610-364 from Summit Racing. Perfect fit, no cutting required.
Last edited by GashF16; 11-09-2019 at 01:28 PM.
Building Gen 3 Coupe complete kit / 2018 Gen 3 5.0 Coyote / T-56
-
Seasoned Citizen
McMaster-Carr is a good source for fasteners mail order https://www.mcmaster.com/91280a798 and Copper State Nut & Bolt is a great local source (there are at least three stores in the Valley) or Fastenall.
Dart Little M 406" SBC 800 HP N/A & 1,100 HP on nitrous, 2-spd Powerglide with trans brake, 6,000 RPM stall converter, narrowed Moser 88 3.90:1 spool with 35-spline gun-drilled axles & Torino bearings, custom parallel four-link, custom tube chassis & roll cage NHRA certified for 8.5-sec (only two FFR Hot Rods have this cert).
33 Hot Rod Super Pro Drag Racer Build:
33 HR NHRA Cert Roll Cage Build
-
Post Thanks / Like - 1 Thanks, 0 Likes
-
Member
Originally Posted by
NAZ
McMaster-Carr is a good source for fasteners mail order
https://www.mcmaster.com/91280a798 and Copper State Nut & Bolt is a great local source (there are at least three stores in the Valley) or Fastenall.
Thanks for that McMaster-Carr link--I ordered a couple. Also, I stopped by Copperstate this morning, but their M14 bolts only go to 90mm. I was surprised, since Copperstate has always had everything I need. Have a good weekend!
Building Gen 3 Coupe complete kit / 2018 Gen 3 5.0 Coyote / T-56
-
Senior Member
1. The rear M14-2.0 x 100mm bolts go through the chassis bushings and into the threaded mounting ears on the diff rear cover. They should engage nearly all the threads in the mounting ears. But don't go through or require nuts on the other side. None are called out in the instructions or listed on the inventory sheet. Both of which I've found are usually accurate. The longer M16-2.0 x 130mm bolts on the front mounts do go all the way through and use the provided deformed thread locknuts. I've done a couple of this style IRS, and never had to replace any hardware. Plus it's a bit specialized as you've found out.
2. Nope. No nuts on the knuckle to hub assembly. Just the provided flange head bolts. Should have come with the knuckle/hub. The two sets I've received were already assembled. Sounds like yours weren't.
Last edited by edwardb; 11-09-2019 at 03:01 PM.
Build 1: Mk3 Roadster #5125. Sold 11/08/2014.
Build 2: Mk4 Roadster #7750. Sold 04/10/2017.
Build Thread
Build 3: Mk4 Roadster 20th Anniversary #8674. Sold 09/07/2020.
Build Thread and
Video.
Build 4: Gen 3 Type 65 Coupe #59. Gen 3 Coyote. Legal 03/04/2020.
Build Thread and
Video
Build 5: 35 Hot Rod Truck #138. LS3 and 4L65E auto. Rcvd 01/05/2021. Legal 04/20/2023.
Build Thread. Sold 11/9/2023.
-
Member
Originally Posted by
edwardb
1. The rear M14-2.0 x 100mm bolts go through the chassis bushings and into the threaded mounting ears on the diff rear cover. They should engage nearly all the threads in the mounting ears. But don't go through or require nuts on the other side. None are called out in the instructions or listed on the inventory sheet. Both of which I've found are usually accurate. The longer M16-2.0 x 130mm bolts on the front mounts do go all the way through and use the provided deformed thread locknuts. I've done a couple of this style IRS, and never had to replace any hardware. Plus it's a bit specialized as you've found out.
2. Nope. No nuts on the knuckle to hub assembly. Just the provided flange head bolts. Should have come with the knuckle/hub. The two sets I've received were already assembled. Sounds like yours weren't.
Ah! Okay, thanks Paul. That makes sense since there are threaded ears on the rear diff. The thing that threw me off is that I have 4 ea. of the deformed thread locknuts instead of 2, and 2 of them are smaller to fit the M14 bolt (or so I assumed...I guess they're for something else). Anyway, mystery solved and back to work. Break time is over!
Building Gen 3 Coupe complete kit / 2018 Gen 3 5.0 Coyote / T-56
-
Member
Quick update. Front and rear suspension is complete, except for the rear swaybar...still waiting for missing bushings and bushing mounts. I'll take some photos of everything underneath after I get the rear swaybar on. I'm now 1 month into the build, and find myself slowing down a bit since I'm still waiting for FFR to send the fuel tank and a few other things. I'm doing some jump ahead miscellaneous things like the e-brake, etc. just to stay busy, but I feel like I'll be more "back on track" once I get my fuel system parts. I did receive the missing shocks and coils last week, so it was nice to install those and have a more "completed" look.
Just like everyone else here, getting the IRS parts to fit in the tabs was a real PIA. But with lots of patience and creativity, we were able to make it happen. It's very satisfying to have the IRS all done. One thing that concerns me is the alignment. I followed FFR's rough alignment measurements, but it all looks pretty wonky right now. Looks like I will have a good excuse to go learn how to do wheel alignments.
Anyway, photos to follow later. I also started a separate "Build Questions" thread so I can keep all my new guy dumb questions in one place.
Building Gen 3 Coupe complete kit / 2018 Gen 3 5.0 Coyote / T-56
-
Senior Member
Originally Posted by
GashF16
One thing that concerns me is the alignment. I followed FFR's rough alignment measurements, but it all looks pretty wonky right now. Looks like I will have a good excuse to go learn how to do wheel alignments.
Don't read too much into what the alignment looks like when hanging at full droop. Will look different when up at ride height. Plus when the alignment is really dialed in versus the approximate settings at this stage.
Build 1: Mk3 Roadster #5125. Sold 11/08/2014.
Build 2: Mk4 Roadster #7750. Sold 04/10/2017.
Build Thread
Build 3: Mk4 Roadster 20th Anniversary #8674. Sold 09/07/2020.
Build Thread and
Video.
Build 4: Gen 3 Type 65 Coupe #59. Gen 3 Coyote. Legal 03/04/2020.
Build Thread and
Video
Build 5: 35 Hot Rod Truck #138. LS3 and 4L65E auto. Rcvd 01/05/2021. Legal 04/20/2023.
Build Thread. Sold 11/9/2023.
-
Senior Member

-
Member
Hey guys, I've been making steady progress but haven't taken the time to upload photos and updates. Here are a few photos. Suspension is done. Fuel and brake lines done. Lots of sheet metal / powder coating / sound proofing done. Got a good start on the air conditioning. Lots of other small things getting done, as you can see from the photos. I haven't really run into any big questions since my last update, but I did just post up a question in my Questions thread (engine mounts and spacers are missing...grrrr). Anyway, I'm just plugging along and getting something small done every day. I'm loving the build, and it's always nice to stand back and admire things after they're installed.
IMG_1109.JPG
IMG_1108.JPG
IMG_1113.JPG
IMG_1112.JPG
IMG_1111.JPG
IMG_1110.JPG
IMG_1105.JPG
Building Gen 3 Coupe complete kit / 2018 Gen 3 5.0 Coyote / T-56
-
Post Thanks / Like - 0 Thanks, 1 Likes
-
FFR Maven

Looks good. You have the chassis at “Race” height... which is typically only desirable for a track-only car since it will be <3” off the ground. If this is going to be driven on the street, recommended to raise the chassis by using the lower holes.
Keep up the good work!
-
Looking great! Thanks for posting the pictures.
-
Senior Member
Originally Posted by
Logan
Looks good. You have the chassis at “Race” height... which is typically only desirable for a track-only car since it will be <3” off the ground. If this is going to be driven on the street, recommended to raise the chassis by using the lower holes.
Actually, the instructions for those dual action Koni shocks are to put them in the upper holes. Apparently they're slightly longer than the stock red Koni's. But the suspension is still at the normal street height. I have the same ones on my build and did the same thing.
Build 1: Mk3 Roadster #5125. Sold 11/08/2014.
Build 2: Mk4 Roadster #7750. Sold 04/10/2017.
Build Thread
Build 3: Mk4 Roadster 20th Anniversary #8674. Sold 09/07/2020.
Build Thread and
Video.
Build 4: Gen 3 Type 65 Coupe #59. Gen 3 Coyote. Legal 03/04/2020.
Build Thread and
Video
Build 5: 35 Hot Rod Truck #138. LS3 and 4L65E auto. Rcvd 01/05/2021. Legal 04/20/2023.
Build Thread. Sold 11/9/2023.
-
FFR Maven
Ah yes! I should have noted the silver color instead of red. You are 100% correct, disregard my suggestion of switching the holes.
Carry on!
-
Member
LOL, thanks guys. I had a few "oh crap" seconds there. I do appreciate the extra eyeballs looking at the details.
Building Gen 3 Coupe complete kit / 2018 Gen 3 5.0 Coyote / T-56
-
Member
I'm exactly at the 6-month point in my build. My 2018 Gen 3 Coyote with Boss 302 intake manifold is now installed. It's a tight fit, but it does go in if you talk to it nicely. We had 5 people during the installation (me on the crane, my wife and youngest son in front, one son underneath the car, and one son guiding the trans from the top). It was a good family project. Things worth noting about the Gen 3 Coyote (as discussed in other threads as well): you need to disconnect the steering rod, otherwise the alternator hits it. I also had to remove the gauge from the FPR because the engine was hitting it. Of course, this depends on where you decide to mount the FPR. Keep an eye on the starter underneath the passenger side, since it's easy to hit it on the engine mount when going down and in. Finally, the FFR manual shows an additional transmission mount adapter between the rubber mount and the transmission. That is not needed...the rubber mount holes will not line up with the frame mount if the adapter is used.
The Boss 302 intake manifold sits pretty high. I'm hoping to have enough body clearance without cutting it. Has anybody else seen a Coyote with Boss intake? How's the fit? I figured I'd ask here before putting the front on to see for myself. I'm also wondering what kind of coil covers are out there for the Gen 3 Coyote with a Boss intake. I did some light Googling, but didn't find anything. Any ideas you guys have would be helpful.
Now I'm just waiting on parts to build the tee for the oil pressure sender (as shown in the *new* FFR Gen 3 Coyote manual). Those parts were not included in my complete kit, probably since Ford Performance didn't tell FFR that the stock oil pressure sender is supposed to stay in. No big deal. I'm good at waiting for parts. I'll get started on the power steering today. I ordered a PS cooler, braided lines and hose ends from Breeze Automotive. Thanks edwardb for the pics and suggestions on that. Mark at Breeze was super helpful as usual.
IMG_1296.JPG
IMG_1297.JPG
Building Gen 3 Coupe complete kit / 2018 Gen 3 5.0 Coyote / T-56
-
Senior Member
Congratulations! That's a big step. For the whole family. Cool they're participating. I think that clearance could be challenging. I set the nose on mine during the initial engine mock-up and snapped several pictures including this one. I was mainly focused on the throttle body and whether the silicone elbow would have room. Which they did. This of course with the stock manifold. What I can see by comparing this picture to yours is the top of the LH heater/radiator T connection is roughly the same height as the throttle body top. Which is roughly three inches from the underside of the nose. Your manifold appears to be much higher than that. I don't know... Before you get to deep into it, I'd sure recommend setting the nose on there and see what you've got.
Curious why the Boss 302 intake? While I know it's not beautiful (!!) the stock 2018+ manifold is one of the best performing ones out there. Many are modding it to their previous gen Coyotes. I've not see any coil covers for the Gen 3 Coyote. Hard to imagine there would be with all the congestion on both sides. My strategy was the same as what Ford did with their cover, and that was to overhang the heads enough to make them a little less conspicuous.
Last edited by edwardb; 04-29-2020 at 08:11 PM.
Build 1: Mk3 Roadster #5125. Sold 11/08/2014.
Build 2: Mk4 Roadster #7750. Sold 04/10/2017.
Build Thread
Build 3: Mk4 Roadster 20th Anniversary #8674. Sold 09/07/2020.
Build Thread and
Video.
Build 4: Gen 3 Type 65 Coupe #59. Gen 3 Coyote. Legal 03/04/2020.
Build Thread and
Video
Build 5: 35 Hot Rod Truck #138. LS3 and 4L65E auto. Rcvd 01/05/2021. Legal 04/20/2023.
Build Thread. Sold 11/9/2023.
-
Post Thanks / Like - 0 Thanks, 1 Likes
-
Top Notch Builder
Originally Posted by
edwardb
I don't know... Before you get to deep into it, I'd sure recommend setting the nose on there and see what you've got.
Was your body on when you test fitted your nose? His appears to be off... should he put the body on as well? May save a step if it doesn’t need to be or add a step if it does.
If this boss manifold is too tall I’m super screwed with my air cleaner... good hood R&D guys thanks
I quick search for coil covers and plenum covers turned up theses... Might work but it's an expensive gamble.
https://www.americanmuscle.com/roush...rs-422161.html
Last edited by P100DHG; 04-29-2020 at 10:08 PM.
-
Post Thanks / Like - 1 Thanks, 0 Likes
-
Member
Originally Posted by
edwardb
Curious why the Boss 302 intake?
When I ordered the engine + transmission combo from FFR last year, I had the idea that the Boss 302 intake manifold could get me some more horsepower. But months later, after reading dyno matchups of the leading intakes (GT 350, 2018 Gen 3, Boss 302, Cobra) it looks like I probably won't gain anything compared to the OE Gen 3 manifold. So I think you're right, I may have paid the extra $ for a pretty face with the same performance. Oh well, at least I get to have my fuel rails installed backwards. ") (yes, the fuel rails have to be put on backwards for proper fitment).
(yes, the fuel rails have to be put on backwards for proper fitment).
Last edited by GashF16; 04-30-2020 at 08:27 AM.
Building Gen 3 Coupe complete kit / 2018 Gen 3 5.0 Coyote / T-56
-
Member
Originally Posted by
P100DHG
Was your body on when you test fitted your nose? His appears to be off... should he put the body on as well? May save a step if it doesn’t need to be or add a step if it does.
If this boss manifold is too tall I’m super screwed with my air cleaner... good hood R&D guys thanks
I quick search for coil covers and plenum covers turned up theses... Might work but it's an expensive gamble.
https://www.americanmuscle.com/roush...rs-422161.html
I'll let you guys know about the fit when I get a chance to put the nose on. After a second look tonight, I might be alright. From the side, I see that the top of the Boss 302 manifold is about level with the top of the dash. I might be okay here. Also, thanks for that link. The Googling force is strong with you. I'll give those guys a call tomorrow to see if that might fit on my setup.
Building Gen 3 Coupe complete kit / 2018 Gen 3 5.0 Coyote / T-56
-
Senior Member
Originally Posted by
P100DHG
Was your body on when you test fitted your nose? His appears to be off... should he put the body on as well? May save a step if it doesn’t need to be or add a step if it does.
I quick search for coil covers and plenum covers turned up theses... Might work but it's an expensive gamble.
https://www.americanmuscle.com/roush...rs-422161.html
No, I didn't have the main body on when I took that picture. I had the radiator tunnel in place with the bulb seal so the hood sat on that. Had the firewall and dash pieces installed, also with bulb seal, and had blankets on top of the engine (visible in the pic) holding the back side up close to where it would sit if the body was there. Judged by the height of the firewall/dash that it sits on top of. Checked again later when everything was together (no pictures looking underneath) and the clearance was very nearly the same. So the mock-up was reasonable.
Hadn't seen those 2018+ coil covers. Anything from Roush is going to be pricey. Seems purpose made for the their supercharger setup, so not sure if they could be modified. But sure seems like there would be a market for something like that even with a modded stock cover or other intake options.
Build 1: Mk3 Roadster #5125. Sold 11/08/2014.
Build 2: Mk4 Roadster #7750. Sold 04/10/2017.
Build Thread
Build 3: Mk4 Roadster 20th Anniversary #8674. Sold 09/07/2020.
Build Thread and
Video.
Build 4: Gen 3 Type 65 Coupe #59. Gen 3 Coyote. Legal 03/04/2020.
Build Thread and
Video
Build 5: 35 Hot Rod Truck #138. LS3 and 4L65E auto. Rcvd 01/05/2021. Legal 04/20/2023.
Build Thread. Sold 11/9/2023.
-
Member
Here's a video of the final dyno pull today at Speed Sports in Gilbert, AZ. I don't have any numbers yet. I really like my Bob Boig Quiet Pipes.
It's been way too long since I've posted here! Since I last checked in on the forum, I got rid of the Boss 302 intake, went back to the stock Gen 3 Coyote intake, and have been getting great help from AZ Cobras (one of the FFR forum sponsors) with the electrical system. Jason at AZ Cobras is an electrical genius...I don't know any other way to describe him. His ideas and solutions are amazing.
I'm looking forward to getting going on the body. Lots more to go on this build!
Building Gen 3 Coupe complete kit / 2018 Gen 3 5.0 Coyote / T-56
-
Post Thanks / Like - 0 Thanks, 1 Likes
-
FFR Maven
Hey Karl, any updates on your build? What are the results from the dyno session in the video above? Have you fitted the body yet?


 Thanks:
  Likes:


 Reply With Quote

