-
Senior Member

I'm trembling with all that clamping to granite in the kitchen! If I did that . . . when my wife was home . . . I'd be locked in the cold garage without the sour dough.
Those brake line mounts are very cool. I wish I needed some, but I'm past that stage.
And, you creatively solved the radiator drain problem that many of us had.
Nice work and thanks for posting it. Happy 2021.
818S/C : Chassis #25 with 06 WRX 2.5 turbo, ABS, cruise, PS, A/C, Apple CarPlay, rear camera, power windows & locks, leather & other complexities. Sold 10/19 with 5,800 miles.
Mk3 Roadster #6228 4.6L, T45, IRS, PS, PB, ABS, Cruise, Koni's, 17" Halibrands, red w/ silver - 9K miles then sold @ Barrett-Jackson Jan 2011 (got back cash spent).
-
Senior Member


Originally Posted by
AZPete

. . . when my wife was home . . .
LOLLLLL!!!! Sounds like a story in need of sharing.
-
Senior Member
Cabinet scraper
Somebody mentioned that cleaning up the parting lines was easier/quicker/cleaner with a cabinet scraper. "What's a cabinet scraper?", I asked.... google. It's a piece of metal with a burr on it that you drag over wood to smooth it. Like a plane, but pulled instead of pushed. Instructables.com helped show me how to make my own.
Old hacksaw blade and old 3/8" drive extension to create the burr. Press down hard and slide forward and rightward to create the burr on the "Starrett" side.

Seems to work pretty well so far.
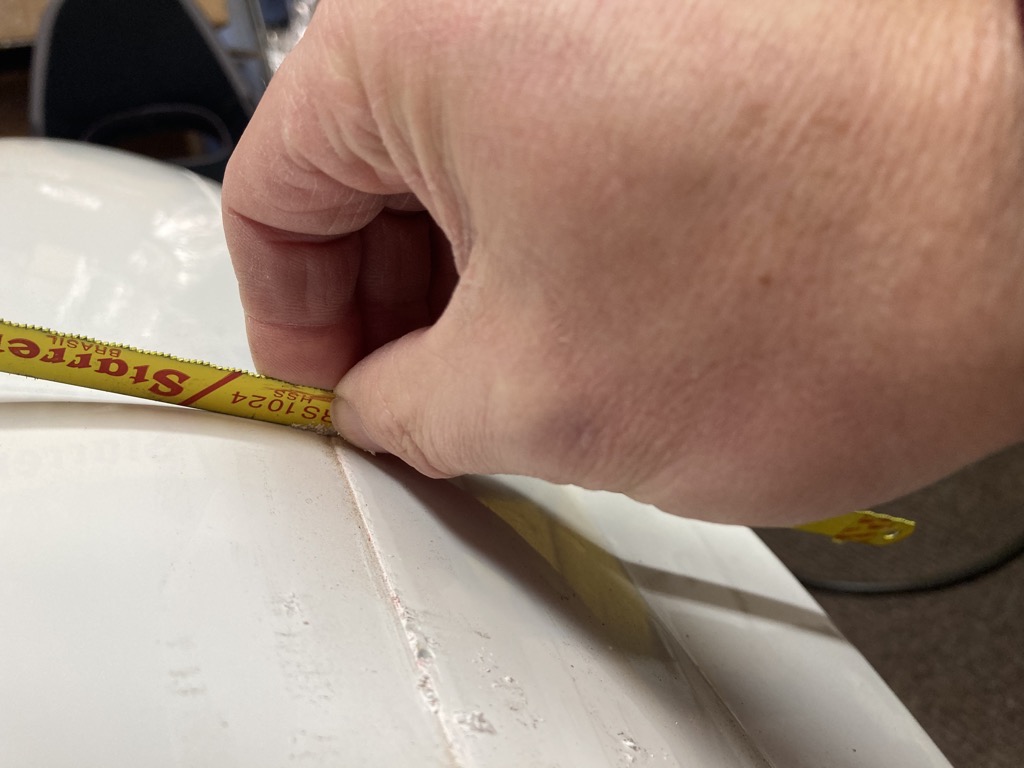
Two-handed operation is best, but I needed a hand to operate the camera.
-
Post Thanks / Like - 0 Thanks, 1 Likes
-
Senior Member
Curb feelers
While tooling around the neighborhood a few days ago, Isaac hit the wrong pedal during a turn ... the turn went from a 90 to a 270 ... fortunately he entered a driveway, then hung the right front wheel over the curb. It could have been much worse. He blames his shoes... and inexperience, which shows a considerable level of self-knowledge and humility for which this dad is most grateful. We'll be looking to get some track time at our local speedway in the next few months, so both of us can learn our way around a mid-engine, rear wheel drive car. After all, it's our first ... in so many ways.
The damage:

The souvenirs!

-
Post Thanks / Like - 0 Thanks, 1 Likes
-
Senior Member

Originally Posted by
fletch
While tooling around the neighborhood a few days ago, Isaac hit the wrong pedal during a turn ... the turn went from a 90 to a 270 ... fortunately he entered a driveway, then hung the right front wheel over the curb. It could have been much worse. He blames his shoes... and inexperience, which shows a considerable level of self-knowledge and humility for which this dad is most grateful. We'll be looking to get some track time at our local speedway in the next few months, so both of us can learn our way around a mid-engine, rear wheel drive car. After all, it's our first ... in so many ways.
Tiger drylac ral3020 - https://www.lvppaints.com/RAL-3020-1...-Up-Paint.html
Bob
-
Post Thanks / Like - 1 Thanks, 0 Likes
-
Originally Posted by
fletch
While tooling around the neighborhood a few days ago, Isaac hit the wrong pedal during a turn ... the turn went from a 90 to a 270 ... fortunately he entered a driveway, then hung the right front wheel over the curb. It could have been much worse. He blames his shoes... and inexperience, which shows a considerable level of self-knowledge and humility for which this dad is most grateful. We'll be looking to get some track time at our local speedway in the next few months, so
both of us can learn our way around a mid-engine, rear wheel drive car. After all, it's our first ... in so many ways.
The damage:
The souvenirs!
Shortly after my sons got their driver's licenses I sent them to 3-4 day professional drivers schools. One went to Bondurant in AZ where he droves Vipers and formula Mazdas. The other to Jim Russell at Mt Tremblant where he drove Formula Mazdas including the car Lance Stroll learned in. Both learned a lot about driving and car control but perhaps more importantly respect for cars and driving.
-
Thinker of thoughts

Originally Posted by
fletch
We've gotten pretty good at draining & refilling the coolant system ... because we've had to fix so many leaks.

One of the royal pains was the radiator outlet. It was trapped inside the radiator frame. In order to open the drain we had to remove the radiator mounting brackets at the top, then shift the radiator up and forward.
So, we needed a solution. More JB-Weld and a few fittings along with a ball valve. We drilled a hole through the handle so we could safety-wire it in the closed position.
That is a really good idea! I partially drained my system to plumb in a heater, and getting it to drain without it hitting the frame and splashing everywhere was really annoying. Then trying to put the plastic plug back in to stop the flow after partially draining it finished making the mess. So I think I will fully drain it and do something like you did.
Rick
-
Senior Member
Sequential turn signals & DRLs - first attempt
With some guidance from Bob_n_Cincy, we put an old Sparkfun Pro Micro (arduino-type) board to use sequencing the turn signals. Here's the breadboard setup - very crude, but functional.
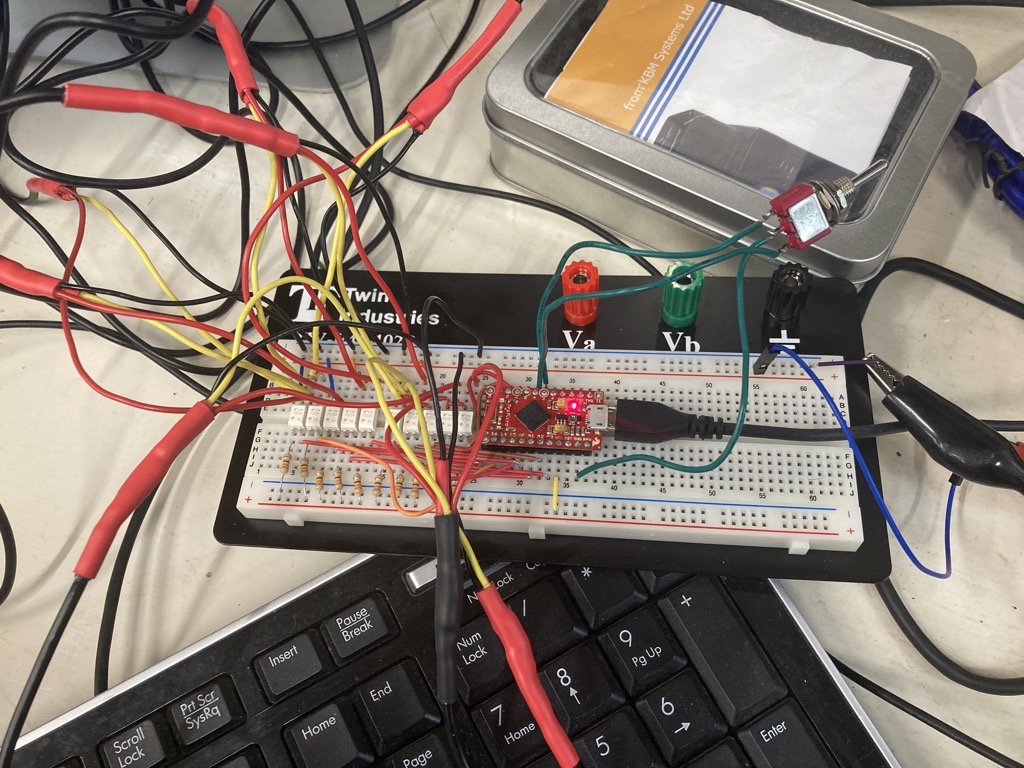
And here's a link to one of the crappiest videos I've ever taken. Enjoy!
https://youtu.be/JYH6xlT72Wo
-
Post Thanks / Like - 0 Thanks, 5 Likes
-
Senior Member
-
Originally Posted by
fletch
Thanks to K3LAG we're now at zero!
K3LAG: Sent you a PM as I'd love to do the same!
-

Yes, I love Technology

I'd trust you to do soldering for me....
-
Post Thanks / Like - 1 Thanks, 0 Likes
-
Senior Member
Powder coating
Major thanks to JimLev for loaning me his powder coating setup.
Before (I forgot to take this pic before coating the first pair of brackets. Too eager to get started!):
IMG_4195.jpg
After:
IMG_4199.jpg
These pieces barely fit in the oven.
IMG_4198.jpg
-
Post Thanks / Like - 0 Thanks, 3 Likes
-
Senior Member
Clutch
Shiny bits.
Resurfaced flywheel and new Exedy clutch installed and waiting for a transmission.
IMG_4225.jpgIMG_4234.jpgIMG_4235.jpg
-
Senior Member
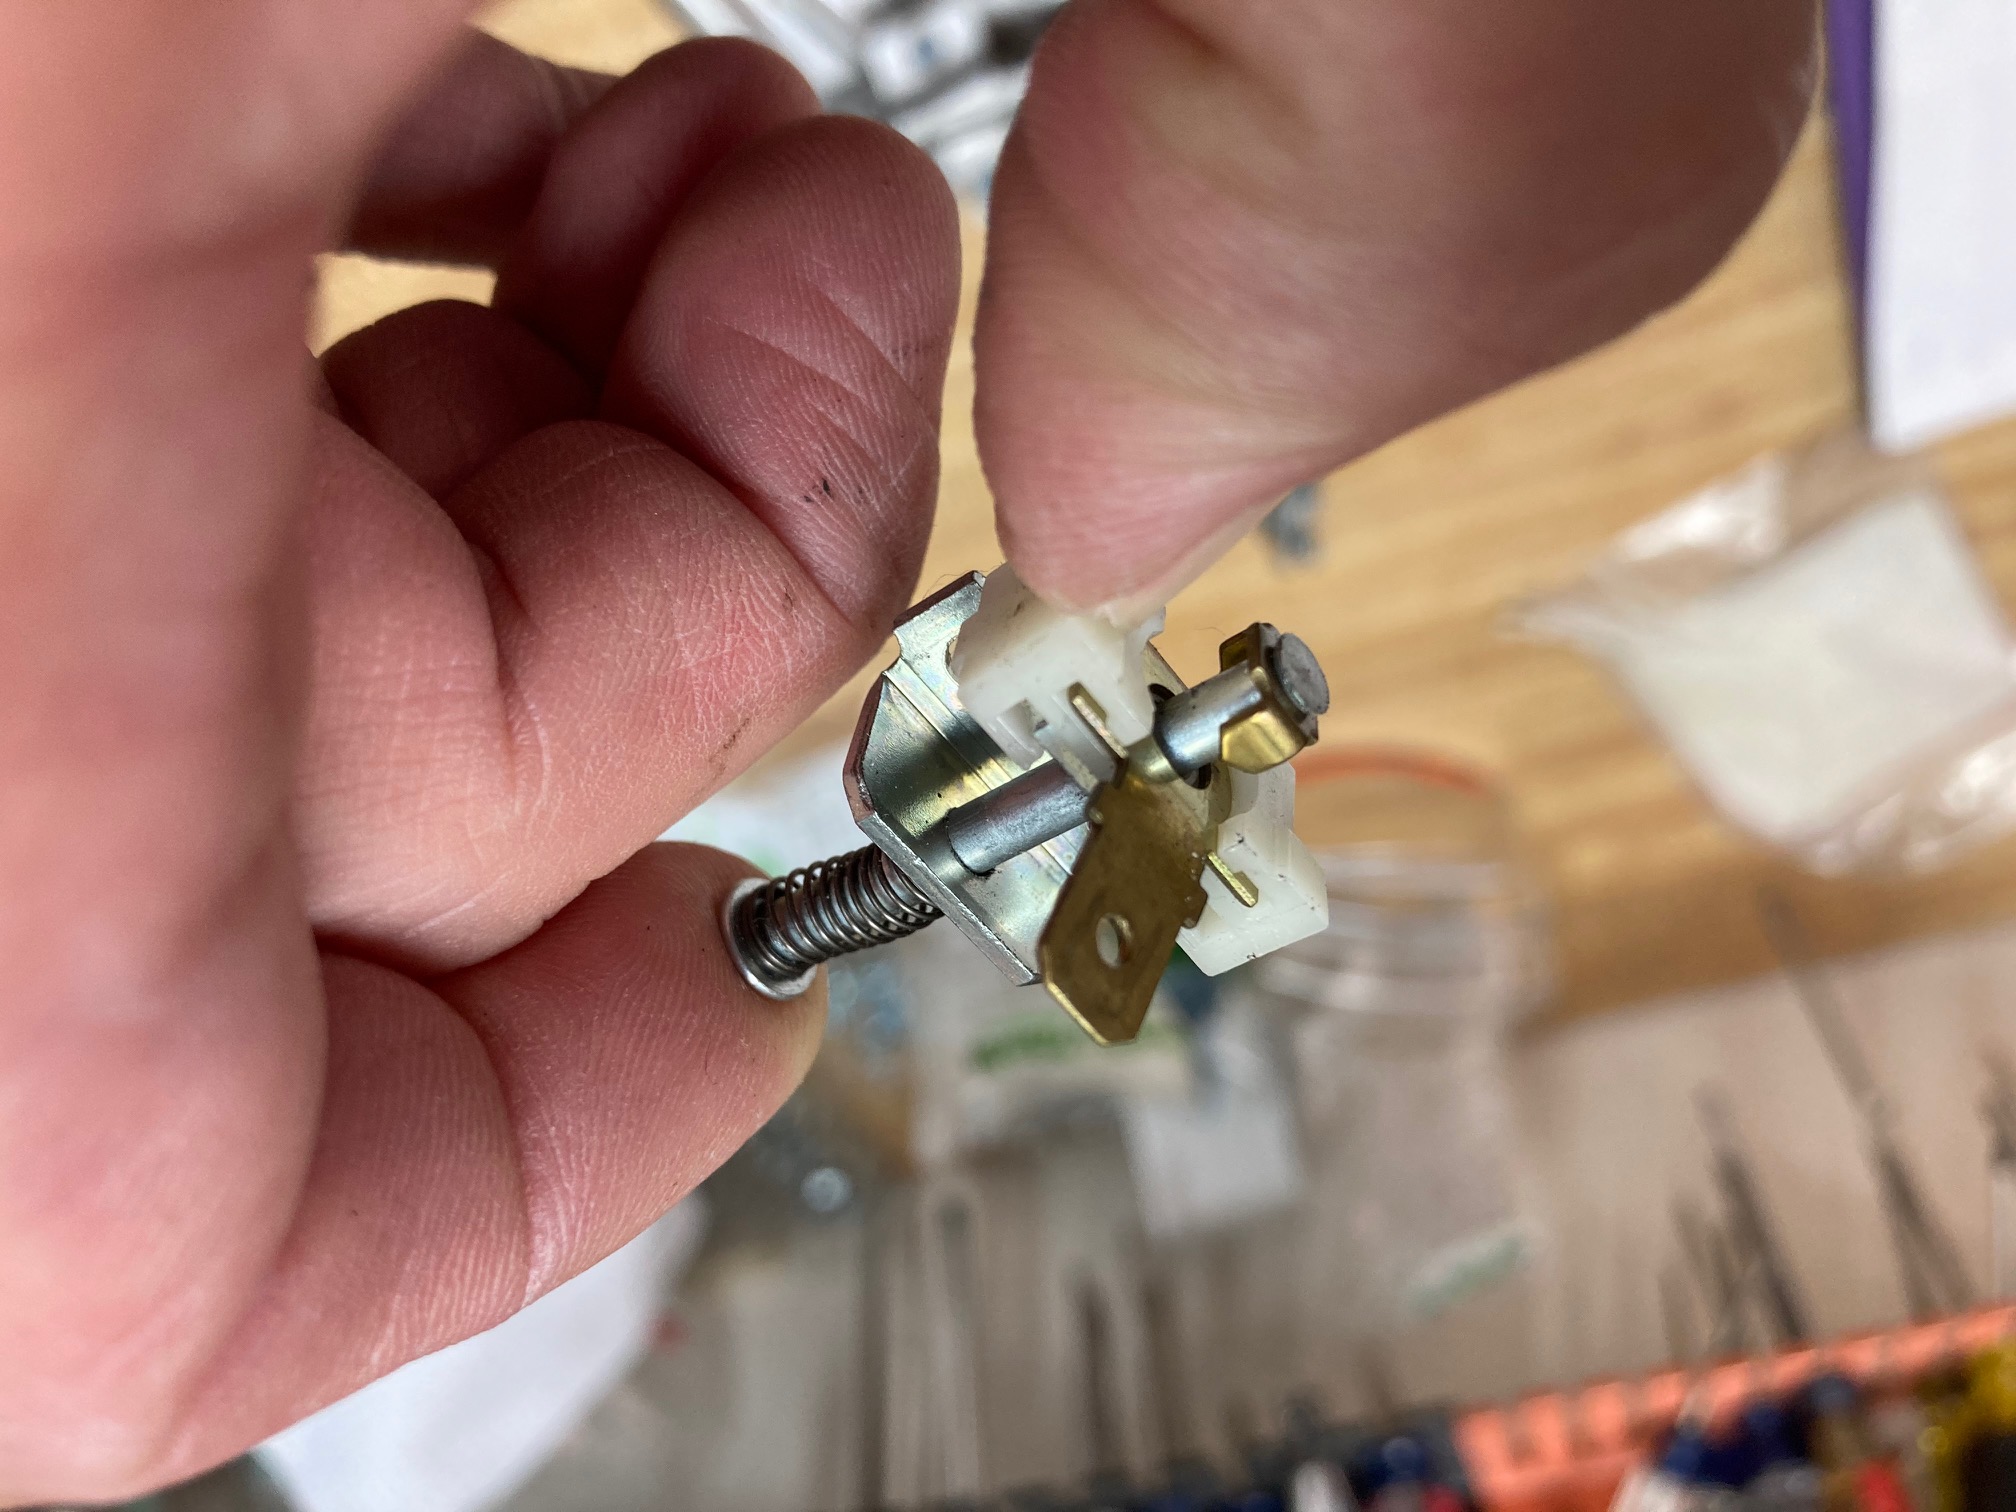
Isolating the parking brake switch
This is probably something that very few people will need to do. Our Arduino implementation for turn signals and DRLs requires an input from the parking brake so we can disable the DRLs when the parking brake is applied. In the OEM design, the parking brake switch grounds its input to chassis when enabled. In our version, the parking brake switch will operate as an input to the Arduino and we'd rather not ground the Arduino to chassis. Doing so would make it much more susceptible to any spurious currents running through the chassis from all sorts of other sources. So we need to isolate the switch electrically from the chassis. Here's what we did.
Here's the unaltered switch. The spade terminal is the "hot" or active side of the circuit. The little brass point (1 of 2) on the left side makes contact with the spade terminal. The current flows all the way up the shaft, then back through the spring, to the mounting bracket which is grounded through the parking brake frame.
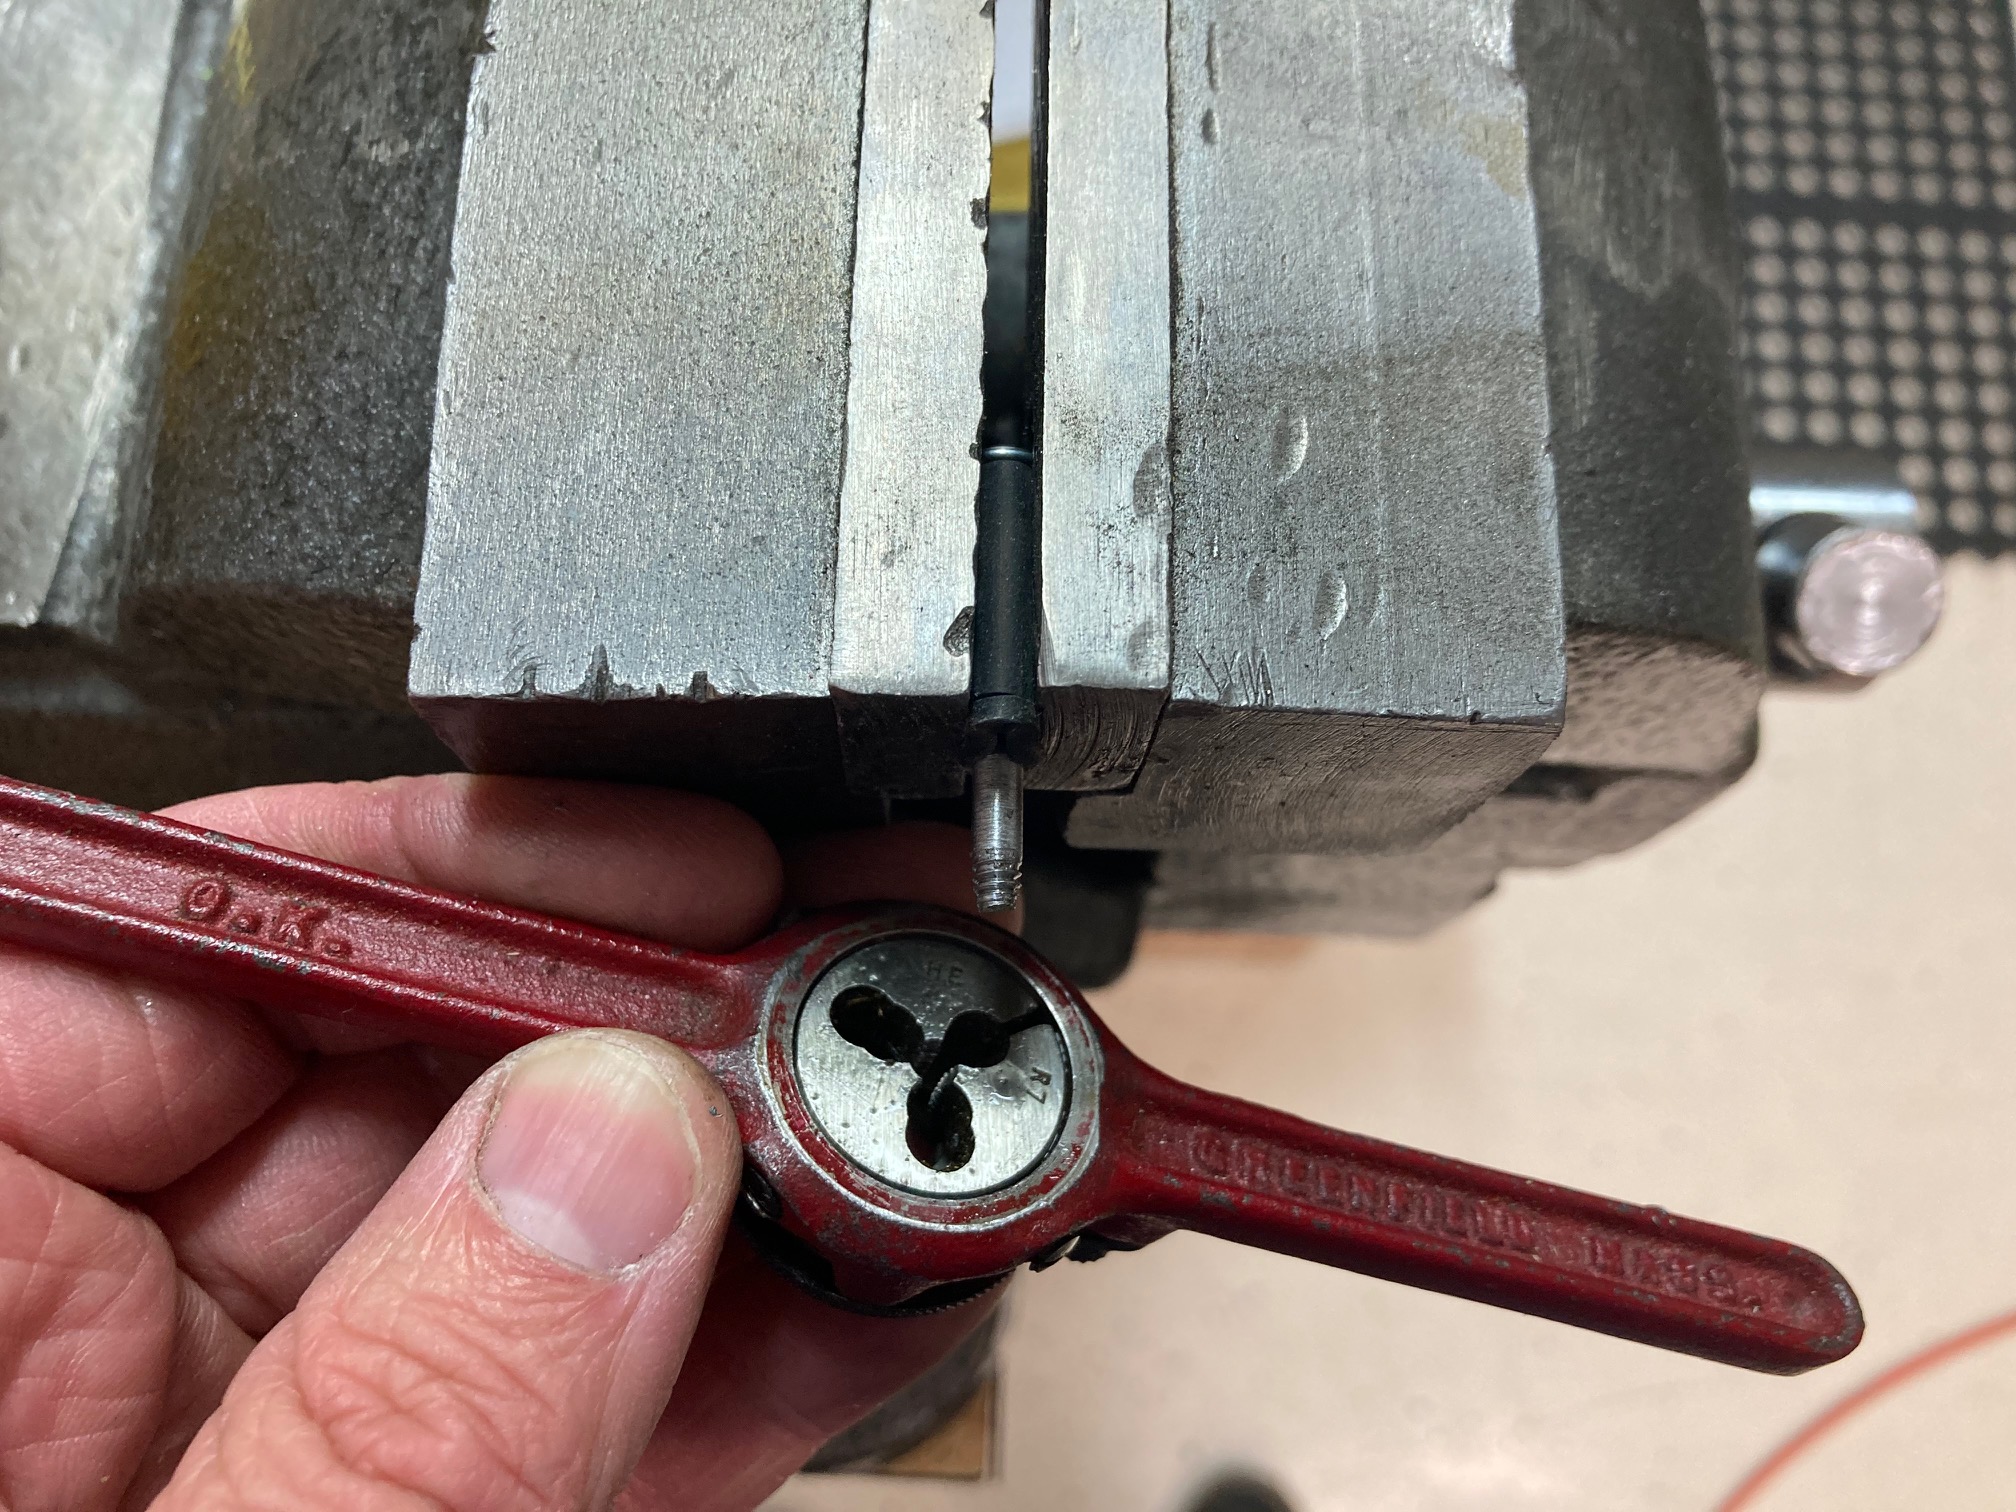
Next, we ground off the end of the shaft and threw away the brass pointy part, then assembled all the parts we'd need. A tiny bit of shrink tube, a 6-32 nut, a ring lug, and JBWeld (in the end we used JB Kwik because we're impatient.) We also adapted a binder clip to compress the spring during future steps.

Putting female threads in a hole is called tapping. I know you use a die to put male threads on a rod. Is that called dying?
Missed a couple photos here. The steps are: 1) Assemble the switch with shaft & spring, and hold with binder clip. 2) Put a short section of shrink tube on the shaft. 3) Put ring lug on shaft. 4) Screw nut onto shaft. 5) Slide shrink tube down to the nut and heat it until shrunk (shrinked?) 6) With ring lug slid toward the nut and over the shrink tube, wrap a narrow strip of masking tape around the shaft to keep the JB Kwik from getting on the shaft past the shrink tube. 6) Apply JB Kwik to the top of the nut, then slide the ring lug down, keeping a narrow thickness of JB Kwik between the ring lug and the nut. 7) After the first cure time, trim any shrink tube that is above the ring lug. This will keep the plunger from traveling far enough to allow the ring lug to contact the spade terminal plate.

Theory of operation: The shrink tube keeps the ID of the ring lug from contacting the plunger. The JB Kwik keeps it from contacting the nut. Instead of the spade terminal grounding to chassis, it contacts the ring lug and completes the circuit through it.
After the first cure time, add another layer especially at the end where the plunger rod protrudes from the nut. Add the wires and it looks something like this.

Here's the finished product from two angles.


It's a good idea to confirm isolation using an ohmmeter throughout the process. It will keep you from making mistakes.
Last edited by fletch; 04-18-2021 at 03:58 PM.
Reason: grammar
-
Post Thanks / Like - 0 Thanks, 3 Likes
-
Yes, I love Technology
So what is more fun... assembling something handed to you or designing solutions and making yourself. (No wrong answer here actually)
-
Senior Member
Originally Posted by
aquillen
So what is more fun... assembling something handed to you or designing solutions and making yourself. (No wrong answer here actually)
I like doing both, at different times. I've always enjoyed and learned from taking things apart and putting them back together. My wife swears that's how I fix most of the broken things around our house - just disassemble, then reassemble. She's got a point that several times, I've not found a root cause but the process seems to fix whatever was wrong - poor electrical contact or maybe just mechanical slippage that's improved by the rebuild.
-
Good solution there. I'm using an arduino for all of my lights and blinkers too, but sine my electric parking brake is controlled by the arduino I got to skip this step.
-
Senior Member
Transmission rebuild
First and of highest importance is to say thanks to Rob T to helping us out in a major way. He made us a fantastic deal on his used gear set. Thank you, Rob. We are very grateful.
IMG_4243.jpgIMG_4242.jpg
One weird thing we noticed was the difference between the 5th-reverse selector setup of the two main shafts. Rob's followed the FSM exactly. Ours was missing a few parts.
IMG_4244.jpg
His version appears to have an actual synchro for reverse where ours was missing that completely. Oh well, maybe this will make for smoother shifts into reverse?!?
Rob's pinion gear was missing two teeth so we needed to swap in our old pinion gear & shaft. We beat on the nut & used plenty of heat, but still couldn't get it off, so...
IMG_4248.jpg
The case is prepped and shafts go in.
IMG_4254.jpgIMG_4253.jpg
Checking backlash & finger painting with the prussian blue.
IMG_4272.jpgIMG_4274.jpg
-
Post Thanks / Like - 0 Thanks, 4 Likes
-
Senior Member
Completing the assembly
IMG_4275.jpgIMG_4276.jpgIMG_4277.jpg
The plan is to put it back in tomorrow night. Then we'll need to decide whether to get back to go-kart right away or to finish a few of the electrical clean up items we were working on. Most likely, we'll get it running again because driving it around the neighborhood is way more fun than cleaning up wires.
I should also say how grateful we are for Hindsight's LSD thread here: https://thefactoryfiveforum.com/show...ions-with-pics
We would probably not have attempted the rebuild without it.
Last edited by fletch; 04-22-2021 at 12:53 AM.
Reason: added thanks
-
Post Thanks / Like - 0 Thanks, 3 Likes
-
04-22-2021, 02:27 AM
#100
how much did you pay for the gear set (if you don't mind). I have a 2nd trans with a blown 1st gear I would like to rebuild
-
04-22-2021, 07:06 AM
#101
Senior Member

Originally Posted by
Shawn818c
how much did you pay for the gear set (if you don't mind). I have a 2nd trans with a blown 1st gear I would like to rebuild
I've got a gear set from an 03 wrx sitting around collecting dust (I only needed the trans case), PM me if interested.
-
04-23-2021, 06:50 PM
#102
Yes, I love Technology
Setting pinion - crown mesh - glad you went for it ?
-
04-23-2021, 06:54 PM
#103
Senior Member
Originally Posted by
aquillen
Setting pinion - crown mesh - glad you went for it ?
Aside from feeling swoll, the benefits were probably nil. The shims as supplied with Rob T’s driven shaft were fine. I suppose finger painting with Prussian blue has its therapeutic benefits as well.
-
05-03-2021, 11:43 PM
#104
Senior Member
Back in
Transmission went back in with little fanfare... just in time to return the borrowed engine hoist. I think we had it for 18 months or so. Working on a car project is a great way to make friends!
IMG_4279.jpgIMG_4280.jpgIMG_4281.jpg
-
05-03-2021, 11:59 PM
#105
Senior Member
Fresh powder!
We're about a month past skiing season in New Mexico. You're probably thinking, "I thought New Mexico was the desert?!? Isn't it way down south?!" Yes, you're right. It's in the desert and it's pretty far south. However, altitude trumps both of those. When you're at 10,000 feet above sea level the snow flies and tends to stick around. But enough about that...
The REAL fresh powder is in the Fletch garage.
IMG_4291.jpg
Nuts on a string
IMG_4289.jpg
This was a case of stars aligning or what have you. JimLev loaned me his powder coating setup and I started to imagine all the uses for it. We had the transmission out so the rear suspension was pretty easy to get to... I even powder coated my coffee mug.
And then... as my wife can attest, I can't leave well enough alone. The painted brakes didn't match the powder coated suspension parts. Plus, they were chipped due to a few wheel removal/reinstall cycles. Of course, that won't suffice. So we stripped and powder coated them too.
IMG_4317.jpg
Right now I'm eyeing the front A arms and steering rack... Isaac's not happy with me. It's been weeks since he's been able to do burnouts in the neighborhood...
-
Post Thanks / Like - 0 Thanks, 6 Likes
-
05-10-2021, 09:25 PM
#106
Senior Member
Steering column
A few weeks ago roadrashrob asked about our steering situation - our use of an NRG quick disconnect with the OEM column, etc. Rob, this is my attempt to answer your questions. If I miss the mark, let me know and I'll post a follow up. Unfortunately, we won't be reinstalling the column for another week or two so all these pics are on the bench.
Here's our column setup in profile. The tips of the stalks are about 3.5" from the center line of the steering wheel. Not ideal, but better than where we started.
IMG_4346.jpg
Various stages of disassembly, showing the NRG hub and the adapter.
IMG_4347.jpg
IMG_4350.jpg
Before and after of the adapter. I don't know for sure if this was a FFR-supplied item. It looks a bit different from others I've seen on the forum. It came with the kit when we bought it second-hand.
IMG_4348.jpg
IMG_4349.jpg
One consequence of all the stack up was to push the wheel too close to the driver for comfort. We compressed the column by pinching the larger OD tube in a vice and sliding the narrower tube & shaft toward the driver. We then extended and lowered the mount point using some plate steel, 1/4" pipe and 5/16" bolts. An unanticipated benefit of this arrangement was that it allowed us to shift the wheel to the left toward the center of the driver's body. We haven't fabbed up our dashboard and recognize the drop may cause issues with finishing around the upper part of the column... a problem for another day.
IMG_4345.jpg
IMG_4351.jpg
-
Post Thanks / Like - 0 Thanks, 1 Likes
-
05-11-2021, 07:35 AM
#107
Thanks Fletch! Exactly what I was looking for. Should help other builders as well.
-
05-11-2021, 11:59 AM
#108
Senior Member
More on steering (moron steering?)
My original post showing the adapter mod & column in place.
https://thefactoryfiveforum.com/show...l=1#post434237
-
Post Thanks / Like - 0 Thanks, 1 Likes
-
05-29-2021, 12:14 AM
#109
Senior Member
Track day
You wouldn't know it from our build thread, because I've not done a good job keeping up with all our work, but we're planning a track day in the next week or two. This will be our first shakedown of sorts and we're looking for input. What would you do? What would you test? What would you measure?
The car will eventually be more of a daily driver, but we'd like to iron several things out first.
Top on our list is brake bias. We've got the Subaru ABS system installed and it works well. A few hard stops from 30-35 mph have produced quick, but even stops. We plan to disable the ABS and dial down the pressure to the rear wheels with the proportioning valves until it's closer to neutral. Then re-enable the ABS. We don't have our final wheel & tire setup so this will be a preliminary brake balance.
What else should we be considering?
If I understand correctly, we may be sharing the track with others, but should have enough space to do more or less whatever we need to. There's a skidpad, a road course and an oval.
Thanks for the input.
-
05-29-2021, 05:35 AM
#110
Senior Member

Fletch: If you are going to Sandia, be careful and take it easy. It's a fun track and the people there are great, but there is very little run off room. Trust me, I had a close encounter with a tire wall there when my brakes failed. Lots of turns with no real place for the brakes to cool. I think my mistake was running with some "old" brake fluid. One thing to do for sure is to make sure your fluid is fresh.
-
05-29-2021, 10:05 PM
#111
Senior Member
Thanks for the reminder Rob. We plan to ease into it. Not really running the track all out or anything near it. Probably just running at auto cross speeds checking various attributes of the car.
-
05-29-2021, 10:57 PM
#112
Senior Member
Wiring
I spent a LOT of time tidying up some of the shortcuts we took late last year to get to go kart. One big area was the wiring. Initially we planned to locate our single fuse box in the front of the tunnel facing the passenger footwell. While trying to clean some of the old wiring up, I decided it was too much trouble to keep it there. So I moved the fuse box up above the dash frame and called JimLev for a battery cable extension. It was so much easier to work with the fuse box in this position. There's still a bit of a mess up in the dash, but we're not done yet. Still to be done: head unit/radio + speakers, seat heater wiring, auto AC panel from Subaru (trying to modify this to drive the Vintage Air temperature control), Arduino for turn signal/DRL control + SSM to CANBUS conversion to display ECU info to the head unit.
Before:
IMG_3654.JPG
After:
IMG_4391.jpgIMG_4392.jpg
Very happy the headlight wiring is in and tested, the cruise control wiring is in (not tested), and we have the harness to the rear bumper fabbed nearly ready to install.
-
Post Thanks / Like - 0 Thanks, 1 Likes
-
05-29-2021, 11:06 PM
#113
Senior Member
Front suspension refresh
Remember how I said the powdercoating tools from JimLev were calling my name, begging me to be used on the front brakes and suspension, those parts that had countless nicks in the paint from our wayward wrenches? Well, I broke down and tore the front apart. A full brake teardown, tie rods spun off the steering rack, pressed bushings out of LCAs... well not actually. Those darn bushings wouldn't come free even after I'd used all manner of heat and pressure (plus a big hammer). You can't bake those things at 400 F. So, what to do? Ebay!
Before
IMG_4377.jpg
After
IMG_4387.jpg
I didn't take any photos of the completed brakes or steering setup, but they look much nicer and aren't going to mind a brake fluid splatter or incident abuse from a dropped wrench.
-
Post Thanks / Like - 0 Thanks, 1 Likes
-
05-29-2021, 11:10 PM
#114
Senior Member
Fuel pump inspection
We purchased some foam blocks for inside the gas tank to reduce sloshing. While installing that, I took a look at our fuel pump given the recent issues others have experienced with the pump output hose coming loose. Here's what I found:
IMG_4381.jpgIMG_4382.jpg
All is still well as we originally built it. We cut the OEM pump bracket and inserted a piece of steel. We used two self-tapping screws to secure the assembly along with a healthy dab of JB Weld. A stainless hose clamp keeps the pump in place. So far so good!
-
Post Thanks / Like - 0 Thanks, 1 Likes
-
05-29-2021, 11:12 PM
#115
Senior Member
Go kart - part 2
And finally, we're back to go kart stage once more. So much good stuff. A transmission that shifts easily into 2nd, front wheel wells, STI LCAs installed in the outer holes so zero rubbing of the front tires. Some insulation in the rear firewall... too much to remember.
IMG_4388.jpg
-
Post Thanks / Like - 0 Thanks, 2 Likes
-
05-30-2021, 07:39 AM
#116
Originally Posted by
fletch
We purchased some foam blocks for inside the gas tank to reduce sloshing.
Where did you get your fuel blocks from? They are on my list, but there seems to be a lot of variation in price in what Ive seen
-
05-31-2021, 10:08 AM
#117
Senior Member
Originally Posted by
roadrashrob
Where did you get your fuel blocks from? They are on my list, but there seems to be a lot of variation in price in what Ive seen
https://www.speedwaymotors.com/Fuel-...ach,52163.html
Bought 6, only needed 4.
-
05-31-2021, 06:04 PM
#118
Senior Member
Alignment
Finished our first alignment today. Still on donor wheels & tires. 17x7 +42 offset w/ 225/45 R17s all around.
Used this fantastic thread. https://thefactoryfiveforum.com/show...s-for-the-818S
And this reference: https://thefactoryfiveforum.com/show...l=1#post126682
Final specs
Ride height 4.5"
Rear:
Toe: 3/16" total
Camber: -0.5 deg
Front:
Aluminum LCAs in outer mounting holes
Toe: 1/16" total
Camber: -1.0 deg
Caster: R 5.1 deg, L 5.5 deg
-
06-01-2021, 03:38 PM
#119
Senior Member
Tuning
This cars going to be a handful.
C0D526DF-0085-4183-ADC2-F9828DAA11CB.jpg
2.5L from 2006 WRX
TD04-19T turbo and Grimmspeed EBCS
91 octane
Our tuner also remapped the DBW pedal inputs to make it much smoother at tip in. Very streetableup to a point.
-
Post Thanks / Like - 0 Thanks, 1 Likes
-
06-01-2021, 03:50 PM
#120
Looking forward to seeing it drive by me in ABQ sometime in the near future!
-
Post Thanks / Like - 0 Thanks, 1 Likes


 Thanks:
  Likes:


 Reply With Quote
