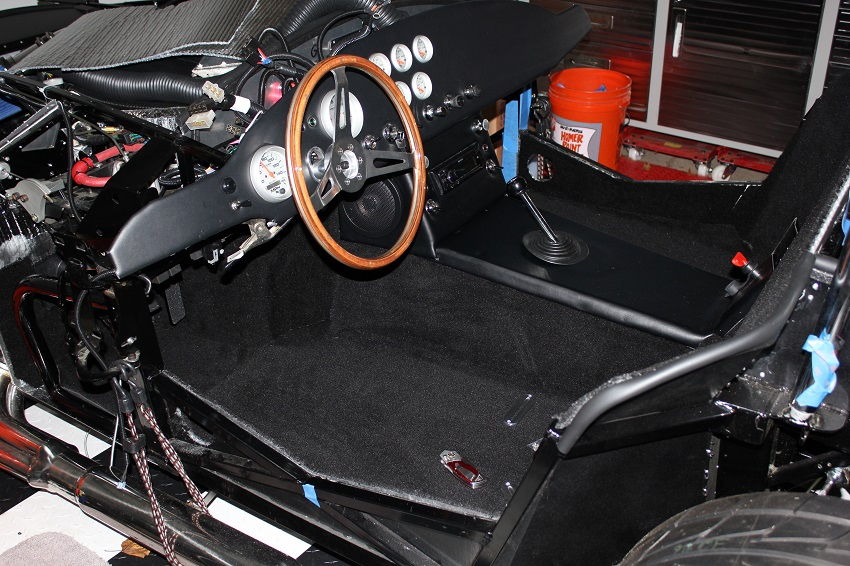
So, after what seems like a lifrtime, I've managed to carpet the trunk, and started on the interior by installing insulation. Got it glued in, and started modifying the tunnel cover to accommodate the S10 tailshaft shifter location, and the handbrake relocation to the top of the tunnel. My question is, after making the new penetrations in the cover, and setting it in place, I'm finding that the outside edges of the cover will not fit over the insulation. Once the carpet is added to the sides of the tunnel it's going to be worse. I tried bending the edges out a bit, but because it's 6061 aluminum, I'm afraid to bend it too far because it will crack. Ask me how I know.
Is it just a matter of carefully flaring the edges out some more, or would I be better off making a new cover? I should probably mention that I intend to cover it with the same vinyl as the dash, so it will be wrapped under the edges making them thicker.
Why did I think this part was going to be easier than any other part of this build?
Rick
Mk4 with Mr. Bruce FIA body, 331 w/ Speedmaster Stack Injection, Full Width Roll Bar with high brake lights by i.e.427, IRS, ABS, PS, PB, FAST FI, First start 3/30/20, First go-kart 7/5/20, paint by Ken Pike
If you want it to be easily removable, do it as egchewy suggests, likewise with the carpet. The carpet on the cover can come down to meet it.
This is what I did, using an aluminum transition floor molding, (normally used for carpet to tile floors, meeting). I covered the mldg in vinyl to match the dash. I then drilled and tapped the top tranny tunnel frame, and used stainless machine screws with finish washers, to hold the cover on.
I stopped short on the insulation but carried the carpet all the way up. I used the FFMetal cover, which may be just a bit wider than the one FFR provides.
Thanks for all the great options guys. I'd like to do this without purchasing a new tunnel cover if I can. With that in mind, I guess Chewy's plan of trimming the insulation down just a bit, and bringing the carpet just up to the bottom edge of the cover might work. I purchased InstaBind carpet edging, so maybe I can bind the top edge of the carpet on the sides of the tunnel, and have the binding just overlap the vinyl on the cover. If I can't figure how to make that work, FFMetal or 520 Speedworks will be getting a call.
Rick
Mk4 with Mr. Bruce FIA body, 331 w/ Speedmaster Stack Injection, Full Width Roll Bar with high brake lights by i.e.427, IRS, ABS, PS, PB, FAST FI, First start 3/30/20, First go-kart 7/5/20, paint by Ken Pike
Thanks for all the great options guys. I'd like to do this without purchasing a new tunnel cover if I can. With that in mind, I guess Chewy's plan of trimming the insulation down just a bit, and bringing the carpet just up to the bottom edge of the cover might work. I purchased InstaBind carpet edging, so maybe I can bind the top edge of the carpet on the sides of the tunnel, and have the binding just overlap the vinyl on the cover. If I can't figure how to make that work, FFMetal or 520 Speedworks will be getting a call.
just don't take too much carpet off like I did. I marked the depth with the tunnel cover sitting on the bare metal. the carpet at the front and rear of the tunnel cover once installed added an extra 1/4" of height that I didn't account for, leaving a slight visible gap of shiny aluminum. I took some matte black spray paint to this area and it's now pretty invisible. I secured my tunnel top at the front and rear corners using 1/4"-20 rivnuts and SS rounded socket head bolts. I also applied a thin layer of RTV on the tops of the 3/4" square tubes as a "gasket" to help w/ any metal on metal rattling.20200925_155526.jpg
Beautiful job! I considered going in that shade of brown for my interior, but I managed to spend all my money, and some I hadn't made yet, before I got to that decision!
Rick
Mk4 with Mr. Bruce FIA body, 331 w/ Speedmaster Stack Injection, Full Width Roll Bar with high brake lights by i.e.427, IRS, ABS, PS, PB, FAST FI, First start 3/30/20, First go-kart 7/5/20, paint by Ken Pike
Chewy, Forgot to mention, first, thanks for the heads up on trimming the carpet, second, I'll be using the 3M new velcro tape along the top of the one inch tubes. When I cut the top piece off of the tunnel carpet section, I made sure to leave a bit of extra. I plan on finishing the tunnel cover and have it in place when I measure and trim the tunnel carpet. Plus I'm using the InstaBind carpet edging on the top edge, so I should get a bit of overlap with that. Thanks again.
Rick
Mk4 with Mr. Bruce FIA body, 331 w/ Speedmaster Stack Injection, Full Width Roll Bar with high brake lights by i.e.427, IRS, ABS, PS, PB, FAST FI, First start 3/30/20, First go-kart 7/5/20, paint by Ken Pike
So, after what seems like a lifrtime, I've managed to carpet the trunk, and started on the interior by installing insulation. Got it glued in, and started modifying the tunnel cover to accommodate the S10 tailshaft shifter location, and the handbrake relocation to the top of the tunnel. My question is, after making the new penetrations in the cover, and setting it in place, I'm finding that the outside edges of the cover will not fit over the insulation. Once the carpet is added to the sides of the tunnel it's going to be worse. I tried bending the edges out a bit, but because it's 6061 aluminum, I'm afraid to bend it too far because it will crack. Ask me how I know.
Is it just a matter of carefully flaring the edges out some more, or would I be better off making a new cover? I should probably mention that I intend to cover it with the same vinyl as the dash, so it will be wrapped under the edges making them thicker.
Why did I think this part was going to be easier than any other part of this build?
I ran the insulation up to the base of the cover and the carpet all the way up. I've slightly flared out the tunnel cover edges to it can go over the carpet. I too will be covering my tunnel cover with foam and vinyl and running into the same issues as you. I have found that raising the tunnel cover up 1/8" has helped the fit a little. I did this by riveting 3/4" x 1/8" aluminum strips to the tunnel framing. I'll see when it finally goes on but it seems a nice fit now. How are you planning on attaching the cove? I 3D printed some clips that attach to the cover then snap over the 3/4" tubes but not sure about it. I've also though about Velcro but still trying to figure it out. Thank you, Tim
Mk4 Complete Kit delivered 5/2019, Gen 2 Coyote, TKO 600, IRS, Wilwood F/R, Power steering, Halibrand 17 X 9 Front 17 X 10.5 Rear, Nitto NT555 G2 F/R
Did the same as tbl100. Its pretty easy to make a slight flair in the tunnel cover.
Kevin
MKIV #8234
Coyote '14/TKO-600/3-Link 3:55 Rear I love the smell of 100 octane in the morning.
NITTO NT01 275X40X17ZR - 315X35ZRX17
Delivered 2/7/14 - Plate "COYOTE NC1965" 3/25/15
Tim, I found that adding a piece of plywood over the aluminum will help in a couple of ways. It eliminates the issue of the tunnel cover being cut for the standard shifter location when I need it for the mid shift position, so I don't have to fix the surface for covering with vinyl. I can use a deeper cup holder if I choose because of the extra height, and location of the switches is easier since I can put one right on one of the 3/4"cross braces, and I have 3/4" to move the wire off to the side to avoid hitting the brace. The sides of the tunnel will be almost 2' high, and I'm using "InstaBind" carpet edge, so if the tunnel cover is in place, or even if I just mark the insulation how far it comes down, I can install the carpet, and allow the carpet edging to just overlap the bottom edge of the cover to hopefully give a clean looking transition. I'm going to use the 3M "Dual Lock Recloseable Fastener" to mount the tunnel cover. We'll see how "easy" it is to remove once in place! I suppose that the FFMetal, or 520 Speedworks replacement cover would make all this a lot easier, as mentioned by some of the guys above, but I just don't want to add another $100 to the build for this. My labor is cheap, and after this long, a few more days is no big thing.
Rick
Mk4 with Mr. Bruce FIA body, 331 w/ Speedmaster Stack Injection, Full Width Roll Bar with high brake lights by i.e.427, IRS, ABS, PS, PB, FAST FI, First start 3/30/20, First go-kart 7/5/20, paint by Ken Pike
Kevin, didn't see your post until I posted above. I started to try to widen the flare on the cover, but as I mentioned, in working with 6061 aluminum before for some parts I made, when I tried to decrease the bend that was put into the part, I had some bends that cracked, and eventually separated completely. I'm glad it worked for you, but knowing my luck I decided to not take the chance!
Rick
Mk4 with Mr. Bruce FIA body, 331 w/ Speedmaster Stack Injection, Full Width Roll Bar with high brake lights by i.e.427, IRS, ABS, PS, PB, FAST FI, First start 3/30/20, First go-kart 7/5/20, paint by Ken Pike
Tim, I found that adding a piece of plywood over the aluminum will help in a couple of ways. It eliminates the issue of the tunnel cover being cut for the standard shifter location when I need it for the mid shift position, so I don't have to fix the surface for covering with vinyl. I can use a deeper cup holder if I choose because of the extra height, and location of the switches is easier since I can put one right on one of the 3/4"cross braces, and I have 3/4" to move the wire off to the side to avoid hitting the brace. The sides of the tunnel will be almost 2' high, and I'm using "InstaBind" carpet edge, so if the tunnel cover is in place, or even if I just mark the insulation how far it comes down, I can install the carpet, and allow the carpet edging to just overlap the bottom edge of the cover to hopefully give a clean looking transition. I'm going to use the 3M "Dual Lock Recloseable Fastener" to mount the tunnel cover. We'll see how "easy" it is to remove once in place! I suppose that the FFMetal, or 520 Speedworks replacement cover would make all this a lot easier, as mentioned by some of the guys above, but I just don't want to add another $100 to the build for this. My labor is cheap, and after this long, a few more days is no big thing.
ok, I see. I bought some 3M Dual Lock as well. Thanks.
Mk4 Complete Kit delivered 5/2019, Gen 2 Coyote, TKO 600, IRS, Wilwood F/R, Power steering, Halibrand 17 X 9 Front 17 X 10.5 Rear, Nitto NT555 G2 F/R


 Thanks:
  Likes:


 Reply With Quote