-
11-25-2019, 12:06 PM
#161
Senior Member

Put some of the new parts I got on...
Few questions and pics of the progress.
Instructions look like I'm suppose to mount the bracket to the F panel, but if I did, the overflow tank wouldn't fit since the bracket's base isn't wide enough. I ended up drilling and tapping a couple holes in the frame and mounted it to that. Will do the same for the lower bracket, unless anyone has any objections...

Finally got the bushings for the power steering rack so I was able to get that in. No issues with that. Still waiting
on the steering shaft.

Radiator showed up, put the fan on and hung it on with zip ties... Will mount it with the 5/8 offset.

The directions are kinda lacking, how exactly does the bottom of the radiator get supported???

Got the exhaust ball fittings. They look like they'll be nice to get it straight.

25th Anniversary Roadster #12 of 25
Gen 3 Coyote
TKO 600 mid-shift
Car
-
Post Thanks / Like - 0 Thanks, 1 Likes
-
11-25-2019, 12:11 PM
#162
Senior Member
Got the computer mount so I threw that on. Seems weird the center one can't lock down but looks like it's in there tight.

Got this with the rest of the POL list. No clue what it is? Anyone? Couldn't see where it listed any kind of mount besides the computer mount.
*** Edit, this is the charcoal can mount. ***

Got the transmission mount, driveshaft and adapter.
A mount for transmission went in no problem. Driveshaft seems good but the adapter is off.....
With one bolt in, the rest of the holes do not fit a bolt, tried them all. Tried rotating it and nothing. The adapter is about an 1/4 inch smaller diameter then the center section... So it can swing a lot with a bolt in.

This is as close as the holes will line up with another bolt in. You can clearly see it's off. Am I missing something???

Last edited by delta0014; 11-25-2019 at 01:51 PM.
25th Anniversary Roadster #12 of 25
Gen 3 Coyote
TKO 600 mid-shift
Car
-
11-25-2019, 12:44 PM
#163
Not a waxer


Originally Posted by
delta0014

The directions are kinda lacking, how exactly does the bottom of the radiator get supported???
If you do it like Factory Five says it is supported by the nose aluminum. Other options are the lower radiator support from Breeze or a homemade version of the same.
Originally Posted by
delta0014
Got the transmission mount, driveshaft and adapter.
A mount for transmission went in no problem. Driveshaft seems good but the adapter is off.....
With one bolt in, the rest of the holes do not fit a bolt, tried them all. Tried rotating it and nothing. The adapter is about an 1/4 inch smaller diameter then the center section... So it can swing a lot with a bolt in.
This is as close as the holes will line up with another bolt in. You can clearly see it's off. Am I missing something???
There is more than one center section flange (I think the difference is whether it came from a manaul or automatic car and I'm not sure which one is used on a new crate diff). FFR has adapters to both but obviously yours doesn't match the rear end you have so you'll need the other one.
Jeff
-
11-25-2019, 02:12 PM
#164
Senior Member
E-mailed FFR about the drive shaft adapter. Haven't heard back but hopefully it's just an easy swap.
Ordered the breeze lower and upper mounts too, so I guess I'll put the cooling off for a bit.
25th Anniversary Roadster #12 of 25
Gen 3 Coyote
TKO 600 mid-shift
Car
-
11-25-2019, 02:40 PM
#165
Senior Member

That center PCM connector locks into place with the lever at the center. Yours looks OK. It shouldn't have been able to push into place unless the lever was off to the side, then moving it to the center locks it into place. The lever does end up at a different location than the end ones, but it should be locked. This is my Gen 3 PCM in my Coupe build. Heavily cropped so it's a little grainy, but you get the idea.
Last edited by edwardb; 11-26-2019 at 06:36 AM.
Build 1: Mk3 Roadster #5125. Sold 11/08/2014.
Build 2: Mk4 Roadster #7750. Sold 04/10/2017.
Build Thread
Build 3: Mk4 Roadster 20th Anniversary #8674. Sold 09/07/2020.
Build Thread and
Video.
Build 4: Gen 3 Type 65 Coupe #59. Gen 3 Coyote. Legal 03/04/2020.
Build Thread and
Video
Build 5: 35 Hot Rod Truck #138. LS3 and 4L65E auto. Rcvd 01/05/2021. Legal 04/20/2023.
Build Thread. Sold 11/9/2023.
-
11-25-2019, 04:35 PM
#166
Senior Member
Thanks
Good to know.
FFR did say they are going to send me out the correct driveshaft adapter too.
25th Anniversary Roadster #12 of 25
Gen 3 Coyote
TKO 600 mid-shift
Car
-
11-25-2019, 04:51 PM
#167
25th Anniversary #9772

recently talked with Mike Forte and he said there's a newer IRS model - so you may have found the different driveshaft adapter issue... where did you get your IRS setup? from FFR? or other?
-
11-25-2019, 04:55 PM
#168
Senior Member
25th Anniversary Roadster #12 of 25
Gen 3 Coyote
TKO 600 mid-shift
Car
-
11-25-2019, 07:18 PM
#169
Senior Member

The aluminum plate with a square hole in it and the 3 screw holes is to Mount Your Vapor canister
-
11-26-2019, 06:49 AM
#170
Senior Member
I used the Breezs lower radiator mount. I really liked it EZ to install and solid you might want to check it out . I don't know if anyone uses the factory 5 overflow with the coyote but you might want to check edwardb on that one, he knows more than me when it comes to coyotes. Its just what I have seen in the past. You might want to look at the fan shroud from breezs too.
-
11-26-2019, 08:21 AM
#171
Originally Posted by
delta0014
Put some of the new parts I got on...
Few questions and pics of the progress.
Instructions look like I'm suppose to mount the bracket to the F panel, but if I did, the overflow tank wouldn't fit since the bracket's base isn't wide enough. I ended up drilling and tapping a couple holes in the frame and mounted it to that. Will do the same for the lower bracket, unless anyone has any objections...
Not sure if this is helpful but here's a picture of how we installed the overflow tank in the F panel. we just used a couple spacers to give it a little more clearance to get around the frame.

Keep up the great work!
-
11-26-2019, 08:49 AM
#172
Not a waxer
Originally Posted by
delta0014
Instructions look like I'm suppose to mount the bracket to the F panel, but if I did, the overflow tank wouldn't fit since the bracket's base isn't wide enough. I ended up drilling and tapping a couple holes in the frame and mounted it to that. Will do the same for the lower bracket, unless anyone has any objections...
That location won't work---it's too high and the hood strut will hit it. Install the hinges and you'll see.
I notice that you do not have a fan shroud. Although the Coyote isn't hard to cool I still highly recommend that you consider using one. I've used the one that Breeze offers on every car I've built. It fits, works well and is reasonably priced.
Jeff
-
Post Thanks / Like - 0 Thanks, 1 Likes
-
11-26-2019, 11:14 AM
#173
Senior Member
Thanks, was hoping someone would be able to say whether it would work or not. Guess I'll mount it lower and put some spacers on it... Or maybe ill drill and tap it on the lower frame bar and use spacers for the top one.
Ordered a bunch of stuff from Breeze, think I'll put the upper and lower radiator mount, fan shroud and radiator cowl cover.
Ordered their seat frames too. Says it fits the "classic seats". I'm hoping the 25th anniversary seats are the same?
25th Anniversary Roadster #12 of 25
Gen 3 Coyote
TKO 600 mid-shift
Car
-
11-26-2019, 11:26 AM
#174
Senior Member
They are the same seat frame just the covers are different they will fit fine.
Last edited by Garage Guy; 12-04-2019 at 05:51 AM.
-
12-04-2019, 01:33 PM
#175
Senior Member
Was pleasantly surprised by how fast Breeze shipped my parts I ordered. Think I had them 3 days after ordering.
Seat mounts, won't install them for awhile, but they look like a nice product.

FFR sent me the correct drive shaft adapter too, got it pretty quick. Still need to put some spacers in and line it up straight. Might have to cut the cross bar by the shifter. Once i move it straight, it gets really close. Has anyone not had to cut it with a mid shift?

It is starting to get really crowded in the engine bay, put the radiator on and was running the hoses, I plan on cutting and combining these two hoses, but it is tight... Probably run the steering line under it. Still need to move the tank.

Lower radiator support from Breeze... Says the radiator is suppose to be at 51 degrees. Think it's close? I used a level laser to mount it. Is the 51 degrees for the body fitting?

Plan on using this tube on the lower radiator, they sent a rubber tube but it doesn't line up very good. It is tight, looks like the steering shaft will be routed right next to it. Don't have the steering shaft yet, so can't see. Already had to move the brake line since I had too big of a bend to get it attached.

25th Anniversary Roadster #12 of 25
Gen 3 Coyote
TKO 600 mid-shift
Car
-
12-04-2019, 01:57 PM
#176
Senior Member
Originally Posted by
delta0014
Was pleasantly surprised by how fast Breeze shipped my parts I ordered. Think I had them 3 days after ordering.
Yup, thats what Mark at Breeze does. Probably the best forum vendor to work with IMO.
Originally Posted by
delta0014
Still need to put some spacers in and line it up straight. Might have to cut the cross bar by the shifter. Once I move it straight, it gets really close. Has anyone not had to cut it with a mid shift?
Assume by straight you mean a straight line between the end of the transmission and the differential? If so, straight isnt necessarily the goal. Search on the forum for pinion angle and youll get lots of discussions and how to check it. I doubt youll have to cut anything for up/down clearance. Midshift or not. Fore/aft maybe if your shifter is running into something. But not up/down.
Originally Posted by
delta0014
Lower radiator support from Breeze... Says the radiator is suppose to be at 51 degrees. Think it's close? I used a level laser to mount it. Is the 51 degrees for the body fitting?
Yes, 51 degrees is roughly the angle of the filler pieces that FF provides for in front of the radiator to the body.
Build 1: Mk3 Roadster #5125. Sold 11/08/2014.
Build 2: Mk4 Roadster #7750. Sold 04/10/2017.
Build Thread
Build 3: Mk4 Roadster 20th Anniversary #8674. Sold 09/07/2020.
Build Thread and
Video.
Build 4: Gen 3 Type 65 Coupe #59. Gen 3 Coyote. Legal 03/04/2020.
Build Thread and
Video
Build 5: 35 Hot Rod Truck #138. LS3 and 4L65E auto. Rcvd 01/05/2021. Legal 04/20/2023.
Build Thread. Sold 11/9/2023.
-
12-05-2019, 06:58 PM
#177
Senior Member

This is where I mounted mine, it fits fine without spacers. The cap is close to the frame but no issue.

Bradley
Build thread - Mk4, Coyote, IRS, Wilwood brakes, old-style soft top and accessories.
The distance between "finished" and finished is literally infinite.
-
12-08-2019, 01:42 PM
#178
Senior Member
Questions, Questions, Questions.....
Wiring is probably the one area i'm most afraid I'm going to screw something up.. Besides hooking up headlights/taillights stuff and the gauges (no dash yet), these are the only things left on wiring.
Any help is appreciated, as I'm kinda lost on these items.
Here's the wires suppose to attach to the O2 sensors on the headers. Obviously they both can't hook up without doing something, I was going to peel them apart and stretch it over to both. But when I took the wires out of the wire tubing, the red wires have a 4 into 1 split.... How do I go about hooking up both sides of the O2 sensors???

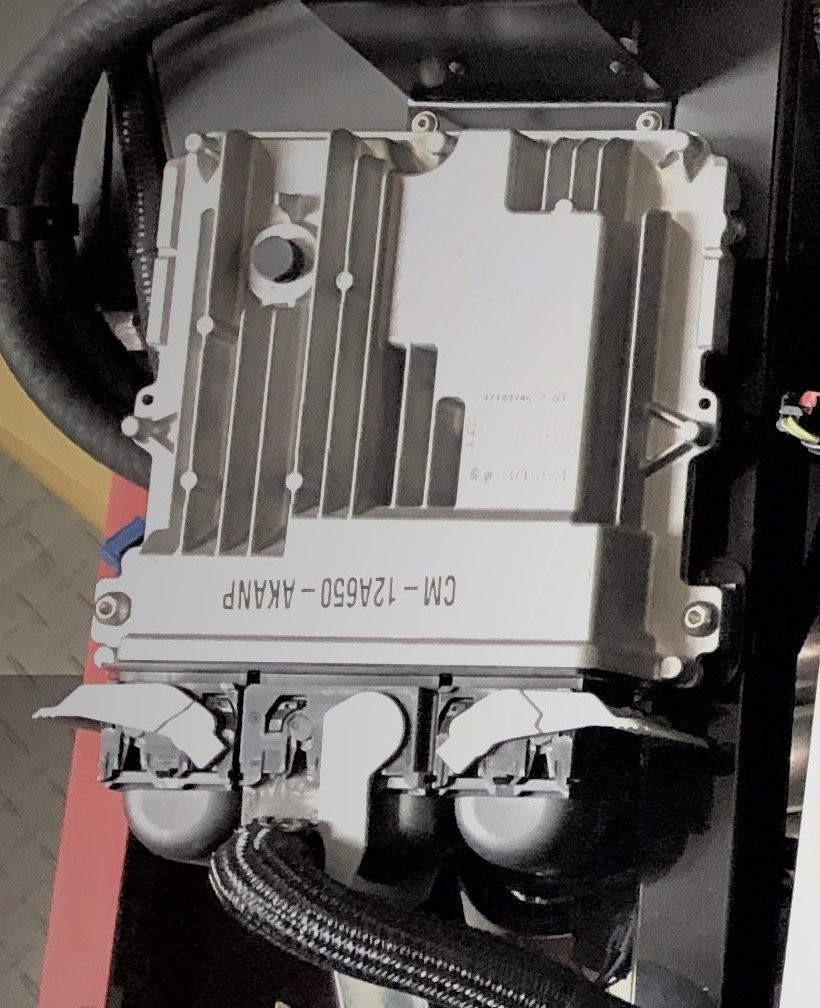
Next is to connect the tach wires so the gauges will work. Says to pull the purple wire from the sending harness, which I assume is the big wire bundle at the top of this pic? And attach to #4 cylinder. Says to attach it to the blue/red wire, but the only wires on the #4cylinder are purple and green/yellow. I assume it's the green/yellow I attach it to???
And the wire in the sending harness, I just cut that and run it to the cylinder? What happens with the rest of it?

Now these wires.
Says take the blue EFI wire and attach to the blue starter wire.
Attach the orange EFI to the green ignition trigger wire.
So I’ll attach those and just cap off the other 3?

Sorry for all the dumb questions but I've been staring at the directions, my car and the forums for too long...
Last edited by delta0014; 12-08-2019 at 03:21 PM.
25th Anniversary Roadster #12 of 25
Gen 3 Coyote
TKO 600 mid-shift
Car
-
12-08-2019, 04:58 PM
#179
Senior Member
Originally Posted by
delta0014
Here's the wires supposed to attach to the O2 sensors on the headers. Obviously, they both can't hook up without doing something, I was going to peel them apart and stretch it over to both. But when I took the wires out of the wire tubing, the red wires have a 4 into 1 split.... How do I go about hooking up both sides of the O2 sensors???
It's strongly recommended to not modify, extend, whatever, the O2 sensor wires. Mentioned in the Ford instructions plus have heard from others. What many have done, and I’d recommend, is use extensions to get the C1571 and C1572 upstream sensors connected. Caspers Electronics is a brand many recommend. Available through multiple sources, including Summit, Jegs, etc. and also direct. Assume you saw the other two (downstream connectors) aren’t used.
Originally Posted by
delta0014
Next is to connect the tach wires so the gauges will work. Says to pull the purple wire from the sending harness, which I assume is the big wire bundle at the top of this pic? And attach to #4 cylinder. Says to attach it to the blue/red wire, but the only wires on the #4cylinder are purple and green/yellow. I assume it's the green/yellow I attach it to???
And the wire in the sending harness, I just cut that and run it to the cylinder? What happens with the rest of it?
Important to differentiate wires from the Ron Francis harness (the one that came with your kit) and the Coyote controls pack harness (the one that came with your Coyote engine).
The “purple wire from the sending harness” is the purple coil-tach wire from your Ron Francis harness. Not from the large bundle you pictured. But is pictured later. The other end of that wire is attached to the tach wire on your gauge through the dash harness. The engine side goes to one of the coil on plug trigger wires, as the instructions describe. It doesn’t matter which cylinder you use. #4 is OK, but so is any other. Whatever is most convenient for your wiring layout. All the coil on plug connections have two wires. One is the same color for all. The other is a unique color for all. You want the one that’s unique.
Originally Posted by
delta0014
Now these wires.
Says take the blue EFI wire and attach to the blue starter wire.
Attach the orange EFI to the green ignition trigger wire.
So I’ll attach those and just cap off the other 3?
Again, make sure to differentiate Ron Francis vs. Coyote wires.
blue EFI wire (RF harness) to the blue starter wire (Coyote pigtail Starter Motor Request (SMR)) wire.
orange EFI (RF harness) to the green ignition trigger wire (Coyote pigtail ignition trigger) wire.
The remaining wires are the speed control wires, which you won’t use if you have the GPS gauges. The other is the tach wire mentioned earlier.
You had another question about a green fuel pump wire in the post previously, which apparently you edited out. Hopefully you found the answer. The green wire in that case was the Coyote pigtail fuel pump relay wire. That gets tapped into the fuel pump circuit in the Ron Francis fuse box you pictured previously.
Build 1: Mk3 Roadster #5125. Sold 11/08/2014.
Build 2: Mk4 Roadster #7750. Sold 04/10/2017.
Build Thread
Build 3: Mk4 Roadster 20th Anniversary #8674. Sold 09/07/2020.
Build Thread and
Video.
Build 4: Gen 3 Type 65 Coupe #59. Gen 3 Coyote. Legal 03/04/2020.
Build Thread and
Video
Build 5: 35 Hot Rod Truck #138. LS3 and 4L65E auto. Rcvd 01/05/2021. Legal 04/20/2023.
Build Thread. Sold 11/9/2023.
-
12-08-2019, 06:17 PM
#180
Senior Member
Thanks!
I will order the extension, that looks to be an easy solution.
Rest makes sense too now that you explained. Took a picture of the dang wire and still didn’t connect the dots....
25th Anniversary Roadster #12 of 25
Gen 3 Coyote
TKO 600 mid-shift
Car
-
12-10-2019, 05:20 PM
#181
25th Anniversary #9772
surprised the extension doesn't come as part of the kit...
-
12-10-2019, 05:51 PM
#182
Senior Member
Originally Posted by
toadster
surprised the extension doesn't come as part of the kit...
Yea, me too. Should of been included in the Coyote option since there was no chance of it reaching. Ordered one for $33 though, so not a huge deal if it works.
25th Anniversary Roadster #12 of 25
Gen 3 Coyote
TKO 600 mid-shift
Car
-
Post Thanks / Like - 0 Thanks, 1 Likes
-
12-10-2019, 07:34 PM
#183
Senior Member
Originally Posted by
delta0014
Yea, me too. Should of been included in the Coyote option since there was no chance of it reaching. Ordered one for $33 though, so not a huge deal if it works.
The wiring harness, including the O2 sensor cables, are quite different between the Gen 2 Coyote and the Gen 3. Plus where you mount the Coyote components (there are multiple possibilities) will affect the O2 sensor connections. So one size doesn't fit all, and a reason for not including.
Build 1: Mk3 Roadster #5125. Sold 11/08/2014.
Build 2: Mk4 Roadster #7750. Sold 04/10/2017.
Build Thread
Build 3: Mk4 Roadster 20th Anniversary #8674. Sold 09/07/2020.
Build Thread and
Video.
Build 4: Gen 3 Type 65 Coupe #59. Gen 3 Coyote. Legal 03/04/2020.
Build Thread and
Video
Build 5: 35 Hot Rod Truck #138. LS3 and 4L65E auto. Rcvd 01/05/2021. Legal 04/20/2023.
Build Thread. Sold 11/9/2023.
-
12-14-2019, 07:26 PM
#184
Member

Love this thread!!!!!! Taking lots of notes so I don't ask the same questions. This forum is probably one of the nicest Ive been on. Really knowledgeable and professional.
-
Post Thanks / Like - 0 Thanks, 1 Likes
-
12-16-2019, 01:31 PM
#185
25th Anniversary #9772
Originally Posted by
nelsond003
Love this thread!!!!!! Taking lots of notes so I don't ask the same questions. This forum is probably one of the nicest Ive been on. Really knowledgeable and professional.
agreed, if it would only be online day to day - the site has been ultra flakey lately!
-
12-16-2019, 03:48 PM
#186
Senior Member
Ordered a several cans of car touch up paint, just to start looking at colors. Might order a few more colors too.
Thinking of doing black with some type of grey/silver/matte black stripes.... But that might change.
Got a box of stuff from FFR today too. Was hoping to get my fuel tank, but no luck. Got steering shafts/joints and passenger roll bar.
POL list is getting smaller, but still has some major things on it (Fuel tank, Rear IRS parts, Shocks, Dash)

25th Anniversary Roadster #12 of 25
Gen 3 Coyote
TKO 600 mid-shift
Car
-
Post Thanks / Like - 0 Thanks, 2 Likes
-
12-17-2019, 05:57 PM
#187
25th Anniversary #9772
-
12-17-2019, 06:57 PM
#188
Senior Member

MK4 #8900 - complete kit - Coyote, TKO600, IRS - Delivered 6/28/16 First Start 10/6/16 Go cart - 10/16/16 Build completed - 4/26/17 - 302 days to build my 302 CI Coyote Cobra - Registered and street legal 5/17/17
Build Thread
http://thefactoryfiveforum.com/showt...e-build-thread
PHIL 4:13 INSTAGRAM - @scottsrides
-
12-17-2019, 08:59 PM
#189
Senior Member
Originally Posted by
wareaglescott
Green!!
Ha, I was looking at doing some kind of an accent color.. But I think i'm gonna pass on that. Didn't like that green anyways.
25th Anniversary Roadster #12 of 25
Gen 3 Coyote
TKO 600 mid-shift
Car
-
12-20-2019, 05:02 PM
#190
Senior Member
Kinda nice to see the steering wheel on it now. The steering shaft showed up a few days ago, so I was able to get that all done.

The lower radiator hose was too close I thought to the pulley's and steering shaft, I so bought a 90 degree hose that seems to work well to keep it away from that stuff.

Had to cut the cross bar to get the transmission to bolt up to the A frame with the mid-shift location. I'll brace it on the back side.

I have this mess of wires still. I don't believe I need them, there's 3 ground wires, was gonna hook those up to the frame for the heck of it and cap off the rest....?

Not sure about the cooling fan hookup. This wire is really short, is this the right one to hook up to the cooling fan? And ground the other side...

25th Anniversary Roadster #12 of 25
Gen 3 Coyote
TKO 600 mid-shift
Car
-
12-20-2019, 05:53 PM
#191
The electric choke wire is a handy wire to keep around for a switched 12v accessory.
-
Post Thanks / Like - 0 Thanks, 1 Likes
-
12-21-2019, 02:21 PM
#192
Senior Member

Originally Posted by
delta0014
The lower radiator hose was too close I thought to the pulley's and steering shaft, I so bought a 90 degree hose that seems to work well to keep it away from that stuff.
The bottom hose looks fine, Hopefully you roughed up the stainless flex hose, to create a better surface for the rubber hose to grip, under the clamp. Some builders put a small stainless screw through the stainless hose, at that point, so the head of the screw would act as a kind of a lip, to help prevent the rubber hose from slipping.
Your upper hose set up is not ideal, in my personal opinion. I'd have been tempted to use a single rubber hose from the engine, directly to the T-filler, rather then the stainless flex hose, and the FFR hose connector, as shown. Did you use that connector because of a step in size? If so, you can actually get a rubber hose that has that step. This avoids one less clamp, and potential for a leak, and may look a little tidier as well.
If your going to keep it as shown, again, rough up the stainless hose at either end, to help prevent slipping under the clamps. A file works well for this.
Hint-If using those chrome hose clamp covers, try to install them so the clamp screws are on the underside.
-
12-22-2019, 10:59 PM
#193
Senior Member

I just posted the same question about the coil, tach, speedo etc. wires. I suppose I have my answer. Thanks. Build is looking great.
Last edited by MSumners; 12-22-2019 at 11:01 PM.
-
12-23-2019, 07:08 AM
#194
Senior Member
Originally Posted by
MSumners
I just posted the same question about the coil, tach, speedo etc. wires. I suppose I have my answer. Thanks. Build is looking great.
Thanks, hopefully my questions will help someone.
Wiring is not my favorite part. Most of it is labeled pretty well, but the stuff that isn’t, I’m kinda lost on.
25th Anniversary Roadster #12 of 25
Gen 3 Coyote
TKO 600 mid-shift
Car
-
01-04-2020, 08:43 PM
#195
Senior Member
Havn't touched the car in a few weeks, FFR said it'd be a couple more weeks before I see any additional parts...
But I did get a cool keychain from them today.

25th Anniversary Roadster #12 of 25
Gen 3 Coyote
TKO 600 mid-shift
Car
-
Post Thanks / Like - 0 Thanks, 2 Likes
-
01-13-2020, 02:03 PM
#196
Senior Member
Received my Upper and Lower control arms for the rear IRS. Was able to get them and the brakes on.
Just need to finish torquing it all down and run the brake / e-brake cables.
Just waiting on the shocks, fuel tank and dash now.

25th Anniversary Roadster #12 of 25
Gen 3 Coyote
TKO 600 mid-shift
Car
-
01-13-2020, 06:35 PM
#197
25th Anniversary #9772
looks great! can't believe you're still waiting on shocks, fuel tank and dash!!!
fortunately - I got an aftermarket tank so I won't be waiting for that... but shocks and dash? I thought the dash was custom for the 25th cars? You'd think 25 of them were already made?
-
01-15-2020, 01:03 PM
#198
Senior Member
This might be obvious to some... But the rear sway bar bracket attaches to the toe arm and lower control arm bolts. So make sure you put it on while you're attaching all the rear suspension. I put the rear suspension all on, tightened it down, then realized I had to take it apart to get the brackets on... Not the most accessible bolt locations either if you don't have a lift.

25th Anniversary Roadster #12 of 25
Gen 3 Coyote
TKO 600 mid-shift
Car
-
Post Thanks / Like - 1 Thanks, 1 Likes
-
01-15-2020, 01:05 PM
#199
25th Anniversary #9772
Originally Posted by
delta0014
This might be obvious to some... But the rear sway bar bracket attaches to the toe arm and lower control arm bolts. So make sure you put it on while you're attaching all the rear suspension. I put the rear suspension all on, tightened it down, then realized I had to take it apart to get the brackets on... Not the most accessible bolt locations either if you don't have a lift.
I've heard this a few times now - good to note this so you're not backtracking!
-
01-15-2020, 01:26 PM
#200
Senior Member
The rear sway bar instructions aren't in the manual, have to download them separately from factory five's website, so it's pretty easy to miss.
25th Anniversary Roadster #12 of 25
Gen 3 Coyote
TKO 600 mid-shift
Car
-
Post Thanks / Like - 0 Thanks, 1 Likes


 Thanks:
  Likes:


 Reply With Quote

