-
Subaru SSM to Can-Bus Convertor DIY
Creating a thread for my SSM to Can-bus convertor. It will be driven by an arduino Uno and utilize an MC33660 For the K-Line SSM communications and an MC2515 for Can-Bus. I will also be utilizing some of the extra channel on the arduino to bring in the blinkers, high-beam, and oil pressure and serve them up to a digital dash over OBD-II adapter.
My first disclaimer is that while I work with automation and code for a living, It's of a much different nature than what I'm taking on here. I'm not an electrical engineer and have no background in electronics, so be wary of anything I'm doing until I've posted final results that it is all working. If you see me doing something totally wrong, please let me know and save me some heartache.
I'm basing my build off of a youtube video that appears to have accomplished almost exactly what I'm hoping to do:
https://www.youtube.com/watch?v=vfkFrv7F5E4
And what appears to be the associated GitHub project:
https://github.com/matprophet/subduino
However neither the video nor the GitHub site explain the hardware side of things.
Based on the libraries used in the code it appears that a MC33660 is being used the SSM communications. They seem pretty hard to find but are available on mouser (https://www.mouser.com/ProductDetail...JnL4W0Y%2Fnssf) however they are in a SIOC form factor and won't fit on an Arduino, so I ordered a SIOC to DIP adapter (https://smile.amazon.com/gp/product/...?ie=UTF8&psc=1) that I hope will get me connected.
The code also uses an MC2515 for CANbus communications which seems to be very common. I'm using a standalone card rather than a shield because it is easier to breadboard with.
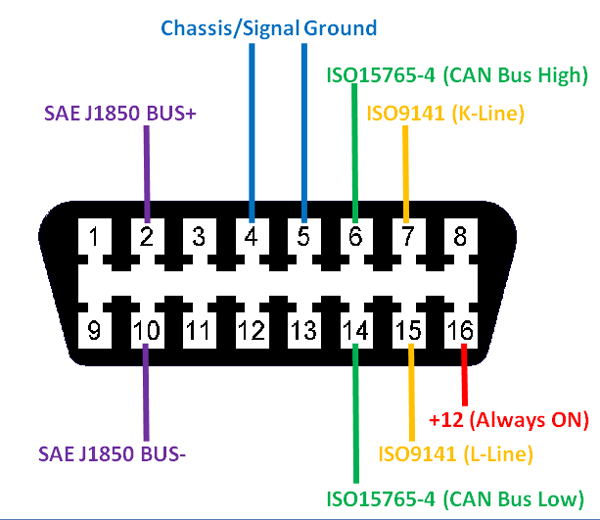
Today I wired up the MC2515 to the Arduino according to the upper half of this diagram:

from here (https://www.electronicshub.org/ardui...-bus-tutorial/) and then hooked up a OBD-II port with the CanHi from the MC2515 connected to pin 6 and CanLo connected to pin 14. I also supplied 12+ from a power supply to pin 16, and then connected ground from my power supply and the arduino (which is powered from USB) together and put them on pins 4 and 5.
I utilized the code from the GitHub above to try and simulate OBD-II CANbus data and read it with a ELM adapter on my phone, but I was never able to pickup any data. I'm not sure if it is a code issue, a wiring issue, or both. I'm way above my head here, but hopefully can make some progress soon.
Last edited by Ajzride; 11-14-2019 at 11:15 PM.
-
Update 03.18.2020
Made a fork on GitHub to track my work, current files are located at:
https://github.com/alan-polk/subduino
Last edited by Ajzride; 03-18-2020 at 02:30 PM.
-
Rev 2 is in the books Updated on GitHub. Removed all of the lag that was in Rev1, added physical inputs fo rOil Pressure, left blinker, right blinker, hi beams, and check engine light. Also upgraded an an Arduino Mega for more hardware serial ports. See Post #18 for details.
Last edited by Ajzride; 04-22-2020 at 09:55 PM.
-
-
-

Yes, I love Technology

-
Senior Member

AJZ, I once thought about doing a SSM (Subaru Synchronous Monitor) to CANbus network.
I found a bluetooth SSM converter that goes to a tablet app. So i decided not to do it.
Below is is a picture of my electronics work bench that I haven't touched in a year.
canbus.jpg
Upper left is two maga boards with CANbus shields. On the right is a 16 cell active BMS board. In the middle is a board I designed that has 3 CANbus ports, A dozen isolated 12v I/O, 3 rs232 serial ports, 16 5v analog I/O, a RTC and a USB host port. I do hardware and software. Let me know where I can help.
Bob
PS: did you get the Throttle body?
Last edited by Bob_n_Cincy; 11-16-2019 at 12:35 AM.
-
Bob
The throttle body showed up a few days ago, Until I get my new ECU installed I can’t test it.
With regards to BTSSM, it’s good for an extra display, but not flexible enough to fully replace a gauge cluster, which is my goal. I hope to use RealDash or equivalent for my only interface to the car.
-
Art suggested I try moving on to something I know I can prove works or does not work, so now that I have my SOIC to DIP board I wired up the MC33660 chip to see if I could read any SSM data out of the ECU. I basically spent several hours getting it all wired up because I'm really slow at soldering, reading circuit diagrams, and Subaru lables their OBD2 port backwards from everyone else. I I think I finally have it wired up as follows:
MC33660
PIN1 - 12V from my power supply
PIN2 - NC
PIN3 - Ground for power supply and also Arduino signals
PIN4 - ECU C16
PIN5 - Arduino TX
PIN6 - Arduino RX
PIN7 - Arduino 5V
PIN8 - Arduino 5V
Nothing smoked when I turned on the power supply, so that is a good first step. Something is wrong with the Arduino program I grabbed from the GitHub link above, it won't even print the setup comments to serial. I'm too tired tonight to troubleshoot it, so maybe tomorrow I'll have some time before church, ir not Thursday.
-
Nothing smoked yesterday, but that means nothing today
I had to borrow some alligator clips from my breadboard setup to work in the garage, and when I went to clip things back together, I got the 12V meant for the ECU clipped into the 5V meant for the UNO, so I smoked the UNO. Second time in the last few weeks I've sent 12V through a 5V channel. So I'm down for a few days while I wait on another Uno (I ordered 4 this time). I took some of my time to draw up how I have things wired up on the breadboard.
IMG_0473.jpg
The OBD-II port shown on my drawing is for CAN-BUS, it is not the OBD-II that the ECU hooks into, that will T off of the purple line on C16 of the ECU.
Chassis and 12+ IGN are being provided by a 12V power supply while on the bench.
Last edited by Ajzride; 11-23-2019 at 03:18 PM.
-
I have not worked on this directly for a couple of weeks now while I focused on the shifting linkage, and at nights I've been taking an online course on the Arduino to help me make progress when I return to it. Today I had to go to the pick and pull to get some caliper brackets so I took the time to search out a Subaru with an ECU similar to mine and cut off the harness plugs so I can make myself a bench unit to test communicating with. This is my smoked ECU, it might not run the car but it powers up and communicates with ROMRaider.
BENCH_ECU.jpg
-
After discussing with Art, I had a few wiring issues to fix, new diagram attached.
84515C1B-ABB0-48F7-B3FA-76BCC3E8F05C.jpeg
-
I was able to establish communications from the Arduino to the ECU utilizing the diagram above. My smoked ECU isn't good for much, but it will communicate and pass back and forth some parameters with ROMRAIDER. For my simple test I was able to read the same value for battery voltage as ROMRAIDER (~9V). Now that I know I can communicate without smoking anything, I'l bring my good ECU inside and start using a potentiometer to vary some sensor values.
I also realized that I had the MC33660 chip oriented wrong, the printing on it is so tiny I could only find the dot marking pin1 by zooming in and taking a picture with flash:
MC33660.JPG
Yes, my soldering is even uglier than my welding.
Since my ECU is daamaged it only reads 9V, even if I supply 14V. However it serves the purpose of today's test.
SerialMonitor.JPG
I'm going to create a fork on GitHub and upload my arduino files there, I'll post the link once I get that done.
-
I haven't touched this in months as I have been focusing getting the car mechanically ready for a track day Saturday, however yesterday I ran a broken drill bit through my thumb (not related to car activities) and got 4 stitches as a memento. So relegated to light duty, I took this up again today.
Unfortunately I have nothing to report. I was able to read some more SSM parameters, and determine that I can't read them on pins 6 and 7 like my drawing shows. I can only get them to read on 10 and 11. It has to do with the way the Uno handles interrupts only on certain pins. However since 11,12, and 13 are required for the CAN-BUS port, I'm thinking I might have to upgrade from an Uno if I want two software communications channels. I have to do more digging on this. I actually spent most of the day wasting time trying to get a can bus message from my arduino into my iPad or laptop via several different ODB-2 readers. I just went in circles and after 7 hours had zero successful messages. Hopefully starting fresh tomorrow morning will get me somewhere.
Last edited by Ajzride; 03-13-2020 at 08:11 AM.
-
Yes, I love Technology
I've been naughty too, playing in the garage instead of on the computer. Nothing new on with the Arduino here either. It's all connected together on the workbench but just sitting there. Often just a day away from programming problems seems to be the solution. Brain works in the background and on the next session things happen. Keep at it.
-
So today's update is that I finally have all of the parameters I want reading from the ECU into arduino and printing out on a serial port to read.
This actually consumed 3 days of time due to the fact that I couldn't read the odometer and cruise settings because their address in the ECU was greater than 255, and i didn't understand how to send it to the ECU properly. Turns out the solution was simple, but since I've never worked with real code before, it took me a while to figure it out myself.
I have created a GitHub fork of the initial subduino project to track my work, link is in post #2. The code I am running now is much simpler to follow and modify than the code I forked from, but it is probably not as efficient.
Next I will focus on writing the data into the RealDash software. After joining the RealDash forum and looking through their messages, I'm going to talk serial over bluetooth to the tablet, rather than going through the can bus. Updated sketch attached.
9FBE2004-543F-42D9-B54E-3C7CB007A28C.jpeg
Last edited by Ajzride; 03-18-2020 at 02:58 PM.
-
Post Thanks / Like - 0 Thanks, 1 Likes
-
Today I was able to jump through some hoops and get data all the way from the ECU, to an old phone running RealDash. Turns out the bluetooth chip I bought will not communicate with an iOS device (thanks to apple), so I had to dig up a 4 year old Samsung, reformat it, and get real dash installed on it.
i have a few variables that are not working (odometer and boost), but until I get a device with a bigger screen so I can easily troubleshoot, I will be sitting this aside. I've ordered a new bluetooth chip that is iOS compliant, so I will be able to run real dash on my iPad Pro soon, then I can dig into what parameters the program is looking for and see where I have my mappings off. I've added into GitHub the xml file for RealDash that converts the Can Packets to Target IDs for the software.
Once I get the new bluetooth chip, I should be able to up the bus speed from 9600 to 115200 and hopefully kill the lag on the tachometer.
I'll also note that I'm not able to get serial communications to work on the analog pins, although I'm supposed to be able to. For now I'm using 0 and 1 on the digital side, but that means I have to unplug the USB port while I'm connected to the bluetooth. If I can't work out the serial over analog pins, I'll just upgrade the Arduino from a Uno to a Mega. It's only $12 and the Mega has 3 hardware serial ports plus more IO for my additional inputs and electric parking brake controller.
Last edited by Ajzride; 03-19-2020 at 06:32 PM.
-
I'm not going to lie, this particular project has consumed way more hours of my life in the last week than I would ever admit to anyone. I got around to installing the new bluetooth module and upgrading to an Arduino Mega with an extra hardware serial port so I could start testing the program out on my iPad Pro. Unfortunately it was still super laggy and looked terrible. I decided that the issue was probably my code since RomRaider logger updates super fast. I knew the code that I had written was not efficient, because I had made it easy to follow, reverse engineer, and troubleshoot. So I decided to step away from my program, take what I had learned, and revisit the code that I had forked from on GitHub. I knew the code that I had forked from was written to be efficient, because it was damn near impossible to reverse engineer. Everything was a pointer, a memory copy, or a loop. There were very few variables, very few print statements, and I couldn't make heads or tails of it.
To start with, I just loaded into my arduino to see what did and didn't work. What did work was reading about 8 values, which were in a data set called SSMSet1Read. The program was intended to read another 163 values in data sets called SSMBlock1Read and SSMBlock2Read, but hose were not populating. As someone who has never worked on true code before this project, it took me almost 8 hours to finally trackdown that there was a hard coded variable that was basically preventing block1 and block2 from ever being read. Once I got that variable to working, I could see the program trying to update block1 and block2, but the values kept coming back as 255 for every parameter. I spent another 2 days trying to figure out why the block reads would not work, I even went back to my easy to troubleshoot code and realized that I could not do block reads either. Finally I gave up and posted on the RomRaiders forum, and someone was able to point out that block reads were not intended to get live data from the ECU, they were intended to flash the ECU and read configuration data. With that knowledge in hand, knowing that I would have to do multi-point address reads, I went back and started trying to expand the SSMSet1Read to get all of the parameters I wanted. I could get most of the, but the odometer and cruise control values are in the 265-271 address range, since this is higher than 255, it requires a 2-byte address instead of a 1-byte address, and the code I was working wasn't set up for that. After spending a full day trying to get the code built around pointers and copies to handle 2 byte addresses, I finally decided to give up on that, and go back to my code, which could handle 2 byte address and try to apply some pointers to it, and speed it up.
Turns out I should have just done that from the beginning, it only took me about 6 hours to rework my code until it was quick enough that you can't see any noticeable lag on the display. I even managed to leave in all of the necessary debugging statements and have them just never execute unless you uncomment 1 definition. I have also added in reading the physical Arduino IO for blinkers, high beams, check engine light, and oil pressure.
Code will get uploaded to GitHub in the next day or so when I finish commenting the code. Here is an updated wiring schematic for the Arduino Mega with the HM10 bluetooth module:
35EDE0C2-9A8F-4664-8E9F-051B2B1BC1EB.jpeg
And video of the interface running. Blinkers, Hi Beams, and Check Engine light are triggered by ground signals, which is what my Coach-1 wiring system uses for everything. If you want to tie them into a factory Subaru Harness, then you would need to use 12V to 5V voltage step downs before bringing the signal into the arduino or use a relay to convert the 12+ to 12-.
Last edited by Ajzride; 04-22-2020 at 10:15 PM.
Reason: File
-
Post Thanks / Like - 0 Thanks, 3 Likes
-
Yes, I love Technology
Very nice job. Don't think for a second your programming timeline is different from most people. Until you've been down the same road a bunch of times, from my experience every step is another education, and backtracking is a constant.
-
Post Thanks / Like - 0 Thanks, 1 Likes
-
If anyone is planning to take this project on, I have 20 of the MC33660 chips, it was much cheaper to order them bulk. Shoot me a PM here or email [email protected] and I'll throw a couple in the mail for you.
-
So it turns out that getting the Arduino communication was just half the battle. Once that was done I had to figure out exactly how to get all the data to a gauge cluster. I knew that I wanted to use an Android device because it is so much easier to customize it to launch the app automatically, turn the screen on and off based on power states etc. The biggest thing that threw a monkey wrench in the plans was that I decided I didn't want to depend on bluetooth for communications, and I wanted to go wired. The first hurdle was getting the arduino to talk to my tablet over a serial cable instead of bluetooth. I ordered an android specific serial adapter from Startech, and my tablet wouldn't even detect it. So I tossed that to the side and just grabbed a regular FTDI serial to USB cable I have work, and the tablet recognized it and could see data coming from the arduino, but all of the data was wrong, like the signal was corrupted. It took me almost a week to finally figure out the correct search terms and learn that computers, modems, and PLCs talk RS232 over 24V signals, and Arduinos and other microprocessor talk over 5V signal. I mean, I knew there was a voltage difference between them, but I always assumed the FTDI cable handled the translation. It turns out that a standard RS232 from FTDI (or prolific) does not do that type of translation, and so it doesn't properly interpret the 1 and 0 because they are not high enough and low enough. What I needed was a USB to TTL 5V cable. Having solved that issue I moved on to what I thought would be the easy part, putting in a USB splitter so I could charge and communicate at the same time. It turns out that only very certain tablets support "USB HOST" and Charging mode at the same time. And even the ones that do, tend to vary between firmware revisions. After going through 4 tablets in 3 weeks, I wound up with a DragonTouch X10. It's about 2 years old, but what is so special about it is that it has a full sized USB port for peripherals and a micro USB for charging. This meant I didn't have to get some voodoo witch involved to make USB Host mode and charging work. After I had a tablet that was working I started to think about how to mount it, 90 degree adapters, 3D printed frame for it to snap into, 3D printed bezel to hide the tablet... not impossible, but a random Youtube video that hit my feed let me to a far more practical solution:
https://smile.amazon.com/Hikity-Andr...1672718&sr=8-1
61iDcugWUVL._AC_SX679_.jpg
It will run the apps I need, will power on and off with the car, can hook up the lights to it so it auto-dims, has built in GPS input, dual USB inputs, and mounting it will be as simple as hacking up a double din radio kit to fit into the dash opening. And it costs less than any of the tablets I went through. I will mount it in the gauge housing with no speakers and set it to auto launch real dash. It might be a head unit, but I will not use any of the audio capabilities of it.
Hopefully all of my rambling will help out someone else who decides to go down this road in the future.
Last edited by Ajzride; 06-08-2020 at 10:28 PM.
-
Post Thanks / Like - 1 Thanks, 3 Likes
-
Yes, I love Technology
Well you have earned your pay on this project for sure. Perseverance is golden.
-
This project is awesome! I'm also using an android head unit in my car, but I'm not sure I've got the coding and electrical knowledge to make this setup work. I've done several DIY raspberry pi projects, but this is another level. It's really tempting for me to try it though because OBDII support is difficult with my JDM Subaru ECU so I pretty much have to use only apps/software that can support SSM.
Also, realdash looks so much better than the Torque Pro setup I currently intend to use for my extra gauges. Nice work!
-

Originally Posted by
lsfourwheeler

This project is awesome! I'm also using an android head unit in my car, but I'm not sure I've got the coding and electrical knowledge to make this setup work. I've done several DIY raspberry pi projects, but this is another level. It's really tempting for me to try it though because OBDII support is difficult with my JDM Subaru ECU so I pretty much have to use only apps/software that can support SSM.
Also, realdash looks so much better than the Torque Pro setup I currently intend to use for my extra gauges. Nice work!
You should try it. It's not very expensive to give it a go, less than $40 for all of the components, and if you use my code from GitHub, it's pretty well labeled and easy to modify if you want different parameters. The hardest part will probably be soldering the MC33660 on the SOIC adapter board. I'll be happy to talk you through any issues over the phone.
-
Post Thanks / Like - 1 Thanks, 0 Likes
-
Quick vid of the android head unit hooked up to an arduino running simulated data. I powered it from a little router 12V power supply, this is going to work perfectly. Started working on a temporary mount to put it in the car until I mount the dash.
-
Post Thanks / Like - 0 Thanks, 1 Likes
-
Never uploaded a video of the displays I worked up for the car. The last one in this video (Orange and Black) is what I envision using 90% of the time
Last edited by Ajzride; 08-26-2021 at 06:57 AM.
-
Post Thanks / Like - 0 Thanks, 3 Likes
-
Senior Member

Looking for some help to get this going on my car using an Arduino Due. The Due microprocessor runs at 3.3V and therefore can't handle 5V inputs. The MC33660 is powered by 5V which I can get from the Arduino board - no issue there. However, the Tx/Rx thresholds of the MC33660 are referenced to that 5V supply which means it will be driving the Arduino's serial interface with up to 5V. Is this a problem? Is there a workaround? Or do I just buy an Arduino Mega (can handle 5V inputs) and move on?
Thanks.
Links:
https://www.google.com/url?sa=t&rct=...iOwPKa1N8kHGXf
https://www.arduino.cc/en/Guide/ArduinoDue
-
I think a logical AND gate would work.
https://www.mouser.com/ProductDetail...N0I8NqkA%3D%3D
For the Arduino Rx/MC33660 TX; Supply Vcc at 3.3v and input 1 at 3.3v constant from the Arduino. Let the TX of the MC33660 go to input 2. This will cause the AND gate to pulse the TX at 3.3v back to the Arduino. You are probably fine doing nothing to the Arduino TX / MC33660 Rx as the 3.3V should be higher enough over 2.5 to trigger the MC33660.
-
Senior Member
This is a circuit I use to convert 5-volt signals to 3.3 volts.
3_v_3.jpg
-
Senior Member
Thank you AJ & Bob. It looks like either part would work for this purpose. I'm going to use the AND gate simply because I already have a few VSOP to DIP interposers. Wish me luck with the soldering...
-
Ajzride,
I have been re-reading a lot of your build thread after you hooked me up to the Coach-1 wiring package. Since I will be using a JDM ECU and JDM EJ205 (non CANBUS), I am trying to see how this will work and what translator is needed to get to the Android device. Any insight you have would much be appreciated.
Bill
-
The arduino laid out in this thread should work as a bridge between the JDM ECU and an Android device.


 Thanks:
  Likes:


 Reply With Quote

