-
Senior Member

Spent some more time in the garage this week. With the help of a friend, we were able to press out the rear hub studs and press in the new 1/2-20 studs without too much trouble. This allowed me to finish up the rear suspension install and rear Wilwood brakes. The left and rear drive shafts needed a little persuasion to get completely seated in the IRS differential but seated in just fine. I then installed the brakes and parking brakes, torqued everything to spec and marked bolts accordingly. I then ran the parking brake cable and noticed that the cable just kinda sits in the bottom bracket. Shouldn't there be a clip or something to hold it in place? The manual doesn't call out anything and the Wilwood directions are silent on it too. The Wilwood caliber e-brake adapters are made of mild steel and already had a nice coating of rust so I cleaned those up and hit them with a coat of POR-15.
IRS and rear brakes complete.
PS Rear brakes.jpg
Rear E-brakes missing a clip? What holds these in place? Upper E-Brake adapter is in paint.
PS rear parking brake.jpg
Thanks!
Mk IV Roadster #9749, Kit received Jan 2, 2020, Blueprint SBF 347 TKO600 Holley Sniper EFI, Dual roll bars, IRS, 17" Halibrand, Nitto 555 G2 245, 315 Road legal Oct 20, 2020
-
Senior Member
Lots of progress and lots of challenges since my last update. I spent a lot of time working on the RT drop trunk mod. I quickly realized I can't cut a straight line with my jig saw or cutting blade on my 4" angle grinder so I had to come up with a better plan. Fortunately, I intend on covering the trunk with carpet so I'm hoping most of my mistakes will be covered up.
I rough cut an expanded opening for the fuel pump per Boss 427 Build. Then I used my wood working skills and set up a flat square jig for my router to use.
Square setup.jpg
Routing square.jpg
I then cut a panel cover from the excess material removed from the drop trunk mod. I rounded the corners and then secured with 10-24 rivnuts
Access panel complete.jpg
I moved on to installing the EdwardB parking brake mod with the Lokar clevis. I read his thread a couple of times and this looked like something easy to do. 6 hours later I finally had it installed. Whew, my metal working skills are no where near his. Regardless, I am learning new skills and I was able to get it installed and seems to be working quite nicely. The wheels lock up nice and tight. I'll keep an eye on the brake cables and adjust as necessary.
E brake missing nut.jpg
E brake installed.jpg
Finally, my wheels showed up today, so I had to try them on for a fit check.
New wheels RF.jpg
New wheels RR.jpg
Next up are fuel system and brake lines. Fun times ahead!
Mk IV Roadster #9749, Kit received Jan 2, 2020, Blueprint SBF 347 TKO600 Holley Sniper EFI, Dual roll bars, IRS, 17" Halibrand, Nitto 555 G2 245, 315 Road legal Oct 20, 2020
-
Senior Member

You're making great progress, Frank!
MKIV Complete Kit #9494 l Delivered 1/5/19 l First Start
11/28/20 l First Go-kart
4/11/21 l Carb'd 347 l Mid-shift TKO600 l 3.55 IRS l P/S l Forte Mechanical Throttle Linkage l RT Turn Signal, Drop Trunk l Breeze Upper/Lower Radiator Support, Fan Shroud l Boig Upper/Lower Cool Tubes & Quiet Pipes l 18" FFR Gasser Wheels l
Build Thread
-
Senior Member

Originally Posted by
VAHokie

You're making great progress, Frank!
Thanks! Yes, being retired allows me to work on it each day (doing on line research, running to the Ace or Fastenal for hardware, ordering parts, etc) As you know there is always something to work on.
Mk IV Roadster #9749, Kit received Jan 2, 2020, Blueprint SBF 347 TKO600 Holley Sniper EFI, Dual roll bars, IRS, 17" Halibrand, Nitto 555 G2 245, 315 Road legal Oct 20, 2020
-
Post Thanks / Like - 0 Thanks, 1 Likes
-
Nice! I like how you're getting the pieces out of different builds to build your own, unique car that is what you want.
-
Post Thanks / Like - 0 Thanks, 1 Likes
-
Senior Member
Fuel system, brake lines and more.
Making more progress. My fuel hanger, fuel pump and filter showed up last week from Pro-M. I opened the boxes and no instructions, so off I went to their web site for tech support. Nothing too helpful there so I tried calling them but got voice mail. Oh well, how hard can it be? Turns out its pretty darn hard if you've never done it before! I had the hanger and fuel pump apart several time before I got it assemble correctly and so that the sock would stay on. Then I modified the fuel tank so that I can get the fuel pump inserted. No way that thing was going in without a bigger opening. Anyway, after several hours I was able to get it assembled. What a PIA.
I labeled the supply and return lines so I won't get confused in the future.
Fuel tank and filter.jpg
I also mounted the filter with 4 SS 5/16 SS bolts. I had to flip the mounting bracket upside down to mount it.
Fuel filter mounted2.jpg
Next I decided to try my hand at bending the Ni-Copp hard fuel lines. I bought 4 5' sections from NAPA and quickly went through two of them making bends where I didn't want them to be. Sigh. Eventually I got to something that looks acceptable. Note the ruined lines on the floor.
Fule line mock up.jpg
I then finished up this section with cushion clamps rivnutted to the frame. I need to buy two more sticks of Ni-Copp and I'll finish off the front section.
Fuel line mounted.jpg
I also made a trip to Lowes and picked up some parts for the charcoal fuel vent. The pet store had these nice charcoal packets in a mesh filter which seemed ideal to fit in my snappy canister.
Fuel vent parts.jpg
Here is a picture of the outlet.
I tested it by trying to blow through it. It takes a little bit (not much though) of effort. How much back pressure should there be?
Fuel vent.jpg
Fuel vent outlet.jpg
I also fabricated a bracket to mount the brake reservoirs on. I staggered the mounts to achieve ~1.25" spacing between the canisters.
Reservoirs mounts mock up.jpg
Reservoirs mounted2.jpg
I plan on mounting the bracket to the bottom of the 3/4 tube with rivnuts. How close to the pedal box should they be mounted? I was thinking of just splitting the distance between the F panel and the pedal box. Does it matter?
Thanks for reading!
Mk IV Roadster #9749, Kit received Jan 2, 2020, Blueprint SBF 347 TKO600 Holley Sniper EFI, Dual roll bars, IRS, 17" Halibrand, Nitto 555 G2 245, 315 Road legal Oct 20, 2020
-
Senior Member

You're making great progress. One hint. Watch the location of where you're mounting those reservoirs. Too far forward and you'll interfere with the hood gas struts when the hood is closed. Keep the reservoirs inside 12-inches max (a little less is OK  ) from the corner of the footbox where it meets the top chassis rail. Can't tell if yours are that far forward, but maybe. Something to check. Mine are well back from the max, but you can see I kept them back by the footboxes.
Build 1: Mk3 Roadster #5125. Sold 11/08/2014.
Build 2: Mk4 Roadster #7750. Sold 04/10/2017.
Build Thread
Build 3: Mk4 Roadster 20th Anniversary #8674. Sold 09/07/2020.
Build Thread and
Video.
Build 4: Gen 3 Type 65 Coupe #59. Gen 3 Coyote. Legal 03/04/2020.
Build Thread and
Video
Build 5: 35 Hot Rod Truck #138. LS3 and 4L65E auto. Rcvd 01/05/2021. Legal 04/20/2023.
Build Thread. Sold 11/9/2023.
-
Senior Member
Hi Paul,
I didn't even think about the hood gas struts. I haven't permanently mounted the reservoirs yet, so I'll take a look at mounting them as close as I can to the footbox.
Thanks for the insight, I appreciate it.
Mk IV Roadster #9749, Kit received Jan 2, 2020, Blueprint SBF 347 TKO600 Holley Sniper EFI, Dual roll bars, IRS, 17" Halibrand, Nitto 555 G2 245, 315 Road legal Oct 20, 2020
-
Not a waxer

Originally Posted by
Caddy Dad
...I didn't even think about the hood gas struts.
Lots of guys don't. They also overlook the same possibility of interference when mounting the coolant overflow tank on the other side so keep that in mind too.
Cheers,
Jeff
-
Senior Member
Originally Posted by
Jeff Kleiner
Lots of guys don't. They also overlook the same possibility of interference when mounting the coolant overflow tank on the other side so keep that in mind too.
Cheers,
Jeff
Good point Jeff. You can see the power steering reservoir in the picture I posted. Similar placement as the coolant overflow tank in many cases. It's in the area of the hood gas struts on that side, but placed low enough that it doesn't interfere.
Build 1: Mk3 Roadster #5125. Sold 11/08/2014.
Build 2: Mk4 Roadster #7750. Sold 04/10/2017.
Build Thread
Build 3: Mk4 Roadster 20th Anniversary #8674. Sold 09/07/2020.
Build Thread and
Video.
Build 4: Gen 3 Type 65 Coupe #59. Gen 3 Coyote. Legal 03/04/2020.
Build Thread and
Video
Build 5: 35 Hot Rod Truck #138. LS3 and 4L65E auto. Rcvd 01/05/2021. Legal 04/20/2023.
Build Thread. Sold 11/9/2023.
-
Senior Member
A major milestone achieved!
I reached a major milestone today with the final install of the brake lines, bleeding and a firm pedal. This part was the one I was most dreading because I'm not very good at bending brake lines and I wanted them to look good and not have any suspect joints or parts for me to worry about. I really struggled with running the lines to the front brakes. If I didn't like the way it looked or I made a bad bend, I'd rip them out and start over. Lots of re-work here and several trips to parts store for more brake line.
I mounted the reservoirs as close to the pedal box as I could. I used a piece of .090 Aluminum that I brushed to a nice finish then hit it with some clear POR-15
Three sisters.jpg
I then ran the supplied tubing to each of the master cylinders. I used a neat trick I learned at build school to lace together hoses, wires, etc using zip ties. I thought it came out nice
Reservoir hoses laced.jpg
I then bent some tubing to run the brake line out the side and down the 3/4 tube.
Master cylinders.jpg
Down the tube.jpg
Then across the front and into the PS brake just as many others have done. Lots of do overs here!
Across the front.jpg
In the PS side.jpg
Do overs.jpg
I then ran the rear brake line out the front through a existing hole in the front of the pedal box and down the front.
Out the front.jpg
Under the DS, up the rear 2x3 box to the mount behind the rear shock.
Rear DS mount.jpg
Then it was straight shot across the PS. I cut a length of tubing and put pig tails in each end. I also use two cushion clamps to keep down vibration.
Rear DS 2.jpg
Mk IV Roadster #9749, Kit received Jan 2, 2020, Blueprint SBF 347 TKO600 Holley Sniper EFI, Dual roll bars, IRS, 17" Halibrand, Nitto 555 G2 245, 315 Road legal Oct 20, 2020
-
Senior Member
Milestone continued.
Rear PS side pigtail
PS brake line mount.jpg
Prior to installing each line I rinsed it out with a good shot of brake cleaner and then blew them out with air. I then started the flush and bleeding. I used a pressure bleeder, I bleed kit from Eastwood with a one way check valve and my 20 something daughter to pump the brakes. Full disclosure here: I have bled brakes before but never Wilwood brakes. My eyes are over 60 and I always wear safety glasses when working on the car. I must've looked at the bleed screw 20 times and I couldn't resolve in my mind why Wilwood would put the brass bleed screw in such a difficult place. I could hardly get a wrench on it. After struggling for about 30 minutes, my daughter asks why I am not using the black nut on the bleed screw. What black nut? Doh!
Every tool in the box.jpg
Teeny tiny bleed screw! Can you see the black nut? I couldn't until it was pointed out to me.
Teeny tiny bleed screw.jpg
Finally, I starting making progress. I used a clear plastic jug to catch the fluid. I couldn't believe how dirty it came out!
Dirty flush.jpg
Does anyone know why Wilwood uses such a small bleed screw? The hose from the bleed kit kept slipping off the nipple and I had to hold it on most of the time. Regardless, the brakes are nice and firm and no leaks. The pressure bleeder helped a lot but the good old fashioned way of using a friend to pump the pedal seemed to help the most. I forgot to mention that I did a bench bleed first on the MC mounted in the pedal box. I was surprised how much air came out just doing that.
Next up, electrical and dash.
Cheers!
Mk IV Roadster #9749, Kit received Jan 2, 2020, Blueprint SBF 347 TKO600 Holley Sniper EFI, Dual roll bars, IRS, 17" Halibrand, Nitto 555 G2 245, 315 Road legal Oct 20, 2020
-
Mark,
Looks great! Only one thing I can point out to you and that's the rear brake line running down the outside of the foot box. It's going to be pretty close to where your header is going to pass by. Just something to think about.
Dave
-
Senior Member
Originally Posted by
Papa
Mark,
Looks great! Only one thing I can point out to you and that's the rear brake line running down the outside of the foot box. It's going to be pretty close to where your header is going to pass by. Just something to think about.
Dave
Hmmm. Good point. How much clearance do you think I'll need? Maybe I can mock it up and check the spacing.
Mk IV Roadster #9749, Kit received Jan 2, 2020, Blueprint SBF 347 TKO600 Holley Sniper EFI, Dual roll bars, IRS, 17" Halibrand, Nitto 555 G2 245, 315 Road legal Oct 20, 2020
-
Originally Posted by
Caddy Dad
Hmmm. Good point. How much clearance do you think I'll need? Maybe I can mock it up and check the spacing.
Sorry,
I thought I was in Mark's build thread. The clearance will vary by header, but my header is pretty close (~1/8") to the corner of the foot box.

Dave
-
Senior Member
Originally Posted by
Papa
Sorry,
I thought I was in Mark's build thread. The clearance will vary by header, but my header is pretty close (~1/8") to the corner of the foot box.
Dave
Dang! That is close! I never realized it would be that tight. I'm guessing it would less that an inch to the header from where I ran my rear brake line. I may have to rethink this one. Sigh.
Mk IV Roadster #9749, Kit received Jan 2, 2020, Blueprint SBF 347 TKO600 Holley Sniper EFI, Dual roll bars, IRS, 17" Halibrand, Nitto 555 G2 245, 315 Road legal Oct 20, 2020
-
Senior Member
I was going to say something about that rear brake line on the outside of the footbox as well. Agree that corner is really close to the header and should be moved. I put mine on a similar path, but inside the footbox where it's protected by the aluminum panel plus insulation. Some don't like putting the line inside the footbox. There are other paths as well. Sorry to say, you may want to think about the front line as well. Maybe OK. You'll have to decide. The upper tube is a better choice to run the line IMO vs. the lower one that is also pretty close to where the header comes out. This is my #8674 build. Coyote but still your headers will be similar. You can see where they are in relation to the footbox and that lower tube. You can also see where I ran mine on the outside of the top tube. Do overs aren't fun. But needless to say way easier at this stage.

Build 1: Mk3 Roadster #5125. Sold 11/08/2014.
Build 2: Mk4 Roadster #7750. Sold 04/10/2017.
Build Thread
Build 3: Mk4 Roadster 20th Anniversary #8674. Sold 09/07/2020.
Build Thread and
Video.
Build 4: Gen 3 Type 65 Coupe #59. Gen 3 Coyote. Legal 03/04/2020.
Build Thread and
Video
Build 5: 35 Hot Rod Truck #138. LS3 and 4L65E auto. Rcvd 01/05/2021. Legal 04/20/2023.
Build Thread. Sold 11/9/2023.
-
Senior Member
Based on the previous review and comments, I decided it would be a good idea to re-route the rear brake line from outside the front of the pedal box to inside. I tried to run it down inside just to the right of the accelerator pedal, but it would have been really close to the pedal and would need some really squirrely bends to get it around a bracket. So I ran it to the outboard of the clutch pedal, out through the bottom of the DS footbox and down the 4" tube. I decided to keep the front brake line run as is for now. I may want to revisit that decision in the future, but for now I'll use as is. I then re-bled the brakes and got a nice firm pedal. I ended up adding a union I really didn't want to, but all connections look leak free at this point.
Inside DS box.jpg
I added a grommet and added some shrink tubing as an anti chafe guard where the line exits the footbox. I'll probably add a cushion clamp to support the line somewhere near the middle of the box. Blue shop towels on the floor are my leak detectors. The epoxy finish on the floor makes it really hard to see clear/light colored liquids on the floor.
Outside DS box.jpg
Thanks to all the SMEs (Subject Matter Experts) for their review and comments. I'm not sure I would be this far without their help and I know it'll will make it a better build.
Mk IV Roadster #9749, Kit received Jan 2, 2020, Blueprint SBF 347 TKO600 Holley Sniper EFI, Dual roll bars, IRS, 17" Halibrand, Nitto 555 G2 245, 315 Road legal Oct 20, 2020
-
Senior Member
I'm now working on electrical wiring and dash panel. I broke out the RF wiring harness and tried a fit check of the mounting panel. Something didn't look right and before I took a dremel tool to modify the panel to fit or just remounting the relay, I called RF to confirm.

I exchanged a few pictures and sure enough, the relay was mounted in the wrong position. There is a self tapping screw holding the relay in and the relay needs to be moved to the right.

I just didn't want to start moving components and inserting screws into electrical mounts without some kind of confirmation from the manufacturer (prior career experience). Here is final configuration. Looks good now.

Next up is final dash configuration and wiring.
Thanks!
Mk IV Roadster #9749, Kit received Jan 2, 2020, Blueprint SBF 347 TKO600 Holley Sniper EFI, Dual roll bars, IRS, 17" Halibrand, Nitto 555 G2 245, 315 Road legal Oct 20, 2020
-
Post Thanks / Like - 0 Thanks, 1 Likes
-
Senior Member
I've been working on wiring the dash and installing the wiring harness. I started using the supplied switches, dash lights etc but just really didn't like the way they looked. I ordered some replacement parts and now waiting on delivery. I'll update that progress when they come in with additional picture. Meanwhile, I ran the wiring harness, installed addition wiring for fog/driving lights and temporarily mocked up the front and rear lights. I bought weather packs for all the connections, but I'm holding off final installation on those until I get the dash finished and maybe do a quick fit check with the body. Regardless, I was able to mock up the tail lights and do my first smoke test on the wiring harness

I then used a small DC power supply as a battery substitute. Less than an amp when I hit the brakes.

Since I don't have a helper or any neighbors around during the day, a simple mirror seems to do the trick

So far no issues with the wiring. It would be nice if the rest of the install goes this way.
Cheers!
Mk IV Roadster #9749, Kit received Jan 2, 2020, Blueprint SBF 347 TKO600 Holley Sniper EFI, Dual roll bars, IRS, 17" Halibrand, Nitto 555 G2 245, 315 Road legal Oct 20, 2020
-
Senior Member
I've been spending a lot of time on wiring the dash with a competition style layout and also installing the wiring harness. I'm attempting to bench test the harness installation and my wiring the best I can before I install the dash and the engine. I know that any electrical issues can be a potential PIA as assembly progresses and more components get added. Build a little, test a little is my motto. As an option, I installed a battery cut off switch and a cooling fan over ride switch. I also wired all the front and rear lights with weather packs for easy disconnect when removing and installing the body. In the process of installing and testing the fan over ride switch without the dash installed I couldn't get power to the fan leads. I rechecked my wiring, and components, did some trouble shooting, scratched my head and consulted the wiring diagram. I then realized that both the ignition switch AND the head light switch need to be installed in order to get power to the fan relay. And oh yeah, it helps to have the the fan fuse installed!
It was missing as shipped, so a quick trip the Ace hardware store and I was back in business

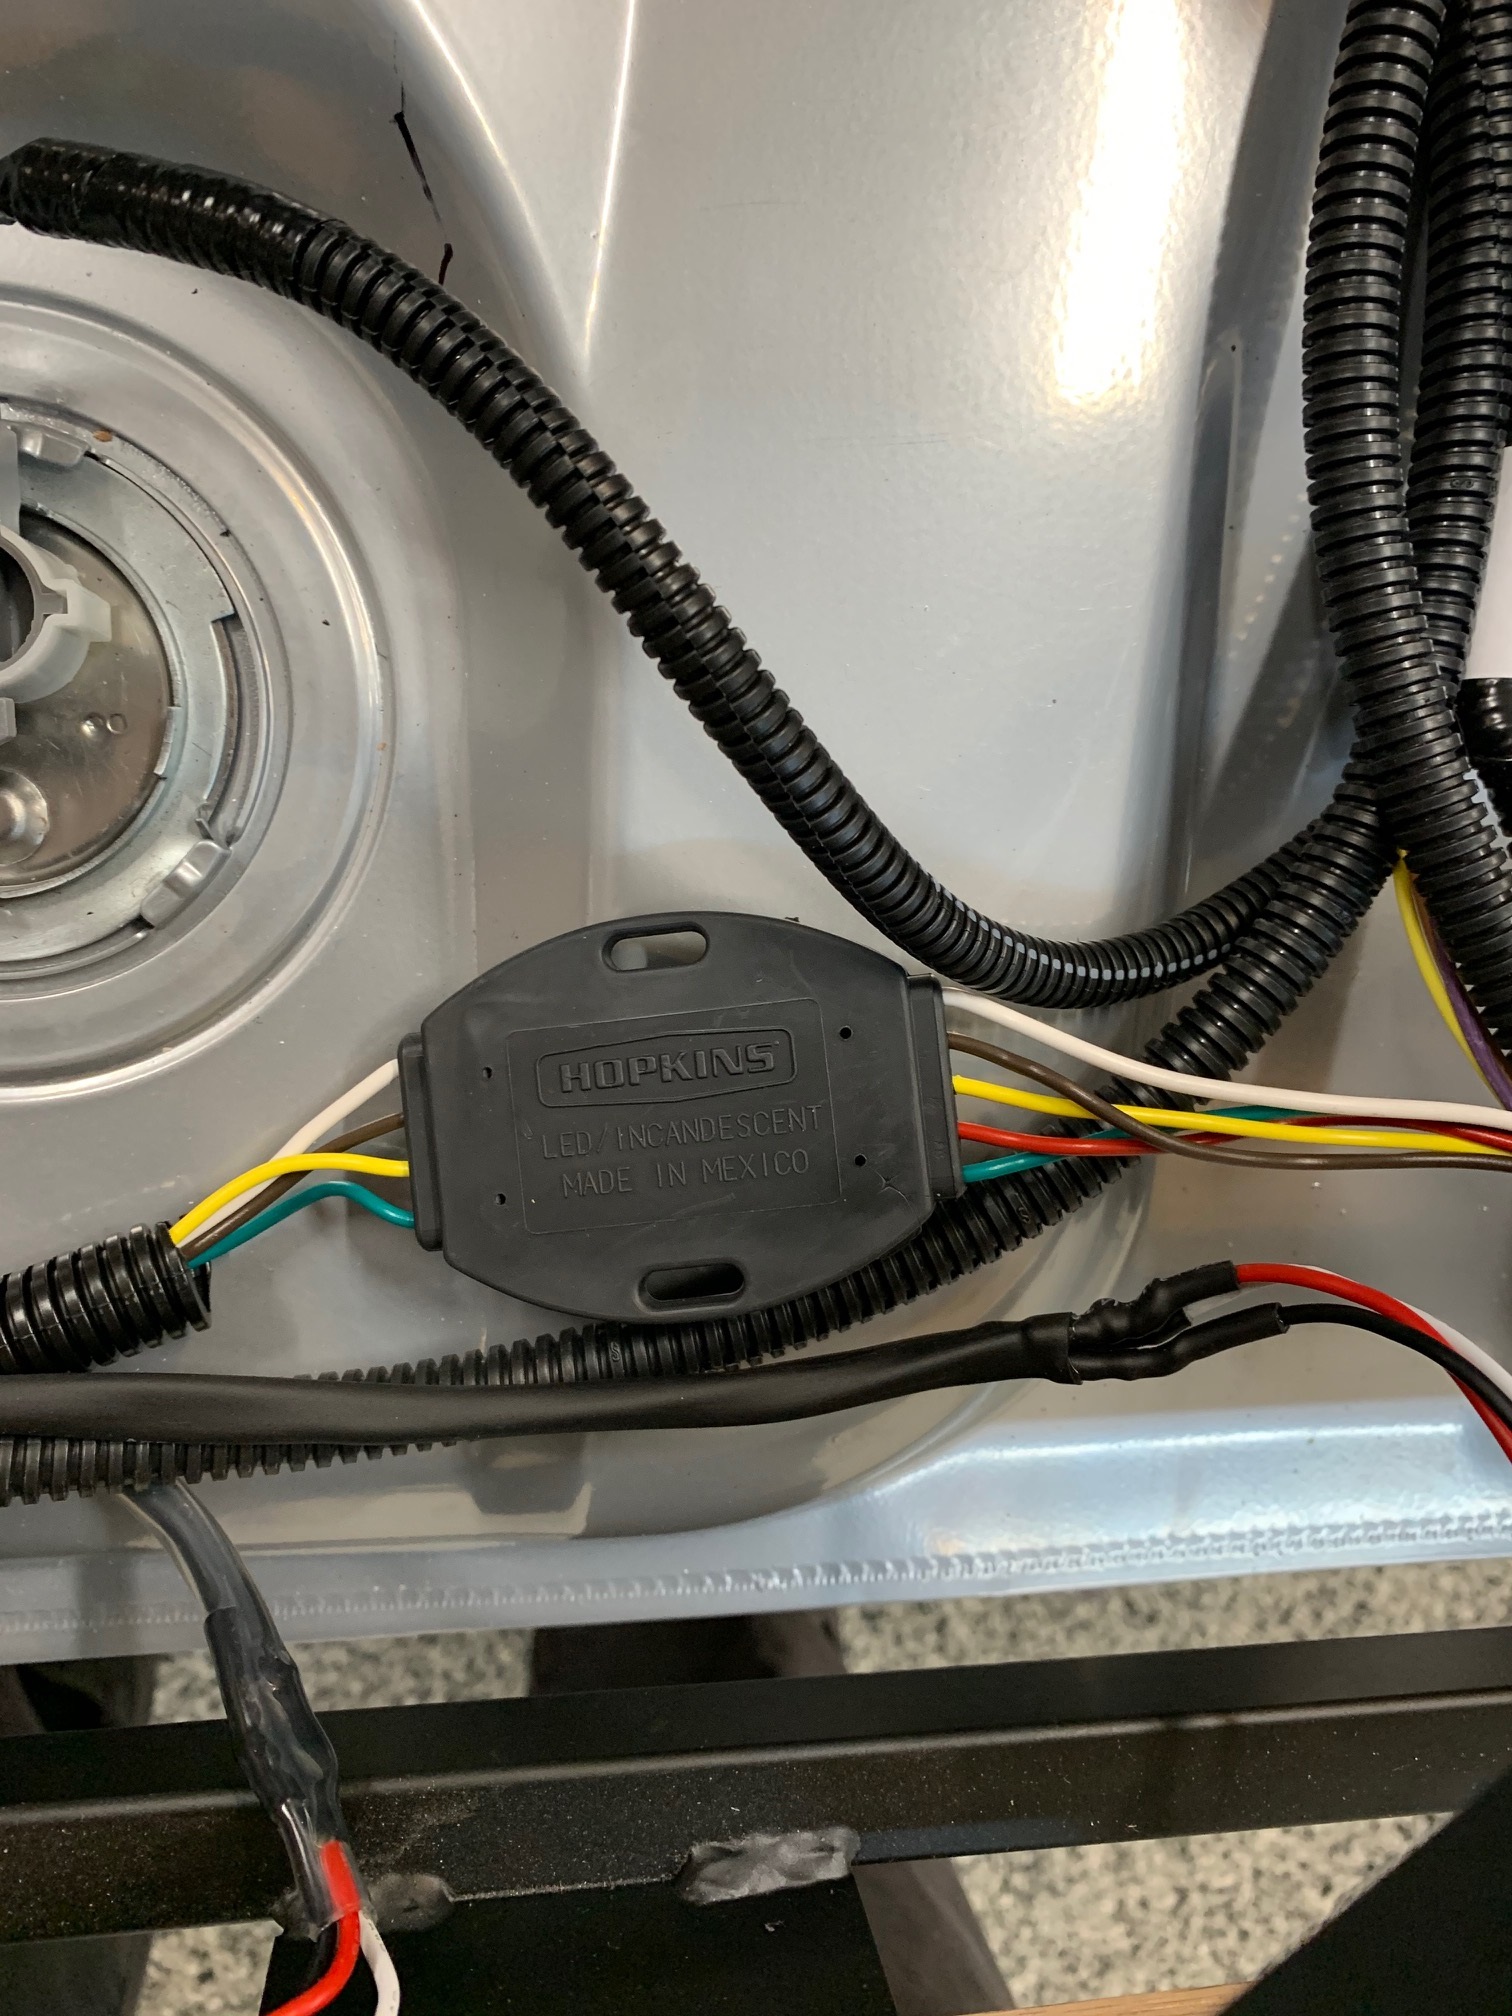
I have the new rectangular tail lights with my kit and as I was wiring up the weather packs for them I realized something didn't look right. I consulted the wiring instructions again and didn't see anything that called out rectangular tail lights and then I realized that a tail light converter component was shipped as part of the kit. I kept wondering what is was to be used for! It's basically a trailer light converter for 5 wire to 4 wire systems. So I wired that in and all is good now
Back to more testing and planning for the engine install this week. As part of my engine install planning I realized I couldn't find the transmission mount. I know it was shipped with the kit as I checked it off as part of my inventory but now can't find it at all. I bet I'm the first person ever to do that! So a quick call to FFR and a few dollars later, one is in the mail.
Enjoying the build!
Mk IV Roadster #9749, Kit received Jan 2, 2020, Blueprint SBF 347 TKO600 Holley Sniper EFI, Dual roll bars, IRS, 17" Halibrand, Nitto 555 G2 245, 315 Road legal Oct 20, 2020
-
Post Thanks / Like - 0 Thanks, 1 Likes
-
Lookin good, buddy. You're building like a mad man!
-
Senior Member
Originally Posted by
Boydster
Lookin good, buddy. You're building like a mad man!
Thanks! Being retired and now self isolated, it gives me ample opportunity to make progress on my build. I'm almost done the dash. I just ordered a low voltage indicator light which I think will come in handy. I also had to order a second RT turn signal bezel as I screwed up the first one trying to notch it to fit next to a gauge. I'm hoping to drop the engine/trans in by the end of the month
How did the move go?
Cheers!
Mk IV Roadster #9749, Kit received Jan 2, 2020, Blueprint SBF 347 TKO600 Holley Sniper EFI, Dual roll bars, IRS, 17" Halibrand, Nitto 555 G2 245, 315 Road legal Oct 20, 2020
-
Senior Member
Caddy Dad Mk IV Roadster build - New tires and now something doesn't look right
I got new tires today from Summit (Nitto 245/45-17 front 315/35-17 rear) and got them mounted.
New tires.jpg
New tires mounted.jpg
Serious rubber.jpg
But after mounting them I quickly found out I had an interference issue. First off, the flex brake line rubs on the rear tires. Not a big issue as a quick visit to Summit web site and a pair of lines with 90 degree fittings are on their way. What's another $60 at this point? Sigh.
Second, the right side rubs against the shock tower coil over. This seemed odd as when I assembled the rear UCAs and LCAs (toe assembly) I made the effort to make sure the adjusting hardware left and right were at the same length and then just snugged down the jam nuts.
Right side interference

The left side looked just fine (other than the brake flex line) and clears by about a 1/2 "

That seemed kinda odd to me that it would be off that much. I decided to try to adjust the right side camber by screwing the UCA heim joint out a bit more and see if I can get the clearance distance the same on the left and the right.
I then measured the length of the adjusting screws with a set of calipers. Right side distance ~2.18"

Left side distance ~1.90"

As it sits suspended on the chassis dolly there appears to be about ~0.28" difference between the sides. I was expecting these measurements to be closer. I don't have access to a precise inclinometer (I did use the one on my phone but it doesn't have enough resolution) so I couldn't measure the exact camber but I did use a bubble level to try and get the camber matching left to right. However the camber is leaning to the outside about +1 degree. Does this seem right? What am I missing? Or is this common with roadsters? Any insight would be appreciated.
Thanks!
Mk IV Roadster #9749, Kit received Jan 2, 2020, Blueprint SBF 347 TKO600 Holley Sniper EFI, Dual roll bars, IRS, 17" Halibrand, Nitto 555 G2 245, 315 Road legal Oct 20, 2020
-
You just have not got the rear end properly aligned. Once you have all the alignment done correctly you should have plenty of space between your shocks, Springs, tires etc.. And also remember it needs to be on the ground fully to do all of that with all of the weight on it such as the body fuel etc. It will probably geometrically all work out for you once you get this completed.
For right now, if you can set it down on the ground and use a basic carpenter square to get your camber set close at straight up and down that will get you a real good start.
Last edited by BadAsp427; 03-19-2020 at 09:20 PM.
-
Originally Posted by
Caddy Dad
How did the move go?
Cheers!
Move went well. Yesterday hit 82*, so after work I got The Boss out and introduced her to Knoxville. 
-
Post Thanks / Like - 0 Thanks, 1 Likes
-
Senior Member
Nice! I'm looking to the time when I can do the same!
Mk IV Roadster #9749, Kit received Jan 2, 2020, Blueprint SBF 347 TKO600 Holley Sniper EFI, Dual roll bars, IRS, 17" Halibrand, Nitto 555 G2 245, 315 Road legal Oct 20, 2020
-
Post Thanks / Like - 0 Thanks, 1 Likes
-
Senior Member
Originally Posted by
BadAsp427
You just have not got the rear end properly aligned. Once you have all the alignment done correctly you should have plenty of space between your shocks, Springs, tires etc.. And also remember it needs to be on the ground fully to do all of that with all of the weight on it such as the body fuel etc. It will probably geometrically all work out for you once you get this completed.
For right now, if you can set it down on the ground and use a basic carpenter square to get your camber set close at straight up and down that will get you a real good start.
Thanks for the insight. I don't have the engine installed yet so I haven't attempted to set the ride height either. But I like your idea and I'll give that a try next. It was a real head scratcher when I first put that tire on. It's just another problem to solve! :-)
Thanks!
Mk IV Roadster #9749, Kit received Jan 2, 2020, Blueprint SBF 347 TKO600 Holley Sniper EFI, Dual roll bars, IRS, 17" Halibrand, Nitto 555 G2 245, 315 Road legal Oct 20, 2020
-
Originally Posted by
Caddy Dad
Thanks for the insight. I don't have the engine installed yet so I haven't attempted to set the ride height either. But I like your idea and I'll give that a try next. It was a real head scratcher when I first put that tire on. It's just another problem to solve! :-)
Thanks!
How do you think I knew how to answer your question? I actually pinched my finger when I went to roll the tire between the shock in the tire LOL
-
Senior Member
Originally Posted by
BadAsp427
How do you think I knew how to answer your question? I actually pinched my finger when I went to roll the tire between the shock in the tire LOL
I did as suggested today. I set the wheels on the ground and bungeed a carpenters level to the wheel. I then adjusted the camber to where it was level or slightly leaning in. Spacing was perfect side to side! I'm sure I'll have to do it again as I get ready for go carting but for now it looks spot on. I was kinda freaked out when I first saw it and wondering how did I screw that up! Big thanks to BadAsp427, Boydster and EdwardB for their insight.
Mk IV Roadster #9749, Kit received Jan 2, 2020, Blueprint SBF 347 TKO600 Holley Sniper EFI, Dual roll bars, IRS, 17" Halibrand, Nitto 555 G2 245, 315 Road legal Oct 20, 2020
-
Senior Member
Here are some pictures of how I set the camber and with the new brake flex lines installed. All is good now!
Adjusting camber

New brake flex lines installed. Plenty of clearance.

Next up; Final dash modifications and install
Cheers!
Mk IV Roadster #9749, Kit received Jan 2, 2020, Blueprint SBF 347 TKO600 Holley Sniper EFI, Dual roll bars, IRS, 17" Halibrand, Nitto 555 G2 245, 315 Road legal Oct 20, 2020
-
Senior Member
I'm mostly finished with bench testing my dash. I went with the competition style layout which meant I got a blank piece of aluminum and had to cut all the holes, debur and lengthen the wiring harness where needed. I used Vivid vinyl to cover the dash it it was easy for this first timer to get a nice looking result. Supposed to be water proof, fade resistant and has four way stretch. We'll see how it holds up. And oh yeah, be careful with the circle blanks when you cut them out as they have a nice sharp edge and a burr that's just asking you to donate blood. :-(
Here is a picture of the full dash. A replacement RT trim bezel is in the mail from Mike Everson.

I also added a low voltage sensor from RF and hooked it up to a bright LED indicator light.

So far I'm pleased with the results
Mk IV Roadster #9749, Kit received Jan 2, 2020, Blueprint SBF 347 TKO600 Holley Sniper EFI, Dual roll bars, IRS, 17" Halibrand, Nitto 555 G2 245, 315 Road legal Oct 20, 2020
-
Senior Member
Originally Posted by
Caddy Dad
I got new tires today from Summit (Nitto 245/45-17 front 315/35-17 rear) and got them mounted.
New tires.jpg
New tires mounted.jpg
Serious rubber.jpg
But after mounting them I quickly found out I had an interference issue. First off, the flex brake line rubs on the rear tires. Not a big issue as a quick visit to Summit web site and a pair of lines with 90 degree fittings are on their way. What's another $60 at this point? Sigh.
Second, the right side rubs against the shock tower coil over. This seemed odd as when I assembled the rear UCAs and LCAs (toe assembly) I made the effort to make sure the adjusting hardware left and right were at the same length and then just snugged down the jam nuts.
Right side interference
The left side looked just fine (other than the brake flex line) and clears by about a 1/2 "
That seemed kinda odd to me that it would be off that much. I decided to try to adjust the right side camber by screwing the UCA heim joint out a bit more and see if I can get the clearance distance the same on the left and the right.
I then measured the length of the adjusting screws with a set of calipers. Right side distance ~2.18"
Left side distance ~1.90"
As it sits suspended on the chassis dolly there appears to be about ~0.28" difference between the sides. I was expecting these measurements to be closer. I don't have access to a precise inclinometer (I did use the one on my phone but it doesn't have enough resolution) so I couldn't measure the exact camber but I did use a bubble level to try and get the camber matching left to right. However the camber is leaning to the outside about +1 degree. Does this seem right? What am I missing? Or is this common with roadsters? Any insight would be appreciated.
Thanks!
Looking good, Frank!
What are your final measurements on each side now that you have a rough alignment? I ask because my version of the manual didn't have the recommended measurements so I went with the .5" of exposed thread on either side of both the UCA and toe arm as others have done. After getting ahold of a July 2019 version of the manual, noticed they had the rough specs in there and while my toe arm was pretty much spot on, the UCA is off by .5".
MKIV Complete Kit #9494 l Delivered 1/5/19 l First Start
11/28/20 l First Go-kart
4/11/21 l Carb'd 347 l Mid-shift TKO600 l 3.55 IRS l P/S l Forte Mechanical Throttle Linkage l RT Turn Signal, Drop Trunk l Breeze Upper/Lower Radiator Support, Fan Shroud l Boig Upper/Lower Cool Tubes & Quiet Pipes l 18" FFR Gasser Wheels l
Build Thread
-
Senior Member
Hi Tony,
I ended up with 1.80" on the left side and 1.93" on the right. I set it on the ground and only adjusted the UCAs on both sides. I did not adjust the toe or ride height yet. I just wanted to get the camber corrected so as not to rub against the coil over. I'll need to read a few more threads on how to do a proper alignment. But first I'll need to finalize electrical system testing, drop the engine in, hook up all the sender connections, cooling, mechanical throttle linkage, hydraulic clutch line, etc etc.
Geez, there's a lot more to do, but this is really a lot of fun!
Cheers!
Mk IV Roadster #9749, Kit received Jan 2, 2020, Blueprint SBF 347 TKO600 Holley Sniper EFI, Dual roll bars, IRS, 17" Halibrand, Nitto 555 G2 245, 315 Road legal Oct 20, 2020
-
Senior Member
Another major milestone today. After reading several threads on engine install and being embolden by Jeff Kleiner stating that he does this by himself, I cajoled my 18 year old daughter into helping me install the engine and transmission.
With the chassis on wheel dollies and the rear end on blocks, I maneuvered the engine into place. With the HF engine hoist loaded, it doesn't roll very well at all. It's so much easier to move the chassis than the lift.

Daughter helping

Slowly lowered into place, adjusted load leveler and with a bit of nudging, she's in!

I'll need to add some spacers under the transmission, but I'm a happy camper!

The install was so much easier than I was prepared for. Almost a non event. Now I've got several connections to figure out, hook up the throttle, hydraulic clutch, exhaust, etc etc. So it might be a while before the first start, but what else is there to do now that we're on total lock down?
Everybody be safe out there!
Last edited by Caddy Dad; 03-30-2020 at 05:06 PM.
Mk IV Roadster #9749, Kit received Jan 2, 2020, Blueprint SBF 347 TKO600 Holley Sniper EFI, Dual roll bars, IRS, 17" Halibrand, Nitto 555 G2 245, 315 Road legal Oct 20, 2020
-
Post Thanks / Like - 0 Thanks, 4 Likes
-

Steve >> aka: GoDadGo

Congrats Navy Dad, Contrats!
-
Senior Member

Congrats! Nice engine, like the black covers.
Kyle
Complete Kit pickup 09/05/2015, 351w, QF680, 3.55, 3-Link, 15" Halibrands with MT's, Painted Viking blue with Wimbledon white stripes on 03/15/2017. Sold in 08/2018 and totally regret it.
-
Not a waxer
-
Senior Member
I've been working on all the little tasks you need to complete before starting up the engine for the first time.
I had to order some transmission spacers from Forte. I used all three.

I then moved onto connecting up the engine sending units (H2O temp, Oil Pressure and Oil Temp) and found out I forgot to order a bung hole for the oil temp sender. No bung hole? No problem! Forte's has an adapter that fits between the oil filter and engine block.

I then added the 7 quarts of break in oil as per BPE instructions

Next I tried to connect up the power steering pump using FFR supplied hoses. That turned into a real head scratcher until I did more research on this forum. Basically I just threw out the FFR parts and called Mark at Breeze. He hooked me up and the install went perfect.

I then turned to installing the mechanical throttle linkage from Forte's Very nice parts but I ran into a bit of a snag when I tried to install it. I have the 2 inch firewall forward kit from FF Metals installed and the Heim ball joints are too short to mount to the 2 inch square tube. I did a little research and ordered some coupling nuts from McMaster Carr to fit between the square tube and the Heim joint. and now good to go.

Feeling confident, I decided to follow the pre-oiling instructions from BPE. I removed all the spark plugs and disconnected the coil wire. I cranked the engine over several times and oil pressure started to show up on the gauge. Life is good!
Next I added about a gallon of gas and flushed the fuel lines before connecting them to the Holley EFI. The fuel pump runs for a for seconds when you turn the key to run and I caught to out flow in a catch can. Fuel looked clean! I connected up the hoses and pressurized the system. The pressure goes up to about ~65 psi and then hangs about 45 after I turn off the key. No leaks detected, but I'll keep an eye on it

Here's a picture of the Holley setup tool when I turn the key to run. I'm guessing these settings are normal for now but I'll do more research before starting

I also ran into another real head scratcher trying to use the FFR parts to connect up the cooling system I just couldn't figure out how that corrugated tubing and adapters that come with the kit are going to be installed and be reliable at the same time. So more research and another phone call to Breeze and Boig and a few dollars later, the upper and lower radiator pipes are on order. Unfortunately this virus has got everyone in a bind so I'll be waiting patiently for a while waiting on more parts to show up. That's all for now. Hopefully the next posting will be a video of the first start!
Everyone be safe out there!
Last edited by Caddy Dad; 04-11-2020 at 12:35 PM.
Mk IV Roadster #9749, Kit received Jan 2, 2020, Blueprint SBF 347 TKO600 Holley Sniper EFI, Dual roll bars, IRS, 17" Halibrand, Nitto 555 G2 245, 315 Road legal Oct 20, 2020
-
Post Thanks / Like - 0 Thanks, 2 Likes
-
Senior Member
Today was another major milestone. I got impatient waiting on my new Boig coolpipes, so I decided to try to connect up the corrugated hose and fittings that come with the kit. I managed to get everything connected and cranked down hard on the hose clamps (I think you know where this is going). My first attempt resulted in a no start. After trouble shooting it a bit and confirming with a phone call to Johnny at BPE I realized I need to run a switched 12 VDC to the plus side of the coil. Sure enough, it's right there in his latest email in black and white.
And this happened:
http://www.youtube.com/watch?v=jKuW9...ature=youtu.be
Engine started right up and sounds really strong. A few issues to work on. Tach reads twice as high as it should. I'm guessing I need to configure it correctly and the oil temperature never came off the peg. Everything else looked good.
Just as it was reaching operating temperature (~85 C) the top radiator hose blew off!
Nothing like a face of hot dexcool to ruin your day!
Fortunately no harm done and no one injured. I've got a huge mess to clean up and a great lesson learned.
This is really getting to be fun now! Enjoy the build!
Last edited by Caddy Dad; 04-16-2020 at 07:44 PM.
Mk IV Roadster #9749, Kit received Jan 2, 2020, Blueprint SBF 347 TKO600 Holley Sniper EFI, Dual roll bars, IRS, 17" Halibrand, Nitto 555 G2 245, 315 Road legal Oct 20, 2020
-
Post Thanks / Like - 0 Thanks, 3 Likes


 Thanks:
  Likes:


 Reply With Quote


