-
Senior Member


Originally Posted by
v1-vr

Great craftsman you are Travis
Looks as perfection is in your blood
Have you checked out the airflow the screen might decrease.
Seems along time ago I did some research with airflow into
motorhome generator compartments and was surprised of the decrease screens vs louves on the door.
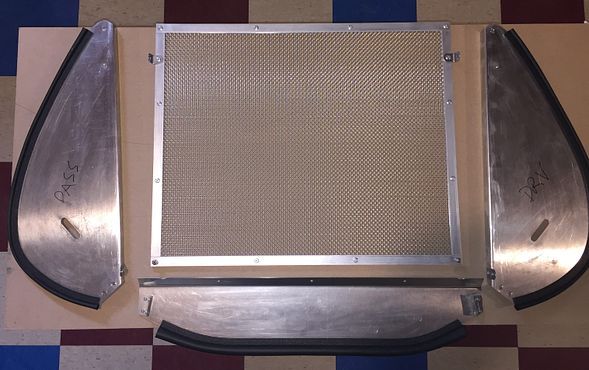
Vspeeds has been running this mesh on his car with a Roush 427 and over 7000 miles on it now with no issues, so I can only assume the airflow will be fine and not reduce cooling. I think more importantly is having a good shroud and fan to pull air, this is why I went with the Breeze fan shroud. Making this cover is pretty simple, a few cuts of aluminum, rivets, and the spring clips is about all it takes. One of the reasons I liked it so much, easy to construct and functional.
Last edited by Fman; 06-08-2020 at 09:25 AM.
-
Senior Member

Originally Posted by
Fman
Vspeeds has been running this mesh on his car with a Roush 427 and over 7000 miles on it now with no issues, so I can only assume the airflow will be fine and not reduce cooling. I think more importantly is having a good shroud and fan to pull air, this is why I went with the Breeze fan shroud. Making this cover is pretty simple, a few cuts of aluminum, rivets, and the spring clips is about all it takes. One of the reasons I liked it so much, easy to construct and functional.
I have used the same mesh on a couple Roadster builds with no issues. Along with my own custom sheet metal.
Build 1: Mk3 Roadster #5125. Sold 11/08/2014.
Build 2: Mk4 Roadster #7750. Sold 04/10/2017.
Build Thread
Build 3: Mk4 Roadster 20th Anniversary #8674. Sold 09/07/2020.
Build Thread and
Video.
Build 4: Gen 3 Type 65 Coupe #59. Gen 3 Coyote. Legal 03/04/2020.
Build Thread and
Video
Build 5: 35 Hot Rod Truck #138. LS3 and 4L65E auto. Rcvd 01/05/2021. Legal 04/20/2023.
Build Thread. Sold 11/9/2023.
-
Post Thanks / Like - 0 Thanks, 2 Likes
-
Sounds like a proven add on. Great idea to protect the radiator
and eliminates the fin combing chore.
From memory though and I'm an old guy it's amazing how much of a drop in airflow even though looking at it you wouldn't think.
Dave
.
-
Senior Member
Triple CNC mount, more powder coat - footbox, engine compartment
For anyone out in Elk Grove this morning it was a pleasure to meet you and see some really nice cars. I always enjoy looking under the hood and seeing how everyone puts there own customization into these builds. Lets hope we can get a local club going!
I was able to accomplish a few things on my build today. Saturday, I got back all my powder coating my entire car is officially now pimped in full powder coat. I have been really happy with Advanced Performance Coatings in Auburn, CA. They have done a fantastic job and are reasonably priced. Anyone in the Sacramento area would highly recommend them. The more I work with the silver vein powder coating it is proving to be extremely durable and scratch resistant, so far no regrets going with this finish.
I also picked up some black aluminum rivets from McMaster Carr, they are working great and look nice against silver vein powder coat. Below is a link to the rivets, I ordered 1000 of the 1/8" x 0.063"-0.125" and 300 of the 1/8" x 0.313"-0.375".
https://www.mcmaster.com/97526A120
https://www.mcmaster.com/97526A590
I also mounted my CNC triple reservoir, got my foot boxes/engine compartment cleco'd back together, and started mounting brake clip tabs in the front. I am getting close to start running my brake lines and I got some good news from Factory Five, my LCA's and some other missing parts should be arriving early this week!
My triple CNC mounted up, I used (3) 1/4-20 button head stainless bolts to mount the 1/8" alum plate I cut out and (4) 1/4-20 button head bolts to secure the reservoir. It is rock solid, not planning on it going anywhere.
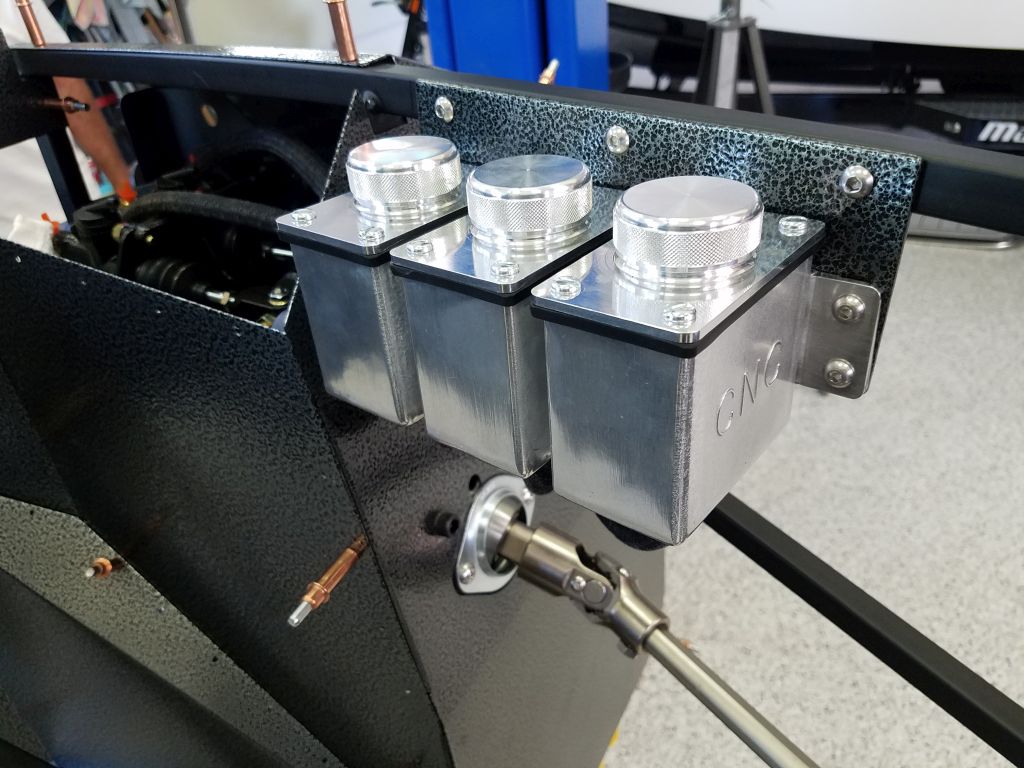
Here is backside of the triple CNC and my DS footbox put back together. I still need to figure out my three line routing going into master cylinders, I have to pick up some rubber grommets for this.

Passenger side foot box back together

Engine compartment slowly starting to come together

F panel officially riveted, my first panel without a Cleco in it. Note the black aluminum McMaster Carr rivets.

Front brake clips mounted

Last edited by Fman; 06-14-2020 at 11:00 PM.
-
Post Thanks / Like - 0 Thanks, 1 Likes
-
#9160

Thing of beauty Fman! Nice work.
MK4 - complete kit - Blueprint 427W - Holly Sniper EFI - TKO 600 .64 - 3.55 3 link - 17" Halibrands
-
Post Thanks / Like - 1 Thanks, 2 Likes
 Fman
Fman thanked for this post
-
Senior Member

Looks great - really like the black rivets against that powdercoat.
FFR9280RD MK4 base kit, 2004 Mach 1 donor, PS, PB, ABS, TC, CC, PATS, Summit heater, DIY wire diet, RT pedal/trunk/turn signal, FFR LCAs, FFR 3-link, 17x9 FR500s all around, Ford Magnetic Gray with custom Kandy Orange stripes (Ken's Custom Auto Body)
-
Post Thanks / Like - 0 Thanks, 2 Likes
-
25th Anniversary #9772

Originally Posted by
Mark K
Looks great - really like the black rivets against that powdercoat.
agreed! looks stellar!!
-
Post Thanks / Like - 0 Thanks, 1 Likes
 Fman
Fman liked this post
-
Senior Member
-
Nice work! Everything is looking great so far. Congrats on getting the first brake line installed. I'm a bit behind you - hoping to start running brake lines next week.
MkIV Roadster build: Gen 2 Coyote, IRS, TKO600. Ordered 10/24/18. Delivered 1/29/19. Engine installed 8/8/21. First start 9/12/21. First go-kart 9/17/21. Off to paint 4/11/22. Back from paint 12/30/22.
Build thread here.
-
Post Thanks / Like - 1 Thanks, 1 Likes
Fman thanked for this post
Fman liked this post
-
Senior Member
-
Post Thanks / Like - 0 Thanks, 1 Likes
-
Senior Member
That's a great idea - backer rod as a template.
FFR9280RD MK4 base kit, 2004 Mach 1 donor, PS, PB, ABS, TC, CC, PATS, Summit heater, DIY wire diet, RT pedal/trunk/turn signal, FFR LCAs, FFR 3-link, 17x9 FR500s all around, Ford Magnetic Gray with custom Kandy Orange stripes (Ken's Custom Auto Body)
-
Post Thanks / Like - 0 Thanks, 1 Likes
-
Senior Member
Originally Posted by
Mark K
That's a great idea - backer rod as a template.
Thanks Mark, I cant really think of any other way to figure out how to measure out how long each run needs to be. I have a question about tightening the fittings, how tight do you end up going? The manual says 29 ft lbs on the banjo fitting, my 3/8 torque wrench is not super great so I just went tight without risk of stripping out something. I figure if I have a leak I can always tighten down a little more.
-
Post Thanks / Like - 1 Thanks, 1 Likes
-
25th Anniversary #9772
Originally Posted by
Mark K
That's a great idea - backer rod as a template.
agreed, on my list for the next home depot run 
Originally Posted by
Fman
Thanks Mark, I cant really think of any other way to figure out how to measure out how long each run needs to be. I have a question about tightening the fittings, how tight do you end up going? The manual says 29 ft lbs on the banjo fitting, my 3/8 torque wrench is not super great so I just went tight without risk of stripping out something. I figure if I have a leak I can always tighten down a little more.
assuming the copper crush washers should snug up nicely, is that the reason for going that route?
are you using PTFE paste on the fittings?
everything I see is up to 15 ft-lbs on banjo bolts
also, are you using a line straightener for the brake lines? Eastwood seems to have a decent one for 1/4" lines
Eastwood 1/4 in. Handheld Tubing Straighteners Coiled to Straight Tubing Tool for Brake & Fuel Line Tube Flaring
ntPSq3Z.png
this one may be better as it could work on 3/8" fuel lines as well (adjustable) - I think @chrisarella used this
Tool Guy Republic TGR Brake & Fuel Line Tubing Straightener - 3/16" - 1/2" Diameter Tubing
hFde4E0.png
didn't realize you got your LCAs - exciting day for sure! You got a ton completed!!
Last edited by toadster; 06-18-2020 at 12:44 PM.
-
Post Thanks / Like - 0 Thanks, 1 Likes
Fman liked this post
-


Originally Posted by
Fman
Thanks Mark, I cant really think of any other way to figure out how to measure out how long each run needs to be. I have a question about tightening the fittings, how tight do you end up going? The manual says 29 ft lbs on the banjo fitting, my 3/8 torque wrench is not super great so I just went tight without risk of stripping out something. I figure if I have a leak I can always tighten down a little more.
"Just tight enough to not leak" seems to be the right answer for banjo bolts. I've seen several threads where folks have tightened to the manual-recommended spec and ended up stripping or snapping the bolt. Here's just one example:
https://thefactoryfiveforum.com/show...ar-Banjo-Bolts
29 ft lbs sounds like way too much to me for those bolts.
MkIV Roadster build: Gen 2 Coyote, IRS, TKO600. Ordered 10/24/18. Delivered 1/29/19. Engine installed 8/8/21. First start 9/12/21. First go-kart 9/17/21. Off to paint 4/11/22. Back from paint 12/30/22.
Build thread here.
-
Senior Member
What the others said...just tight enough not to leak. I used the same approach for joining my hard brake and fuel line union and adapter fittings.
FFR9280RD MK4 base kit, 2004 Mach 1 donor, PS, PB, ABS, TC, CC, PATS, Summit heater, DIY wire diet, RT pedal/trunk/turn signal, FFR LCAs, FFR 3-link, 17x9 FR500s all around, Ford Magnetic Gray with custom Kandy Orange stripes (Ken's Custom Auto Body)
-
Post Thanks / Like - 0 Thanks, 1 Likes
Fman liked this post
-
Senior Member
Originally Posted by
toadster
Todd,
I went with copper crush washers because the FFR washers looked mediocre at best and Vspeeds recommended the copper.
I did not use any PTFE paste on the fittings, I have no idea what that product is? got any more info on this?
I do have the eastwood straightener also loaned to me by Vspeeds, the one line I was able to run I did not use it. Planning on trying it on the other lines.
Page 203 of the my build manual says...
"Torque the front flexible brake line to caliper banjo bolts to 29 lb-ft with a torque wrench and 9/16 socket."
I am just going tight and will adjust once I bleed the brakes...
-
Senior Member
No paste on fittings with a crush washer. The washer is doing the sealing job, not the threads. Only time to use sealant is on NPT (National Pipe Tapered) fittings where the threads are doing the sealing.
Build 1: Mk3 Roadster #5125. Sold 11/08/2014.
Build 2: Mk4 Roadster #7750. Sold 04/10/2017.
Build Thread
Build 3: Mk4 Roadster 20th Anniversary #8674. Sold 09/07/2020.
Build Thread and
Video.
Build 4: Gen 3 Type 65 Coupe #59. Gen 3 Coyote. Legal 03/04/2020.
Build Thread and
Video
Build 5: 35 Hot Rod Truck #138. LS3 and 4L65E auto. Rcvd 01/05/2021. Legal 04/20/2023.
Build Thread. Sold 11/9/2023.
-
Post Thanks / Like - 1 Thanks, 2 Likes
Fman thanked for this post
-
25th Anniversary #9772
Originally Posted by
edwardb
No paste on fittings with a crush washer. The washer is doing the sealing job, not the threads. Only time to use sealant is on NPT (National Pipe Tapered) fittings where the threads are doing the sealing.
ah yes, thanks for the reminder!
-
Senior Member
-
06-22-2020, 11:34 PM
#100
Senior Member
-
06-22-2020, 11:49 PM
#101
Senior Member
-
Post Thanks / Like - 1 Thanks, 3 Likes
-
06-23-2020, 10:25 PM
#102
Senior Member
FFR9280RD MK4 base kit, 2004 Mach 1 donor, PS, PB, ABS, TC, CC, PATS, Summit heater, DIY wire diet, RT pedal/trunk/turn signal, FFR LCAs, FFR 3-link, 17x9 FR500s all around, Ford Magnetic Gray with custom Kandy Orange stripes (Ken's Custom Auto Body)
-
Post Thanks / Like - 0 Thanks, 1 Likes
Fman liked this post
-
06-24-2020, 06:53 AM
#103
Senior Member

Fman, your build is looking absolutely Fmantastic! I dig the PC color and the attention to detail, nicely done. As for the engine dress, dang, Cinderella never had it so good! And your beauty has no time deadline.
Keep at it, I/we can't wait to see that all bolted on.
Dj
-
Post Thanks / Like - 0 Thanks, 1 Likes
Fman liked this post
-
06-24-2020, 12:42 PM
#104
Senior Member
Originally Posted by
ydousurf
Fman, your build is looking absolutely Fmantastic! I dig the PC color and the attention to detail, nicely done. As for the engine dress, dang, Cinderella never had it so good! And your beauty has no time deadline.
Keep at it, I/we can't wait to see that all bolted on.
Dj
Thank you, I appreciate the kind words of motivation... I am definitely a weekend hack wrench turner and really enjoying the build process. As others have mentioned it only seems to get better as the car starts to come together! Really fortunate to have this forum to study and able to learn a ton from other builders and threads, which is definitely making the process much more do-able for me.
Last edited by Fman; 06-24-2020 at 02:45 PM.
-
Post Thanks / Like - 0 Thanks, 1 Likes
-
06-28-2020, 11:01 PM
#105
Senior Member
Lokar 8078 Ebrake mod - added some leverage and clearance
After a horrendous night at work and two hours of sleep I powered through today and made a little more progress on the Mk4. Thankful for a good cup of joe and some Diet Cokes today to help me make it through the day.
THREAD UPDATE 05/21/21: I ended up not using the extra door hinge extension on the e-brake handle, it was not allowing the e-brake to retract enough and apply enough tension. I have since removed it and the e-brake is working better, although still not as good as e-stopp which I will be adding later on this winter.
Like many others I wanted to improve the FFR cable routing, not a fan of it going under the 4" round tube. I went to the Edwardb playbook, page 34 and there was the Lokar brake mod, I also used a page out of sunshine garage write up. Always appreciate Paul and all the other builders posting up there build pics to help newbs out like myself
https://www.sunshinegaragemkiv.com/c...ncy-brake.html
Here is a pic of the final product after I spent a few hours trying different angles and handle mounts. I was not happy with the lokar alum clevis block hitting the carriage bolt head when tightened up, after a few pulls it was already starting to scrape up the aluminum piece, over time I think this would be a problem. Of all things I ended up using a piece of stainless door hinge I had laying around in my garage. Ironically the holes aligned up perfectly to extend the handle bracket down and create more leverage and much better clearance. I ended up cutting off the hinge slots, grinding the edge smooth and painting the hinge.
I am really pleased with how this turned out, 2-3 clicks on the handle it pulls the cables tight and no components are hitting the lower carriage bolt now. I truly feel like I will have a solid, safe working e-brake now which is what I was hoping for.
This picture is with the e-brake engaged

Ebrake handle disengaged

Door hinge after it was painted and cut down. I did have to enlarge the lower and upper hole to accommodate the larger bolt, simple and easy.

Stainless door hinge before it was cut down and painted

Rollers that are used to support the cable while under tension

Last edited by Fman; 05-21-2021 at 03:30 PM.
-
Post Thanks / Like - 0 Thanks, 1 Likes
-
06-28-2020, 11:18 PM
#106
Senior Member
-
Post Thanks / Like - 1 Thanks, 1 Likes
-
06-29-2020, 05:37 PM
#107
25th Anniversary #9772
Travis - that's some cool innovation using the door hinge!
lookin great buddy! You should probably look at doing carpet in the footbox while you're at it
-
Post Thanks / Like - 0 Thanks, 1 Likes
Fman liked this post
-
06-29-2020, 09:50 PM
#108
Senior Member
Originally Posted by
toadster
Travis - that's some cool innovation using the door hinge!
lookin great buddy! You should probably look at doing carpet in the footbox while you're at it
Todd, I knew there was a reason I never returned that hinge to home depot! Who would have thought, but it did the job and seems to be solid, not expecting any issues with it. That extra length added to the arm makes a noticeable difference to help pull the handle up easier and creates needed clearance. Thanks for the tip on the carpet, I was wondering when the carpet should start going in. I was surprised how difficult it was to access those foot boxes without the side piece off. I definitely wont be attaching the drivers outside panel permanently until after my go-kart.
-
Post Thanks / Like - 0 Thanks, 1 Likes
-
07-01-2020, 10:55 PM
#109
Senior Member
-
Post Thanks / Like - 0 Thanks, 2 Likes
-
07-02-2020, 12:32 AM
#110
MkIV Roadster build: Gen 2 Coyote, IRS, TKO600. Ordered 10/24/18. Delivered 1/29/19. Engine installed 8/8/21. First start 9/12/21. First go-kart 9/17/21. Off to paint 4/11/22. Back from paint 12/30/22.
Build thread here.
-
Post Thanks / Like - 1 Thanks, 0 Likes
Fman thanked for this post
-
07-02-2020, 09:48 AM
#111
25th Anniversary #9772
-
Post Thanks / Like - 1 Thanks, 0 Likes
Fman thanked for this post
-
07-03-2020, 11:22 PM
#112
Senior Member
Wiring started - have some questions looking for some help
Happy 4th of July to everyone, hope this weekend your able to get out and enjoy some time with your family and friends! in CA we get to wear masks, lucky us
I started my electrical today, only mounted the panel and then I started to have some questions so thought it would be a good stopping point.
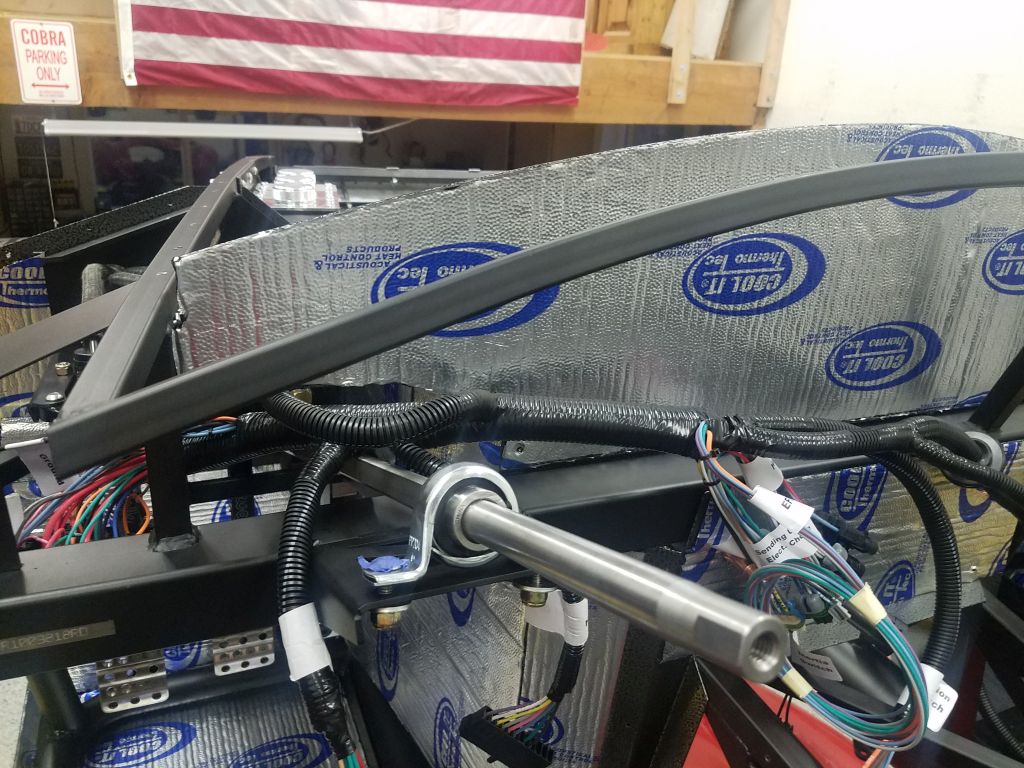
First question, is everyone running the large wire bundle over the steering column shaft? Seems like the only option, not liking how it contacts the shaft, any other ideas?
I am running Mike Forte throttle linkage, anyone using his linkage could you let me know how far over do I need to go with the two 1 1/4" holes in firewall for electrical so I have enough real estate to mount Forte's throttle linkage? Any measurements or help on this would be appreciated! I definitely do not want to drill any holes in my firewall without making 100% sure they are in the proper locations. RF does give mounting hole measurements but they are not taking into consideration people using Forte's throttle linkage setup.
Is there any gotchas with the Ron Francis wiring harness I should be aware of? Just follow the manual step by step?
Thanks in advance for anyone who can give me any help on this...it is always appreciated.
RF fuse panel mounted, I painted it satin black and realized why Powder coating is so much more durable than rattle can paint on aluminum. It got nicked up in a few places installing the panel, will have to go back and touch it up. Not really noticeable under the dash but I was hoping to have a clean looking panel mount with no chips in the paint.

Is this how most guys are running the large wire loom, over the steering shaft? I cant see many other options.
I was also able to get my drivers footbox finished up with Thermo tech. I will finish up the seams once I permanently rivet everything, still using the Clecos on DS footbox.
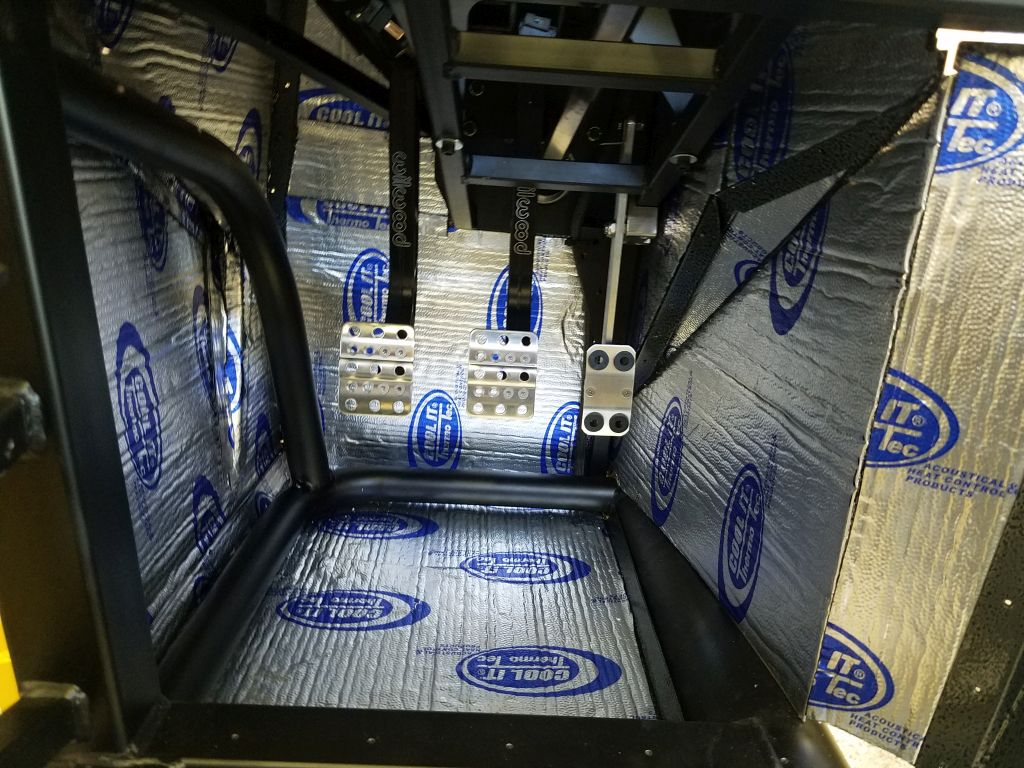
I ended up doing everything above the brake MC's too, hopefully this keeps out as much heat as possible

Last edited by Fman; 07-05-2020 at 06:11 PM.
-
07-04-2020, 10:55 AM
#113
Senior Member
The harness legs need to go above the steering column. And they shouldn't touch or drag on the steering column. You need to figure out a way to keep that from happening. I use a padded clamp attached the firewall on one or more of the harness legs to keep them above. But first order of business IMO is your dash. Get your gauge and switches, including ignition and headlight, located where you want them and use that to route those legs. Route the dash harness on the dash and the legs from the main harness to line up with them. From that, you'll be able to determine the best location and routing for everything. Personally I'd wait on the holes in the firewall as well until you have everything where you think they belong. Including the engine and its connections.
Build 1: Mk3 Roadster #5125. Sold 11/08/2014.
Build 2: Mk4 Roadster #7750. Sold 04/10/2017.
Build Thread
Build 3: Mk4 Roadster 20th Anniversary #8674. Sold 09/07/2020.
Build Thread and
Video.
Build 4: Gen 3 Type 65 Coupe #59. Gen 3 Coyote. Legal 03/04/2020.
Build Thread and
Video
Build 5: 35 Hot Rod Truck #138. LS3 and 4L65E auto. Rcvd 01/05/2021. Legal 04/20/2023.
Build Thread. Sold 11/9/2023.
-
Post Thanks / Like - 1 Thanks, 1 Likes
Fman thanked for this post
Fman liked this post
-
07-05-2020, 11:47 AM
#114
Senior Member
Originally Posted by
edwardb
The harness legs need to go above the steering column. And they shouldn't touch or drag on the steering column. You need to figure out a way to keep that from happening. I use a padded clamp attached the firewall on one or more of the harness legs to keep them above. But first order of business IMO is your dash. Get your gauge and switches, including ignition and headlight, located where you want them and use that to route those legs. Route the dash harness on the dash and the legs from the main harness to line up with them. From that, you'll be able to determine the best location and routing for everything. Personally I'd wait on the holes in the firewall as well until you have everything where you think they belong. Including the engine and its connections.
Thanks Paul, that makes total sense. I am planning on doing the competition dash layout, my engine is in the process of being built hoping to see it in the next 4-6 weeks.
Also I noticed the fuse panel is directly below the clutch MC and center brake MC. If those cylinders ever leaked it appears the panel would get hit with brake fluid which cant be good for anything. Have you seen anyone fab up some type of cover to eliminate any fluid potentially hitting the fuse panel?
Last edited by Fman; 07-05-2020 at 02:51 PM.
-
07-05-2020, 01:20 PM
#115
Senior Member
Hunting around on the internet I did locate this, looks like a good template for comp layout? Not sure if anyone has a better layout, this was about as good as I could find.

-
07-05-2020, 03:28 PM
#116
Hey Travis. One suggestion I've read is to put your seat in position and temporarily place the dash in position, then make some circular cutouts of all the gauges and play with their positions so that you can have a clear line of sight to all the gauges from your sitting position.
MkIV Roadster build: Gen 2 Coyote, IRS, TKO600. Ordered 10/24/18. Delivered 1/29/19. Engine installed 8/8/21. First start 9/12/21. First go-kart 9/17/21. Off to paint 4/11/22. Back from paint 12/30/22.
Build thread here.
-
Post Thanks / Like - 1 Thanks, 2 Likes
Fman thanked for this post
-
07-06-2020, 10:46 PM
#117
Senior Member
Originally Posted by
JohnK
Hey Travis. One suggestion I've read is to put your seat in position and temporarily place the dash in position, then make some circular cutouts of all the gauges and play with their positions so that you can have a clear line of sight to all the gauges from your sitting position.
John, good idea thanks for the tip. The dash is going to keep me busy for awhile, I am looking forward to the challenge. I am also going to try and source out some good quality automotive leather and pad for the dash, not a fan of what FFR sent me. The material they sent me looks cheap and not really good quality, disappointing to see this.
-
07-06-2020, 11:09 PM
#118
Travis, I bought a cow hide on eBay for my dash and it was really nice quality. I wound up going a different direction with the dash but used the leather on the trans cover, headrests and cubby. Check this out https://www.ebay.com/itm/162592582983
Mark
-
Post Thanks / Like - 1 Thanks, 1 Likes
Fman thanked for this post
Fman liked this post
-
07-08-2020, 12:26 AM
#119
Senior Member
Originally Posted by
Mark Eaton
Travis, I bought a cow hide on eBay for my dash and it was really nice quality. I wound up going a different direction with the dash but used the leather on the trans cover, headrests and cubby. Check this out
https://www.ebay.com/itm/162592582983
Mark
Mark, thanks for sharing that link. That hide looks really good quality, I might just order that one up. It appears there would be enough with one hide to do the dash and center console.
One question for you, any idea if this hide matches up with the FFR leather seats?
-
07-08-2020, 03:50 AM
#120
Senior Member

Originally Posted by
Fman
I noticed the fuse panel is directly below the clutch MC and center brake MC. If those cylinders ever leaked it appears the panel would get hit with brake fluid which cant be good for anything. Have you seen anyone fab up some type of cover to eliminate any fluid potentially hitting the fuse panel?
Havent had issue with the MC's leaking (touch wood) but instead on a friends Mk3 had a case where after washing the car, the indicators would no longer flash. Fault traced to flasher can full of water. This had dripped through where the side bar on the windscreen passes through the body. Even though my friend had done his best to seal it, water still penetrated. This was a RH drive, but is pretty much a mirror image of what you are building, so something to consider?
Cheers,
Nigel


 Thanks:
  Likes:


 Reply With Quote
