-
Senior Member

Windshield Bracket Slots
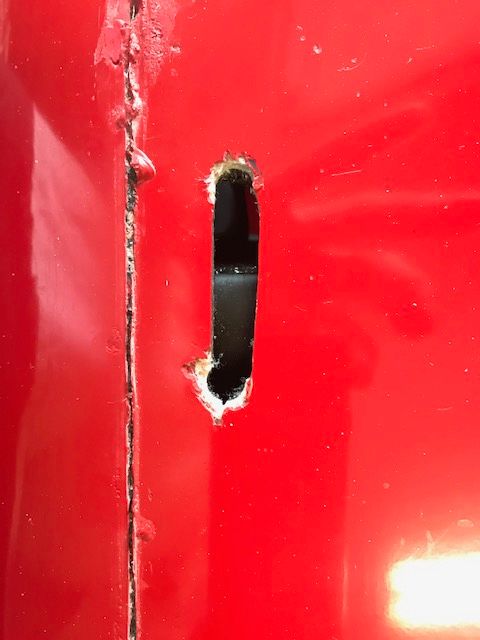
Hey guys. Finally getting around to mounting my windshield. 2 questions in regard to the windshield bracket slots that are precut from FFR. As with most I'm sure, mine are not even from side to side. The passenger side slot is cut about 5/8" forward compared to the driver's side.
My questions are around modifying these slots. The driver's side slot has no interference and will go right in. On the passenger side, the firewall extension is falling almost right in the middle of the slot...maybe 1/16" or so short of half. I've cut back the bulb seal just a little, so I'd have to cut the slot forward about 1/2" in order for the windshield bracket to slide down. Which brings me to the driver's side, I'd have to lengthen that slot quite a bit to match the passenger side, as it's already 5/8" behind the passenger side.
I'm assuming that these slots should be equidistant on both sides. Here's a picture of the passenger side slot (Top is toward the rear of the car).
Thoughts?
-
Post Thanks / Like - 1 Thanks, 0 Likes
-
I would take a ruler or anything straight that's about 1 to 1.5 wide. Draw a line down the center of it and them place it on the frame where the windshield mounts. Center the lines on the ruler over the holes. move it up till it touches the underside of the body. Now you know where the centerline of the arm will be as well as the inside edge. Open up from there until you can slide the arms down through the slots in the body. I have had to trim the aluminum on the passenger side many times. You will also find that the slots are not parallel to the center line of the body. Once you can get the assembled windshield in place, you can mark the actual cutout size and repair any areas that you not happy with. If I get some that are way off, I mark where the cutout should be by extending lines well beyond the actual cutout then fill the whole thing in with 3M high strength filler and then recut.
Mike
-
Post Thanks / Like - 0 Thanks, 1 Likes
-

Steve >> aka: GoDadGo

Mike Everson Knows These Cars Like The Back Of His Hand!
...He has Built Many Factory Fives So You Just Got Some Great Advice!
..............NOTE:..Evercoat Fibertech will do the trick of filling any holes too.
Last edited by GoDadGo; 06-21-2020 at 07:07 AM.
-
Not a waxer

First of all don't try to make the left and right match. You need to think of these as two separate half cars---one is the left half and the other is the right half. They aren't alike; not at the front, not at the back and not at the middle. Get your head around that and things are easier!
As Mike mentioned the firewall extension on the RH side needs to have the slot cut down 1/2 to 3/4 of an inch to provide clearance for the windshield arm. Interrupt the bulb seal across the entire width of the slot.

As a rule of thumb the finished slots in the body measure approximately 5/8" wide and around 2 1/4" long. Open them up a little at a time as needed...if they wind up a bit big it can be dealt with (your body guy will just gripe about it) 
Jeff
firewall extension.jpg
-
Post Thanks / Like - 1 Thanks, 1 Likes
-
Senior Member
Thanks Mike and Jeff. You guys are awesome!!
-
Steve >> aka: GoDadGo

Originally Posted by
cv2065

Thanks Mike and Jeff. You guys are awesome!!
So Luke Skywalker (Mike) & Obi-Wan Kenobi (Jeff) are both on the scene so The Force Is Truly With You!
-
I didn't see it covered in the posts above, but with the windshield in its final position, the body shouldn't touch the windshield frame at all. Open the slots in any spots that contact the frame.
-
Senior Member

Plus - the body to lower windshield chromed plates are a generous size and will cover the enlarged slot in the body.
Chris
Generation 3 Type 65 Daytona Coupe Complete Kit #151885 received May 6, 2022. Gen 3 Coyote, IRS, Tremec TKX, American Powertrain hydraulic throwout bearing & Wilwood brakes.
MK4 Basic Kit #7404, 347 EFI - Pro M Racing ECM, 30# injectors, 70 mm throttle body, 80 mm MAF, Edelbrock Performer aluminum heads & RPM II intake, all new G-Force T5, 3:55 gears, Pro 5.0 shifter, 3-link, carbon fiber dash/custom Speedhut gauges and paint by Da Bat.
-
Senior Member
Looks like I'll have to drop the fuse panel in order to get access on the driver's side. I have a bus bar sitting on the 2" that is in my way. The art of putting one of these together insists that you think ahead for future access.
-
Not a waxer
Originally Posted by
cv2065
Looks like I'll have to drop the fuse panel in order to get access on the driver's side.
Pretty much always. You want to make like easier for yourself (and others )? After you mark where the holes need to be in the windshield arms drill and tap them for 1/2-13 bolts. Much, much better than having to fuss with bolts and nuts.
Jeff
-
Senior Member
Originally Posted by
Jeff Kleiner
Pretty much always. You want to make like easier for yourself (and others
)? After you mark where the holes need to be in the
windshield arms drill and tap them for 1/2-13 bolts. Much, much better than having to fuss with bolts and nuts.
Jeff
Thanks Jeff. Got the tools lined up to do just that.
-
Originally Posted by
cv2065
Looks like I'll have to drop the fuse panel in order to get access on the driver's
side. I have a bus bar sitting on the 2" that is in my way. The art of putting one of these together insists that you think ahead for future access.
:-) I have a lot of holes from things I've had to move.
-
Senior Member

Originally Posted by
Jeff Kleiner
Pretty much always. You want to make like easier for yourself (and others
)? After you mark where the holes need to be in the
windshield arms drill and tap them for 1/2-13 bolts. Much, much better than having to fuss with bolts and nuts.
Jeff
Where the hells the fun in that??? ")
Mrk III, 331 stroker, Borla stack injection, T5, 3:55 IRS, Power steering and brakes. Kleiner body & paint


 Thanks:
  Likes:


 Reply With Quote


