BluePrint Engines

Visit our community sponsor

Thanks Thanks:  255
Likes Likes:  391
Page 11 of 14 FirstFirst ... 910111213 ... LastLast
Results 401 to 440 of 525

Thread: EdwardB’s 35 Hot Rod Truck Build

  1. #401
    Senior Member
    Join Date
    Jan 2021
    Posts
    221
    Post Thanks / Like
    Great resolution - nice work as usual..
    Jeff_J

  2. #402
    Senior Member edwardb's Avatar
    Join Date
    Feb 2011
    Location
    Lake Orion, Michigan
    Posts
    10,576
    Post Thanks / Like
    Quote Originally Posted by McGuyver View Post
    Paul, you are way ahead of me as always. Assuming I will probably have similar issues when I get to my doors. You mind posting or sending a few interior photos of your pie cut handy work? Just trying to get a better idea of the process. Thanks
    Quote Originally Posted by House Money View Post
    I too would like to see pics of the pie cuts made to get the doors to fit better.

    Gary
    Thought about taking pictures as I was laying this out and doing the cuts. But didn’t. So will try to explain and show what I did. Pretty straightforward, I think. First, with the doors on the cab, marked where the door to body alignment started going out. On both sides, in the vicinity of the door handle on the sides, and 14-16” back on the bottom. Then I measured the amount the door stood proud at the bottom corner. As noted previously, just over 1/4" on the left side. Under 1/4" on the right side. Of course () used a digital micrometer and noted the actual values. This was the amount to remove on both sides. Then removed the doors.

    Next, I laid a piece of blue masking tape on the inside door shell portion going up into the radius of the door skin. Then, using a spacer block (roughly 3/16" thick) drew a line with a Sharpie on the tape parallel to the back of the door skin. Basically, where the inner radius ended. That was one cut line. Then I traced the curve of the door sides and bottoms onto pieces of thin cardboard. (Ram Board from HD. Perfect template material. A roll lasts forever.) Then used the templates to trace the second cut line which matches the curve of the door. On top of the first line where the alignment started to go out and offset by the measured amount of misalignment at the bottom rear corner. Hence the term pie cut. In this case, a long skinny pie cut.

    Using a Dremel with a cut-off wheel, it was easy enough to follow the lines. Tried to make the cuts as straight as possible to get a good bond line. I wasn’t sure how flexible the door skin would be once the cuts were complete. But not an issue. Easy to clamp and close the pie cut. Next, applied HSRF somewhat liberally to the cut, making sure both sides were wetted, and clamped closed. Tip: Either leave the masking tape in place or apply new strips along both sides of the cut lines. Then once clamped, scrape the squeezed out HSRF off and let cure. Then remove the tape. Prevents getting HSRF on the gel coat (which you need to remove because it doesn’t bond well but still is a pain to sand off) and makes it real easy to give a light sand and you’re done for the outside. For the inside, I use vinylester resin and 2-1/2” wide strips of fiberglass cloth across the cut lines for reinforcement.

    Today took these pictures. As mentioned above, this is after the cut and re-bond. So only for illustration. But hopefully makes sense along with the above description. The bond line is visible. The tape outlines the approximate amount of material that was previously removed. For the sides, the match is nearly even. With usual finishing methods will disappear. For the bottom, the shell is angled so removing the 1/4" or so of material caused the match to be slightly off. As evidenced by the additional visible HSRF and slight step. A little bit of body filler will make that go away. Or do nothing as it’s on the bottom of the door and not normally visible. Hope that all makes sense and helps.

    RH Side:


    RH Bottom:

    Last edited by edwardb; 08-13-2022 at 05:34 AM.
    Build 1: Mk3 Roadster #5125. Sold 11/08/2014. Build 2: Mk4 Roadster #7750. Sold 04/10/2017. Build Thread
    Build 3: Mk4 Roadster 20th Anniversary #8674. Sold 09/07/2020. Build Thread and Video. Build 4: Gen 3 Type 65 Coupe #59. Gen 3 Coyote. Legal 03/04/2020. Build Thread and Video
    Build 5: 35 Hot Rod Truck #138. LS3 and 4L65E auto. Rcvd 01/05/2021. Legal 04/20/2023. Build Thread. Sold 11/9/2023.

  3. Likes McGuyver, Pat Landymore, RuffShod liked this post
  4. #403
    Senior Member
    Join Date
    Sep 2019
    Location
    Houston, TX
    Posts
    130
    Post Thanks / Like
    Thanks for the write up Paul, much better understanding of the process now! Looks like it was similar to what Pat resorted to on his build.

  5. Thanks edwardb thanked for this post
  6. #404
    Senior Member
    Join Date
    Aug 2019
    Location
    Alvin, Texas
    Posts
    235
    Post Thanks / Like
    I don't exactly understand where you made the cuts.

  7. #405
    Senior Member edwardb's Avatar
    Join Date
    Feb 2011
    Location
    Lake Orion, Michigan
    Posts
    10,576
    Post Thanks / Like
    Quote Originally Posted by RuffShod View Post
    I don't exactly understand where you made the cuts.
    I don't know how to explain it any differently than I did in post #402 above. The white you can see in the pictures is one cut. The edge of the tape represents where the other cut would be. It's logical if you think of what's trying to happen as a result, e.g. eliminate the bottom rear corner protruding out of the cap door opening. Apologize I didn't take pictures before making the cuts. I would have been more clear. The above are after the cuts and re-bond. But still illustrates what I did. I don't know where you're at with your build or if you have the same misalignment. You may/may not have to do this.
    Build 1: Mk3 Roadster #5125. Sold 11/08/2014. Build 2: Mk4 Roadster #7750. Sold 04/10/2017. Build Thread
    Build 3: Mk4 Roadster 20th Anniversary #8674. Sold 09/07/2020. Build Thread and Video. Build 4: Gen 3 Type 65 Coupe #59. Gen 3 Coyote. Legal 03/04/2020. Build Thread and Video
    Build 5: 35 Hot Rod Truck #138. LS3 and 4L65E auto. Rcvd 01/05/2021. Legal 04/20/2023. Build Thread. Sold 11/9/2023.

  8. Thanks Sigurd thanked for this post
  9. #406
    Senior Member
    Join Date
    Aug 2019
    Location
    Alvin, Texas
    Posts
    235
    Post Thanks / Like
    Quote Originally Posted by edwardb View Post
    I don't know how to explain it any differently than I did in post #402 above. The white you can see in the pictures is one cut. The edge of the tape represents where the other cut would be. It's logical if you think of what's trying to happen as a result, e.g. eliminate the bottom rear corner protruding out of the cap door opening. Apologize I didn't take pictures before making the cuts. I would have been more clear. The above are after the cuts and re-bond. But still illustrates what I did. I don't know where you're at with your build or if you have the same misalignment. You may/may not have to do this.
    I see it now. The pix wernt there when I posted.

    Thanks!

  10. #407
    Senior Member edwardb's Avatar
    Join Date
    Feb 2011
    Location
    Lake Orion, Michigan
    Posts
    10,576
    Post Thanks / Like

    More Body Work Completed

    It’s been a while since my last update. Very busy month with family related travels plus lots of Coupe driving events. The Woodward Dream Cruise (http://www.woodwarddreamcruise.com/) seemed bigger and more crowded than ever. It's officially only a Saturday event. But in reality lasts all week. The Saturday turned out nice and we had a good time. I believe the count of cars from the Great Lakes Cobra Club was over 60 for our Snake Pit event as part of the cruise. The Coupe turned 5,000 miles last weekend. Not too bad for its second full driving season. Have I mentioned how much I like that thing? Two more events this weekend. But back to the build.

    My goal has been to wrap up my punch list prior to paint. The only items left now are body work related. After fixing the doors (last update) my next task was the hood. Two issues. The gap at the back by the windshield/cowl area was noticeably too wide. About 1/2 inch. I did some very minor clean-up of the front and back edges. But didn’t take any length off. This was how it was received. My original thought was just to leave it. But after staring at it long enough, decided to do something about it. The second thing to fix was the mismatch between the angle of the hood and the top angle of the grill cowl which had a noticeable “up” angle compared to the hood. Not a good look. There’s some variability here I guess. A function of the radiator angle and location. I have the radiator placed at the only location and angle that everything would fit. Which in turn dictates the angle of the grille and cowl. So no chance to change anything there. At least for how I have it assembled and I'm not going to change anything at this point. The engine side covers fit reasonably well. So seems I had things about right. This is a “before” picture I posted previously.


    For the rear edge of the hood, I need to add about 1/4". Then slide the hood back slightly so it clears the grill cowl when opening. Resulting in a goal of 3/16” gap. I did what I’ve done a couple times before on other builds with HSRF. First, roughed up the edge with 40 grit paper. Then used the same 40 grit to make about a 1/8” bevel on both sides of the hood edge. Because the hood is relatively thick, I decided to also drill 1/16” holes about 1/4" apart all along the edge. Something for the HSRF to have even more of a grip. I made a dam out of cardboard by tracing the back edge of the hood and cutting accordingly, covered the edge with clear packing tape, waxed the tape, and double-back taped it to the top of the hood. Leaving roughly 1/4" exposed. Then troweled on the HSRF up to the level of the other side. Pushing the HSRF as much as I could into the bevels and 1/16" holes. Worked pretty well. Sanded, put the hood back on the body, used a scribe to get my new gap line, and sanded/trimmed the HSRF accordingly. Mission accomplished. Much better. Now I can stand to look at it.


    For the hood/grill cowl, first I adjusted the hood so it was a straight line along the top of the hood to the front of the cowl. Like the above picture. This required a somewhat large bumper under the center. Then, using a straight edge, marked where the filler (again, HSRF) needed to be applied on the grill cowl. Ending up being kind of a crescent shape. Used a DA to remove the gel coat in that area and followed up with 40 grit paper (again) to make sure the bare glass was plenty rough. Side note: It's funny how when you're not trying to harm the gel coat seems like you go right through it. When trying to remove it on purpose, it's like iron. Oh well. Then troweled on more of that liquid gold (aka HSRF) and used a straight edge to the hood to level appropriately. Took a couple coats to get it acceptable. Plus I was trying to get it as close as possible to minimize major sanding. That stuff doesn’t sand easily to say the least. With final sanding and rounding, mounted the hood and adjusted the hinges as necessary. The hood isn’t a perfect match on the sides. But the top is now level with the cowl and looks 100% better. A thin skim coat of body filler and the usual finishing steps and I expect the build-up will disappear. Note the gap has to be this wide on the front. I’ve beveled the back of the hood and rounded the grill cowl and it just clears when opening and closing.


    My very last item on the punch list is to spray UPOL Raptor on the underside of the fenders, running boards, engine sides, and bed sides. Will get that done in the next few weeks before the weather turns cool. (Grrr) With that I’m officially out of things to do until paint. I have a possible lead on paint for this winter. But no final decision yet. We’ll see.

    Finally, to go off topic just a bit, I’ve been collecting things I need for my next project. Mentioned in post number 371. One of the standing jokes on this forum is the question “How many clecos does it take…” and numbers both high and low are suggested. Today I’m announcing that I plan to win any future such contests. 650 between those four containers. Looks like the project should be starting in the next few months.

    Last edited by edwardb; 09-03-2022 at 07:00 PM.
    Build 1: Mk3 Roadster #5125. Sold 11/08/2014. Build 2: Mk4 Roadster #7750. Sold 04/10/2017. Build Thread
    Build 3: Mk4 Roadster 20th Anniversary #8674. Sold 09/07/2020. Build Thread and Video. Build 4: Gen 3 Type 65 Coupe #59. Gen 3 Coyote. Legal 03/04/2020. Build Thread and Video
    Build 5: 35 Hot Rod Truck #138. LS3 and 4L65E auto. Rcvd 01/05/2021. Legal 04/20/2023. Build Thread. Sold 11/9/2023.

  11. #408
    Not a waxer Jeff Kleiner's Avatar
    Join Date
    Feb 2011
    Location
    Bloomington, Indiana
    Posts
    8,082
    Post Thanks / Like
    Well done Paul! We’ll make a body man out if you yet

    Jeff

  12. Likes edwardb liked this post
  13. #409
    Senior Member Nigel Allen's Avatar
    Join Date
    Oct 2012
    Location
    South Australia
    Posts
    504
    Post Thanks / Like
    Hmmmm, I don't recall any announcements? Is it aircraft related?

    Nigel
    Mk.4 FFR supplied Right hand drive
    Received 12/2012 completed 12/2019
    Gen1 Coyote / TKO600 / IRS
    Lots of mods to make compliant for Australian design rules

  14. Thanks edwardb thanked for this post
  15. #410
    Senior Member edwardb's Avatar
    Join Date
    Feb 2011
    Location
    Lake Orion, Michigan
    Posts
    10,576
    Post Thanks / Like
    Quote Originally Posted by Nigel Allen View Post
    Hmmmm, I don't recall any announcements? Is it aircraft related?

    Nigel
    I didn't make any announcements. Because some have asked, said at the end of the post referenced that I'd picked my next project and started the order process. Another one from my bucket list and should be another great learning experience and probably stretch me more than I realize. Don't want to get off topic in this build thread but have to keep the suspense up, right? Although you might be on to something.
    Build 1: Mk3 Roadster #5125. Sold 11/08/2014. Build 2: Mk4 Roadster #7750. Sold 04/10/2017. Build Thread
    Build 3: Mk4 Roadster 20th Anniversary #8674. Sold 09/07/2020. Build Thread and Video. Build 4: Gen 3 Type 65 Coupe #59. Gen 3 Coyote. Legal 03/04/2020. Build Thread and Video
    Build 5: 35 Hot Rod Truck #138. LS3 and 4L65E auto. Rcvd 01/05/2021. Legal 04/20/2023. Build Thread. Sold 11/9/2023.

  16. #411
    Senior Member FLFrank35's Avatar
    Join Date
    May 2019
    Location
    Viera, FL
    Posts
    261
    Post Thanks / Like
    Blog Entries
    1
    Quote Originally Posted by edwardb View Post
    Couple of other miscellaneous items. I want to have a fire extinguisher in the truck. For safety plus required in some shows I attend. I’ve been reading about a new type of extinguisher from a company called Element. Has been featured on some of the automotive shows on TV too. Looked interesting, so I’m giving it a try. I chose the Element EL 40050 which is a 50 second discharge.
    Great idea with the extinguisher! How/where did you mount it?
    Thanks

  17. #412
    Senior Member edwardb's Avatar
    Join Date
    Feb 2011
    Location
    Lake Orion, Michigan
    Posts
    10,576
    Post Thanks / Like
    Quote Originally Posted by FLFrank35 View Post
    Great idea with the extinguisher! How/where did you mount it?
    Thanks
    Haven't yet. Will be part of final assembly which is still a ways away. For now, my thought is behind the seats. There's quite a bit of room back there and the seats I purchased allow the seatback to tip forward as well as back. If that doesn't work out, maybe under the dash somewhere. Open to other suggestions.
    Build 1: Mk3 Roadster #5125. Sold 11/08/2014. Build 2: Mk4 Roadster #7750. Sold 04/10/2017. Build Thread
    Build 3: Mk4 Roadster 20th Anniversary #8674. Sold 09/07/2020. Build Thread and Video. Build 4: Gen 3 Type 65 Coupe #59. Gen 3 Coyote. Legal 03/04/2020. Build Thread and Video
    Build 5: 35 Hot Rod Truck #138. LS3 and 4L65E auto. Rcvd 01/05/2021. Legal 04/20/2023. Build Thread. Sold 11/9/2023.

  18. #413
    Senior Member FLFrank35's Avatar
    Join Date
    May 2019
    Location
    Viera, FL
    Posts
    261
    Post Thanks / Like
    Blog Entries
    1
    Quote Originally Posted by edwardb View Post
    Haven't yet. Will be part of final assembly which is still a ways away. For now, my thought is behind the seats. There's quite a bit of room back there and the seats I purchased allow the seatback to tip forward as well as back. If that doesn't work out, maybe under the dash somewhere. Open to other suggestions.
    Ok, thanks!
    I'm considering a rollbar mount or possibly under the seat, so it can be grabbed while seated.

  19. #414
    Senior Member Robodent's Avatar
    Join Date
    Aug 2018
    Location
    Hampshire, IL
    Posts
    302
    Post Thanks / Like
    I’m looking forward to see what you guys come up with on where to mount a extinguisher. I’ve been considering it for a while now.
    FFR 35 p/u # 0016 Dart 347 TKO 600

  20. #415
    Senior Member edwardb's Avatar
    Join Date
    Feb 2011
    Location
    Lake Orion, Michigan
    Posts
    10,576
    Post Thanks / Like

    Undercoating

    Finally, another update. Since my last update, Erik Treves took his truck build from kit delivery to a running and rolling chassis. That’s crazy. For lots of reasons, don’t expect I'll ever be able to complete things at that pace. I have been working some when I’ve had the chance but nothing too significant to report. Between driving season and events with the Coupe, travel, couple weeks in Cleveland for planned surgery for my wife, it's been an usually busy summer and now fall. Will sneak in a couple updates today.

    I had a page-long punch list of body related items to complete, which is now done. I will only say that deciding to do a truck with full fenders, running boards, hood, and engine side covers probably doubles or even triples the amount of body related work compared to what I’ve observed are the more common truck builds with open wheels, etc. I don’t regret my choice one bit. It’s how I envisioned the truck for me. But fair warning to other builders – it’s not just the sheer number of fiberglass parts to deal with but getting them to all fit together. I’m done. Can’t say it’s perfect. But as close as I’m going to get with how the parts fit. Enough said on that.

    My last task before going to paint was to put undercoating on the fenders, running boards, and bed sides. I used UPOL Raptor, same as earlier on this build and on my Coupe build. Really like how that stuff goes down and how durable it is once cured. Highly recommended. Spent hours masking (the usual case when spraying…) and yesterday had a perfect day out on the driveway getting the pieces sprayed. Put a single coat on the bed sides. Only the part that’s below the SS panels but visible from underneath. Put three coats on the other pieces. Used up a 4-liter kit in the process. The directions are excellent so can’t add anything. I used the higher end Raptor adjustable gun (UPL-UP4880) which I highly recommend over the standard Schutz gun. My only caution is to follow the directions and clean the gun between each coat. Not necessarily like the final cleaning. But get the material out of the innards of the gun. The one hour wait time between coats is just enough for the material to start gelling and mess with how it flows the next time around. Ask me how I know about that. All done now and looks like this while curing for a couple days while the DD sits outside.


    Next up I’m going to remove the dash and all the components. Then I’m ready for paint. I have a painter lined up so that’s a breakthrough. A buddy who used to paint cars in a former life is going to paint it for me. He did his own Challenge Roadster and it looks very nice. Plan is to start next month and should easily be complete and back together for the start of driving season next year. We’ve decided to leave the cab on the chassis, with that and the doors to be completed first. Then back to my place for re-assembly with the balance of pieces as they’re completed. Looking forward to getting this wrapped up. I think it’s going to be a fun ride. The first components of my next project are supposed to be shipping any time. So shouldn’t run out of things to do.
    Last edited by edwardb; 10-07-2022 at 05:56 AM.
    Build 1: Mk3 Roadster #5125. Sold 11/08/2014. Build 2: Mk4 Roadster #7750. Sold 04/10/2017. Build Thread
    Build 3: Mk4 Roadster 20th Anniversary #8674. Sold 09/07/2020. Build Thread and Video. Build 4: Gen 3 Type 65 Coupe #59. Gen 3 Coyote. Legal 03/04/2020. Build Thread and Video
    Build 5: 35 Hot Rod Truck #138. LS3 and 4L65E auto. Rcvd 01/05/2021. Legal 04/20/2023. Build Thread. Sold 11/9/2023.

  21. Likes Pat Landymore, jayguy, slarson liked this post
  22. #416
    Senior Member edwardb's Avatar
    Join Date
    Feb 2011
    Location
    Lake Orion, Michigan
    Posts
    10,576
    Post Thanks / Like

    Final Paint Preparation

    Last minor update before (hopefully) showing some paint progress. Should get started in the next month or so. My painter asked if there was a way to hold the fenders for sanding and paint. Ideally at a good working height and the same orientation as on the truck. Something better than the usual x-frame style work stand. Anything I can do to make his life easier (and maybe save a buck??). I used the base from the Moser crate my rear axle came in. Plus, some scraps from a retired body buck. Came up with what’s pictured below. Fenders are held in place by the same flange and bolt holes that hold it to the body plus another padded brace piece near the outside not visible in the pictures. Not pretty and will be kindling or recycle once used. But I think will do the job.


    Also spent a few hours, with some more scrap 2x4’s left behind by the former owner of our house and some HF casters, to make a stand for this tool for my next project. Some will know what it is.


    And since I’m posting random pictures, will add this one. Some of you may have seen the thread I posted about meeting Peter Brock at an event here in the SE Michigan area. What an incredible honor that was! We were doing a parade lap around the track and he rode by the string of cars in a golf cart. When he came to my Coupe, they stopped the cart, he got out, and we had a chance to briefly talk and take some pictures. What a gentleman he was! He was very complimentary of my Coupe. I posted some pictures in the other thread. But recently got a copy of this one from another vantage point. Obviously we were posing for a few pictures. Very cool.


    OK, back to the truck build to get this thing wrapped up. Will be quiet for awhile I suspect. But hopefully next posts are with paint going on.
    Last edited by edwardb; 10-14-2022 at 01:40 PM.
    Build 1: Mk3 Roadster #5125. Sold 11/08/2014. Build 2: Mk4 Roadster #7750. Sold 04/10/2017. Build Thread
    Build 3: Mk4 Roadster 20th Anniversary #8674. Sold 09/07/2020. Build Thread and Video. Build 4: Gen 3 Type 65 Coupe #59. Gen 3 Coyote. Legal 03/04/2020. Build Thread and Video
    Build 5: 35 Hot Rod Truck #138. LS3 and 4L65E auto. Rcvd 01/05/2021. Legal 04/20/2023. Build Thread. Sold 11/9/2023.

  23. Likes BlueMud, RR20AC, WIS89, Fman liked this post
  24. #417
    Junior Member
    Join Date
    Jul 2022
    Posts
    14
    Post Thanks / Like
    Quote Originally Posted by edwardb View Post
    Last minor update before (hopefully) showing some paint progress. Should get started in the next month or so. My painter asked if there was a way to hold the fenders for sanding and paint. Ideally at a good working height and the same orientation as on the truck. Something better than the usual x-frame style work stand. Anything I can do to make his life easier (and maybe save a buck??). I used the base from the Moser crate my rear axle came in. Plus, some scraps from a retired body buck. Came up with what’s pictured below. Fenders are held in place by the same flange and bolt holes that hold it to the body plus another padded brace piece near the outside not visible in the pictures. Not pretty and will be kindling or recycle once used. But I think will do the job.


    Also spent a few hours, with some more scrap 2x4’s left behind by the former owner of our house and some HF casters, to make a stand for this tool for my next project. Some will know what it is.


    And since I’m posting random pictures, will add this one. Some of you may have seen the thread I posted about meeting Peter Brock at an event here in the SE Michigan area. What an incredible honor that was! We were doing a parade lap around the track and he rode by the string of cars in a golf cart. When he came to my Coupe, they stopped the cart, he got out, and we had a chance to briefly talk and take some pictures. What a gentleman he was! He was very complimentary of my Coupe. I posted some pictures in the other thread. But recently got a copy of this one from another vantage point. Obviously we were posing for a few pictures. Very cool.


    OK, back to the truck build to get this thing wrapped up. Will be quiet for awhile I suspect. But hopefully next posts are with paint going on.


    Awesome Paul cant wait to see Paint , will you be posting a link for the new project thread ?

  25. #418
    Senior Member edwardb's Avatar
    Join Date
    Feb 2011
    Location
    Lake Orion, Michigan
    Posts
    10,576
    Post Thanks / Like
    Quote Originally Posted by orangecruz View Post
    Awesome Paul cant wait to see Paint , will you be posting a link for the new project thread ?
    Thanks. I can't wait to get it painted and all back together either. Legal and driving will be some months though as fall weather as officially arrived in Michigan and we all know what happens next.

    I'll be documenting the new project but not sure exactly how or where yet.
    Build 1: Mk3 Roadster #5125. Sold 11/08/2014. Build 2: Mk4 Roadster #7750. Sold 04/10/2017. Build Thread
    Build 3: Mk4 Roadster 20th Anniversary #8674. Sold 09/07/2020. Build Thread and Video. Build 4: Gen 3 Type 65 Coupe #59. Gen 3 Coyote. Legal 03/04/2020. Build Thread and Video
    Build 5: 35 Hot Rod Truck #138. LS3 and 4L65E auto. Rcvd 01/05/2021. Legal 04/20/2023. Build Thread. Sold 11/9/2023.

  26. #419
    Senior Member Higgybulin's Avatar
    Join Date
    Dec 2017
    Location
    Southern Ontario
    Posts
    486
    Post Thanks / Like
    Quote Originally Posted by edwardb View Post
    Thanks. I can't wait to get it painted and all back together either. Legal and driving will be some months though as fall weather as officially arrived in Michigan and we all know what happens next.

    I'll be documenting the new project but not sure exactly how or where yet.
    I'm not sure what your next project is but I assume it not Factory Five based. How bout posting a thread in the 'off topic' forum here. Your on here all the time anyway lol!!
    New MK4 kit ordered, promised date 04/13/24
    MK4 #10616 picked up 4/10/23!!!
    302w, 4 link, 17's, dual roll bar SOLD
    MK4 #9759 picked up on 4/3/19
    351C, 3 link, 17's, dual roll bars SOLD

  27. Thanks edwardb thanked for this post
    Likes Jeff33Ford liked this post
  28. #420

    Join Date
    May 2014
    Location
    Simi Valley, CA
    Posts
    566
    Post Thanks / Like
    Way back in post 407 (amongst many others) you demonstrated that you are a master of using HSRF. Now that HSRF is becoming available again I thought it was a good time to bring up an issue I've had working with the stuff. My problem is that even if I mix a small (golf ball size) quantity, some of it sets up before I can get it where I need it. Is there any way to increase the working life without compromising the strength? Or, do I just need to work faster?

    Thanks,

    Keith HR #894

  29. #421
    Senior Member edwardb's Avatar
    Join Date
    Feb 2011
    Location
    Lake Orion, Michigan
    Posts
    10,576
    Post Thanks / Like
    Quote Originally Posted by progmgr1 View Post
    Way back in post 407 (amongst many others) you demonstrated that you are a master of using HSRF. Now that HSRF is becoming available again I thought it was a good time to bring up an issue I've had working with the stuff. My problem is that even if I mix a small (golf ball size) quantity, some of it sets up before I can get it where I need it. Is there any way to increase the working life without compromising the strength? Or, do I just need to work faster?

    Thanks,

    Keith HR #894
    Don't know if I'm the master but have gone through enough cans of the stuff during my builds. But for all the times I've used it, I rarely mix that much at once. Granted, their mix instructions ("1-1/2 inch strip to a golf ball sized amount of filler") don't translate easily to smaller portions. But I do the best I can to estimate and haven't had any issues. I have whatever I'm doing ready to go before starting to mix, and plan on 3-4 minutes (maybe 5) of working time before it starts to kick. So plan what I'm trying to do accordingly. I'll frequently break up a task into several separate mix sessions if possible. Also, the quicker you can get it spread out will give you a little more time. Left in a larger/thicker size amount on your mixing surface will kick faster. Hope that helps a little.
    Build 1: Mk3 Roadster #5125. Sold 11/08/2014. Build 2: Mk4 Roadster #7750. Sold 04/10/2017. Build Thread
    Build 3: Mk4 Roadster 20th Anniversary #8674. Sold 09/07/2020. Build Thread and Video. Build 4: Gen 3 Type 65 Coupe #59. Gen 3 Coyote. Legal 03/04/2020. Build Thread and Video
    Build 5: 35 Hot Rod Truck #138. LS3 and 4L65E auto. Rcvd 01/05/2021. Legal 04/20/2023. Build Thread. Sold 11/9/2023.

  30. Thanks WIS89 thanked for this post
  31. #422
    Senior Member Mastertech5's Avatar
    Join Date
    Jul 2020
    Location
    Spencer, MA
    Posts
    865
    Post Thanks / Like
    Hi edwardb. Your truck is coming along great! I'm having an issue with the pink wire in the GM harness that I'm suppose to connect to ign/start 12 volts(orange coil/EFI wire of the RF harness). I can't find a wire sticking out of the harness like the fuel pump and coolant fan wires. Am I to assume you use the #11 pink wire slot in the GM harness bulkhead connector? JimLev's has this engine too and he has his all taped up and can't remember. I have the terminals and seals for doing that. Your help would be greatly appreciated. You can let me know in my build thread so as to not take up more space in yours. Thanks!
    33 Hot Rod Stage 1, Gen.2 ordered 11/11/2021 started June 12, 2022, LS3 E-Rod crate engine, Tremec TKX, 8.8 WITH 3.55 Ratio and limited slip with 31 spline axles.17X8 and18x10 Race Star wheels wrapped in Conti Extreme contact DWS tires, Mustang Cobra brakes all around. Electric PS and AC. Hard top, electric windows and bike fenders. First Start 5/31/2023. Go-Kart 6/2/2023.

  32. #423
    Senior Member edwardb's Avatar
    Join Date
    Feb 2011
    Location
    Lake Orion, Michigan
    Posts
    10,576
    Post Thanks / Like
    Quote Originally Posted by Mastertech5 View Post
    Hi edwardb. Your truck is coming along great! I'm having an issue with the pink wire in the GM harness that I'm suppose to connect to ign/start 12 volts(orange coil/EFI wire of the RF harness). I can't find a wire sticking out of the harness like the fuel pump and coolant fan wires. Am I to assume you use the #11 pink wire slot in the GM harness bulkhead connector? JimLev's has this engine too and he has his all taped up and can't remember. I have the terminals and seals for doing that. Your help would be greatly appreciated. You can let me know in my build thread so as to not take up more space in yours. Thanks!
    It's not the pink wire in the bulkhead connector. More detailed response in your build thread.
    Build 1: Mk3 Roadster #5125. Sold 11/08/2014. Build 2: Mk4 Roadster #7750. Sold 04/10/2017. Build Thread
    Build 3: Mk4 Roadster 20th Anniversary #8674. Sold 09/07/2020. Build Thread and Video. Build 4: Gen 3 Type 65 Coupe #59. Gen 3 Coyote. Legal 03/04/2020. Build Thread and Video
    Build 5: 35 Hot Rod Truck #138. LS3 and 4L65E auto. Rcvd 01/05/2021. Legal 04/20/2023. Build Thread. Sold 11/9/2023.

  33. Thanks Mastertech5 thanked for this post
  34. #424
    Senior Member edwardb's Avatar
    Join Date
    Feb 2011
    Location
    Lake Orion, Michigan
    Posts
    10,576
    Post Thanks / Like

    Paint Progress. We Have Color!

    Quick update with pictures of my paint progress. Base coat color and then clear yesterday for the first time. These are relatively low resolution cell phone pictures and the color isn't very accurate. In person it's a deeper red than showing here. But will post to show the progress. Doors and dash aren't in these pictures. The rest will be done in follow-up sessions because of limited space. Bunch of pieces when you do the full fender, hood, etc. version. I'll take these parts back to my shop to finish the interior, hang the doors, put the dash back in, etc. while the balance of parts are completed.

    Painting it with the cab on the chassis as shown here and mentioned before. Very happy with how it's turning out. I picked the color out of a color book and the shop mixed it accordingly. Probably crosses to some OE colors but don't have that in front of me right now. Purposely went non-metallic to be a little bit period correct. But of course had to be red. Some things just aren't negotiable.

    Getting close with final primer coats. So good to see those parting lines filled and gone. My guy did an awesome job getting it dead flat and all the waves out. Something he's very particular about.


    Guide coat. Getting close.


    First shots after color and clear. Said it flowed out well. But sanding and polishing not done yet.


    Last edited by edwardb; 12-07-2022 at 04:24 PM.
    Build 1: Mk3 Roadster #5125. Sold 11/08/2014. Build 2: Mk4 Roadster #7750. Sold 04/10/2017. Build Thread
    Build 3: Mk4 Roadster 20th Anniversary #8674. Sold 09/07/2020. Build Thread and Video. Build 4: Gen 3 Type 65 Coupe #59. Gen 3 Coyote. Legal 03/04/2020. Build Thread and Video
    Build 5: 35 Hot Rod Truck #138. LS3 and 4L65E auto. Rcvd 01/05/2021. Legal 04/20/2023. Build Thread. Sold 11/9/2023.

  35. #425
    Senior Member svassh's Avatar
    Join Date
    Apr 2021
    Location
    Highland Village, TX
    Posts
    309
    Post Thanks / Like
    Outstanding as always Paul, there are other incredible builders on here whose skills I envy but few have your attention to detail.
    MK2 Roadster - 347 - Boss 302 Crate 4x2 Weber 44 IDFs

  36. Thanks edwardb thanked for this post
  37. #426
    Senior Member Mastertech5's Avatar
    Join Date
    Jul 2020
    Location
    Spencer, MA
    Posts
    865
    Post Thanks / Like
    Looks great Paul. Can't wait to see the final product.

  38. Thanks edwardb thanked for this post
  39. #427
    Not a waxer Jeff Kleiner's Avatar
    Join Date
    Feb 2011
    Location
    Bloomington, Indiana
    Posts
    8,082
    Post Thanks / Like
    Looking good Paul! So many variations with red with the undertones; some go orange, some go pink, some go blue or brown or violet… Can’t wait to see it all together and sitting on those chrome wires

    Jeff

  40. Thanks edwardb thanked for this post
  41. #428
    Senior Member rthomas98's Avatar
    Join Date
    Aug 2012
    Location
    Ypsilanti, MI
    Posts
    299
    Post Thanks / Like
    Paul that looks fantastic. Can't wait to see it all done.

  42. Thanks edwardb thanked for this post
  43. #429
    Senior Member
    Join Date
    Sep 2022
    Posts
    421
    Post Thanks / Like
    Looking good Paul

    I've got a red color sample and am very anxious to see how it compares to your color selection !

    Craig C

  44. Thanks edwardb thanked for this post
  45. #430
    Senior Member wareaglescott's Avatar
    Join Date
    Apr 2016
    Location
    Auburn, AL
    Posts
    2,146
    Post Thanks / Like
    Looking great Paul. Always enjoy watching the final steps come together!
    MK4 #8900 - complete kit - Coyote, TKO600, IRS - Delivered 6/28/16 First Start 10/6/16 Go cart - 10/16/16 Build completed - 4/26/17 - 302 days to build my 302 CI Coyote Cobra - Registered and street legal 5/17/17
    Build Thread http://thefactoryfiveforum.com/showt...e-build-thread
    PHIL 4:13 INSTAGRAM - @scottsrides

  46. Thanks edwardb thanked for this post
  47. #431
    JohnK's Avatar
    Join Date
    Sep 2018
    Location
    SF Bay Area, CA
    Posts
    2,222
    Post Thanks / Like
    Looks incredible Paul. There are many aspects of your builds that I try to emulate, but your skills with bodywork are truly impressive and something that I don't even dare attempt. That was one aspect of the build that I was happy to leave to the pros. I can't wait to see the completed truck.
    MkIV Roadster build: Gen 2 Coyote, IRS, TKO600. Ordered 10/24/18. Delivered 1/29/19. Engine installed 8/8/21. First start 9/12/21. First go-kart 9/17/21. Off to paint 4/11/22. Back from paint 12/30/22. Build thread here.

  48. Thanks edwardb thanked for this post
  49. #432
    Senior Member
    Join Date
    Oct 2021
    Location
    Sarasota, FL
    Posts
    267
    Post Thanks / Like
    Quote Originally Posted by edwardb View Post
    It’s been a couple weeks since an update. But I’ve been busy. Mostly under the general category of plumbing. So button up. This could get long. The build manual shows basic setup and routing for everything. But based on my engine choice and other build decisions, only some of it’s applicable. So after doing lots of studying, along with reviewing other build threads, dove in.

    First a quick word about my thought process. As anyone who has built one of these knows, regardless of model there are a lot of interdependencies. One thing can easily affect another. Intentionally or not. If you haven't found that out yet, at some point you will. My approach is to start with things that either can’t move or have limited flexibility. Then move to the next thing in line with a little more flexibility. And so on ending with whatever has the most flexibility.

    So with that started with the e-brake cables. Very often those have a fixed or very limited routing that takes into account the cables, attachment points, brakes, etc. That definitely was the case with this build. The optional Wilwood rear brakes have the e-brake attachment on the front and the cable comes in from the bottom. Really only one routing along the floor and through the chassis. Both are connected and working. I don't expect to use the e-brake too much to be honest. With the park position on the auto trans locking the drivetrain. But it's there. I had these same Wilwood single cylinder rear calipers on my #7750 Roadster build. They needed helper springs added at the cable attachment to release reliably. Others experienced the same thing. Doesn't look like these do. Looks like Wilwood beefed up the circular spring on the e-brake lever.

    Next up, everyone’s favorite. Brake lines. As I mentioned in my last update, I’ve done rigid SS in my last several builds and really like the final product. But it’s a lot more work and even with the right tools can be challenging. Couple that with my go-to source for SS tubing, where I could buy in straight lengths versus coiled, is no longer allowing counter sales. They’ve gone 100% to on-line sales. They’ll sell me the tubing, but only shipped and coiled. Even though they’re about 20 minutes away. Just not wanting to try to straighten SS tubing. So for this build, I decided to go steel. I know many like NiCopp. But I prefer the slightly stiffer steel. The Classic Tube C3 Tubing I bought from Summit came coiled. But fairly large with soft bends and straightened OK by hand without any special tools. It’s zinc coated and in this application (e.g. garaged, fair weather car) not too worried about corrosion or rust. My Eastwood professional flaring tool easily makes dead-on perfect flares in the steel every single time. More about that later…

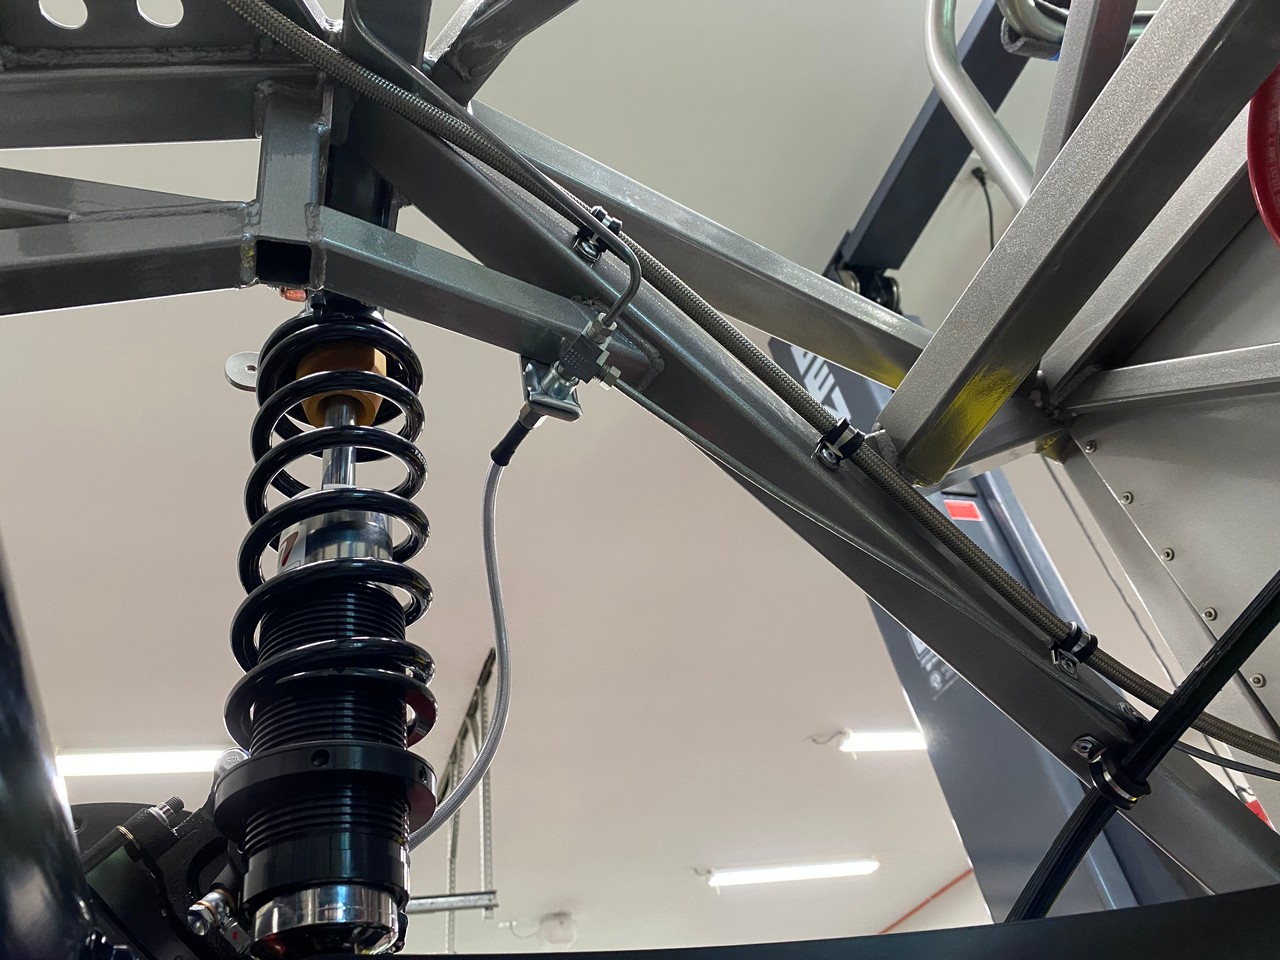
    For the brake line layout, in the front I deviated quite a bit from the build manual because of the dual master cylinder on the firewall (versus the Wilwood pedal box inside) plus the master cylinder has two lines for the front brakes. One to each side. So I routed the two lines along the top of the round frame rail rather than on the lower frame rail as in the manual. If I were going to have an open engine bay, may not choose the top of the rail. But I’m going to have the side covers. One to the LH side. The other crossed over to the RH side. Pretty straightforward.


    For the rear brakes, went down the firewall, along the underside to the back, up to the LH side where it feeds there plus crosses over to the RH side. Similar to how shown in the manual.


    All the runs are one piece. No unions. Relatively easy to do except for the front to back run. Note I did use the kit provided brake lines. Used them for patterns. Once I had a piece fitting the way I wanted, then duplicated in the single steel line. I don’t trust myself to make them exactly right the first time. Just don’t do it often enough.

    With that done, no reason not to put fluid in the system and bleed it, right? Good way to check your work plus cross off a pretty big milestone. Wilwood was nice enough to include fittings and hoses for bench bleeding their dual master cylinder. Nice.


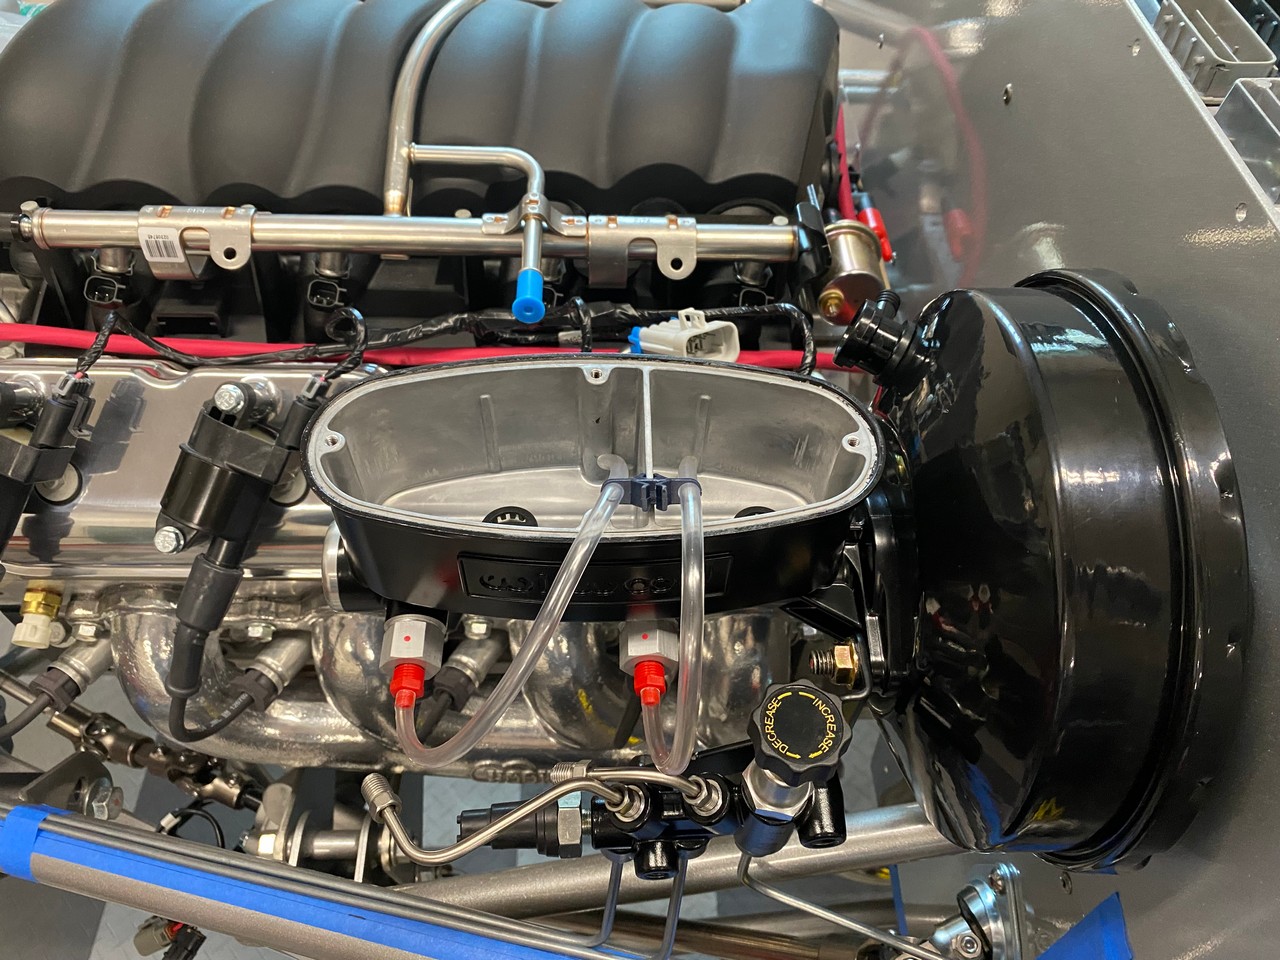
    With that, a pretty big mess. All four connections between the MC and the compensation valve (visible in the picture above) leaked. With nothing more than gravity pressure in the MC. Note these are SS lines that were included with the power brake assembly I had so much trouble getting after I ordered it. Talked about it a bunch early in the build thread. Tried the usual practice of backing off the tube nuts a bit and re-tightening. Nothing helped. So, drained all the brake fluid out of the MC (man I hate that stuff) and took things apart. What I found were the worst flares you can imagine. Especially the front longer one. Crooked and off-center. Just very poor quality to say the least. I had some scrap SS tubing on hand, so made new pieces. Better, but still leaked at the MC. Took things apart again and found that the Wilwood flare adapters into the MC were damaged due to the bad flares. The adapters are aluminum. The brake lines are much tougher SS. And I probably was too aggressive tightening. Regardless, the seats were damaged to the point they’d never seal. Fortunately, Summit had the Wilwood adapters in stock and on my porch the next day. After sleeping on it, decided to make new lines again but this time out of steel. A little more malleable and maybe give me a better chance of sealing and not tearing up the aluminum. So that’s what I did and with new adapters and new lines now no leaks. Good grief. Didn’t see that one coming.

    For bleeding, for all my builds I’ve done pressure bleeding using air pressure in the reservoirs. Not an easy option with the very traditional dual MC with integral reservoir. So decided to use the standard pedal down/pedal up bleeding with my wife as the pedal operator and me opening and closing the bleeders at the calipers. After some explaining on how it would work (which I really didn’t think was mansplaining…) went around all four corners twice and had a hard pedal. One leak at a banjo fitting I didn’t have quite tight enough and everything else was good. Went around one last time to confirm zero bubbles and called it good. Further testing and no leaks or runs. Brakes all work of course. Pretty happy about that. One thing I noticed FYI is the Wilwood 6-piston front calipers (same as on my Anniversary Roadster and Gen 3 Coupe) no longer have separate bleeders on each caliper. You used to have the bleed those calipers twice. Once on each side. Now only has bleeders on the inner caliper. Another Wilwood change. But makes things a bit simpler.
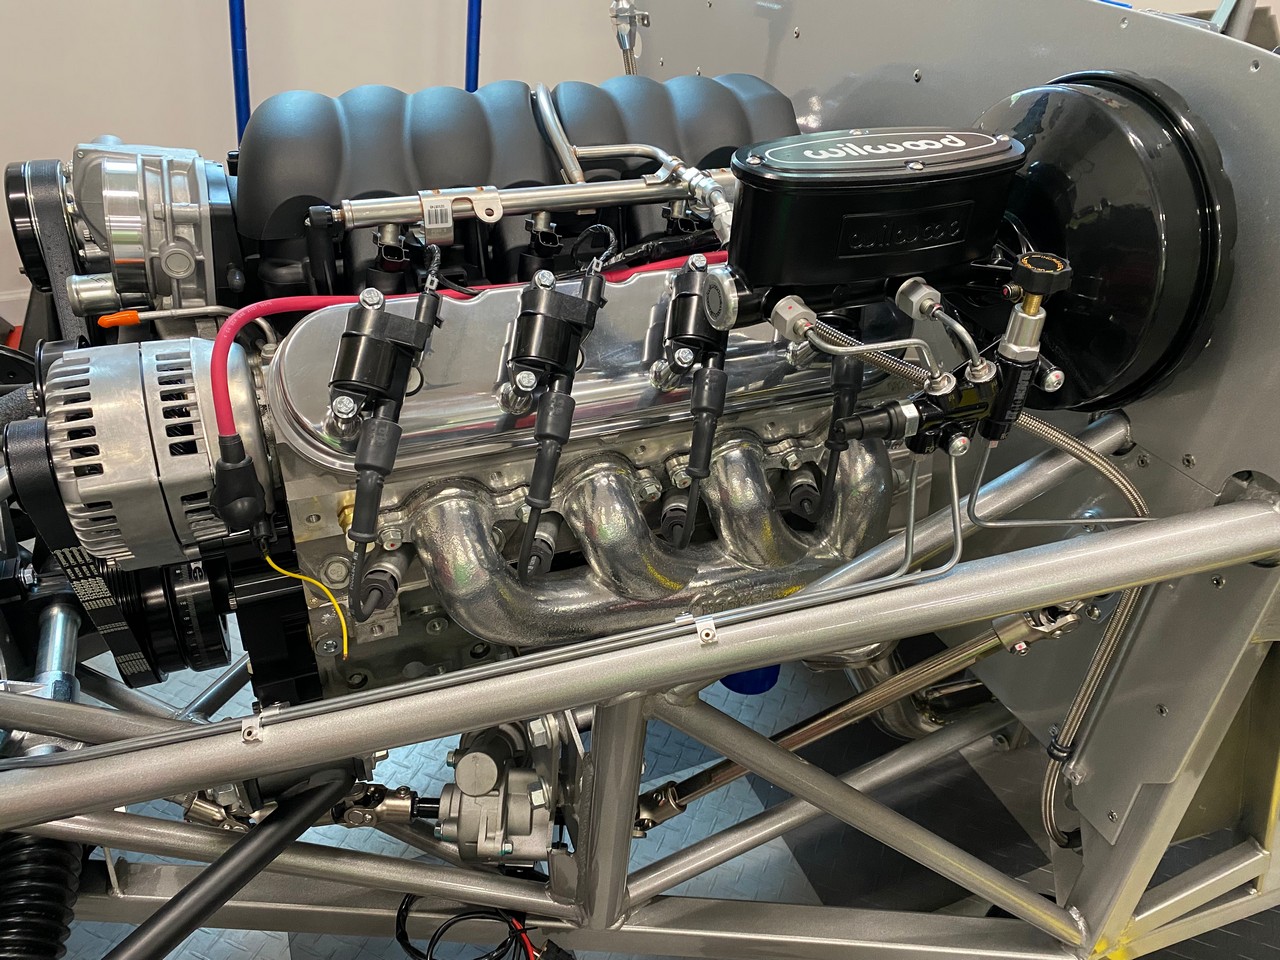
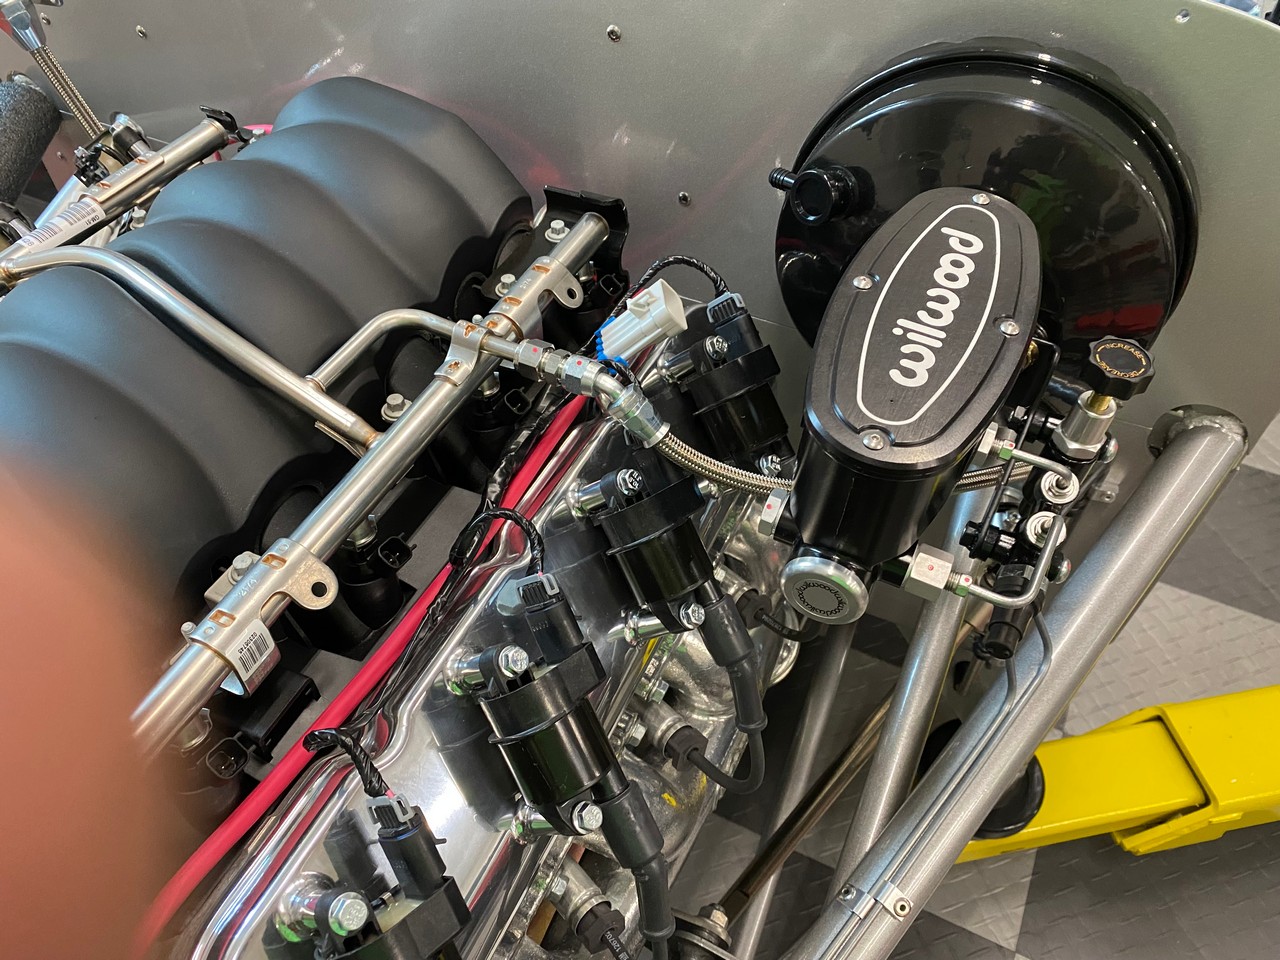
    Next up, fuel lines. Again, I’ve used 3/8” rigid SS on my last builds but decided to go with all -6 AN SS flex. Just to keep it simple plus again not being able to easily get straight tubing. Also decided, as I mentioned before, to put the regulator in the back by the tank rather than run two lines all the way to the engine. I already had the Aeromotive regulator. So it’s mounted in a not too handy spot. But I’ve found once set I haven’t had to adjust. So no big deal. Easy to see why the GM Corvette fixed regulator many use is popular to mount back there. Other than the regulator location, the setup is the same I’m used on multiple builds now. A Pro-M Racing full 3/8” pump hangar, Trick Flow TFX canister fuel filter, and -6 AN flex and connectors hooking it all together. A very solid and robust setup that's probably overkill. But it works and has been trouble free in the other builds. I’ve pretty much standardized on using Aeroquip hose and fittings. Lots of choices. I just find the quality and reliability to be excellent and I’m used to how it goes together. I pressure tested each hose section after putting the ends on. This is what I ended up with. I angled things to cut down a bit on bends.


    The fuel line goes down a frame rail (seen in the previous brake line pic), along the bottom, up the firewall, and over to the connection on the LS3.

    Paul,

    Looking at your fittings going into the fuel rail the LS3, I cannot quite takeout what you did at that location. It seems like a union and a small amount of SS line and some other combinations to get to the flex line. Can you enlighten me on that set of connections?

    Thanks

    Bill

  50. #433
    Senior Member edwardb's Avatar
    Join Date
    Feb 2011
    Location
    Lake Orion, Michigan
    Posts
    10,576
    Post Thanks / Like
    Quote Originally Posted by maclonchas View Post
    Paul,

    Looking at your fittings going into the fuel rail the LS3, I cannot quite takeout what you did at that location. It seems like a union and a small amount of SS line and some other combinations to get to the flex line. Can you enlighten me on that set of connections?

    Thanks

    Bill
    Only two fittings, although I agree it looks like more. Several things influenced what I did. (1) The fuel rail connection was kind of long and used a push-on connector which I'm not a huge fan of for these builds. I know, run for millions of miles on DD's. Just not what I prefer here. (2) I needed a down angle, closer to the engine if possible, to provide better clearance under the power brake MC without putting a lot of strain on the SS flex as it went under and then down the firewall. (3) I always look for solutions that use the least amount of fittings possible. I'm not a fan of stacking them up unnecessarily.

    So I cut back the LS connection to just inside the existing raised section for a push-on connection. Cutting that line may not be what many want to do. But I did it. It's 3/8" tubing, so this 3/8" SS connection from Breeze fit perfectly: https://breezeautomotive.com/shop/fi...ainless-steel/. I use these connectors a lot. They are fantastic. No flare or special treatment needed. Just a clean end. Rated PSI far in excess of what we'll over need. It's an industry standard part available multiple places, but I've always gotten them from Mark. The gave me a -6 AN male connection. Used an Aeroquip FBM1112 45 degree, female -6 AN to -6 AN hose fitting to the Aeroquip PTFE racing hose. Looks good, no leaks, works great so far.
    Last edited by edwardb; 12-23-2023 at 07:05 AM.
    Build 1: Mk3 Roadster #5125. Sold 11/08/2014. Build 2: Mk4 Roadster #7750. Sold 04/10/2017. Build Thread
    Build 3: Mk4 Roadster 20th Anniversary #8674. Sold 09/07/2020. Build Thread and Video. Build 4: Gen 3 Type 65 Coupe #59. Gen 3 Coyote. Legal 03/04/2020. Build Thread and Video
    Build 5: 35 Hot Rod Truck #138. LS3 and 4L65E auto. Rcvd 01/05/2021. Legal 04/20/2023. Build Thread. Sold 11/9/2023.

  51. #434
    Senior Member
    Join Date
    Oct 2021
    Location
    Sarasota, FL
    Posts
    267
    Post Thanks / Like
    Paul,
    Thanks. Understand what you di now and at least I will options with my BPE LS3 engine.

    Thanks again,

    Bill

  52. #435
    Senior Member edwardb's Avatar
    Join Date
    Feb 2011
    Location
    Lake Orion, Michigan
    Posts
    10,576
    Post Thanks / Like

    Back in the House

    Today we moved the chassis with the finished cab back into my garage shop. Was going to rent a trailer. But nothing quickly available to borrow or rent from U-Haul and weather closing in. Since the location it’s being painted is only 1-1/2 miles away, and about 1/2 mile is a private road, we decided to just drive it home. Bolted a seat in, added a few layers of clothing (25 degrees out), and cinched the seat belt down. Waited for a gap in traffic, my buddy following, and made the one-mile dash to my house. It was cold as expected, but all went fine and it’s safe in the shop. Hopefully next time out will be all assembled (and a little more legal.) These pictures with my phone and higher resolution give a better idea of the color compared to previous posts. Doors and dash will be done sometime after Christmas, and then the rest of the pieces will follow. Very happy with how it looks and now will start final details in the interior and elsewhere. Had to laugh. My buddy doing the paint today said now he understands why I was getting high quotes to paint this thing. A lot of pieces and a lot of details including hand work especially for the final sand and polish. Looking forward to a family visit over the holidays if the weather doesn’t get as bad as some of the predictions.


    Last edited by edwardb; 12-22-2022 at 06:30 AM.
    Build 1: Mk3 Roadster #5125. Sold 11/08/2014. Build 2: Mk4 Roadster #7750. Sold 04/10/2017. Build Thread
    Build 3: Mk4 Roadster 20th Anniversary #8674. Sold 09/07/2020. Build Thread and Video. Build 4: Gen 3 Type 65 Coupe #59. Gen 3 Coyote. Legal 03/04/2020. Build Thread and Video
    Build 5: 35 Hot Rod Truck #138. LS3 and 4L65E auto. Rcvd 01/05/2021. Legal 04/20/2023. Build Thread. Sold 11/9/2023.

  53. Thanks GoDadGo thanked for this post
  54. #436
    PLATNUM Supporting Member
    wallace18's Avatar
    Join Date
    Apr 2012
    Location
    Trenton, Florida
    Posts
    5,382
    Post Thanks / Like
    Looks great! 1st photos from Paint looked to lean towards a pink tone. These look more red. Must be light differance. I really like the red with the chrome wire wheels.

    Super job!
    Last edited by wallace18; 12-22-2022 at 09:37 AM.
    16+ FFR kits and counting!

  55. Thanks edwardb thanked for this post
  56. #437
    Namrups's Avatar
    Join Date
    Sep 2021
    Location
    Mechanicville, NY
    Posts
    1,016
    Post Thanks / Like
    Stunning!
    Scott Pregont
    Present build: 65 Daytona Coupe #393 - Forte 427 EFI crate w/TKX 2.87/ .81 - Ordered 11/16/21 - Delivered 6/23/2022
    Location: Mechanicville, NY
    Build Thread: https://thefactoryfiveforum.com/show...na-Coupe-build
    My Albums
    Special Tools, Custom Parts, misc supplies: https://thefactoryfiveforum.com/album.php?albumid=2045
    Garage Pics: https://thefactoryfiveforum.com/album.php?albumid=2041
    POR15 First Try: https://thefactoryfiveforum.com/album.php?albumid=2068
    Silicone application tips: https://thefactoryfiveforum.com/album.php?albumid=2063

  57. Thanks edwardb thanked for this post
  58. #438
    Senior Member
    Join Date
    Oct 2021
    Location
    Curtice, Oh
    Posts
    187
    Post Thanks / Like
    Wow is that is coming along. That has come a long way since I visited you when I was looking into my kit. Thanks for all your post. It is a great help and guide.

  59. Thanks edwardb thanked for this post
  60. #439
    Senior Member Tooth's Avatar
    Join Date
    Nov 2020
    Posts
    205
    Post Thanks / Like
    Amazing as usual.

  61. Thanks edwardb thanked for this post
  62. #440
    Senior Member
    Join Date
    Sep 2022
    Posts
    421
    Post Thanks / Like
    Looks good Paul!

    It's difficult to tell from the photos, but this is what I was planning for my build (deep red...almost a blood red)...combined with gun metal grey or dark silver. Good that you figured a way to get it home...we're expecting nasty weather down here, too. About the only thing I'll be doing is garage work (if I can keep my garage space reasonably heated...and we don't have power outages)

    Merry Christmas!

    Craig C

  63. Thanks edwardb thanked for this post
Page 11 of 14 FirstFirst ... 910111213 ... LastLast

Posting Permissions

  • You may not post new threads
  • You may not post replies
  • You may not post attachments
  • You may not edit your posts
  •  

Breeze

Visit our community sponsor