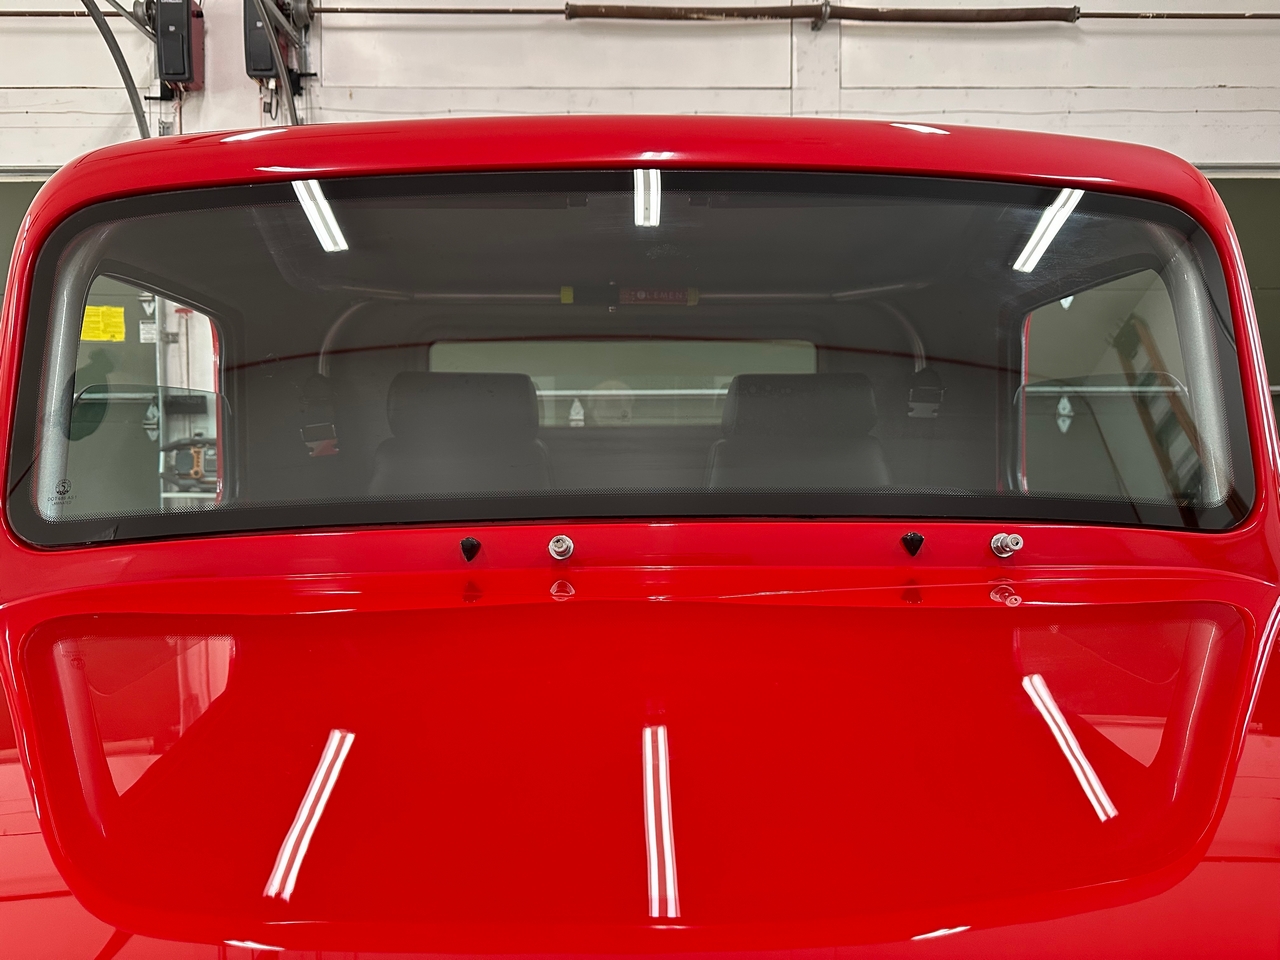
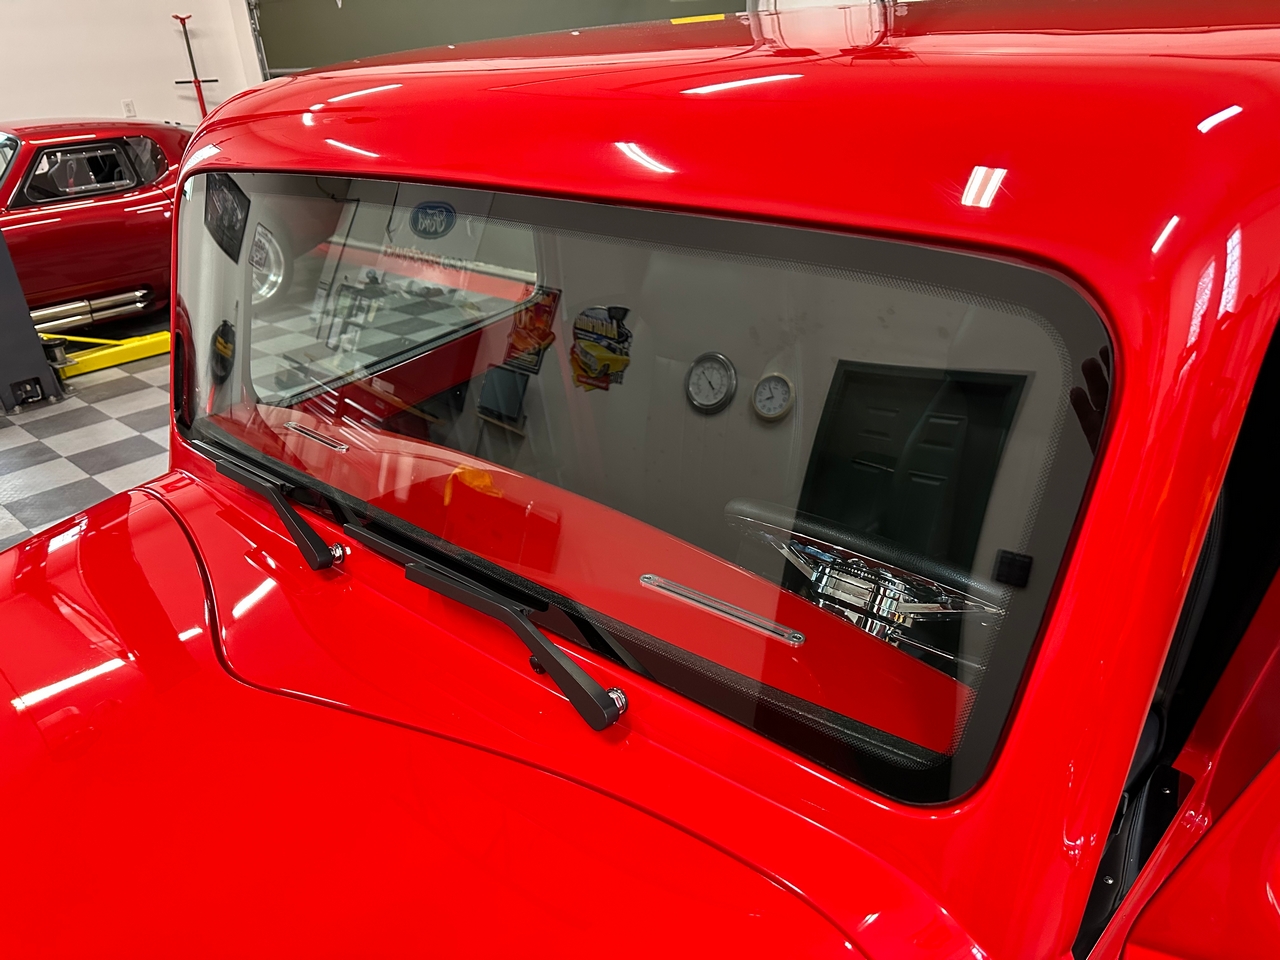
Not a huge update, but this close to the finish line feels like a good step forward. Plus two more empty boxes to put in the recycle bin. Yesterday we installed the front and back windows. Today I installed the wiper arms for the first time. All good.
For the windows, the truck has a glued in windshield just like the Coupe, several other FF models, and untold millions of DD's. Plus a smaller window on the back of the cab. As opposed to the bolt-on windshield with the Roadster. Which, for the work required, seems a bit of a chore. But, trust me, easier than the glue-in process. The truck is a bit easier than the Coupe though as the glass comes with the frit (black border) already in place. So, no tedious masking and painting the frit with black primer. Didnt miss that step at all. Also, again as compared to the Coupe, the supplied glass from FF fits the truck openings perfectly without any bending or trimming. I used rubber trim around the windshield on the Coupe. But didnt use any for the truck. Also made it simpler. As with previous installations, I have a local buddy whos in the business working for one of the major OE suppliers, lives close by, and is happy to stop and help whenever I ask. Good thing because none of the regular glass shops Ive talked to are interested in doing this kind of custom work and I still haven't developed the nerve to try it myself.
Theres really not a lot to say about the process. Its pretty straightforward. My buddy ask me to abrade the pinch weld contact area with 120 grit sandpaper. Then we very carefully cleaned (no touching!) and did apply primer even though the adhesive we used was technically primerless. Which is pretty common now. With that, and the perimeter of the glass also carefully cleaned, gunned in the urethane adhesive (I watched
) using a power caulking gun with a special tip that makes a V bead. Then pressed the glass into place, made sure it was properly centered, and added a few pieces of wide masking tape. We did the small rear window first, then the larger windshield. Theres not really much to add. Its a straightforward and very standard process. The main tip I would mention is the pinch weld and frit are relatively narrow. So the right size bead (on the small side) properly placed is critical. You obviously need enough for a strong water-tight seal. But not so much that its squeezing out excessively around the edges. Both the inside and outside edges are pretty exposed. I didnt have to do anything to the rear glass. For the windshield, I did a little clean-up and trimming in a few places after the adhesive had set for a couple of hours. All turned out fine and really happy to see the glass in place.

Today I installed the wiper arms and confirmed the angles and directions I set on the Specialty Power Windows WWK2 wiper drive kit back when it was installed. Good thing because its a little bit of a pain to disassemble and adjust. Mostly just messy with all the packed grease. I used Specialty Power Windows WAB-01BR Billet Aluminum Wiper Arms, RH Bend that I had previously sprayed with satin black Steel-It Polyurethane Spray. I'm Ok with how it all turned out. These wiper arms I would rate as a little fiddly to set up. They have very small screws and theyre not knurled like the 1/2" drums on the wheelboxes. I made sure to use blue Loctite on everything and get the set screws plenty tight. Im sure theyll be fine for the (hopefully) very limited use on the truck. But I wouldnt put them up there with OE style wipers, like the Anco ones on the Coupe. Also tested and confirmed my washers work. Nothing exiting but will pass the safety inspection.

Couple more last minute details. I was going to glue the mount for the kit supplied center rear view mirror on the windshield and get that done. But unfortunately the mirror is wider than the opening between the sun visors I installed. I have 6 between and the supplied mirror is almost 8". Ends up a little clunky with things running into each other. Going to look for a different mirror and maybe mount it to the body rather than the windshield. TBD.
While moving the truck around in preparation for installing the glass, the MIL lit and it threw a P2138 Throttle/Pedal Position Sensor/Switch D/E Voltage Correlation" code. First time my LS3 has thrown a code. With the MIL on, the accelerator pedal was inoperative, which agrees with various write-ups about this code, putting the engine into a low power or no-drive condition since its a potential safety issue. Basically, for redundancy there are two voltage paths between the accelerator and the throttle body. If they are different by a certain amount, the system throws this code. I cleared the code with my scanner and it hasnt come back (yet
). So maybe its a one-time random event. But after doing some research, found that connectors could be the issue. So unplugged each (one at the throttle body, two at the accelerator pedal DBW module), cleaned with contact cleaner, allowed them to dry, and put a very small amount of dielectric grease on the pins. Again, as recommend on multiple sites. All is working OK so far with limited testing. But obviously will be monitoring closely. All new components, so wouldnt expect anything to be bad. But anythings possible. The one wildcard IMO is the Dakota Digital cruise control setup Im using has a jumper cable between the LS3 harness and the DBW module. Maybe thats disturbing something? Next troubleshoot if the code reappears will be to take that jumper out of the circuit and see if anything changes.
Finally, Ive decided to change the rear springs. Way back in the build thread I noted how the driveshaft contacted the chassis with the rear suspension in full droop. From another builder, received a recommendation to move the rear coilover upper mounts to the top holes (described in the manual as for the Hot Rod or low ride height) as opposed to the lower holes which are for the truck. This limited the suspension droop and eliminated the chassis interference. But as is often the case, changes can have unintended consequences. In this case, the coilover adjustment collars required additional adjustment to make up for the higher mounting. Plus I found in order to keep the rear tires off the fenders, I needed the ride height to be more than the recommended amount. Both of these factors put the coilover adjustments near the end of their upper range and Im really compressing the kit supplied 8" springs. Now that its been on the ground more, the ride height has settled slightly (normal) and ideally I should adjust it some more. But instead, Im going to swap out the 8 springs for 10 ones. That will get me back to where it should be plus give a little wiggle room for some front-to-back rake which I dont currently have. I ordered Eibach 1000.250.0250 springs (2.500 ID, 10 length, 250 lbs./in. spring rate) which are the same ID and spring rate as the stock springs. Plus Eibachs are supposedly an upgrade. Theyll be here next week and shouldnt be a difficult swap.
The Ford script is now attached with 3M molding tape to the center of the tailgate. Thanks for those that responded to my question and confirmed that location. Seeing a picture of an original 1935 sealed the deal. An easy Google search I could have done but didn't.
Thats enough. My painter is due back from vacation tomorrow so hoping to get the last few pieces finished and installed soon. Unless something else breaks or I decide to change something else, really getting close to done.


 Thanks:
  Likes:

Originally Posted by edwardb
 While waiting for further progress with the paint, finalized all remaining details with the interior. I received the sport shifter back from Lokar. They repaired mine although did offer if they couldnt repair, they would send a new replacement. Their parts have a lifetime guarantee. Would be nice to not have a defect on a new part. But they stood behind it 100%. Its still a mystery exactly what happened. But best I can tell it was defective out of the box and eventually failed. It now clicks through the gears smoothly and with much less effort. As expected, it was challenging to install back into the hole in the center console. But its done and buttoned up. In keeping with what other build threads have done, I made a video of the completed interior. Not edited (obviously with gaffes and not knowing the difference between right and left ) but gives a look at the final outcome.
. The only thing left are the fenders and running boards. Theyre not quite done and my painter had the nerve to go on vacation. Didnt even ask for permission! Hell be back and I know he wants to get this wrapped up. Probably by month end I should have a completed truck.


 Reply With Quote