
Visit our community sponsor

Thanks:
0

Likes:
0
-
Member

Holes for defroster vents
Is there a diagram available for locating the defroster vents?
-
Tech Support, FFR

The location is up to the customer. There are some pictures in the directions of about where they should be. You need to be careful of what is under your body where you cut the holes for the defrost vents. Make sure you have enough room to attach the duct work to the vent.
Click here for a PDF with the heater-defroster instructions.
Best regards,
Brian Zakrzewski
FFR Tech & Sales
-
Senior Member

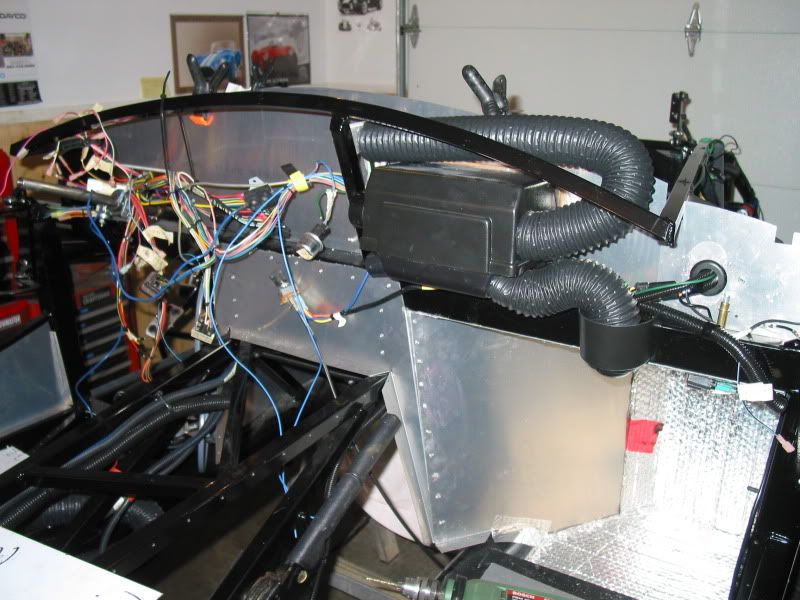
Brian raises a good point. You need to look in front of your dash at the gauge positions, indicator lights, heater,, wiring, etc. to locate a good spot for positioning your hoses and vents.. The plenum extends below the body a few inches but you also have to allow for the duct hose's, and keeping a gentle bend in them where it fits on to the plenum. You can't kink that hose, and expect decent air flow...
What I did was to first put the body on,. after taking a good look at where everything was, behind the dash. I then reached up under the dash, and felt around for an area of the body that was free of interference with anything. I than marked the body in that general area,(from the underside) with a felt pen. After the body was off I was able to look at the marked areas, and then do some final measuring, to try and keep the defog bezels looking even with one another. You should be able to find spots, (depending on your dash layout) that will allow them to be placed the same distance forward of the dash, and equally from the windshield post holes.
You also need to plan the routing of the duct hoses to the vents. Hopefully you mounted your heater low enough on the firewall, that you can run the drivers side hose over the top of the heater. The passenger side is easier, but you still need to allow enough room for the gentle curve down, than upward, the hose needs to prevent kinking.
If you want to make it even easier again, you could forgo the oblong bezels and install some aftermarket round vents. Vintage Air has some available, or you could try and find some used ones (auto wrecker) like I did. The wonderful thing about these outlets is they can be completely shut off to re-direct more heat down into the foot box area..on those cold days..
For example, her is how I mocked up my passenger side hose so not to kink it..I allowed for some additional hose length, as I needed to attach the hose to the vent while the body was still slightly elevated off the frame. A friend held the body up while I attached the hose with hose clamps. (The ball type defog vents I used, install from the top of the body, so they were already in place)
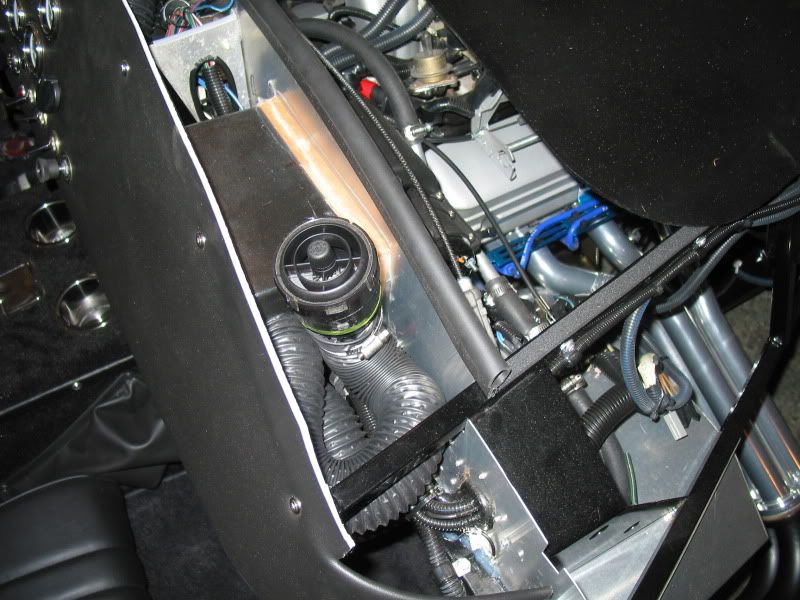
Here I have just begun to mock up the hose routing. Also visible is the passenger foot box ball vent attached.
It can be pretty tight behind the dash, depending on your layout, accessories, switches, glove box, etc..Be patient,,lol
HTH
Last edited by AC Bill; 10-28-2011 at 09:02 AM.
-
Tech Support, FFR
Thanks Bill! Great pictures and advice!!!
Brian Zakrzewski
FFR Tech & Sales
 Posting Permissions
- You may not post new threads
- You may not post replies
- You may not post attachments
- You may not edit your posts
-
Forum Rules

Visit our community sponsor


 Reply With Quote