-
Senior Member

looking good. good catch on the back of the cockpit aluminum. I didn't recognize that the backs of the rear wall would be the front of the wheel well until the panels were on. I had to tape them off and sprayed them w/ bed liner to match the rear splash panels.
-
Post Thanks / Like - 1 Thanks, 0 Likes
-
Very nice and clean! My box 15 with tank should arrive this week, I'm excited to do some more wrenching and not sheet metal work. I did build my e-brake, that was fun. Your panels are looking really clean, and I love the fuel lines on the passenger footbox, very jealous!
-
Senior Member


Originally Posted by
BeePea

Very nice and clean! My box 15 with tank should arrive this week, I'm excited to do some more wrenching and not sheet metal work. I did build my e-brake, that was fun. Your panels are looking really clean, and I love the fuel lines on the passenger footbox, very jealous!
Thanks man!
MK4 #10008 - Ordered 10/06/20, Delivered 03/03/21, First Start 7/22/21, First Go Kart 7/24/21
Paint by Metal Morphous 5/14/22, Legally registered 6/8/22, Graduated 7/20/22
Build Thread
https://thefactoryfiveforum.com/show...been-delivered
Complete Kit, Ford 306, Sniper/Dual Sync, T5, Hydraulic clutch
-
Senior Member
We started putting in the brake lines and all in all went pretty smooth. I tried to avoid routing in a way that left a lot of "service loops". My only real tip is the brake line is really easy to manipulate. I found a large socket worked better than the tube bender for tight turns.
My dad is out this week and we've been getting a lot done. It's been fun putzing around the garage together. Really moving along.


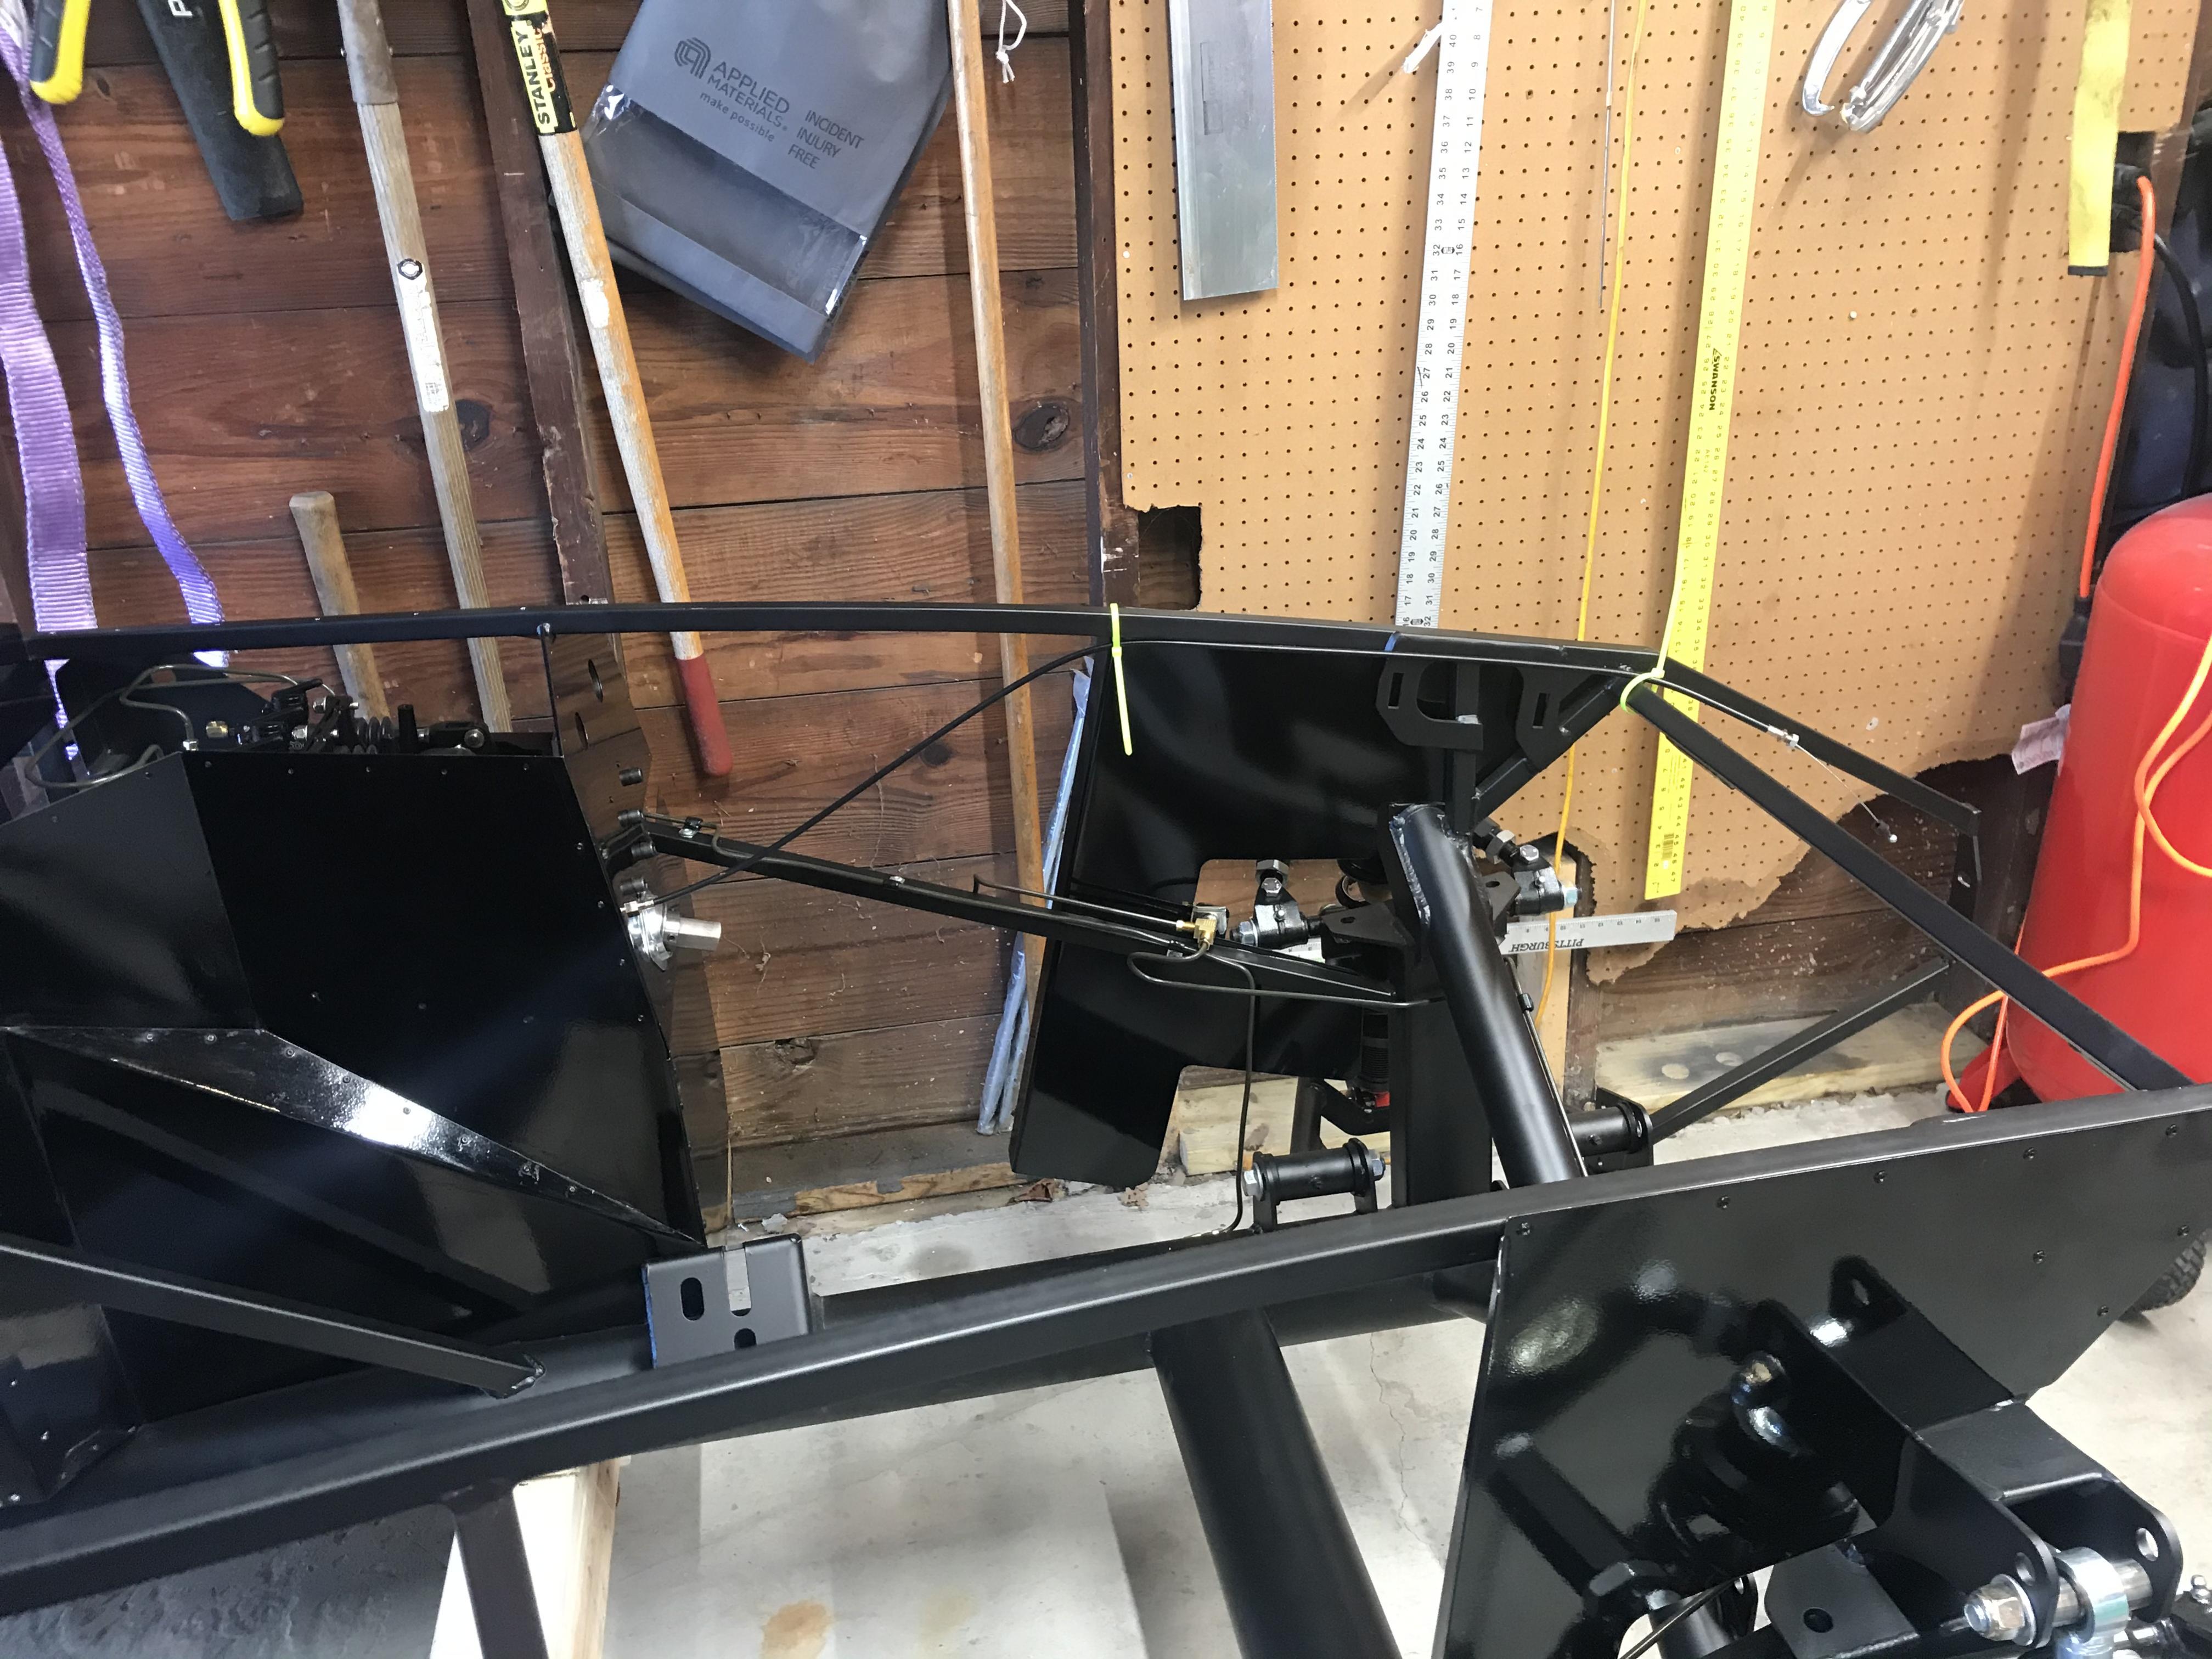
I couldn't find a route for the rear that I liked. A lot of guys go through the footbox and that was my first choice but it requires manipulating the line in a way that is difficult without a lift. I also didn't want the line in front of the footbox. This is my solution was to run down the lower 3/4 tube to the "F" panel and then drop straight down to the 4" main tube and run all the way back.

My Wilwoods will be here Friday. Yay but I don't have spindles or a stearing rack so they will stay in the box for a while.
Last edited by Blitzboy54; 04-07-2021 at 10:47 PM.
MK4 #10008 - Ordered 10/06/20, Delivered 03/03/21, First Start 7/22/21, First Go Kart 7/24/21
Paint by Metal Morphous 5/14/22, Legally registered 6/8/22, Graduated 7/20/22
Build Thread
https://thefactoryfiveforum.com/show...been-delivered
Complete Kit, Ford 306, Sniper/Dual Sync, T5, Hydraulic clutch
-
Post Thanks / Like - 0 Thanks, 2 Likes
-
Senior Member
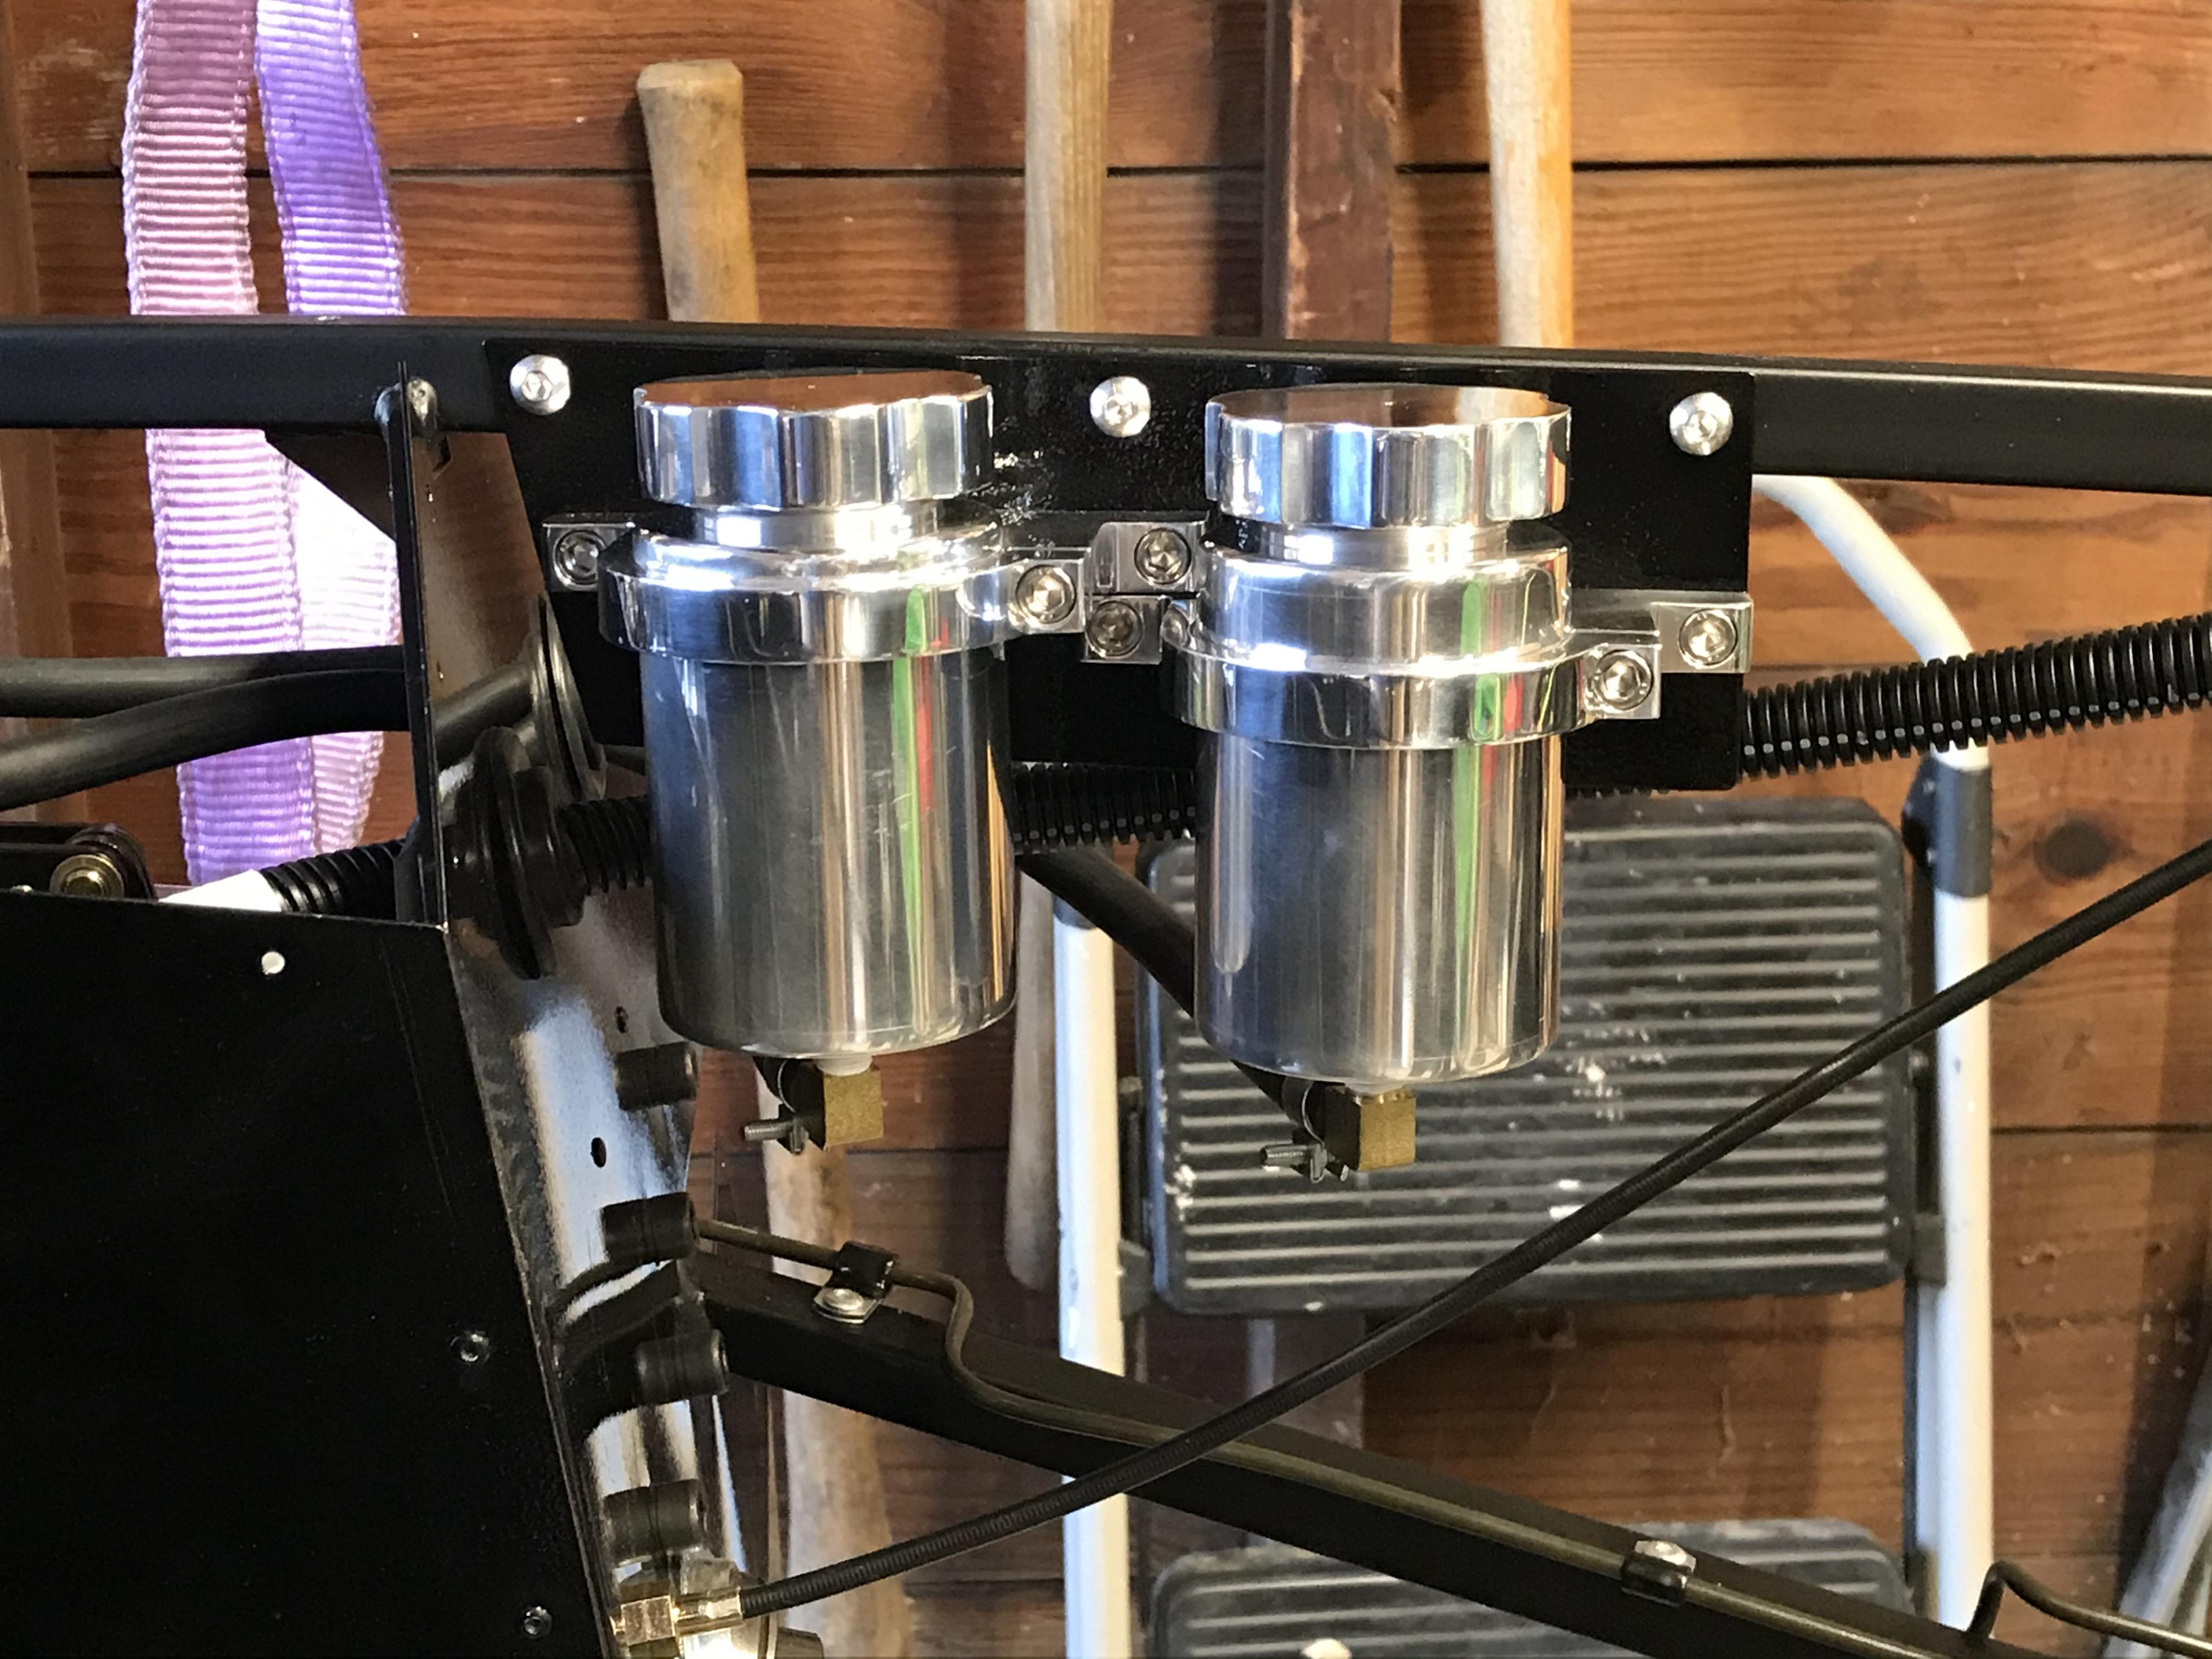
I am running a Holley Sniper, when I ordered it I also purchased the complete kit. This included the fuel pump, filters and lines. A lot of builders run an in tank pump and I think that is probably the best option but since I already purchased the external setup I am going to run with it. The first real problem is I need to be below the fuel tank. If I was running IRS there is a bracket to attach to but not with the live axle. This is my solution. I am running it below the seat pan. I used button head screws and some spacers. I plan to make a steal plate and install nutserts to make it removable. This will protect it from stray debris. A lot of cars run the pumps in this area but these cars run low to the ground.

There wasn't enough room for both filters so we mounted the first one just outside the tank


MK4 #10008 - Ordered 10/06/20, Delivered 03/03/21, First Start 7/22/21, First Go Kart 7/24/21
Paint by Metal Morphous 5/14/22, Legally registered 6/8/22, Graduated 7/20/22
Build Thread
https://thefactoryfiveforum.com/show...been-delivered
Complete Kit, Ford 306, Sniper/Dual Sync, T5, Hydraulic clutch
-
Post Thanks / Like - 0 Thanks, 1 Likes
 Fman
Fman liked this post
-
Senior Member

Jesse nice to see you and your dad working on the car together. I had some build days with my dad too, will always remember those times with him.
Keep up the good work!
-
Post Thanks / Like - 1 Thanks, 2 Likes
-
Senior Member

Originally Posted by
Blitzboy54
I couldn't find a route for the rear that I liked. A lot of guys go through the footbox and that was my first choice but it requires manipulating the line in a way that is difficult without a lift. I also didn't want the line in front of the footbox. This is my solution was to run down the lower 3/4 tube to the "F" panel and then drop straight down to the 4" main tube and run all the way back.
That's what I did, too. Works just fine.
MKIV Complete Kit #9822 l BluePrint 347 EFI l TKO600 l Power Steering l Heater/Defrost l
Build Thread
-
Post Thanks / Like - 1 Thanks, 0 Likes
-
Senior Member
Originally Posted by
Fman
Jesse nice to see you and your dad working on the car together. I had some build days with my dad too, will always remember those times with him.
Keep up the good work!
Thank you, it was a good week.
MK4 #10008 - Ordered 10/06/20, Delivered 03/03/21, First Start 7/22/21, First Go Kart 7/24/21
Paint by Metal Morphous 5/14/22, Legally registered 6/8/22, Graduated 7/20/22
Build Thread
https://thefactoryfiveforum.com/show...been-delivered
Complete Kit, Ford 306, Sniper/Dual Sync, T5, Hydraulic clutch
-
Senior Member
My whirlwind week continues. Now that the brake lines are finished we spent some time dialing in the front pedal setup. We narrowed the gap between the front and rear master cylinders to 0.23' that puts us in spec on slack. We also set the pedal height, rough set the bias and tested the clutch and break switches. Once that was settled it was time to move on to the reservoirs. Like a lot of you I mocked it up in front of the pedal box. It was fun to "fabricate" something. Even as simple as this


Powder coated and picked up some nice button head screws. As luck would have it a True Value opened up a half mile from my house this winter. It's been fantastic. I live in the hardware section.
Last edited by Blitzboy54; 04-15-2021 at 11:50 PM.
MK4 #10008 - Ordered 10/06/20, Delivered 03/03/21, First Start 7/22/21, First Go Kart 7/24/21
Paint by Metal Morphous 5/14/22, Legally registered 6/8/22, Graduated 7/20/22
Build Thread
https://thefactoryfiveforum.com/show...been-delivered
Complete Kit, Ford 306, Sniper/Dual Sync, T5, Hydraulic clutch
-
Senior Member
We pulled out the Ron Francis wiring harness and started setting that up. The fuse box wouldn't fit correctly in the bracket. What we found was there is the relay for the inertia switch is attached from the factory with a screw. It was placed incorrectly. We backed the screw out and re attached. now everything fits correctly.

I added a couple of zip ties to keep the trunk off the steering shaft. I also connected the pedal box ground and both pedal switches. I have 1.2 ohms resistance from the far end of the loom the chassis at the seat pan. I get .8 ohms to the same spot from the ground lug so I feel pretty good about it. In my experience weird things happen if your don't have a clean ground

Everything is laid out and roughed in. They make it pretty easy. Like most people there are elements of this build I am not particularly confident about, wiring is something I am pretty comfortable with. This guarantees I will have a problem. LOL
Also installed the Breeze battery box. Solid piece and those SS rivets are no joke.


My dad and I rewarded ourselves for our productive week by mocking up the dash. It really makes it look like a car. I have to start thinking about how I want to lay it out.

Last edited by Blitzboy54; 04-08-2021 at 09:48 PM.
MK4 #10008 - Ordered 10/06/20, Delivered 03/03/21, First Start 7/22/21, First Go Kart 7/24/21
Paint by Metal Morphous 5/14/22, Legally registered 6/8/22, Graduated 7/20/22
Build Thread
https://thefactoryfiveforum.com/show...been-delivered
Complete Kit, Ford 306, Sniper/Dual Sync, T5, Hydraulic clutch
-
Post Thanks / Like - 0 Thanks, 1 Likes
-
You're making nice progress, great work. Everything is looking really clean.
-
Senior Member

Your build is looking great!
Are you going to do the Kleiner mod on the rear body mount bolts? Somebody reminded me to do it before I did the trunk aluminum and I really appreciated the reminder.
-
Senior Member
Originally Posted by
hineas
Your build is looking great!
Are you going to do the Kleiner mod on the rear body mount bolts? Somebody reminded me to do it before I did the trunk aluminum and I really appreciated the reminder.
Yes sir. I just ordered the couplers and rods from McMaster Carr. I could not find it locally oddly enough. Thanks for the reminder
Last edited by Blitzboy54; 04-09-2021 at 04:11 PM.
MK4 #10008 - Ordered 10/06/20, Delivered 03/03/21, First Start 7/22/21, First Go Kart 7/24/21
Paint by Metal Morphous 5/14/22, Legally registered 6/8/22, Graduated 7/20/22
Build Thread
https://thefactoryfiveforum.com/show...been-delivered
Complete Kit, Ford 306, Sniper/Dual Sync, T5, Hydraulic clutch
-
Jesse, just sent you a PM
-
Senior Member
I'm glad you ordered them. I didn't understand how useful the modification was until I played with the quick jack bolts after installing the gas tank. Now I completely understand why the mod is so popular!
-
Senior Member
Originally Posted by
hineas
I'm glad you ordered them. I didn't understand how useful the modification was until I played with the quick jack bolts after installing the gas tank. Now I completely understand why the mod is so popular!
If you plan to do a "drop trunk" mod, the Kleiner mod is pretty much mandatory. You lose a lot of access to the space between the trunk and the gas-tank/body with the drop-trunk mod. The Kleiner mod really comes in handy.
MKIV Complete Kit #9822 l BluePrint 347 EFI l TKO600 l Power Steering l Heater/Defrost l
Build Thread
-
Post Thanks / Like - 1 Thanks, 0 Likes
-
The build is coming along really nicely. Cool to see that your dad is also able to help out. I noticed in one of the photos that you mounted the steering rod bearing on the outside of your foot box. You may want to consider putting that on the inside of the foot box. This extra 1/4" or so is very helpful when working with the steering rod installation. Just an observation that could save you a bit of hassle.
-
Senior Member
Originally Posted by
BadAsp427
The build is coming along really nicely. Cool to see that your dad is also able to help out. I noticed in one of the photos that you mounted the steering rod bearing on the outside of your foot box. You may want to consider putting that on the inside of the foot box. This extra 1/4" or so is very helpful when working with the steering rod installation. Just an observation that could save you a bit of hassle.
Really appreciate the advice and will do! I’ll switch it when I get my steering rack.
Thanks
Last edited by Blitzboy54; 04-22-2021 at 10:41 PM.
MK4 #10008 - Ordered 10/06/20, Delivered 03/03/21, First Start 7/22/21, First Go Kart 7/24/21
Paint by Metal Morphous 5/14/22, Legally registered 6/8/22, Graduated 7/20/22
Build Thread
https://thefactoryfiveforum.com/show...been-delivered
Complete Kit, Ford 306, Sniper/Dual Sync, T5, Hydraulic clutch
-
Senior Member
Alright it's been a minute. i spent a lot of time looking at and planning my dash. For me this one area I want to put my own signature on. At the end of the day the only FFR supplied switches I am going to use are headlights and the heater. I really like the headlight switch and changing the heater switch is impractical although not impossible. After planning out what switches I want and how I plan to power them I went back through my harness layout. I permanently mounted my rear harness.
My Wilwoods arrived this week. I test fit the fronts in the empty wheel and they fit great. They will be in the box for a while as I've been told not to expect spindles until June. FFR is sending me a return label for the rear brakes I can't use. Another classy touch in my opinion as shipping these kits is not cheap.
I don't have seats yet so I have this really cool backpacking chair that uses a Thermorest that sits in a shell. I haven't used it in years but man it was perfect for getting me in position so I could find dash layout that works best for me. I just noticed the rear corner of my transmission tunnel is not riveted correctly. The tab is supposed to be under the tunnel cover. I will drill out the rivets and fix it tomorrow

This is what I am going to go with. This is a rough layout I will be measuring and making everything symmetrical. Also I received my leather hide. I am going to do the dash transmission cover and tunnel sides in leather.
While waiting for some of the switches I ordered to arrive I decided to work on the drop trunk. Since I had to drop the gas tank anyhow to get the Kleiner bolts in for the quick jacks (passenger side bottom won't clear the tank) it made sense to do the drop trunk as well.
I have to say this was quite a project. I have been surprised at some of the things that have been easier than I expected, this was the opposite. It was really challenging figuring out how to get everything lined up especially with the gas tank basically loose. The other thing I didn't think about was all the metal shavings that end up all over the gas tank. Now that I've done it I'm sure it would be easier a second time.
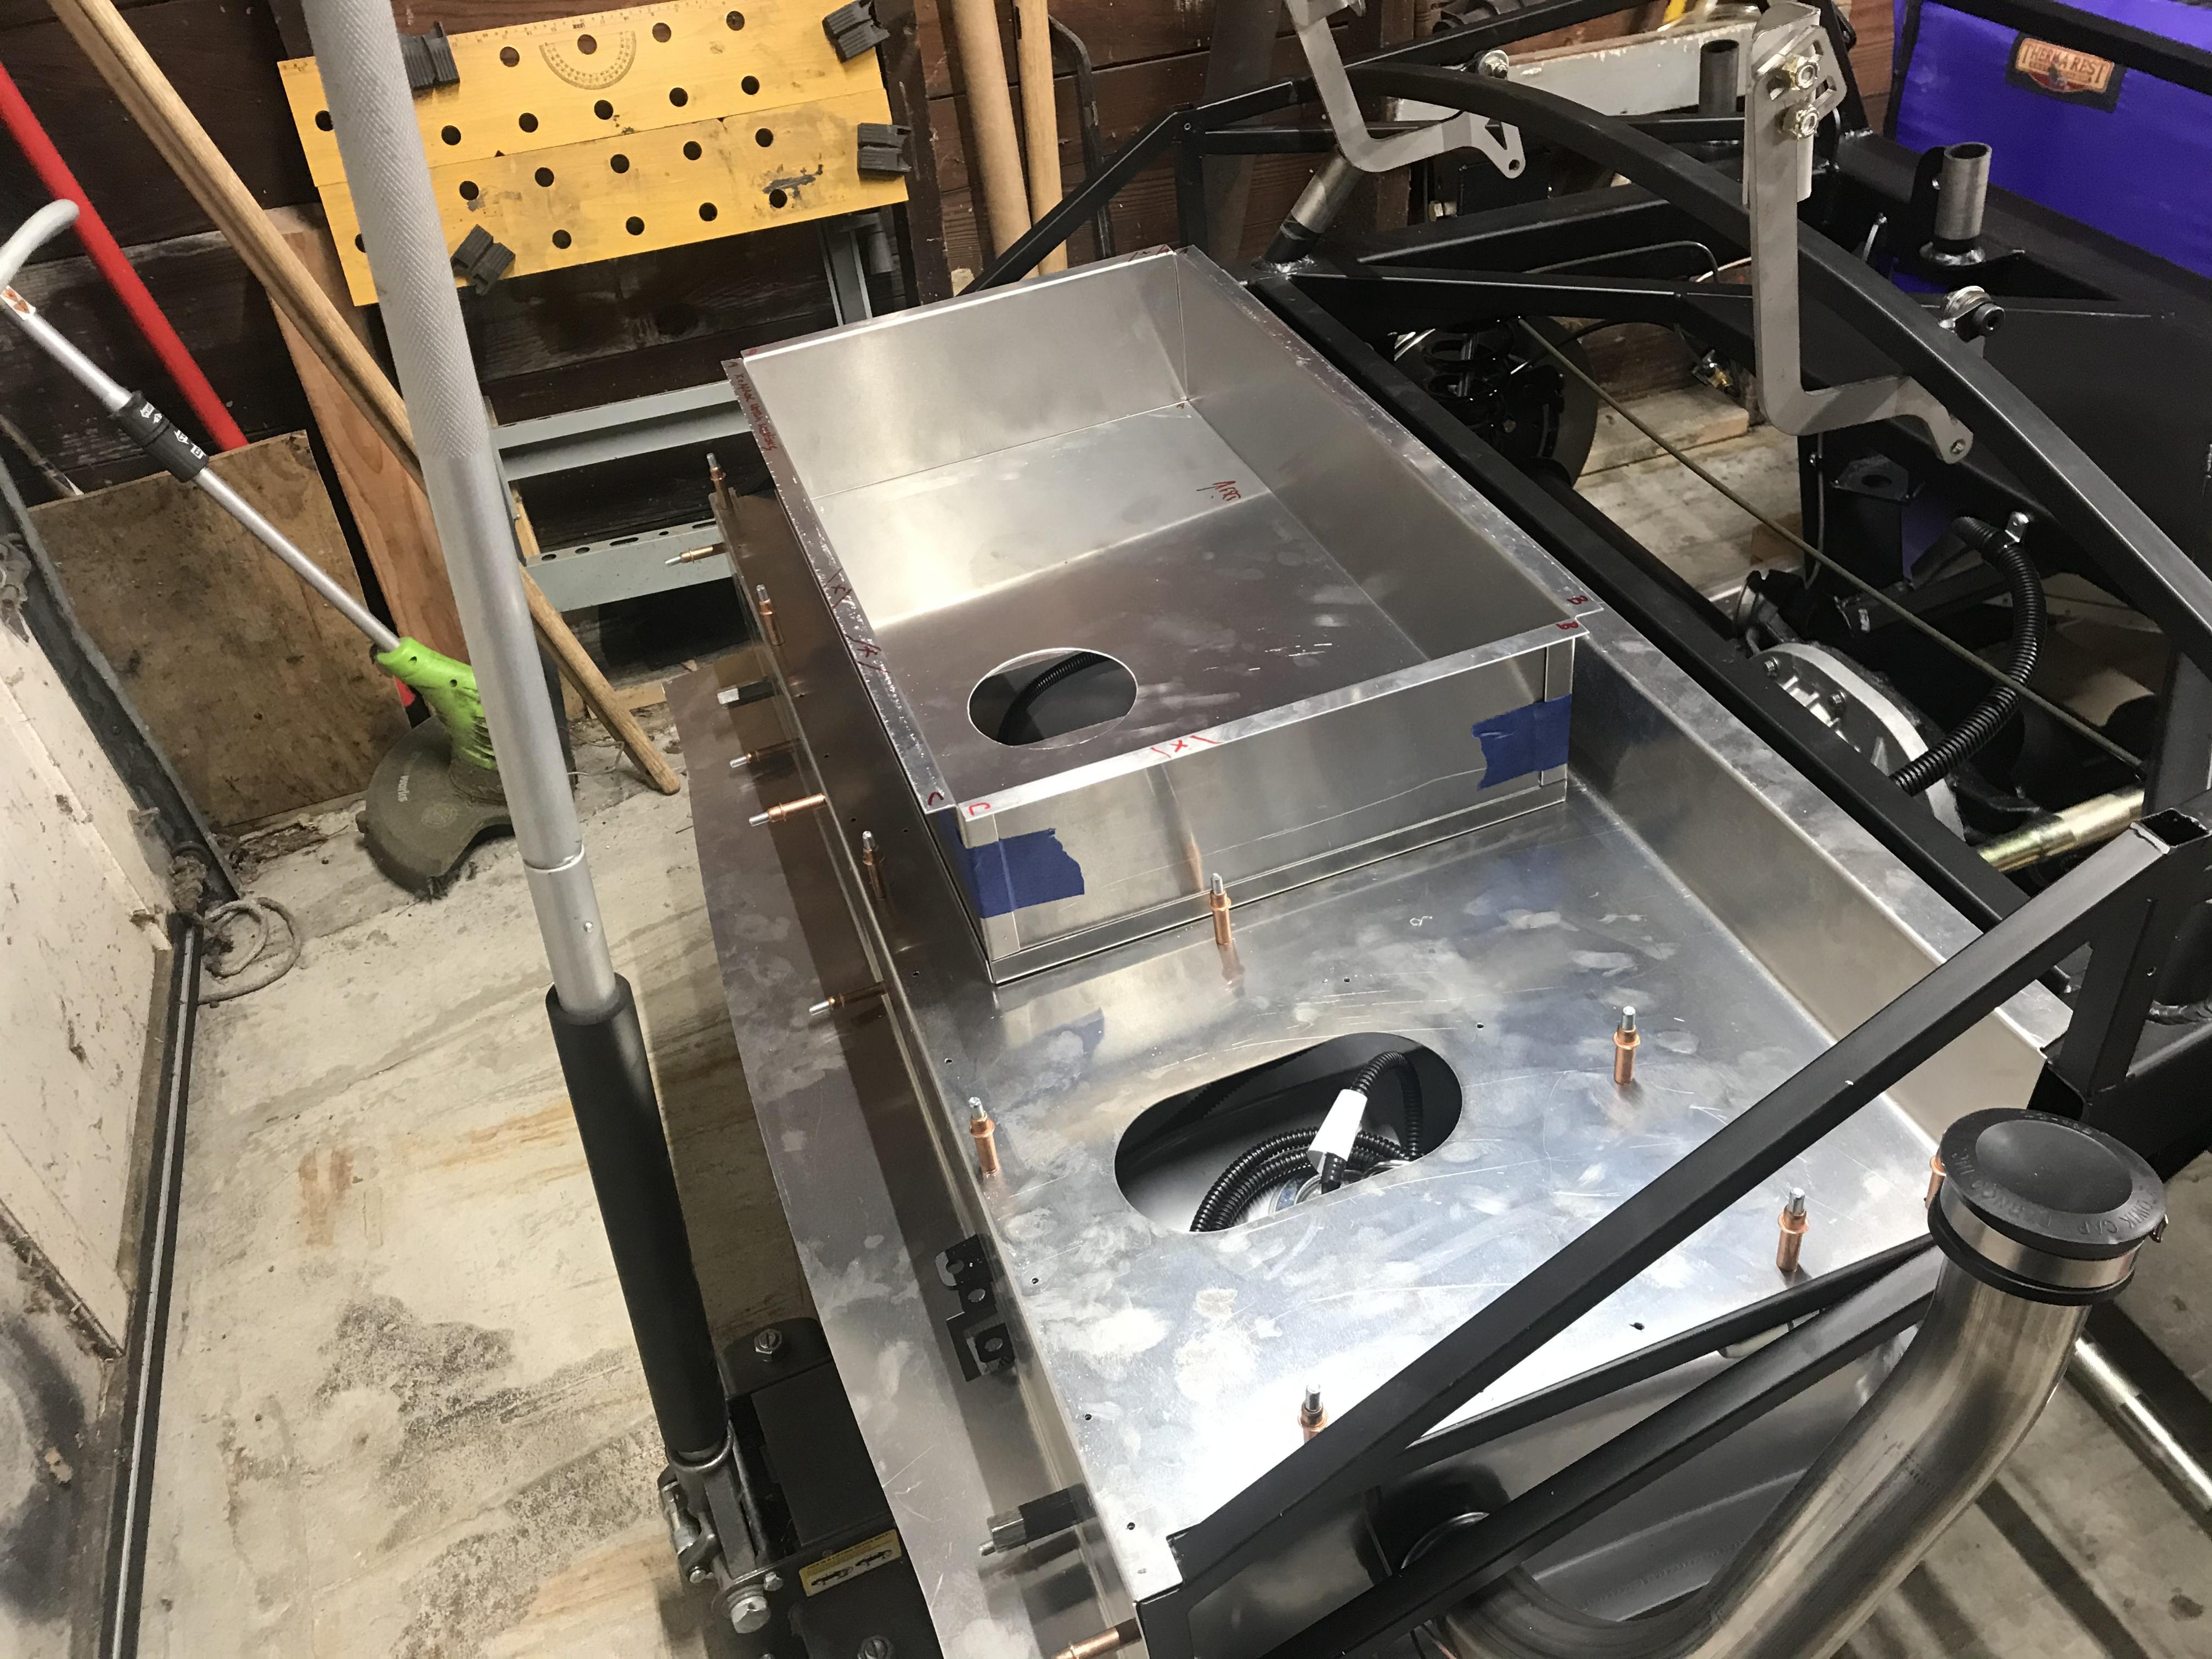
I know the pan is supposed to not go over the top corner but in order to get the cutout to center over my sending unit that was the best location.

The final product was not my best work but will be carpeted so any lapse in craftsmanship will be covered up. But it's in and I'm generally happy with it

Last edited by Blitzboy54; 04-15-2021 at 11:57 PM.
MK4 #10008 - Ordered 10/06/20, Delivered 03/03/21, First Start 7/22/21, First Go Kart 7/24/21
Paint by Metal Morphous 5/14/22, Legally registered 6/8/22, Graduated 7/20/22
Build Thread
https://thefactoryfiveforum.com/show...been-delivered
Complete Kit, Ford 306, Sniper/Dual Sync, T5, Hydraulic clutch
-
Post Thanks / Like - 0 Thanks, 2 Likes
-
04-16-2021, 10:24 AM
#100
Nice work Jessie, I have similar thoughts around my drop trunk install, but like you said, it will be covered (and in the trunk...). Nice progress!
-
04-18-2021, 05:07 PM
#101
Senior Member
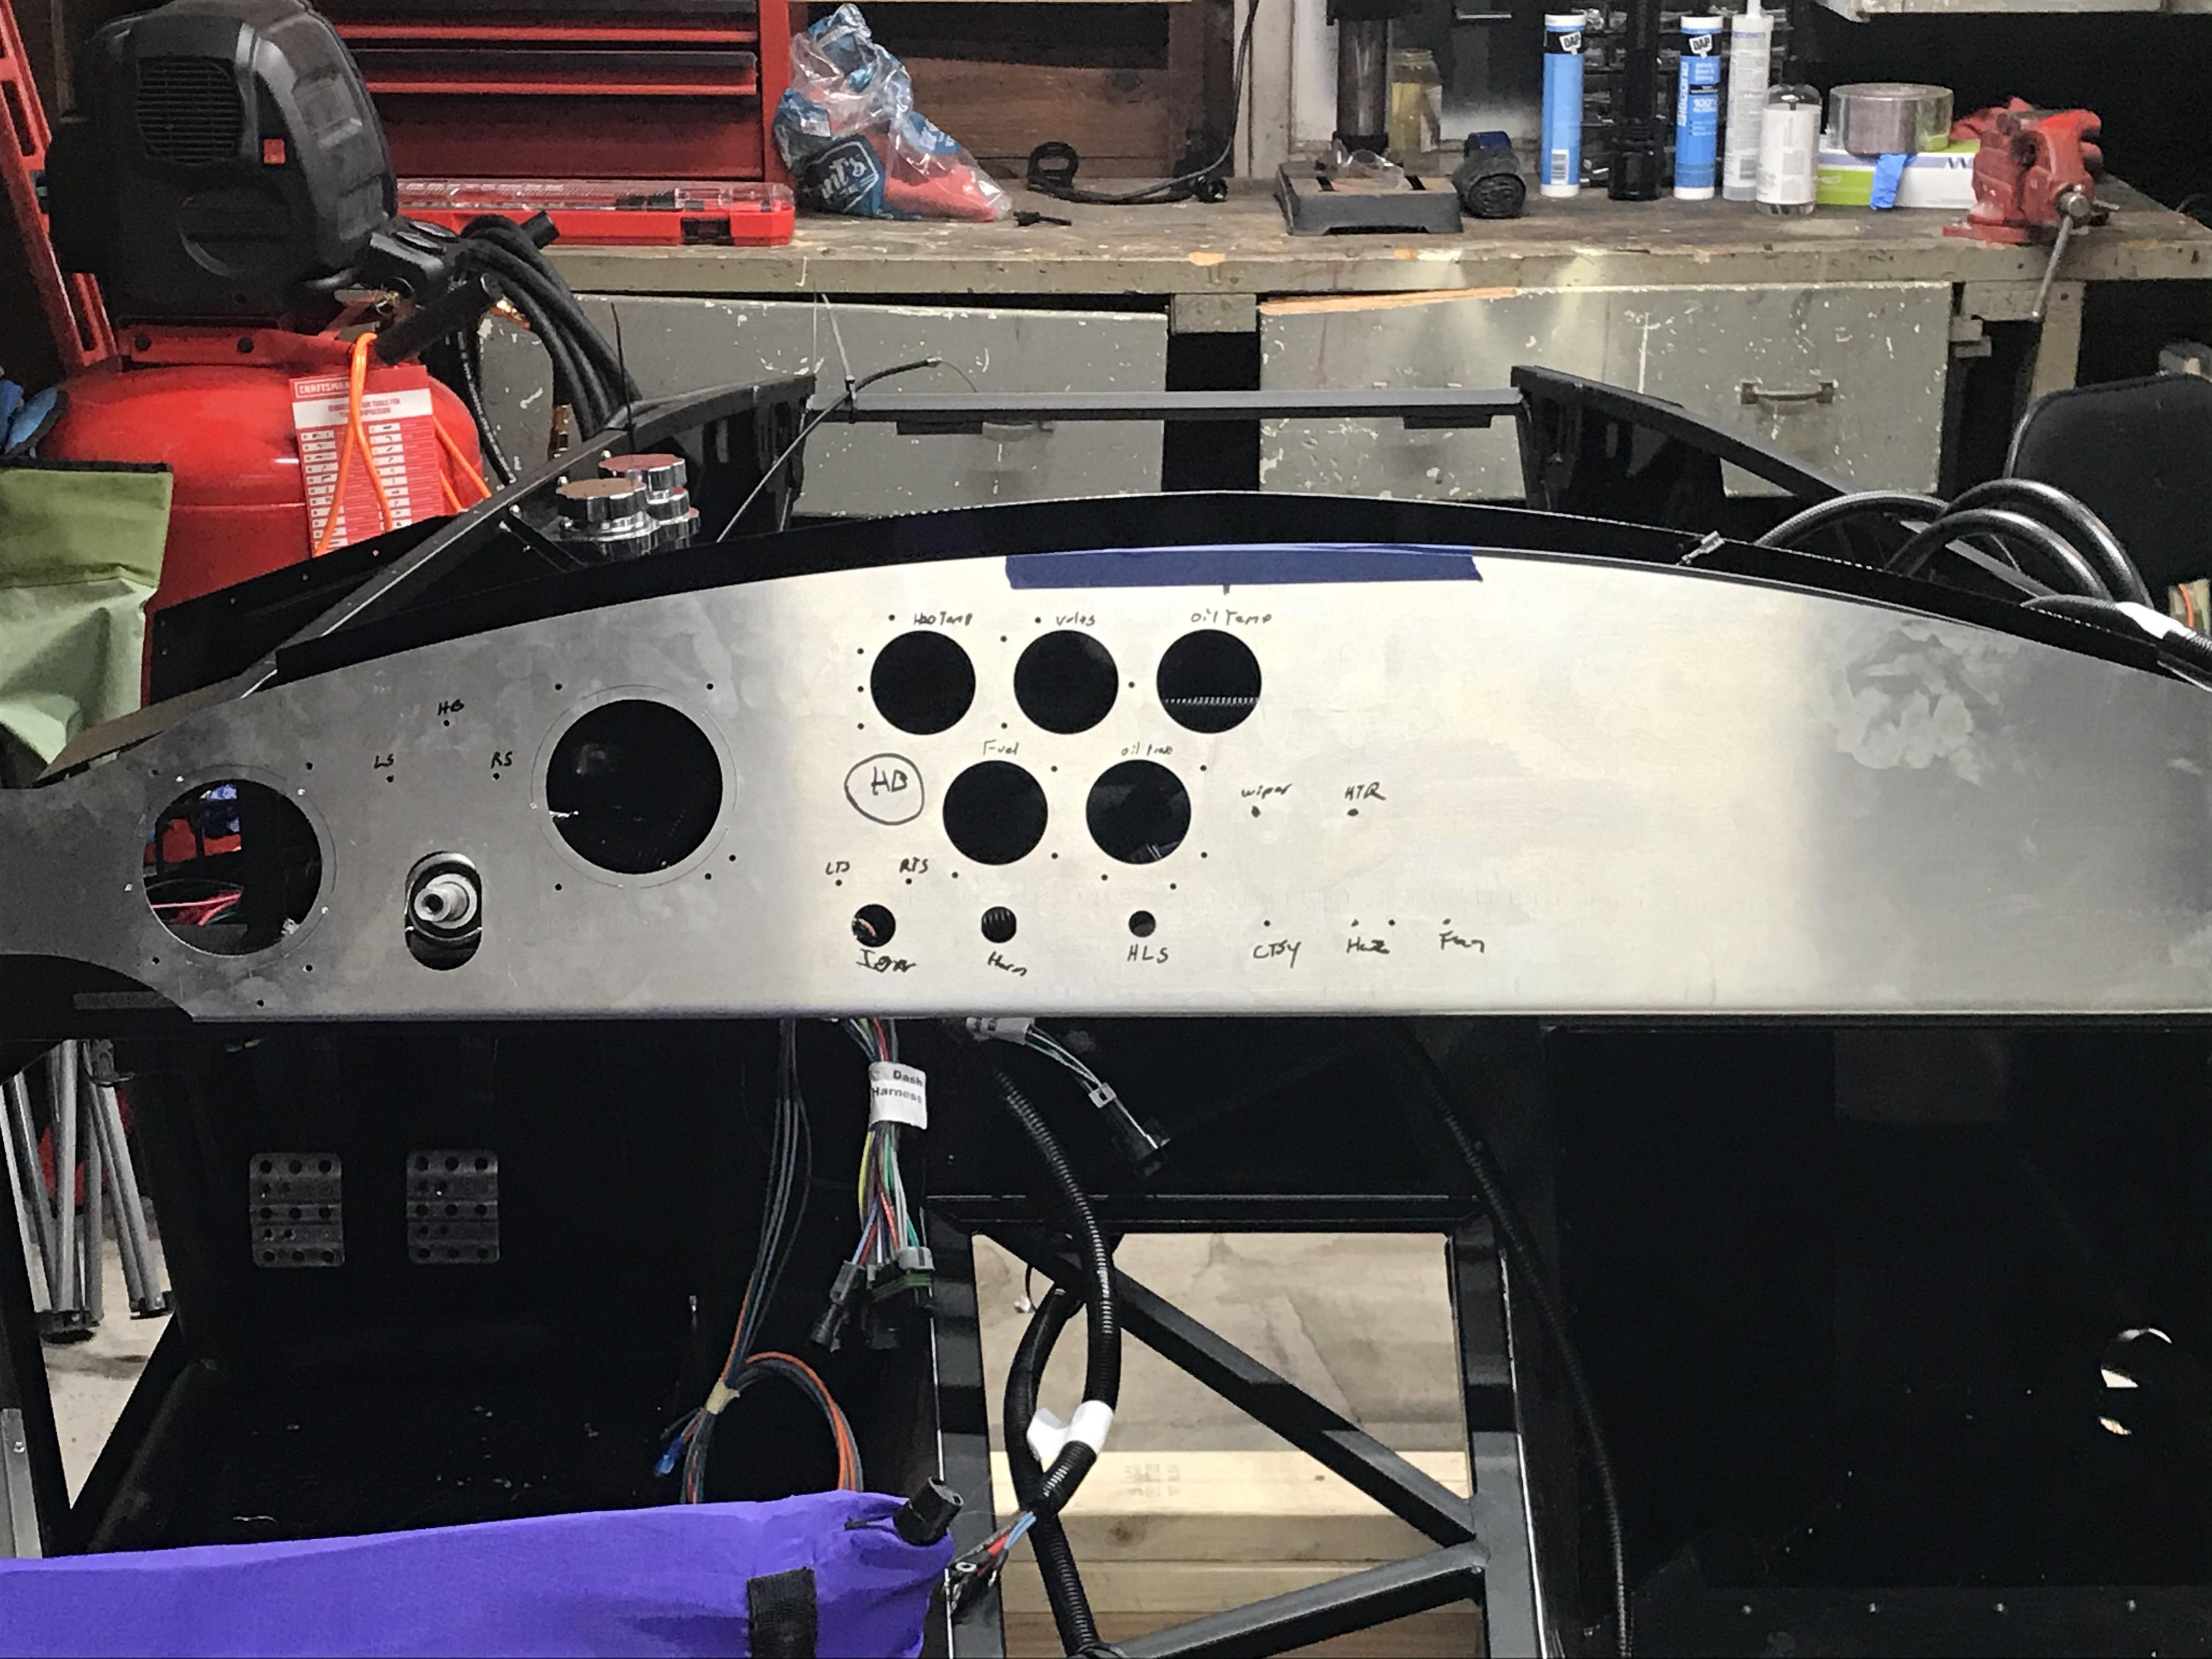
I've spent most of the week working on getting the dash mocked up. I had a few early challenges to work out. The horn button I've opted to use is smaller than the pre cut hole that came with my dash. I swapped the horn and ignition because it was a better layout for the buttons I've opted to use. The other issue I had was I purchased from another builder the original FFR ignition with the branded keys. The precut hole for the other ignition is too small. No big deal but I had a friend stop over and i wasn't paying close enough attention and drilled out the wrong hole so I had to come up with a solution for that. I could have just swapped the ignition and the headlights but I just didn't like it. In retrospect if I was to do this again I would probably get a blank dash and go from there.
I used some scrap aluminum and JB Weld to get started. The horn button is only slightly smaller so I pre drilled it then cut it out. For my ignition mistake I put a blank plate behind the hole and then cut another piece to fit inside and glued it in. I don't own any hole saws, they are very expensive and I didn't want to spend the money for a single job so I used snipers instead.
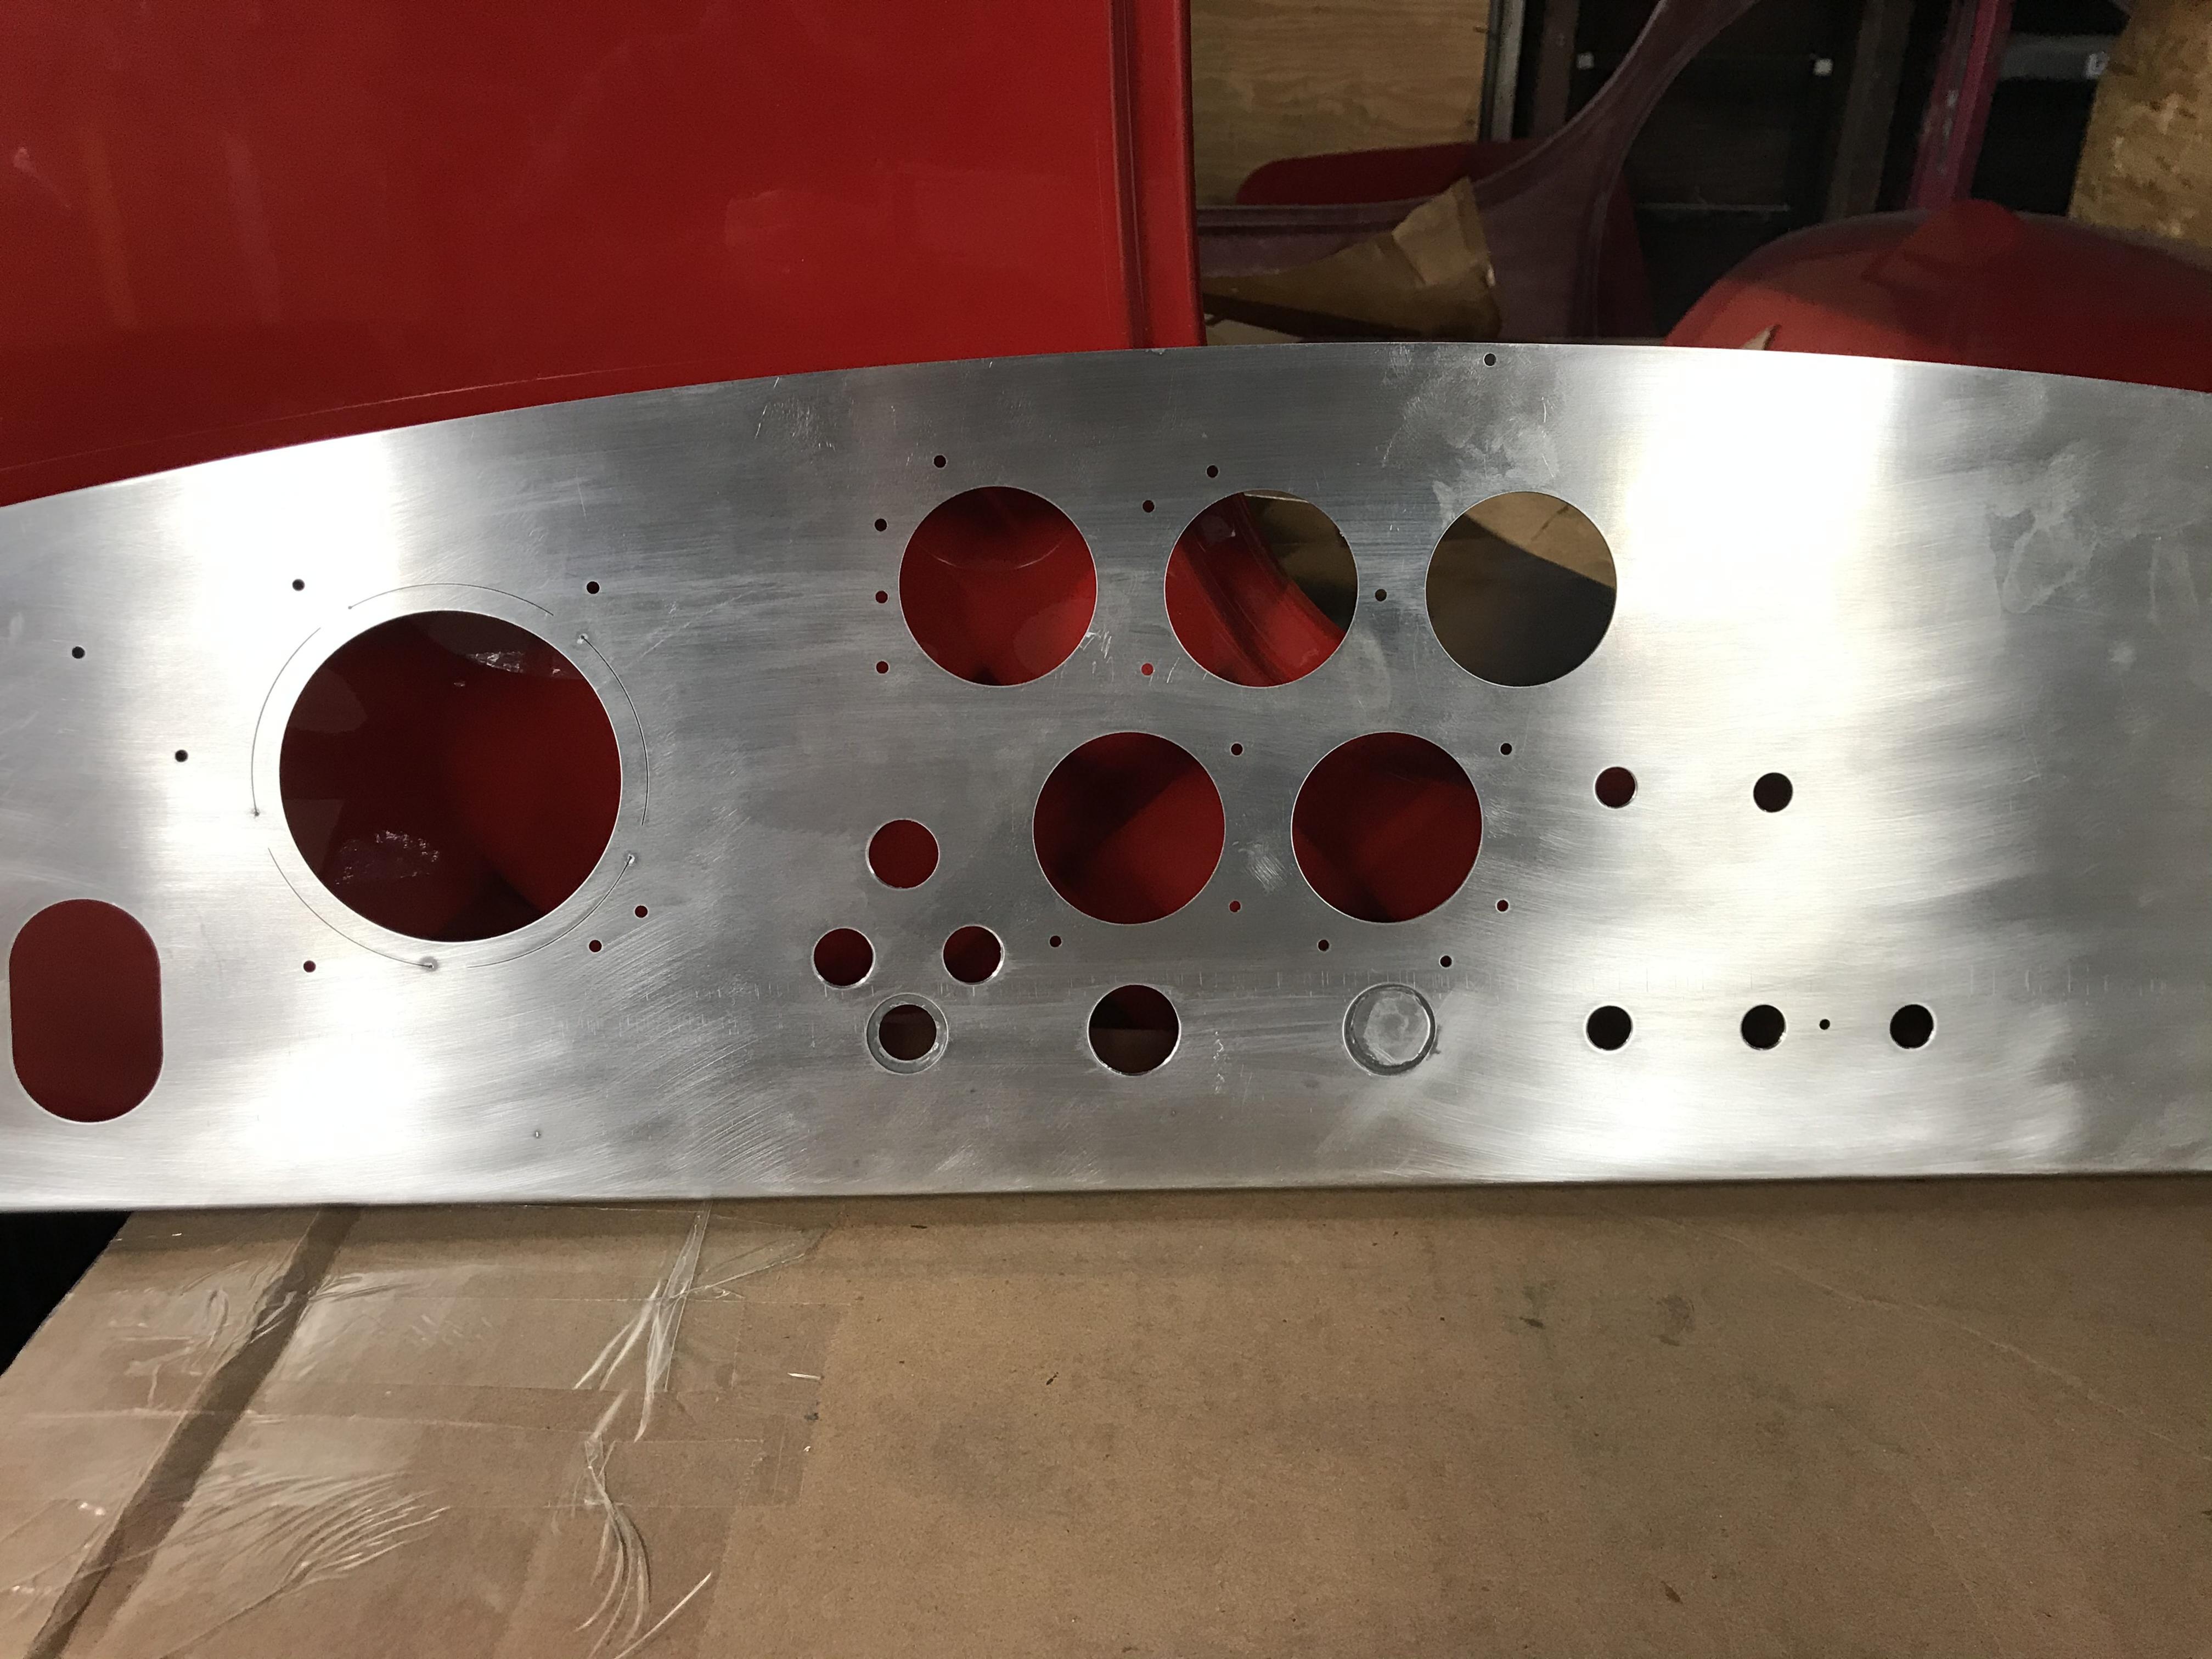
I then used body filler (bondo) and sanded everything smooth. For some reason in the pre cut dash there are lots of little 1/8 holes all over the place. I don't know what purpose they serve but i filled those in as well. Well, almost I missed one up near the water temp gauge but I plan to implement hidden brackets for the upper dash mounts ala edwardb and fman (I'm sure lots of other builders too) so I will fill it when I cover up those holes. I put key notches in for the ignition and headlight switch to help keep them from rotating

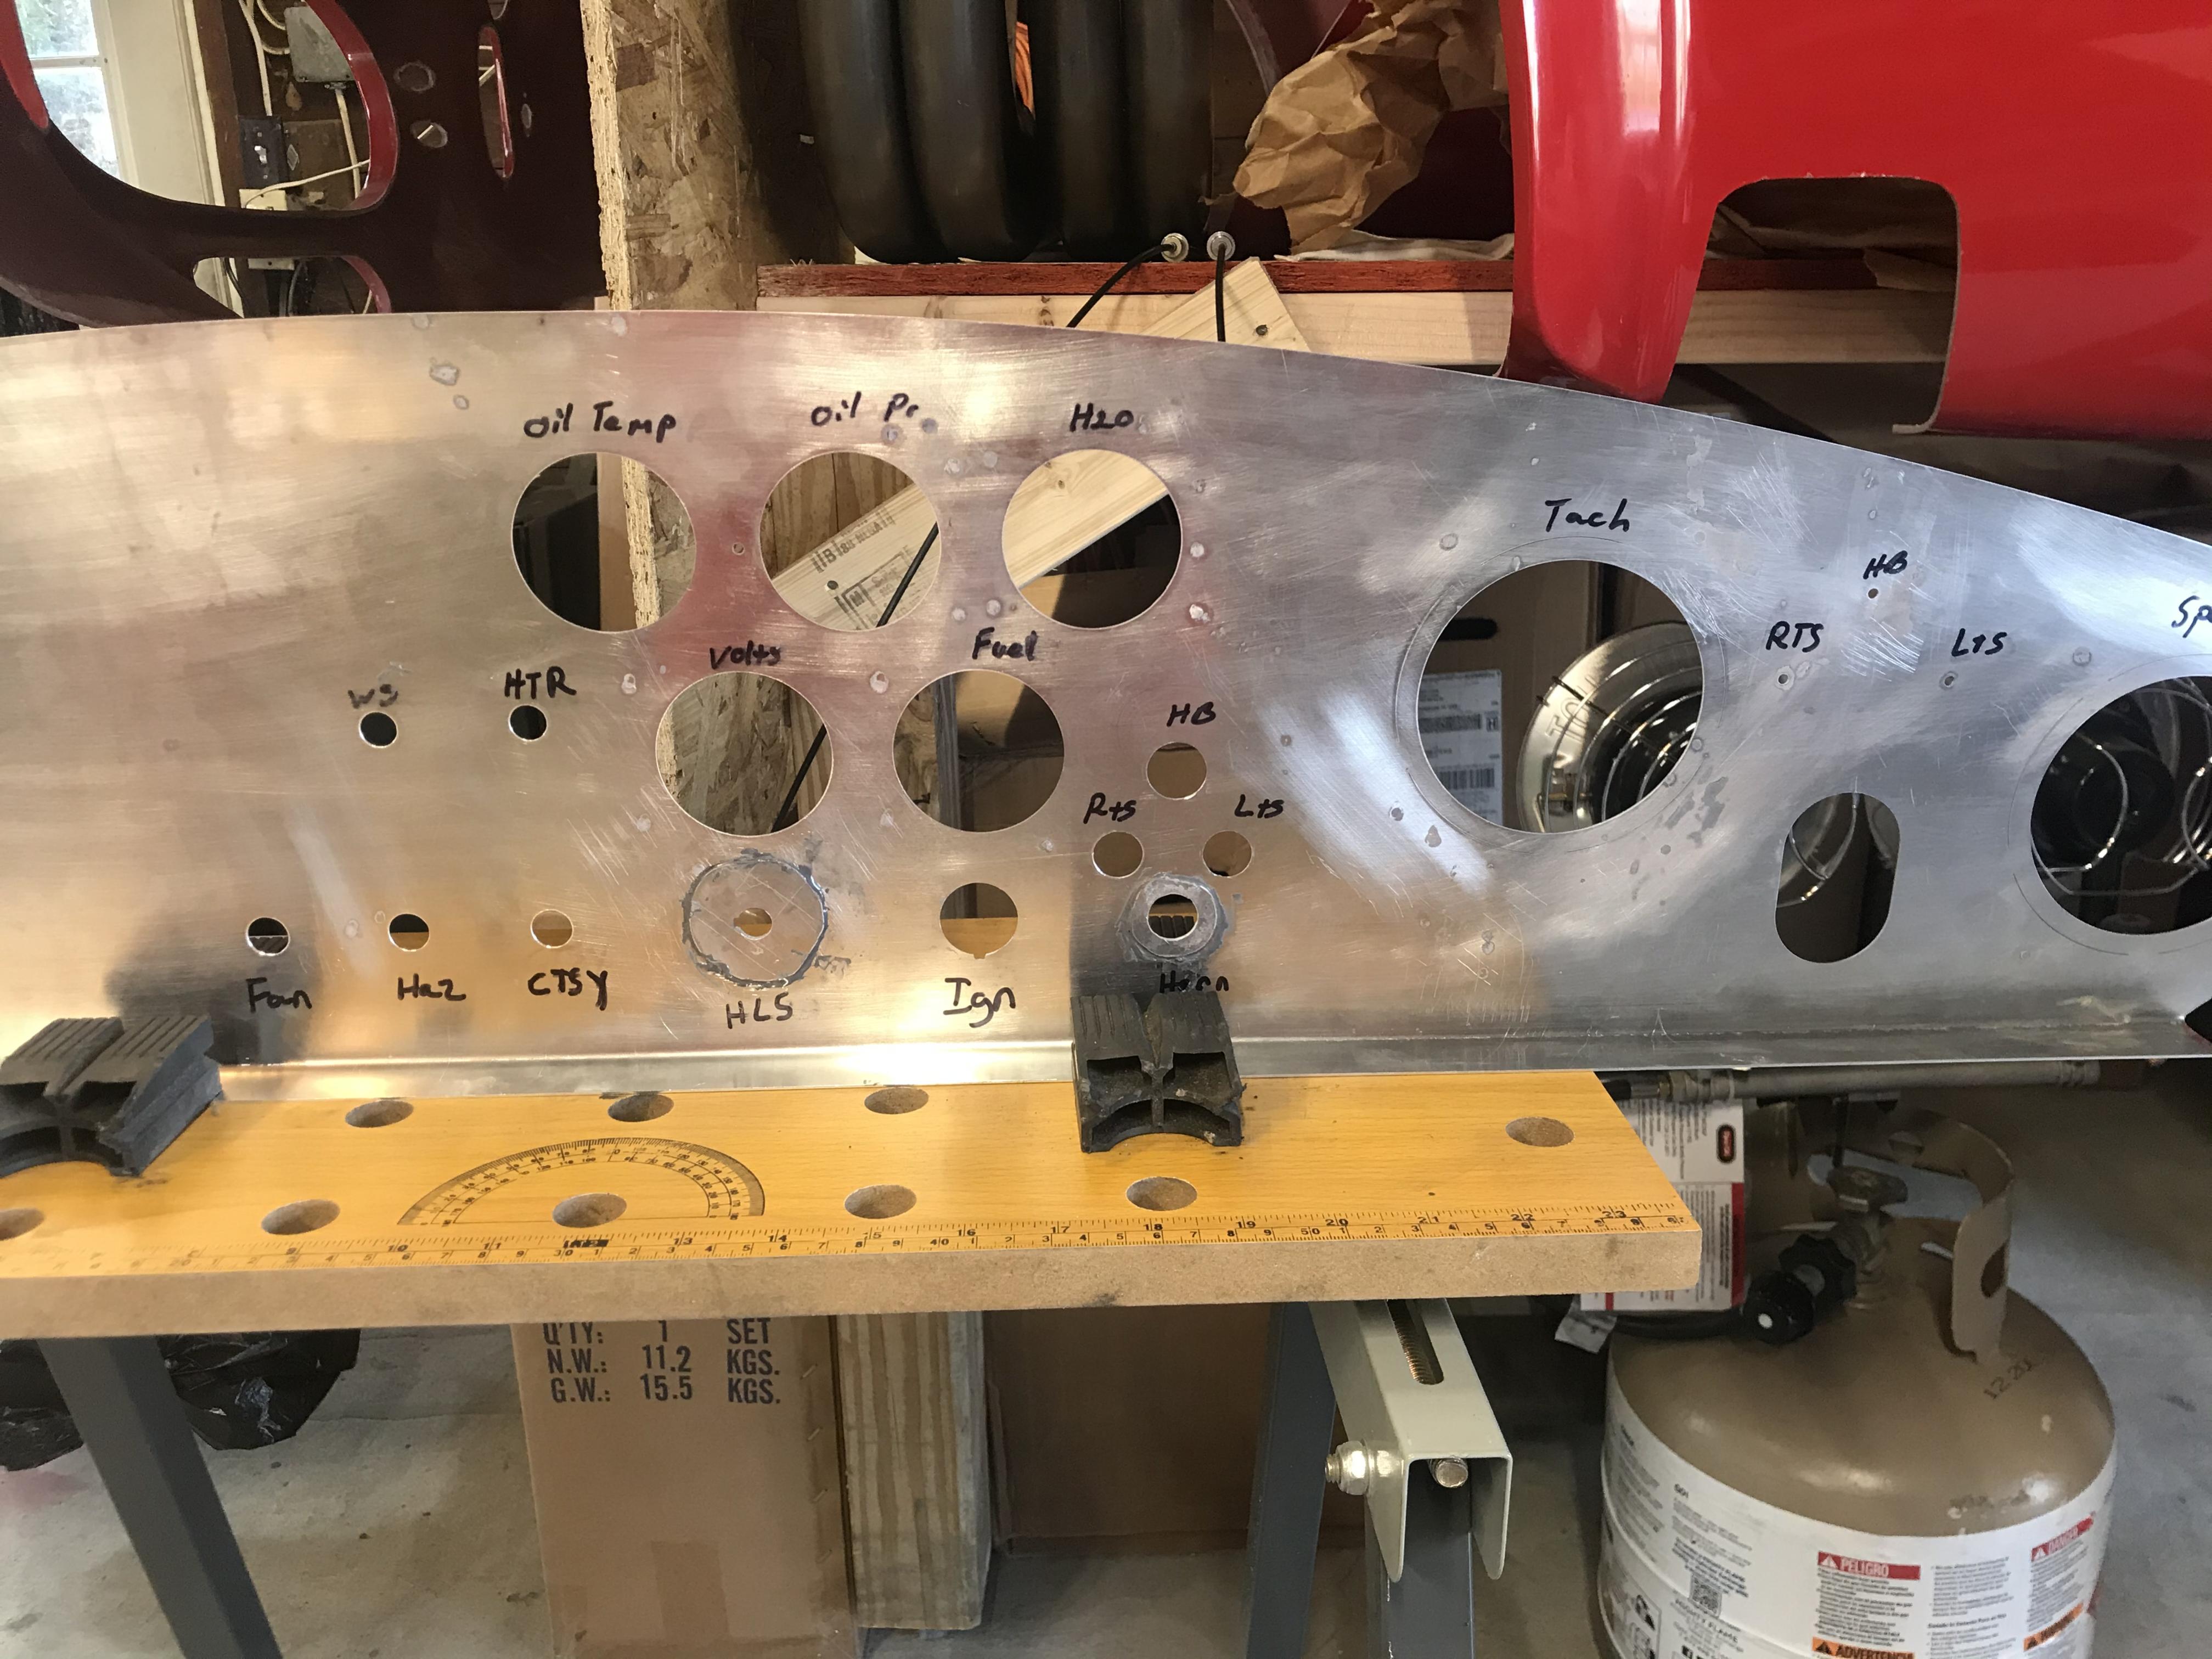
This is what I'm running with. The 3 holes between the tach and speedo are for the turn signal and high beam indicators. I'm using LED's that have not arrived yet. I am also waiting on my foam and adhesive to arrive. I am going to upholster it in leather and use the exact method that edwardb highlighted in his anniversary build. I have some test pieces of aluminum and and some scrap leather that I plan to practice with.


This has been a really fun part of the build so far. Even with the mistakes. Also anyone with any real world experience with the precut dash has any input on my gauge locations I would appreciate any feedback.
Last edited by Blitzboy54; 04-18-2021 at 05:20 PM.
MK4 #10008 - Ordered 10/06/20, Delivered 03/03/21, First Start 7/22/21, First Go Kart 7/24/21
Paint by Metal Morphous 5/14/22, Legally registered 6/8/22, Graduated 7/20/22
Build Thread
https://thefactoryfiveforum.com/show...been-delivered
Complete Kit, Ford 306, Sniper/Dual Sync, T5, Hydraulic clutch
-
Post Thanks / Like - 0 Thanks, 2 Likes
-
04-19-2021, 07:24 AM
#102
Senior Member
FWIW others have pointed out that the speedo is more visible when positioned on the R of the steering column.
-
04-19-2021, 09:57 AM
#103
Senior Member

Great progress. I thought doing the dash layout was a lot of fun. I had more flexibility (and therefore more opportunity for bad layout decisions) with a blank dash as a starting point. I think your knobs and switches are thoughtfully laid out from the front view. Make sure things are adequately separated in the back - check to make sure you can plug in the headlight plug right below the electrical gauge.
You can get a carbon copy of the light / wiper knobs and use it on the heater. At first I thought there was something special about the heater knob, and had visions of having to use epoxy / mold-making ... or some other elaborate scheme to get a better looking knob on the heater. But on close inspection its just basically a set screw engaged in a slot in the shaft that does the work.
I don't have your layout, but personal preference for me in terms of visibility / proximity would be oil pressure, water temp, volts, fuel, and oil temp. I don't think you're going to be monitoring oil temp unless you're in an endurance race with a lot of time at sustained high RPM.
One final tip: if you place the dash face down after leather application, make sure the weight / pressure is ALWAYS very evenly distributed across the dash face. Not only the days / weeks you have the dash down on towels when you're doing the dash wiring, but also the minutes / hours when you're hooking the dash up to the main harness and installing. Ask me how I know. ")
MK4 #7838: IRS 3.55 TrueTrac T5z Dart 347
The drawing is from ~7th grade, mid-1970s
Meandering, leisurely build thread is
here
-
04-19-2021, 10:41 AM
#104
Senior Member
Originally Posted by
egchewy79
FWIW others have pointed out that the speedo is more visible when positioned on the R of the steering column.
Yes, I think you are right. Great point, thank you
Originally Posted by
John Ibele
Great progress. I thought doing the dash layout was a lot of fun. I had more flexibility (and therefore more opportunity for bad layout decisions) with a blank dash as a starting point. I think your knobs and switches are thoughtfully laid out from the front view. Make sure things are adequately separated in the back - check to make sure you can plug in the headlight plug right below the electrical gauge.
You can get a carbon copy of the light / wiper knobs and use it on the heater. At first I thought there was something special about the heater knob, and had visions of having to use epoxy / mold-making ... or some other elaborate scheme to get a better looking knob on the heater. But on close inspection its just basically a set screw engaged in a slot in the shaft that does the work.
I don't have your layout, but personal preference for me in terms of visibility / proximity would be oil pressure, water temp, volts, fuel, and oil temp. I don't think you're going to be monitoring oil temp unless you're in an endurance race with a lot of time at sustained high RPM.
One final tip: if you place the dash face down after leather application, make sure the weight / pressure is ALWAYS very evenly distributed across the dash face. Not only the days / weeks you have the dash down on towels when you're doing the dash wiring, but also the minutes / hours when you're hooking the dash up to the main harness and installing. Ask me how I know.
I have the stand for the dash and generally plan to use that. But what am I avoiding, does the foam shift? I've not heard laying it down is an issue. I appreciate the heads up, your leather work is excellent. On the spacing I spent quite a bit of time making sure it would all fit. My only "compromise" is I rotated the headlight switch 90 deg to best fit all the wiring. I'm a tiny bit concerned that my defroster is going to be an issue but that's down the line and I don't have louvers yet so I can't mock it up.
I had not considered changing the heater knob, now I'm intrigued.
Last edited by Blitzboy54; 04-19-2021 at 10:51 AM.
MK4 #10008 - Ordered 10/06/20, Delivered 03/03/21, First Start 7/22/21, First Go Kart 7/24/21
Paint by Metal Morphous 5/14/22, Legally registered 6/8/22, Graduated 7/20/22
Build Thread
https://thefactoryfiveforum.com/show...been-delivered
Complete Kit, Ford 306, Sniper/Dual Sync, T5, Hydraulic clutch
-
04-19-2021, 05:21 PM
#105
Senior Member
Hmm ... maybe we're stuck on two uses of the term 'laying it down'. It applied just fine and stays in place. And when it's all done it does exactly what you want ... when you push on it, it gives. You push on it hard with a sharp edge for long enough, you're going to leave a permanent dent that won't bounce back. That's all. And it took a lot less than I thought, in weight and time, to do that.
90 deg ... really good idea, and worst case, I'm going to have to do some time-consuming work from the back side with the Dremel to do that. I think flag terminals will fit though.
Heater knob, I remember now ... there's an allen screw hidden deep in all that tacky plastic. Loosen that up and you can take the knob off and see that it's a lot less than what you thought. And, you can see that the shaft not only has the 'D' shape in cross section, they also put another flat on it so that the pull / push function isn't going to result in the handle coming off in your hand.
MK4 #7838: IRS 3.55 TrueTrac T5z Dart 347
The drawing is from ~7th grade, mid-1970s
Meandering, leisurely build thread is
here
-
Post Thanks / Like - 1 Thanks, 0 Likes
-
04-19-2021, 07:45 PM
#106
Looks really nice! The buttons you picked are going to look great with the leather dash.
MK4 Complete Kit, EFI 427W/TKO 600, 2015 IRS
Ordered: 11/6/20, Kit Completion: 2/13/21, Picked Up: 2/16/21, Build Started: 2/19/21, First Start: 6/13/21, Go Kart: 8/15/21, Sent for Paint: 12/23/21, Back From Paint: 6/16/22, Street Legal: 7/11/22
-
04-21-2021, 02:02 AM
#107
Senior Member
Things are looking great! We will be starting our dash and doing the drop trunk fairly soon (if I ever get time to get back to the car--work gets in the way). It's nice to see your solutions before I do it!
-
04-22-2021, 09:35 PM
#108
Senior Member
Does anyone living in the Northeast know why it's winter again? It's April 22nd and it has snowed twice this week. TWICE!!
I am learning a ton. I almost never make the same mistake twice but I make almost all of them once. I stripped down my dash and made brackets for my hidden dash mounts. I used 6-32 pan head screws per Paul's recommendation and counter sunk the holes on the dash. I used a counter sink tool i use to clean up burrs and wouldn't you know it i over did it and the screws slipped right through. DOH! So I move up a size and ground down the heads to make them flush. I used rivnuts in the bottom of the hoop. I made some brackets with steel stock I had lying around and secured them to the frame with 1/4 20's. The dash is now very secure. I moved the car around my garage a bit just using the grab bar and nothing else flexes so I am feeling pretty good about it


Next I will take it down, powder coat the brackets, then upholster the dash. Then start putting it together for good.

So far the only thing I would go back and tell 2 months ago Jesse is don't use gloss black on the engine bay panels. it's already a pain to keep clean and finger print free and it doesn't have an engine in it yet. I am building a driver not a show car so I wish I had given that more thought. It's not a real big deal. On the bright side this has been as much fun as i hoped it would be
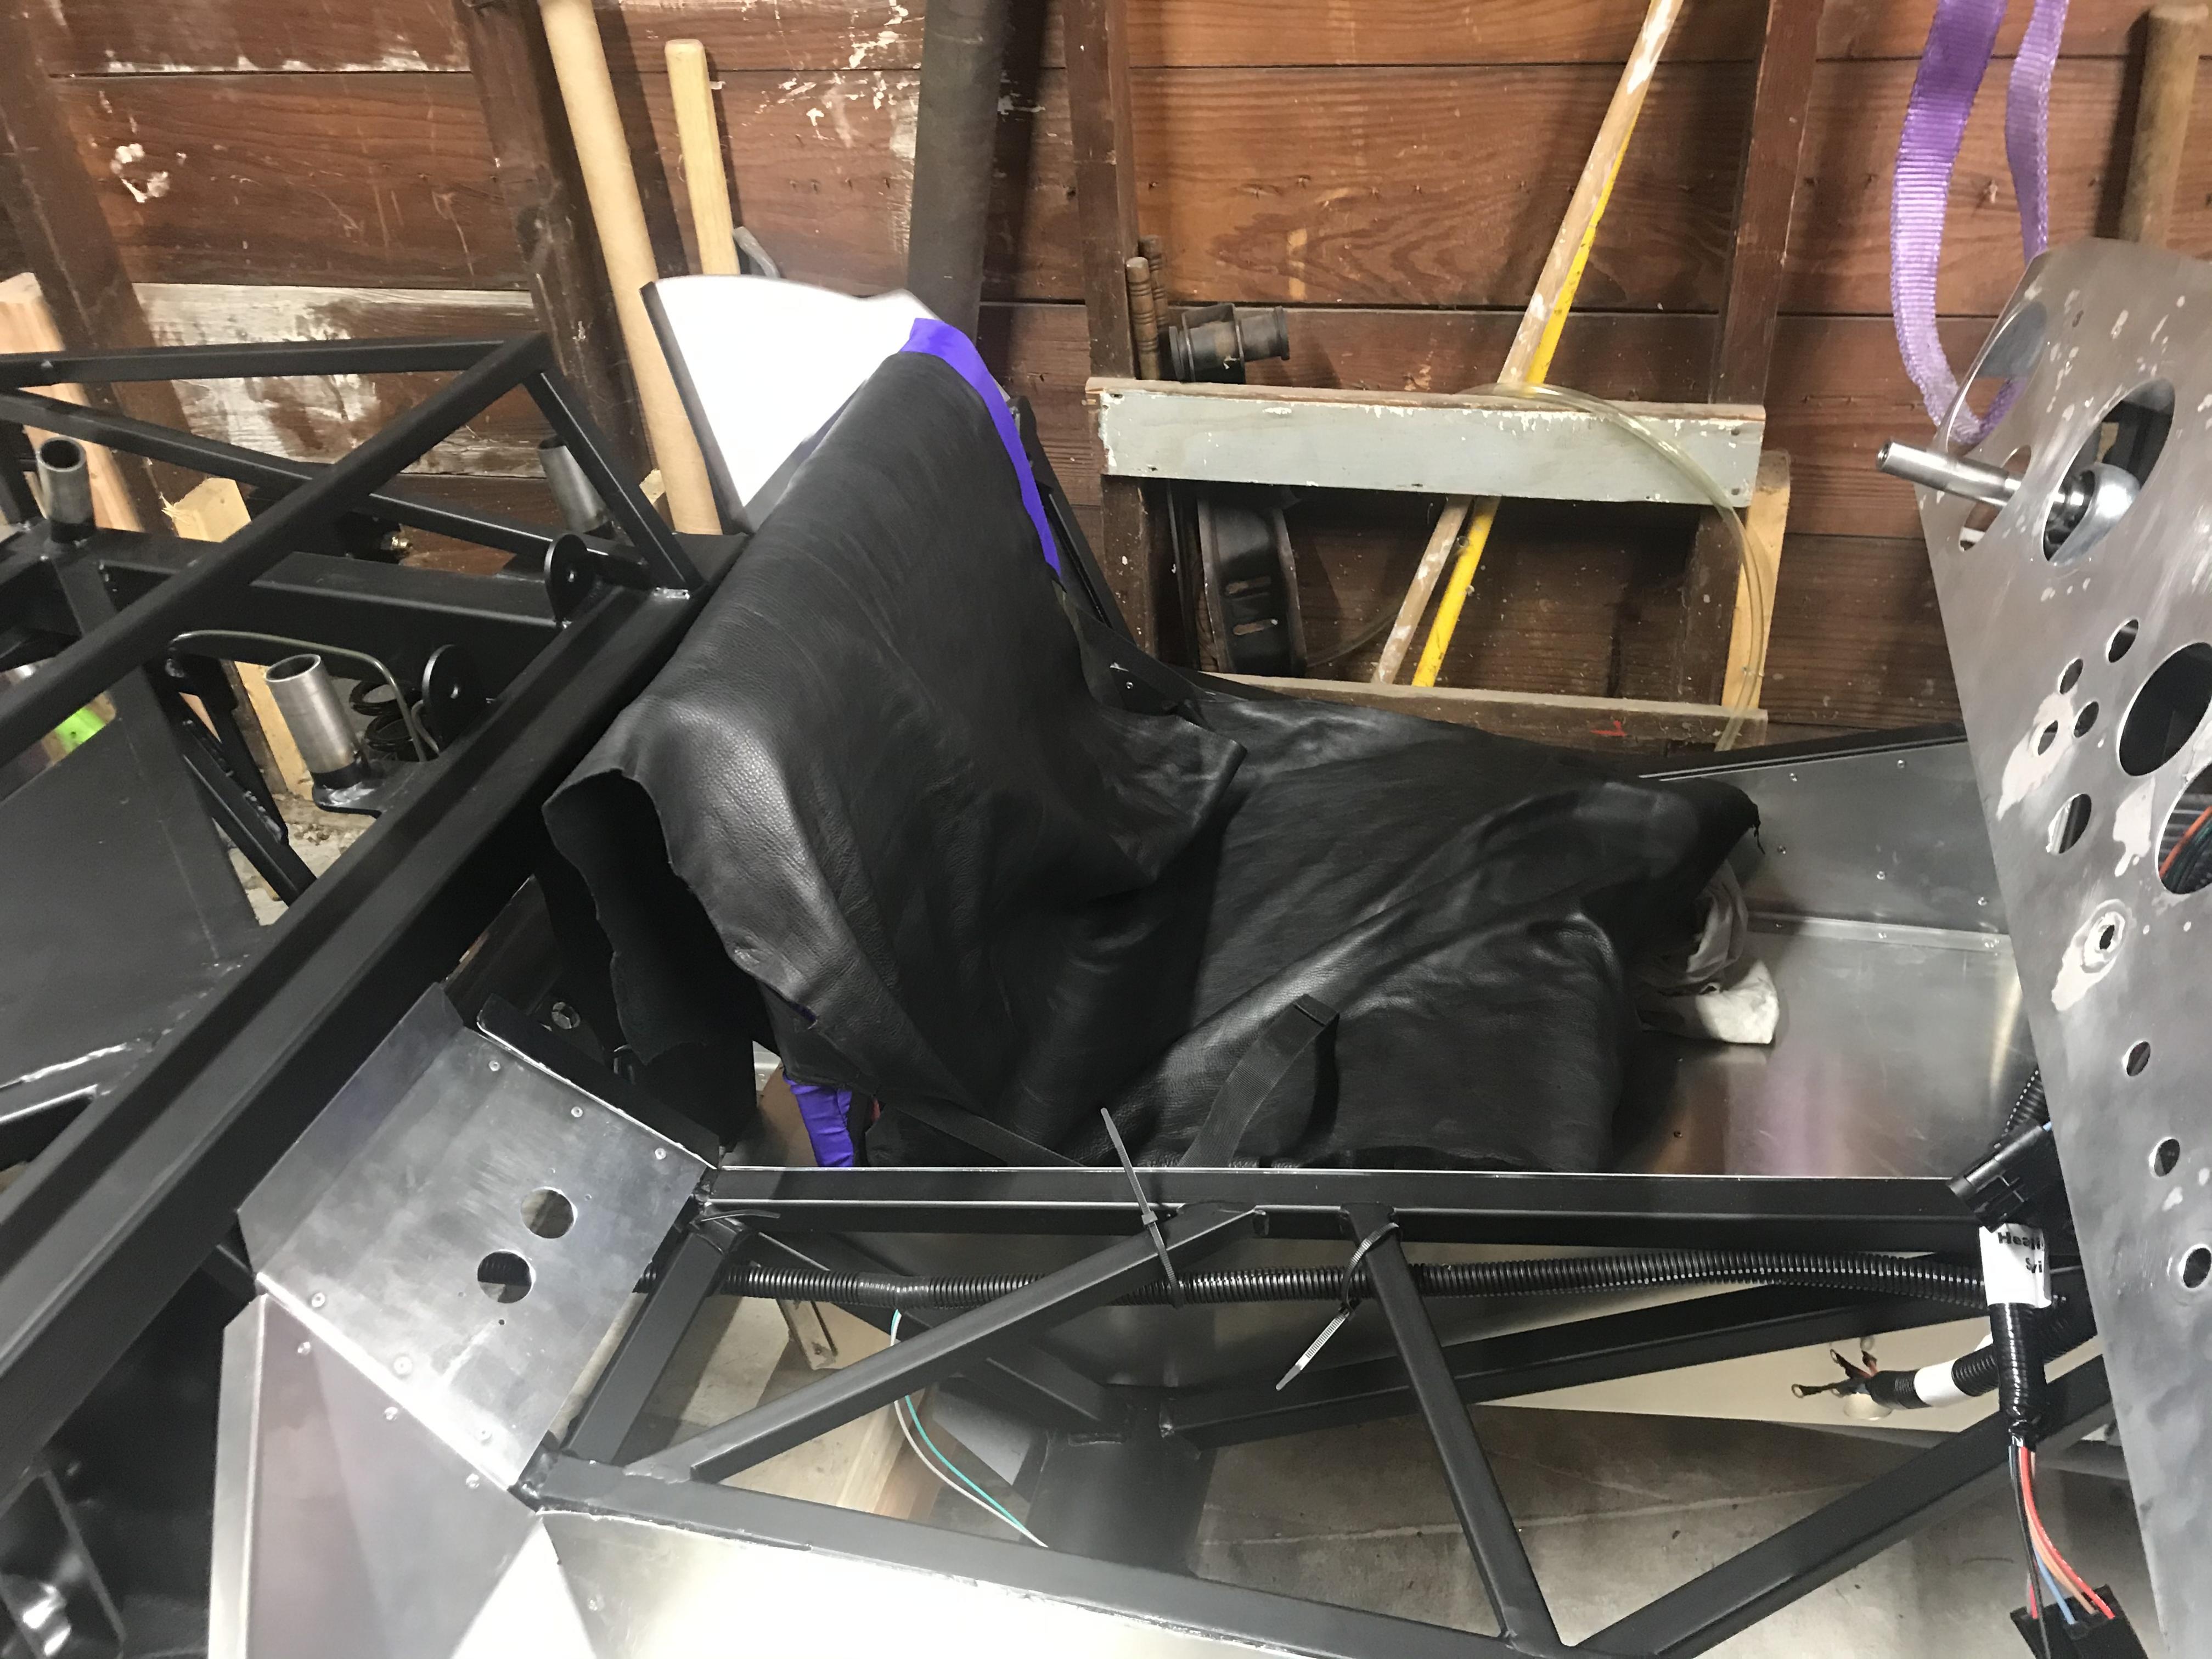
I got an update from FFR on my POL. The only real surprise is my Kirkey seats have no eta. I guess they are having some real supplier issues too. So since I am stuck with my camping chair for a while I upgraded it to leather (no that's not my dash leather)
Last I was sorting out some aluminum and I saw this. It's listed as a fuse panel bracket. Is it safe to assume this is for a donor harness perhaps? I'm not clear what it's for and I don't see it anywhere in the manual.
Thanks

Last edited by Blitzboy54; 04-22-2021 at 10:48 PM.
MK4 #10008 - Ordered 10/06/20, Delivered 03/03/21, First Start 7/22/21, First Go Kart 7/24/21
Paint by Metal Morphous 5/14/22, Legally registered 6/8/22, Graduated 7/20/22
Build Thread
https://thefactoryfiveforum.com/show...been-delivered
Complete Kit, Ford 306, Sniper/Dual Sync, T5, Hydraulic clutch
-
04-22-2021, 11:42 PM
#109
Nice work on the dash, things are looking great!
I'm seeing dust/more on my panels as well, it's a bummer for sure.
-
04-23-2021, 12:41 PM
#110
Senior Member
Originally Posted by
Blitzboy54
Last I was sorting out some aluminum and I saw this. It's listed as a fuse panel bracket. Is it safe to assume this is for a donor harness perhaps? I'm not clear what it's for and I don't see it anywhere in the manual.
You're looking in the manual for the wiring harness, correct? I don't know if there's more than one version of this panel in your kit, but you need this to hold the fuse panel which is connected to the main harness up on the top of your DS footbox.
Here's a link to a photo of Fman's in his build thread.
MK4 #7838: IRS 3.55 TrueTrac T5z Dart 347
The drawing is from ~7th grade, mid-1970s
Meandering, leisurely build thread is
here
-
04-23-2021, 01:29 PM
#111
Senior Member
Originally Posted by
John Ibele
You're looking in the manual for the wiring harness, correct? I don't know if there's more than one version of this panel in your kit, but you need this to hold the fuse panel which is connected to the main harness up on the top of your DS footbox.
Here's a
link to a photo of Fman's in his build thread.
Thanks John, The RF harness had an aluminum mount packed with it for the fuse box. I used it. The pic is a close up, but it's in there. I think I must have either received 2 or its for the donor harness.
Fuse Panel.jpg
As an aside, I'm taking on the upholstery this weekend, definitely a little nervous. If it comes out half as good as yours I'll be happy.
Last edited by Blitzboy54; 04-23-2021 at 01:32 PM.
MK4 #10008 - Ordered 10/06/20, Delivered 03/03/21, First Start 7/22/21, First Go Kart 7/24/21
Paint by Metal Morphous 5/14/22, Legally registered 6/8/22, Graduated 7/20/22
Build Thread
https://thefactoryfiveforum.com/show...been-delivered
Complete Kit, Ford 306, Sniper/Dual Sync, T5, Hydraulic clutch
-
04-23-2021, 06:37 PM
#112
Senior Member
Looks like you’re set - good luck with the weekend project!
MK4 #7838: IRS 3.55 TrueTrac T5z Dart 347
The drawing is from ~7th grade, mid-1970s
Meandering, leisurely build thread is
here
-
Post Thanks / Like - 1 Thanks, 0 Likes
-
04-27-2021, 07:10 PM
#113
Senior Member
So this for me was the most stressful part of the build BY A MILE! If you screw up the dash there really isn't any hiding it. I knew at the beginning of last week I was gearing up to do this and the closer it got the more it was on my mind. Going in I had an idea of what I wanted to do and how I thought I wanted to do it but I have never upholstered anything in my life and you just don't know what you don't know. Right out front I want to thank Paul (edwardb) and John Ibele for so thoroughly documenting their experience. It was an enormous help.
I started using the Landau Top and Trim like a lot of other builders including the fellas I just mentioned. Like Paul has said it's meant for a spray gun but can be brushed on. When I went to purchase it I found it is now available in a spray can (score!) so I went that route. On Friday I started testing it with scrap pieces of aluminum and leather and I am glad I did. I found the spray version to have issues. The product itself is fine but the spray can isn't awesome. It comes out clumpy and sprays very inconsistently. This was my experience your mileage may vary. Since I didn't have any more on hand I picked up both some 3M super 77 and 3M 90. I ended up using the latter. So after about 10 different experiments I went for it.
I used paper to trace out my bigger holes and set them in with the dash lying face down on the leather. I have a layer of 1/8' upholstery foam from yourautotrim.com glued to the dash. Now with everything masked off it was time to spray.
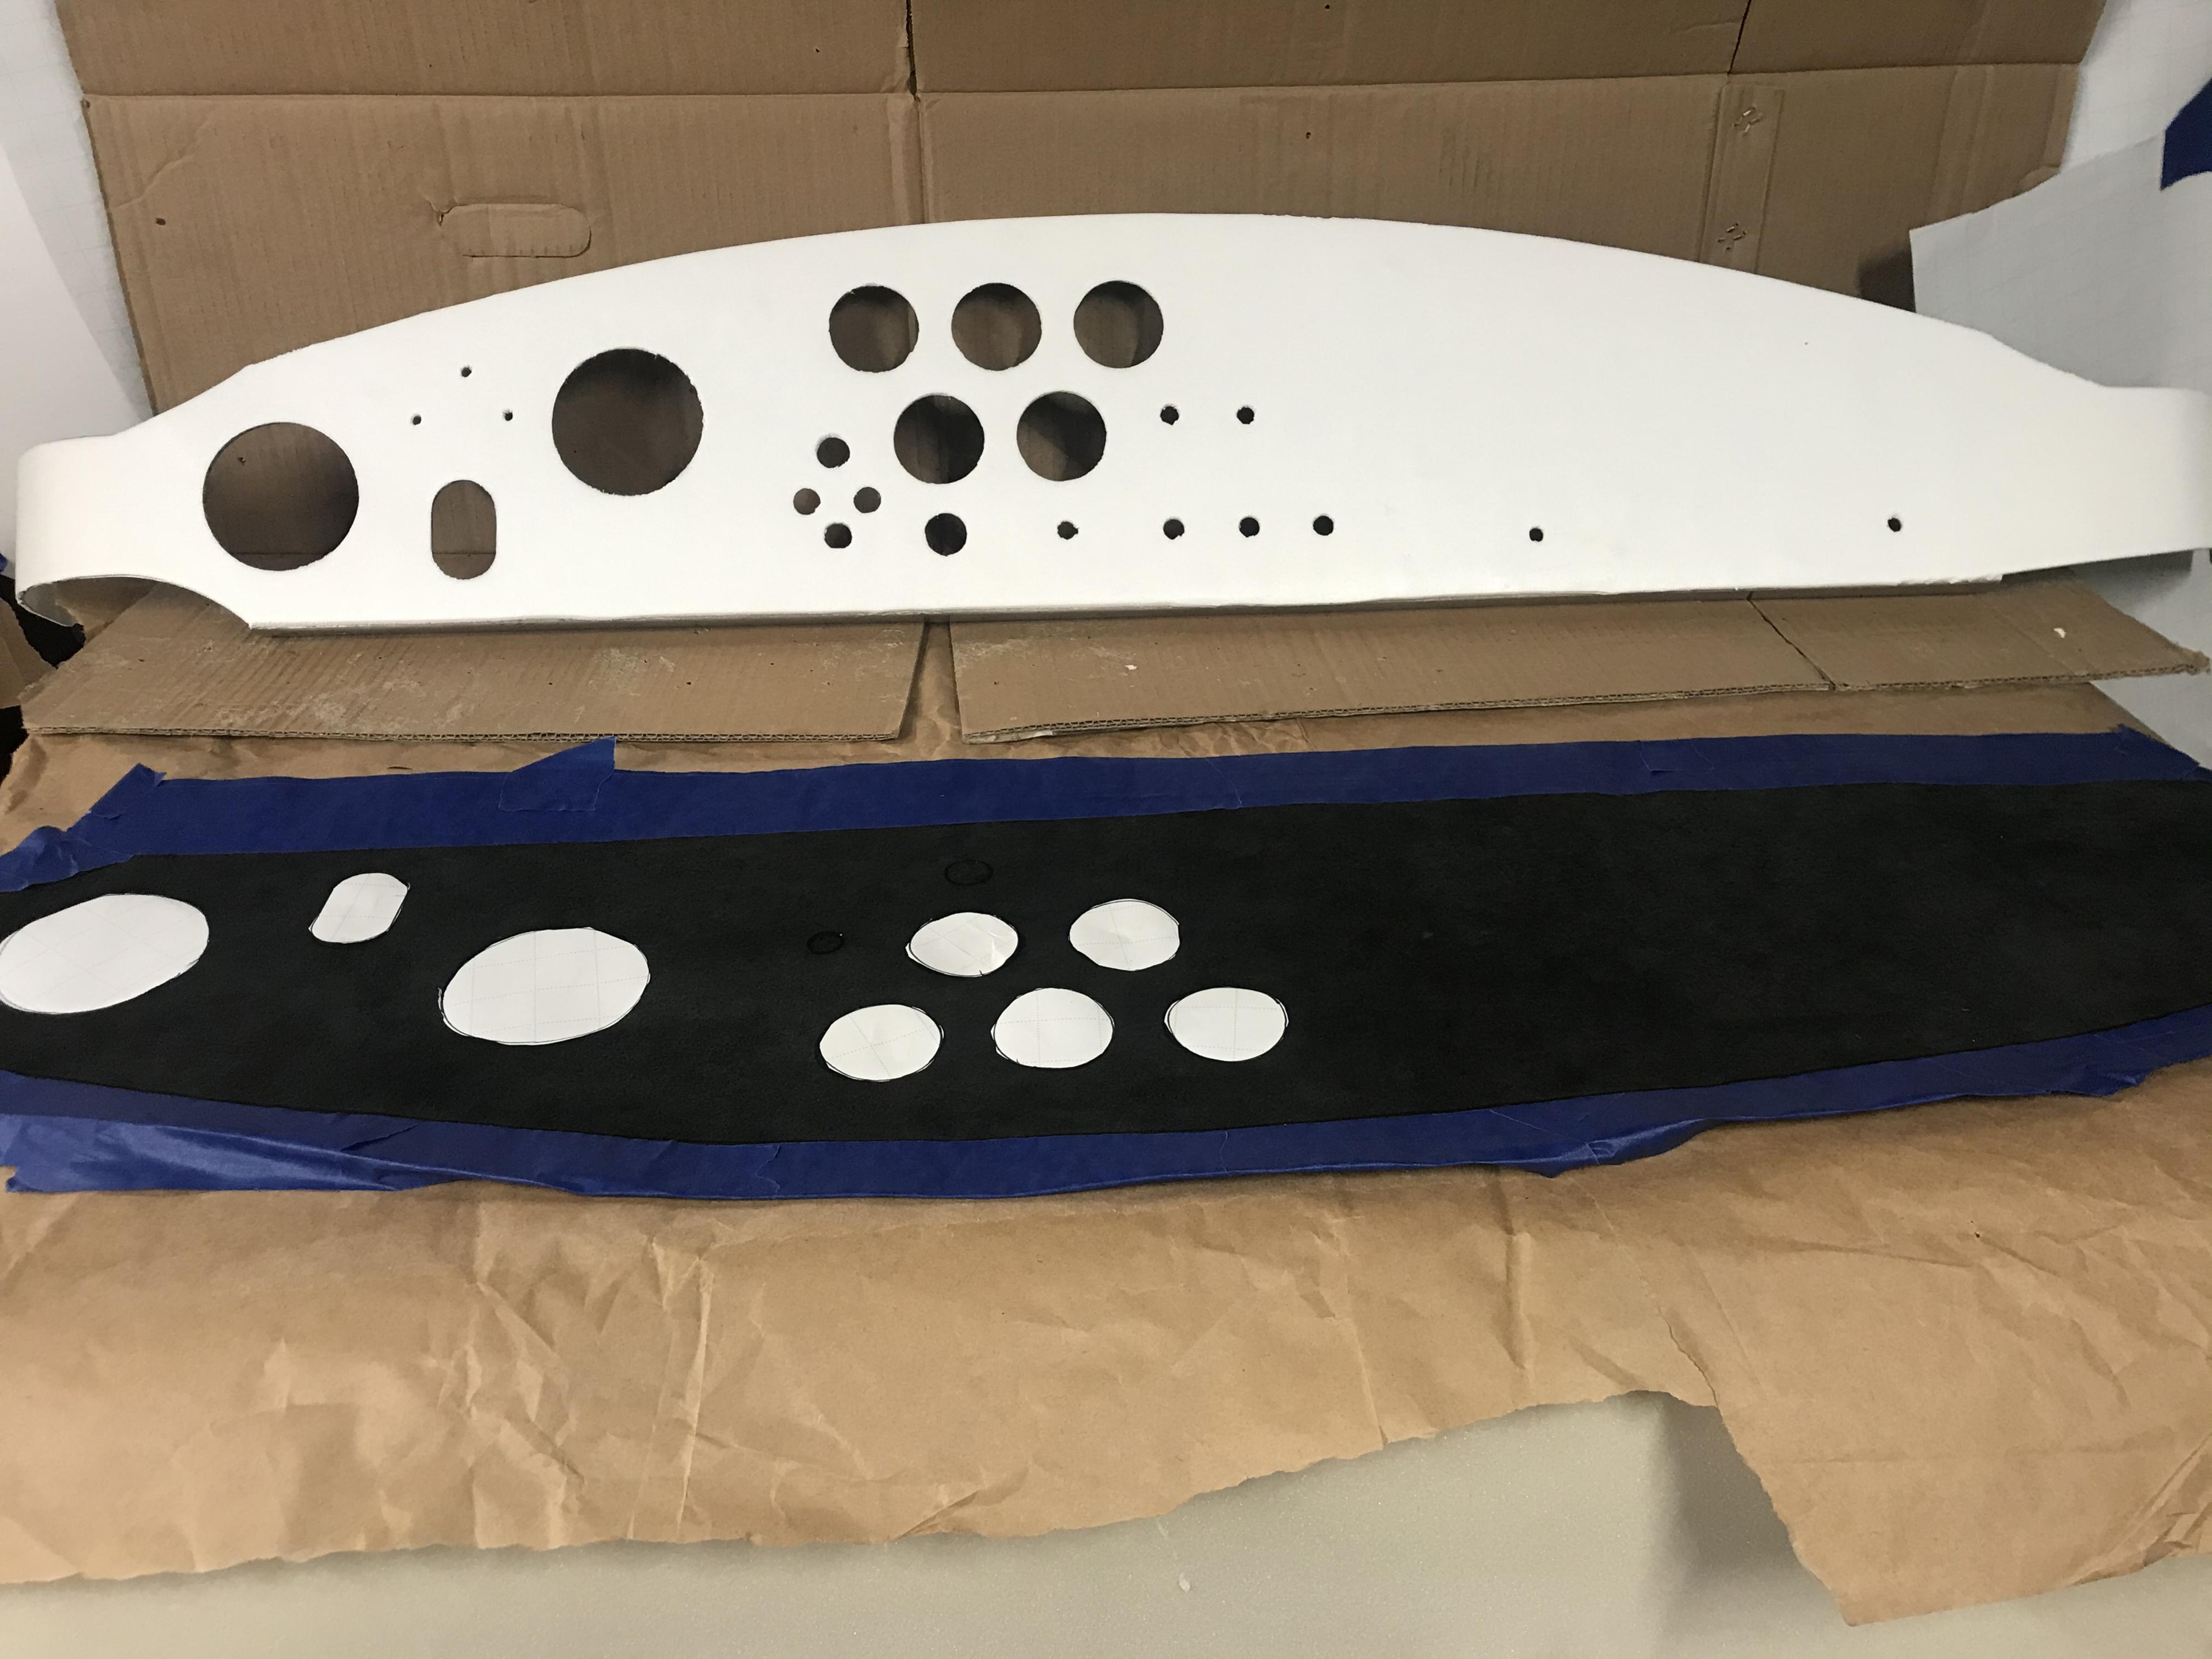
You have like 3 minutes before you are in the tacky zone. I carefully laid it down then hand pressed it and finished it off with a hobby roller
https://www.amazon.com/gp/product/B0...?ie=UTF8&psc=1

After letting that dry overnight I carefully worked the holes with a hobby razor knife. Like everyone else has said buy extra blades the leather is tough on them. I re masked in sections and after cutting my pie pieces started folding it over. This is where you can learn from my experience. I cut my first pie section all the way to the edge of the dash metal. DO NOT DO THIS!!! When you fold it over you see the metal underneath. Thankfully I was at least smart enough to do it in an area that is tucked into the car and can't be seen. Leave at least an 1/8th of an inch (probably more) of material around the dash to stop your pie cuts.
The other thing to keep in mind that I had not previously picked up on others builds is the dash is significantly thicker with the foam and leather. I mocked up my dash on bare aluminum, all the switches fit (the ignition is a VERY tight fit). The only real casualty is the grab bar I purchased has really long stand offs. I cut them down but now that the dash is thicker I think they are too short. So I may need purchase a replacement. So account for that.


All in all I am very pleased with how it turned out.


Like this entire experience I learned so much and would be better at it the next time, but this was my first "Built Not Bought" moment. I feel like I accomplished something significant. It feels great.
For anyone looking to use leather I picked up a hide that was a tremendous value. I can't remember who I got the tip from, I think Fman but it could have been edwardb (or any number of other builders). It's an entire hide and the quality is excellent.
https://www.ebay.com/itm/162592582983
Last edited by Blitzboy54; 05-02-2021 at 04:21 PM.
MK4 #10008 - Ordered 10/06/20, Delivered 03/03/21, First Start 7/22/21, First Go Kart 7/24/21
Paint by Metal Morphous 5/14/22, Legally registered 6/8/22, Graduated 7/20/22
Build Thread
https://thefactoryfiveforum.com/show...been-delivered
Complete Kit, Ford 306, Sniper/Dual Sync, T5, Hydraulic clutch
-
Post Thanks / Like - 0 Thanks, 2 Likes
-
04-28-2021, 07:33 AM
#114
Senior Member

Excellent build thread BLitz! I just got caught up on it. Keep on cruising. You will be go karting in no time. Like you my biggest issue for slowing me down is the POL. Also my other issue slowing me down is analysis paralysis..... Too many options to do one thing that has ramifications down the road so I sit on it and ponder too long.
FFR MK4 Roadster (9945) complete kit, delivered 12/4/2020, First start and go kart 5/7/2021. Legal 8/14/2021, Paint finished 7/18/2022 (Viking Blue). 347BPE CI, TKO600, Moser 8.8 3link 3.55, Halibrand 17x9 17x10.5, power steering. Carbon Fiber Dash. Carbon Fiber trans tunnel, adjustable Kirkey Lowback Vintage seats, Vintage gauges, RT drop trunk mod, FFmetal drop battery mod and trans tunnel, Forte front sway bar. Forte mechanical throttle linkage, RT gas pedal.
www.covespringsfarm.com
-
Post Thanks / Like - 1 Thanks, 0 Likes
-
04-28-2021, 08:19 AM
#115
Senior Member
Well, that was a successful weekend! Congrats on a big milestone - it's definitely a 'built not bought' item, and the first finished part of the interior that you get to see. The next goofy milestone is sitting in your car, in the dark, in the garage, enjoying the gauge lighting
MK4 #7838: IRS 3.55 TrueTrac T5z Dart 347
The drawing is from ~7th grade, mid-1970s
Meandering, leisurely build thread is
here
-
04-28-2021, 08:29 AM
#116
Senior Member
That dash turned out excellent, very nice job!
I really like how each builder does there own recipe on the dash layout.
-
Post Thanks / Like - 1 Thanks, 0 Likes
-
04-28-2021, 10:02 AM
#117
Senior Member
Originally Posted by
John Ibele
Well, that was a successful weekend! Congrats on a big milestone - it's definitely a 'built not bought' item, and the first finished part of the interior that you get to see. The next goofy milestone is sitting in your car, in the dark, in the garage, enjoying the gauge lighting
I'm really looking forward to that part for sure
MK4 #10008 - Ordered 10/06/20, Delivered 03/03/21, First Start 7/22/21, First Go Kart 7/24/21
Paint by Metal Morphous 5/14/22, Legally registered 6/8/22, Graduated 7/20/22
Build Thread
https://thefactoryfiveforum.com/show...been-delivered
Complete Kit, Ford 306, Sniper/Dual Sync, T5, Hydraulic clutch
-
04-28-2021, 01:00 PM
#118
Senior Member
Just noticed a couple things. First, really nice work, it looks great. I picked the vintage gauges but the Auto Meters really pop and have a more race-ready look. Nice. I also like the simplicity of the layout.
Second thing, particularly since I don't see a warning light, for your small gauges I would have water temp and oil pressure closest to me. That way you have 'something's not right' and 'pull over now' gauges closest. After that probably volts and fuel, then oil temp last unless you're planning on long stints at high RPM. FWIW.
MK4 #7838: IRS 3.55 TrueTrac T5z Dart 347
The drawing is from ~7th grade, mid-1970s
Meandering, leisurely build thread is
here
-
04-28-2021, 01:27 PM
#119
Senior Member
Originally Posted by
John Ibele
Just noticed a couple things. First, really nice work, it looks great. I picked the vintage gauges but the Auto Meters really pop and have a more race-ready look. Nice. I also like the simplicity of the layout.
Second thing, particularly since I don't see a warning light, for your small gauges I would have water temp and oil pressure closest to me. That way you have 'something's not right' and 'pull over now' gauges closest. After that probably volts and fuel, then oil temp last unless you're planning on long stints at high RPM. FWIW.
Thanks John
All good points. I thought about warning lights but the gauges are right there, although I could easily add a red indicator. I used the same line of thinking. While sitting in the cockpit my eyes were naturally up to that first row. The first 2 gauges on the top row are the ones I see best. I agree those are the two most critical and for me most in my line of site.
MK4 #10008 - Ordered 10/06/20, Delivered 03/03/21, First Start 7/22/21, First Go Kart 7/24/21
Paint by Metal Morphous 5/14/22, Legally registered 6/8/22, Graduated 7/20/22
Build Thread
https://thefactoryfiveforum.com/show...been-delivered
Complete Kit, Ford 306, Sniper/Dual Sync, T5, Hydraulic clutch
-
Post Thanks / Like - 0 Thanks, 1 Likes
-
04-28-2021, 08:34 PM
#120
Congrats Jesse! You did a great job. It looks amazing.
MK4 Complete Kit, EFI 427W/TKO 600, 2015 IRS
Ordered: 11/6/20, Kit Completion: 2/13/21, Picked Up: 2/16/21, Build Started: 2/19/21, First Start: 6/13/21, Go Kart: 8/15/21, Sent for Paint: 12/23/21, Back From Paint: 6/16/22, Street Legal: 7/11/22
-
Post Thanks / Like - 1 Thanks, 0 Likes


 Thanks:
  Likes:


 Reply With Quote
