-
Senior Member

Next question...Door window gap
Working on the windows and it seems that I have a rather large gap...
1-1/4" without seals...IMG_1806(1).JPG 3/4" with seals...IMG_1805(1).JPG
This isn't normal, is it?? I assume it should be a snug fit on both sides of the glass.
Any suggestions as to the best way to rectify this? I did find a post by chuck35truck and he had .65".
Thanks
-
The below might help out. I don't remember what the final gap was on mine but 1-1/4" is way to big. My glass when done was supper snug and I had to really trim down to get things to operate smoothly. But when done was smooth and tight seal like OEM. I think that would be a problem I'd put on FFR to solve.
https://thefactoryfiveforum.com/show...dows-made-easy
-
Senior Member

Originally Posted by
bnelson

The below might help out. I don't remember what the final gap was on mine but 1-1/4" is way to big. My glass when done was supper snug and I had to really trim down to get things to operate smoothly. But when done was smooth and tight seal like OEM. I think that would be a problem I'd put on FFR to solve.
https://thefactoryfiveforum.com/show...dows-made-easy
I want it snug too, but I'm not sure how I get there if I'm starting with a wide gap. I contacted FFR and am waiting to hear back. Thanks for the link, I'll bookmark it to reference when/if I get to that point.
Thanks!
-
installed gasket on inside door frame; laid door on table gasket side down, placed glass in door, on gasket (window up position). Took a Sharpie marker, laid flat on glass and scribed outside frame for trimming. This gave me consistent a gap except a bit at bottom of frame, where wider than trim marks. Used "cat's head" gasket all the way around both sides, this gave me correct spacing.
-
Post Thanks / Like - 1 Thanks, 0 Likes
-
Originally Posted by
FLFrank35
Working on the windows and it seems that I have a rather large gap...
1-1/4" without seals...
IMG_1806(1).JPG 3/4" with seals...
IMG_1805(1).JPG
This isn't normal, is it?? I assume it should be a snug fit on both sides of the glass.
Any suggestions as to the best way to rectify this? I did find a post by chuck35truck and he had .65".
Thanks
I have not started on my doors yet. I just measured mine: Drivers side about the middle of the slot I got .766, passengers side I got .851. Not really sure what "Normal" is with these!
Gary
FFR Gen 2 35 truck, Barrett Jackson edition # 4, chassis # 81, 525HP LS3 & 4L75E, 8.8" 3 link.
-
Post Thanks / Like - 2 Thanks, 1 Likes
-
Senior Member
Thanks for the replies. Using simple math...if each cat head is .25" and there are 2 sides = .50". Add to that the thickness of the glass (.15?) = .65". So I would think we need to start with a .65" gap for it to fit perfectly. And it probably doesn't have to be perfect... .76" might be just fine.
I am waiting to hear back from Dave Correia (FFR). He's checking with the engineering dept. to see what the starting gap should be, and then we'll go from there. I would guess the only options are to build up the gap edges or get new doors.
Frank
-
Post Thanks / Like - 1 Thanks, 0 Likes
-
Originally Posted by
FLFrank35
Thanks for the replies. Using simple math...if each cat head is .25" and there are 2 sides = .50". Add to that the thickness of the glass (.15?) = .65". So I would think we need to start with a .65" gap for it to fit perfectly. And it probably doesn't have to be perfect... .76" might be just fine.
I am waiting to hear back from Dave Correia (FFR). He's checking with the engineering dept. to see what the starting gap should be, and then we'll go from there. I would guess the only options are to build up the gap edges or get new doors.
Frank
Yea. Unfortunately that's a really difficult edge to extend even for an experienced fiberglass guy. I'd guess they trimmed to far before putting together. I don't see how you would correct that easily. FFR has been real good about taking care of those types of things though. They'll take care of it 
-
Post Thanks / Like - 1 Thanks, 1 Likes
-
Senior Member

Me too...
I'm working on my truck build doors right now installing the power windows and at this exact point. I have a similar problem. It isn't so much that the gap is too wide as much as it's not centered with where the glass ends up. The location of the glass is set by the felt lined edging on the inside of the frame and mainly by the window lift mechanism. I've done everything I can think of to move it incrementally but not much has changed. The position of where the glass exits the door at the beltline is nearly immovable. On mine, I'm going to need to trim on the outside to have room for the cat head edging. But the inside is too wide. The cat head edging won't fill the gap. It measures around 9/16" opening to the glass. About 1/4" too much. I'm not a fan of the transition at each end from the cat head to the felt-lined edging either. Maybe with careful trimming it will be OK.
I'm too deep into these doors timewise to even think about starting over. Possible options: Build up the edge with glass, cloth, HSRF, whatever. As already stated, not easy. Maybe find a different edging material. I've spent some time looking at what https://www.steelerubber.com/steele-...***-components has. Maybe some options but not without some additional work. Another option might be just a piece of bulb seal. Wouldn't look the best, but better than a gap.
Will be very interested to hear what Factory Five says.
Build 1: Mk3 Roadster #5125. Sold 11/08/2014.
Build 2: Mk4 Roadster #7750. Sold 04/10/2017.
Build Thread
Build 3: Mk4 Roadster 20th Anniversary #8674. Sold 09/07/2020.
Build Thread and
Video.
Build 4: Gen 3 Type 65 Coupe #59. Gen 3 Coyote. Legal 03/04/2020.
Build Thread and
Video
Build 5: 35 Hot Rod Truck #138. LS3 and 4L65E auto. Rcvd 01/05/2021. Legal 04/20/2023.
Build Thread. Sold 11/9/2023.
-
Post Thanks / Like - 2 Thanks, 0 Likes
-
Senior Member
Glad I’m not the only one...misery loves company. I’ll post when I hear back from FF.
-
Post Thanks / Like - 0 Thanks, 1 Likes
-
Senior Member

Edwardb:
Ive been looking at belt line weatherstripping for a Foxbody Mustang as Im prepping my cab and doors for paint. Very familiar with those as Ive hot rodded three of them over my years.
IMO the fibreglass at the bottom of the windows of the doors on 35 is far too thin/flexible to ever seal well with just bulb type stripping.
The Foxbody belt line has metal inside it much like one or two of the offerings in the link you posted. And the price in your link is better. 👍🏼
Will my solution look original or be blessed by FFR...almost certainly not. Will it work...almost for sure.
Thats my 2 cents 😁
-
Senior Member
Originally Posted by
Pat Landymore
Edwardb:
I’ve been looking at “belt line weatherstripping” for a Foxbody Mustang as I’m prepping my cab and doors for paint. Very familiar with those as I’ve hot rodded three of them over my years.
IMO the fibreglass at the bottom of the windows of the doors on 35 is far too thin/flexible to ever seal well with just bulb type stripping.
The Foxbody belt line has metal inside it much like one or two of the offerings in the link you posted. And the price in your link is better. ����
Will my solution look original or be blessed by FFR...almost certainly not. Will it work...almost for sure.
That’s my 2 cents ��
I'd be very interested to see what you come up with. Just a couple observations though. I don't have expectations that the truck windows will be as robust or waterproof as DD's. I don't intentionally drive my builds in the rain. Having said that, pretty reasonable to expect the truck will be better than an open top Roadster or our Coupe with the sliding plexi windows.  Also, I agree the fiberglass window frames are a bit on the flexible side. But mainly on the inside. Especially probably the side in question in this thread where the gap is wider than the provided weatherstripping. What I have noticed though is the window lift mechanism attaches to that surface and adds a bit of rigidity. Also the kit provided door cards are quite stiff and when attached will add more. Don't particularly like depending on those kinds of things. But it does add up to where it would probably meet my expectations if I could just close the gap. Again, very interested to see what others do.
Build 1: Mk3 Roadster #5125. Sold 11/08/2014.
Build 2: Mk4 Roadster #7750. Sold 04/10/2017.
Build Thread
Build 3: Mk4 Roadster 20th Anniversary #8674. Sold 09/07/2020.
Build Thread and
Video.
Build 4: Gen 3 Type 65 Coupe #59. Gen 3 Coyote. Legal 03/04/2020.
Build Thread and
Video
Build 5: 35 Hot Rod Truck #138. LS3 and 4L65E auto. Rcvd 01/05/2021. Legal 04/20/2023.
Build Thread. Sold 11/9/2023.
-
Post Thanks / Like - 1 Thanks, 0 Likes
-
Senior Member
Any update on possible solutions to this? Curious how Factory Five responded or if anyone has any suggestions.
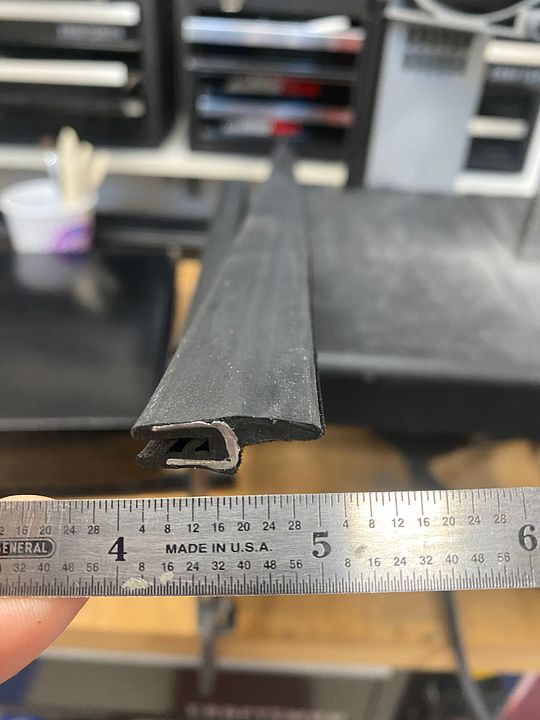
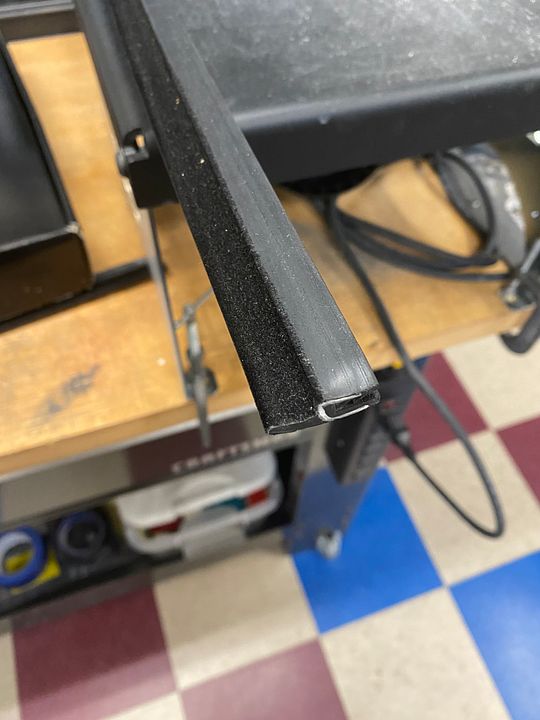
So having said that, did stumble onto a possibility. Was going through a box (#9) getting some parts and noticed part number 26037 Weatherstrip, Felted Rubber Seal, 3/8" Flange x 34.25". It's under the "Dash Install Components" group. Looking through the manual see that it's intended to go along the front of the dash in the area of the lower edge of the windshield. Obviously takes two pieces trimmed to size make it all the way across. This same material looks like it would fit along the edge of the inside lower window opening and at least in my case go against the glass. The felt on the edge looks like it would just be touching the glass, although it would work if it didn't. (Would seem the felt has no purpose on it's intended use on the dash BTW.) The material is quite stiff so would add a little strength to the edge as well. Would have to get more from Factory Five to have it in both places. Also still wouldn't be the greatest transition to the weatherstrip provided for the rest of the way around the inside of the window. But not sure that's going to be easily solved. Pictures below. Thoughts?
Build 1: Mk3 Roadster #5125. Sold 11/08/2014.
Build 2: Mk4 Roadster #7750. Sold 04/10/2017.
Build Thread
Build 3: Mk4 Roadster 20th Anniversary #8674. Sold 09/07/2020.
Build Thread and
Video.
Build 4: Gen 3 Type 65 Coupe #59. Gen 3 Coyote. Legal 03/04/2020.
Build Thread and
Video
Build 5: 35 Hot Rod Truck #138. LS3 and 4L65E auto. Rcvd 01/05/2021. Legal 04/20/2023.
Build Thread. Sold 11/9/2023.
-
Post Thanks / Like - 1 Thanks, 1 Likes
-
Senior Member

I did not use the stuff weather strip in the door or on the dash. I really do not know what it’s intended for.
I used a 3/8 bulb seal from McMaster and Carr for the front edge of the dash where it meets the windshield to fill the gap .
Rob
FFR 35 p/u # 0016 Dart 347 TKO 600
-
Post Thanks / Like - 0 Thanks, 1 Likes
-
Senior Member
Originally Posted by
edwardb
Any update on possible solutions to this? Curious how Factory Five responded or if anyone has any suggestions...
No response yet. I sent another email yesterday but have not heard back.
I looked through my inventory list and didn't receive any kind of weather stripping for the dash, however that piece in your picture looks promising. If FF doesn't provide a satisfactory resolution, I may have to see what McMaster-Carr has that will work.
I will post an update when I hear back from them.
-
Post Thanks / Like - 0 Thanks, 1 Likes
-
Senior Member
Originally Posted by
Robodent
I did not use the stuff weather strip in the door or on the dash. I really do not know what it’s intended for.
I used a 3/8 bulb seal from McMaster and Carr for the front edge of the dash where it meets the windshield to fill the gap.
Rob
It's intended to fill the gap between the dash and the body at the windshield. Picture in the build manual. But I agree. Bulb seal is probably a better choice. That's that they called out on the Coupe and what I used.
Originally Posted by
FLFrank35
No response yet. I sent another email yesterday but have not heard back.
I looked through my inventory list and didn't receive any kind of weather stripping for the dash, however that piece in your picture looks promising. If FF doesn't provide a satisfactory resolution, I may have to see what McMaster-Carr has that will work.
I will post an update when I hear back from them.
Interesting. I guess a later add? It's in my build manual as I mentioned. I don't see anything quite like it on McMaster or Steele Rubber Products.
Build 1: Mk3 Roadster #5125. Sold 11/08/2014.
Build 2: Mk4 Roadster #7750. Sold 04/10/2017.
Build Thread
Build 3: Mk4 Roadster 20th Anniversary #8674. Sold 09/07/2020.
Build Thread and
Video.
Build 4: Gen 3 Type 65 Coupe #59. Gen 3 Coyote. Legal 03/04/2020.
Build Thread and
Video
Build 5: 35 Hot Rod Truck #138. LS3 and 4L65E auto. Rcvd 01/05/2021. Legal 04/20/2023.
Build Thread. Sold 11/9/2023.
-
Senior Member
After looking at freight to Canada I just went ahead and ordered the Foxbody stuff. Planning to have cab and doors primed by Saturday...so hopefully later next week Ill be able to show you lads some photos of how Ill be proceeding with real belt line weather strip inside and outside of the doors.
Cheers 🍻
Pat
-
Senior Member
I looked thru my paperwork and here is the part number I used on my dash edge from McMaster- Carr
1120A312. Push on bulb seal 3/16 edge 3/8 wide . It worked out nice and looks clean. Rob
image.jpg
FFR 35 p/u # 0016 Dart 347 TKO 600
-
Post Thanks / Like - 1 Thanks, 1 Likes
-
Senior Member
Update...
After several emails back and forth, I finally got a call from Dave Correia (FFR) today regarding the window gap. He said the gap from the factory should be 9/16 - 5/8 and I must have gotten a couple bad ones. So, he is sending me two new doors with the proper gaps.
-
Post Thanks / Like - 0 Thanks, 1 Likes
-
Thanks for posting, mine are not as bad as yours but definitely on the wide side. I have not started on doors yet so I’ll get measurements off to FFR and see what they recommend.
-
Senior Member
Update: New doors arrived
Two new doors were delivered by FedEx yesterday. The window gaps are MUCH smaller than the .75-1.25 on the original doors.
8AB6A585-AAC3-49A4-9434-777485BBCEDA.jpeg
-
Senior Member
Originally Posted by
FLFrank35
Nice! Youre really fortunate to get doors like that!
Photos of two of my three doors
the replacement sent was really little better, not worth the effort. Still working on potential solutions.
Cheers,
Pat
9E5813FA-ECDC-463A-B042-98B653DC477D.jpg3C14DFE8-8DFE-4DD4-931F-0D3BC15DD926.jpg


 Thanks:
  Likes:


 Reply With Quote
