-
10-18-2023, 10:26 AM
#121
Senior Member


Originally Posted by
cv2065

I just bought my drop trunk kit from TJ at Mountain Metalworks. Plan on getting their pedal and turn signal as well.
Just roughed-in my Mountain Metalworks drop trunk this past weekend. Quality product!
20231014_232515.jpg
Built an early MkIII years ago, sold years ago.
Got Corvettes out of my system, and now back after 18 years to build a MkIV.
MkIV Complete Kit Ordered 4/18/23, Delivered 7/11/23, 427 Stroker, Holley Sniper 2, Hyperspark, TKX, IRS, Wilwood Big Brakes
Here to learn, contribute, and have fun!
-
Post Thanks / Like - 0 Thanks, 1 Likes
-
10-18-2023, 07:29 PM
#122
Senior Member

-
10-18-2023, 07:31 PM
#123
Senior Member
Niiiice... I heard back from them and am ordering the drop trunk and turn signal kit. He said there was a little bit of a wait for that one. He's still getting caught up.
-
10-20-2023, 12:43 PM
#124
Hi Ethan,
Can you describe a little more how the RT Accel Pedal integrates with the Forte' rod setup? I have the latter and am waiting on the former...
I can imagine that one of the linkage rods actually installs inside the footbox (just between the inner wall and the inner 3/4" square frame tube), but do you have more pictures that you can share? Also, does the 2nd "main" rod support get bolted to the firewall inside the footbox or outside?
Thanks,
Craig C
-
10-21-2023, 09:48 AM
#125
Senior Member

I just purchased a straight pedal bar from MMW, the curve on the original RT pedal had my foot very close to the inside wall before any carpet or heat shield.
-
10-22-2023, 09:49 AM
#126
Senior Member
Hey Craig,
Do you have the instructions for Forte's linkage? If not, they can be found here: https://fortesparts.com/technical-do...-instructions/
There are some pictures of how the whole thing bolts together, and he even used the RT pedal in the pictures.
I haven't gotten very far with this, and I don't yet have any of the Forte linkage actually installed, but I have it figured out in my mind. My firewall is only clecoed in at this point, so I haven't installed the shaft supports, and my engine isn't in yet, so you can't tell where the throttle body end of the rod goes.
Basically, the rotating shaft goes parallel to the firewall, and both its supports bolt to the firewall outside of the footbox, in the engine compartment. The big washers lend them support. You'll cut a hole in the footbox wall for the shaft to go through into the footbox. The two rods are reverse threaded on one end, for the ball joints to screw into. Both rods get cot to the appropriate length, and then once you have cut them, you tap threads into the other end for the regular thread ball joints to go in. One rod goes straight back from the throttle body towards the rotating shaft, and the other goes inside the footbox from the shaft to the gas pedal. The adjustability comes from the length of the rods and the angle of the connecting arms on the shaft.
The Breeze/RT gas pedal has two different linkages to connect to different throttle cables, but you won't use either. You'll bolt one of the Forte rod end ball joints to it instead. The hole isn't big enough, so I openned it up to 1/4" to accomodate the ball joint. I used the reverse threaded one so I can attach the rod and then trim the other end as needed before threading it.
As I said, I don't have most of it installed,but here are a couple pictures of the gas pedal. I'm not sure where on the frame tube it will end up, and won't for a while yet.
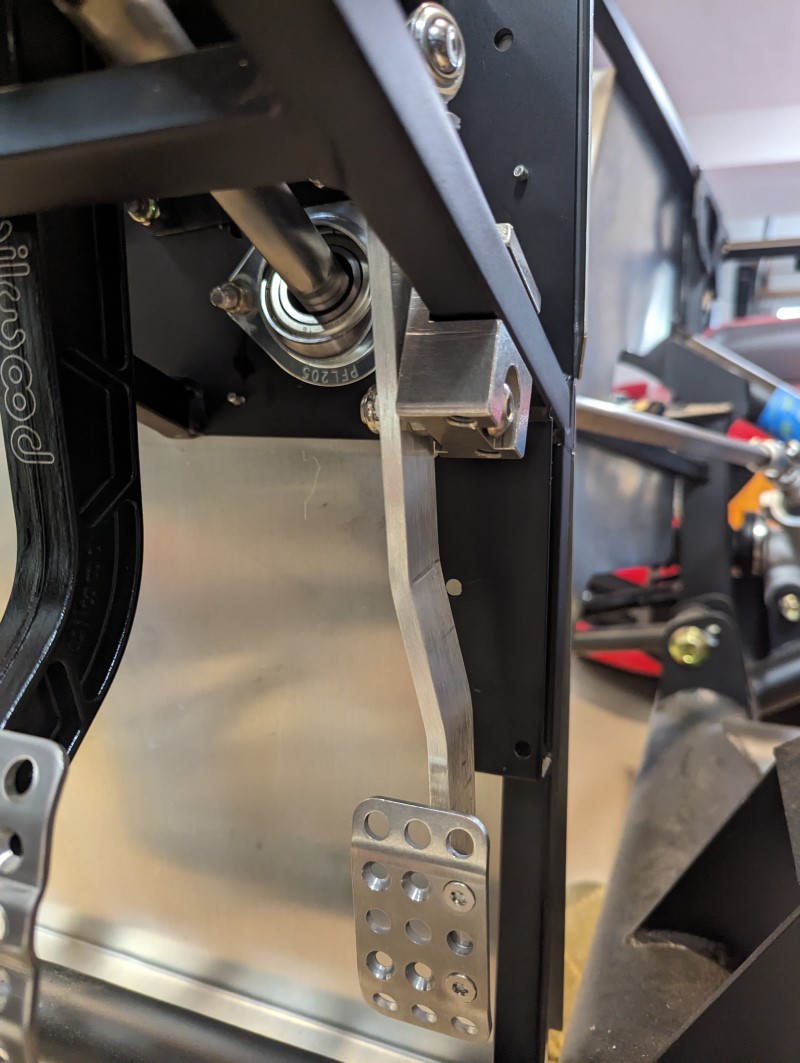
IT all does look pretty tight in there. I am prepared to do some bending of the pedal if needed so that everything (including my foot) fits.
-
10-22-2023, 11:09 AM
#127
Senior Member

I had to adjust the RT gas pedal a little. The dog leg bends easily in a vice. Regarding your Forte throttle linkage, you should have all of that adjusted before you button up the footbox. The rod ends are adjustable, so very easy to do.
-
10-22-2023, 11:51 AM
#128
Senior Member
Thanks for that. Good to know. I was concerned about that. I'd prefer to be able to sit in the seat and adjust the pedal for ideal placement. I'll also need to measure the full travel of the throttle body to make sure I'm getting the right range of motion at the pedal. Maybe I'm overthinking it?
-
10-22-2023, 12:09 PM
#129
Senior Member
You are definitely thinking about it the right way. You want the Forte linkage to allow for full extension of the throttle body without overextension. Might want to think about a pedal stop once you get it configured correctly. And don't forget to roll pin the lever arms to the SS rod to avoid slippage.
-
10-22-2023, 04:15 PM
#130
Senior Member
-
10-22-2023, 06:33 PM
#131
Hi Ethan,
Thanks for the extra pictures and link 
I've been the Forte' website many times, but never visited the Tech Support page. I ended up calling them last Friday and they told me it was right there. I had a good mental image of the overall arrangement, but was short on some details until I saw the pictures.
I'm also trying to think ahead (like you) and the challenging thing about this install is that the panels really need to be located/drilled after the engine is installed or very careful measurements are taken...or iterations to that effect.
I've heard other builders say that you build the car several times before it is done -- I believe it now! Thanks again for the pictures
Craig C
-
02-05-2024, 06:07 PM
#132
Senior Member
-
02-06-2024, 02:36 PM
#133
-
02-06-2024, 08:27 PM
#134
Senior Member
Thanks Craig. I'm trying to balance my need to check off boxes in my head with keeping my options open and accessible! I am erring on the side of options...
-
02-13-2024, 02:17 PM
#135
Senior Member
Brake Bleeding thoughts
I know, I'm all over the place. Some days I don't have time in the workshop but I can squeeze in some research and planning between other tasks. I had some thoughts on the brakes, as I'll be doing the hard lines soon.
1. A lot of builders seem to prefer pressure bleeding the brakes. Are the hand pump ones less likely to do the job than the ones that use a air compressor? Does anyone know if the Wilwood billet remote fluid reservoirs accept the standard 45mm adapters? I measured it with a caliper and it was just over 45 mm.
2. Most people say to bench bleed the MCs. Having already installed them, I'd prefer not to take them off to do it. I understand they need to be level to be properly bled. Is there any reason not to just jack up the front of the car to make them level and just bench bleed them in place?
Any input is welcome and appreciated!!
-
02-13-2024, 03:40 PM
#136
Before you start buying tools to bleed the brakes, try gravity bleeding.
I have the Wilwood master cylinders and calipers. I filled the reservoirs and opened the bleeder to the passenger rear caliper. After a few minutes it was dripping. The remaining 3 bleed the same. I topped the reservoir off for each caliper. I did pump bleed them all and found a minute amount of air in a couple.
IMO about the only thing that will interfere with this method is the master cylinders not being at full release.
Good luck,
20th Anniversary Mk IV, A50XS Coyote, TKO 600, Trunk Drop Box, Trunk Battery Box, Cubby Hole, Seat Heaters, Radiator hanger and shroud.
-
02-13-2024, 04:15 PM
#137
Senior Member

X2 on Railroad's experience. It was a no stress event for me too.
Mk.4 FFR supplied Right hand drive
Received 12/2012 completed 12/2019
Gen1 Coyote / TKO600 / IRS
Lots of mods to make compliant for Australian design rules
-
02-13-2024, 04:31 PM
#138
Senior Member

I installed the cockpit floors before the brake/fuel lines were installed. not a huge deal to lay on my side to install these. you need to get under the car to secure the lines where the seats go anyway due to the cockpit floor.
for the trunk, do the Kleiner mod first, then install the drop trunk (if using the RT drop trunk kit) and then the fuel tank. With the tank in place, you won't be able to install the drop trunk or the lower PS bolt for the Kleiner mod. I'd get everything plumbed up first before installing the lower trunk aluminum panel. you can always cleco the drop trunk in place while you're working. I'd consider running the rear wiring harness and hook things up to where they belong before putting the lower trumk aluminum in .
I did a pressure bleed for the brakes. use a hand/bike pump to around 5-10psi. too much pressure and you might blow out your master cylinder diaphragms. I didn't bench bleed the MCs and it worked just fine.
-
02-13-2024, 05:07 PM
#139
Senior Member

These are pure gold when bleeding brakes. https://www.amazon.com/dp/B000CMDP44...t_details&th=1
I used to use a small bottle with a hose running into it but I'm so clumsy I would always knock it over spilling brake fluid everywhere.
-
02-14-2024, 10:03 AM
#140
Senior Member
Awesome stuff guys, thanks. That's exactly what I was looking for!
-
02-16-2024, 05:28 PM
#141
Senior Member
More random thoughts as I peruse other build threads. I see a lot of people grease the control arm bushings before installation, both in the zerk fitting and on the side. I didn't get the memo. Is it worth taking everything apart to accomplish this or do I just hit all the zerks and call it good?
-
02-17-2024, 06:25 PM
#142
Senior Member
I bit the bullet and dedided to take off and grease all of the control arms. I also decided to check the adjustment settings of all four shocks while I was at it. It never occurred to me that they might not come in the correct setting. The rears were both good, but both fronts were messed up. Neither of them stops when you rotate the shaft trying to adjust them, and one of them leaks pretty bad when you press the adjustment button. I have reached out to factory five to see what they say. I also got one side of the rear suspension taken apart, greased and put back together. There was some straining, banging, and quite a bit of blood, but I got it done. The other 3 corners should go quicker, I think.
I'd also like to echo CV2065's plug for the locknlube zerk coupler. Fantastic. I was also very happy about my milwaukee cordless electric grease gun and the Lucas oil Green heavy duty grease.
-
02-18-2024, 03:06 PM
#143
Senior Member
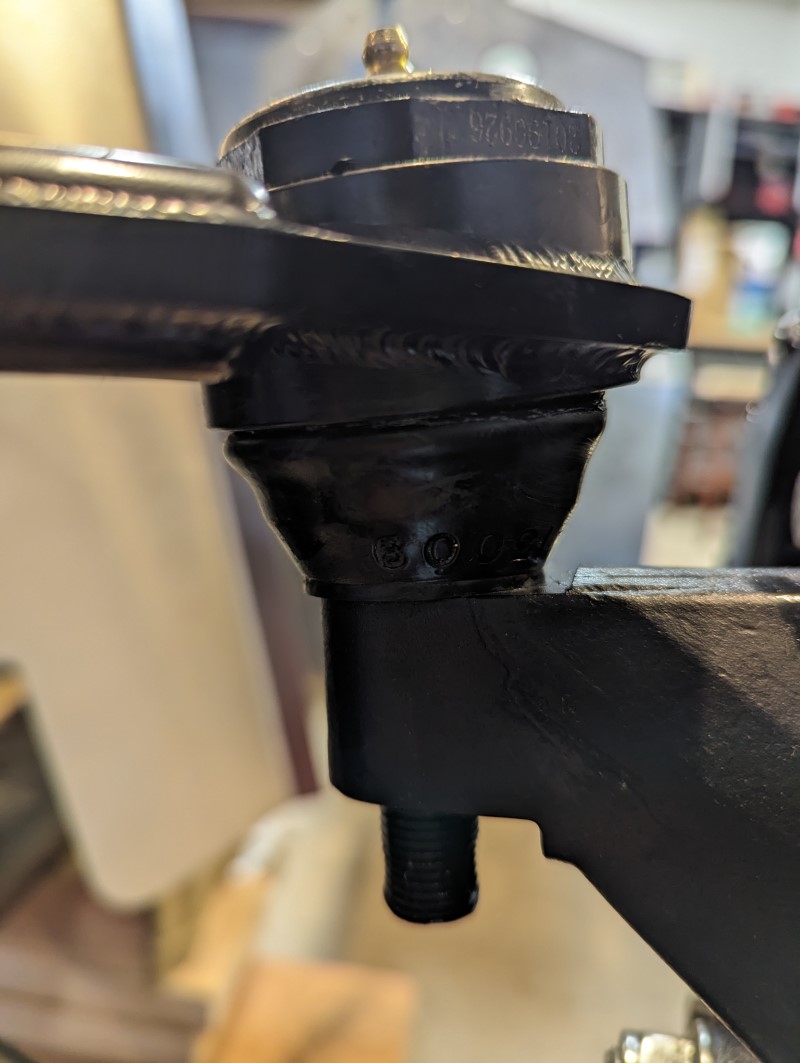
Well, I managed to finish up that project. A bit of a pain to take everything apart and coax the control arms back into place, and also to clean up all the grease, but I'm glad its done. While I was working on the front, I noticed the condition of the front upper ball joint dust boots. Holy cow. The manual says that they will deform and look wierd until there is weight on the suspension, but I don't think this is what was meant:
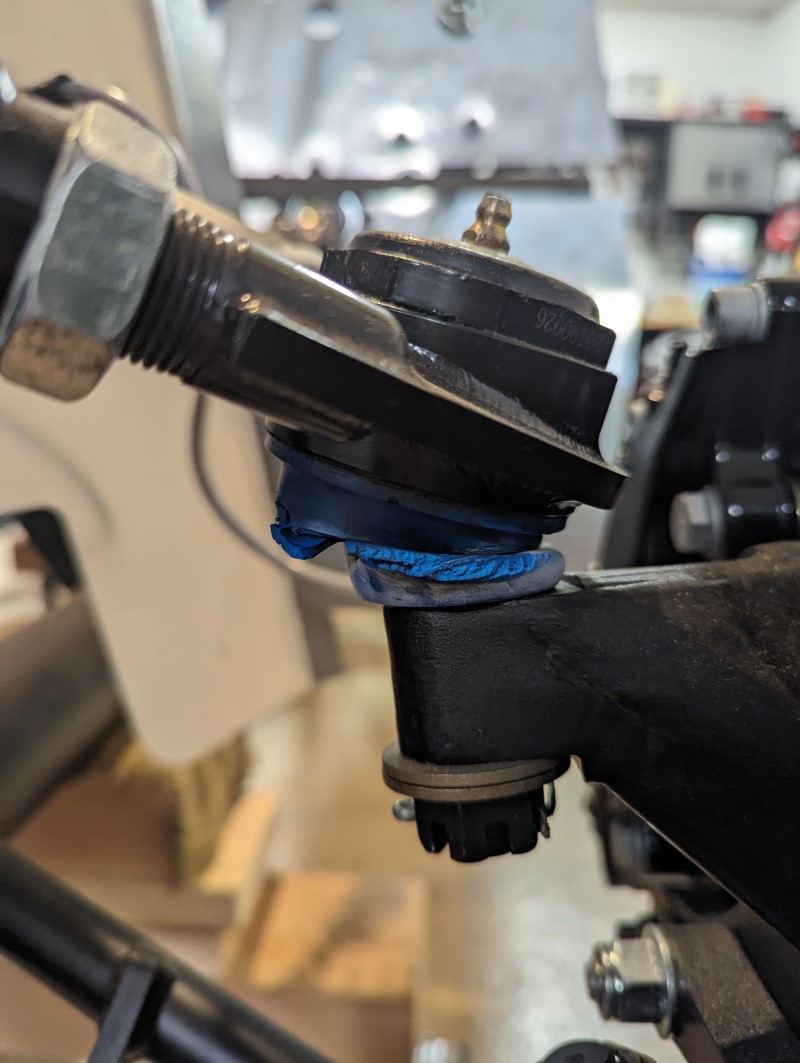
The other one wasn't as bad, but still has a crack and hole in it. That stinks.
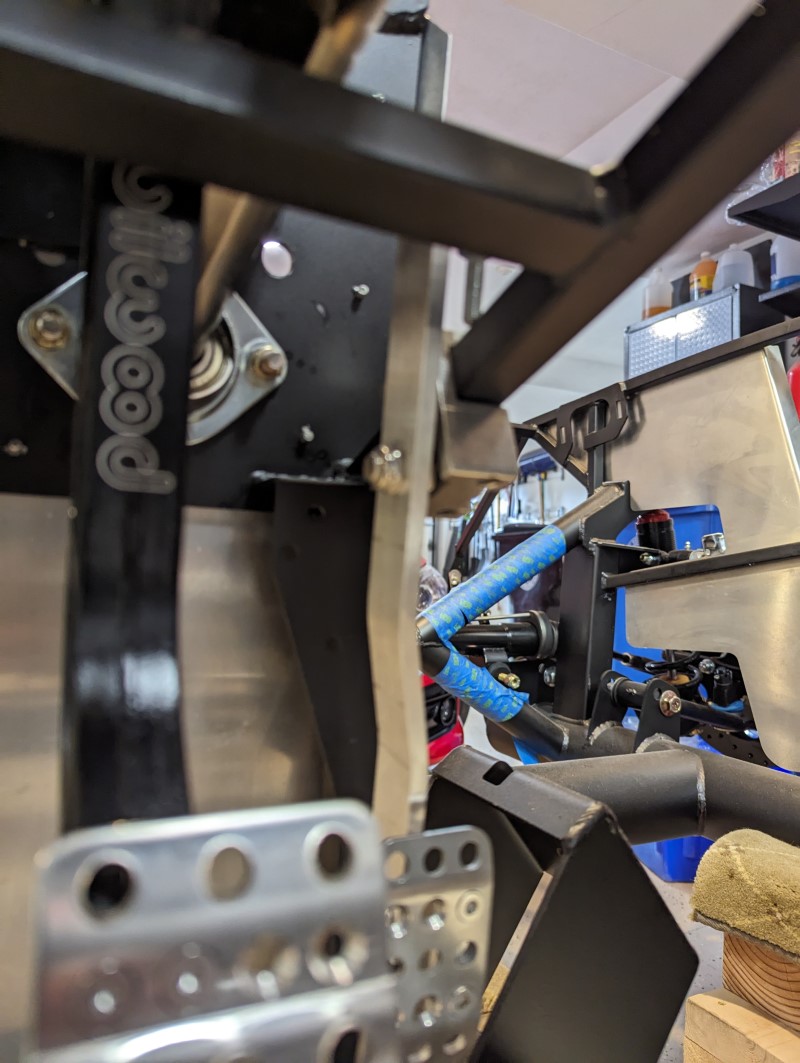
I sourced all of the hardware for the kleiner mod, so I'll be sticking those couplers in soon. Then I think I'll run the brake lines and mount the reservoirs. I have the Forte/Wilwood triple reservoir. It seems most people mount these to the frame tube in front of the driver footbox. Any clearance issues I should be aware of?
-
02-22-2024, 10:09 AM
#144
Senior Member
Front Ball joint dust boot replacement
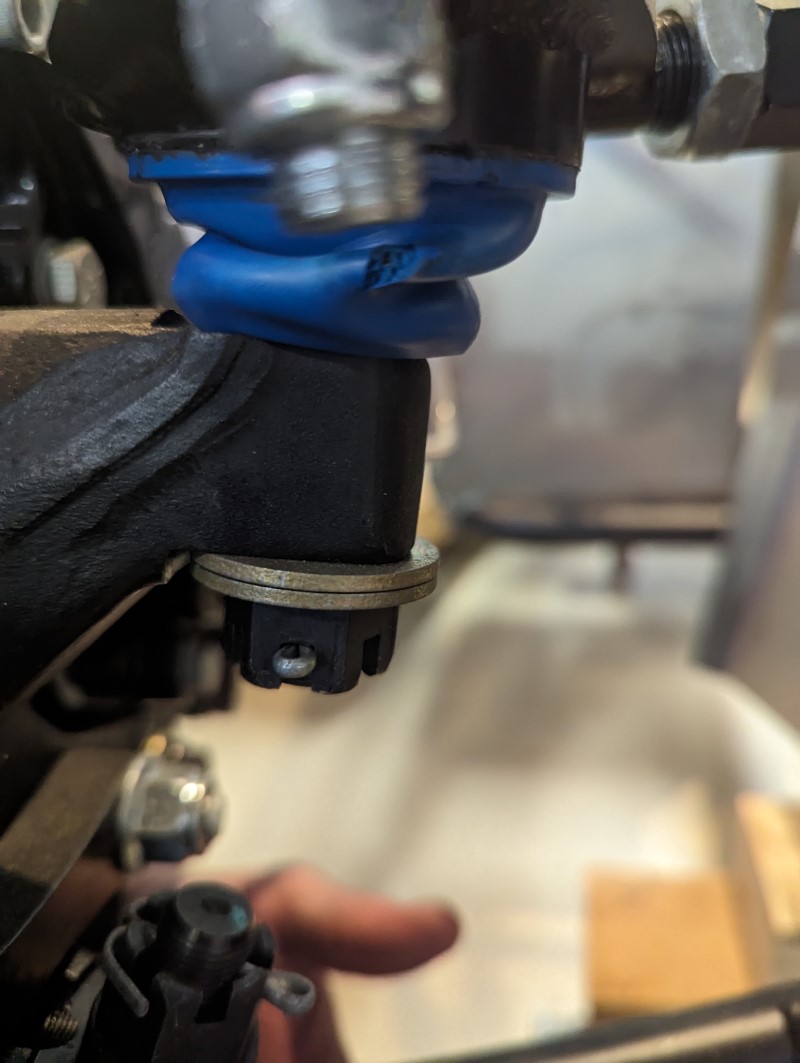
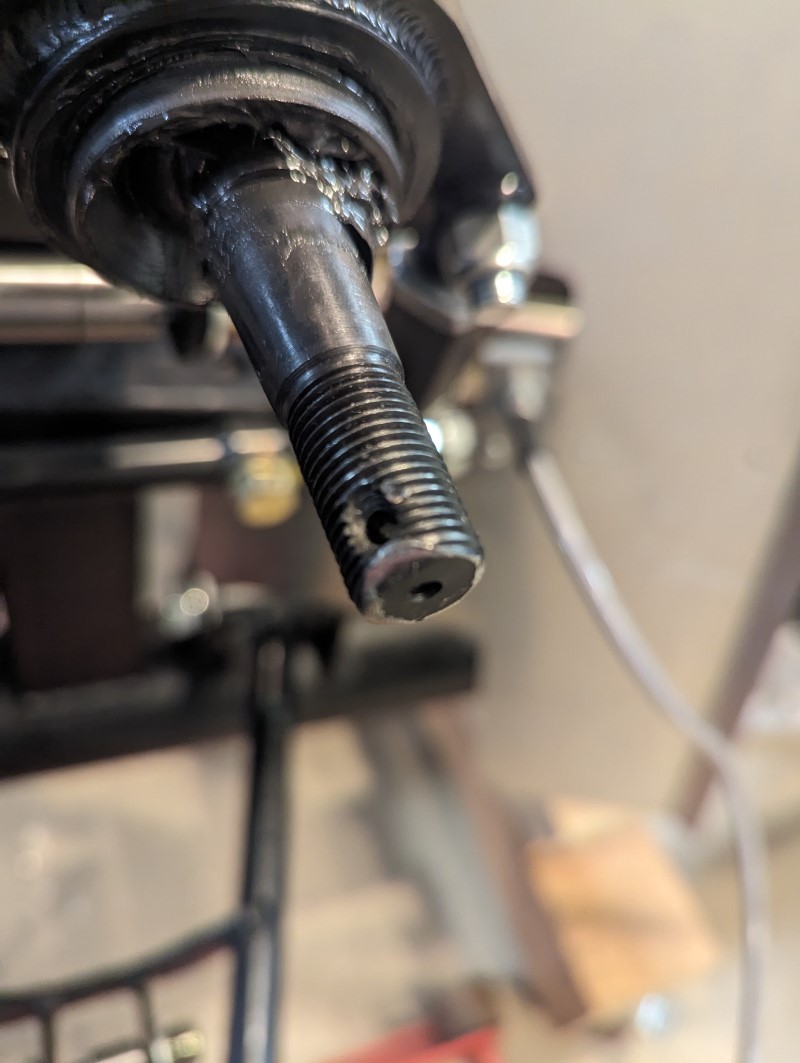
Another day of one step forward two steps back. I decided to address the upper ball joint dust boots. Way back when, I had bought the energy suspension dust boots (5.13102G) but they didn't really seem to fit to me, so I didn't use them. Now that the FFR ones have disintegrated, I am going to try the energy ones again. My progress on the car has been so slow that the front suspension has been sitting up in the air for over 2 years. I don't know if that contributed to the deterioration of the dust boots, but it certainly seems to have seized up the front suspension joints. It took an hour of prying and banging to get just one side apart. I tried some penetrating oil and some heat, but at the end of the day, it took a hammer, and not a dead blow one, to get it all apart. Am I doing something wrong here? Should I be putting anti-seize on these?
I dug out the energy dust boots, and wasn't too sure which of the two styles was best. This one, the longer one, seemed to fit better, but I see others have used the shorter, flatter one up here. I guess I'll try that one again.

In other news, I heard back from factory five about my defective shocks. They say they'll replace the leaking one, but not the other one. Every communication cycle seems to take at least 24 hours, so I'm not sure where I stand yet, but I'm not going to be thrilled if I have to pay to replace the other shock. It's definitely not working right.
-
02-22-2024, 12:45 PM
#145
Senior Member
Yeah, that looks a little better with the shorter, flatter dust boot. This picture has the suspension jacked up with a floor jack, so hopefully when it droops, it wont deform the boot too bad. I am sort of waiting to torque it all up again until I figure out if I'm going to use any anti-seize on the ball joint shafts.
I also decided to retro-actively hit the rust prone parts of my axle shafts with some POR 15, so I started the prep for that. And while I was at it, I decided to hit the ABS sensor holes in the rear knuckles with silicone. What a mess. Probably a mistake to do that now, but at least its done. If you do this after the fact, be very sparing with the silicone. I didn't realize those holes went through to the bottom and got silicone everywhere. Pain in the neck to clean up with everything in place...
-
02-23-2024, 08:10 PM
#146
Senior Member
Well, I think learning has occurred. A frustrating couple of hours in the workshop, to be sure. On the plus side, I finished prepping for POR 15 of the axles, so I'll be able to paint tomorrow once things are dry. That didn't take long. I decided to try to reassemble the front suspension with the energy dust boot, and found that all of my hammering had destroyed the threads on that ball joint, and I couldn't get the castle nut on. So after all of that, it seems I will need at least one new ball joint. Probably not worth trying to put new threads on that thing...
I guess I'll be deciding whether to upgrade to the Howe ball joints that others have used, or to just replace this one. Do I want to disassemble both upper control arms, or just one?
Either way, while trying to disassemble the other side and finding the same stuck ball joint, I learned that its better to spend the time and money on the right tool than to create extra problems by being impatient. An irritating and expensive lesson to be sure, but I'll be finding myself a ball joint separator along with my replacement parts.
And Factory Five isn't going to help with both of my bad shocks, just the leaking one. Not cool. $165 to replace a part that was bad from the get go. A very expensive day in the shop all put together.
-
02-23-2024, 08:28 PM
#147
Senior Member
The Howes ball joints are $100 apeice plus dust boots. I think I'll find another mevotech....
-
02-26-2024, 06:11 PM
#148
Senior Member
-
02-26-2024, 08:15 PM
#149
Senior Member

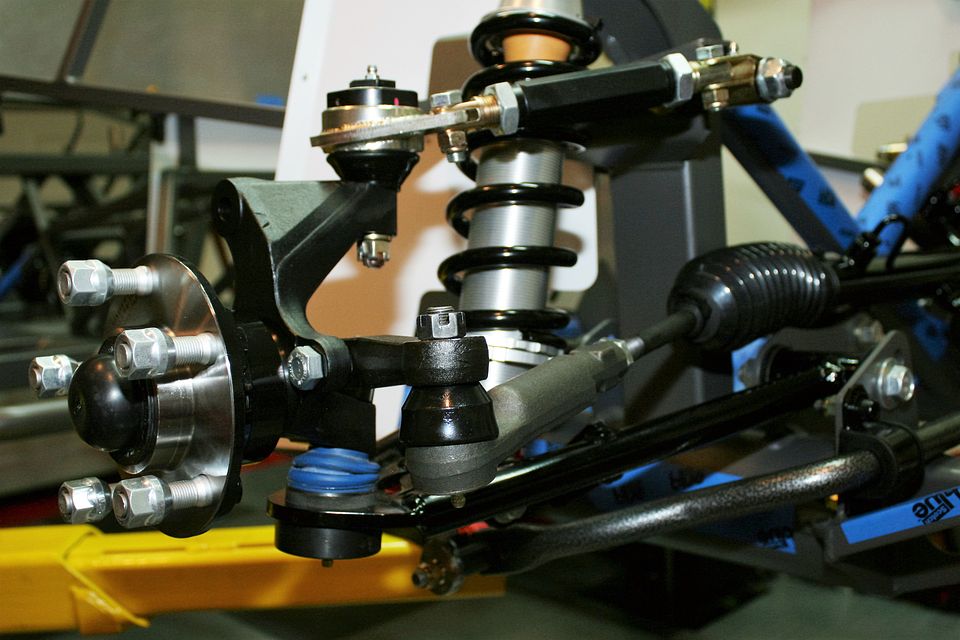
Energy Suspension 5.13102G dust boots are the right parts. The small/shorter ones are used for the upper ball joints. When drooped, they may look like they don't fit. But at ride height should slide into place. This is from one of my builds. You can see it in the background. Sorry, best pic I could find. In this case, Howe ball joints under the covers. But shouldn't change how they fit with Moog or Mevotech. Notw also Energy Suspenion boots on the tie rods. Those are Energy Suspension 9.13101G dust boots. Also highly recommended.
Build 1: Mk3 Roadster #5125. Sold 11/08/2014.
Build 2: Mk4 Roadster #7750. Sold 04/10/2017.
Build Thread
Build 3: Mk4 Roadster 20th Anniversary #8674. Sold 09/07/2020.
Build Thread and
Video.
Build 4: Gen 3 Type 65 Coupe #59. Gen 3 Coyote. Legal 03/04/2020.
Build Thread and
Video
Build 5: 35 Hot Rod Truck #138. LS3 and 4L65E auto. Rcvd 01/05/2021. Legal 04/20/2023.
Build Thread. Sold 11/9/2023.
-
02-27-2024, 11:20 AM
#150
Senior Member
Thanks as always Paul for your knowledge, experience and willingness to help. After sleeping on it I had pretty much decided to use the energy ones and then just keep an eye on them as I put the drivetrain in and put it down on the wheels. Your 20th Anniversary build is like a build manual for me.
-
02-27-2024, 05:37 PM
#151
Senior Member


 Thanks:
  Likes:


 Reply With Quote


