Midwest Classic Insurance

Visit our community sponsor

Thanks Thanks:  87
Likes Likes:  315
Page 13 of 25 FirstFirst ... 3111213141523 ... LastLast
Results 481 to 520 of 999

Thread: The race is on - Namrups 65 Daytona Coupe build

  1. #481
    Namrups's Avatar
    Join Date
    Sep 2021
    Location
    Mechanicville, NY
    Posts
    1,036
    Post Thanks / Like
    The problem as I see it is the "Z" shaped piece that may be need in a different application but not in this one. My solution will be to cut the leg of the "Z" piece off and then I can use the 3/4" bolt with enough threads for the nut to lock and not hit the spring.


    Will post additional picks when completed.

    The next issue that I ran into I have read about in other posts. The cables a just a tad short.


    I have worked out a possible solution and will explain and post when it's complete.

    My CV axles arrived a couple of days ago. They have been painted and installed!


    Once I complete hooking up the e-brake the front and rear will be complete. Have to make a decision on panel finish so that I can start to install some of them for the last time. Then on to engine and transmission mockup. No first start until I get headers. No roller until I get tires.
    Scott Pregont
    Present build: 65 Daytona Coupe #393 - Forte 427 EFI crate w/TKX 2.87/ .81 - Ordered 11/16/21 - Delivered 6/23/2022
    Location: Mechanicville, NY
    Build Thread: https://thefactoryfiveforum.com/show...na-Coupe-build
    My Albums
    Special Tools, Custom Parts, misc supplies: https://thefactoryfiveforum.com/album.php?albumid=2045
    Garage Pics: https://thefactoryfiveforum.com/album.php?albumid=2041
    POR15 First Try: https://thefactoryfiveforum.com/album.php?albumid=2068
    Silicone application tips: https://thefactoryfiveforum.com/album.php?albumid=2063

  2. #482
    Junior Member
    Join Date
    May 2017
    Posts
    22
    Post Thanks / Like
    Scott I'm admiring your Wilwood brakes. Did you order those with your kit or source them elsewhere? Still waiting for mine...

    John

  3. #483
    Namrups's Avatar
    Join Date
    Sep 2021
    Location
    Mechanicville, NY
    Posts
    1,036
    Post Thanks / Like
    Quote Originally Posted by JMo View Post
    Scott I'm admiring your Wilwood brakes. Did you order those with your kit or source them elsewhere? Still waiting for mine...

    John
    They were the 12.88" front and IRS rear drilled and slotted upgrade with the complete kit. Pictures don't do them justice. They do force you to use a 17" or 18" wheel.
    Scott Pregont
    Present build: 65 Daytona Coupe #393 - Forte 427 EFI crate w/TKX 2.87/ .81 - Ordered 11/16/21 - Delivered 6/23/2022
    Location: Mechanicville, NY
    Build Thread: https://thefactoryfiveforum.com/show...na-Coupe-build
    My Albums
    Special Tools, Custom Parts, misc supplies: https://thefactoryfiveforum.com/album.php?albumid=2045
    Garage Pics: https://thefactoryfiveforum.com/album.php?albumid=2041
    POR15 First Try: https://thefactoryfiveforum.com/album.php?albumid=2068
    Silicone application tips: https://thefactoryfiveforum.com/album.php?albumid=2063

  4. #484
    Namrups's Avatar
    Join Date
    Sep 2021
    Location
    Mechanicville, NY
    Posts
    1,036
    Post Thanks / Like
    E-brake solutions

    Here's my solution to the issue of attaching the e-brake cable to the e-brake. After eliminating the leg of the "z" clip the 3/4" bolt could be used. I also ground down the cable itself about 2mm for a better fit.


    I added two ~ 1" steel links to the ends of the cables to make up for them being a little short in reaching the e-brake handle. E-brake works fine. Was able to hold the hub from turning while I torqued the hub nut.


    The rest of the routing zip tied in place. E-brake complete.
    Scott Pregont
    Present build: 65 Daytona Coupe #393 - Forte 427 EFI crate w/TKX 2.87/ .81 - Ordered 11/16/21 - Delivered 6/23/2022
    Location: Mechanicville, NY
    Build Thread: https://thefactoryfiveforum.com/show...na-Coupe-build
    My Albums
    Special Tools, Custom Parts, misc supplies: https://thefactoryfiveforum.com/album.php?albumid=2045
    Garage Pics: https://thefactoryfiveforum.com/album.php?albumid=2041
    POR15 First Try: https://thefactoryfiveforum.com/album.php?albumid=2068
    Silicone application tips: https://thefactoryfiveforum.com/album.php?albumid=2063

  5. #485
    Senior Member
    Join Date
    Jul 2021
    Posts
    179
    Post Thanks / Like
    Any word on header ETA? I'll be waiting on a set very shortly.

  6. #486
    Namrups's Avatar
    Join Date
    Sep 2021
    Location
    Mechanicville, NY
    Posts
    1,036
    Post Thanks / Like
    Quote Originally Posted by GT_Rich View Post
    Any word on header ETA? I'll be waiting on a set very shortly.
    Nothing yet.
    Scott Pregont
    Present build: 65 Daytona Coupe #393 - Forte 427 EFI crate w/TKX 2.87/ .81 - Ordered 11/16/21 - Delivered 6/23/2022
    Location: Mechanicville, NY
    Build Thread: https://thefactoryfiveforum.com/show...na-Coupe-build
    My Albums
    Special Tools, Custom Parts, misc supplies: https://thefactoryfiveforum.com/album.php?albumid=2045
    Garage Pics: https://thefactoryfiveforum.com/album.php?albumid=2041
    POR15 First Try: https://thefactoryfiveforum.com/album.php?albumid=2068
    Silicone application tips: https://thefactoryfiveforum.com/album.php?albumid=2063

  7. #487
    Namrups's Avatar
    Join Date
    Sep 2021
    Location
    Mechanicville, NY
    Posts
    1,036
    Post Thanks / Like
    My daughter and I spent some time on the build today. She installed the battery box and battery.


    We also mocked up the fuel tank again so that I could get a measurement for the braded fuel lines. Work on those tomorrow.

    Scott Pregont
    Present build: 65 Daytona Coupe #393 - Forte 427 EFI crate w/TKX 2.87/ .81 - Ordered 11/16/21 - Delivered 6/23/2022
    Location: Mechanicville, NY
    Build Thread: https://thefactoryfiveforum.com/show...na-Coupe-build
    My Albums
    Special Tools, Custom Parts, misc supplies: https://thefactoryfiveforum.com/album.php?albumid=2045
    Garage Pics: https://thefactoryfiveforum.com/album.php?albumid=2041
    POR15 First Try: https://thefactoryfiveforum.com/album.php?albumid=2068
    Silicone application tips: https://thefactoryfiveforum.com/album.php?albumid=2063

  8. #488
    Namrups's Avatar
    Join Date
    Sep 2021
    Location
    Mechanicville, NY
    Posts
    1,036
    Post Thanks / Like
    Staycation's over ... back to work!

    I purchased Teflon Lined Braided Stainless Hose and fittings from Breeze to go from the fuel hanger to the SS fuel lines. I have never worked with these fittings or lines before. In with the fittings was a "installation sheet". I wanted to document this on the thread not only for others but also for me if I should loose this instruction sheet.

    The sheet offers 4 different methods for cutting the SS hose. Method 4 (which Breeze uses) uses a HD hardened jaw cable cutter. I just so happened to have one that I used in the wiring of the garage! (Damn, a tool I didn't have to buy!


    Using this cutter will pinch the hose end into a football shape.


    Inserting a tapered punch will into the Teflon hose will round it out again.

    Scott Pregont
    Present build: 65 Daytona Coupe #393 - Forte 427 EFI crate w/TKX 2.87/ .81 - Ordered 11/16/21 - Delivered 6/23/2022
    Location: Mechanicville, NY
    Build Thread: https://thefactoryfiveforum.com/show...na-Coupe-build
    My Albums
    Special Tools, Custom Parts, misc supplies: https://thefactoryfiveforum.com/album.php?albumid=2045
    Garage Pics: https://thefactoryfiveforum.com/album.php?albumid=2041
    POR15 First Try: https://thefactoryfiveforum.com/album.php?albumid=2068
    Silicone application tips: https://thefactoryfiveforum.com/album.php?albumid=2063

  9. Thanks rhk118 thanked for this post
  10. #489
    Namrups's Avatar
    Join Date
    Sep 2021
    Location
    Mechanicville, NY
    Posts
    1,036
    Post Thanks / Like
    The fitting has three parts (from top to bottom) the tube nut, the ferrule and the fitting body.


    Apply a small amount of grease to the threads and slide the tube nut over the hose "funnel" end first. I used a qtip to apply the grease.


    The ferrule then gets slid over the Teflon tube and under the SS braid. There are internal barbs inside the ferrule that grab the Teflon tube. There is also an internal step that will only allow the ferrule to be pushed in so far. It can only go on one way. make sure the Teflon tube inserts all of the way into the ferrule until it is stopped by the internal step. I tried to get a picture of this but it wasn't meant to be.: mad:

    The fitting body now gets inserted into the hose end until it meats the ferrule.


    A small amount of grease is applied to the male threads on the fitting body and the tube nut is tightened to the fitting body until it is within 1/16" of the fitting body.


    This is my finished mockup of the feed and return lines.
    Scott Pregont
    Present build: 65 Daytona Coupe #393 - Forte 427 EFI crate w/TKX 2.87/ .81 - Ordered 11/16/21 - Delivered 6/23/2022
    Location: Mechanicville, NY
    Build Thread: https://thefactoryfiveforum.com/show...na-Coupe-build
    My Albums
    Special Tools, Custom Parts, misc supplies: https://thefactoryfiveforum.com/album.php?albumid=2045
    Garage Pics: https://thefactoryfiveforum.com/album.php?albumid=2041
    POR15 First Try: https://thefactoryfiveforum.com/album.php?albumid=2068
    Silicone application tips: https://thefactoryfiveforum.com/album.php?albumid=2063

  11. Thanks rhk118 thanked for this post
  12. #490
    Namrups's Avatar
    Join Date
    Sep 2021
    Location
    Mechanicville, NY
    Posts
    1,036
    Post Thanks / Like
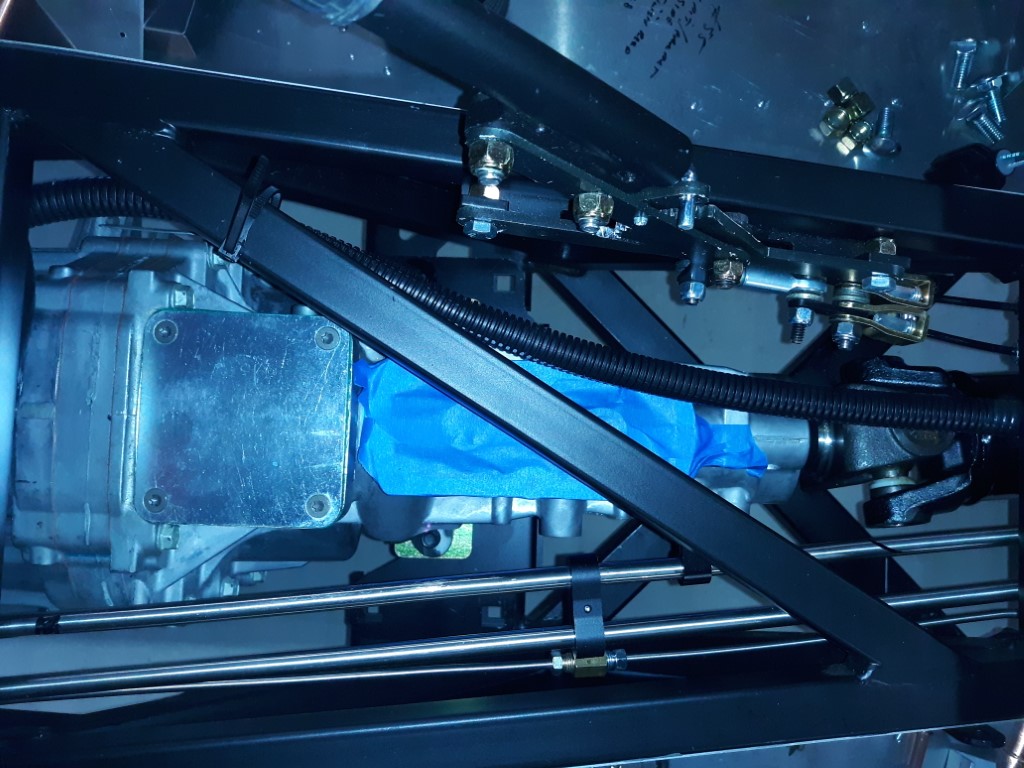
    I didn't want to upset my daughter by telling her that we forgot to apply thread locker to the fasteners holding the battery box in place. She went back with her mother yesterday so today it was removed and reinstalled with blue thread locker. All of the brake lines were also rechecked for tightness. The special spacer was installed on the diff using orange thread locker and torqued by feel as I don't have the right fitting to use my torque wrench.

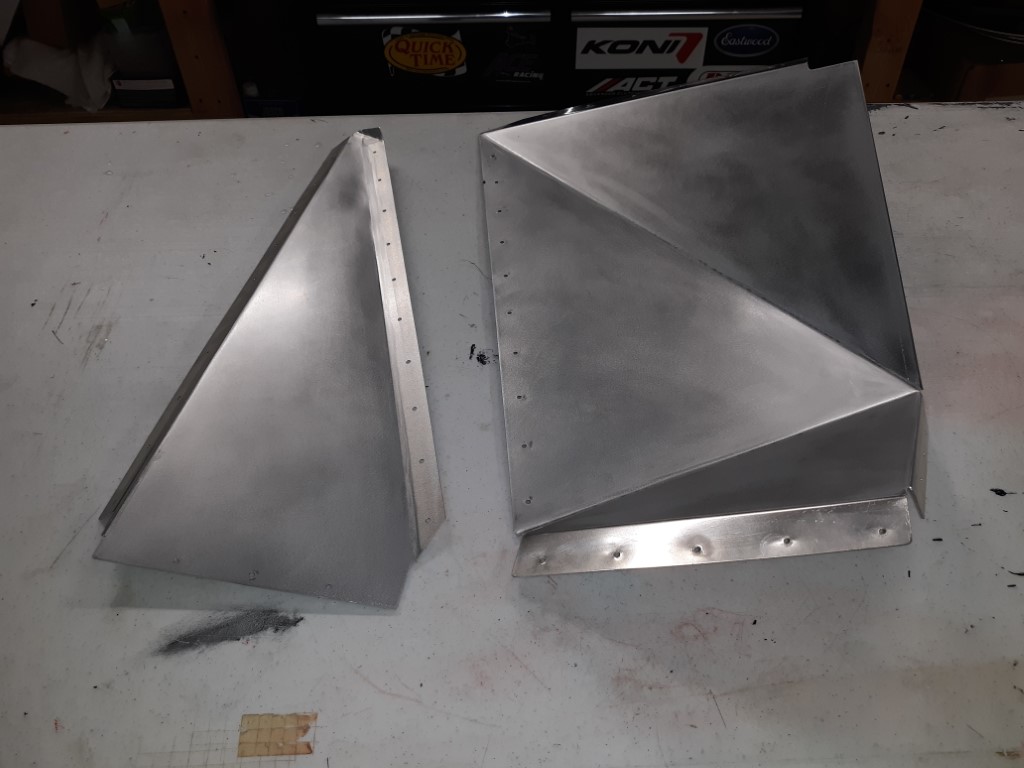
    I finished and installed my first aluminum panel today!


    If you look close you can see the driveshaft and the safety hoop in the background. I want to get the safety hoop mocked up before I start installing the tunnel panels permanently.
    Scott Pregont
    Present build: 65 Daytona Coupe #393 - Forte 427 EFI crate w/TKX 2.87/ .81 - Ordered 11/16/21 - Delivered 6/23/2022
    Location: Mechanicville, NY
    Build Thread: https://thefactoryfiveforum.com/show...na-Coupe-build
    My Albums
    Special Tools, Custom Parts, misc supplies: https://thefactoryfiveforum.com/album.php?albumid=2045
    Garage Pics: https://thefactoryfiveforum.com/album.php?albumid=2041
    POR15 First Try: https://thefactoryfiveforum.com/album.php?albumid=2068
    Silicone application tips: https://thefactoryfiveforum.com/album.php?albumid=2063

  13. #491
    Namrups's Avatar
    Join Date
    Sep 2021
    Location
    Mechanicville, NY
    Posts
    1,036
    Post Thanks / Like
    Day 77

    Worked on the safety hoop again today. This is a generic hoop and the base is too wide for the trans tunnel.


    Because the diff is offset to the PS the legs of the base needed to be cut at different lengths.


    The location looks good but my issue now is getting in to drill the holes in the chassis. I ordered short bits from McMaster-Carr and will have to purchase an angle drill as the ones I have don't fit.
    Scott Pregont
    Present build: 65 Daytona Coupe #393 - Forte 427 EFI crate w/TKX 2.87/ .81 - Ordered 11/16/21 - Delivered 6/23/2022
    Location: Mechanicville, NY
    Build Thread: https://thefactoryfiveforum.com/show...na-Coupe-build
    My Albums
    Special Tools, Custom Parts, misc supplies: https://thefactoryfiveforum.com/album.php?albumid=2045
    Garage Pics: https://thefactoryfiveforum.com/album.php?albumid=2041
    POR15 First Try: https://thefactoryfiveforum.com/album.php?albumid=2068
    Silicone application tips: https://thefactoryfiveforum.com/album.php?albumid=2063

  14. #492
    Namrups's Avatar
    Join Date
    Sep 2021
    Location
    Mechanicville, NY
    Posts
    1,036
    Post Thanks / Like
    I also started to coat some of my panels with Raptor bed coating.


    Decided to also coat the fuel tank. Probably over kill but why not?
    Scott Pregont
    Present build: 65 Daytona Coupe #393 - Forte 427 EFI crate w/TKX 2.87/ .81 - Ordered 11/16/21 - Delivered 6/23/2022
    Location: Mechanicville, NY
    Build Thread: https://thefactoryfiveforum.com/show...na-Coupe-build
    My Albums
    Special Tools, Custom Parts, misc supplies: https://thefactoryfiveforum.com/album.php?albumid=2045
    Garage Pics: https://thefactoryfiveforum.com/album.php?albumid=2041
    POR15 First Try: https://thefactoryfiveforum.com/album.php?albumid=2068
    Silicone application tips: https://thefactoryfiveforum.com/album.php?albumid=2063

  15. #493
    Namrups's Avatar
    Join Date
    Sep 2021
    Location
    Mechanicville, NY
    Posts
    1,036
    Post Thanks / Like
    Day 80

    Worked on applying bed liner on some more panels so that I can fasten some for the last time!


    Also completed the plumbing on the brake and clutch lines. Should be all set to bleed the brakes now.
    Scott Pregont
    Present build: 65 Daytona Coupe #393 - Forte 427 EFI crate w/TKX 2.87/ .81 - Ordered 11/16/21 - Delivered 6/23/2022
    Location: Mechanicville, NY
    Build Thread: https://thefactoryfiveforum.com/show...na-Coupe-build
    My Albums
    Special Tools, Custom Parts, misc supplies: https://thefactoryfiveforum.com/album.php?albumid=2045
    Garage Pics: https://thefactoryfiveforum.com/album.php?albumid=2041
    POR15 First Try: https://thefactoryfiveforum.com/album.php?albumid=2068
    Silicone application tips: https://thefactoryfiveforum.com/album.php?albumid=2063

  16. #494
    Namrups's Avatar
    Join Date
    Sep 2021
    Location
    Mechanicville, NY
    Posts
    1,036
    Post Thanks / Like
    Worked on a couple of the PS footbox panels I want to install permanently before I drop the engine in. Inside the footbox I am applying a layer of Dynamat sound deadener covered by a layer of Dynaliner for the heat. It will all be covered with carpet in the end. The exterior is sanded with 220 grit sandpaper using a random orbital sander followed by a coating of Shark Hide.


    Scott Pregont
    Present build: 65 Daytona Coupe #393 - Forte 427 EFI crate w/TKX 2.87/ .81 - Ordered 11/16/21 - Delivered 6/23/2022
    Location: Mechanicville, NY
    Build Thread: https://thefactoryfiveforum.com/show...na-Coupe-build
    My Albums
    Special Tools, Custom Parts, misc supplies: https://thefactoryfiveforum.com/album.php?albumid=2045
    Garage Pics: https://thefactoryfiveforum.com/album.php?albumid=2041
    POR15 First Try: https://thefactoryfiveforum.com/album.php?albumid=2068
    Silicone application tips: https://thefactoryfiveforum.com/album.php?albumid=2063

  17. #495
    Namrups's Avatar
    Join Date
    Sep 2021
    Location
    Mechanicville, NY
    Posts
    1,036
    Post Thanks / Like
    Coupe builders heads up!!

    I ran into a small issue today. I was mocking up the installation of the dash and the end filler pieces. I am riveting the end pieces to the back metal cross member. My plan was to use 2 - 3/16" rivets. It worked fine on the PS. The sun was shining so the DS was in shade while I was drilling the first hole. I had just started to drill the second hole when the sun went behind a cloud and I noticed that the tab that I was drilling thru was actually covering the stamped serial number on the cross member!


    I drilled out the rivet already installed and removed the metal filler piece. As shown the drill had already scared the serial #. By looking closely you can see that the only possible number it could be is a 3 so I hope this doesn't give me problems trying to register this car.


    I cut the mounting tab back so that the serial number could be seen and can only use 1 pop rivet to secure it. I might be able to squeeze a second rivet in.
    Scott Pregont
    Present build: 65 Daytona Coupe #393 - Forte 427 EFI crate w/TKX 2.87/ .81 - Ordered 11/16/21 - Delivered 6/23/2022
    Location: Mechanicville, NY
    Build Thread: https://thefactoryfiveforum.com/show...na-Coupe-build
    My Albums
    Special Tools, Custom Parts, misc supplies: https://thefactoryfiveforum.com/album.php?albumid=2045
    Garage Pics: https://thefactoryfiveforum.com/album.php?albumid=2041
    POR15 First Try: https://thefactoryfiveforum.com/album.php?albumid=2068
    Silicone application tips: https://thefactoryfiveforum.com/album.php?albumid=2063

  18. Thanks rhk118 thanked for this post
  19. #496
    Senior Member Blitzboy54's Avatar
    Join Date
    Oct 2020
    Location
    Albany, NY
    Posts
    1,183
    Post Thanks / Like
    Quote Originally Posted by Namrups View Post
    Coupe builders heads up!!

    I drilled out the rivet already installed and removed the metal filler piece. As shown the drill had already scared the serial #. By looking closely you can see that the only possible number it could be is a 3 so I hope this doesn't give me problems trying to register this car.
    Unfortunately Scott, it might. I know that's not what you want to hear but I would reach out to the inspection dept and see if you can get in front of it. I am not saying it will definitely or even likely be a problem but you don't want to finish the car and find out it's an issue. Better to get in front of it first.

    I know how stressful that part can be. Call the Technical Dept and ask for advice. I would consider sending pictures of the damaged frame and a picture of the Certificate of Origin to Division of Field Investigations as well depending on what the Technical Dept says.


    Like I said you are probably fine but if your not better to know now.
    MK4 #10008 - Ordered 10/06/20, Delivered 03/03/21, First Start 7/22/21, First Go Kart 7/24/21
    Paint by Metal Morphous 5/14/22, Legally registered 6/8/22, Graduated 7/20/22
    Build Thread https://thefactoryfiveforum.com/show...been-delivered
    Complete Kit, Ford 306, Sniper/Dual Sync, T5, Hydraulic clutch

  20. #497
    Namrups's Avatar
    Join Date
    Sep 2021
    Location
    Mechanicville, NY
    Posts
    1,036
    Post Thanks / Like
    Blitzboy54 stopped by over the weekend and we bleed the brakes. Thanks Jesse for the help and for bringing your pressure bleeding unit.

    Working to get to a point where I can drop the engine in. To do so I need to have some of the engine bay electrical completed. Laid out the positive and negative battery cables. Using 2 ga cable to go from the battery to the master cut off switch. Then from the switched side to the starter with 4 ga. Also from the switched side to a 150 amp breaker to a positive bus bar in the dash with 8 ga cable. Also laid out the negative to the frame with 2 ga.


    Also laid out the rear harness. Shortened the fuel pump and the sender wires for a better fit. This harness will enter the cockpit thru the DS side panel. The rear brake line and the hydraulic clutch line also use this same location.


    Thinking about laying out the dash I decided to follow EdwardB's lead and made up a filler piece between the dash and the front transmission tunnel cover. Now to figure out how to lay out all the switches and buttons.
    Scott Pregont
    Present build: 65 Daytona Coupe #393 - Forte 427 EFI crate w/TKX 2.87/ .81 - Ordered 11/16/21 - Delivered 6/23/2022
    Location: Mechanicville, NY
    Build Thread: https://thefactoryfiveforum.com/show...na-Coupe-build
    My Albums
    Special Tools, Custom Parts, misc supplies: https://thefactoryfiveforum.com/album.php?albumid=2045
    Garage Pics: https://thefactoryfiveforum.com/album.php?albumid=2041
    POR15 First Try: https://thefactoryfiveforum.com/album.php?albumid=2068
    Silicone application tips: https://thefactoryfiveforum.com/album.php?albumid=2063

  21. Likes rhk118 liked this post
  22. #498
    Namrups's Avatar
    Join Date
    Sep 2021
    Location
    Mechanicville, NY
    Posts
    1,036
    Post Thanks / Like
    100 days!

    This is going to be a rather lengthy update. It's been 100 days since the Coupe was delivered. The weather is cooling off and the dreaded white stuff will be flying around soon. One of my personal goals was to have the engine installed by the time the snow flies. I have the engine but in order to install it I wanted to get some items in the engine bay completed. The PS footbox panels are attached from the engine bay side so I insulated the interior surface and finished the exterior with Shark Hid and got those installed. The battery has been installed. The next item on my list was engine bay electrical. The positive and negative battery cables.

    The negative was easy. Made up a short piece of cable and routed it to the chassis.


    The positive cable took a little thought. My final decision was to run from the battery to my main cutoff switch. Then from the switched side to the starter. Now ... where to put the cutoff switch?? As I showed in a previous post I added a filler panel under the dash between the dash and the front transmission tunnel cover. The upper unseen part of the cover will be used to mount electrical components leaving needed space behind the dash for air conditioning/heater ducts. The lower portion of the cover is where I decided to mount the main cutoff switch along with my battery charge port, USB charge port and the PS/DS seat heater buttons.


    This idea created another issue for me. All of the electrical connections behind the filler piece will be above the cover plate. The items below the filler plate will have all of the electrical connections below the cover plate. I will not be making the tunnel cover plate removable as the dash will be removable making access to the upper components easy. My solution to this issue was to make the tunnel cover two pieces. This will allow me to remove the lower piece without touching the upper piece. Because of having no room between aluminum and the angled chassis member I chose to rivet this piece in place when the time comes and if I have to remove it at some point I will have to drill the rivets out.


    So having made the decision on where to put the main cutoff I made up and installed the positive cable from the battery to the cutoff switch.

    From the battery across the front cross member.


    Up the PS chassis.
    Scott Pregont
    Present build: 65 Daytona Coupe #393 - Forte 427 EFI crate w/TKX 2.87/ .81 - Ordered 11/16/21 - Delivered 6/23/2022
    Location: Mechanicville, NY
    Build Thread: https://thefactoryfiveforum.com/show...na-Coupe-build
    My Albums
    Special Tools, Custom Parts, misc supplies: https://thefactoryfiveforum.com/album.php?albumid=2045
    Garage Pics: https://thefactoryfiveforum.com/album.php?albumid=2041
    POR15 First Try: https://thefactoryfiveforum.com/album.php?albumid=2068
    Silicone application tips: https://thefactoryfiveforum.com/album.php?albumid=2063

  23. #499
    Namrups's Avatar
    Join Date
    Sep 2021
    Location
    Mechanicville, NY
    Posts
    1,036
    Post Thanks / Like
    To the main cutoff switch. From the switched side I ran a cable back to the starter. I do not have an always on circuit using this arrangement. My battery charger, the Sniper EFI and my Digital Guard Dog will have to be wired directly to the battery bypassing the cutoff switch. The reason I am wiring the DGD to the battery is it also controls my door poppers and will need constant power. With the started on the switched side of the cutoff the car will not start.


    I ran the wires for my battery charger down the DS of the chassis and if you go back to the battery picture you can see they are attached. The clutch safety switch has a wire from the RF harness that gets attached to the starter also. This meant that I had to pull the harness out and get that process started. I'm not scared of the wiring but pulling that harness out of the box was a little scary. I found out that the wire that goes from the clutch switch to the starter was too short. I had to add about 6 inches of wire to it.

    Next up was the horns. I didn't like the location or the mounting method the manual showed so off the reservation we go again. I bent the brackets and mounted in what I hope is an out of the way location that I feel is more secure.


    Scott Pregont
    Present build: 65 Daytona Coupe #393 - Forte 427 EFI crate w/TKX 2.87/ .81 - Ordered 11/16/21 - Delivered 6/23/2022
    Location: Mechanicville, NY
    Build Thread: https://thefactoryfiveforum.com/show...na-Coupe-build
    My Albums
    Special Tools, Custom Parts, misc supplies: https://thefactoryfiveforum.com/album.php?albumid=2045
    Garage Pics: https://thefactoryfiveforum.com/album.php?albumid=2041
    POR15 First Try: https://thefactoryfiveforum.com/album.php?albumid=2068
    Silicone application tips: https://thefactoryfiveforum.com/album.php?albumid=2063

  24. #500
    Namrups's Avatar
    Join Date
    Sep 2021
    Location
    Mechanicville, NY
    Posts
    1,036
    Post Thanks / Like
    More corrections to the RF harness.... I understand that the RF harness is generic. Knowing this I am not criticizing it, just pointing out where I had issues and what I did to correct.

    I laid out the front harness and noted a few things. First was the fact that the location that was generic for the horn wires to split out and for the DS to split from the PS was way off. This made the DS too short and the horn wires come in at a weird angle.


    I pulled that section out the harness apart and corrected the location of the split and where the horn wires break out. Fits a lot better now.


    Scott Pregont
    Present build: 65 Daytona Coupe #393 - Forte 427 EFI crate w/TKX 2.87/ .81 - Ordered 11/16/21 - Delivered 6/23/2022
    Location: Mechanicville, NY
    Build Thread: https://thefactoryfiveforum.com/show...na-Coupe-build
    My Albums
    Special Tools, Custom Parts, misc supplies: https://thefactoryfiveforum.com/album.php?albumid=2045
    Garage Pics: https://thefactoryfiveforum.com/album.php?albumid=2041
    POR15 First Try: https://thefactoryfiveforum.com/album.php?albumid=2068
    Silicone application tips: https://thefactoryfiveforum.com/album.php?albumid=2063

  25. #501
    Namrups's Avatar
    Join Date
    Sep 2021
    Location
    Mechanicville, NY
    Posts
    1,036
    Post Thanks / Like
    One last item I needed to complete before dropping the engine in was the main ground strap between the engine and the frame. Natural instinct is to attach it using an engine mount bolt and the frame on the PS side of the car next to the starter. There is a hole in the chassis engine mount at that location but the way the bracing is there is no real room to get a fastener in there. I chose to use the DS instead. There was plenty of room to get the bolt in.


    I am ready (I hope) to drop the engine in now! I am still waiting for the accelerator linkage that Forte is developing for the coupe but I should be able to install that with the engine in.

    Dan, Pat and Jerry of the Upstate Cobra Club stopped by on Thursday and we dropped the engine in. There was no drama in putting the engine in but it's not without issues.


    Scott Pregont
    Present build: 65 Daytona Coupe #393 - Forte 427 EFI crate w/TKX 2.87/ .81 - Ordered 11/16/21 - Delivered 6/23/2022
    Location: Mechanicville, NY
    Build Thread: https://thefactoryfiveforum.com/show...na-Coupe-build
    My Albums
    Special Tools, Custom Parts, misc supplies: https://thefactoryfiveforum.com/album.php?albumid=2045
    Garage Pics: https://thefactoryfiveforum.com/album.php?albumid=2041
    POR15 First Try: https://thefactoryfiveforum.com/album.php?albumid=2068
    Silicone application tips: https://thefactoryfiveforum.com/album.php?albumid=2063

  26. #502
    Namrups's Avatar
    Join Date
    Sep 2021
    Location
    Mechanicville, NY
    Posts
    1,036
    Post Thanks / Like
    The first issue I have is the Forte supplied hydraulic clutch slave cylinder was hitting the chassis member.


    We removed it as to not damage it. I contacted Mike and he said I got the wrong slave cylinder and is sending the correct one that I should receive today.

    The next issue is not being able to line up the transmission crossmember with the transmission mount.


    I talked to FF and they mentioned flipping the bracket. I will continue to look at this and follow up.
    Scott Pregont
    Present build: 65 Daytona Coupe #393 - Forte 427 EFI crate w/TKX 2.87/ .81 - Ordered 11/16/21 - Delivered 6/23/2022
    Location: Mechanicville, NY
    Build Thread: https://thefactoryfiveforum.com/show...na-Coupe-build
    My Albums
    Special Tools, Custom Parts, misc supplies: https://thefactoryfiveforum.com/album.php?albumid=2045
    Garage Pics: https://thefactoryfiveforum.com/album.php?albumid=2041
    POR15 First Try: https://thefactoryfiveforum.com/album.php?albumid=2068
    Silicone application tips: https://thefactoryfiveforum.com/album.php?albumid=2063

  27. #503
    Namrups's Avatar
    Join Date
    Sep 2021
    Location
    Mechanicville, NY
    Posts
    1,036
    Post Thanks / Like
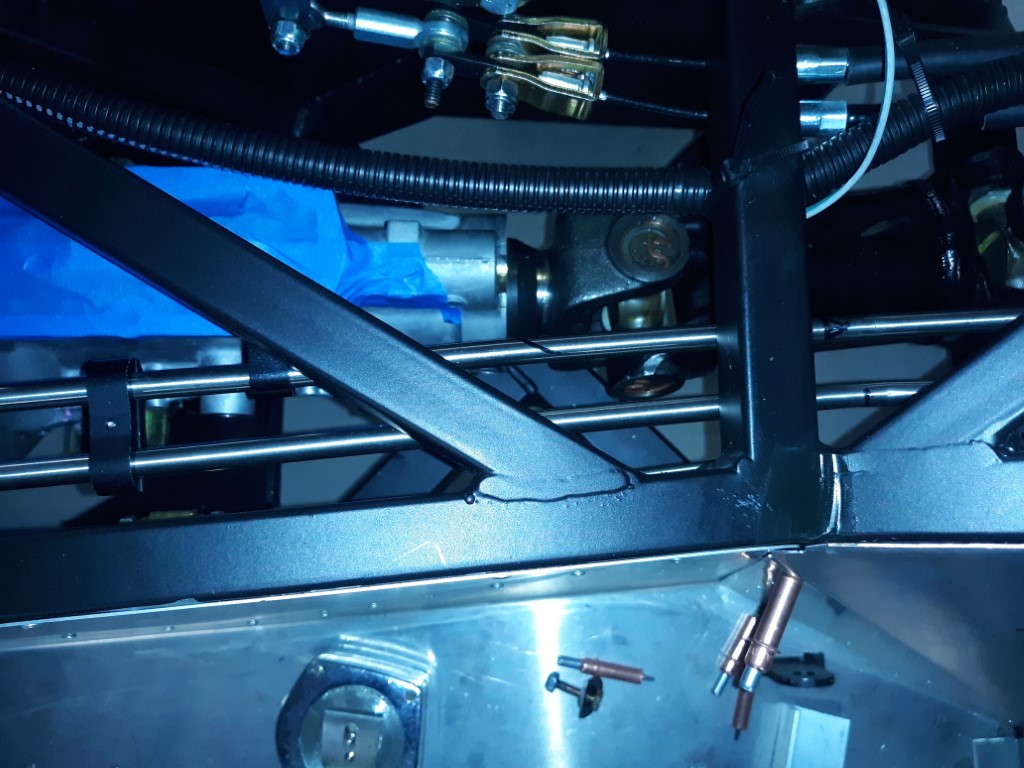
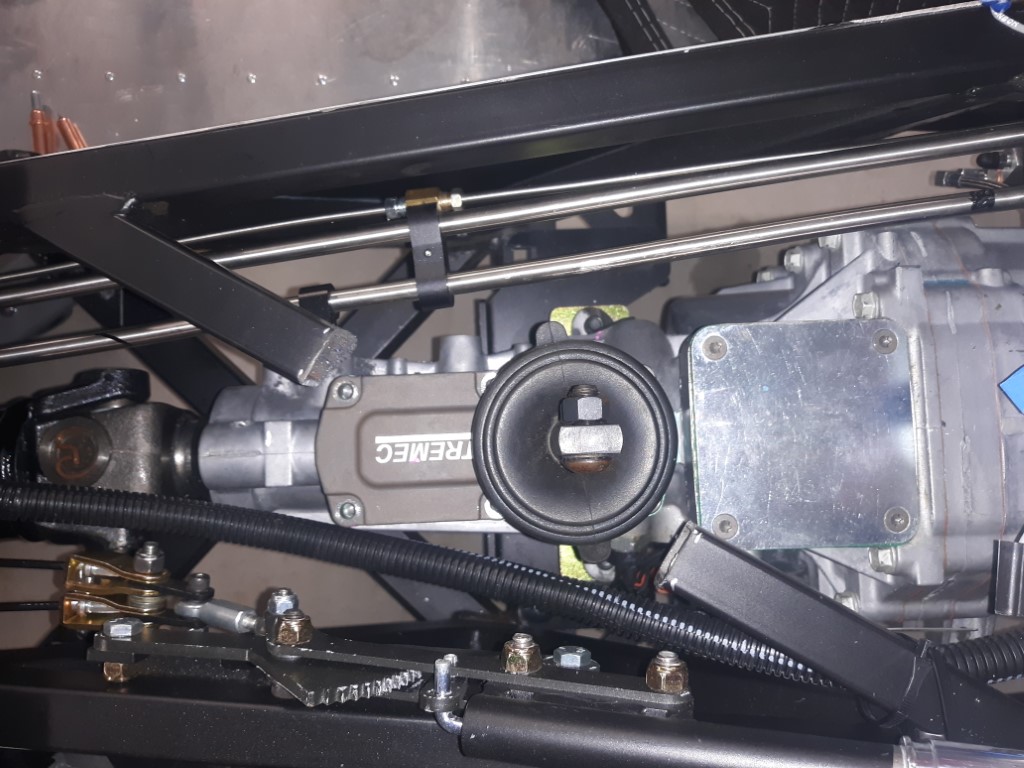
    The final issue is the fact that the cross brace on the transmission tunnel is right in the way of the shift lever. If you look close at this picture you can see that the brace is welded in the front at the intersection of the chassis members but at the rear is is short of this intersection. If they were to weld it starting at the rear intersection it would move that brace back enough to clear the shift lever. It looks like I will have to get the Sawzall out and remove that brace.

    Scott Pregont
    Present build: 65 Daytona Coupe #393 - Forte 427 EFI crate w/TKX 2.87/ .81 - Ordered 11/16/21 - Delivered 6/23/2022
    Location: Mechanicville, NY
    Build Thread: https://thefactoryfiveforum.com/show...na-Coupe-build
    My Albums
    Special Tools, Custom Parts, misc supplies: https://thefactoryfiveforum.com/album.php?albumid=2045
    Garage Pics: https://thefactoryfiveforum.com/album.php?albumid=2041
    POR15 First Try: https://thefactoryfiveforum.com/album.php?albumid=2068
    Silicone application tips: https://thefactoryfiveforum.com/album.php?albumid=2063

  28. #504
    Member James Morse's Avatar
    Join Date
    Feb 2020
    Location
    SW Virginia
    Posts
    32
    Post Thanks / Like
    There isn't the option to move the shift lever? Some trans have multiple locations?
    Seems like you shouldn't have to cut things but I've heard of it.

  29. #505
    Namrups's Avatar
    Join Date
    Sep 2021
    Location
    Mechanicville, NY
    Posts
    1,036
    Post Thanks / Like
    There are 3 positions. The two easy ones are under the cross member and will depend on which way you put the shift cover on. The third one is that blank plate in front. That is a separate kit that has to be purchased and the whole rear end of the transmission has to be removed and the internals changed. Not something I would want to do if I don't have to. There is also the question of clearing the dash being that far forward. I don't plan on racing so I don't believe removing this brace will really effect anything with the car.
    Scott Pregont
    Present build: 65 Daytona Coupe #393 - Forte 427 EFI crate w/TKX 2.87/ .81 - Ordered 11/16/21 - Delivered 6/23/2022
    Location: Mechanicville, NY
    Build Thread: https://thefactoryfiveforum.com/show...na-Coupe-build
    My Albums
    Special Tools, Custom Parts, misc supplies: https://thefactoryfiveforum.com/album.php?albumid=2045
    Garage Pics: https://thefactoryfiveforum.com/album.php?albumid=2041
    POR15 First Try: https://thefactoryfiveforum.com/album.php?albumid=2068
    Silicone application tips: https://thefactoryfiveforum.com/album.php?albumid=2063

  30. Likes James Morse liked this post
  31. #506
    Namrups's Avatar
    Join Date
    Sep 2021
    Location
    Mechanicville, NY
    Posts
    1,036
    Post Thanks / Like
    Engine bay clearance

    I had a request to see pictures of the engine install from above to see what kind of clearance there is. I figured others might also be interested so here they are. The engine is based on the 351 block (Boss 427 Stroker) with AFR heads. Weiand 8023WND intake. Sniper EFI. The front is dressed with alternator, power steering pump and air conditioner compressor. Headers are not shown because I do not have them yet. Transmission is TKX. The motor is presently secured on the motor mounts. The transmission mount is not yet secured. The drive shaft is in. The pinion angle is not yet set.

    Overall from top.


    Firewall clearance from PS.


    PS rear.


    PS front.


    Front engine bay.
    Scott Pregont
    Present build: 65 Daytona Coupe #393 - Forte 427 EFI crate w/TKX 2.87/ .81 - Ordered 11/16/21 - Delivered 6/23/2022
    Location: Mechanicville, NY
    Build Thread: https://thefactoryfiveforum.com/show...na-Coupe-build
    My Albums
    Special Tools, Custom Parts, misc supplies: https://thefactoryfiveforum.com/album.php?albumid=2045
    Garage Pics: https://thefactoryfiveforum.com/album.php?albumid=2041
    POR15 First Try: https://thefactoryfiveforum.com/album.php?albumid=2068
    Silicone application tips: https://thefactoryfiveforum.com/album.php?albumid=2063

  32. Likes Straversi liked this post
  33. #507
    Namrups's Avatar
    Join Date
    Sep 2021
    Location
    Mechanicville, NY
    Posts
    1,036
    Post Thanks / Like
    Clearance continued

    DS front.


    DS rear.


    Firewall clearance from DS.


    Hope this helps.
    Scott Pregont
    Present build: 65 Daytona Coupe #393 - Forte 427 EFI crate w/TKX 2.87/ .81 - Ordered 11/16/21 - Delivered 6/23/2022
    Location: Mechanicville, NY
    Build Thread: https://thefactoryfiveforum.com/show...na-Coupe-build
    My Albums
    Special Tools, Custom Parts, misc supplies: https://thefactoryfiveforum.com/album.php?albumid=2045
    Garage Pics: https://thefactoryfiveforum.com/album.php?albumid=2041
    POR15 First Try: https://thefactoryfiveforum.com/album.php?albumid=2068
    Silicone application tips: https://thefactoryfiveforum.com/album.php?albumid=2063

  34. Likes rhk118 liked this post
  35. #508
    Namrups's Avatar
    Join Date
    Sep 2021
    Location
    Mechanicville, NY
    Posts
    1,036
    Post Thanks / Like
    I have looked at the issue of the cross brace being in the way of the shifter from every angle. I can see only 2 solutions. 1: buy the shift kit to move the shifter all the way to the front. This is not workable for me. I do not want to pull the engine out for one and I think it would be very, of not too close to the dash. 2: Cut the cross brace to clear the shifter. If anyone else has another option please feel free to speak up!
    Scott Pregont
    Present build: 65 Daytona Coupe #393 - Forte 427 EFI crate w/TKX 2.87/ .81 - Ordered 11/16/21 - Delivered 6/23/2022
    Location: Mechanicville, NY
    Build Thread: https://thefactoryfiveforum.com/show...na-Coupe-build
    My Albums
    Special Tools, Custom Parts, misc supplies: https://thefactoryfiveforum.com/album.php?albumid=2045
    Garage Pics: https://thefactoryfiveforum.com/album.php?albumid=2041
    POR15 First Try: https://thefactoryfiveforum.com/album.php?albumid=2068
    Silicone application tips: https://thefactoryfiveforum.com/album.php?albumid=2063

  36. #509
    Senior Member
    Join Date
    Mar 2021
    Posts
    361
    Post Thanks / Like
    Quote Originally Posted by Namrups View Post
    Health update!

    Had an appointment with my cancer doctor today. Good news! Good to go for another three months. Better news! Because I have done so well on the medication, my doctor has decided to try a lower dosage of the cancer meds! He believes a lower dosage will still keep the cancer at bay and reduce some of the side effects such as muscle and joint pain, hypertension and what I feel is most important the out of pocket cost! He wanted to see me after only three months just to make sure all is well. Praying this works.

    Due to the fact it was over 100 degrees today I decided to put off working on the car and instead went in search of a supplier of sheet aluminum. I have ideas of parts and pieces I want to fab and didn't want to wait for online sales. I found a local business called Metal Supermarket that specializes in small orders. They had a cutoff rack that I found three pieces 20" x 22" and I ordered two specific cut pieces 23" x 7 1/2" all for $56.00. When I priced this online it was over $100.00! Great find.
    Really nice to hear about your update with your doc. You must be doing something right:-) Continue with your fun agenda with this build. Maybe all will be in the rear view mirror before long!

  37. #510
    Senior Member
    Join Date
    Mar 2021
    Posts
    361
    Post Thanks / Like
    Quote Originally Posted by Namrups View Post
    I have looked at the issue of the cross brace being in the way of the shifter from every angle. I can see only 2 solutions. 1: buy the shift kit to move the shifter all the way to the front. This is not workable for me. I do not want to pull the engine out for one and I think it would be very, of not too close to the dash. 2: Cut the cross brace to clear the shifter. If anyone else has another option please feel free to speak up!
    I have a different setup with my SBF / TKO600, and I opted for the midshift. This may not be relevant to your design constraints. It did solve the cross member excision question for me tho. However, and there are more things in play like seat choice and steering wheel position, but in my case, it is a little crowded with the mid-shift. Short hands (or bent elbows) with both steering wheel and shifter. If wishes were fishes, I would wish for a bit more of a stretched position. But then ... I am just getting used to this layout. I may choose to design or find a different shift lever - I cheated a bit and drilled and tapped a different mounting hole in the kit lever to open it up for me a bit; perhaps not enough.

    I am going to get some road time on this little beastie. Muscle memory will make all of this moot for me I expect :-)

  38. Thanks Namrups thanked for this post
    Likes Namrups liked this post
  39. #511
    Not a waxer Jeff Kleiner's Avatar
    Join Date
    Feb 2011
    Location
    Bloomington, Indiana
    Posts
    8,132
    Post Thanks / Like
    Looking great Scott! Last I knew a mid shift is not yet available for the TKX. Cut the diagonal tube and carry on…trust me, the car won’t collapse upon itself when you do

    Jeff

  40. #512
    Namrups's Avatar
    Join Date
    Sep 2021
    Location
    Mechanicville, NY
    Posts
    1,036
    Post Thanks / Like
    Quote Originally Posted by Jeff Kleiner View Post
    Looking great Scott! Last I knew a mid shift is not yet available for the TKX. Cut the diagonal tube and carry on…trust me, the car won’t collapse upon itself when you do

    Jeff
    Thanks for the kind words Jeff! If I was going to race this car I would remove and then reinstall that brace in a different location but as a street car I will just cut a portion of it out of the way and move on.
    Scott Pregont
    Present build: 65 Daytona Coupe #393 - Forte 427 EFI crate w/TKX 2.87/ .81 - Ordered 11/16/21 - Delivered 6/23/2022
    Location: Mechanicville, NY
    Build Thread: https://thefactoryfiveforum.com/show...na-Coupe-build
    My Albums
    Special Tools, Custom Parts, misc supplies: https://thefactoryfiveforum.com/album.php?albumid=2045
    Garage Pics: https://thefactoryfiveforum.com/album.php?albumid=2041
    POR15 First Try: https://thefactoryfiveforum.com/album.php?albumid=2068
    Silicone application tips: https://thefactoryfiveforum.com/album.php?albumid=2063

  41. #513
    Senior Member
    Join Date
    May 2021
    Location
    Fort Worth, Texas
    Posts
    403
    Post Thanks / Like
    Any option I come up with is going to require some welding. The purpose of the brace is to help prevent the left and right side of the tunnel from moving forward and back, independent of each other. Looking at the rest of the design, there is little chance of that happening with the brace removed, except in extreme circumstances (i.e. rolling the car for example).

    It can help with some potential flexing of the left and right side of the upper tunnel., but that motion is alleviated with the attachment of the aluminum panels.
    My Type 65 Coupe: Ordered May 27, 2021. Arrived November 19, 2021.
    I would like to treat my gas pedal as a binary operator. It would be nice to get the cooperation of everyone in front of me.

  42. #514
    Namrups's Avatar
    Join Date
    Sep 2021
    Location
    Mechanicville, NY
    Posts
    1,036
    Post Thanks / Like
    Quote Originally Posted by Skuzzy View Post
    Any option I come up with is going to require some welding. The purpose of the brace is to help prevent the left and right side of the tunnel from moving forward and back, independent of each other. Looking at the rest of the design, there is little chance of that happening with the brace removed, except in extreme circumstances (i.e. rolling the car for example).

    It can help with some potential flexing of the left and right side of the upper tunnel., but that motion is alleviated with the attachment of the aluminum panels.
    If I roll the car, side tunnel movement will be the least of my problems! IMO removal of that bar will not be a big issue for a street car.
    Scott Pregont
    Present build: 65 Daytona Coupe #393 - Forte 427 EFI crate w/TKX 2.87/ .81 - Ordered 11/16/21 - Delivered 6/23/2022
    Location: Mechanicville, NY
    Build Thread: https://thefactoryfiveforum.com/show...na-Coupe-build
    My Albums
    Special Tools, Custom Parts, misc supplies: https://thefactoryfiveforum.com/album.php?albumid=2045
    Garage Pics: https://thefactoryfiveforum.com/album.php?albumid=2041
    POR15 First Try: https://thefactoryfiveforum.com/album.php?albumid=2068
    Silicone application tips: https://thefactoryfiveforum.com/album.php?albumid=2063

  43. #515
    Senior Member
    Join Date
    May 2021
    Location
    Fort Worth, Texas
    Posts
    403
    Post Thanks / Like
    Quote Originally Posted by Namrups View Post
    If I roll the car, side tunnel movement will be the least of my problems! IMO removal of that bar will not be a big issue for a street car.
    I agree. I am going to have the same problem when I get there.

    Slow going for me. For instance, it took me 15 minutes to install the rack, but 2 hours to move the boxes around enough to find the parts needed to install it. Then there is the one hour setup time before I can start work. It was even slower going before I bought a 10'x10' shade structure and put it up the driveway. Getting the frame into the driveway allowed me to work better and safer. Just takes time to put up and tear down the tent each day.

    I just hope I can get enough done before winter sets in.
    My Type 65 Coupe: Ordered May 27, 2021. Arrived November 19, 2021.
    I would like to treat my gas pedal as a binary operator. It would be nice to get the cooperation of everyone in front of me.

  44. Likes rhk118 liked this post
  45. #516
    Namrups's Avatar
    Join Date
    Sep 2021
    Location
    Mechanicville, NY
    Posts
    1,036
    Post Thanks / Like
    Quote Originally Posted by Skuzzy View Post
    I agree. I am going to have the same problem when I get there.

    Slow going for me. For instance, it took me 15 minutes to install the rack, but 2 hours to move the boxes around enough to find the parts needed to install it. Then there is the one hour setup time before I can start work. It was even slower going before I bought a 10'x10' shade structure and put it up the driveway. Getting the frame into the driveway allowed me to work better and safer. Just takes time to put up and tear down the tent each day.

    I just hope I can get enough done before winter sets in.
    It's all part of the journey. I have what I feel is a good setup for this build. Have I seen better .... YES. Have I seen worse ... Yes. But we didn't start this journey because of the build space. We started this journey because of the build and the pride of "I built this!" when it's done. The trial and tribulations of your build space only shows your commitment to the journey! I for one admire that.
    Scott Pregont
    Present build: 65 Daytona Coupe #393 - Forte 427 EFI crate w/TKX 2.87/ .81 - Ordered 11/16/21 - Delivered 6/23/2022
    Location: Mechanicville, NY
    Build Thread: https://thefactoryfiveforum.com/show...na-Coupe-build
    My Albums
    Special Tools, Custom Parts, misc supplies: https://thefactoryfiveforum.com/album.php?albumid=2045
    Garage Pics: https://thefactoryfiveforum.com/album.php?albumid=2041
    POR15 First Try: https://thefactoryfiveforum.com/album.php?albumid=2068
    Silicone application tips: https://thefactoryfiveforum.com/album.php?albumid=2063

  46. Likes rhk118 liked this post
  47. #517
    Senior Member rhk118's Avatar
    Join Date
    Nov 2021
    Location
    Portland, Maine
    Posts
    355
    Post Thanks / Like
    Scott, great progress as usual! Engine looks great! And I appreciate what Skuzzy said...I spend more time finding parts and making sure I have all the correct everything on hand for 3 hours for what amounts to about 30 minutes of work on the car

  48. Thanks Namrups thanked for this post
    Likes Namrups liked this post
  49. #518
    Namrups's Avatar
    Join Date
    Sep 2021
    Location
    Mechanicville, NY
    Posts
    1,036
    Post Thanks / Like
    New shoes arrived today!!


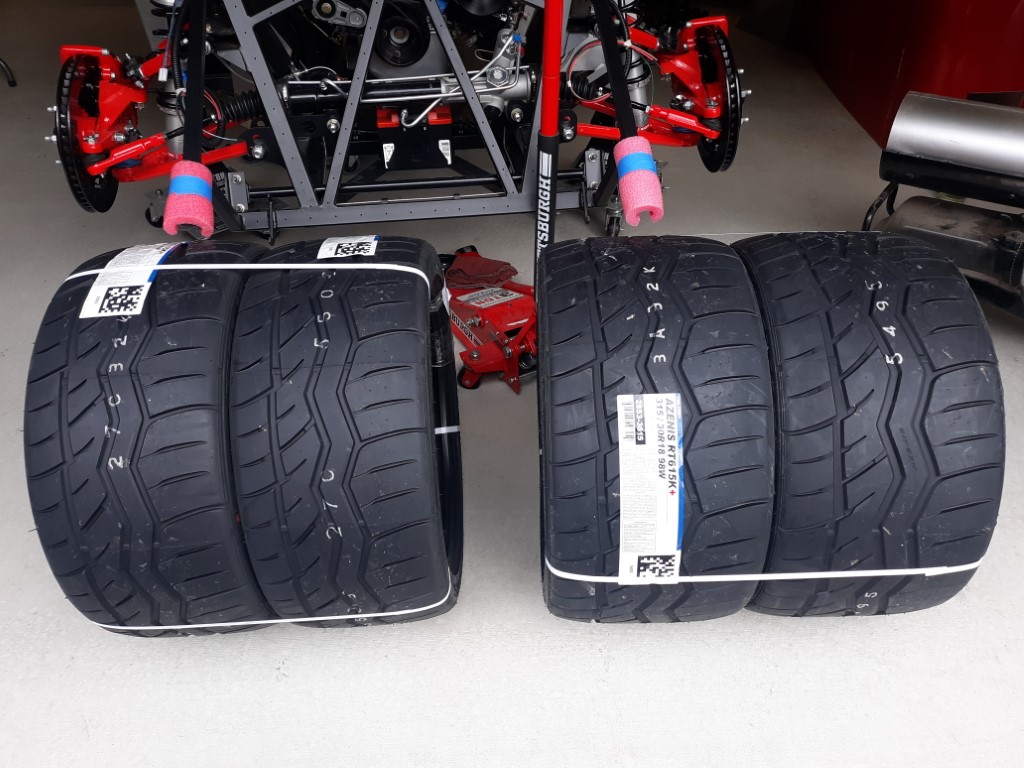
    IT'S DONE! The cross brace has been cut and the shifter now fits!
    Scott Pregont
    Present build: 65 Daytona Coupe #393 - Forte 427 EFI crate w/TKX 2.87/ .81 - Ordered 11/16/21 - Delivered 6/23/2022
    Location: Mechanicville, NY
    Build Thread: https://thefactoryfiveforum.com/show...na-Coupe-build
    My Albums
    Special Tools, Custom Parts, misc supplies: https://thefactoryfiveforum.com/album.php?albumid=2045
    Garage Pics: https://thefactoryfiveforum.com/album.php?albumid=2041
    POR15 First Try: https://thefactoryfiveforum.com/album.php?albumid=2068
    Silicone application tips: https://thefactoryfiveforum.com/album.php?albumid=2063

  50. Likes rhk118 liked this post
  51. #519
    Namrups's Avatar
    Join Date
    Sep 2021
    Location
    Mechanicville, NY
    Posts
    1,036
    Post Thanks / Like
    Need help in mounting transmission (pinion angle)

    I am a real novice at this so any and all help accepted!

    My understanding is rule 1: The angle of the output shaft on the diff should be equal but opposite to the output shaft of the transmission. In other words if the angle of the diff is a minus 8 degrees then the angle of the transmission should be plus 8 degrees. That would put the centerlines in parallel. Without going any further I fail rule 1 and now don't know what to do.

    I will try to explain.

    I have the IRS rear end and my assumption is the angle will never change nor can I do anything to change it. The angle of my diff is minus .8 degrees. (the output shaft points toward the ground) I measured this from the milled portion of the universal joint that is attached to the diff.

    With my transmission mount sitting on the transmission crossmember my transmission output shaft measures plus 2.9 degrees. (the rear of the transmission points to the ground) This was measured from the crank pully on the front of the engine. The crank and the output shaft are in the same plane.

    At this point my drive shaft measures minus 2.1 degrees. (the transmission side of the drive shaft is lower than the diff side)

    In order to get the output shaft of the transmission parallel to the output shaft of the diff I have to raise the rear of the transmission until the angle reads plus .8 degrees.

    When I jack the rear of the transmission as high as I can (actually hitting the chassis) the output shaft of the transmission reads zero degrees but the drive shaft now is at a plus 16.9 degrees!

    I'm not an artist but here is a rough pic.


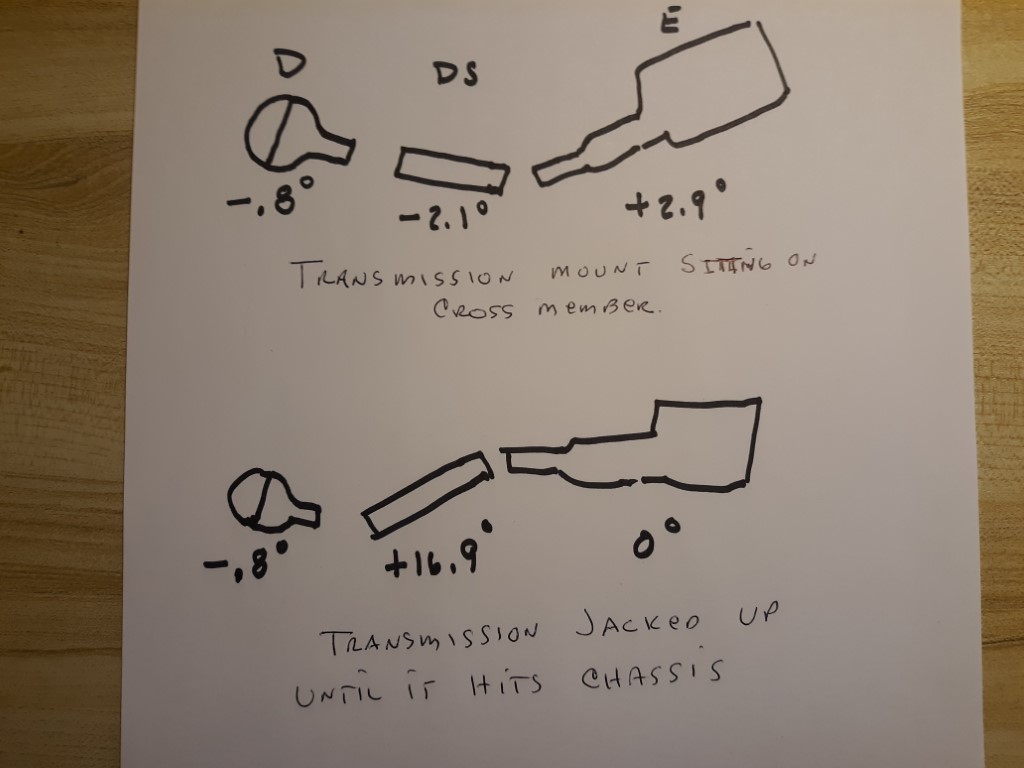
    So where do I go from here?
    Scott Pregont
    Present build: 65 Daytona Coupe #393 - Forte 427 EFI crate w/TKX 2.87/ .81 - Ordered 11/16/21 - Delivered 6/23/2022
    Location: Mechanicville, NY
    Build Thread: https://thefactoryfiveforum.com/show...na-Coupe-build
    My Albums
    Special Tools, Custom Parts, misc supplies: https://thefactoryfiveforum.com/album.php?albumid=2045
    Garage Pics: https://thefactoryfiveforum.com/album.php?albumid=2041
    POR15 First Try: https://thefactoryfiveforum.com/album.php?albumid=2068
    Silicone application tips: https://thefactoryfiveforum.com/album.php?albumid=2063

  52. #520
    Senior Member edwardb's Avatar
    Join Date
    Feb 2011
    Location
    Lake Orion, Michigan
    Posts
    10,592
    Post Thanks / Like
    First, all the angle measurements are relative. Meaning the chassis itself may not be exactly level. And likely isn't. So you're looking at differences. Not absolute numbers. Just want to point that out. For mine, the IRS diff does indeed point down slightly in relation to the chassis. Was the same on my Roadster. So I think that's a standard position by FF. In my case, no shim was required for the T-56 and Coupe mounting plate. However, plate is mounted on the bottom (vs. top as instructions show) in order for shifter to not be against the transmission tunnel cover. In that position, my pinion angle is just under two degrees. With IRS, recommended that engine is 1 - 2 degrees down from the fixed diff. So I called it good. Not much I could do to make it different. 5,100 miles (and counting) and has worked fine. No sign of any issues. You'll get different opinions on here, but many don't measure the driveshaft angle. Yes, there are design limits to how much it can move. Don't know if mine exceeds that, but hasn't been a problem. For yours, not doubting you, but seems hard to believe the driveshaft angle could change by 19 degrees by moving the engine.
    Build 1: Mk3 Roadster #5125. Sold 11/08/2014. Build 2: Mk4 Roadster #7750. Sold 04/10/2017. Build Thread
    Build 3: Mk4 Roadster 20th Anniversary #8674. Sold 09/07/2020. Build Thread and Video. Build 4: Gen 3 Type 65 Coupe #59. Gen 3 Coyote. Legal 03/04/2020. Build Thread and Video
    Build 5: 35 Hot Rod Truck #138. LS3 and 4L65E auto. Rcvd 01/05/2021. Legal 04/20/2023. Build Thread. Sold 11/9/2023.

Page 13 of 25 FirstFirst ... 3111213141523 ... LastLast

Tags for this Thread

Posting Permissions

  • You may not post new threads
  • You may not post replies
  • You may not post attachments
  • You may not edit your posts
  •  

Breeze

Visit our community sponsor