-
01-07-2024, 06:47 PM
#321
Senior Member

And a nice go-kart session today in the Florida sun:
https://youtu.be/K2mC-VPa-Gc
Sorry the audio sucks. I've gotta figure out a better microphone. This one is remote but cheap.
Matt
My build thread
here
-
Post Thanks / Like - 0 Thanks, 1 Likes
-
01-08-2024, 10:45 AM
#322
Depending on your physical build, you might want to sit in the seat and see how the dash button locations work out ergonomically. Things to the left and under the steering wheel are not the most accessible for me.
Good job on the trans.
20th Anniversary Mk IV, A50XS Coyote, TKO 600, Trunk Drop Box, Trunk Battery Box, Cubby Hole, Seat Heaters, Radiator hanger and shroud.
-
Post Thanks / Like - 1 Thanks, 0 Likes
 MB750
MB750 thanked for this post
-
01-08-2024, 12:39 PM
#323
Senior Member

Originally Posted by
Railroad

Depending on your physical build, you might want to sit in the seat and see how the dash button locations work out ergonomically. Things to the left and under the steering wheel are not the most accessible for me.
Good job on the trans.
Thank you. Since you mention it, I've chosen that location for the turn signal buttons because I'm used to using my left arm for turn signal action, and in manual cars I tend to keep my right hand on the shifter. BUT, do you think there's a chance the top of the door will be in the way for my left arm to comfortably access those switches?
Clearly I don't have the door installed so I wouldn't know the difference. Why was it an issue for you?
Matt
My build thread
here
-
01-09-2024, 12:04 PM
#324
I thought I would mount something on the left side of the steering wheel, forgot what it was.
I must have had the body and doors on, when I found out the reduction of area and access.
I ended up putting the horn button on the dash, to the right of the steering wheel.
My headlight dimmer is on the Russ Thompson turn signal lever.
I must not have a pic of the my dash. I do have a panel on the trans tunnel to dash support. I have a power outlet, 4 way flasher and wiper switch on it.
Too cold to go to barn for pic taking, today.
Maybe others will chime in.
good luck,
20th Anniversary Mk IV, A50XS Coyote, TKO 600, Trunk Drop Box, Trunk Battery Box, Cubby Hole, Seat Heaters, Radiator hanger and shroud.
-
Post Thanks / Like - 1 Thanks, 0 Likes
MB750 thanked for this post
-
01-09-2024, 01:45 PM
#325
Not a waxer

-
Post Thanks / Like - 1 Thanks, 0 Likes
MB750 thanked for this post
-
01-12-2024, 11:09 AM
#326
Senior Member
I like the idea of putting them to the left of the tach, I just figured the curved nature of the dash wouldn't allow for a 19mm diameter momentary switch. I'll take a closer look. I also like the idea of putting a hi-lo toggle over there as well.
Matt
My build thread
here
-
01-15-2024, 08:53 AM
#327
Senior Member
Originally Posted by
Jeff Kleiner
I've built several cars using a self cancelling Signal Dynamics module (which uses momentary switches for activation) rather than a Russ Thompson style column mount and on all of those located the controls to the left of the wheel. It works and as you say seems more natural.
Jeff
Hey Jeff, I'm curious, but did you just use a jumper wire in place of the OEM flasher relay that goes into the fuse block? Since the Signal Dynamics module does the flashing, I'm guessing you'll have to feed it 12 VDC constant through that circuit.
Matt
My build thread
here
-
01-15-2024, 09:55 AM
#328
Not a waxer
I set them up with keyed and fused 12 volts, just like conventional turn signals. That can come from the turn signal feed or wherever else you care to grab it. I prefer keyed power rather than constant hot so that people can’t activate them while the car is parked.
Jeff
-
Post Thanks / Like - 1 Thanks, 0 Likes
MB750 thanked for this post
-
01-17-2024, 04:43 PM
#329
Senior Member
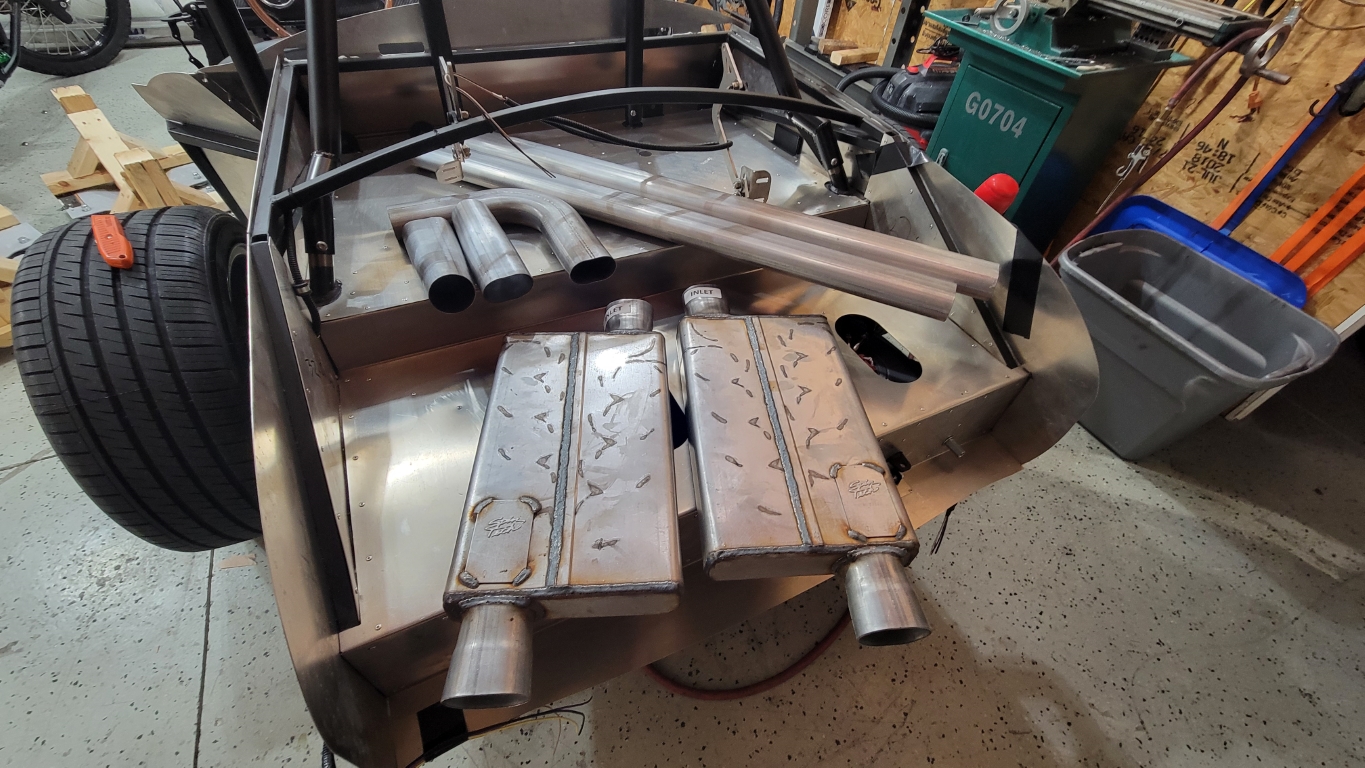
I'm too excited to not share this, but I just spent $700 at Spintech for all my low-profile exhaust components. I'll be sure to post pics of the fabrication and assembly, and definitely sound clips.
Matt
My build thread
here
-
Post Thanks / Like - 0 Thanks, 1 Likes
-
01-27-2024, 10:32 PM
#330
Senior Member
I installed a smaller clutch MC today. The last few times I went out I grew annoyed how touchy the clutch was. Wilwood sells a bunch of different sizes, so I did some quick math and went with a 15/16" MC. The clutch onset is so much smoother now, less grabby, and easier to leave the line and go backwards up my driveway.
Matt
My build thread
here
-
01-30-2024, 06:25 PM
#331
Senior Member
Gonna have a fun couple a weekends:
Matt
My build thread
here
-
Post Thanks / Like - 0 Thanks, 1 Likes
-
01-31-2024, 08:11 AM
#332
Wow that is definitely a different mod for the MK4. I will be interested in your install and see how it looks.
Roadster MK4 #10653 Date: 4-27-23; First Start: Oct 2023; Go Kart: Nov 2023; Body and Paint: To Kleiner EDD - April 2024; Graduated: TBD
SBF Boss 347, Edelbrock ProFlo 4, Milodon Road Race Oil Pan, Tremec TKX 2.87/0.81 OD, IRS Dakota Digital Dash, FFMetal Firewall Forward, BOIG Lower Cool Pipes, Forte's Mechanical Throttle Linkage and Hydraulic Clutch, Breeze Radiator Fan Shroud- Radiator Support Kit and Battery Forward
-
Post Thanks / Like - 1 Thanks, 0 Likes
MB750 thanked for this post
-
01-31-2024, 08:41 AM
#333
Senior Member
Originally Posted by
maclonchas
Wow that is definitely a different mod for the MK4. I will be interested in your install and see how it looks.
The design intent is to run the oval tubing and muffler right under the seats, then ditch out in front of the rear tires. I'm gonna put a 1/4" strip of wood on top of the mufflers and jack them up firmly before welding the hangers so they're actually hanging a bit, but up as high as possible. Then a buttload of insulation under the seat.
There's a fella on here who's done the same thing. The end game here is the "Gentleman's Cobra". Metallic BRG paint with an under exhaust, but since I'm solid axle doing tail pipes would be difficult.
Matt
My build thread
here
-
Post Thanks / Like - 1 Thanks, 0 Likes
-
01-31-2024, 01:17 PM
#334
Originally Posted by
MB750
Gonna have a fun couple a weekends:
This may be of interest:
https://www.ffcars.com/forums/17-fac...t-halfway.html
I'm the current owner of the car shown in the thread above--exhaust was fabbed by the prior owner/builder.
-
Post Thanks / Like - 0 Thanks, 2 Likes
-
02-01-2024, 08:47 AM
#335
Senior Member
Originally Posted by
jab351w
Hand built headers? Amazing!
I went with the oval inlet/outlet 7000 series. My goal was the lowest profile mufflers available. These are only 2.5" thick.
Matt
My build thread
here
-
02-07-2024, 08:09 AM
#336
Senior Member

Drivers side. Went together pretty easily. Some custom cuts to adjust angle, but for the most part not bad. It's just tacked together with the Flux Core, but I'll TIG it for the finish welds. And I'll whip up a hanger on the back end. I got started on the passenger side but dinner was calling before I got to the J pipe.
It'll all get a coat of high temp paint, and header wrap from the O2 sensors down to the muffler to try keeping heat inside the pipe.
Matt
My build thread
here
-
Post Thanks / Like - 0 Thanks, 1 Likes
-
02-07-2024, 09:04 AM
#337
Senior Member

I find this interesting. On the original 260 & 289 Cobras the exhaust ran under the car and out the back. The 427SC had the sidepipes we all know. What you're doing is under the car but exiting at about the same place as the sidepipes. Is it just to eliminate the big sidepipe and clean up the lines of the car? I'm guessing with those mufflers it will be quieter than with the sidepipes.
I hope you're able to insulate well enough to keep from roasting your butt. When I was looking to buy a Viper I looked at a few Gen III that had the exhaust under the car and out the back. The heat from the exhaust in the cockpit was noticeable. I ended up buying a Gen IV where they went back to the sidepipes and no heat in the interior.
Looking good so far!
-
02-08-2024, 03:30 PM
#338
Senior Member
That's interesting Mike, I always thought the 427 had the full under exhaust and the 289 had the side pipes.
Regardless, my end game is the Gentlemen's Cobra. British Racing Green and no pipe to sting your lady's leg.
I'll definitely post a sound video when they're done
Matt
My build thread
here
-
Post Thanks / Like - 0 Thanks, 1 Likes
-
02-25-2024, 01:50 PM
#339
Senior Member
Spintech exhaust fabricated, but not yet painted and insulated:
https://youtu.be/59DJ5jZvCo0
I'll be painting, then wrapping the pipe up to the muffler, then partially wrapping the top and inside of each muffler with some aluminum backed fiberglass to keep heat off my bum and the fuel/brake lines.
Matt
My build thread
here
-
Post Thanks / Like - 0 Thanks, 1 Likes
-
03-13-2024, 03:43 PM
#340
Senior Member
From the "Took long enough..." department, exhaust is done and installed:
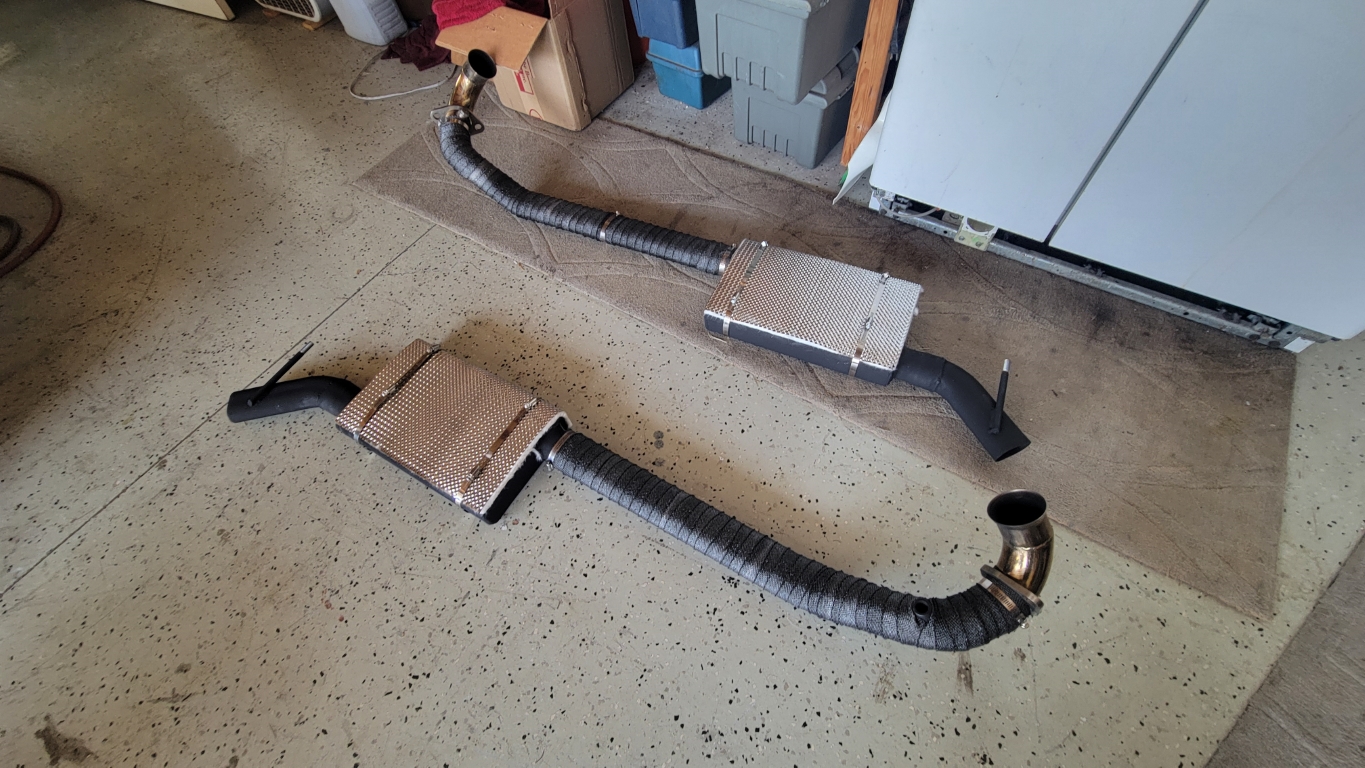

Header wrap down to the muffler, then fiberglass backed aluminum around the top and inside of each muffler. Hopefully that'll keep the heat at bay (somewhat).
Matt
My build thread
here
-
Post Thanks / Like - 0 Thanks, 1 Likes
-
03-21-2024, 08:10 PM
#341
Senior Member
After a few more miles go-karting around the hood I decided I wasn't much of a fan of the pedal positioning, so I made some modifications. Firstly, the brake needs to be further out, but there's a frame member in the way:

I didnt' want to push the seat forward because I like the positioning the way it is, so I made some adapters.

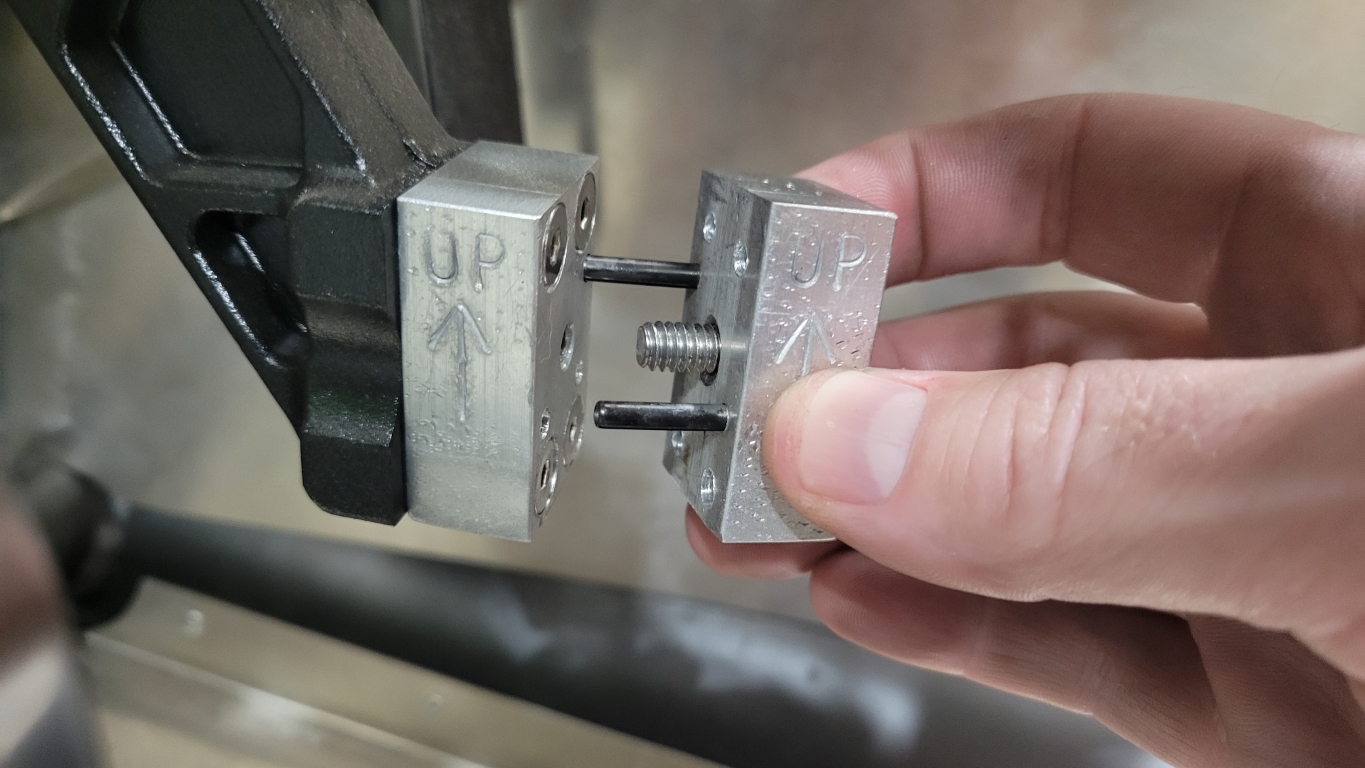

I finally got to use those Harbor Freight letter stamps too. Now it's perfect!
Next up, raise the gas pedal a scootch, and scoot the clutch over as far as possible, just to make the pedal flush with the Wilwood arm.
Matt
My build thread
here
-
04-09-2024, 05:34 PM
#342
Senior Member
I've had heartburn over that panel bend on the throttle side of the footbox because my toe kept hitting it, so I picked up some sheet aluminum and a metal brake from Harbor Freight and went to town. First with some cardboard, then the final product. Two pieces later:


I also scooted the clutch pedal over one hole space and used a metal plate to distribute the load. It looks a bit goofy but works great. Now I can wear normal shoes and not worry about my foot hitting anything unintended (like the gas when I'm hitting the brakes...)
Matt
My build thread
here


 Thanks:
  Likes:


 Reply With Quote
