Forte's

Visit our community sponsor

Thanks Thanks:  64
Likes Likes:  79
Page 2 of 9 FirstFirst 1234 ... LastLast
Results 41 to 80 of 342

Thread: MB750's MKIV Roadster build thread

  1. #41
    Senior Member MB750's Avatar
    Join Date
    Feb 2022
    Location
    Tampa, FL
    Posts
    790
    Post Thanks / Like


    Now write all that good data down somewhere you can reference and compare to the cam card (like right on the cam card)


    Now repeat that process on the other lifter:


  2. Likes WIS89 liked this post
  3. #42
    Senior Member MB750's Avatar
    Join Date
    Feb 2022
    Location
    Tampa, FL
    Posts
    790
    Post Thanks / Like
    Back to the cam card with more data, now you can do some math too


    As you can see, everything is about 3 degrees advanced. This makes sense because the cam card says this cam is 3 degrees advanced.

    There's a neat trick to move the torque curve around in an engine where if you advance the cam you move the powerband earlier, and consequently retard the timing makes it later (or higher up the rev range). This being a 306ci I'm not expecting stump-pulling torque, but I'd prefer as much bottom end and midrange in this engine as it can make so I'm going to advance the cam a bit more since my timing chain set allows it.

    That circle mark over the keyway means this set is "straight up". Rotating it to the triangle mark indicates a 4 degree advance.


    And rechecking everything leads to this:


    Good to go. As you can see I also confirmed my duration measurements to the cam card. This was just a double-check to make sure my math was clean.
    Last edited by MB750; 04-13-2022 at 03:41 PM.

  4. #43
    Senior Member MB750's Avatar
    Join Date
    Feb 2022
    Location
    Tampa, FL
    Posts
    790
    Post Thanks / Like
    The most important value in all those measurements is the intake close event and where it lands after bottom dead center. If you think about the dynamics of an IC engine (internal combustion), as the piston sweeps past BDC during the intake stroke there's a certain kinetic energy in the intake charge that keeps flowing into the cylinder even as the piston starts its path back up on the compression stroke. If the intake cam stays open long after BDC some of that charge may end up being shoved out the intake valve. What also happens with a later intake close event is the dynamic compression ratio drops.

    ***Quick segue here: Compression ratio is measured statically (which is all the measurements you're typically familiar with), as well as dynamically (as in when the engine is spinning under use). In order to calculate a dynamic compression ratio you need everything for a static CR measurements, as well as the rod length and the intake close timing event.

    As the piston heads back up after BDC to start the compression stroke, the dynamic compression is measured by knowing how far up the piston is from BDC and only uses that remaining cylinder volume in the calculation. The point of this allows much more aggressive cams that are better matched to your static CR.

    For instance, if you have a typical 306 (just like mine) at 10:1 CR, if you do the math for dynamic CR it comes out 8.6:1. If I were to move my cam back to straight up the DCR would move to 8.47:1 but SCR stays at 10:1.

    Some theoritical engine with a 12:1 SCR could easily run pump gas if you closed the intake valve at 65 degrees ABDC because that would put the DCR at a manageable 8.35:1.

    What this basically means for performance is that the earlier you close your intake valve the harder your starter is going to work, the more sensitive your engine will be to pinging, and the more snappy the engine will be in the lower rev ranges. I'm only doing this because I want a lower-heavy powerband out of my engine. I will have to be cautious of the piston to intake valve clearance, but I'll cross that bridge later. If I end up with the pings (even using 93 octane) I'll have the option to move the cam back to straight up, or even retard it 4 degrees. I can even put a thicker head gasket in to lower my SCR, but then I'll lose my quench which I'm not interested in doing, but if I have to I will. The whole point of a tight quench is to increase combustion chamber turbulence to prevent pre-ignition (pings).

    Back in my days of Harley engine building the rule of thumb was to keep DCR less than 9:1. That meant you could usually tune out detonation using the typical tricks without having to resort to very high octane race fuel, and the garbage Harley starters had a snowball's chance in Haiti of being able to crank the engine over without needing compression releases.
    Last edited by MB750; 04-13-2022 at 03:44 PM.

  5. #44
    Senior Member MB750's Avatar
    Join Date
    Feb 2022
    Location
    Tampa, FL
    Posts
    790
    Post Thanks / Like
    Haven't updated in a while, been saving up for these:


    Like a glove...


    Well, good thing I'm not in California. I'm surprised they don't put them labels on bottles of water out there:


    I also got some checker springs for checking valve to piston clearance, and a new timing tape:


    Next up will be checking clearances and torquing them down. I haven't bought pushrods yet because I'm optimistic I'll get away with my OEM ones. If not I'll sacrifice a couple of them by converting two into adjustable ones so I'll know exactly what length I'll need to buy.

  6. #45
    Senior Member MB750's Avatar
    Join Date
    Feb 2022
    Location
    Tampa, FL
    Posts
    790
    Post Thanks / Like
    Since it was obvious my OEM pushrods were too short I sacrificed two of them by making some adjustable checker pushrods. No biggie, just drill, tap, and install some longer screws that fit:


    Silly putty in the valve pockets for checking clearance:


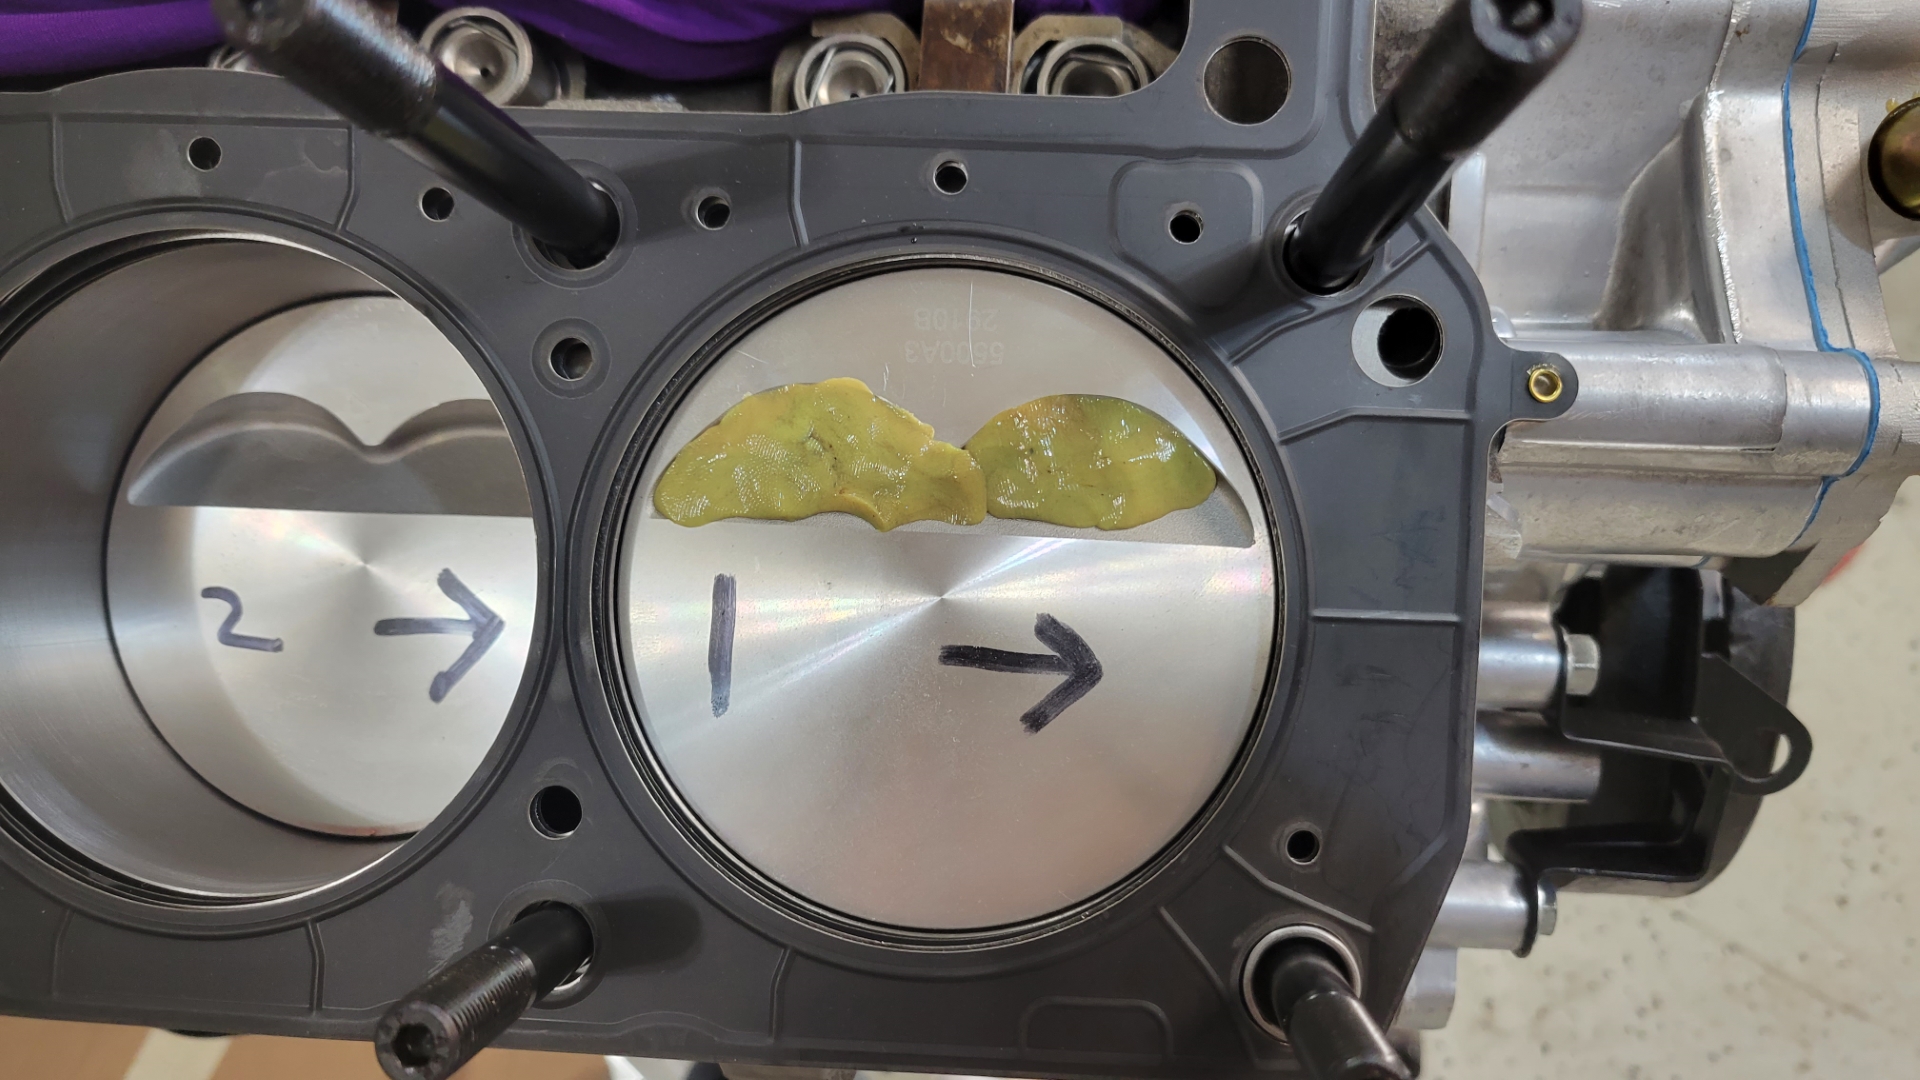
    And remember that since the lifters are brand new and never been pumped up they will collapse immediately under any spring pressure. No, soaking them in oil for a week doesn't pump them up, I've tried. The only thing that pumps them up is being under pressure. I just collapse them all the way and do all my checks like they were solid lifters, then at the end figure out the travel, back that number out, and then I go buy pushrods.

    Collapsing them for checking:


    As you can see, the roller is not centered on the valve tip.


    What's needed is to know the roller sweep during actuation. This is easy using a Sharpee. Just marker up the valve tip and spin the engine over.

    As you can see, not good enough:


    But on the plus side, I've got a country mile of valve clearance:


  7. #46
    Senior Member MB750's Avatar
    Join Date
    Feb 2022
    Location
    Tampa, FL
    Posts
    790
    Post Thanks / Like
    Since I've got the checker springs I wanted to try them. First, pull the valve springs using my trusty home-made valve spring compressor and pop in the checkers:


    Now I can literally push the valve down with my fingers. A double-check for valve clearance at this point is to put the piston at 10 degrees plus and minus around TDC and physically push the valve down. 10 degrees BTDC is for the exhaust valve, and 10 degrees ATDC is for the intake. As you can visually see, there's TONS more clearance than the recommended minimum of .080" (and .100" for the exhaust):


    Also, after some fiddling around with pushrod length I got my roller sweep perfect!


    And take a measurement:


    BUT, remember, those lifters are 100% collapsed. I put my dial gauge on the pushrod side of the rocker and actuated it up and down. These lifters have .115" of takeup, so subtracting that from the pushrod length I measured means I'll need to buy 6.400" pushrods. During the install I'll be preloading the pushrods 3/4 turn on the stud. Since the studs are 24tpi that means I'll have around .030" preload on each lifter.

  8. #47
    BadAsp427's Avatar
    Join Date
    Jul 2018
    Location
    Greeneville, TN
    Posts
    1,177
    Post Thanks / Like
    It's all looking fantastic... Nice work...
    Last edited by BadAsp427; 05-26-2022 at 02:54 PM.

    Mk4 20th Anniversary #8690 (#8 of 20) Purchased 8/18/18----Build Started 8/19/18
    Build Thread Click Here / Registry Entry Click Here / BluePrint Engines 347ci / TKO600
    Carb/Heater/Heated Seats/Cruise Control/Drop Trunk & Battery/Custom Cubby

  9. Thanks MB750 thanked for this post
  10. #48
    Senior Member MB750's Avatar
    Join Date
    Feb 2022
    Location
    Tampa, FL
    Posts
    790
    Post Thanks / Like
    Quote Originally Posted by BadAsp427 View Post
    It's all looing fantastic... Nice work...
    Thank you. I think the worst part is I'm about a year away from firing it up, at the earliest. Depends on how fast I can get the Roadster up and rolling.

  11. #49
    Senior Member MB750's Avatar
    Join Date
    Feb 2022
    Location
    Tampa, FL
    Posts
    790
    Post Thanks / Like
    Getting this engine build back on the rails. First thing's first, cool down my garage:


    Clean the crap out of the threads from the block cleaning


    Thread sealant on the lower studs


    .030" Cometic head gaskets:


    And torque em' down.

    Last edited by MB750; 08-06-2022 at 07:47 PM.

  12. #50
    Senior Member MB750's Avatar
    Join Date
    Feb 2022
    Location
    Tampa, FL
    Posts
    790
    Post Thanks / Like
    And after I got them both torqued down I had a gut feeling I didn't double-check something. Gold star or free beer to whoever can call out my snafu:


    On to the rockers. Can't just slap them on though. The alignment plates need to be welded after alignment is checked to keep the rockers centered:


    Gotta use a TIG tho, no mess.


    Now they will never fall out of alignment:

    Last edited by MB750; 08-06-2022 at 07:56 PM.

  13. #51
    Senior Member MB750's Avatar
    Join Date
    Feb 2022
    Location
    Tampa, FL
    Posts
    790
    Post Thanks / Like
    And repeat seven more times:


    I gave the engine a few spins to watch the symphony.

    I also picked up a high contrast timing tape


    And I installed the oil pan studs


    That's enough for one day.

  14. #52
    Junior Member
    Join Date
    Oct 2020
    Posts
    6
    Post Thanks / Like
    I hope you flipped the head gasket

  15. Likes speedfreak1211, MB750 liked this post
  16. #53
    Senior Member MB750's Avatar
    Join Date
    Feb 2022
    Location
    Tampa, FL
    Posts
    790
    Post Thanks / Like
    Quote Originally Posted by rustyrim View Post
    I hope you flipped the head gasket

  17. Likes rustyrim liked this post
  18. #54
    Senior Member Blitzboy54's Avatar
    Join Date
    Oct 2020
    Location
    Albany, NY
    Posts
    1,178
    Post Thanks / Like
    I'm really enjoying watching this engine build. Good stuff
    MK4 #10008 - Ordered 10/06/20, Delivered 03/03/21, First Start 7/22/21, First Go Kart 7/24/21
    Paint by Metal Morphous 5/14/22, Legally registered 6/8/22, Graduated 7/20/22
    Build Thread https://thefactoryfiveforum.com/show...been-delivered
    Complete Kit, Ford 306, Sniper/Dual Sync, T5, Hydraulic clutch

  19. Thanks MB750 thanked for this post
  20. #55
    Senior Member MB750's Avatar
    Join Date
    Feb 2022
    Location
    Tampa, FL
    Posts
    790
    Post Thanks / Like
    Today I'm gonna get the oil pan in better condition, starting with welding a bulkhead above the oil line for a turbo drain. Just in case.....

    Poke a hole (between the oil pan studs...), mock it up, looks good:


    Bust out the big guns


    Not stacked dimes but it'll hold oil.


  21. #56
    Senior Member MB750's Avatar
    Join Date
    Feb 2022
    Location
    Tampa, FL
    Posts
    790
    Post Thanks / Like
    Also need to weld a plate over the low oil sensor bung


    My way of getting a round piece of steel:


    I also noticed a weird looking thing in the inside of the pan close to the drain hole. Looks like it may be cracked a bit, so I worked it some with a hammer and rounded punch:


    Yup, drop a TIG bead over that too.

    Next up, strip the garbage paint off the pan for a new coat. I'm also gonna run to Napa today for some new drain plugs. I want them ones with the built-in rubber sealing washer.
    Last edited by MB750; 08-07-2022 at 09:43 AM.

  22. #57
    Senior Member MB750's Avatar
    Join Date
    Feb 2022
    Location
    Tampa, FL
    Posts
    790
    Post Thanks / Like
    Cleaned up and painted the oil pan


    Banged out the raspberries best I could. I'll run it.

  23. Likes toadster liked this post
  24. #58
    Senior Member
    Join Date
    Aug 2014
    Location
    Northern Virginia
    Posts
    212
    Post Thanks / Like
    Awesome work, I love your thread.

    I want to point out that the drain plug in the rear of the pan will hang down below the frame rails. I have the same pan in my car (although unmodified), and plan to switch it for a 7" deep pan this winter. I figure it would be easier to consider this now rather than later. I hope this helps, not trying to be critical.
    FFR MKIV 8309, FMS 306 Crate w/Edelbrock EFI, T5, 3.55 Three Link, Wilwood Brakes

  25. Thanks MB750 thanked for this post
  26. #59
    Senior Member MB750's Avatar
    Join Date
    Feb 2022
    Location
    Tampa, FL
    Posts
    790
    Post Thanks / Like
    Quote Originally Posted by Chopper View Post
    Awesome work, I love your thread.

    I want to point out that the drain plug in the rear of the pan will hang down below the frame rails. I have the same pan in my car (although unmodified), and plan to switch it for a 7" deep pan this winter. I figure it would be easier to consider this now rather than later. I hope this helps, not trying to be critical.
    Thank you, I appreciate any and all feedback. Everything I'm doing here is based on a collection of historical knowledge, and some Youtube videos, so this build is totally receptive to outside feedback because sometimes other people have a better idea how to do something than I've got planned.

    Case in point, I did not know this pan's sump went below the frame rails. Once I get everything installed and moving I'll be mindful of this potential issue, but more importantly take measurements so I can modify this pan to fit better (and hold a bit more oil). I'm not a fan of the front sump anyway so a drain to the rear sump will be incorporated into the design so there's only one outlet.

  27. #60
    Not a waxer Jeff Kleiner's Avatar
    Join Date
    Feb 2011
    Location
    Bloomington, Indiana
    Posts
    8,094
    Post Thanks / Like
    Quote Originally Posted by MB750 View Post
    Also need to weld a plate over the low oil sensor bung


    Should have asked us before doing that! It's a great place to put the oil temperature sensor.


    Jeff

  28. #61
    Senior Member MB750's Avatar
    Join Date
    Feb 2022
    Location
    Tampa, FL
    Posts
    790
    Post Thanks / Like
    Quote Originally Posted by Jeff Kleiner View Post
    Should have asked us before doing that! It's a great place to put the oil temperature sensor.


    Jeff
    Ah, shucks. Initially my AEM Wideband gauge will be installed where the oil temp gauge hole is. Oh well, I could just weld a bung onto that plate when I go with an oil temp meter in the future, or put the sensor in the remote oil filter lines. That oil pan bung is a clean location though.

  29. #62
    Senior Member MB750's Avatar
    Join Date
    Feb 2022
    Location
    Tampa, FL
    Posts
    790
    Post Thanks / Like
    Got the pan installed tonight, and it was quite a PITA using those ARP studs. I had to oversize every oil pan hole just to get a decent lineup, and bend those metal bars a bit for the same reason. One hole I even needed to bust out the die grinder to oblong the hole. Lemme say, I do NOT envy whoever has to remove that oil pan.


    I think this weekend I'm gonna start the paint process on the block.

  30. #63
    Senior Member MB750's Avatar
    Join Date
    Feb 2022
    Location
    Tampa, FL
    Posts
    790
    Post Thanks / Like
    That went ok. Next time I'll paint the block BEFORE I BOLT EVERYTHING ONTO IT!!!


  31. Likes Chopper liked this post
  32. #64
    Senior Member MB750's Avatar
    Join Date
    Feb 2022
    Location
    Tampa, FL
    Posts
    790
    Post Thanks / Like
    Tried fitting the Edelbrock Performer RPM intake manifold yesterday. Looks like I'm gonna need more RTV and thicker gaskets...


    Damn stacked tolerances.


    Looks like a 3/8" roughing mill will make quick work of that issue. ALL the studs were off like this. Oh well, good thing I have a mill.

  33. #65
    Senior Member
    Join Date
    Mar 2011
    Location
    Heart of Dixie, Alabama
    Posts
    1,857
    Post Thanks / Like
    Very nice work. After elongating the holes, you will be able to see if you need any port matching. Would not want to let this get overlooked.
    Those shoulders on the upper edge of the AFR heads look like a close fit on the intake also. Maybe you will be lucky and the intake will clear.
    More pics!
    20th Anniversary Mk IV, A50XS Coyote, TKO 600, Trunk Drop Box, Trunk Battery Box, Cubby Hole, Seat Heaters, Radiator hanger and shroud.

  34. Thanks MB750 thanked for this post
  35. #66
    Senior Member John Ibele's Avatar
    Join Date
    Sep 2011
    Location
    Minneapolis, MN
    Posts
    719
    Post Thanks / Like
    Quote Originally Posted by MB750 View Post
    ... Looks like I'm gonna need more RTV and thicker gaskets...
    There's a seriously dry sense of humor at work ... I'm kinda parched now.

    Super fun following your engine build. You've got an enviable set of skills, knowledge and tools on tap. Thanks for sharing.
    MK4 #7838: IRS 3.55 TrueTrac T5z Dart 347
    The drawing is from ~7th grade, mid-1970s
    Meandering, leisurely build thread is here

  36. Thanks MB750 thanked for this post
    Likes 460.465USMC liked this post
  37. #67
    Senior Member MB750's Avatar
    Join Date
    Feb 2022
    Location
    Tampa, FL
    Posts
    790
    Post Thanks / Like
    After slight milling of the holes:


    Clean with acetone and RTV the china rails:


    Proud engine, just about done:


    Test the thermostat, for funzies. Don't worry, no wives were pissed at this process. That's my oatmeal pan:


  38. #68
    Senior Member Fman's Avatar
    Join Date
    Jan 2020
    Location
    State of Jefferson
    Posts
    1,281
    Post Thanks / Like
    I really enjoy following your build. One thing you might want to double check is your oil pan depth, 7" deep is really the safe bet to make sure it will not be below the frame. Ask me how I know, Started with a Canton 8" and ended up with a Champ 7".
    Build #9818 completed 04/2021 - Dart SBF 427, PF4 EFI, TKO600 Build thread: https://thefactoryfiveforum.com/show...utton-head-mod
    Build review video:https://www.youtube.com/watch?v=k6IAbo2sFt4&t=1111s My finished car: https://thefactoryfiveforum.com/atta...7&d=1638415131

  39. Thanks MB750 thanked for this post
  40. #69
    Senior Member MB750's Avatar
    Join Date
    Feb 2022
    Location
    Tampa, FL
    Posts
    790
    Post Thanks / Like
    Quote Originally Posted by Fman View Post
    I really enjoy following your build. One thing you might want to double check is your oil pan depth, 7" deep is really the safe bet to make sure it will not be below the frame. Ask me how I know, Started with a Canton 8" and ended up with a Champ 7".
    Thanks for the tip. I'm almost positive it'll be too deep. Someone already suggested this OEM SN-95 pan might be too deep but I don't want to stop the music just yet. I'd like to get everything installed and functional, then I'll take some measurements and do some modifying accordingly.

    And keep my fingers crossed the first few thousand miles don't ground out. I plan on making the ride height a bit on the high side, depending on how it looks. I like how I can adjust that however I'd like.

  41. #70
    Senior Member MB750's Avatar
    Join Date
    Feb 2022
    Location
    Tampa, FL
    Posts
    790
    Post Thanks / Like
    I made an "engine buck" today. This way I can roll it around and even try starting it. Just some of those cheap engine stand pieces from Amazon, couple of Harbor Freight castors, and some lumber I pilfered from a construction site in my neighborhood. (Hey, it was leaning up against a dumpster... )


    And there's enough room in the back to bolt up the bellhousing, clutch, trans, etc...

  42. #71
    Senior Member John Ibele's Avatar
    Join Date
    Sep 2011
    Location
    Minneapolis, MN
    Posts
    719
    Post Thanks / Like
    Nice. You can return all that RTV and thicker gasket material now ...
    MK4 #7838: IRS 3.55 TrueTrac T5z Dart 347
    The drawing is from ~7th grade, mid-1970s
    Meandering, leisurely build thread is here

  43. Likes MB750 liked this post
  44. #72
    Senior Member MB750's Avatar
    Join Date
    Feb 2022
    Location
    Tampa, FL
    Posts
    790
    Post Thanks / Like
    I'm going to keep this thread updated, but I'm also going to be taking videos for the short attention span types out there:


    The running trend for these videos will be summations of this thread. This thread will incorporate the details, the videos will be quick. The key is "short attention span". None of these 20 min videos with tons of red herrings all over. Straight to the key facts for the ADD/OCD viewers.
    Last edited by MB750; 09-08-2022 at 02:26 PM. Reason: Vid link

  45. Thanks MPTech thanked for this post
  46. #73
    Senior Member MB750's Avatar
    Join Date
    Feb 2022
    Location
    Tampa, FL
    Posts
    790
    Post Thanks / Like
    The water pump on this build is slightly different than the one I tore off. This engine came from a 95 Mustang, but somehow there was a Fox Body accessory drive and water pump on it. I replaced it with a 94+ water pump, but now the pulleys aren't perfect. Time to modify it, here's the water pump flange:


    Center it in the mill:


    Boring bar going to town (slooooooooowwwwwwwwwwly):


    Like a glove:


    But now my crank pulley don't line up:


    From my research, the SN-95 Mustang went with an electronic radiator fan, whereas the Fox Body has mechanical drive directly off the water pump. No biggie, I've found underdrive pulleys for the SN-95 all day long on the internet for about $75.

  47. Likes Fman liked this post
  48. #74
    Senior Member MB750's Avatar
    Join Date
    Feb 2022
    Location
    Tampa, FL
    Posts
    790
    Post Thanks / Like
    I also didn't cover this with pics, but I fixed how the oil pan mounts. Apparently the new timing cover wasn't perfectly exactly a replication of the OEM part because the two front oil pan bolts were juuuuuuuuuuuuuuuust a smidge angled off, which put the ends of the studs pointing away from the rest, which made installation of the oil pan and keeper rails a PITA. So I got out the die grinder and cleaned those two holes up. Now the oil pan slips on and off like buttah.

    I also double-nutted the oil pan studs and used red loctite. They're studs, they ain't coming out any time soon.

  49. #75
    Senior Member MB750's Avatar
    Join Date
    Feb 2022
    Location
    Tampa, FL
    Posts
    790
    Post Thanks / Like
    Bench testing the 3G alternator that came out of the Mustang:

    Edit: 6G alternator, not a 3G.

    Last edited by MB750; 09-25-2022 at 06:27 PM.

  50. #76
    Senior Member MB750's Avatar
    Join Date
    Feb 2022
    Location
    Tampa, FL
    Posts
    790
    Post Thanks / Like
    Is there a reason my youtube videos are shown but not playing? I just get the spinning circle, it never starts. I can click on the Youtube link in the bottom right to go to youtube to watch it but it never plays from this thread.

  51. #77
    Senior Member John Ibele's Avatar
    Join Date
    Sep 2011
    Location
    Minneapolis, MN
    Posts
    719
    Post Thanks / Like
    Not sure if there was a time lag from when you loaded, but both worked for me by hitting the play arrow, and didn’t take me anywhere else. I think you’re good.
    MK4 #7838: IRS 3.55 TrueTrac T5z Dart 347
    The drawing is from ~7th grade, mid-1970s
    Meandering, leisurely build thread is here

  52. Thanks MB750 thanked for this post
  53. #78
    Senior Member MB750's Avatar
    Join Date
    Feb 2022
    Location
    Tampa, FL
    Posts
    790
    Post Thanks / Like
    Quote Originally Posted by John Ibele View Post
    Not sure if there was a time lag from when you loaded, but both worked for me by hitting the play arrow, and didn’t take me anywhere else. I think you’re good.
    Thanks man. The problem is on my end for some reason. I use Firefox, but when I open this thread in Edge (and don't log into my FFR Forum account) the videos play just fine.

  54. Likes John Ibele liked this post
  55. #79
    Senior Member MB750's Avatar
    Join Date
    Feb 2022
    Location
    Tampa, FL
    Posts
    790
    Post Thanks / Like
    Plugging along on the engine. Dealing with Ian right now so my garage is very full of stuff

    HEI distributor, reused the 6G alternator and made a custom lower mount for it:


    Just a 1.5" long aluminum spacer was enough to keep the back of the alternator about 1/4" away from the head. I'll have to fabricate something for the top mount. Maybe some type of mount that takes the hole around the side of the alternator so I can use some heim joints to tension the belt.


    And look at that alignment now...


  56. #80
    Senior Member MB750's Avatar
    Join Date
    Feb 2022
    Location
    Tampa, FL
    Posts
    790
    Post Thanks / Like
    Since nobody makes an alternator bracket for my application, I made one myself:


    I'll paint it black later.

Page 2 of 9 FirstFirst 1234 ... LastLast

Posting Permissions

  • You may not post new threads
  • You may not post replies
  • You may not post attachments
  • You may not edit your posts
  •  

Breeze

Visit our community sponsor