-
I'd be curious to know how many folks are installing an adjuster knob who are not planning track time.
For those just planning to drive on roads, the adjustment knob is certainly a convenient way to literally "dial in your brakes" (as opposed to fishing around in a crowded foot box)
Totally agree with your comments Dave, and thanx for the link.
Trail breaking is a skill I practiced at the track on motorcycles. Of course a balance bar is not in play there. And the lessons can get pretty rough if one grabs too much of a front brake (for example)
I need to find a skid pad !!
-
Post Thanks / Like - 0 Thanks, 1 Likes
-

Originally Posted by
rhk118

Yes, looking at the car there is a brace there on the PS but it might not get in the way once the cable is attached to the bar, worst case is a little will need to be ground away/trimmed to fit it. Gordon's location certainly is the most direct. Looks like in the link Chopper sent above he was able to get that 90 degree adapter fitted no problem. Ordered one and will play around with it. Also considering using that lock nut to prevent myself from overly rear-biasing the brakes with the knob....one more thing to put on the "list" of preferences

Lock nut on the balance bar itself, like a travel limiter? Interesting idea !
-
Post Thanks / Like - 0 Thanks, 1 Likes
-
Senior Member

Originally Posted by
Dave Tabor
post #9 in this thread may also be helpful:
https://thefactoryfiveforum.com/show...in-Gen-3-Coupe
I tweak brake bias quite a bit- at the track- especially under trail-braking (braking around to the corner apex before rolling on the throttle) if the back end starts to come around too much- you want it to come around somewhat - sort of the complement to oversteer under throttle. Also good to be able to adjust at autocross events where the pads/tires are not fully heated- or if you are playing around with brake pad choices.
Dave
Gen III #17
That is a great read Dave, thank you. Appreciate your pictures in there as well coming off the right side of the balance bar and into the engine compartment. This is also what Gordon Levy suggests. I had the worry as well that the size of the hole you bring the bias adjuster cable through could potentially interfere with the leveraging of the balance bar and hence your actual brake balance -- glad you brought up that detail as well...Then reading Logan's post he did what I am thinking of doing and shortened the balance bar to make room for the 90 degree tilton adapter (just arrived yesterday, it is a solid, quality piece...just not sure destined for my car yet).
Imagine you are not having issues with biasing with your setup?
Unrelated question Dave - for your track days and Auto-X what do they require for seats/# of points on belts? I really like Paul's Corbeau seats but you can only use 4-points...I will never be racing this in competition, just Auto-X and track days...
Originally Posted by
LateApex
Lock nut on the balance bar itself, like a travel limiter? Interesting idea !
Yes, exactly that Bob, so if I lose track of turns on that knob I'm not accidentally setting myself to 70% rear bias for example. But reading that thread Dave posted looks like there should be a locknut at the end of where your cable attaches to the balance bar as well so it doesn't spin itself loose over time.
This is all great discussion! I realize we are all reinventing the wheel and many others have been here before but appreciate it guys!
Last edited by rhk118; 09-23-2022 at 11:47 AM.
-
Senior Member
tl;dr...Have a second person available when mounting the differential...
Got the differential hung today. Recommend use of a friend, this was a bit of a wrestling match as the mounting points on my chassis didn't line up completely with the differential...close but not close enough for it to just "go in". The first bolt obviously was easiest, then the remaining 3 were just a couple mm off (all in different directions) relative to the bushing sleeves requiring the use of pry bars, pry 2x4 between the diff and the frame, prying it over then using ratchet straps to hold the differential in place, and for the final bolt (passenger side front) had to grind down the tip of the bolt to a taper so it would bridge the gap between the drilled hole and the lining sleeve. Thought about overdrilling the 5/8" mounting holes on the front of the diff, but with tapering the nose of the mounting bolt with a piece of wood between frame and the mounting sleeve (to prevent the mounting sleeve from pushing out of the bushings when trying to get the bolt though, even when tapered), while simultaneously using my entire weight on a prybar, the last bolt went in. The last 2 bolts (the fronts) did push the bushings on the front side out 1/2 way, but tightening and torquing the flanged nut "pulled" them back in. Regardless, mission accomplished, just didn't expect that and needed the second person.
One ratchet strap holding the frame to the lift, the other pulling the front of the diff towards the drivers side:


Last edited by rhk118; 09-24-2022 at 09:21 PM.
-
Post Thanks / Like - 0 Thanks, 1 Likes
-
Senior Member
Work, kids sports, life….been a few weeks since last update. Front suspension and IRS installed with brakes, and the fuel lines run. Was waiting on deformed thread flanged nuts for all the IRS components from Factory Five, so ended up getting them from McMaster thinking I’d move quicker…nope…before I got anything installed I received large washers and nylon locknuts as their replacement on my POL from Factory Five. I ended up using the ones from McMaster, just look cleaner. Then part way through installing the rear IRS knuckles figured out I had received 2 extra suspension locknuts rather than 2 other parts that link the upper control arm to the knuckle (I had counted the 2 extra parts as the ones I needed). As usual Factory Five had the parts on my stoop in a day. Off to pictures…
Rear hubs I had painted before pressing back in the studs, then painted the stud heads separately, this worked OK for the rears but created a problem on the fronts:
Rear:

Rear hub mounted to knuckle:

Front hub:

On the front hub you can see the splined portion of the studs supplied is longer than the thickness of the hub. I had used a bearing-based stud installer with an impact gun and that extra length of the splined portion of the stud got stuck in the bearing. Fun. Screwdrivers, prybars, hammers, and 1 broken stud installer later went with the washer/nut method, you can see the circles on the hub face from that. More fun was when trying to mount the rotors, the hat holes were also too small to fit over these wider sections (you can see in the picture of my spacer what I mean). Had to sand those things down and also Dremel out the powdercoat on the rotor hats to get them to sit flush over these things. Thought it was due to my paint, but there was actually too much metal there. Just in the front, no issue with the rears, studs there were the same diameter all the way to the hub face.

IRS coming together without knuckles fully installed:

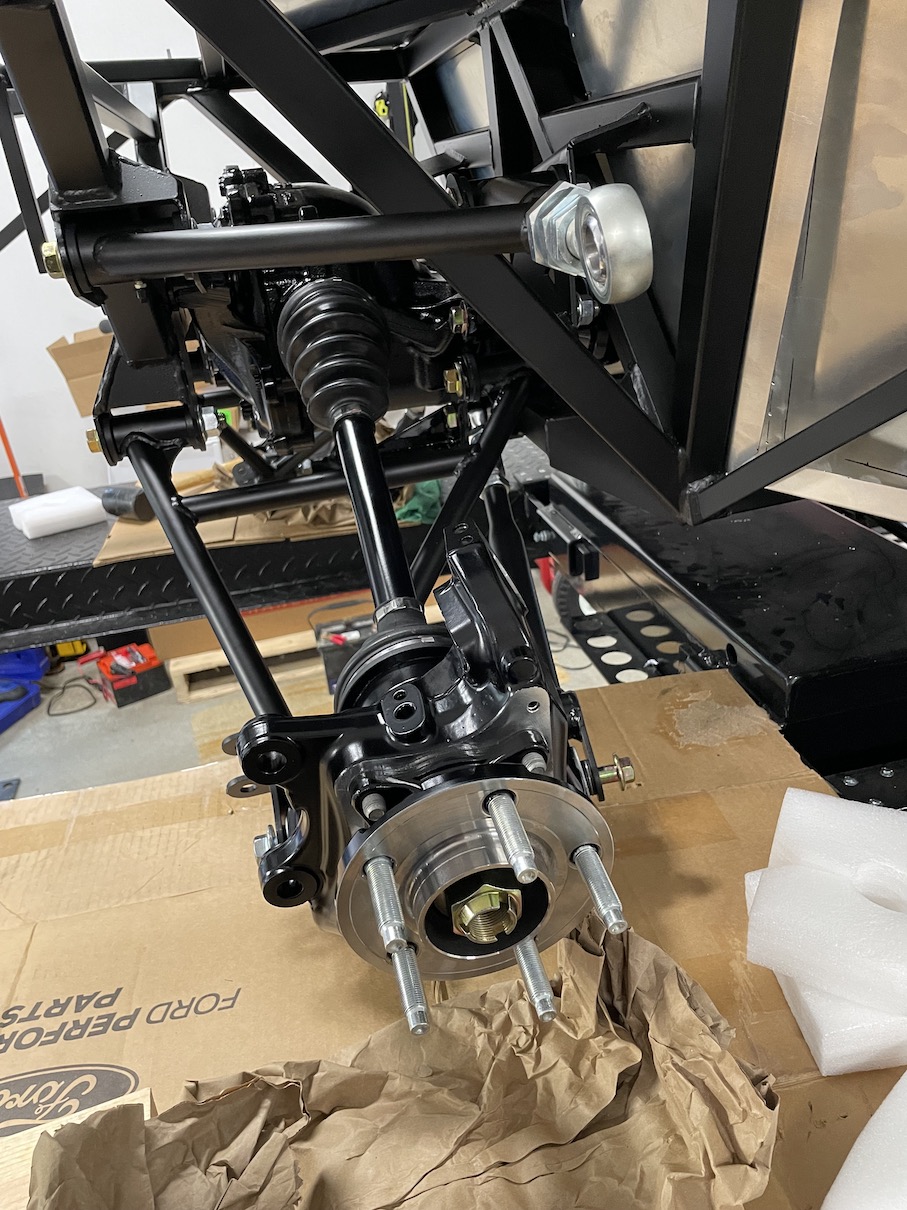
IRS with shocks and knuckles fully mounted:

-
Senior Member
-
Senior Member
-
Senior Member
-
Originally Posted by
rhk118
That is a great read Dave, thank you. Appreciate your pictures in there as well coming off the right side of the balance bar and into the engine compartment. This is also what Gordon Levy suggests.
Imagine you are not having issues with biasing with your setup?
Unrelated question Dave - for your track days and Auto-X what do they require for seats/# of points on belts? I really like Paul's Corbeau seats but you can only use 4-points...I will never be racing this in competition, just Auto-X and track days...
Hi Hank,
No issues with the balance bar nor the adjuster as I have it set up. I don't like having the cable routing hole into the engine compartment but I'm not running a high-pressure fuel system either.
For seats/belts I use Kirkey high-backs and Scroth Profi ASM harness with a sub-belt set up as a 6-point setup.
https://www.schrothracing.com/item/p...ia-4-point-asm
You can read about the ASM system at the link above - make your own conclusions about the need for a sub-belt but I do run a sub-belt (you just order a 6-point sub-belt from Scroth) - the buckle/release has an empty receptacle for it. One disadvantage of the ASM is that after one hit in an accident, that ASM belt will now be loose for any subsequent hit say as you cartwheel down the track.
Dave
Gen III #17
-
Post Thanks / Like - 1 Thanks, 1 Likes
-
Senior Member

Hank, on the rear shocks, turn the lowers ends so the adjusters point in, they will be easier to get to to adjust.
99/2000 NASA PSO Champion-2005 west coast FFR challenge series Champions
Sponsor Tony B's 2007 ST2 National Championship
2009 NASA TTC runner up-2010 NASA TTB runner up
-
Post Thanks / Like - 1 Thanks, 1 Likes
-
Senior Member
Haha! I thought about that momentarily then my "Attention Deficit OHHH SHINY" must have kicked in...easier to do now than once wheels mounted up and where'd the adjusters go? I love the heft of this brake kit and just how easy pad changes will be. Thanks Gordon.
Last edited by rhk118; 11-07-2022 at 09:49 PM.
-
Post Thanks / Like - 0 Thanks, 1 Likes
-
Senior Member
M1 Concourse - American Speed Festival 9/1/22-10/2/22
A friend and I flew from Maine to Pontiac Michigan in late September/Early October for the 2nd annual American Speed Festival at M1 Concourse which is a private track/garage condo setup but open to the public for this and similar events. If you're into cars at all (haha), and you can make it next year, was worth the trip.
More importantly they were celebrating 60 years of Shelby and I was able to swing the weekend off to go. Had a hunch there would be some coupes there, and man were they. 3 McCluskey Coupes (built from the original bucks and to the original spec of the first 6 even though they were all different), a couple Superformance coupes, and Paul and his FFR coupe were there on the Sunday as part of a local Shelby car club show. I got to meet Peter Brock and spent a couple minutes chatting with him on the Saturday, got to meet Paul who has been a tremendous resource for me and I'm sure most of us on here, and more importantly got to see Peter Brock stop his golf cart and hop out to run over to Paul's car, take pictures of it, then have Paul get out and chat for a while (theres a thread on that), what a great moment.
And then there were the cars. I took a lot of pictures of these things as there weren't many people around early in the morning. If there is some detail you'd like to see better on as close to an original as you can get, or Paul's car (thanks Paul), I'm happy to post. But here are a few. On Sunday Peter had a Q&A and question was asked about aerodynamics. You can see the Superformance has more of a "bubble" to the cockpit and apparently this was the original design (closest of the 4 cars in the first picture), 3-4 MPH faster down a long straight than the "flat-roofed" versions (similar to the FFR Type 65)....I won't be missing any of that speed. When they took the car to have it built in Italy, the Italians changed the roofline to the same line as the Ferrari GTOs as "thats what they knew how to build", hence the flat roof on 5 of the 6 originals. I personally think the "Italian roofline" looks better, but was a neat story.


Wow, just wow:

Finally Paul making the Ferrari Guys turn their heads!

Last edited by rhk118; 11-07-2022 at 10:39 PM.
-
Post Thanks / Like - 2 Thanks, 4 Likes
-
Senior Member
Brake and Fuel Lines Done.
FYI - 25 feet of Brake line is enough, 20 feet of fuel line is more than enough. I also flipped the rear shocks around so they are still mounted upside down, adjustment dials now point in toward the car.
Finished up fuel and brake lines yesterday. Used stainless for all as others have done. Fuel lines were fairly straightforward by making the copper 3/8 line templates then copying them. Not all perfect bends but they will get the job done and be relatively unseen but I know they will last and look great. The brake lines on the other hand were tedious – I think I averaged about 3 hours per line, but that included mocking up with the steel lines that came with the kit as well as drilling and tapping with the line mounts. The only stainless steel 3/16 line I could find was from summit. 3 out of 4 flares cracked, don’t think it was because of the brand I used, just the nature of the beast. I will say with 2 complete line do-overs, 25 feet of line was just enough. I'd also like to say that Gordon Levy's brake kit includes everything and all adapters needed to run the hard lines from the chassis to caliper. Thankfully no Banjo bolt snapping issues like many have had for me. I appreciate that I didn't need to search for and find all these adapters, and they were there with the brake kit!
For the brakes I started by mounting the brackets to the chassis where the hard lines meet the flex lines to the calipers so I knew where I was running the brake lines to. I tried multiple different locations with these and angles of them with a flex line installed to see which location would make the flex line bend out of the way of the shock and not interfere with where tires will eventually end up. In the end these locations were exactly where Paul mounted his, which meant making an opening in the front "engine bay" panels, but I'm happy with the locations. I Cleco'ed the brackets on and am going to have them powder coated with a bunch of other parts.
I only needed 5 lines, so 10 flares total...For each brake line run I would measure and leave myself an extra 2 inches or so, and for the first couple lines that wasn’t enough due to the number of cracked flares that had to be trimmed back leaving me short on a couple. So by the last line I was leaving 3-4 inches of excess based on my measurements and that seemed to do the trick. Even with a “gentle touch” with the 2nd flare would still get cracks, oh well, they are done for now provided no leaks!
Lines in the tunnel:
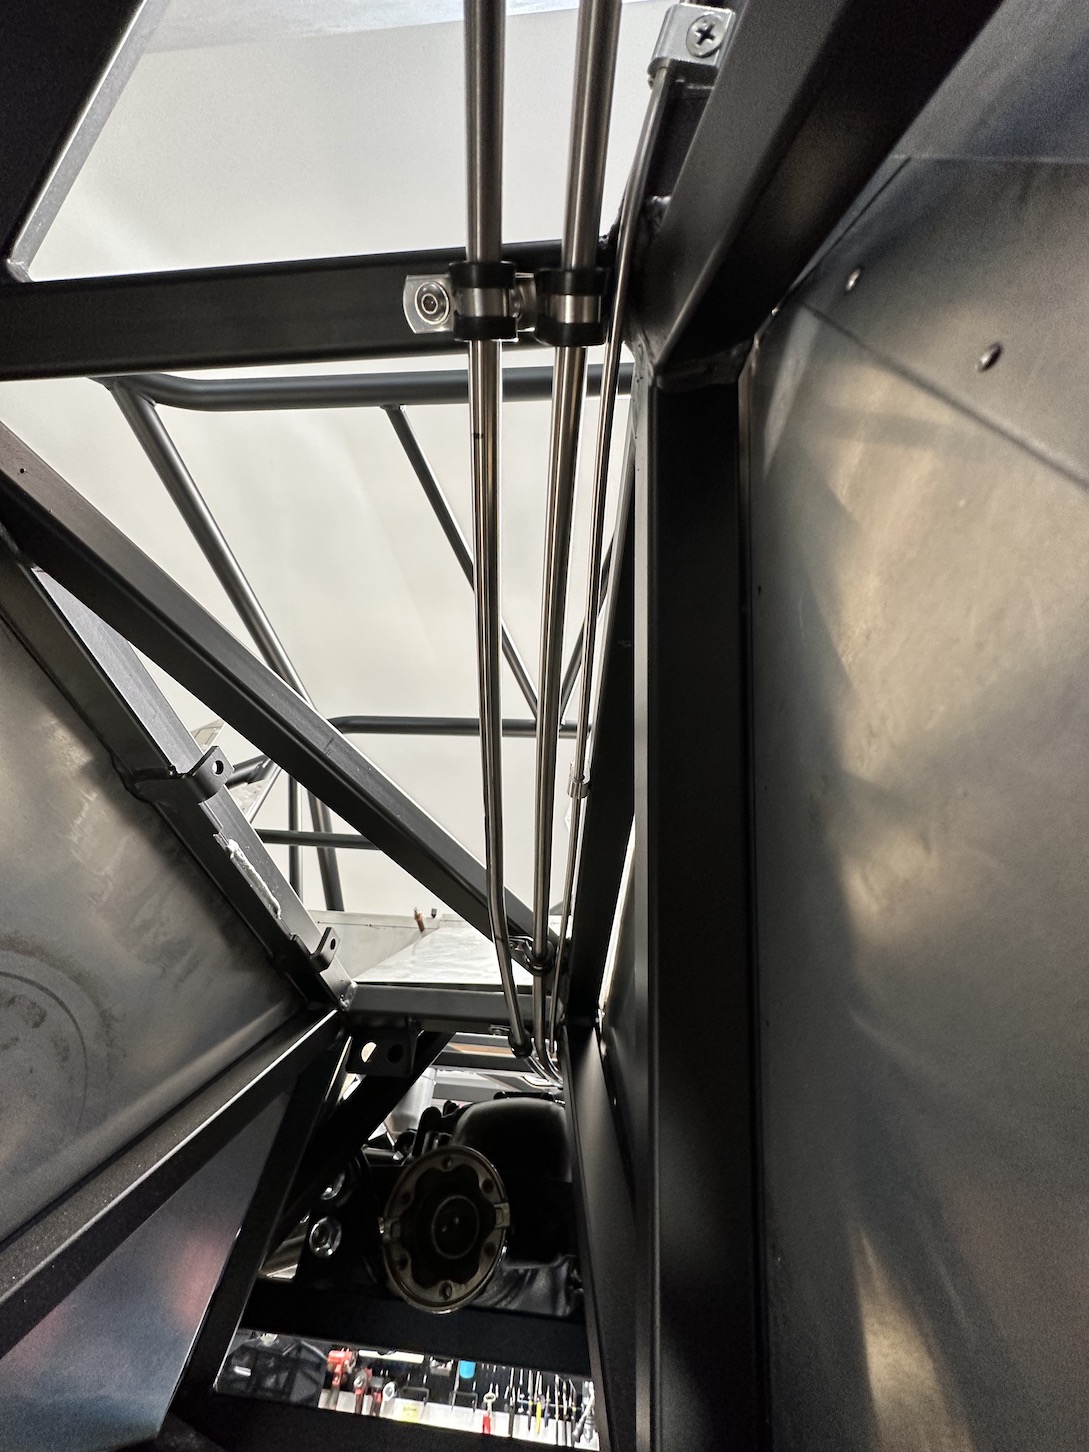

Front Brake Lines:


Rear Brake and Fuel lines:

I feel like after brake lines I’ve been in the trees, so it is cool to take a step back and just take the “forest” view in:

Last edited by rhk118; 11-26-2022 at 01:43 PM.
-
Senior Member
Had a question on where I mounted the hard to flex line brackets for all 4 corners. I ended up determining that Paul (EdwardB)'s locations were pretty good and he has several photos in his thread. Here are a couple that I have. The first picture is the rear with the adapter and flex line I used to approximate how the flex line will bend so I could make a convexity away from the shock at each corner.
Rear:

Front:

-
Looking good Hank! Excellent job!
-
Post Thanks / Like - 1 Thanks, 0 Likes
-
Senior Member
Swaybar question
Installed my front and rear swaybars today....rear is finished, front is mounted but not hooked up as missing a couple of the rod ends. Had all the parts for the rear so installed that, not difficult (remember if you're going to go with swaybars to install the longer bolts that come with the swaybar kit for the lower portion of the rear lower control arm, the inner rear toe arm mount, and up front the lower mount for the shock to save yourself a step of having to remove them later).
I know the rear swaybar can be controversial and will be a trial and error sort of thing but have it and mounted it for now, softest setting, but Im also running softer springs than stock (me 350#, stock 400#) which should hopefully help with compliance in weight transfer (with other option being stiff springs and no bar).
Question - I mounted the rear bar in the softest setting (furthest hole out). Because of the angle the bar is very close to contacting the lower control arm and just wondering if this looks correct? I know the car is in the air currently and nothing is compressed in the suspension, but when it does it seems this will just collapse in and the bar will be contacting the LCA....appreciate any input on this, it just looks wonky to me.


Last edited by rhk118; 12-05-2022 at 08:50 PM.
-
I have mine mounted on the car but I have not tightened anything down yet. I am in the second hole for now. Figured I would do final adjustment when car is on the ground and fully loaded. As you said both my front and rear look "wonky" with the car on jack stands.
-
Post Thanks / Like - 1 Thanks, 0 Likes
-
Senior Member
Originally Posted by
Namrups
Hank, When you get to the brake bias adjuster please post a lot of pictures. I can not for the life of me figure out how that is installed in the coupe. It has stumped a couple of others also. Good luck and I hope you figure it out.
Hey Scott, was just going through my list and going to be a while before I get to the brake bias adjuster. Reason being is need to mount my electric steering motor behind the dash and this will by necessity be partially in the footbox, which may change where I can mount the actual adjuster knob and how I route the cable. Haven't forgotten about all the pics though!
-
Post Thanks / Like - 1 Thanks, 1 Likes
-
Senior Member
Getting there

-
11-30-2022, 09:09 PM
#100
Originally Posted by
rhk118
Getting there
Sweet!
-
Post Thanks / Like - 1 Thanks, 0 Likes
-
11-30-2022, 09:55 PM
#101
Looks nice. I can’t make out the brand of oil pan that is. Would you share that please. Also curious to see what the depth is from the pan rail to the bottom of the pan. What is the estimated horse power?
-
Post Thanks / Like - 1 Thanks, 0 Likes
-
12-01-2022, 06:18 PM
#102
Senior Member
Originally Posted by
Blueblood
Looks nice. I can’t make out the brand of oil pan that is. Would you share that please. Also curious to see what the depth is from the pan rail to the bottom of the pan. What is the estimated horse power?
That is a rear sump Champ pan. Bought from Mike Forte. The engine is at a builder local to me so can’t get the measurement quickly although Mike says it will fit and is a part he stocks so I believe him. I dropped a 1974 302 block off at the builder in November 2021 (on my first page) and due to parts shortages it has taken him that long to get to this point. He was unable to easily source a rear sump pan so I called Mike who had one on the shelf and there it is. Forged internals, roller rockers. I imagine it will end up around 450-ish??? Going on the dyno with regular carb in the near future then with the EFI intake.
Edit: I’m 99% sure it’s this Blueblood:
https://www.champpans.com/products/p/cp351fox/
Which means 8”…I’m not sure clearance to frame rails on the gen 3 with the FFR mounts, I know gen 2 was 7.5”…so maybe this will hang down a bit too far and need changing out…if anyone knows the measurement off the top of your head please chime in, I can’t find it easily with a search…they have another road race pan that’s 7” depth.
Last edited by rhk118; 12-01-2022 at 06:43 PM.
-
12-02-2022, 09:59 AM
#103
Thanks for the info. I used the lowered engine mounts from Gordon Levy so my pan has to be 7” it lessens the options for pans but improves the hood clearance. Right now I have a bored 302 with three deuces that clears the hood without issues but I am building a 400 Windsor that may have a taller intake which I hope will clear the hood. Sounds like the 450 power plant will keep you well entertained as long as you are gentle with your right foot. Hehe
-
Post Thanks / Like - 0 Thanks, 1 Likes
-
12-02-2022, 12:11 PM
#104
Senior Member
Originally Posted by
Blueblood
Thanks for the info. I used the lowered engine mounts from Gordon Levy so my pan has to be 7” it lessens the options for pans but improves the hood clearance. Right now I have a bored 302 with three deuces that clears the hood without issues but I am building a 400 Windsor that may have a taller intake which I hope will clear the hood. Sounds like the 450 power plant will keep you well entertained as long as you are gentle with your right foot. Hehe
Glad you chimed into my thread Blueblood! I have the lowered engine mounts from Gordon Levy as well, will have to see if I use them or the Factory Five mounts when it gets to that point. I like the idea lower center of gravity and more space for air to the stack with the lower mounts, but this car is pretty low to begin with! Might just change that oil pan out to a 7" now, so thanks for looking at my engine picture and bringing that up. When I bought that pan there were severe shortages and wait times, and Mike thankfully just had one.
I assume with the lower mounts you needed to customize your headers or use different ones for the 302 when you used the lowering mounts? If I use them sounds like I need a different oil pan.
My plan for the 450 HP is wide sticky tires and really small shoes that don't reach the gas pedal too well ")
Last edited by rhk118; 12-05-2022 at 09:01 PM.
-
12-02-2022, 07:17 PM
#105
Shorty headers bolted up perfectly and the supplied exhaust bends hooked up to the side pipes with no modifications needed. One of the items that went on without a glitch.
-
Post Thanks / Like - 0 Thanks, 1 Likes
-
12-02-2022, 08:21 PM
#106
Senior Member
Originally Posted by
Blueblood
One of the items that went on without a glitch.
 I have learned that of which you speak
-
12-15-2022, 06:05 PM
#107
Looks like you are making great progress Hank! That is a nice looking power plant!!
-
Post Thanks / Like - 1 Thanks, 0 Likes
-
12-15-2022, 09:35 PM
#108
Senior Member
Thanks! When I stand back the amount of stuff to do and keep track of on these is overwhelming. But then I look at all that has been done so far and it’s encouraging! Will be putting it down for a while with the holidays upon us and a nagging injury I need to mind.
-
12-16-2022, 02:32 PM
#109
Sorry to hear about the injury. The amount that goes into a build is overwhelming. I have been feeling that way, off and on. I talked to both Gordon Levy and Mike Forte this week and am in process of ordering from them - both of them were extremely helpful (as you had described) and I feel like "I am in good hands with them". I've made the decision to go with 17s rather than 18s - had been going back and forth on that for a while. I've spent a lot of time recently working on my garage to get things straightened out, and clear space for the many boxes! I am generally feeling better about all of it at this point! I hope you have great holidays - we are off to Hawaii next week which is exciting.
-
Post Thanks / Like - 0 Thanks, 1 Likes
-
12-17-2022, 08:15 AM
#110
Senior Member
Thanks John. Enjoy your trip and the build is completely worth it! Pinched nerve in my neck and don't really know what I did but that's a 2-4 month affair. My wife thinks I probably "drank water too hard" as the cause
I just did a ton of research on tires and appreciate anybody's input on them. There are not a lot of options in 17" tires out there compared to 18" rims. My goal is to go as wide as possible so looking 275 up front and 315s out back. The 275 up front limits what is available a bit in a 17", but I imagine 275 up front will still be better than 255 up front for traction and I want this car to be slightly over-steery. Wider up front has arguments for and against inducing oversteer. Wider might bite better/better traction allowing the rear to unload under braking inducing some oversteer. Likewise wider up front might distribute pressure over a wider area making the front more apt to slide ("snowplow"), and hence understeer. Guess now way to know until you try it and compound/temp and how the suspension shifts weight likely has more to do with it rather than width.
I will be running 2 sets of rims, eventually a dedicated track/autocross/warm summer 18" set and then the 17" Halibrands will be used for Daily driving. I'm in New England so the daily tires will need to work down to 30 degrees. Won't be driving the thing in winter, but there are plenty spring and fall days around 30 in the morning and in the 50s by afternoon. Again looking for 275 width up front and 315 out back, although I guess 255 up front for daily driving would be fine.
I love Michelin PS4S tires which are great summer tires with fantastic grip and from my M3 days easily work well enough into the upper 20s (they turn to plastic at exactly 24 F). Alas no dice in 17" rims for those. Michelin does have a new all-season (snowflake certified so good for winter and all) tire called the all season 4 that comes on the new corvettes and seem to get good reviews through about 1/2 their 40K mile rated treadlife when all of a sudden entire blocks of the tire go missing and they destroy themselves if one is participating in "spirited" driving. Also traction in a low weight/high HP car like these likely isn't as good as the other options with a tire like that trying to be everything for everyone and we are building cars that like to eat tires for lunch!
So for the 17" daily rims I have basically narrowed it down to Toyo R888R, Nitto NT555 G2, and Michelin Pilot Sport All Season 4. I have no idea how the Toyos or Nittos will behave in the 30-40 degree range. This car will definitely be driven in those temps. From the internet all I can gather is go easy when approaching 40 degrees. Seems the Toyos warm up quickly, treadlife is good and performance seems linear throughout treadlife. Nittos the same but lots of people mention performance seems to drop off quickly on these early on in their lives, they are less expensive so less painful to replace earlier, but I don't like the prospect of "changing traction characteristics" in a tire and not sure how much of this is true but it was mentioned in multiple individual reviews as well as some professional reviews but the tire was otherwise highly praised. The Nittos sound like better wet traction than the Toyos. I'm leaning towards the Toyo but I suspect they will really drop of around 40, and in the end for now I just need tires to make this a roller.
Looked into the BFG Rival-S and they seem to be having supply issues, or its just winter and they haven't ramped up production for next summer yet.
Anyhow just some word vomit there to sum up my research so far. I'll research track rubber when I get to that point.
Appreciate any input on handling characteristics of 255 front / 315 rear vs 275 front / 315 rear (suspect little if any differences), and daily driving any of the tires above.
Last edited by rhk118; 12-17-2022 at 08:29 AM.
-
12-19-2022, 07:24 PM
#111
I am really starting to feel like this is build is "for real" - I just talked to Todd at Stewart shipping and understand what is involved there.
Once again you completely out-do me in your ability to research! Dave Tabor tracks and autocrosses his Daytona consistently and he has told me "just go with the Toyo R888R". Seeing that same tire is in your list I think my decision is made! Thanks again for being my "deep research department"!
If you want to see what I have been up to while I await delivery of my Daytona, check out my attempt at being a YouTuber: https://youtu.be/d22WTQqUEIo
-
Post Thanks / Like - 0 Thanks, 1 Likes
-
12-19-2022, 09:29 PM
#112
Originally Posted by
jgray
.
Once again you completely out-do me in your ability to research! Dave Tabor tracks and autocrosses his Daytona consistently and he has told me "just go with the Toyo R888R". Seeing that same tire is in your list I think my decision is made! Thanks again for being my "deep research department"!
...and we are both also out in CA.
I've run 275/305, 275/315 and 295/315 front/rear and I like the 275/315 pair the best - both looks and handling. I've never had the car understeer and I don't think that it needs any more rubber than a 275 in the front.
I've run Nitto NT01, NT05 and Toyo R888R on this car.
The NT01 were worth a couple/few seconds a the track (100 TW vs 140/200 TW of the NT05) and had noticeably more traction under braking.
R888R are more widely available so I've been running them - they feel similar to the NT01 but 'maybe' take a bit more to get them warmed up.
I've driven/tracked the Nitto NT555 (but not the G2) on another car and they are great as an all-around tire- for a car that was not as track-focused as my car is now. If I were to have a dedicated set of 'street' tires/wheels I'd use the NT555 G2.
Dave
Gen III #17
16,000+ miles
-
Post Thanks / Like - 0 Thanks, 2 Likes
-
12-19-2022, 09:58 PM
#113
Senior Member
Currently if I was doing a hard core track set up on a gen 3 I would probably run an 18x11 or 19x11 square with a 295 or 305 width tire. 1 because there are a ton of tires available but second because i can get IMSA scrubs for a fraction of what new tires costs. This is what we do on our ST Vette and Mustangs.
99/2000 NASA PSO Champion-2005 west coast FFR challenge series Champions
Sponsor Tony B's 2007 ST2 National Championship
2009 NASA TTC runner up-2010 NASA TTB runner up
-
Post Thanks / Like - 0 Thanks, 1 Likes
-
12-20-2022, 03:05 PM
#114
I'm loving following your build and everything looks great! Learning a lot from y'all which help immensely once I get my Coupe underway (hoping to purchase my kit in the spring). Keep up the good work!
-
Post Thanks / Like - 0 Thanks, 1 Likes
-
12-21-2022, 11:17 AM
#115
Hello Hank,
I am seriously considering ordering a kit within the next couple months. May I ask what the lead time was on delivery? I may go pick it up myself when the time comes. Just curious. Thanks and good luck with your build.
Jeff
-
Post Thanks / Like - 0 Thanks, 1 Likes
-
12-22-2022, 09:23 AM
#116
Senior Member
Originally Posted by
jgray
Dave Tabor tracks and autocrosses his Daytona consistently and he has told me "just go with the Toyo R888R". Seeing that same tire is in your list I think my decision is made! Thanks again for being my "deep research department"!
If you want to see what I have been up to while I await delivery of my Daytona, check out my attempt at being a YouTuber:
https://youtu.be/d22WTQqUEIo
Love it John! Love the name of the account better and the accent really makes it "proper" there 007  . Subscribed....would love to see a video of the airplanes as well if you ever get a chance...man that Bronco is going to be a lot of work but well worth it once done!
Originally Posted by
Dave Tabor
...and we are both also out in CA.
I've run 275/305, 275/315 and 295/315 front/rear and I like the 275/315 pair the best - both looks and handling. I've never had the car understeer and I don't think that it needs any more rubber than a 275 in the front.
I've run Nitto NT01, NT05 and Toyo R888R on this car.
The NT01 were worth a couple/few seconds a the track (100 TW vs 140/200 TW of the NT05) and had noticeably more traction under braking.
R888R are more widely available so I've been running them - they feel similar to the NT01 but 'maybe' take a bit more to get them warmed up.
I've driven/tracked the Nitto NT555 (but not the G2) on another car and they are great as an all-around tire- for a car that was not as track-focused as my car is now. If I were to have a dedicated set of 'street' tires/wheels I'd use the NT555 G2.
Dave
Gen III #17
16,000+ miles
Dave - thanks so much, I feel like you've done a lot of the legwork on what I'm planning on doing. Won't be able to track as much as you but as always appreciate your help!
Originally Posted by
Gordon Levy
Currently if I was doing a hard core track set up on a gen 3 I would probably run an 18x11 or 19x11 square with a 295 or 305 width tire. 1 because there are a ton of tires available but second because i can get IMSA scrubs for a fraction of what new tires costs. This is what we do on our ST Vette and Mustangs.
Thanks Gordon, I had read about folks running a square setup and that will definitely help like you mention in the finding proper sizes and maybe getting some more use out of the track set of rims and tires. Very good idea. I'm sure we will be talking in the not too distant future!
Originally Posted by
Mooch66
Hello Hank,
I am seriously considering ordering a kit within the next couple months. May I ask what the lead time was on delivery? I may go pick it up myself when the time comes. Just curious. Thanks and good luck with your build.
Jeff
Hey Jeff! I ordered my Kit in November 2021. Was scheduled to be delivered in Mid-June 2022 but someone backed out of theirs and I took that kit which arrived in late May 2022, so for me was quoted 7 months and waited 6. Pretty much my entire "punch list" of backordered parts was filled by October from FFR, 1 item I'm waiting on which I won't need until next summer likely. I'm not sure what their current lead time is from order to delivery, but FFR will let you know. In terms of delivery itself I had to wait 3-4 weeks from when I was told I could have the kit someone backed out of and when it was delivered. Had to wait on a Stewart truck headed my way. If you go pickup obviously timing on getting the kit is a lot more flexible.
-
01-13-2023, 12:39 PM
#117
Senior Member
-
Post Thanks / Like - 0 Thanks, 1 Likes
-
01-16-2023, 07:34 PM
#118
Darn - sorry to hear about your disc injury - that is a considerable impediment to everything you do. I am sure it is highly frustrating to you. Hang in there - get yourself well. Great news on your engine. That is a lot of power!
Given your injury and that amount of power you should where a Hans device at all times!
I hope to get my kit at the beginning of March so you will be able to laugh at my mistakes as I try to catch up to you! The very first thing I turned my hand to was the Wilwood rotors where I came to a stoppage because I did not have 12 point sockets and did not have an inch pound torque - so all my reading and spending money on tools I still "fell at the first fence" to use a English horse racing term!
We are most likely going to be out on your coast in fall and hope to connect up with you then.
-
Post Thanks / Like - 0 Thanks, 1 Likes
-
01-17-2023, 09:05 AM
#119
Senior Member
Originally Posted by
jgray
Darn - sorry to hear about your disc injury - that is a considerable impediment to everything you do. I am sure it is highly frustrating to you. Hang in there - get yourself well. Great news on your engine. That is a lot of power!
Given your injury and that amount of power you should where a Hans device at all times!
I hope to get my kit at the beginning of March so you will be able to laugh at my mistakes as I try to catch up to you! The very first thing I turned my hand to was the Wilwood rotors where I came to a stoppage because I did not have 12 point sockets and did not have an inch pound torque - so all my reading and spending money on tools I still "fell at the first fence" to use a English horse racing term!
We are most likely going to be out on your coast in fall and hope to connect up with you then.
Absolutely you should connect up when over here! I had the same issue with the 12 point socket for the rotors and wasn't an easy find in any stores around me in that size, fortunately borrowed from a friend. you'll also need a 12 point in a slightly larger size to mount the brakes. I ordered an 11 piece tekton 1/4 inch SAE set of 12 points from home depot and that covered the gamut in sizes needed so far.
I now know what "pain in the neck" means haha! Still in the phase where I have good and bad days, know it will ne slow to heal.
-
01-22-2023, 04:47 PM
#120
Senior Member


 Thanks:
  Likes:


 Reply With Quote


