-
06-11-2023, 12:13 AM
#121
Senior Member

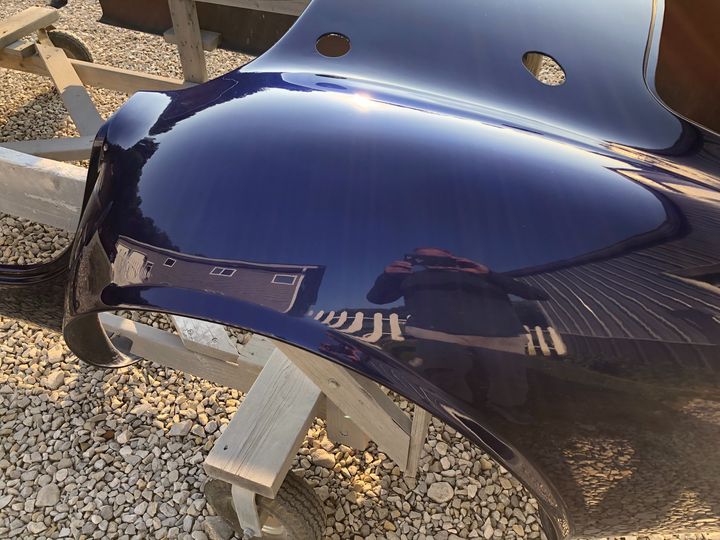
We finished wet sanding the body this evening with 1500, 2000, then 3000 grit. We also did the first pass on the buffing.
It is amazing at how good it looks even with one pass on the buffing. It is still ever so slightly hazy, but it looks good. Now it looks better than it did before we started sanding the clear.
There still is a tiny bit of orange peel, but it is way better than a paint job from a dealer.
The reflection also looks great. I can't wait to get through the polishing stages!
20230610_225010.jpg
20230610_224955.jpg
20230610_225026.jpg
20230610_225020.jpg
20230610_204803.jpg
In the last picture you can see how clear the reflection is even after one pass at buffing.
I was buffing at 1000 rpm and just went slow. I probably need to go faster, but with the wool pad it was catching the edges too much so I went slow.
Total time today: I spent 8 hours, my brother spent 10 hours.
Total man hours up to this point on the body and paint: 237
-
Post Thanks / Like - 0 Thanks, 2 Likes
-
06-11-2023, 06:10 AM
#122

Steve >> aka: GoDadGo

Almost There Looking Fantastic!
You guys are much braver than me because painting a car is not something I know how to do.
-
06-11-2023, 07:51 AM
#123
Not a waxer

-
Post Thanks / Like - 0 Thanks, 2 Likes
-
06-11-2023, 08:33 AM
#124
Senior Member
That is beautiful!
I ended up getting a 7" rotary buffer and I am using Meguiar's 110 and 210. Why did I choose this one? Because that is what I could find locally.
-
06-11-2023, 08:38 AM
#125
Not a waxer

Originally Posted by
hineas

That is beautiful!
I ended up getting a 7" rotary buffer and I am using Meguiar's 110 and 210. Why did I choose this one? Because that is what I could find locally.
I think I told you that 110 and 210 are what I've been using for a couple of years and they work well!
Jeff
-
06-11-2023, 11:32 AM
#126
Senior Member

Originally Posted by
Jeff Kleiner
Looking good Carl! What products did you settle on?
Crowding your post again but I'll put this here because I'm sure this well documented thread is going to become a great reference for others who are tackling this part of the build themselves.
I said that I'd report back after using the new 3M Perfect-It Random Orbital system that my supplier wanted me to try.
https://www.3m.com/3M/en_US/collisio...ishing-system/
After being a "forever" rotary user I have to say that I like it! I had not seen a RA deliver the kind of results that the combination of this machine and the specific compounds designed for use with it does. It's lighter and easier to handle and probably cut my time by 30%. I had this one cut to 3000 and gave it kind of a "hurry up" because I needed to get it back to him the next morning but I'm confident that if I spent more time with it I'd like it even better.


Cheers,
Jeff
Sorry to hi-jack but what color is that Jeff?!
Higgy
MK4 #11012 picked up 04/16/24
351W, 3 link, single roll bar
MK4 #10616 picked up 4/10/23
302w, 4 link, 17's, dual roll bar SOLD
MK4 #9759 picked up on 4/3/19
351C, 3 link, 17's, dual roll bars SOLD
-
06-11-2023, 12:44 PM
#127
Senior Member
Originally Posted by
GoDadGo
Almost There Looking Fantastic!
You guys are much braver than me because painting a car is not something I know how to do.
Thanks! We are so close I can taste it.
We also didn't know how to do it, but the forum and YouTube helped a ton.
Our paint job is far from perfect. To be honest, though, most paint jobs aren't perfect. However, only someone that paints for a living would notice the flaws in our paint.
Even though our paint job isn't perfect, I am more than proud of it. It looks stunning so far. Also, we built this car to drive and put hundreds of thousands of miles on it. It will get rock chips, tar, bugs, scratches, etc. I suspect if I wanted to put another 100 hours into we could get a show quality paint job that would win awards, but that wasn't our goal.
-
06-11-2023, 12:44 PM
#128
Senior Member
Originally Posted by
Jeff Kleiner
I think I told you that 110 and 210 are what I've been using for a couple of years and they work well!
Jeff
That is one reason I felt comfortable getting what I did!
-
06-11-2023, 01:56 PM
#129
Not a waxer
Originally Posted by
Higgybulin
Sorry to hi-jack but what color is that Jeff?!
Higgy
Ford Deep Impact Blue.
Jeff
-
Post Thanks / Like - 1 Thanks, 1 Likes
-
06-11-2023, 06:53 PM
#130
Senior Member
The is a gorgeous blue. Maybe I should sand my red and do that instead?
Tempting...
-
Post Thanks / Like - 1 Thanks, 0 Likes
-
06-11-2023, 08:27 PM
#131
Senior Member
We finished buffing the body today. We were out of time, so we didn't get the doors, trunk, and hood done. However, the body is complete!
For those who have never buffed, this is what we did. I am NOT an expert at this, so if there are any tips from more experienced people that definitely trumps my method.
We started with Meguiar's 110 compound on a wool disc. That was hard to control so we only went at about 1000 rpms on a rotary buffer.
Next we switched to buffing pads. The only pads in my area that I could find were at Harbor Freight. We got the 7" Bauer pads. We skipped the coarse pad because we did the wool instead. Next we did the medium cut pad with the Meguiar's 110. This was easier to control and we upped the speed to 1400 rpm.
Once that was finished we then did the finishing pad with Meguiar's 210 compound. This was even easier and we buffed at 1800 rpm.
We decided to do the ultra fine pad (they call it the "Show Car Finish" pad. We used Meguiar's 210 on this as well. I could actually see a difference in the reflection with this pad, so it was worth it.
While buffing I used a LOT of compound. If it isn't flinging everywhere, it isn't enough. I preferred spreading a nice coat of the compound directly on the body with my hand. Then I wiped the excess off my glove onto the pad. The reason I liked spreading it on the body was because I never got dry spots on the body. Also, it made it super easy to know where I had polished.
I worked in fairly small sections at a time. I probably split the car up into 20 sections mentally and buffed each section. I had a little overlap of the sections so I didn't miss anything.
The nose was difficult, but doable. To get around the headlight, signal lights, etc. I often would just use the edge of the buffing pad. I just took my time and slowed the speed down so I didn't burn through any edges.
I think it turned out pretty great.
20230611_164653.jpg
20230611_161026.jpg
20230611_161052.jpg
20230611_161044.jpg
The body isn't attached yet, but I WAS able to free up my garage. Our main goal was to get my wife's car back in the garage this weekend. My wife was gracious enough to let me take over the entire garage. However, her car is an electric car and the only way we can charge it is if it is in the garage. To make matters worse, the nearest fast charger is 30 minutes away. I did make sure to drive to the fast charger whenever it needed charging, but I didn't want to push it too far.
Now her car is back in the garage and everyone is happy.
Today I spent 6 hours and my brother spent 7 hours.
Total man hours up to this point on body work and paint: 250 hours.
Last edited by hineas; 06-12-2023 at 12:32 AM.
-
Post Thanks / Like - 1 Thanks, 4 Likes
-
06-11-2023, 08:42 PM
#132
Senior Member

MK4 #10008 - Ordered 10/06/20, Delivered 03/03/21, First Start 7/22/21, First Go Kart 7/24/21
Paint by Metal Morphous 5/14/22, Legally registered 6/8/22, Graduated 7/20/22
Build Thread
https://thefactoryfiveforum.com/show...been-delivered
Complete Kit, Ford 306, Sniper/Dual Sync, T5, Hydraulic clutch
-
Post Thanks / Like - 0 Thanks, 1 Likes
-
06-12-2023, 10:43 AM
#133
Looks great!
I can't remember if you already mentioned this...but did you trim up the side vents and the exhaust cut-outs from the initial factory rough cuts?
Thanks,
Craig C
-
06-12-2023, 12:15 PM
#134
Senior Member
Originally Posted by
cc2Arider
Looks great!
I can't remember if you already mentioned this...but did you trim up the side vents and the exhaust cut-outs from the initial factory rough cuts?
Thanks,
Craig C
Yes, we did.
The side vents were pretty close to acceptable for us. We basically just straightened out the lines a little, but it didn't need much. We didn't do any cutting, just sanding.
The exhaust cutouts required a lot of work. I don't remember exactly how much we trimmed, but if memory serves We had to raise the cut about 1/2" on one side. One side needed about the same amount cut off the back edge and the other side needed it cut out of the front edge.
We didn't even try to make them the same size and location. You only see the cutout from one side so it isn't noticeable. I'll see if I can get a picture of each side and compare them side by side.
We have had hundreds of people look at our car and put 5,000 miles on it while in gel coat. Not a single person has noticed. Heck, I know they are vastly different and I don't even notice!
But like my brother always says, "Only the rear end needs to look good because that is all that people will see of us on the road!"
-
Post Thanks / Like - 1 Thanks, 1 Likes
-
06-17-2023, 06:06 PM
#135
Senior Member
I have started putting the car back together. I tell people all the time that we have built the car 3 times. It always seems something happens and we have to take something apart because we often did a test fit of a part, it wasn't fitting right, we would want to modify it after install, because we broke something, because we didn't realize we had to do a different step first, etc. Now that I'm putting it back together it feels like we have built it 4 times!
It is starting to look like a car again. I have installed the body mounts, roll bars, lights, side mirror, and mounts for the soft top. I haven't tightened everything down yet because I still might nudge the body location a bit once I get the doors installed.
I have loosely installed the windshield mounts. I did as Jeff recommended and removed the fuse box. That made it so much easier!
I still have to buff the doors, hood and trunk. We ran out of time when my brother was here. Buffing those pieces is easier with two people. I thought about asking my wife to help hold the pieces while I buff, but I don't think she would appreciate the compound flying everywhere, including on her.
This is the first time we have installed the roll bar grommets. I highly recommend getting them. I think they look great and help everything look finished.
20230616_103625.jpg
20230616_110951.jpg
20230616_120943.jpg
20230616_123541.jpg
For the soft top attachment point behind the doors, I ended up using a rubber washer. I hope it doesn't mess up the fit, but I don't think it will. I ended up doing a rubber washer on the paint and also on the under side of the body. Getting the shims lined up nicely so it holds snug is tedious. Also, getting it tight enough without ruining the paint is also hard. The rubber washers made it so much easier.
20230616_102403.jpg
20230616_102428.jpg
I haven't attached the bumper over-riders yet because I bought the grommets that go into the hole on the front of the body. They arrive on Monday. I they arrive I will install them and tighten everything down.
I put in 4 hours.
Total time on body work and paint (including disassembly and reassembly): 254
-
Post Thanks / Like - 0 Thanks, 2 Likes
-
06-19-2023, 11:21 PM
#136
Senior Member
Today I got a package in the mail with the grommets for the holes for the front over riders.
I highly recommend getting these. It holds everything together better. It looks more finished. And I just like them.
I installed the grommets this evening and put the front over riders on. It looks great!
20230619_220623.jpg
20230619_220613.jpg
I didn't do anything else on the car today and only spent about 15 minutes doing these.
-
Post Thanks / Like - 0 Thanks, 1 Likes
-
06-20-2023, 08:14 AM
#137
Not a waxer
Originally Posted by
hineas
Today I got a package in the mail with the grommets for the holes for the front over riders.
I highly recommend getting these. It holds everything together better. It looks more finished. And I just like them.
I installed the grommets this evening and put the front over riders on. It looks great!
20230619_220623.jpg
20230619_220613.jpg
I didn't do anything else on the car today and only spent about 15 minutes doing these.
Use those grommets with 3/4" O.D. tubing, not the 5/8" tubes that FFR provides. Doing so allows you to eliminate the "horseshoes" that span between the bumper bolts and parking lamp studs and which I have found can stress and fracture the body.
Jeff
-
Post Thanks / Like - 1 Thanks, 0 Likes
-
06-20-2023, 04:18 PM
#138
Lookin' good!
I'm curious about where you sourced those front quick jack grommets and the soft top mounts?
Craig C
-
06-20-2023, 10:00 PM
#139
Senior Member
I just searched online for the grommets. I got them from Metro Molded Parts.
The soft top mounts come with the premium soft top from Rod Tops. I just added a simple rubber washer that you can get from the hardware store.
-
06-20-2023, 10:02 PM
#140
Senior Member
Originally Posted by
Jeff Kleiner
Use those grommets with 3/4" O.D. tubing, not the 5/8" tubes that FFR provides. Doing so allows you to eliminate the "horseshoes" that span between the bumper bolts and parking lamp studs and which I have found can stress and fracture the body.
Jeff
Thanks for the tip. I'll see if I can find some 3/4" tubing at the hardware store tomorrow and I'll remove those horseshoes.
-
06-21-2023, 11:56 PM
#141
Senior Member
I was able to get a lot done today
First, I finished buffing the doors and did some buffing on the hood. I still have to finish buffing the hood and trunk. The reason I didn't finish was because I felt more comfortable buffing the hood and trunk with somebody else holding them. I really don't want to mess up the paint if I knocked them over trying it by myself. My wife was gracious enough to help, but she had to leave so we will finish tomorrow.
Next, I attached all of the roll bar grommets. That was a big fat pain in the patoot. I wish the grommet for the rear leg was just a little bigger. I had to really compress the front side of the rubber to get it to cover the rear of the hole that was cut by Factory Five. The small screws and nuts were also difficult to attach. I am now a yoga master after all the contortionist maneuvers that were required. The other difficulty was that I had to plan where I put the holes on the front legs because my drill wouldn't reach some areas. I finally got them all installed and they look fantastic. I was unable to get two nuts in place, but I used a drill bit that was smaller than the screw so it threaded into the fiber glass. I think it will be fine.
20230621_154610.jpg
Now that I have my body in place, I tightened down the windshield mounts and installed the grommets. I put silicone around the holes to reduce the amount of water that will run right onto the fuse box. I ended up putting a piece of tape on the inside of the body to hold the silicone on place while it cures.
Next I installed the rear view mirror. I know on the forum there are quite a few people who don't like the mirror mounted on the body. I personally love the look. However, drilling the holes was nerve racking since you can't see the location of the 3/4" tube. I spent some time measuring and did an educated guess. I was lucky and hit the tube.
We had mounted the rear view mirror while in gel coat. We ended up filling in those holes because we figured they wouldn't align with the stripe. I'm glad we did and it looks perfect having the mirror centered on the stripe.
20230621_161009.jpg
I also installed the driver door, attached the body to the frame under the door, and installed the side pipe. That was so much easier getting everything aligned since I had already done the hard work before. It took less than 5 minutes to get the door in the right position. It is starting to look like a car!
20230621_134620.jpg
I also went to the hardware store and bought a 3/4" outer diameter sleeve for the quick jack bolts and some other odds and ends.
Tomorrow I hope to get the passenger door mounted and side pipe installed. Then I'll work on the trunk and hood. I also need to wire the lights. When we first did the wiring we didn't think ahead and used butt connectors. When it came time to remove the body we had to cut them. I bought spade connectors so I can replace lights in the future.
Total time spent today: 8 hours
Total man hours spent on body work and paint: 262
-
Post Thanks / Like - 0 Thanks, 1 Likes
-
06-22-2023, 10:00 AM
#142
Looking great! We are going to finish right about the same time!!
-
06-23-2023, 03:16 AM
#143
Senior Member
Originally Posted by
Ted G
Looking great! We are going to finish right about the same time!!
Exciting, isn't it? Yours looks gorgeous!
-
06-24-2023, 01:44 AM
#144
Senior Member
Yesterday and today I finished putting the car back together. I installed the passenger door and side pipe without any issues. I got the trunk installed (I still need to tweak the hinge just a touch but it is really close). I attached the hood scoop and installed the hood. I finished wiring the lights. All of that went without any real issues.
I ended up getting a 3/4" outer diameter tube from the local hardware store per Jeff's recommendations. I cut them to length and installed them on the quick jack bolts in the front. These were a tight fit in the grommets. The only sleeves I could find were aluminum or regular steel, so I opted for aluminum. The wall was thin enough that the ones supplied by Factory Five fit inside the 3/4" sleeve. I figured that reducing the gap between the bolts and the sleeves was a good thing, so I ended up just installing the 3/4" sleeve over the ones supplied with the kit. Now that the front end is held in place with less slop I felt more comfortable removing the body mounts that go to the turn signal.
Once all was said and done I took the car off the jack stands and moved it into the driveway to clean it. I just used some water and a rag but it cleaned up great!
20230623_120916.jpg20230623_120859.jpg20230623_120848.jpg20230623_120838.jpg20230623_120952.jpg
I do have one question, though. Maybe Jeff or Jeff can help. Once I got the car into the sun, some of my panels have "holograms" or "buffer trails." When I was researching, it might be because I went with too slow on the rpms and moved across the panel too fast. I am going to have to buff a few areas some more to get rid of the holograms. Do you recommend just doing the ultra-fine finishing pad or starting at a more aggressive pad?
Here is a picture of the buffer trails:
buffer trails.jpg
I still have a lot of work to do, BUT it is finished enough to start driving again! I still have to do the nose aluminum, install the under door aluminum, finish the weather stripping, finish carpeting the drop trunk, install the emblems, and a few other odds and ends. But now that we are back on the road we can do those at our lesiure.
Over-all I am pleased with the outcome of the paint job. Once I fix the buffer trails it is going to be even more stunning. To be honest, it looks phenomenal even with the buffer trails.
Time spent yesterday and today: 10 hours
Total man hours spent on body work and paint (including disassembly and reassembly): 272
-
Post Thanks / Like - 0 Thanks, 4 Likes
-
06-24-2023, 03:47 PM
#145
Whooo--wee....lookin' sa--weeeet!
Craig C
-
Post Thanks / Like - 0 Thanks, 1 Likes
-
06-25-2023, 10:45 AM
#146
Your car is looking badass. Great job guys! You should be very proud of the work you have put into it and the results.
MK IV Build #9659, 3 link, 17's, Forte 347, Sniper EFI, power steering, built for a freak sized person with 17" Kirkey Vintage seats, RT drop trunk, RT turn signal, lots of stuff from Breeze Automotive, Wilwood brakes, paint by Jeff Miller
-
06-25-2023, 06:15 PM
#147
Senior Member
Thanks! We definitely are proud. I can't wait for you to see it!
-
06-27-2023, 12:45 AM
#148
Senior Member
I buffed the car again with the last pad at 3,000 rpm. It only helped a little with the buffing trails. However, while cleaning I noticed that if I hand buffed with a microfiber towel it improved some more. I ended up using my random orbital sander with a foam velcro pad and the microfiber towel and went over the whole car. That actually helped a ton and the trails are almost gone. It is to the point that it is now acceptable and I'm happy with the results. I figure each time I clean I'll put a little elbow grease with the microfiber towel and it will get even better.
I'm going to call the body work and paint portion complete (is anything on these cars ever finished?). I still have to finish the nose aluminum, the under door aluminum, clean up some wires around the headlights, etc. However, I don't think I need to include those things on this thread. The grand total for man hours spent on the body work and paint was 280 hours. This included disassembly of the car after driving it 5,000 miles in gel coat. This included deep cleaning the body to get 5,000 miles of grime and bugs off the car. This included all the body work. This included paint. This included putting everything back together.
The 280 hours was calculated by adding how many hours I put into it plus how many hours my brother worked on the car and the number of hours my nephew helped.
In my opinion, as a complete newb on body work and paint, this project was every bit as big as the mechanical portion of the build. It was also more nerve wracking and more intimidating because this is what makes a car look good or bad.
I'm going to type up my thoughts later on doing the body work myself. I'll talk about the good, the bad, and the ugly. I'll talk about what I wish I did differently, which parts of the results I'm not happy with, and which parts I'm proud of.
The short story, though, is that I'm glad I did it. I'm proud of my work. It was a huge project that we saw through to completion and I'm not embarrassed to show it to other people. Is our paint job as good as one done by the professionals? Absolutely not. But our paint job is still phenomenal considering we did it ourselves and have zero experience. If I build another car, will I do the body work and paint again? I'm not sure, but I will definitely consider it.
I took the car for its first voyage today in full paint. It felt great. The car looked amazing in the sun. The color is gorgeous. I ended up going through a drive through at a fast food joint and I could over hear all the employees talking about how amazing the car looked. I'm proud of our work!
-
Post Thanks / Like - 0 Thanks, 4 Likes
-
06-27-2023, 07:27 AM
#149
Steve >> aka: GoDadGo
Great Job & Well Done!
Note:..For the record; I ran out of talent once I hit the bodywork phase.
-
Post Thanks / Like - 0 Thanks, 1 Likes
-
06-27-2023, 09:42 AM
#150
Senior Member
You should be proud. You truly built it.
MK4 #10008 - Ordered 10/06/20, Delivered 03/03/21, First Start 7/22/21, First Go Kart 7/24/21
Paint by Metal Morphous 5/14/22, Legally registered 6/8/22, Graduated 7/20/22
Build Thread
https://thefactoryfiveforum.com/show...been-delivered
Complete Kit, Ford 306, Sniper/Dual Sync, T5, Hydraulic clutch
-
Post Thanks / Like - 1 Thanks, 0 Likes
-
01-05-2024, 08:16 AM
#151
Senior Member
Now that it has been over 6 months since paint, I wanted to leave a few more thoughts.
First off, every time I walk past the car in the garage I still have to stop and look at it. Every time I park the car I still have to look back twice as I walk away. I am amazed that we built and painted such a beautiful car.
I was a little too hard on myself earlier in this threat about the flaws. Yes, they are there, but the car turned out better than I dreamed it would. Could I have block sanded the orange peel a little better? Sure, but it is still less orange peal than my cars I bought from a dealer. To prove my point, my brother who painted the car with me couldn't even see most of the flaws. It really does look good.
I recently went to a few small car shows to see the other cars (I didn't enter, sadly, but that's a different story). One car show was small with only a handful of cars. The other show had perhaps 100-150 cars. The thing that hit home the most was that I felt like our paint job was better than about 80% of the cars there. Also, I felt like that the only ones that were better were those that were done by a professional. Even the professional paint jobs still had errors if you looked closely.
So, in closing, thank you for all the help and kind words. I really feel like this wouldn't have been possible without this forum!
-
Post Thanks / Like - 0 Thanks, 4 Likes
-
01-13-2024, 12:17 PM
#152
Originally Posted by
hineas
Now that it has been over 6 months since paint, I wanted to leave a few more thoughts.
First off, every time I walk past the car in the garage I still have to stop and look at it. Every time I park the car I still have to look back twice as I walk away. I am amazed that we built and painted such a beautiful car.
I was a little too hard on myself earlier in this threat about the flaws. Yes, they are there, but the car turned out better than I dreamed it would. Could I have block sanded the orange peel a little better? Sure, but it is still less orange peal than my cars I bought from a dealer. To prove my point, my brother who painted the car with me couldn't even see most of the flaws. It really does look good.
I recently went to a few small car shows to see the other cars (I didn't enter, sadly, but that's a different story). One car show was small with only a handful of cars. The other show had perhaps 100-150 cars. The thing that hit home the most was that I felt like our paint job was better than about 80% of the cars there. Also, I felt like that the only ones that were better were those that were done by a professional. Even the professional paint jobs still had errors if you looked closely.
So, in closing, thank you for all the help and kind words. I really feel like this wouldn't have been possible without this forum!
A belated reading of your body paint effort. As others have said, big congratulations and thanks for the detailed discussion. I just finished having mine painted and did some of the sanding with my mentor who directed the whole job, save for the sealer, base coat and clear. I think your hours spent were much less than I expected and likely half of what I would have spent. Charging at least $50/hr for labor would likely put you in the $12-15,000 range, but that might not include the reassembly. However, writing a check is much different from doing the work yourself. Enjoy the hell out of it.
Thank you again for this valuable contribution. Ed Klein.
-
02-27-2024, 02:32 AM
#153
Senior Member
Thank you for the kind words! It was a great experience and I'm glad we did it.


 Thanks:
  Likes:


 Reply With Quote


